oil pressure SKODA OCTAVIA 2012 3.G / (5E) Owner's Manual
[x] Cancel search | Manufacturer: SKODA, Model Year: 2012, Model line: OCTAVIA, Model: SKODA OCTAVIA 2012 3.G / (5E)Pages: 222, PDF Size: 13.52 MB
Page 15 of 222
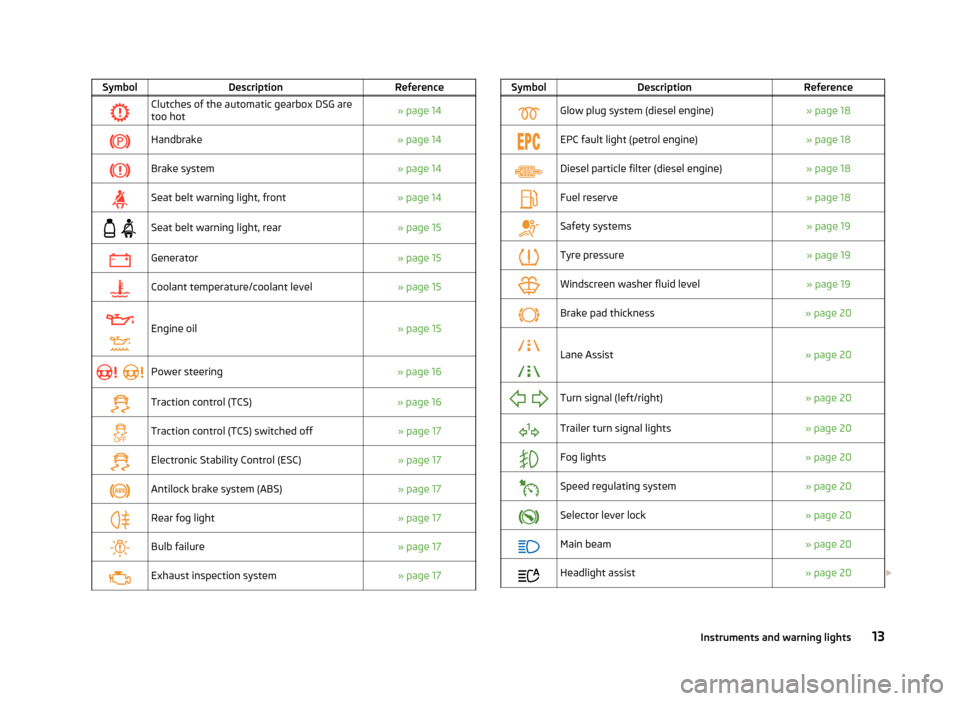
SymbolDescriptionReferenceClutches of the automatic gearbox DSG aretoo hot» page 14Handbrake» page 14Brake system» page 14Seat belt warning light, front» page 14
Seat belt warning light, rear» page 15Generator» page 15Coolant temperature/coolant level» page 15
Engine oil» page 15
Power steering» page 16Traction control (TCS)» page 16Traction control (TCS) switched off» page 17Electronic Stability Control (ESC)» page 17Antilock brake system (ABS)» page 17Rear fog light» page 17Bulb failure» page 17Exhaust inspection system» page 17SymbolDescriptionReferenceGlow plug system (diesel engine)» page 18EPC fault light (petrol engine)» page 18Diesel particle filter (diesel engine)» page 18Fuel reserve» page 18Safety systems» page 19Tyre pressure» page 19Windscreen washer fluid level» page 19Brake pad thickness» page 20
Lane Assist» page 20
Turn signal (left/right)» page 20Trailer turn signal lights» page 20Fog lights» page 20Speed regulating system» page 20Selector lever lock» page 20Main beam» page 20Headlight assist» page 20 13Instruments and warning lights
Page 17 of 222
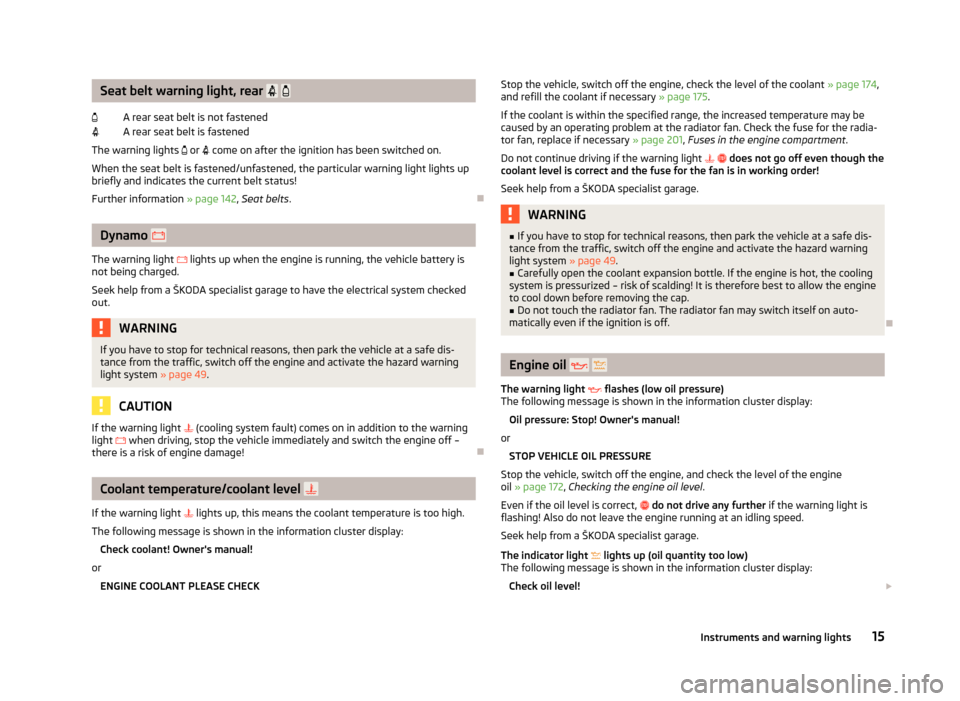
Seat belt warning light, rear
A rear seat belt is not fastenedA rear seat belt is fastened
The warning lights or come on after the ignition has been switched on.
When the seat belt is fastened/unfastened, the particular warning light lights up briefly and indicates the current belt status!
Further information » page 142, Seat belts .
Dynamo
The warning light
lights up when the engine is running, the vehicle battery is
not being charged.
Seek help from a ŠKODA specialist garage to have the electrical system checked
out.
WARNINGIf you have to stop for technical reasons, then park the vehicle at a safe dis-
tance from the traffic, switch off the engine and activate the hazard warning
light system » page 49.
CAUTION
If the warning light (cooling system fault) comes on in addition to the warning
light when driving, stop the vehicle immediately and switch the engine off –
there is a risk of engine damage!
Coolant temperature/coolant level
If the warning light
lights up, this means the coolant temperature is too high.
The following message is shown in the information cluster display:
Check coolant! Owner's manual!
or ENGINE COOLANT PLEASE CHECK
Stop the vehicle, switch off the engine, check the level of the coolant » page 174,
and refill the coolant if necessary » page 175.
If the coolant is within the specified range, the increased temperature may be
caused by an operating problem at the radiator fan. Check the fuse for the radia-
tor fan, replace if necessary » page 201, Fuses in the engine compartment .
Do not continue driving if the warning light does not go off even though the
coolant level is correct and the fuse for the fan is in working order!
Seek help from a ŠKODA specialist garage.WARNING■ If you have to stop for technical reasons, then park the vehicle at a safe dis-
tance from the traffic, switch off the engine and activate the hazard warning
light system » page 49.■
Carefully open the coolant expansion bottle. If the engine is hot, the cooling
system is pressurized – risk of scalding! It is therefore best to allow the engine
to cool down before removing the cap.
■
Do not touch the radiator fan. The radiator fan may switch itself on auto-
matically even if the ignition is off.
Engine oil
The warning light
flashes (low oil pressure)
The following message is shown in the information cluster display:
Oil pressure: Stop! Owner's manual!
or STOP VEHICLE OIL PRESSURE
Stop the vehicle, switch off the engine, and check the level of the engine
oil » page 172 , Checking the engine oil level .
Even if the oil level is correct,
do not drive any further if the warning light is
flashing! Also do not leave the engine running at an idling speed.
Seek help from a ŠKODA specialist garage.
The indicator light
lights up (oil quantity too low)
The following message is shown in the information cluster display:
Check oil level!
15Instruments and warning lights
Page 100 of 222
WARNING■Greater physical effort for braking is required when the engine is switched
off – risk of accident!■
During the braking procedure on a vehicle with manual transmission, when
the vehicle is in gear and at low revs, press the clutch pedal. If you fail to do
so, the functionality of the brake booster can be impaired – risk of accident!
■
If a front spoiler, full wheel trim, etc. is mounted retrospectively, it must be
ensured that the air supply to the front wheel brakes is not reduced. The front
brakes may overheat which can have a negative impact on the functioning of
the braking system - risk of accident!
CAUTION
■ Observe the recommendations on the new brake pads » page 100.■Never let the brakes slip with light pressure on the pedal if braking is not neces-
sary. This causes the brakes to overheat and can also result in a longer braking distance and excessive wear.
Note
■ If the brakes are applied in full and the control unit for the braking system con-
siders the situation to be dangerous for the following traffic, the brake light
flashes automatically. After the speed was reduced below around 10 km/h or the vehicle was stopped, the brake light stops flashing and the hazard warning light
system switches on. The hazard warning light system is switched off automatical-
ly after accelerating or driving off again.■
Before negotiating a steep downhill section, reduce the speed, shift down into
the next lower gear (manual gearbox) or select a lower drive position (automatic
gearbox). As a result, the braking effect of the engine will be used, reducing the
load on the brakes. Any additional braking should be completed intermittently, not continuously.
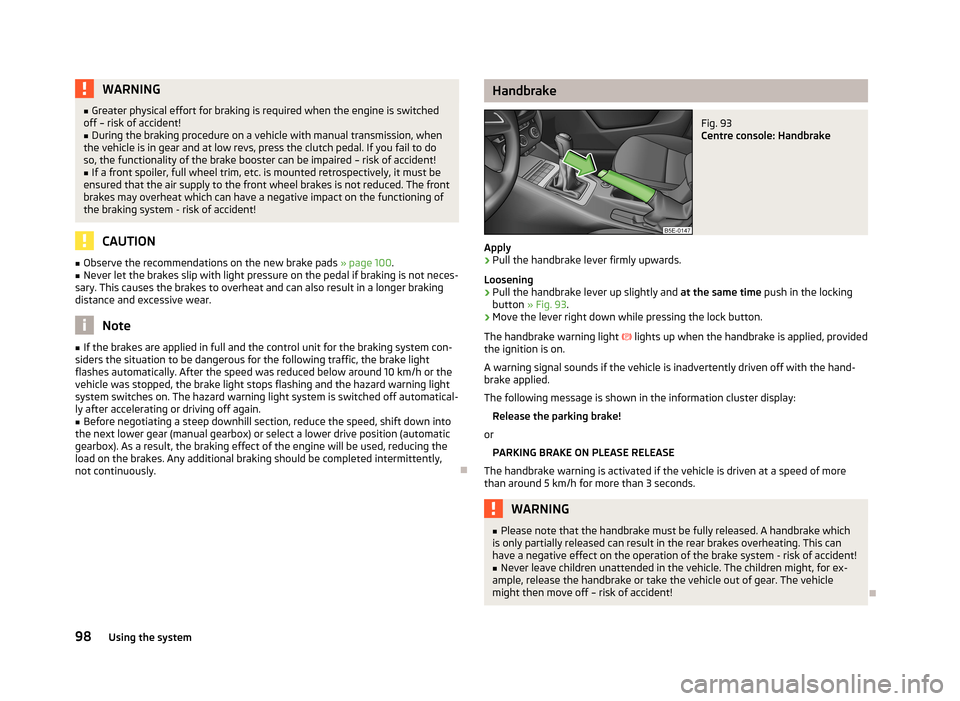
HandbrakeFig. 93
Centre console: Handbrake
Apply
›
Pull the handbrake lever firmly upwards.
Loosening
›
Pull the handbrake lever up slightly and at the same time push in the locking
button » Fig. 93 .
›
Move the lever right down while pressing the lock button.
The handbrake warning light
lights up when the handbrake is applied, provided
the ignition is on.
A warning signal sounds if the vehicle is inadvertently driven off with the hand-
brake applied.
The following message is shown in the information cluster display:
Release the parking brake!
or
PARKING BRAKE ON PLEASE RELEASE
The handbrake warning is activated if the vehicle is driven at a speed of more than around 5 km/h for more than 3 seconds.
WARNING■ Please note that the handbrake must be fully released. A handbrake which
is only partially released can result in the rear brakes overheating. This can
have a negative effect on the operation of the brake system - risk of accident!■
Never leave children unattended in the vehicle. The children might, for ex-
ample, release the handbrake or take the vehicle out of gear. The vehicle
might then move off – risk of accident!
98Using the system
Page 105 of 222
Information about convenience consumers and the amount of fuel con-sumed » operating instructions for Infotainment , chapter Setting vehicle systems
(CAR button) .
A maximum of three convenience consumers are displayed in the Infotainment
display- the top 3 in terms of energy consumption.
You can decide to switch off the consumers or to set them to a lower level to re-duce the level of fuel consumption.
Checking tyre inflation pressures
Tyres which are correctly inflated save fuel.
Always ensure the tyre inflation pressure is correct. If the inflation pressure is too
low, the tyres must overcome a higher rolling resistance. This will not only in-
crease fuel consumption but also tyre wear and the driving behaviour will worsen.
Always check the tyre inflation pressure when the tyres are cold.
Avoid unnecessary ballast
Transporting ballast costs fuel.
Every additional kilogram in weight increases the fuel consumption. We there-
fore recommend you do not travel with any unnecessary weight.
It is particularly in town traffic, when one is accelerating quite often, that the ve-
hicle weight will have a significant effect upon the fuel consumption. A rule of
thumb here is that an increase in weight of 100 kilograms will cause an increase
in fuel consumption of about 1 litre/100 kilometres.
At a speed of 100 - 120 km/h, a vehicle fitted with a roof rack cross member with-
out a load will use about 10 % more fuel than normal due to the increased aero- dynamic drag.
Regular servicing
A poorly tuned engine uses an unnecessarily high amount of fuel.
By having your vehicle regularly maintained by a ŠKODA specialist garage, you
create the conditions needed for driving economically. The maintenance state of your vehicle has a positive effect on traffic safety and value retention.
A poorly tuned engine can result in a fuel consumption which is 10 % higher than normal!
Check the oil at regular intervals, e.g. when filling up. Oil consumption is depend-
ent to a considerable extent on the load and speed of the engine. Oil consump-
tion could be as high as 0.5 litres/1 000 km depending on your style of driving.
It is quite normal that a new engine has a higher oil consumption at first, and rea- ches its lowest level only after a certain running in time. The oil consumption of anew vehicle can therefore only be correctly assessed after driving about5 000 km.
For the sake of the environment
■ Additional improvements to the fuel economy can be made by using synthetic
high-lubricity oils.■
Regularly check the ground under the vehicle. Have your vehicle inspected by a
ŠKODA specialist garage if you find any stains caused by oil or other fluids on the
floor.
Note
We recommend that your vehicle is serviced on a regular basis by a ŠKODA Part-
ner.
Environmental compatibility
Environmental protection has played a major role in the design, selection of mate-
rials and manufacture of your new ŠKODA. Particular emphasis has been placed
on the following points:
Design measures › Joints designed to be easily detached.
› Simplified disassembly due to the modular structure system.
› Improved purity of different classes of materials.
› Identification of all plastic parts in accordance with VDA Recommendation 260.
› Reduced fuel consumption and exhaust emission CO
2.
› Minimum fuel leakage during accidents.
› Reduced noise.
Choice of materials › Extensive use of recyclable material.
› Air conditioning filled with CFC-free refrigerant.
103Driving and the Environment
Page 162 of 222
■For Alcantara ®
do not use any solvents, floor wax, shoe cream, stain remover,
leather cleaners, or similar agents.■
Remove fresh stains such as those from ball-point pens, ink, lipstick, shoe pol-
ish, etc., from the material (leather), panels and textiles as quickly as possible.
For the sake of the environment
■ Used cans of vehicle care products represent a special type of hazardous waste.
These must be disposed of in accordance with national legal regulations.■
Only wash the vehicle at washing bays intended for this purpose.
Note
Due to potential issues with the cleaning and care of the interior of your vehicle,
the special tools and knowledge required, we recommend that cleaning and care of the interior of your vehicle is completed by a ŠKODA Partner.
Washing the vehicle
First read and observe the introductory information and safety warn-
ings
on page 159.
The best protection for your vehicle against harmful environmental influences is
frequent washing and wax treatment. How often the vehicle should be washed
depends on a wide range of factors, such as:
› Frequency of use;
› The parking situation (garage, below trees etc.);
› Season of the year;
› Weather conditions;
› Environmental influences.
The longer insect residues, bird droppings, tree sap, road and industrial dust, tar,
soot particles, road salt and other aggressive deposits remain adhering to the paintwork of your vehicle, the more detrimental their destructive effect can be.
High temperatures, such as those caused by intensive sun's rays, accentuate this
caustic effect.
It is essential to also thoroughly clean the underside of the vehicle at the end of
the winter.
Automatic car wash systems
First read and observe the introductory information and safety warn-
ings
on page 159.
Your vehicle can be washed in automatic car wash systems.
The usual precautionary measures must be taken before washing the vehicle in
an automatic car wash system (closing the windows including the sliding/tilting
roof, etc.).
If your vehicle is fitted with any particular attached parts, such as a spoiler, roof
luggage rack, two-way radio aerial – it is best to consult the operator of the car
wash system beforehand.
It is important to clean and degrease the lips of the windscreen wiper rubbers af-
ter passing through the automatic vehicle wash system.
Washing by hand
First read and observe the introductory information and safety warn-
ings
on page 159.
When washing by hand, first soften the dirt with plenty of water and rinse off as
much as possible.
Clean the vehicle with a soft sponge, a washing glove or a washing brush . Work
from the top to the bottom – starting with the roof. Only apply slight pressure when cleaning the vehicle's paintwork. Only use a car shampoo for stubborn dirt.
Wash out the sponge or washing glove thoroughly at short intervals.
Clean wheels, door sills and similar parts last. Use a second sponge for such
areas.
Give the vehicle a good rinse after washing it and dry it off using a chamois leath- er.
160General Maintenance
Page 183 of 222
Wheels
Tyres and wheel rims
Introduction
This chapter contains information on the following subjects:
Tyre life
182
New tyres and wheels
183
Unidirectional tyres
184
Spare wheel
184
Full wheel trim
185
Wheel bolts
185
Tyre control display
185
Wheel bolts
186
Winter tyres
186
Snow chains
186WARNING■ During the first 500 km, new tyres do not offer optimum grip and appropri-
ate care should therefore be taken when driving – risk of accident!■
Never drive with damaged tyres – risk of accident!
■
Never exceed the maximum permissible load bearing capacity of mounted
tyres.
■
Immediately replace damaged wheel rims or tyres.
■
On all four wheels, use only radial tyres of the same type, size (rolling cir-
cumference) and the same tread pattern.
■
Only use those tyres or wheel rims which have been approved by ŠKODA for
your model of vehicle. Failure to observe this instruction will adversely affect the road safety of your vehicle – risk of accident!
■
The maximum permissible speed for your tyres must not be exceeded under
any circumstances – risk of an accident resulting from tyre damage and loss of
control of the vehicle.
WARNING (Continued)■ If the inflation pressure is too low, the tyre must perform a greater rolling
resistance. At higher speeds the tyre will warm up as a result of this. This can
result in tread separation and a tyre blowout.■
For safety reasons, do no replace tyres individually.
■
Never use tyres if you do not know anything about the condition and age.
■
You must have your tyres replaced with new ones at the latest when the
wear indicators have been worn down.
■
Worn tyres do not provide the necessary adhesion to the road surface par-
ticularly at high speeds on wet roads. One could experience “aquaplaning” (uncontrolled movements of the vehicle – “swimming” on a wet road surface).
■
Do not use summer or winter tyres that are older than 6 years or 4 years re-
spectively.
■
The wheel bolts must be clean and must turn easily. Never treat them with
grease or oil.
■
If the wheel bolts are tightened to a too low tightening torque, the rim can
come loose when the car is moving – risk of accident! A tightening torque
which is too high can damage the bolts and threads and this can result in per-
manent deformation of the contact surfaces on the rim.
■
In case of incorrect treatment of the wheel bolts, the wheel can loosen
when the car is moving – risk of accident!
■
Never drive with more than one spare wheel mounted.
■
Only use the spare wheel while absolutely necessary.
■
The snow chains cannot be used on the spare wheel.
■
An incorrect wheel alignment at the front or rear impairs handling - risk of
accident!
■
The tyre control display does not absolve the driver of the responsibility to
ensure the correct tyre inflation pressure. Check the tyre inflation pressure at
regular intervals.
■
Unusual vibrations or pulling of the vehicle to one side could be a sign of
tyre damage. If there is any doubt that a wheel is damaged, immediately re-
duce your speed and stop! If no external damage is evident, drive slowly and
carefully to the nearest ŠKODA specialist garage to have the vehicle checked.
■
To low or too high inflation pressure impairs handling - risk of an accident!
■
The national legal requirements must be observed for the use of tyres.
■
Observe the national legal regulations relating to the use of snow chains
and the maximum vehicle speed with snow chains.
181Wheels
Page 184 of 222
CAUTION■If a spare wheel is used that is not identical to the fitted tyres, the following
must be observed » page 184, Spare wheel .■
Protect the tyres from contact with oil, grease and fuel.
■
Replace lost dust caps.
■
If, in the event of a puncture, it is necessary to fit a spare wheel with a tyre
without a dedicated running direction or the opposite running direction, drive carefully as the optimum characteristics of the tyre are no longer applicable in
this situation.
■
The tyre control display does therefore not replace the regular tyre inflation
pressure control, as the system cannot detect an even loss of pressure.
■
The system cannot warn in case of very rapid tyre inflation pressure loss, e.g. in
case of sudden tyre damage. In this case carefully bring the vehicle to a standstill
without sudden steering movements or sharp braking.
■
To ensure a proper functioning of the tyre control display, it is necessary to re-
peat the basic setting every 10 000 km or once a year.
For the sake of the environment
Tyres which are insufficiently inflated increase your fuel consumption.
Note
■ We recommend that any work on the wheels or tyres is carried out by a ŠKODA
Partner.■
We recommend that you use wheel rims, tyres, full wheel trims and snow chains
from ŠKODA Original Accessories.
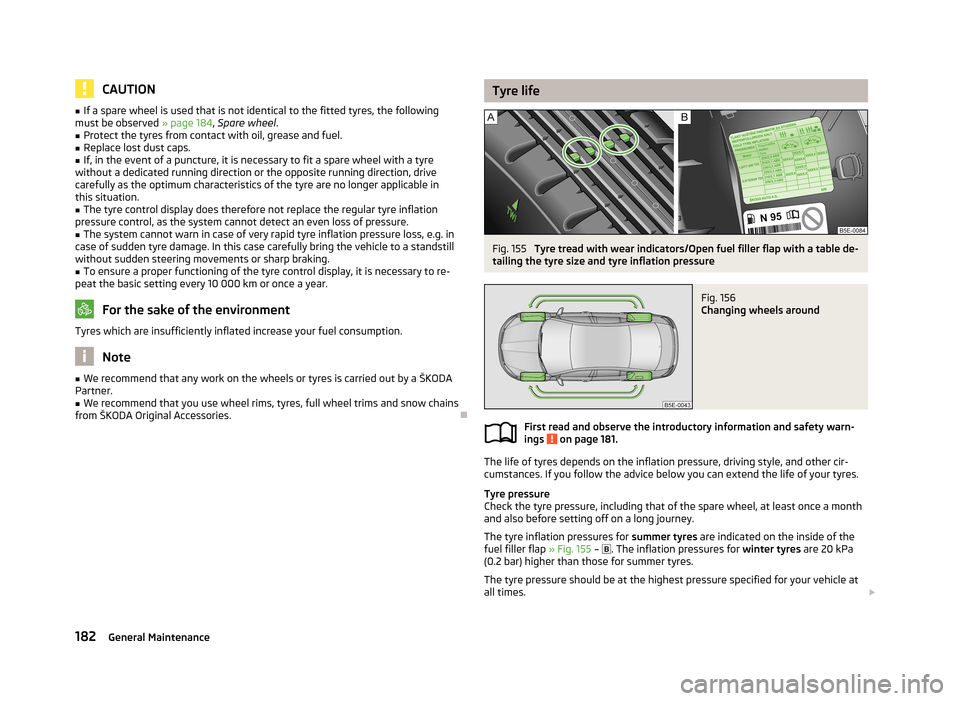
Tyre lifeFig. 155
Tyre tread with wear indicators/Open fuel filler flap with a table de-
tailing the tyre size and tyre inflation pressure
Fig. 156
Changing wheels around
First read and observe the introductory information and safety warn-
ings on page 181.
The life of tyres depends on the inflation pressure, driving style, and other cir-
cumstances. If you follow the advice below you can extend the life of your tyres.
Tyre pressure
Check the tyre pressure, including that of the spare wheel, at least once a month and also before setting off on a long journey.
The tyre inflation pressures for summer tyres are indicated on the inside of the
fuel filler flap » Fig. 155 –
. The inflation pressures for
winter tyres are 20 kPa
(0.2 bar) higher than those for summer tyres.
The tyre pressure should be at the highest pressure specified for your vehicle at all times.
182General Maintenance
Page 192 of 222
Note■The anti-theft wheel bolt set and adapter can be purchased from a ŠKODA Part-
ner.■
The national legal requirements must be observed when changing a wheel.
Preliminary work
First read and observe the introductory information and safety warn-ings
on page 189.
The following steps must be carried out before actually changing the wheel:
›
Park the vehicle as far away as possible from the flow of traffic. The place you choose should be level.
›
Let all of the occupants get out. While changing a tyre, the occupants of the
vehicle should not stand on the road (instead they should remain behind a crash
barrier).
›
Switch off the engine and move the gearshift lever into Neutral or move the se-
lector lever on the automatic gearbox into position P.
›
Firmly apply the handbrake.
›
If a trailer is connected, remove it.
›
Remove the vehicle tool kit » page 188 and the spare wheel » page 184 from
the luggage compartment.
Changing a wheel
First read and observe the introductory information and safety warn-
ings
on page 189.
Always change a wheel on a level surface as far as possible.
›
Remove the full wheel trim » page 185 or caps » page 185 .
›
First of all slacken the anti-theft wheel bolt and then the other wheel
bolts » page 191 .
›
Jack up the vehicle until the wheel that needs changing is clear of the
ground » page 191 .
›
Unscrew the wheel bolts and place them on a clean surface (cloth, paper, etc.).
›
Remove the wheel.
›
Attach the spare wheel and slightly screw on the wheel bolts.
›
Lower the vehicle.
›Alternately tighten the wheel bolts opposite each other using the wheel
wrench (crosswise) and then tighten the anti-theft wheel bolt » page 191.›
Replace the wheel trim or the caps.
Note
■
All bolts must be clean and must turn easily.■Under no circumstances grease or oil the wheel bolts!■
When fitting unidirectional tyres, ensure that the direction of rotation is cor-
rect » page 181 .
Subsequent steps
First read and observe the introductory information and safety warn-
ings
on page 189.
The following steps must also be performed after changing the wheel.
›
Stow and attach the replaced wheel in the spare wheel well using a special screw » page 184 .
›
Stow the vehicle tool kit in the space provided.
›
Check the tyre pressure on the installed spare wheel as soon as possible.
›
Have the tightening torque of the wheel bolts checked with a torque wrench
as soon as possible.
›
Change the damaged wheel or consult a ŠKODA specialist garage about repair
possibilities.
Note
■ If it is determined that the wheel bolts are corroded and difficult to turn when
changing the wheel, the bolts must be replaced before checking the tightening
torque.■
Drive cautiously and only at a moderate speed until the tightening torque has
been checked.
190Do-it-yourself
Page 203 of 222
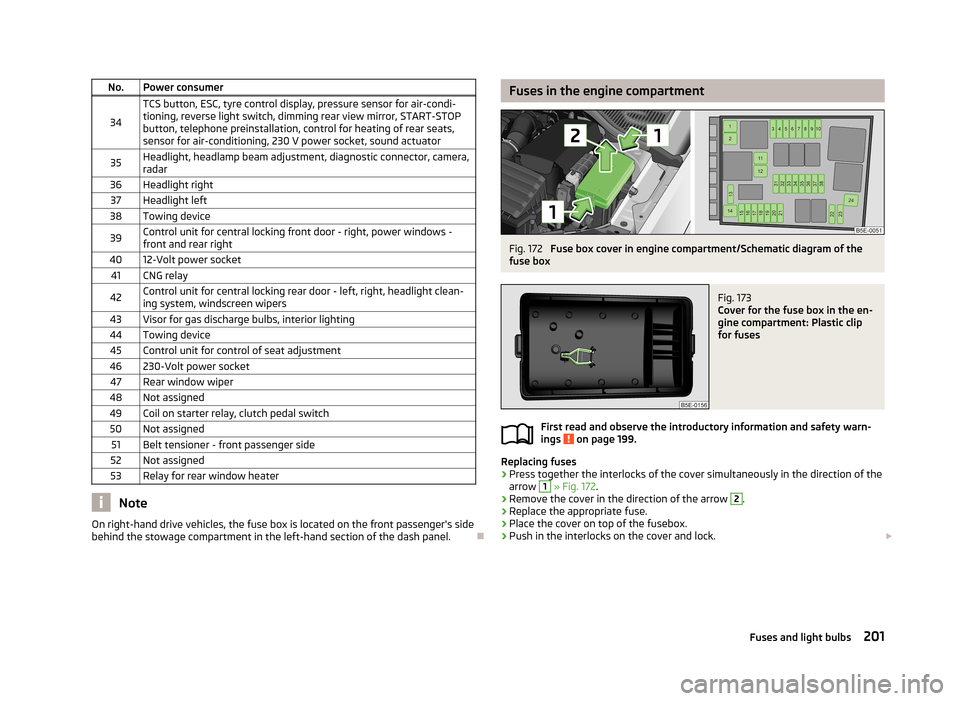
No.Power consumer
34
TCS button, ESC, tyre control display, pressure sensor for air-condi-tioning, reverse light switch, dimming rear view mirror, START-STOPbutton, telephone preinstallation, control for heating of rear seats,sensor for air-conditioning, 230 V power socket, sound actuator35Headlight, headlamp beam adjustment, diagnostic connector, camera,
radar36Headlight right37Headlight left38Towing device39Control unit for central locking front door - right, power windows -
front and rear right4012-Volt power socket41CNG relay42Control unit for central locking rear door - left, right, headlight clean-
ing system, windscreen wipers43Visor for gas discharge bulbs, interior lighting44Towing device45Control unit for control of seat adjustment46230-Volt power socket47Rear window wiper48Not assigned49Coil on starter relay, clutch pedal switch50Not assigned51Belt tensioner - front passenger side52Not assigned53Relay for rear window heater
Note
On right-hand drive vehicles, the fuse box is located on the front passenger's side
behind the stowage compartment in the left-hand section of the dash panel.
Fuses in the engine compartmentFig. 172
Fuse box cover in engine compartment/Schematic diagram of the
fuse box
Fig. 173
Cover for the fuse box in the en-
gine compartment: Plastic clip
for fuses
First read and observe the introductory information and safety warn-
ings on page 199.
Replacing fuses
›
Press together the interlocks of the cover simultaneously in the direction of the
arrow
1
» Fig. 172 .
›
Remove the cover in the direction of the arrow
2
.
›
Replace the appropriate fuse.
›
Place the cover on top of the fusebox.
›
Push in the interlocks on the cover and lock.
201Fuses and light bulbs
Page 218 of 222
ReplenishingCoolant175
Engine oil173
Windscreen washer fluid176
Roof luggage rack Attachment points
69
Roof rack system68
Roof load69
Running-in the first 1 500 km
100
Running in Brake pads
100
Engine100
Tyres100
S
Safe securing system
30
Safety138
Child safety154
Child safety seats154
Head restraints63
ISOFIX157
TOP TETHER158
Save electrical energy101
Seat Adjusting electrically
60
Manually adjusting60
Seat belt Warning light
14, 15
Seat belt height adjuster145
Seat belts Belt tensioners
145
Cleaning165
fastening and unfastening144
Height adjustment145
Seatbelts Inertia reels
145
Seatsfolding forward63
Head restraints63
Heating62
see automatic gearbox Manual shifting of gears on the multifunction steering wheel
131
Select driving mode124
Selector lever see selector lever positions
130
Selector lever positions130
Service display11
setting Auxiliary heating (auxiliary heating and ventila- tion)
90
Setting Manual air conditioning system
85
Steering wheel93
Setting the clock11
Shifting Diving economically
101
Gearshift lever99
Side airbag149
Sliding/tilting roof Closing
41
Opening and tilting41
Operating41
Snow chains186
Spare wheel184
Speedometer10
Speed symbol see Wheels
183
Stabilisation Control (ESC)112
START/STOP Function
121
Starting engine Jump-starting
195
Starting the engine92
START STOP Jump-starting
196
Steering force assistance93
Steering wheel93
Stopping off the engine92
Storage72
Storage compartments72
Sun screen53
Sun visors53
Switching lights on and off44
T
Tachometer see Speedometer
10
Taking care of the vehicle Material coverings
164
Natural leather164
Seat belts165
Taking care of your vehicle159
Automatic car wash system160
Chrome parts161
Cleaning the wheels163
Door lock cylinders163
Headlight lenses162
High-pressure cleaner161
Plastic parts162
Polishing the paintwork161
Preservation161
Rubber seals163
Washing160
Washing by hand160
Wash system160
TCS Function
113
Warning light16
Technical data207
Through-loading bag77
Through-loading channel77
Tiptronic131
Tool188
TOP TETHER158
216Index