clock SKODA OCTAVIA 2015 3.G / (5E) Amundsen Bolero Infotainment System Manual
[x] Cancel search | Manufacturer: SKODA, Model Year: 2015, Model line: OCTAVIA, Model: SKODA OCTAVIA 2015 3.G / (5E)Pages: 84, PDF Size: 8.21 MB
Page 6 of 84

Important information about this manual
This Owner's Manual is valid for the different versions of the Infotainment Bo-
lero and Amundsen (hereinafter referred to only as device). The device may dif-
fer depending on the vehicle model, in which it is installed in both its appear-
ance and in the arrangement of the controls.
This Owner's Manual describes all possible device functions without identify-
ing them as special equipment, model variants or market-dependent equip-
ment. Consequently, the device on this vehicle does not need to contain all of
the functions described in this Owner's Manual.
For example, if the vehicle is not equipped from the factory with a navigation function, then the menu item Clock time source: for the date and time settings
is not displayed.
The availability of some features described in this manual depends on the
type of external devices (for example, phone, music player, etc..).
Information on the compatibility of external devices can be found on ŠKODAIn-
ternet pages http://infotainment.skoda-auto.com .
The Images in these Operating Instructions are for illustrative purposes only.
The illustrations can differ in minor details from your vehicle; they are only in-
tended to provide general information.
ŠKODA AUTO a.s. pursues a policy of ongoing product and model development
with all vehicles. Changes in terms of supply scope are possible at any time
with regard to design, equipment and technology. The information listed in
these Operating Instructions corresponds to the information available at the
time of going to press.
It is therefore not possible for legal claims to be made based on the technical
data, illustrations and information contained in these Operating Instructions.
Declaration of conformity
ŠKODA AUTO a.s. hereby declares that the ŠKODA Infotainment systems meet
the basic requirements and additional provisions of Directive 1999/5/EC with
reference to radio equipment and telecommunications devices.
Applies to Nigeria: ŠKODA AUTO a.s. hereby declares that the “connection and
the use of this communication device is granted by the Nigerian Communica-
tions Commission.”3Important information about this manual
Page 18 of 84

■Bluetooth audio: - Volume settings of the Bluetooth ®
audio profile con-
nected device
■ Entertainment fading while parking - Lowers the audio volume (e.g. radio
volume) with activated parking aid
■ Off - Fading is not active
■ Scale 1 - 5 - Setting the fading (1 = lowest, 5 = highest)
■ Full - Muting
■ Entertainment fading (nav. announce.) - Lowers the audio volume (e.g. ra-
dio volume) with activated nav. announcements ■ Off - Fading is not active
■ Scale 1 - 5 - Setting the fading (1 = lowest, 5 = highest)
■ Full - Muting
■ Bass - Mid - Treble - Setting the equalizer
■ Balance - Fader - Set the balance between left and right, front and rear
■ CANTON Optimisation - Setting the room balance of the sound (all, front,
driver)
■ CANTON surround - Setting the surround sound levels in the area (“-9 ”Ster-
eo / “+9 ”full surround)
■ CANTON Equaliser - Setting the equalizer
■ Individual - Adjustment of treble, mid and bass
■ Profile - Setting of the profile (e.g. Rock. Classical and so on).
■ Subwoofer - Subwoofer volume settings
■ ŠKODA Surround - Switching the surround sound
■ Virtual Subwoofer - Switching the virtual sub woofer
■ Touchscreen tone - Switch on/off audible tone when touching the screen
■ No navigation sound during call - Switches on or off the navigation prompts
during a telephone conversation
Screen settings
›
Press the key
→
→ Screen .
■ Switch off screen (in 10 seconds) - Enable / disable the automatic power off
function
■ Brightness: - Adjusts the brightness of the screen
■ Touchscreen tone - Switch on/off audible tone when touching the screen
■ Animation when finger near screen - Switch on/off the proximity sensors
(suppression of some function keys)
■ Show clock in standby mode - Time and date displayed on the screen when
the ignition is switched on and the unit is switched off
Time and date settings›
Press the key
→
→ Time and date .
■ Clock time source: - Time of the clock time source: Manual / GPS (Amundsen)
■ Time: - Time settings
■ Summer (DST) - Switches the summer time setting on/off (Amundsen)
■ Time zone: - Select the time zone
■ Time format: - Set the time format
■ Date: - Date settings
■ Date format: - Set the date format
Setting the device language
›
Press the key
→
→ Language .
The following language menu is displayed: In some languages, the device noti-
fications will be displayed after confirming a function button for the choice of
female or male device voice.
For some languages, pressing the function button Female or Male selects the
voice type for acoustic messages of the device.
The messages are generated by the device. The flawless clarity (e.g. road or
city name) cannot always be guaranteed.
Note
When a language is selected which does not support voice control, the device
will indicate with a message on the screen .
Setting the keyboard layout
›
Press the key
→
→ Keypad: .
■ ABC - Keyboard character assignment in alphabetical order
■ QWERTY - Keyboard character assignment QWERTY system
Additional keypad language settings
›
Press the key
→
→ More keypad languages .
In this menu, a keyboard language set can be added to allow the entering of
characters other than those in the currently selected language (function but-
ton ).
15Device operation and settings
Page 31 of 84

Pictures
Image viewer
Introduction
This chapter contains information on the following subjects:
Home Page
28
Select Image Source
28
Operation
28
Image with GPS coordinates (Amundsen)
29
Supported image sources and file formats
29
Settings
29
Note
Viewing images in the device screen is not supported by connected Apple de-
vices.
Home Page
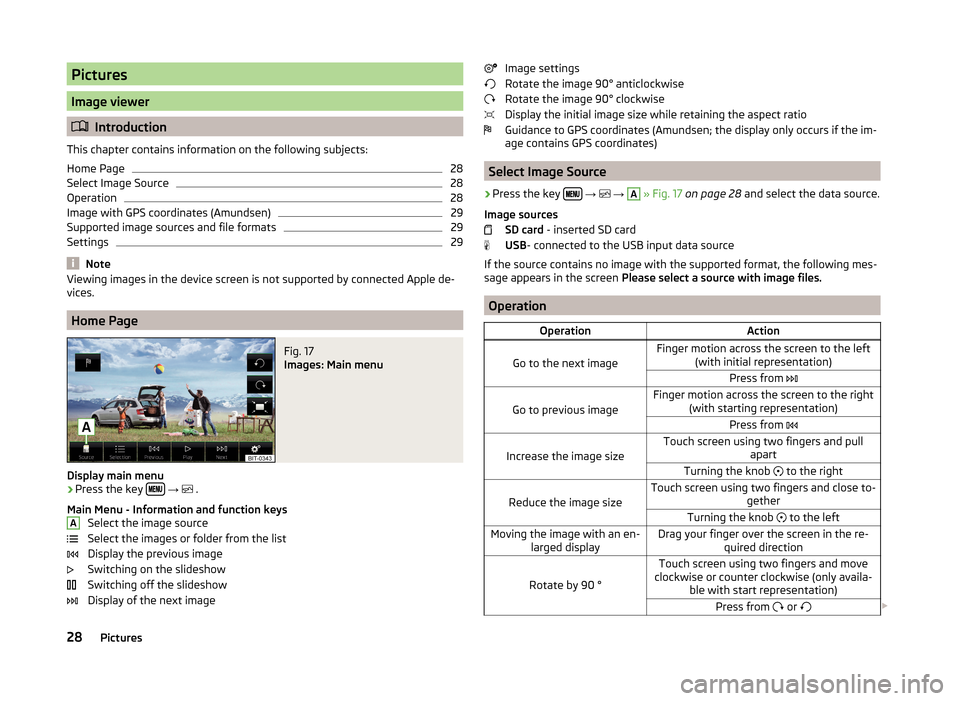
Fig. 17
Images: Main menu
Display main menu
›
Press the key
→
.
Main Menu - Information and function keys Select the image source
Select the images or folder from the list
Display the previous image
Switching on the slideshow
Switching off the slideshow
Display of the next image
AImage settings
Rotate the image 90° anticlockwise
Rotate the image 90° clockwise
Display the initial image size while retaining the aspect ratio
Guidance to GPS coordinates (Amundsen; the display only occurs if the im-
age contains GPS coordinates)
Select Image Source
›
Press the key
→
→
A
» Fig. 17 on page 28 and select the data source.
Image sources SD card - inserted SD card
USB - connected to the USB input data source
If the source contains no image with the supported format, the following mes-
sage appears in the screen Please select a source with image files.
Operation
OperationAction
Go to the next image
Finger motion across the screen to the left
(with initial representation)Press from
Go to previous image
Finger motion across the screen to the right
(with starting representation)Press from
Increase the image size
Touch screen using two fingers and pull
apartTurning the knob to the right
Reduce the image size
Touch screen using two fingers and close to-
getherTurning the knob to the leftMoving the image with an en-
larged displayDrag your finger over the screen in the re- quired direction
Rotate by 90 °
Touch screen using two fingers and move
clockwise or counter clockwise (only availa- ble with start representation)Press from or 28Pictures