reset SKODA OCTAVIA 2015 3.G / (5E) Columbus Infotainment System Manual
[x] Cancel search | Manufacturer: SKODA, Model Year: 2015, Model line: OCTAVIA, Model: SKODA OCTAVIA 2015 3.G / (5E)Pages: 100, PDF Size: 11.13 MB
Page 20 of 100
Radio
Operation
Introduction
This chapter contains information on the following subjects:
Main menu
17
Select broadcasting sector
17
List of available stations
18
Search and select available stations
18
Store preferred station
19
Station logos
19
TP Traffic programme
19
Radio DAB text and image presentation
20
The device allows analogue radio reception of FM and AM frequency ranges as
well as DAB digital radio reception.
CAUTION
■ For vehicles with window antennas do not stick foil or metal coated stickers
to the window as this can lead to interference.■
Car parks, tunnels, tall buildings or mountains can interfere with the radio
signal even causing it to fail completely.
Main menu
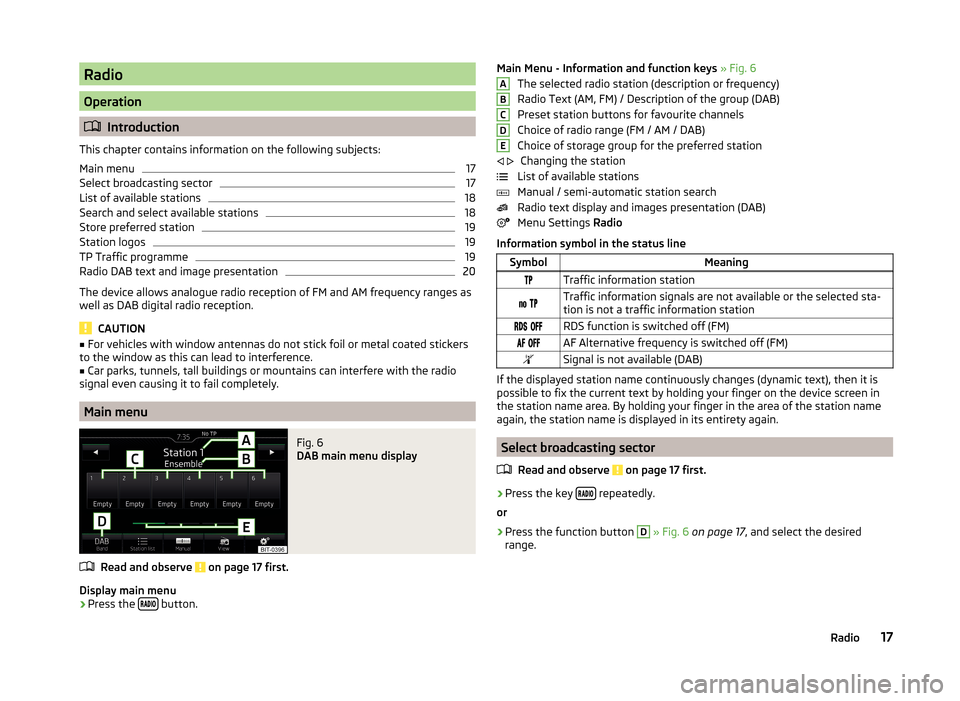
Fig. 6
DAB main menu display
Read and observe on page 17 first.
Display main menu
›
Press the button.
Main Menu - Information and function keys
» Fig. 6
The selected radio station (description or frequency)
Radio Text (AM, FM) / Description of the group (DAB)
Preset station buttons for favourite channels
Choice of radio range (FM / AM / DAB)
Choice of storage group for the preferred station Changing the station
List of available stations
Manual / semi-automatic station search
Radio text display and images presentation (DAB)
Menu Settings Radio
Information symbol in the status lineSymbolMeaningTraffic information station Traffic information signals are not available or the selected sta-
tion is not a traffic information station RDS function is switched off (FM) AF Alternative frequency is switched off (FM)Signal is not available (DAB)
If the displayed station name continuously changes (dynamic text), then it is
possible to fix the current text by holding your finger on the device screen in
the station name area. By holding your finger in the area of the station name
again, the station name is displayed in its entirety again.
Select broadcasting sector
Read and observe
on page 17 first.
›
Press the key repeatedly.
or
›
Press the function button
D
» Fig. 6 on page 17 , and select the desired
range.
ABCDE 17Radio
Page 21 of 100
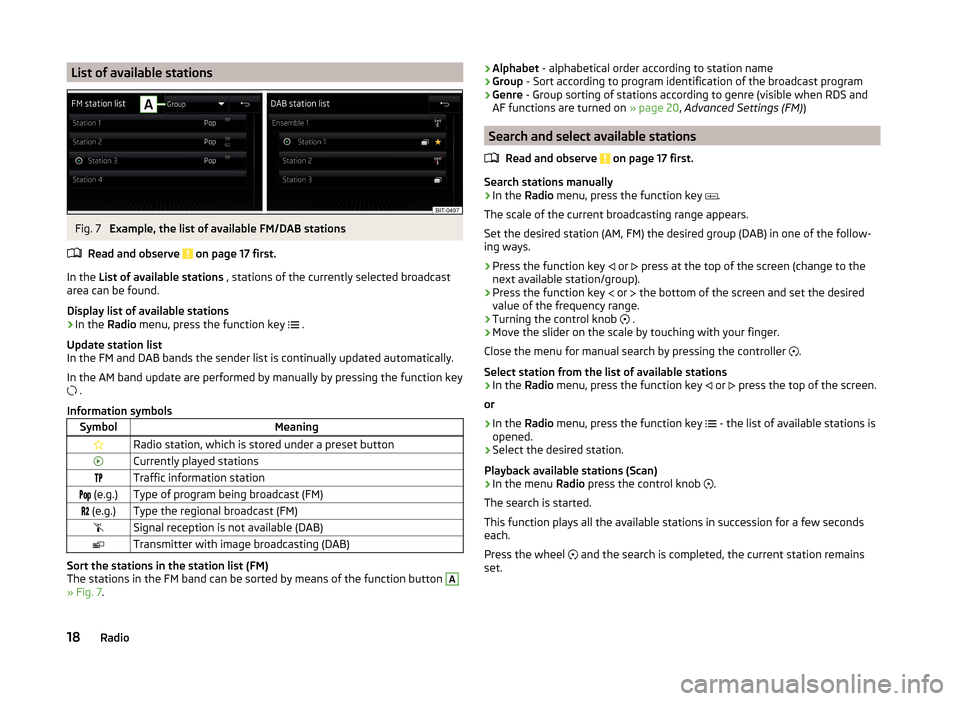
List of available stationsFig. 7
Example, the list of available FM/DAB stations
Read and observe
on page 17 first.
In the List of available stations , stations of the currently selected broadcast
area can be found.
Display list of available stations
›
In the Radio menu, press the function key
.
Update station list
In the FM and DAB bands the sender list is continually updated automatically.
In the AM band update are performed by manually by pressing the function key
.
Information symbols
SymbolMeaningRadio station, which is stored under a preset buttonCurrently played stationsTraffic information station (e.g.)Type of program being broadcast (FM) (e.g.)Type the regional broadcast (FM)Signal reception is not available (DAB)Transmitter with image broadcasting (DAB)
Sort the stations in the station list (FM)
The stations in the FM band can be sorted by means of the function button
A
» Fig. 7 .
›Alphabet
- alphabetical order according to station name
› Group
- Sort according to program identification of the broadcast program
› Genre
- Group sorting of stations according to genre (visible when RDS and
AF functions are turned on » page 20, Advanced Settings (FM) )
Search and select available stations
Read and observe
on page 17 first.
Search stations manually
›
In the Radio menu, press the function key
.
The scale of the current broadcasting range appears.
Set the desired station (AM, FM) the desired group (DAB) in one of the follow-
ing ways.
›
Press the function key or
press at the top of the screen (change to the
next available station/group).
›
Press the function key or
the bottom of the screen and set the desired
value of the frequency range.
›
Turning the control knob .
›
Move the slider on the scale by touching with your finger.
Close the menu for manual search by pressing the controller .
Select station from the list of available stations
›
In the Radio menu, press the function key
or
press the top of the screen.
or
›
In the Radio menu, press the function key
- the list of available stations is
opened.
›
Select the desired station.
Playback available stations (Scan)
›
In the menu Radio press the control knob
.
The search is started.
This function plays all the available stations in succession for a few seconds
each.
Press the wheel and the search is completed, the current station remains
set.
18Radio
Page 22 of 100
Store preferred stationRead and observe
on page 17 first.
For each broadcasting range there are 18 preset buttons to store the preferred
stations. These preset buttons are divided into three memory groups.
A station can be stored in the device memory in one of the following ways.
Store station from the Radio menu
›
In the menu Radio select a station and hold the desired station button
C
» Fig. 6 on page 17 until you hear an acoustic signal.
If a station was already stored in the desired position it is replaced with the
currently selected station.
Store station from the station list
›
In the list of available stations » page 18 hold the function key of the desired
station.
The following station button is displayed.
›
Press the station button.
Station logos
Read and observe
on page 17 first.
Channel logos are stored in the device memory which are assigned automati-
cally by the device when storing the stations under preset buttons.
Disable / Enable Auto-save station logos (FM / DAB)
›
In the Radio menu, press the function key
→ Advanced settings .
›
Select the menu item
Auto-save station logos Switch on or off » page 20,
Advanced Settings (FM) and » page 20 , Advanced settings (DAB) .
Assign station logo manually
A logo can be assigned manually for the preferred station.
›
In the Radio menu, press the function key
→ Station logos .
A menu with preset buttons for stations is displayed.
›
Press the preset button for the station, which a logo is to be assigned to.
A menu of media (SD card, USB) is displayed.
›
In the relevant media select the logo you want to have.
Remove station logo›In the Radio menu, press the function key → Station logos .
A menu with preset buttons for stations is displayed.›
Press the preset button for the station, which a logo is to be removed from.
Note
■ The following image formats are supported: jpg, gif, png, bmp.■We recommend a resolution of up to 500 x 500 pixels.
TP Traffic programme
Read and observe
on page 17 first.
The function allows the reception of traffic information.
Switching the traffic information station on and off manually
›
In the Radio menu, press the function key
.
›
Enable or disable the menu item
Traffic programme (TP).
Current traffic reports
During a traffic announcement, the following menu is displayed.
›
Cancel - Interruption of the current traffic report, the TP function remains ac-
tive
›
Deactivate - Interrupt the current traffic report and turn off TP function
Note
■
Should this station not transmit traffic reports or the signal is not available,
then the device automatically searches in the background for another TP sta-
tion.■
During playback in menu Media or a station in the AM radio range, traffic
news is received from the previously selected FM radio range.
19Radio
Page 23 of 100
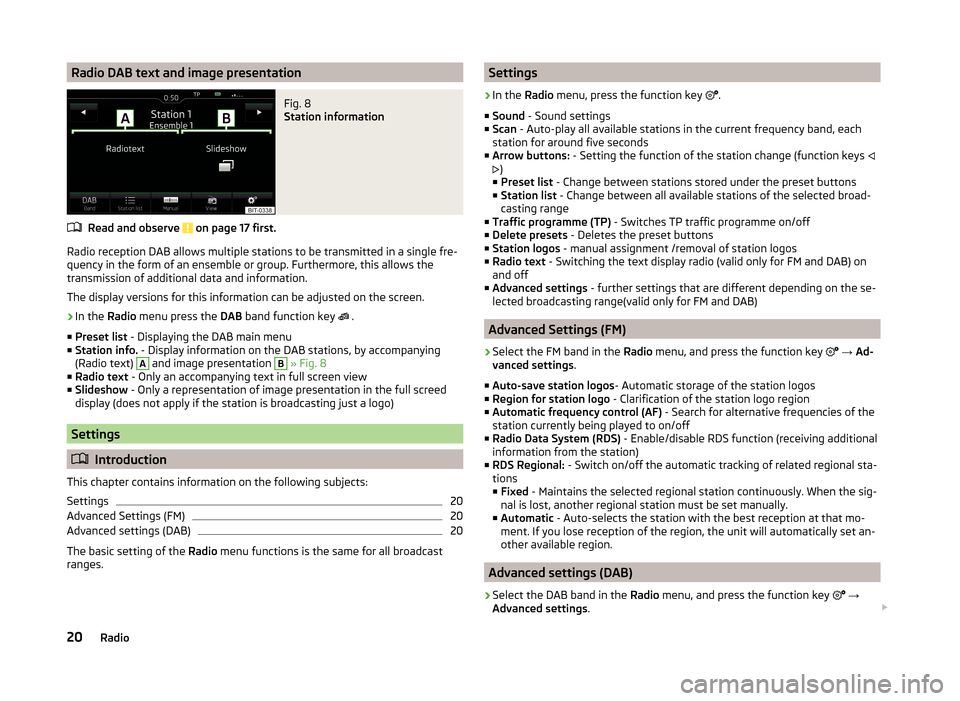
Radio DAB text and image presentationFig. 8
Station information
Read and observe on page 17 first.
Radio reception DAB allows multiple stations to be transmitted in a single fre-
quency in the form of an ensemble or group. Furthermore, this allows the
transmission of additional data and information.
The display versions for this information can be adjusted on the screen.
›
In the Radio menu press the DAB band function key
.
■ Preset list - Displaying the DAB main menu
■ Station info. - Display information on the DAB stations, by accompanying
(Radio text)
A
and image presentation
B
» Fig. 8
■ Radio text - Only an accompanying text in full screen view
■ Slideshow - Only a representation of image presentation in the full screed
display (does not apply if the station is broadcasting just a logo)
Settings
Introduction
This chapter contains information on the following subjects:
Settings
20
Advanced Settings (FM)
20
Advanced settings (DAB)
20
The basic setting of the Radio menu functions is the same for all broadcast
ranges.
Settings›
In the Radio menu, press the function key
.
■ Sound - Sound settings
■ Scan - Auto-play all available stations in the current frequency band, each
station for around five seconds
■ Arrow buttons: - Setting the function of the station change (function keys
)
■ Preset list - Change between stations stored under the preset buttons
■ Station list - Change between all available stations of the selected broad-
casting range
■ Traffic programme (TP) - Switches TP traffic programme on/off
■ Delete presets - Deletes the preset buttons
■ Station logos - manual assignment /removal of station logos
■ Radio text - Switching the text display radio (valid only for FM and DAB) on
and off
■ Advanced settings - further settings that are different depending on the se-
lected broadcasting range(valid only for FM and DAB)
Advanced Settings (FM)
›
Select the FM band in the Radio menu, and press the function key
→ Ad-
vanced settings .
■ Auto-save station logos - Automatic storage of the station logos
■ Region for station logo - Clarification of the station logo region
■ Automatic frequency control (AF) - Search for alternative frequencies of the
station currently being played to on/off
■ Radio Data System (RDS) - Enable/disable RDS function (receiving additional
information from the station)
■ RDS Regional: - Switch on/off the automatic tracking of related regional sta-
tions
■ Fixed - Maintains the selected regional station continuously. When the sig-
nal is lost, another regional station must be set manually.
■ Automatic - Auto-selects the station with the best reception at that mo-
ment. If you lose reception of the region, the unit will automatically set an-
other available region.
Advanced settings (DAB)
›
Select the DAB band in the Radio menu, and press the function key
→
Advanced settings .
20Radio
Page 27 of 100
/ Currently playing title / track playback stoppedThe title cannot be played (pressing the function key shows the
cause).
Note
■ With more than 1,000 tracks in the folder only the first 1,000 tracks with the
oldest creation date are displayed.■
The scanning speed of the folder / track list depends on the connection
speed and volume of data.
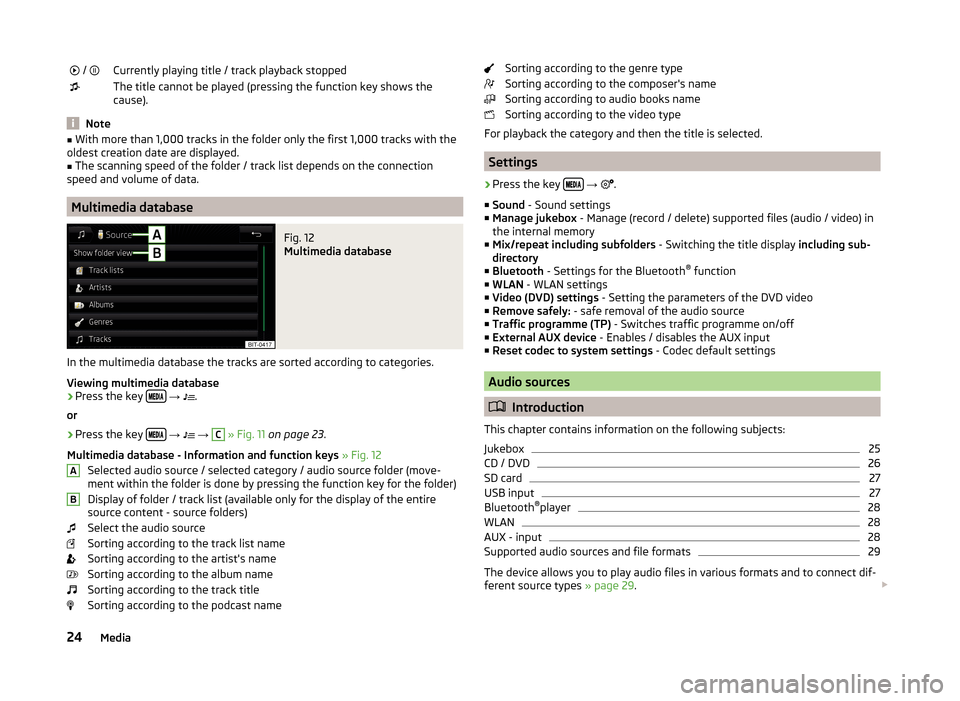
Multimedia database
Fig. 12
Multimedia database
In the multimedia database the tracks are sorted according to categories.
Viewing multimedia database
›
Press the key
→
.
or
›
Press the key
→
→
C
» Fig. 11 on page 23 .
Multimedia database - Information and function keys » Fig. 12
Selected audio source / selected category / audio source folder (move- ment within the folder is done by pressing the function key for the folder)
Display of folder / track list (available only for the display of the entire
source content - source folders)
Select the audio source
Sorting according to the track list name
Sorting according to the artist's name
Sorting according to the album name
Sorting according to the track title
Sorting according to the podcast name
ABSorting according to the genre type
Sorting according to the composer's name
Sorting according to audio books name
Sorting according to the video type
For playback the category and then the title is selected.
Settings
›
Press the key
→
.
■ Sound - Sound settings
■ Manage jukebox - Manage (record / delete) supported files (audio / video) in
the internal memory
■ Mix/repeat including subfolders - Switching the title display including sub-
directory
■ Bluetooth - Settings for the Bluetooth ®
function
■ WLAN - WLAN settings
■ Video (DVD) settings - Setting the parameters of the DVD video
■ Remove safely: - safe removal of the audio source
■ Traffic programme (TP) - Switches traffic programme on/off
■ External AUX device - Enables / disables the AUX input
■ Reset codec to system settings - Codec default settings
Audio sources
Introduction
This chapter contains information on the following subjects:
Jukebox
25
CD / DVD
26
SD card
27
USB input
27
Bluetooth ®
player
28
WLAN
28
AUX - input
28
Supported audio sources and file formats
29
The device allows you to play audio files in various formats and to connect dif-
ferent source types » page 29.
24Media
Page 38 of 100
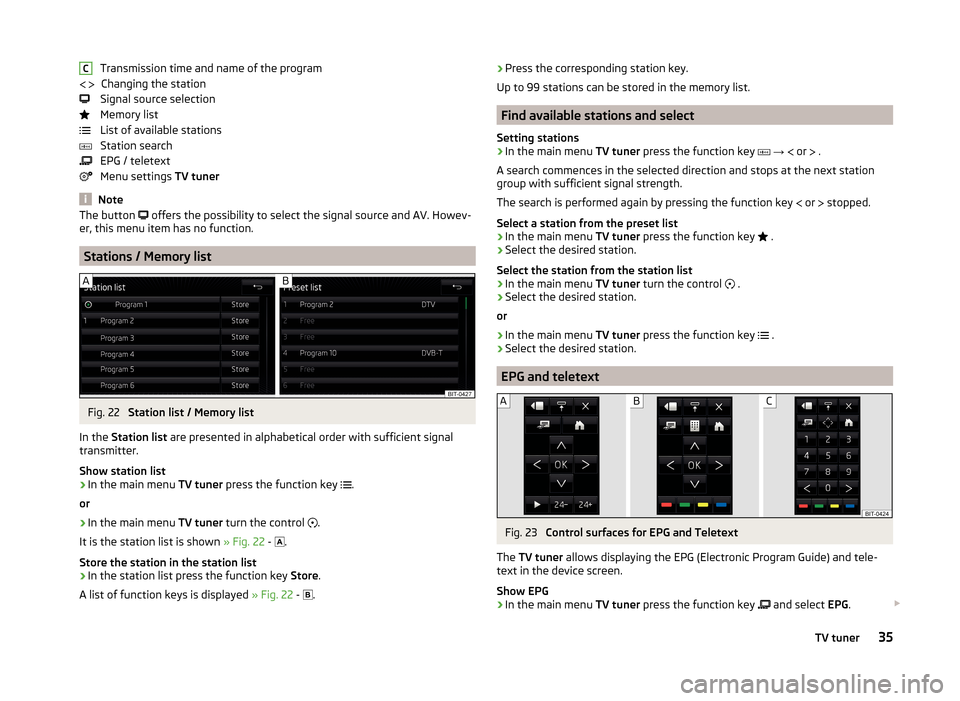
Transmission time and name of the programChanging the station
Signal source selection
Memory list
List of available stations
Station search
EPG / teletext
Menu settings TV tuner
Note
The button offers the possibility to select the signal source and AV. Howev-
er, this menu item has no function.
Stations / Memory list
Fig. 22
Station list / Memory list
In the Station list are presented in alphabetical order with sufficient signal
transmitter.
Show station list
›
In the main menu TV tuner press the function key
.
or
›
In the main menu TV tuner turn the control
.
It is the station list is shown » Fig. 22 -
.
Store the station in the station list
›
In the station list press the function key Store.
A list of function keys is displayed » Fig. 22 -
.
C › Press the corresponding station key.
Up to 99 stations can be stored in the memory list.
Find available stations and select
Setting stations
›
In the main menu TV tuner press the function key
→
or
.
A search commences in the selected direction and stops at the next station
group with sufficient signal strength.
The search is performed again by pressing the function key
or
stopped.
Select a station from the preset list
›
In the main menu TV tuner press the function key
.
›
Select the desired station.
Select the station from the station list
›
In the main menu TV tuner turn the control
.
›
Select the desired station.
or
›
In the main menu TV tuner press the function key
.
›
Select the desired station.
EPG and teletext
Fig. 23
Control surfaces for EPG and Teletext
The TV tuner allows displaying the EPG (Electronic Program Guide) and tele-
text in the device screen.
Show EPG
›
In the main menu TV tuner press the function key
and select
EPG.
35TV tuner
Page 39 of 100
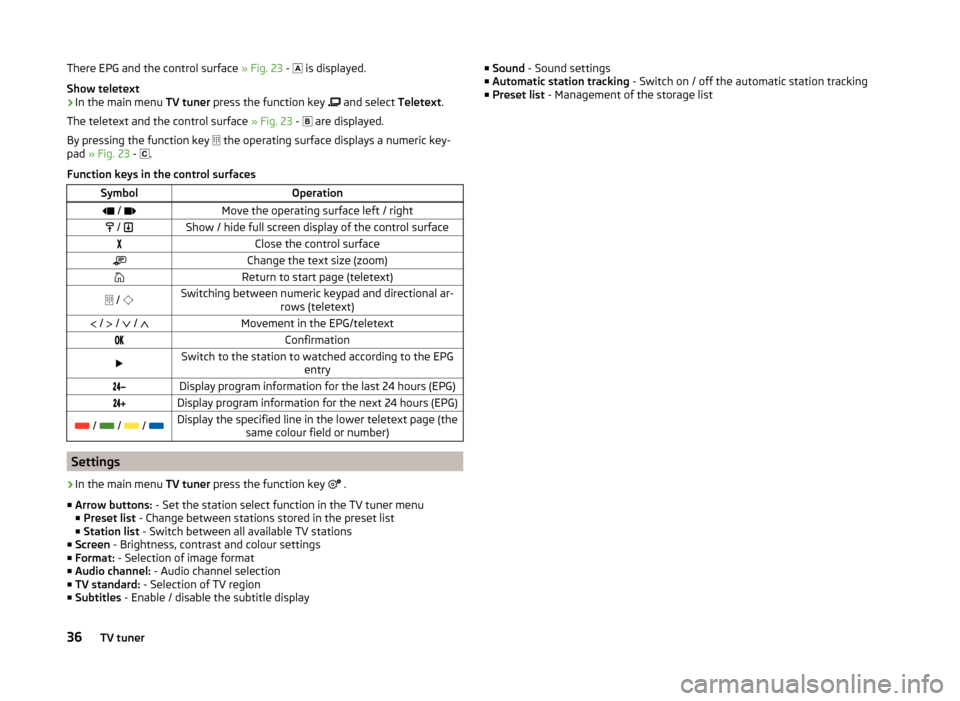
There EPG and the control surface » Fig. 23 - is displayed.
Show teletext›
In the main menu TV tuner press the function key
and select Teletext.
The teletext and the control surface » Fig. 23 -
are displayed.
By pressing the function key
the operating surface displays a numeric key-
pad » Fig. 23 -
.
Function keys in the control surfaces
SymbolOperation / Move the operating surface left / right / Show / hide full screen display of the control surfaceClose the control surfaceChange the text size (zoom)Return to start page (teletext) / Switching between numeric keypad and directional ar-
rows (teletext) / / / Movement in the EPG/teletextConfirmationSwitch to the station to watched according to the EPG
entryDisplay program information for the last 24 hours (EPG)Display program information for the next 24 hours (EPG) / / / Display the specified line in the lower teletext page (the
same colour field or number)
Settings
›
In the main menu TV tuner press the function key
.
■ Arrow buttons: - Set the station select function in the TV tuner menu
■ Preset list - Change between stations stored in the preset list
■ Station list - Switch between all available TV stations
■ Screen - Brightness, contrast and colour settings
■ Format: - Selection of image format
■ Audio channel: - Audio channel selection
■ TV standard: - Selection of TV region
■ Subtitles - Enable / disable the subtitle display
■
Sound - Sound settings
■ Automatic station tracking - Switch on / off the automatic station tracking
■ Preset list - Management of the storage list36TV tuner
Page 49 of 100
Dial the mailbox number
Entering a number using the voice control
Edit the entered telephone number
The telephone number you entered can be edited even before dialling, by
pressing one of the function keys.
›
- To delete the last number entered.
›
- Display of the function keys
/
for the movement of the cursor in the
input line » Fig. 29 -
.
Prefix code
If the telephone number entered has no prefix code, then the prefix number
can be added before the number by using the function key.
Press the function key is displayed only when the prefix function
» page 38,
Settings is shown.
The prefix can, for example, be used for international calls.
Breakdown and info numbers
The breakdown and info numbers are free of charge. Charges are only made
for a telephone call in accordance with the fare conditions of your telephone
service provider.
The telephone numbers are already set at the factory. If you want to change
the numbers, then consult a ŠKODA service partner.
If no breakdown or Info calls can be made then a ŠKODA service partner should
be consulted.
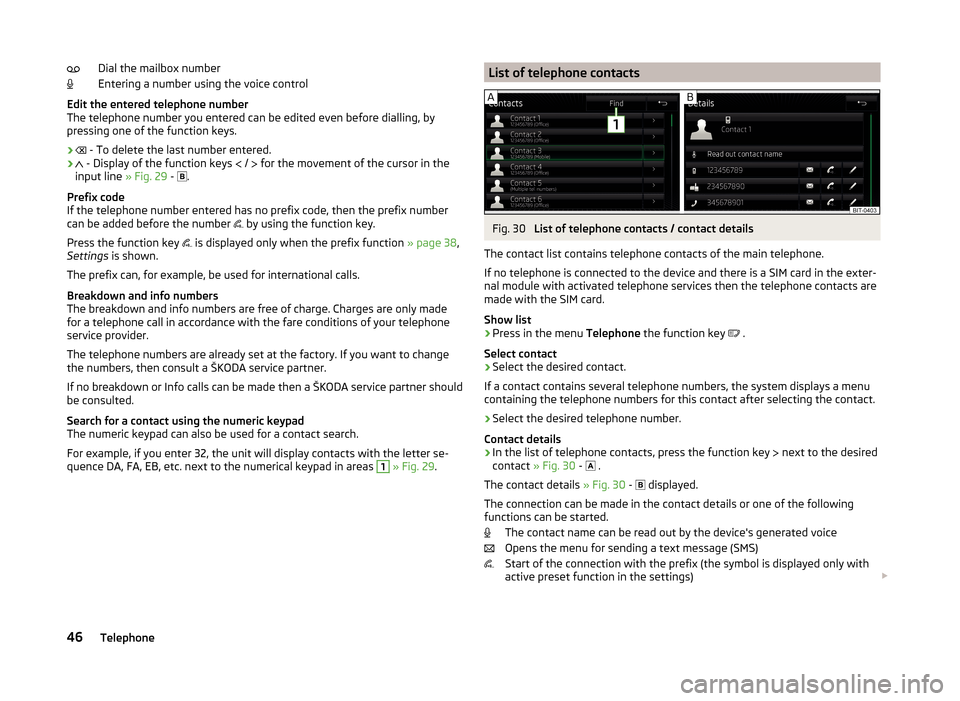
Search for a contact using the numeric keypad
The numeric keypad can also be used for a contact search.
For example, if you enter 32, the unit will display contacts with the letter se-
quence DA, FA, EB, etc. next to the numerical keypad in areas 1
» Fig. 29 .
List of telephone contactsFig. 30
List of telephone contacts / contact details
The contact list contains telephone contacts of the main telephone.
If no telephone is connected to the device and there is a SIM card in the exter-
nal module with activated telephone services then the telephone contacts are
made with the SIM card.
Show list
›
Press in the menu Telephone the function key
.
Select contact
›
Select the desired contact.
If a contact contains several telephone numbers, the system displays a menu
containing the telephone numbers for this contact after selecting the contact.
›
Select the desired telephone number.
Contact details
› In the list of telephone contacts, press the function key
next to the desired
contact » Fig. 30 -
.
The contact details » Fig. 30 -
displayed.
The connection can be made in the contact details or one of the following
functions can be started.
The contact name can be read out by the device's generated voice
Opens the menu for sending a text message (SMS)
Start of the connection with the prefix (the symbol is displayed only with
active preset function in the settings)
46Telephone
Page 55 of 100
If the device is connected to the external device via WLAN client the following
will appear in the function key
→ → WLAN → WLAN the WLAN name
of the external device.
Security type
In the list of available WLAN networks the security type appears in the func-
tion key with the name of the WLAN security type A
» Fig. 36 .
■ WPA2 - WPA2 security
■ WPA - WPA security
■ Open - Without security (without WLAN access password)
Disconnection
› Switch off the WLAN client mode in the device.
or
› Press the key
→
→ WLAN → WLAN → Delete .
WLAN client - manual settings
Manual settings / connections are then to be used when the desired WLAN
network is not in the list of available WLAN networks (e.g. the desired WLAN
network is not broadcasting a name).
›
Press the key
→
→ WLAN → WLAN → Manual settings .
›
Enter and select the following menu items.
■ Network name - Enter the WLAN name
■ Network key - Enter password for the WLAN connection
■ Security level: - Setting of the WLAN connection security
■ WPA2 - WPA2 security
■ WPA - WPA security
■ No security level - Without protection (without WLAN access password)
› Press the function key
Connect.
Data connection
Introduction
This chapter contains information on the following subjects:
Connection options for the data connection
52
Settings
52Connection options for the data connection
Using the data connection, the device can be connected to the Internet.
The data connection can be established in one of the following ways.
Data connection using rSAP›
Connect the device via Bluetooth ®
profile rSAP to a telephone with activated
data services.
Data connection using the SIM card in the external module
›
Insert a SIM card with activated data services in the external module and es-
tablish the data connection » page 44.
Data connection via WLAN
›
Connect the device to an external device with activated data services over
the WLAN client mode » page 51.
Settings
›
Press the key
→
→ Network .
■ Network settings - Setting of the data connection according to the associ-
ated telephone service provider (APN settings)
■ Access point name: ... - Setting of the access point name
■ User name: … - Setting of user name
■ Password: ... - Password setting
■ Authentication - Setting for the type of verification
■ Normal - Without verification
■ Safe - Verification required
■ Delete connection - Delete the data connection
■ Reset access point (APN) - Delete the settings of the data connection pa-
rameters
■ Store - Saving the settings
■ Network provider: ... - Select the data connection provider (the menu item is
visible when only the data connection of the inserted SIM card is active)
■ Data roaming - Enable / disable the use of data roaming connection
■ Current connection details - Display of information on data downloaded (by
pressing the function key Reset the data information is deleted)
■ Restore factory settings - Restoring the data connection settings
■ Data connection: - Settings relating to turning on/off the data connection
■ Off - Turning the data connection off
■ Ask - Switch on the data connection after confirming the request
■ On - Switch on the data connection
52WLAN connectivity and data connection
Page 83 of 100
Vehicle systems
CAR - Vehicle settings
Introduction
This chapter contains information on the following subjects:
Main menu
80
Convenience consumer
80
Driving data
81
DriveGreen
81
Vehicle condition
81
ESC and TCS systems
81
Tyres
81
Assistance systems
82
Parking and manoeuvring
82
Light
83
Interior lighting
83
Mirror and wiper
83
Opening and closing
83
Seats
84
Instrument cluster (multifunction display)
84
Time, date and unit setting
84
Service
84
Reset to factory settings
84
In the menu CAR travel data and information displayed on the vehicle and
some vehicle systems can be set.
Description of the individual systems » Vehicle Owner's Manual .
Note
Settings relating to the vehicle systems can only be made when the ignition is
switched on.Main menuFig. 66
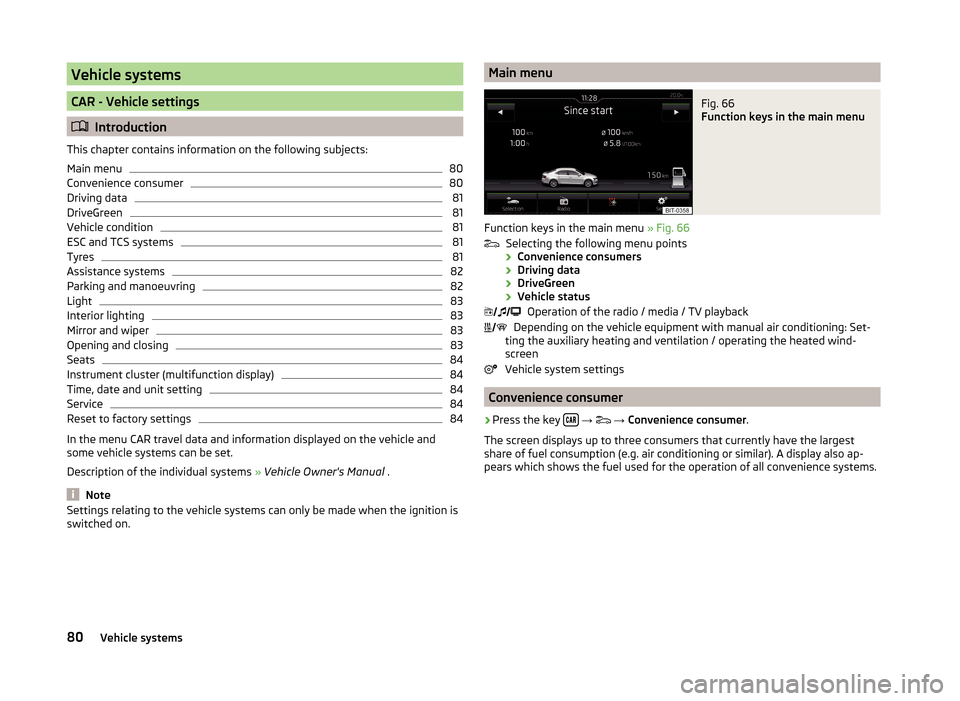
Function keys in the main menu
Function keys in the main menu » Fig. 66
Selecting the following menu points
› Convenience consumers
› Driving data
› DriveGreen
› Vehicle status
Operation of the radio / media / TV playback
Depending on the vehicle equipment with manual air conditioning: Set-
ting the auxiliary heating and ventilation / operating the heated wind- screen
Vehicle system settings
Convenience consumer
›
Press the key
→
→ Convenience consumer .
The screen displays up to three consumers that currently have the largest
share of fuel consumption (e.g. air conditioning or similar). A display also ap-
pears which shows the fuel used for the operation of all convenience systems.
80Vehicle systems