display SKODA OCTAVIA 2015 3.G / (5E) Owner's Guide
[x] Cancel search | Manufacturer: SKODA, Model Year: 2015, Model line: OCTAVIA, Model: SKODA OCTAVIA 2015 3.G / (5E)Pages: 268, PDF Size: 37.54 MB
Page 45 of 268
Current driving speed
The display is identical to the display on the speedometer.
Average speed
The indication is calculated continuously since the last deletion of the memory.
After erasing the memory, no data will appear for the first 300 m driven.
Distance travelled
The distance travelled since the memory was last erased is displayed.
The maximum distance indicated is 9999 km. The indicator is automatically set
back to zero if this period is exceeded.
Driving time
The time travelled since the memory was last erased is displayed.
The maximum distance indicated is 99 hours and 59 minutes. The indicator is
automatically set back to zero if this period is exceeded.
Convenience consumers
There, the total consumption of all consumer comfort in l / h is displayed.
Along with the consumption data, a list of the three consumers with the larg-
est share of fuel consumption (e.g. air conditioning and similar devices) is dis-
played.
Refuelling amount 1)
After the consumption of about 10 litres of fuel from the fully refuelled tank, an amount of fuel is displayed in l. This amount can now be safely refilled.
Natural gas quality
The details of the quality of natural gas are displayed as a percentage of be-
tween 70% to 100%.
The higher the value of natural gas, the lower is the consumption.
Coolant temperature
If the coolant temperature is in the range 80-110 °C, the engine operating tem-
perature is reached.
If the temperature lies below 80 °C or above 110 °C, avoid high engine revs, full
throttle and high engine loads.Warning when exceeding the set speed
Read and observe
on page 41 first.
The system offers the possibility to set a speed limit beyond which an audible
alarm will sound and the following warning message appears.
Speed ... exceeded.SPEED TOO HIGH
Adjust the speed limit while the vehicle is stationary
›
Select the menu item
Warning at
at (
) or
(
) and confirm.
›
Set the desired speed limit.
›
Confirm the set value, or wait several seconds; your settings will be saved
automatically.
The speed limit can be set in 5 km/h intervals.
Adjusting the speed limit while the vehicle is moving
›
Select the menu item
Warning at
at ( ) or
(
) and confirm.
›
Drive at the desired speed.
›
Confirm the current speed as the speed limit.
The set speed limit can be manually adjusted later if needed.
Deactivate speed limit
›
Select the menu item
Warning at
at ( ) or
(
) and confirm.
›
Confirm the stored value of the speed limits.
The speed limit will be disabled.
The speed limit set mode is stored even after the ignition is switched off and
on. After a gap between driving exceeding 2 hours, the pre-set speed limit is
deactivated.
1)
Only valid for some countries.
43Information system
Page 46 of 268
MemoryFig. 31
Memory display: MAXI DOT dis-
play (
)/segment display (
)
Read and observe on page 41 first.
Following driving data is stored in three locations.
▶ Average fuel consumption.
▶ Distance driven.
▶ Average speed.
▶ Driving time.
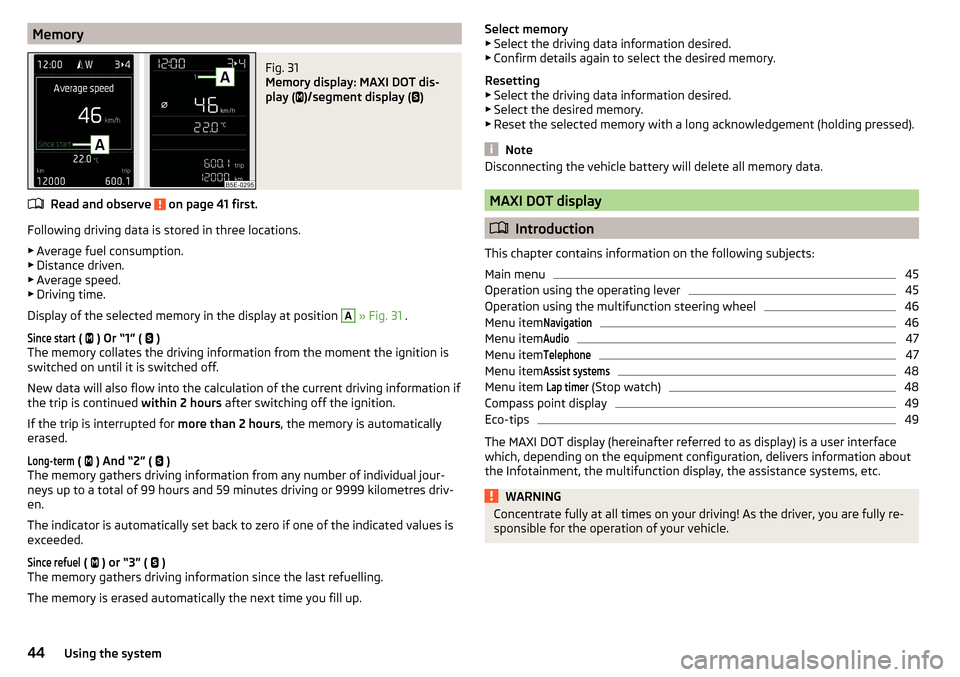
Display of the selected memory in the display at position
A
» Fig. 31 .
Since start
(
) Or “1” (
)
The memory collates the driving information from the moment the ignition is
switched on until it is switched off.
New data will also flow into the calculation of the current driving information if
the trip is continued within 2 hours after switching off the ignition.
If the trip is interrupted for more than 2 hours, the memory is automatically
erased.
Long-term
( ) And “2” (
)
The memory gathers driving information from any number of individual jour-
neys up to a total of 99 hours and 59 minutes driving or 9999 kilometres driv-
en.
The indicator is automatically set back to zero if one of the indicated values is
exceeded.
Since refuel
( ) or “3” (
)
The memory gathers driving information since the last refuelling.
The memory is erased automatically the next time you fill up.
Select memory
▶ Select the driving data information desired.
▶ Confirm details again to select the desired memory.
Resetting ▶ Select the driving data information desired.
▶ Select the desired memory.
▶ Reset the selected memory with a long acknowledgement (holding pressed).
Note
Disconnecting the vehicle battery will delete all memory data.
MAXI DOT display
Introduction
This chapter contains information on the following subjects:
Main menu
45
Operation using the operating lever
45
Operation using the multifunction steering wheel
46
Menu item
Navigation46
Menu item
Audio47
Menu item
Telephone47
Menu item
Assist systems48
Menu item
Lap timer
(Stop watch)
48
Compass point display
49
Eco-tips
49
The MAXI DOT display (hereinafter referred to as display) is a user interface
which, depending on the equipment configuration, delivers information about
the Infotainment, the multifunction display, the assistance systems, etc.
WARNINGConcentrate fully at all times on your driving! As the driver, you are fully re-
sponsible for the operation of your vehicle.44Using the system
Page 47 of 268
Main menuRead and observe
on page 44 first.
Call up the main menu
›
Press and hold the button
A
on the operating lever » Fig. 32 on page 45 .
or
›
Press and hold the dial
G
on the multifunction steering wheel » Fig. 33 on
page 46 .
Main menu items (depending on vehicle equipment) ■
Driving data
» page 41
■
Assist systems
» page 48
■
Navigation
» page 46
■
Audio
» page 47
■
Telephone
» page 47 ;
■
Vehicle
» page 40 , Auto-check control
■
Lap timer
» page 48 , Menu item
Lap timer
(Stop watch)
The menus can be opened using the buttons on the control lever » Fig. 32 on
page 45 or on the multi-function steering wheel » Fig. 33 on page 46 .
Note
■
If warning messages are displayed, these messages must first be confirmed
to access the main menu.■
For vehicles with Infotainment, the language of the MAXI DOT display can be
set in the Infotainment » Owner´s Manual Infotainment , chapter Device set-
tings (SETUP key) .
■
For vehicles without infotainment, the language of the MAXI DOT displays
can only be adjusted by a specialist garage.
Operation using the operating leverFig. 32
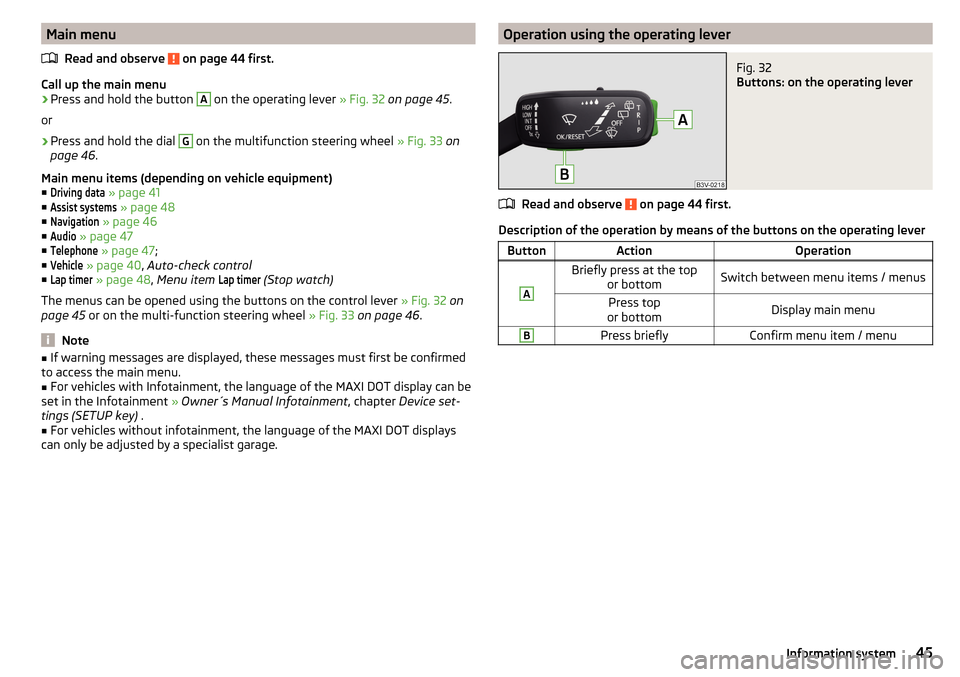
Buttons: on the operating lever
Read and observe on page 44 first.
Description of the operation by means of the buttons on the operating lever
ButtonActionOperationABriefly press at the top or bottomSwitch between menu items / menusPress top
or bottomDisplay main menuBPress brieflyConfirm menu item / menu45Information system
Page 48 of 268
Operation using the multifunction steering wheelFig. 33
Buttons/dials: on the multifunction steering wheel
Read and observe
on page 44 first.
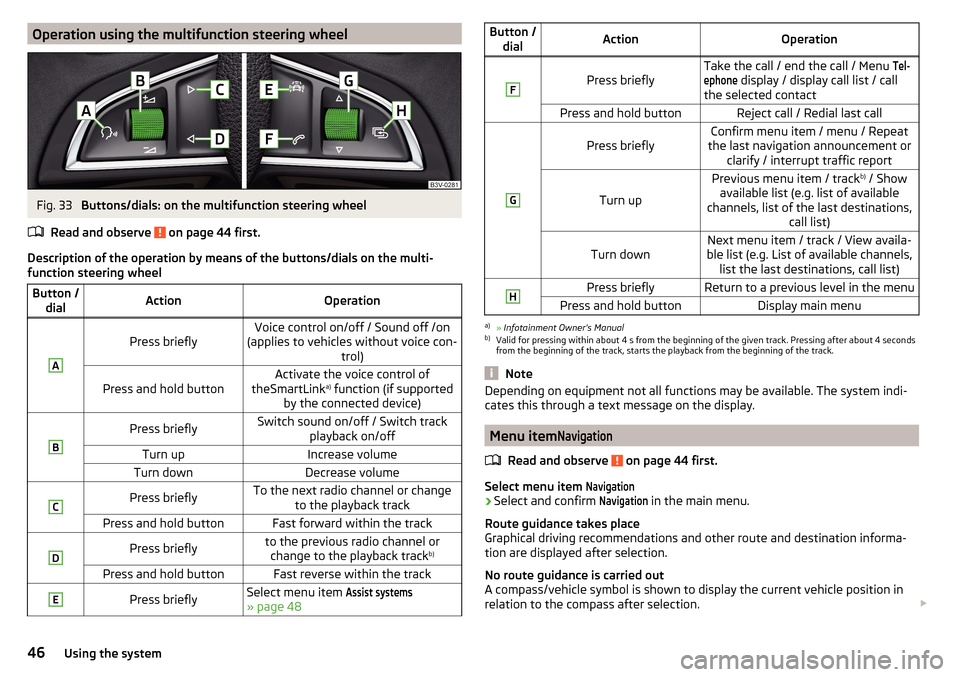
Description of the operation by means of the buttons/dials on the multi-
function steering wheel
Button / dialActionOperationA
Press brieflyVoice control on/off / Sound off /on
(applies to vehicles without voice con- trol)Press and hold buttonActivate the voice control of
theSmartLink a)
function (if supported
by the connected device)BPress brieflySwitch sound on/off / Switch track playback on/offTurn upIncrease volumeTurn downDecrease volumeCPress brieflyTo the next radio channel or changeto the playback trackPress and hold buttonFast forward within the trackDPress brieflyto the previous radio channel orchange to the playback track b)Press and hold buttonFast reverse within the trackEPress brieflySelect menu item Assist systems
» page 48
Button /
dialActionOperationF
Press brieflyTake the call / end the call / Menu Tel-ephone
display / display call list / call
the selected contactPress and hold buttonReject call / Redial last callG
Press brieflyConfirm menu item / menu / Repeat
the last navigation announcement or clarify / interrupt traffic report
Turn up
Previous menu item / track b)
/ Show
available list (e.g. list of available
channels, list of the last destinations, call list)Turn downNext menu item / track / View availa-
ble list (e.g. List of available channels, list the last destinations, call list)HPress brieflyReturn to a previous level in the menuPress and hold buttonDisplay main menua)
» Infotainment Owner's Manual
b)
Valid for pressing within about 4 s from the beginning of the given track. Pressing after about 4 seconds
from the beginning of the track, starts the playback from the beginning of the track.
Note
Depending on equipment not all functions may be available. The system indi-
cates this through a text message on the display.
Menu item
Navigation
Read and observe on page 44 first.
Select menu item
Navigation›
Select and confirm
Navigation
in the main menu.
Route guidance takes place
Graphical driving recommendations and other route and destination informa-
tion are displayed after selection.
No route guidance is carried out
A compass/vehicle symbol is shown to display the current vehicle position in
relation to the compass after selection.
46Using the system
Page 49 of 268
Then turn dial G » Fig. 33 on page 46 on the multifunction steering wheel to
display the Last destinations
menu.
The menu shows the
Home address
menu item and a list of recent destinations.
When you select one of the menu items, the destination name and the follow-
ing items are displayed.
■
OK
- Start navigation
■
Cancel
- Return to the Navigation menu – the compass/vehicle symbol will be
displayed
If the home address is not defined when the menu item
Home address
is selec-
ted, the following message appears:
Please enter the home address on the infotain-ment system.
Menu item
Audio
Read and observe on page 44 first.
Select menu item
Audio›
Select and confirm
Audio
in the main menu.
The following information can be displayed in the display.
■ Radio
■ Currently played station (name/frequency)
■ The selected frequency range (e.g. FM) optionally with the number of the
station button (e.g. FM3), if the station is stored in the memory list
■ List of available station (if more than 5 stations can be received)
■ TP traffic announcements.
■ Media
■ Name of the track being played, if necessary, further information regarding
title (e.g. artist, album name), if this information is stored as a so called ID3
tag on the audio source.
Menu item
Telephone
Read and observe on page 44 first.
Select menu item
Telephone›
Select and confirm
Telephone
in the main menu.
›
Turn the dial
G
» Fig. 33 on page 46 .
The system displays a call list.
If the call list includes no entries, the following message appears No entries avail-able.
The following symbols are displayed next to each entry in the call list. Incoming call
Outgoing call
Missed call
Outgoing call
■
Cancel
- Ends the call
Incoming call
■
Answer
– Accept incoming call
■
Reject
– Reject incoming call
■
Ignore
- Mute the ringer (this option is only available if there is no other call)
Ongoing conversation or conference call
■
Hang up
- End a call
■
Hold
– Hold a call
■
Continue
– Continue held call
■
Mic. off
– Microphone off
■
Mic. on
– Microphone on
■
Private
– Switch the call to the telephone
■
Hands-free
– Toggles the call to the device
Ongoing and held call ■
Hang up
– End an ongoing call
■
Call wait.
– Switch to a held call
■
Conference
– Make a conference call 1)
■
Mic. off
– Microphone off
■
Mic. on
– Microphone on
■
Private
– Switch ongoing call to the telephone
■
Hands-free
– Switch ongoing call to the device
Symbols in the display Charge status of the telephone battery 1)
Signal strength 1)
A telephone is connected to the unit
1)
This function is only supported by some mobile phones.
47Information system
Page 50 of 268
Missed calls (if there are several missed calls, the number of calls is shown
next to the symbol)
Switch-off microphone
Menu item
Assist systems
Read and observe on page 44 first.
Select menu item
Assist systems›
Select and confirm
Assist systems
in the main menu.
or
›
Press the button on the multi-function steering wheel .
In the menu item
Assist systems
, the Front Assist and Lane Departure Warning
(Lane Assist) systems can be enabled/disabled.
Menu item
Lap timer
(Stop watch)
Read and observe
on page 44 first.
Select menu item
Lap timer›
Select and confirm
Lap timer
in the main menu.
The Lap timer function offers the possibility of calculating the lap time, for ex-
ample when driving on a race course. The measured time is shown in the dis-
play.
The calculated times are displayed in minutes, seconds and tenths of seconds.
The following functions are available. ■
Start
- start the timing manually or continue the interrupted measurement
■
Since start
- Start the timer automatically upon start-up
■
Statistics
- Evaluate and reset the measured times
Time measurement
Manually start the measurement
▶ Select the menu item
Lap timer
-
Start
.
Start the measurement automatically ▶ Select the menu item
Lap timer
-
Since start
. Timing will begin automatically
when starting up.
Start timing of next round
▶ Select the menu item
New lap
during timing.
During timing, information about the fastest and the last lap time are also
shown in the display.
Measure split time ▶ During the timing, select the menu item Split time
. The split time data is dis-
played for about 5 seconds in the display.
The split time can be measured repeatedly during a round.
Stop measurement
▶ During the timing, press the menu item
Stop
.
The time measurement is stopped, the following functions are now available.
■
Continue
- Continue measurement of the current lap time
■
New lap
- Start measurement of the next lap time.
■
Abort lap
- Cancel the timer (the aborted lap time is not stored)
■
Hang up
- End timing (the aborted lap time is stored)
Evaluate recorded times ▶ Select the menu item
Lap timer
-
Statistics
.
The following information is displayed.
▶
Fastest:
- The fastest lap
▶
Slowest:
- The slowest lap
▶
Average:
- The average lap time
▶
Overall time:
- The total of all the lap times
Reset measured times ▶ Select the menu item
Lap timer
-
Statistics
-
Reset
.
WARNING■ Concentrate fully at all times on your driving! As the driver, you are fully
responsible for the operation of your vehicle.■
Only use the
Lap timer
when you are in any traffic situation where you have
full control over the vehicle.
Note
■ The system allows the measurement of up to 11 lap times.■Individual lap times are no longer measured after 99 hours, 59 minutes and
59 seconds. After this time has been reached, a new lap time is automatically
measured.■
The measured times cannot be reset individually.
■
If the measured times are not reset, then these are stored even after turning
off the ignition.
48Using the system
Page 51 of 268
Compass point displayFig. 34
Compass display
Read and observe on page 44 first.
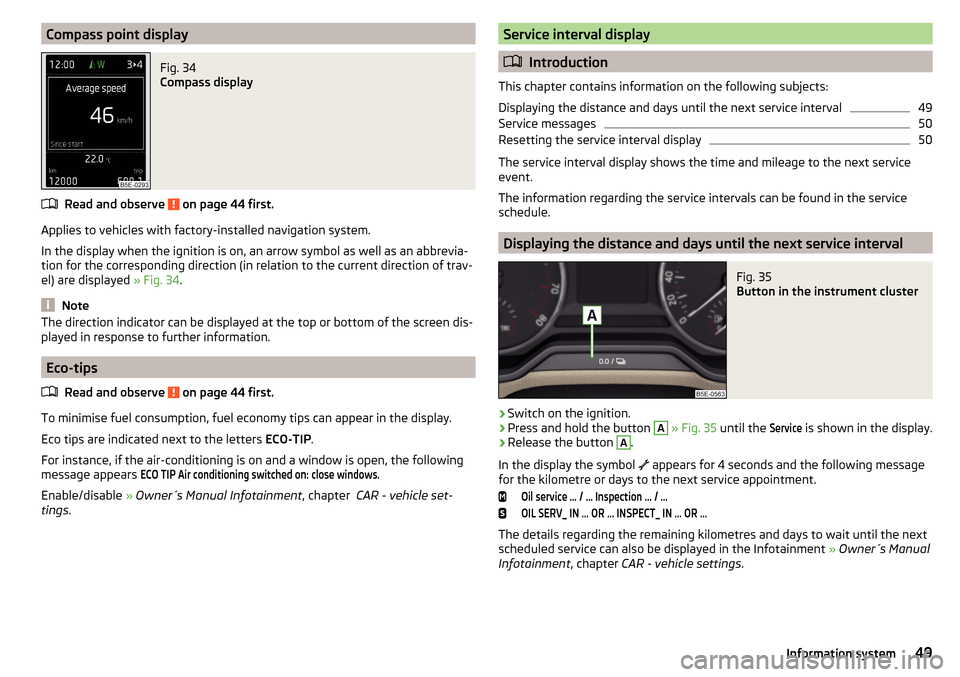
Applies to vehicles with factory-installed navigation system.
In the display when the ignition is on, an arrow symbol as well as an abbrevia- tion for the corresponding direction (in relation to the current direction of trav-
el) are displayed » Fig. 34.
Note
The direction indicator can be displayed at the top or bottom of the screen dis-
played in response to further information.
Eco-tips
Read and observe
on page 44 first.
To minimise fuel consumption, fuel economy tips can appear in the display.
Eco tips are indicated next to the letters ECO-TIP.
For instance, if the air-conditioning is on and a window is open, the following
message appears
ECO TIP Air conditioning switched on: close windows.
Enable/disable » Owner´s Manual Infotainment , chapter CAR - vehicle set-
tings .
Service interval display
Introduction
This chapter contains information on the following subjects:
Displaying the distance and days until the next service interval
49
Service messages
50
Resetting the service interval display
50
The service interval display shows the time and mileage to the next service
event.
The information regarding the service intervals can be found in the service
schedule.
Displaying the distance and days until the next service interval
Fig. 35
Button in the instrument cluster
›
Switch on the ignition.
›
Press and hold the button
A
» Fig. 35 until the
Service
is shown in the display.
›
Release the button
A
.
In the display the symbol appears for 4 seconds and the following message
for the kilometre or days to the next service appointment.
Oil service … / … Inspection … / …OIL SERV_ IN … OR … INSPECT_ IN … OR …
The details regarding the remaining kilometres and days to wait until the next
scheduled service can also be displayed in the Infotainment » Owner´s Manual
Infotainment , chapter CAR - vehicle settings .
49Information system
Page 52 of 268
Service messages
Messages before reaching the scheduled service date
Before the next service date has been reached, after switching on the ignition,
the symbol
as well as a message about the mileage or days until the next
service event appears in the display.
Messages upon reaching scheduled service date
Once the service interval is reached, the icon
appears in the display after the
ignition is switched on, as well as the following message, for example.Oil service now!OIL SERVICE NOW
or
Inspection now!INSPECTION NOW
or
Oil service and inspection now!OIL SERVICE + INSP_ NOW
Resetting the service interval display
We recommend that the display reset is completed by a specialist garage.
We recommend that you do not reset the service interval display yourself. In-
correctly setting the service interval display could cause problems to the vehi-
cle.
Variable service interval
For vehicles with variable service intervals, after resetting the oil change serv-
ice display in a specialist garage, the values of the new service interval are dis-
played, which are based on the previous operating conditions of the vehicle.
These values are then continuously matched according to the actual operating
conditions of the vehicle.
SmartGate
Introduction
Fig. 36
ŠKODA websites
This chapter contains information on the following subjects:
Connection to SmartGate using Wi-Fi
51
Connection to SmartGate using Wi-Fi Direct
51
SmartGate web interface
52
Password/PIN code change
52
SmartGate is a system that transmits certain driving data (such as fuel con-
sumption, speed or similar) via Wi-Fi and Wi-Fi Direct.
The ŠKODA compatible communications device (e.g. phone, tablet, notebook)
offer the possibility to further transmit the received data.
More information on available applications, a list of compatible communication
devices and on SmartGate can be found on the ŠKODA website » Fig. 36.
http://www.skoda-auto.com
WARNING■ The general binding country-specific regulations for operating communi-
cation devices in the vehicle must be observed.■
Never leave a communication device in the deployment area of an airbag,
on a seat, on the dash panel or any another area, from which it can be
thrown during a sudden braking manoeuvre, an accident or a collision - risk
of injury!
■
Never connect or disconnect a communication device while driving - risk
of accident!
50Using the system
Page 53 of 268
CAUTION■To increase the access security to the transmitted vehicle data, once the
ŠKODA application has been started, you are requested to change the pass-
word/PIN code if the default password/PIN code has not yet been changed
» page 52 , Password/PIN code change . It is not possible to start the ŠKODA
application without changing it.■
ŠKODA accepts no responsibility for any problems caused by incompatibility
or improper functioning of the communication devices.
Note
The ŠKODA applications, support communications devices with the Android
operating system version 4.x.x and later and iOS 7.x.x and higher.
Connection to SmartGate using Wi-Fi
Read and observe
and on page 50 first.
Connecting to an Android communication device
›
Switch on the ignition.
›
Switch on the Wi-Fi on the communication device to be connected.
›
Start the SmartGate application using the communication device to be con-
nected.
›
Then follow the instructions in the manual, which are included in the
SmartGate application.
With SmartGate, a maximum of four communication devices can be connected
simultaneously using Wi-Fi, with as many launched ŠKODA applications as re-
quired.
Connecting to an iOS communication device
›
Switch on the ignition.
›
Switch on the Wi-Fi on the communication device to be connected.
›
Allow the communication device to be connected to search for available Wi-
Fi networks (see the Owner's Manual for the communication device to be
connected).
›
In the menu of the detected networks select “SmartGate_...” 1)
or “DIRECT
SmartGate_...” 1)
.
›
Enter the password » page 52.
With SmartGate, a maximum of four communication devices can be connected
simultaneously using Wi-Fi. In these communication devices, up to four ŠKODA
applications can be started simultaneously.
Disconnection
The connection can be switched off in one of the following ways.›
Switch off the ignition for longer than 5 seconds (for vehicles with a starter
button, switch off the engine and open the driver's door).
›
End the connection in the SmartGate application.
›
Switch off the Wi-Fi on the connected communication device.
Automatic connection
If the communication device once had a connection with SmartGate, then the
connection is automatically restored under the following conditions.
The ignition is switched on.
The Wi-Fi on the communication device to be connected is switched on.
The communication device to be connected stores the password required
for the connection check.
Connection to SmartGate using Wi-Fi Direct
Read and observe
and on page 50 first.
This type of connection is intended for communication devices running theAndroid operating system.
Connection set-up
›
Switch on the ignition.
›
Start the SmartGate application using the communication device to be con-
nected.
›
Then follow the instructions in the manual, which are included in the
SmartGate application.
With SmartGate, a maximum of two communication devices can be connected
simultaneously using Wi-Fi Direct, with as many launched ŠKODA applications
as required.
If you want to connect to SmartGate in another vehicle, you must first end the
existing connection to the SmartGate application and then re-establish the
connection.
1)
The last 6 characters of the VIN vehicle identification number of your vehicle are displayed at position
....
51Information system
Page 54 of 268
Disconnection
The connection can be switched off in one of the following ways.›
Switch off the ignition for longer than 5 seconds (for vehicles with a starter
button, switch off the engine and open the driver's door).
›
End the connection in the SmartGate application.
›
Switch off the Wi-Fi on the connected communication device.
Automatic connection
If the communication device once had a connection with SmartGate, then the
connection is automatically restored after the ignition is started.
SmartGate web interface
Read and observe
and on page 50 first.
SmartGate parameters can be set in the SmartGate web interface.
The following address must be entered via Wi-Fi in the web browser of the
connected communication device.
HTTP://192.168.123.1
The setting changes are only effective after pressing the “Save” button and
then the “Reboot” button.
Password/PIN code change
Read and observe
and on page 50 first.
The password for the Wi-Fi connection preset by the factory is the completevehicle identification number (upper case); the PIN code for the Wi-Fi Direct
connection preset by the factory is the last 6 digits of the vehicle identification
number.
After changing the password/PIN, the connection to SmartGate must be re-es-
tablished on the communication device to be connected using the new pass-
word or new PIN code.
If the password/PIN code is still set to the preset factory password/PIN code,
you are requested to change the password/PIN code after starting the ŠKODA
application. Without changing the password/PIN code, you are unable to use
the application.
Changing the password for the Wi-Fi connection›Open the SmartGate web interface.›
In the “WPA / WPA2 key:” menu item, enter the new password (8 to 63 al-
phanumeric characters and special characters, small and capital letters).
›
Confirm the password change by tapping on the “Save” interface.
›
Restart SmartGate by tapping on the “Reboot” 1)
interface.
Changing the PIN code for the Wi-Fi Direct connection
›
Open the SmartGate web interface.
›
In the “WiFi Direct PIN:” menu item, enter the new PIN code (6 digits).
›
Confirm the PIN code change by tapping on the “Save” interface.
›
Restart SmartGate by tapping on the “Reboot” 1)
interface.
Note
If you have forgotten your password for the connection to SmartGate,
SmartGate must be reset to factory settings in a specialised workshop.1)
If the “Reboot” interface is not displayed, you must manually restore the web browser display.
52Using the system