engine SKODA OCTAVIA 2015 3.G / (5E) Owner's Guide
[x] Cancel search | Manufacturer: SKODA, Model Year: 2015, Model line: OCTAVIA, Model: SKODA OCTAVIA 2015 3.G / (5E)Pages: 268, PDF Size: 37.54 MB
Page 55 of 268
Unlocking and opening
Unlocking and locking
Introduction
This chapter contains information on the following subjects:
Locking/unlocking using the key via the lock cylinder
54
Unlocking/locking with the remote control key
54
Unlocking / locking - KESSY
55
Locking and unlocking the vehicle with the central locking button
55
Safe securing system
56
Individual settings
56
Opening/closing a door
57
Child safety lock
57
Malfunctions
57
Your car is equipped with a central locking system.
The central locking system allows you to lock and unlock all doors, the fuel fill-
er flap and the boot lid at the same time. The functions of the central locking
system can be individually adjusted » page 56.
After unlocking, depending on vehicle equipment and setting the following is
valid for the central locking. ▶ The turn signal lights flash twice as confirmation that the vehicle has been
unlocked.
▶ An double audible signal sounds additionally on vehicles which are fitted
with the anti-theft alarm system.
▶ The doors, the boot lid and the fuel filler flap are unlocked.
▶ The interior lamp illuminates.
▶ The SafeLock system is switched off.
▶ The indicator light in the driver door stops flashing.
▶ The exterior mirrors are set into the driving position.
▶ The anti-theft alarm system is deactivated.
After locking, depending on vehicle equipment and setting the following is
valid for the central locking. ▶ The turn signal lights flash once as confirmation that the vehicle has been
locked.
▶ An audible signal sounds additionally on vehicles which are fitted with the
anti-theft alarm system.
▶ The doors, the boot lid and the fuel filler flap are locked.
▶ The interior lamp goes out.
▶ The SafeLock system is switched on.
▶ The warning light in the driver door begins flashing.
▶ The exterior mirrors are folded back into the park position.
▶ The anti-theft alarm system is activated.
If the doors or the luggage compartment lid remain open after the vehicle has
been locked, the turn signal lights do not flash until they have been closed.
Protection against unwanted vehicle unlocking
If the vehicle is unlocked and a door or the boot lid not opened within the next
45 seconds, the vehicle will lock again automatically and the safe securing sys-
tem or anti-theft alarm system will be switched back on.WARNING■ Never leave the key in the vehicle when you exit the vehicle. Unauthor-
ized persons, such as children, for example, could lock the car, turn on the
ignition or start the engine - there is a danger of injury and accidents!■
When leaving the vehicle, never leave persons who are not completely in-
dependent, such as children, unattended in the vehicle. These individuals
might not be able to leave the vehicle on their own or to help themselves.
Can be fatal at very high or very low temperatures!
CAUTION
■ Each key contains electronic components; therefore it must be protected
against moisture and severe shocks.■
Keep the groove of the keys absolutely clean. Impurities (textile fibres, dust,
etc.) have a negative effect on the functionality of the locking cylinder and ig-
nition lock.
■
If the driver's door has been opened, the vehicle cannot be locked.
53Unlocking and opening
Page 78 of 268
The lighting switches off around 30 seconds after the front door is closed or
the ignition is switched on.WARNINGIf the entry light is on, do not touch its cover – risk of burns!
Visibility
Introduction
This chapter contains information on the following subjects:
Windscreen and rear window heater
76
Sun visors in the front
76
Sun screen
77WARNINGMake sure that the view outside is not covered by ice, snow, mist or other
objects.
Windscreen and rear window heater
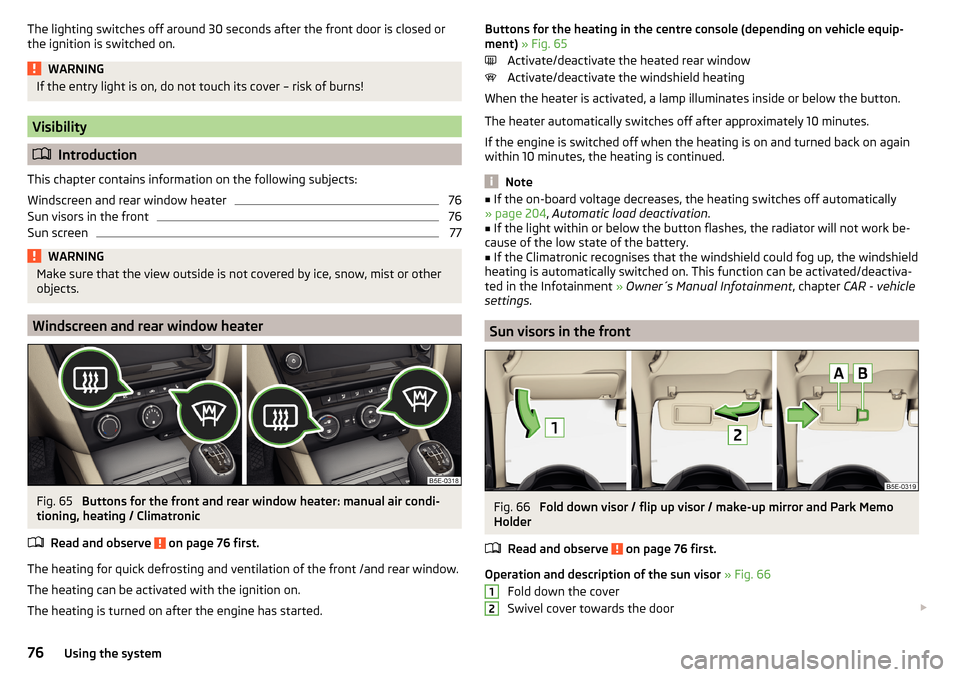
Fig. 65
Buttons for the front and rear window heater: manual air condi-
tioning, heating / Climatronic
Read and observe
on page 76 first.
The heating for quick defrosting and ventilation of the front /and rear window.
The heating can be activated with the ignition on.
The heating is turned on after the engine has started.
Buttons for the heating in the centre console (depending on vehicle equip-
ment) » Fig. 65
Activate/deactivate the heated rear window
Activate/deactivate the windshield heating
When the heater is activated, a lamp illuminates inside or below the button.
The heater automatically switches off after approximately 10 minutes.
If the engine is switched off when the heating is on and turned back on again
within 10 minutes, the heating is continued.
Note
■ If the on-board voltage decreases, the heating switches off automatically
» page 204 , Automatic load deactivation .■
If the light within or below the button flashes, the radiator will not work be-
cause of the low state of the battery.
■
If the Climatronic recognises that the windshield could fog up, the windshield
heating is automatically switched on. This function can be activated/deactiva-
ted in the Infotainment » Owner´s Manual Infotainment , chapter CAR - vehicle
settings .
Sun visors in the front
Fig. 66
Fold down visor / flip up visor / make-up mirror and Park Memo
Holder
Read and observe
on page 76 first.
Operation and description of the sun visor » Fig. 66
Fold down the cover
Swivel cover towards the door
1276Using the system
Page 82 of 268
Exterior mirrorsFig. 70
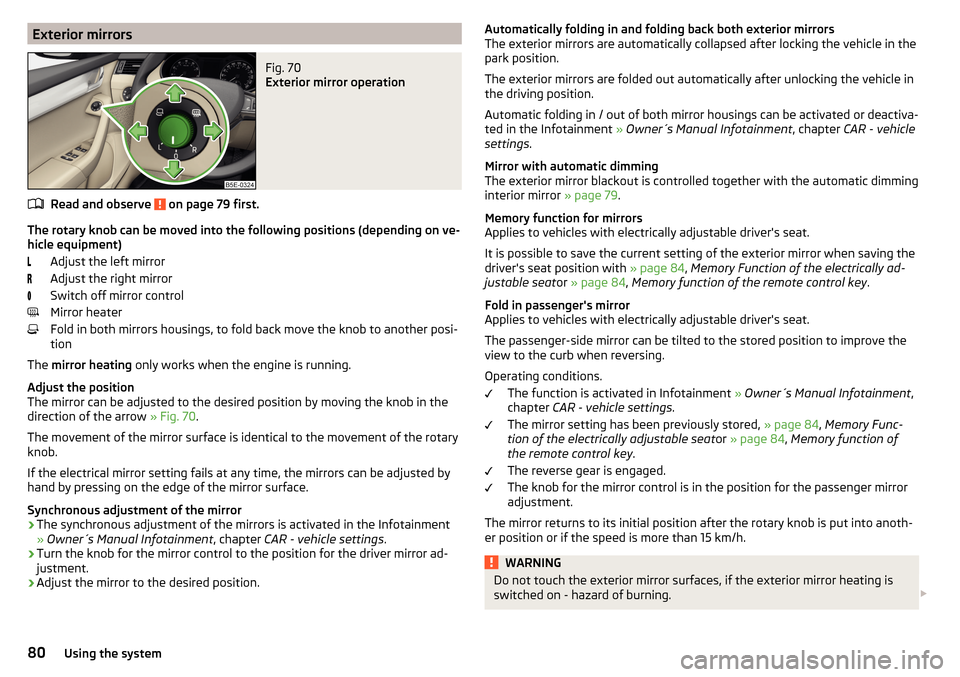
Exterior mirror operation
Read and observe on page 79 first.
The rotary knob can be moved into the following positions (depending on ve-
hicle equipment)
Adjust the left mirror
Adjust the right mirror
Switch off mirror control
Mirror heater
Fold in both mirrors housings, to fold back move the knob to another posi-
tion
The mirror heating only works when the engine is running.
Adjust the position
The mirror can be adjusted to the desired position by moving the knob in the
direction of the arrow » Fig. 70.
The movement of the mirror surface is identical to the movement of the rotary
knob.
If the electrical mirror setting fails at any time, the mirrors can be adjusted by
hand by pressing on the edge of the mirror surface.
Synchronous adjustment of the mirror
›
The synchronous adjustment of the mirrors is activated in the Infotainment
» Owner´s Manual Infotainment , chapter CAR - vehicle settings .
›
Turn the knob for the mirror control to the position for the driver mirror ad-
justment.
›
Adjust the mirror to the desired position.
Automatically folding in and folding back both exterior mirrors
The exterior mirrors are automatically collapsed after locking the vehicle in the
park position.
The exterior mirrors are folded out automatically after unlocking the vehicle in
the driving position.
Automatic folding in / out of both mirror housings can be activated or deactiva-
ted in the Infotainment » Owner´s Manual Infotainment , chapter CAR - vehicle
settings .
Mirror with automatic dimming
The exterior mirror blackout is controlled together with the automatic dimming
interior mirror » page 79.
Memory function for mirrors
Applies to vehicles with electrically adjustable driver's seat.
It is possible to save the current setting of the exterior mirror when saving the
driver's seat position with » page 84, Memory Function of the electrically ad-
justable seat or » page 84 , Memory function of the remote control key .
Fold in passenger's mirror
Applies to vehicles with electrically adjustable driver's seat.
The passenger-side mirror can be tilted to the stored position to improve the
view to the curb when reversing.
Operating conditions. The function is activated in Infotainment » Owner´s Manual Infotainment ,
chapter CAR - vehicle settings .
The mirror setting has been previously stored, » page 84, Memory Func-
tion of the electrically adjustable seat or » page 84 , Memory function of
the remote control key .
The reverse gear is engaged.
The knob for the mirror control is in the position for the passenger mirror
adjustment.
The mirror returns to its initial position after the rotary knob is put into anoth-
er position or if the speed is more than 15 km/h.WARNINGDo not touch the exterior mirror surfaces, if the exterior mirror heating is
switched on - hazard of burning. 80Using the system
Page 87 of 268
When the vehicle is next unlocked using the same key, the driver's seat and
the external mirrors assume the positions stored in the memory of this key.
Saving front passenger mirror settings for reversing
The function of lowering the passenger mirror surface when reversing must be
enabled in Infotainment » Infotainment Owner´s Manual , chapter CAR - Vehi-
cle Settings .›
Unlock the vehicle with the relevant remote control key.
›
Switch on the ignition.
›
Turn the knob for the external mirror control to the position for the passen-
ger side mirror adjustment » page 80.
›
Engage reverse gear.
›
Adjust the front passenger's mirror to the desired position.
›
Disengage reverse gear.
The adjusted position of the exterior mirror is stored in the remote control key
memory.
Disable the function of automatic storage
›
Unlock the vehicle with the remote control key.
›
Press the button (Position
A
» Fig. 76 on page 84 ) and hold.
›
Press the button on the remote control key within 10 seconds.
The successful deactivation of the automatic storage function for each key is confirmed by an acoustic signal.
Stopping the ongoing adjustment
›
Press any button on the driver's seat or the button on the remote control
key.
Seat features
Introduction
This chapter contains information on the following subjects:
Seat heaters
85
Front armrest setting
86
Rear armrest setting
86
Folding front passenger seat
86
Seat backrests
87
Long cargo channel in the rear seat backrest
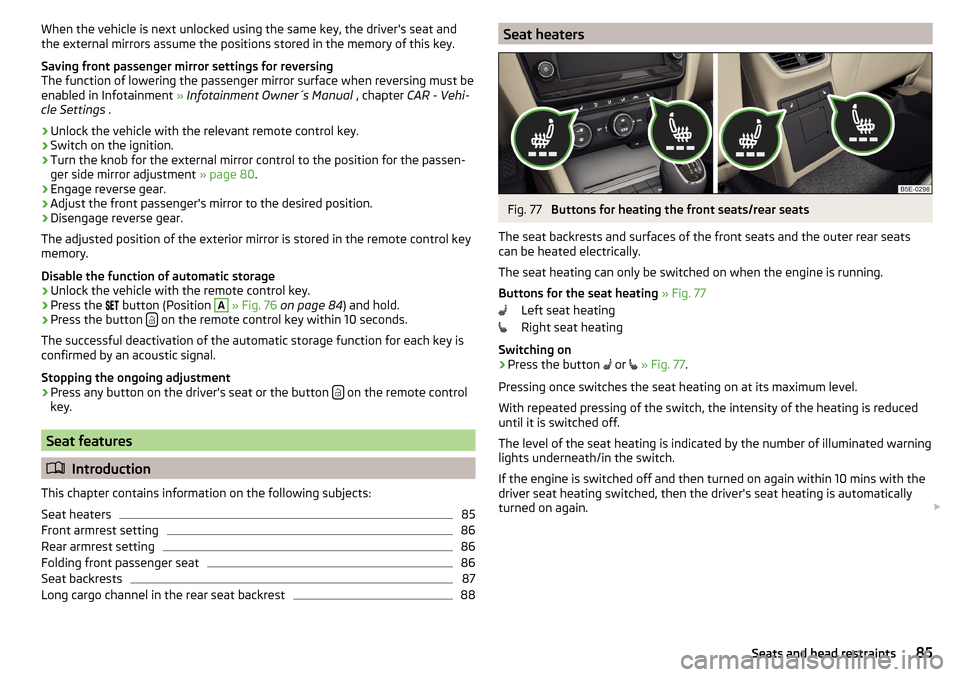
88Seat heatersFig. 77
Buttons for heating the front seats/rear seats
The seat backrests and surfaces of the front seats and the outer rear seats
can be heated electrically.
The seat heating can only be switched on when the engine is running.
Buttons for the seat heating » Fig. 77
Left seat heating
Right seat heating
Switching on
›
Press the button or
» Fig. 77 .
Pressing once switches the seat heating on at its maximum level.
With repeated pressing of the switch, the intensity of the heating is reduced
until it is switched off.
The level of the seat heating is indicated by the number of illuminated warning
lights underneath/in the switch.
If the engine is switched off and then turned on again within 10 mins with the
driver seat heating switched, then the driver's seat heating is automatically
turned on again.
85Seats and head restraints
Page 95 of 268
The insertion of the insert and closing of the ashtray is carried out in reverse
order.WARNINGNever place hot or flammable objects in the ashtray – risk of fire!
12-Volt power outlet
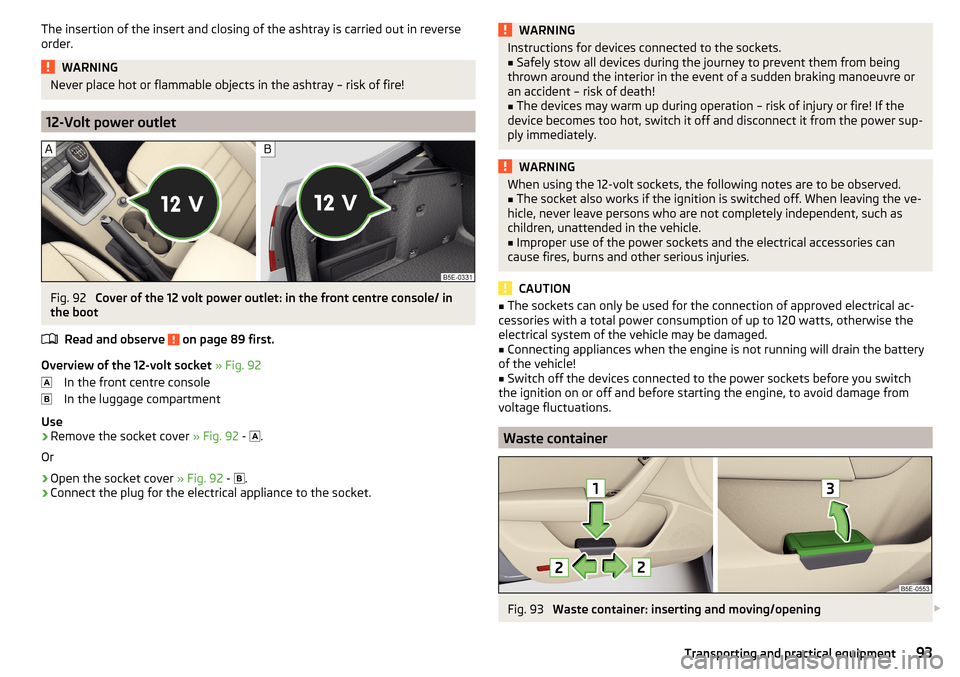
Fig. 92
Cover of the 12 volt power outlet: in the front centre console/ in
the boot
Read and observe
on page 89 first.
Overview of the 12-volt socket » Fig. 92
In the front centre console
In the luggage compartment
Use
›
Remove the socket cover » Fig. 92 -
.
Or
›
Open the socket cover » Fig. 92 -
.
›
Connect the plug for the electrical appliance to the socket.
WARNINGInstructions for devices connected to the sockets.■Safely stow all devices during the journey to prevent them from being
thrown around the interior in the event of a sudden braking manoeuvre or
an accident – risk of death!■
The devices may warm up during operation – risk of injury or fire! If the
device becomes too hot, switch it off and disconnect it from the power sup-
ply immediately.
WARNINGWhen using the 12-volt sockets, the following notes are to be observed.■The socket also works if the ignition is switched off. When leaving the ve-
hicle, never leave persons who are not completely independent, such as
children, unattended in the vehicle.■
Improper use of the power sockets and the electrical accessories can
cause fires, burns and other serious injuries.
CAUTION
■ The sockets can only be used for the connection of approved electrical ac-
cessories with a total power consumption of up to 120 watts, otherwise the
electrical system of the vehicle may be damaged.■
Connecting appliances when the engine is not running will drain the battery
of the vehicle!
■
Switch off the devices connected to the power sockets before you switch
the ignition on or off and before starting the engine, to avoid damage from
voltage fluctuations.
Waste container
Fig. 93
Waste container: inserting and moving/opening
93Transporting and practical equipment
Page 100 of 268
CAUTION■The power socket can only be used for connecting approved electrical acces-
sories with a two-pin 230V plug, with a total power uptake of up to 150 watt.■
Place the connector on the electrical device into the power socket as far as it
can go to create a connection between the contacts.
■
If the connector of the electrical device is not inserted fully into the power
socket, the child safety lock might release, and the power socket be activated.
The electrical device is still not supplied with power.
■
The socket is temporarily disabled at engine start-up and the indicator light
flashes red. After starting the engine, the power socket is re-activated auto-
matically.
■
Do not connect any lamps with neon filaments to the power socket - risk of
damaging the lamp.
■
A larger current surge may arise in some power supplies (e.g. for notebooks)
when connecting them to the power socket- this will automatically deactivate
the power socket. In this case, disconnect the power supply from the consum-
er and connect the power supply to the power socket first, followed by the
consumer.
■
The connected appliances may behave differently to when connected to the
mains.
Removable through-loading bag
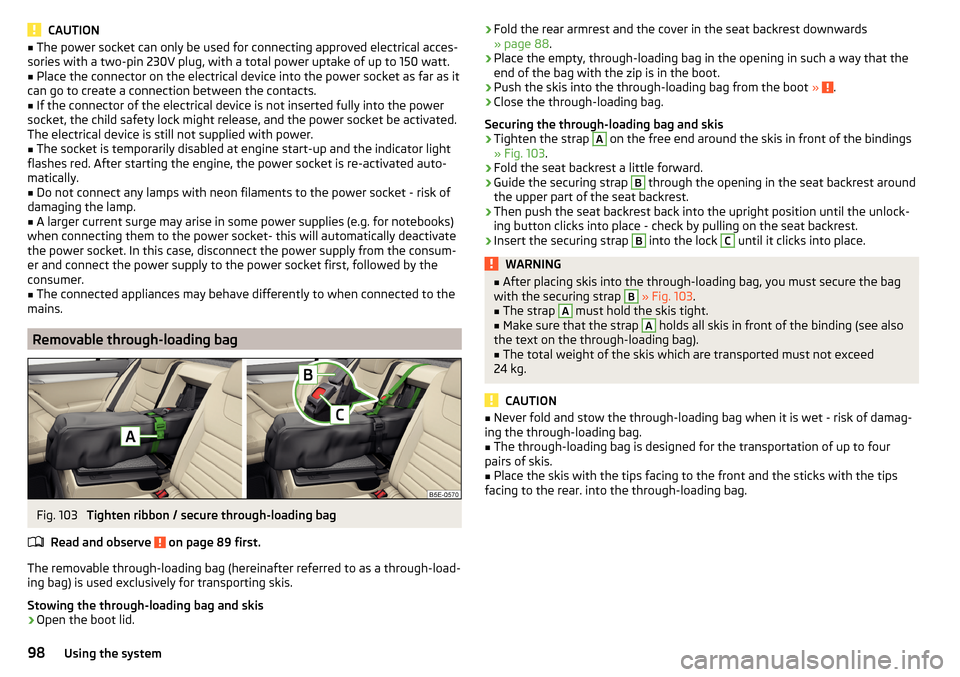
Fig. 103
Tighten ribbon / secure through-loading bag
Read and observe
on page 89 first.
The removable through-loading bag (hereinafter referred to as a through-load-
ing bag) is used exclusively for transporting skis.
Stowing the through-loading bag and skis
›
Open the boot lid.
› Fold the rear armrest and the cover in the seat backrest downwards
» page 88 .›
Place the empty, through-loading bag in the opening in such a way that the
end of the bag with the zip is in the boot.
›
Push the skis into the through-loading bag from the boot » .
›
Close the through-loading bag.
Securing the through-loading bag and skis
›
Tighten the strap
A
on the free end around the skis in front of the bindings
» Fig. 103 .
›
Fold the seat backrest a little forward.
›
Guide the securing strap
B
through the opening in the seat backrest around
the upper part of the seat backrest.
›
Then push the seat backrest back into the upright position until the unlock-
ing button clicks into place - check by pulling on the seat backrest.
›
Insert the securing strap
B
into the lock
C
until it clicks into place.
WARNING■ After placing skis into the through-loading bag, you must secure the bag
with the securing strap B » Fig. 103 .■
The strap
A
must hold the skis tight.
■
Make sure that the strap
A
holds all skis in front of the binding (see also
the text on the through-loading bag).
■
The total weight of the skis which are transported must not exceed
24 kg.
CAUTION
■ Never fold and stow the through-loading bag when it is wet - risk of damag-
ing the through-loading bag.■
The through-loading bag is designed for the transportation of up to four
pairs of skis.
■
Place the skis with the tips facing to the front and the sticks with the tips
facing to the rear. into the through-loading bag.
98Using the system
Page 114 of 268
Roof loadRead and observe
and on page 110 first.
Do not exceed the permissible roof load of 75 kg, this includes the carrier sys-
tem.
The full permissible roof load cannot be used if a roof rack system with a lower
load carrying capacity is used. The maximum capacity of the carrier system
should never be exceeded.
Heating and ventilation
Heating, manual air conditioning system, Climatronic
Introduction
This chapter contains information on the following subjects:
Heating and manual air conditioning
113
Climatronic (automatic air conditioning)
114
Climatronic - automatic operation
115
Air distribution control
115
Air outlet vents
116
The heating and air conditioning ventilate and heat the vehicle interior. The air
conditioning system also cools and dehumidifies the vehicle interior.
The heating effect is dependent upon the coolant temperature, thus full heat
output only occurs when the engine has reached its operating temperature.
The cooling system operates only if the following conditions are met. The cooling system is switched on.
The engine is running.
The outside temperature is above approx. +2 °C.
The blower is switched on.
If the cooling system is switched on, the temperature and air humidity drops in the vehicle. The cooling system prevents the windows from misting up during
the cold season of the year.
It is possible to briefly activate recirculated air mode to enhance the cooling
effect » page 115 .
Health protection
To reduce health risks (e.g. common colds), the following instructions for the
use of the cooling system are to be observed. ▶ The difference between the indoor temperature and the outdoor air temper-
ature should not be greater than about 5 ° C.
▶ The cooling system is to be turned off about 10 minutes before the end of
the journey.
▶ Once a year, disinfection of the manual air conditioner or the Climatronic is to
be carried out by a specialist company.
112Using the system
Page 115 of 268
WARNING■For your own safety and that of other road users, ensure that all the win-
dows are free of ice, snow and misting. The blower should always be on to
prevent the windows from misting up.■
Under certain circumstances, air at a temperature of about 5 °C can flow
out of the vents when the cooling system is switched on.
CAUTION
■ The air inlet in front of the windscreen must be free of e.g. ice, snow or
leaves to ensure that the heating and cooling system operates properly.■
After switching on the cooling Condensation from the evaporator of the air
conditioning may drip down and form a puddle below the vehicle. This is not a
leak!
■
If the coolant temperature is too high, the cooling system is switched off to
ensure that the engine cools down.
Heating and manual air conditioning
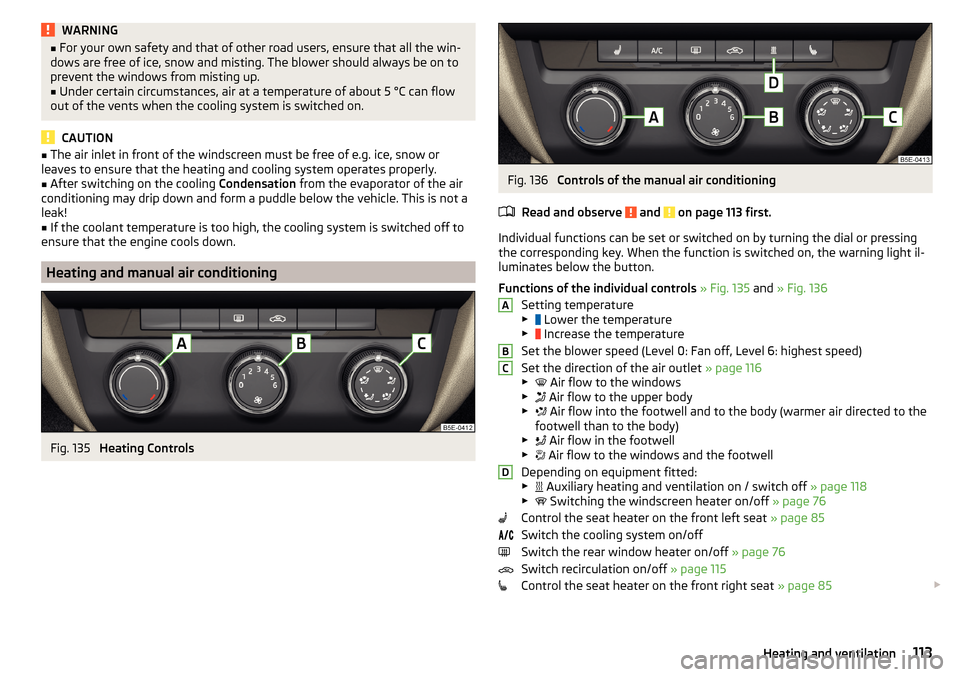
Fig. 135
Heating Controls
Fig. 136
Controls of the manual air conditioning
Read and observe
and on page 113 first.
Individual functions can be set or switched on by turning the dial or pressing
the corresponding key. When the function is switched on, the warning light il-
luminates below the button.
Functions of the individual controls » Fig. 135 and » Fig. 136
Setting temperature
▶ Lower the temperature
▶ Increase the temperature
Set the blower speed (Level 0: Fan off, Level 6: highest speed)
Set the direction of the air outlet » page 116
▶ Air flow to the windows
▶ Air flow to the upper body
▶ Air flow into the footwell and to the body (warmer air directed to the
footwell than to the body)
▶ Air flow in the footwell
▶ Air flow to the windows and the footwell
Depending on equipment fitted:
▶ Auxiliary heating and ventilation on / switch off
» page 118
▶ Switching the windscreen heater on/off
» page 76
Control the seat heater on the front left seat » page 85
Switch the cooling system on/off
Switch the rear window heater on/off » page 76
Switch recirculation on/off » page 115
Control the seat heater on the front right seat » page 85
ABCD113Heating and ventilation
Page 116 of 268
Information on the cooling system
The cooling system operates only if the following conditions are met
» page 112 .
The warning light below the button
» Fig. 136 illuminates after activation,
even if not all of the conditions for the function of the cooling system have
been met. The lighting up of the indicator light in the button signals the opera-
tional readiness of the cooling system.
When the air distribution control is turned to position
the cooling system is
activated.
Note
During operation of the manual air conditioning, an increase in engine idle
speed may occur under certain circumstances in order to ensure sufficient
heating comfort.
Climatronic (automatic air conditioning)
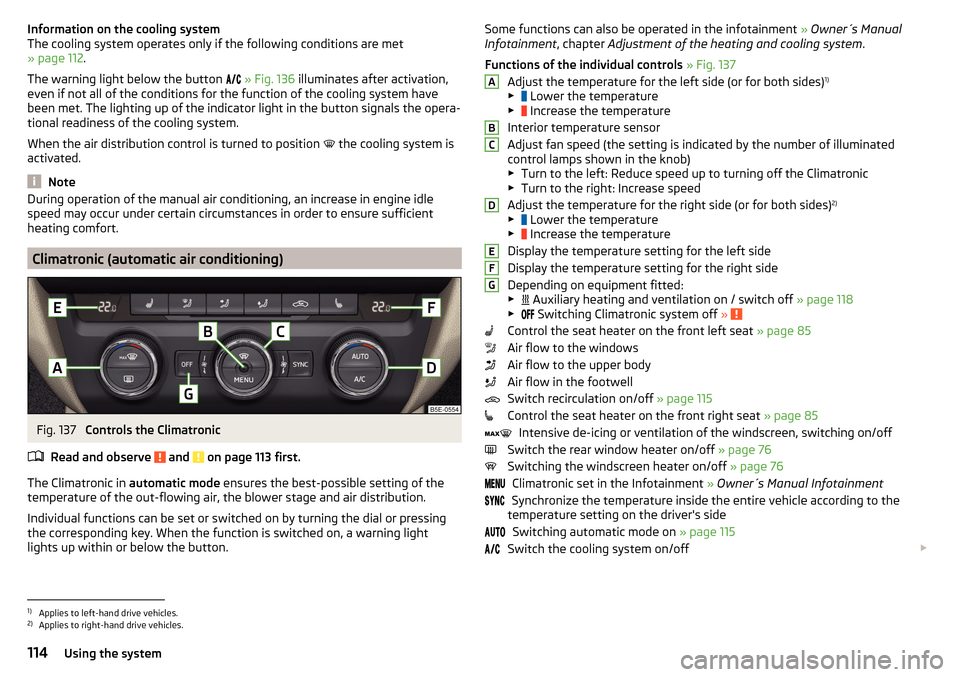
Fig. 137
Controls the Climatronic
Read and observe
and on page 113 first.
The Climatronic in automatic mode ensures the best-possible setting of the
temperature of the out-flowing air, the blower stage and air distribution.
Individual functions can be set or switched on by turning the dial or pressing
the corresponding key. When the function is switched on, a warning light
lights up within or below the button.
Some functions can also be operated in the infotainment » Owner´s Manual
Infotainment , chapter Adjustment of the heating and cooling system .
Functions of the individual controls » Fig. 137
Adjust the temperature for the left side (or for both sides) 1)
▶ Lower the temperature
▶ Increase the temperature
Interior temperature sensor
Adjust fan speed (the setting is indicated by the number of illuminated
control lamps shown in the knob) ▶ Turn to the left: Reduce speed up to turning off the Climatronic
▶ Turn to the right: Increase speed
Adjust the temperature for the right side (or for both sides) 2)
▶ Lower the temperature
▶ Increase the temperature
Display the temperature setting for the left side
Display the temperature setting for the right side
Depending on equipment fitted:
▶ Auxiliary heating and ventilation on / switch off
» page 118
▶ Switching Climatronic system off
»
Control the seat heater on the front left seat » page 85
Air flow to the windows
Air flow to the upper body
Air flow in the footwell
Switch recirculation on/off » page 115
Control the seat heater on the front right seat » page 85
Intensive de-icing or ventilation of the windscreen, switching on/off
Switch the rear window heater on/off » page 76
Switching the windscreen heater on/off » page 76
Climatronic set in the Infotainment » Owner´s Manual Infotainment
Synchronize the temperature inside the entire vehicle according to the
temperature setting on the driver's side
Switching automatic mode on » page 115
Switch the cooling system on/off
ABCDEFG1)
Applies to left-hand drive vehicles.
2)
Applies to right-hand drive vehicles.
114Using the system
Page 117 of 268
Setting temperature
The temperature can be adjusted on the Climatronic control unit or in the Info-
tainment » Owner´s Manual Infotainment , chapter Setting the heating and the
cooling system .
The temperature can be set between +16 °C and +29.5 °C. The temperature is
regulated automatically within this range.
Illuminates in the temperature display
then the Climatronic works with max-
imum cooling (temperature setting below +16 °C).
Illuminates in the temperature display
then the Climatronic works with maxi-
mum heating (temperature setting above +29.5 °C).
There is no automatic temperature control in the two end positions.WARNING■ Do not switch off the Climatronic system for longer than necessary.■Switch on the Climatronic system as soon as the windows mist up.
CAUTION
Do not cover the interior temperature sensor B » Fig. 137 as this could impair
the functioning of the Climatronic.
Note
■ During operation of the Climatronic, an increase in engine idle speed can oc-
cur under certain circumstances in order to ensure adequate heating comfort.■
When
is switched on, the air flow to the windows
is switched on. The
air flow to the windows will remain switched on after turning
off.
■
Holding the button
will turn on
automatically.
Climatronic - automatic operation
Read and observe
and on page 113 first.
The automatic mode is used in order to maintain a constant temperature and
to demist the windows in the interior of the car.
Automatic mode can be switched off by pressing one of the buttons for the air
distribution or by increasing/decreasing the blower speed. The temperature
regulation is continued.
Operating modes
Automatic mode works in three modes - moderate, medium, and intensive.
Setting the individual operating modes » Owner´s Manual Infotainment , chap-
ter Setting the heating and the cooling system .
After the automatic mode is switched on, Climatronic works in the last selec-
ted mode.
The currently selected mode is displayed in the Infotainment display.
Note
Climatronic is set to the medium setting at the factory.
Air distribution control
Read and observe
and on page 113 first.
The recirculation mode prevents contaminated outside air getting into the In-
terior of the vehicle.
In recirculated air mode air is sucked out of the interior of the vehicle and then
fed back into the interior.
Switching on/off
›
Press the button.
When the recirculation mode is activated, the warning light below the button
lights up.
Heating and manual air conditioning system
If the air distribution control is set to position when the recirculation modes
is switched on, the recirculated-air mode is switched off. Recirculated air mode
can be switched on again from this setting by repeatedly pressing the symbol
button .
When the is switched on and the temperature regulator is turned to the
left, the recirculated-air mode is switched on.
Climatronic
Climatronic may have an air quality sensor for the detection of the pollutant
concentration in the sucked-in air.
If a considerable increase in concentration of pollutants is recognised by the
air quality sensor, the recirculated air mode will be switched on automatically.
When the pollutant concentration decreases to the normal level, the recircula-
ted air mode is automatically switched off.
115Heating and ventilation