SKODA OCTAVIA 2016 3.G / (5E) Columbus Amundsen Bolero Infotainment System Navigation Manual
Manufacturer: SKODA, Model Year: 2016, Model line: OCTAVIA, Model: SKODA OCTAVIA 2016 3.G / (5E)Pages: 100, PDF Size: 12.8 MB
Page 41 of 100
Phone
Introductory information
Introduction to the subject
This chapter deals with the operation of a device with the telephone connec- ted via Bluetooth ®
as well as the use of the SIM-card in the external module.
Depending on the Bluetooth ®
-profile used it is possible to connect to a tele-
phone or two phones simultaneously to the device.
The SIM card in the external module can be used for data and telephone serv-
ices (applies to Columbus).
If telephones are connected to the device with multiple SIM cards, then calls
can be accepted by all SIM cards of the connected telephones.
For outgoing calls, it depends on the type of connected telephone, either only
the primary SIM card or one of the other SIM cards can be selected.
The device makes it possible to choose if you want to work with text messag-
es on the main phone (if supported by phone), or work with text messages in-
serted in the external module.
If the device to is connected to an external device via Apple CarPlay ™
, then the
use of the Bluetooth ®
Connection is not possible and the phone menu is not
available. A possible data connection via the SIM card remains operational
» page 53 .
If the device is connected to an external device via Android Auto ™
then the
connected phones and the Bluetooth ®
player are automatically disconnected
by connecting to external device and it connects to the device via Bluetooth ®
.
Connecting an additional telephone and the use of telephone services on the
SIM card via Android Auto ™
is not possible over the duration of the connection.
If the Bluetooth ®
Feature was not turned on in external device to be connec-
ted, it will be automatically switched on usingAndroid Auto ™
switched when
setting up the connection. A possible data connection via the SIM card remains
operational » page 53.
Phonebox
The storage compartment in the front centre console can be equipped with
the Phonebox function » Owner's Manual .
If a telephone is directed, with its rear side downwards, on the pad in the stor-
age compartment, the phone signal is amplified by the roof antenna.
Telephones that support the Qi standard for wireless charging, can also be charged wirelessly in the storage compartment.WARNINGThe general binding country-specific regulations for operating mobile
phones in the vehicle must be observed.WARNINGWhile wireless charging is taking place, no objects may be between the pad
and the telephone being charged.■
Metal objects can become hot due to the action of the induction field -
There is a risk of injury. If there is a metal object in the storage compart-
ment that has become hot, then take out the telephone and let the object
cool in the storage compartment!
CAUTION
While wireless charging is taking place, there may be noobjects between the
pad and the telephone being charged - thePhoneboxFunction could be im-
paired.■
With cards with a magnetic strip or chip, SD card, USB flash drives and similar
devices, there is a risk of data loss and damage to the disk.
■
Metal objects can become hot due to the action of the induction field - there
is a risk of damage to the telephone.
Note
■ At the start of the wireless charging, the appropriate message appears on
the device screen.■
For optimum telephone signal strength and uninterrupted wireless charging,
we recommend placing the phone in the storage compartment without the
protective sleeve, if possible.
■
It is normal for the telephone to heat up during the wireless charging.
39Phone
Page 42 of 100
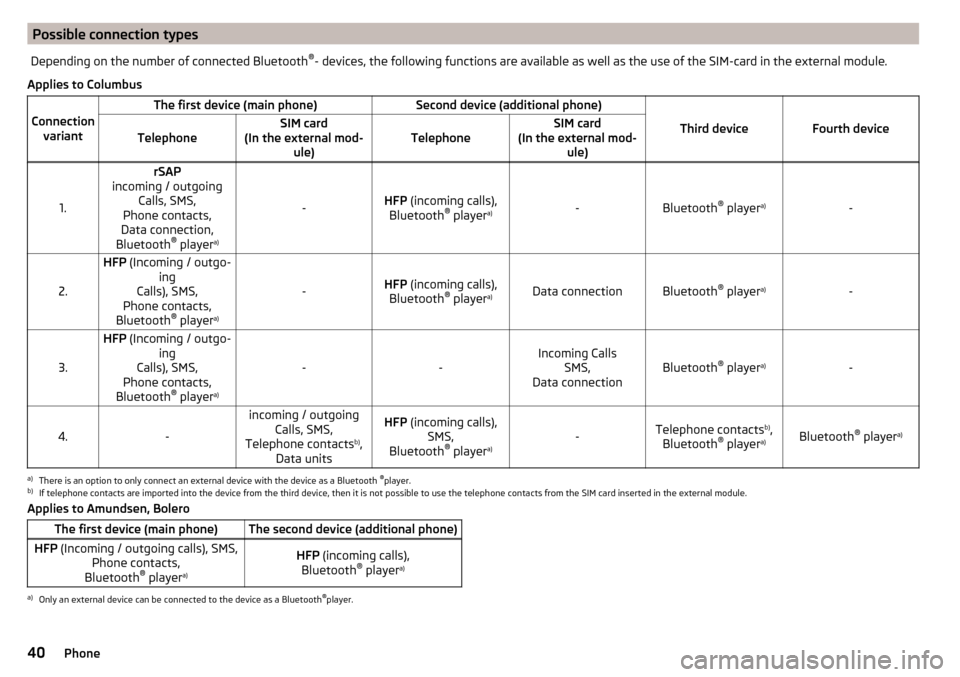
Possible connection typesDepending on the number of connected Bluetooth®
- devices, the following functions are available as well as the use of the SIM-card in the external module.
Applies to Columbus
Connection
variant
The first device (main phone)Second device (additional phone)
Third deviceFourth deviceTelephoneSIM card
(In the external mod- ule)TelephoneSIM card
(In the external mod- ule)
1.
rSAP
incoming / outgoing Calls, SMS,
Phone contacts,
Data connection,
Bluetooth ®
player a)
-HFP
(incoming calls),
Bluetooth ®
player a)-Bluetooth
®
player a)-2.
HFP
(Incoming / outgo-
ing
Calls), SMS,
Phone contacts,
Bluetooth ®
player a)
-HFP
(incoming calls),
Bluetooth ®
player a)Data connectionBluetooth ®
player a)-3.
HFP
(Incoming / outgo-
ing
Calls), SMS,
Phone contacts,
Bluetooth ®
player a)
--Incoming Calls
SMS,
Data connectionBluetooth ®
player a)-4.-
incoming / outgoing
Calls, SMS,
Telephone contacts b)
,
Data unitsHFP (incoming calls),
SMS,
Bluetooth ®
player a)-Telephone contacts b)
,
Bluetooth ®
player a)Bluetooth ®
player a)
a)
There is an option to only connect an external device with the device as a Bluetooth
®
player.
b)
If telephone contacts are imported into the device from the third device, then it is not possible to use the telephone contacts from the SIM card inserted in the external module.
Applies to Amundsen, BoleroThe first device (main phone)The second device (additional phone)HFP (Incoming / outgoing calls), SMS,
Phone contacts,
Bluetooth ®
player a)HFP
(incoming calls),
Bluetooth ®
player a)a)
Only an external device can be connected to the device as a Bluetooth
®
player.
40Phone
Page 43 of 100
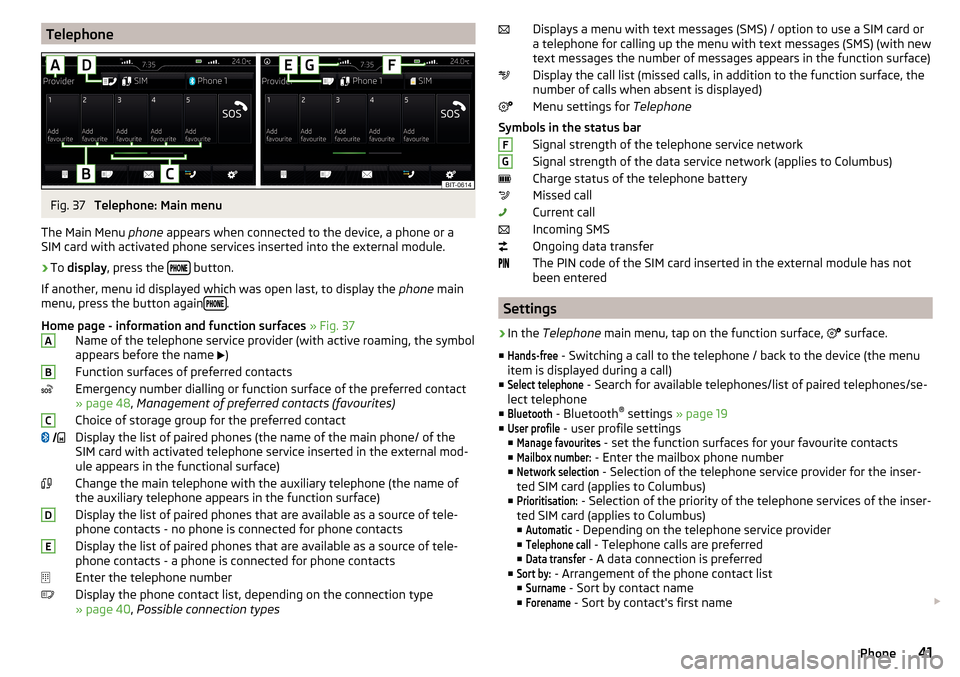
TelephoneFig. 37
Telephone: Main menu
The Main Menu phone appears when connected to the device, a phone or a
SIM card with activated phone services inserted into the external module.
›
To display , press the button.
If another, menu id displayed which was open last, to display the phone main
menu, press the button again
.
Home page - information and function surfaces » Fig. 37
Name of the telephone service provider (with active roaming, the symbol
appears before the name )
Function surfaces of preferred contacts
Emergency number dialling or function surface of the preferred contact
» page 48 , Management of preferred contacts (favourites)
Choice of storage group for the preferred contact
Display the list of paired phones (the name of the main phone/ of the
SIM card with activated telephone service inserted in the external mod-
ule appears in the functional surface)
Change the main telephone with the auxiliary telephone (the name of
the auxiliary telephone appears in the function surface)
Display the list of paired phones that are available as a source of tele-
phone contacts - no phone is connected for phone contacts
Display the list of paired phones that are available as a source of tele- phone contacts - a phone is connected for phone contacts
Enter the telephone number
Display the phone contact list, depending on the connection type
» page 40 , Possible connection types
ABC DEDisplays a menu with text messages (SMS) / option to use a SIM card or
a telephone for calling up the menu with text messages (SMS) (with new
text messages the number of messages appears in the function surface)
Display the call list (missed calls, in addition to the function surface, the
number of calls when absent is displayed)
Menu settings for Telephone
Symbols in the status bar Signal strength of the telephone service network
Signal strength of the data service network (applies to Columbus)
Charge status of the telephone battery
Missed call
Current call
Incoming SMS
Ongoing data transfer
The PIN code of the SIM card inserted in the external module has not
been entered
Settings
›
In the Telephone main menu, tap on the function surface,
surface.
■
Hands-free
- Switching a call to the telephone / back to the device (the menu
item is displayed during a call)
■
Select telephone
- Search for available telephones/list of paired telephones/se-
lect telephone
■
Bluetooth
- Bluetooth ®
settings » page 19
■
User profile
- user profile settings
■
Manage favourites
- set the function surfaces for your favourite contacts
■
Mailbox number:
- Enter the mailbox phone number
■
Network selection
- Selection of the telephone service provider for the inser-
ted SIM card (applies to Columbus)
■
Prioritisation:
- Selection of the priority of the telephone services of the inser-
ted SIM card (applies to Columbus)
■
Automatic
- Depending on the telephone service provider
■
Telephone call
- Telephone calls are preferred
■
Data transfer
- A data connection is preferred
■
Sort by:
- Arrangement of the phone contact list
■
Surname
- Sort by contact name
■
Forename
- Sort by contact's first name
FG41Phone
Page 44 of 100
■Profile Name: - Rename the profile of the SIM card inserted in the external
module
■Import contacts:
- Import phone contacts
■
Select device contacts
- Open the paired telephones menu (if the SIM card is in-
serted in the external module) (applies to Columbus)
■
Select ring tone
- Selecting the ring tone
■
Reminder: Remember your mobile
- Turn on/off the warning mode before forget-
ting the phone in the vehicle (if the phone was connected to the device)
■
Show pictures for contacts
- Switch on/off the display of the image assigned to
the contact
■
Conference
- Activates/deactivates conference calls
■
Call settings
- Setting the phone features of the inserted in the external mod-
ule SIM card during a call (applies to Columbus) ■
Hold call
Switch on/off the display of the option for answering an incoming
call during a call, determining the current divert setting
■
On
- Turn on the display
■
Off
- Turn off the display
■
Request status
- Checking the settings of the SIM card function
■
Send own number
- Setting the phone number display on the call recipient
■
On
- Turn on the display
■
Off
- Turn off the display
■
Network dependent
- Telephone service provider dependent display
■
Request status
- Checking the settings of the SIM card function
■
Clear calls
- Deleting the selected type of called carried out using the SIM card
inserted in the external module (applies to Columbus)
■
All
- Delete all calls
■
Missed calls
- Delete list of missed calls
■
Dialled numbers
- Deletion of outgoing calls
■
Received calls
- list of received calls
■
SMS settings
- Adjustment of text messages of the SIM card inserted in the ex-
ternal module (applies to Columbus)
■
Standard account
- Setting for the use of text messages on the SIM card or the
connected telephone
■
No standard account
- Without priority (selection of the SIM card or the con-
nected telephone required)
■
SIM
- A list of text messages on the SIM card
■
MAP
- A list of text messages of the connected telephone
■
Service centre number:
- Setting the number of SMS services of the telephone
service provider
■
Store sent text messages
- Enable / disable the storage of the text message on
the SIM card
■Period of validity- Adjustment of the period in which the telephone service
provider will try to send the text message (for example, when power is off.)
■Delete text messages
- Delete the text message stored on the SIM card
■
All
- Delete all text messages
■
Inbox
- Delete the text messages received
■
Outbox
- Delete draft text messages
■
Sent
- Delete sent text messages
■
Phone Interface “Business”
- Turn on / off the phone function of the external
module (applies to Columbus)
■
Use SIM card only for data connection
- Switch on - activation of only data services /
Switch off - Activation of data and voice services of the inserted SIM card
(applies to Columbus)
■
network
- Setting the telephone service provider network of the SIM card in-
serted in the external module (applies to Columbus) » page 19
■
settings PIN
- Setting the PIN code of the SIM card inserted in the external
module (applies to Columbus) ■
Automatic PIN entry
- Enable / disable the storage of the PIN code of the SIM
card
■
Change PIN
- Change the PIN code of the SIM card
■
Add PIN 2
- Enter the second PIN code of the SIM card (when the function
Automatic PIN entry
is on or when the SIM card supports another telephone
service provider)
■
Forward calls
- Setting the forwarding of incoming calls (applies to Columbus)
■
All calls
- Forward all incoming calls
■
If engaged
- Forwarding incoming calls during a telephone conversation
■
If not available
- Forwarding the incoming calls when the vehicle is outside
the reach of the telephone service provider signal
■
If no answer
- Redirecting incoming calls when the incoming call is not an-
swered
Pair and connect
Introduction to the subject
The range of the connection to the hands-free system is limited to the passen-
ger compartment.
To connect a telephone with the device, the two devices must be paired via
Bluetooth ®
.
The pairing procedure is dependent on the number of telephones already con-
nected, whether using the SIM card inserted in the external module or via the
telephone using the rSAP profile » page 40, Possible connection types .
42Phone
Page 45 of 100
Up to 20 external devices can be paired with the device. After reaching the
maximum number, the pairing of the next external device will replace that of
the device that has not been used for the longest period of time.
A connection with a telephone that is already paired does not require coupling. It is enough to find the telephone that has been coupled in the list of coupled
phones and make the connection.WARNINGPair and connect a telephone to the device only when the vehicle is at a
standstill - there is risk of accident!
conditions for coupling
Fig. 38
QR code with reference to the
ŠKODA websites
The telephone can be coupled with the device under the following conditions.
The ignition is switched on.
The Bluetooth ®
function of the device and the telephone is switched on.
The visibility of the device and the telephone is switched on.
The telephone is within range of the Bluetooth ®
signal of the device.
The telephone is compatible with the device.
There is no external device connected to the device using Apple CarPlay ™
.
The pairing can be initiated from the device or from the telephone.
During the pairing and connection process, information messages are dis-
played in the device screen and the telephone screen. These messages must
be observed and if necessary confirmed (e.g. enabling the contact import or
connecting the Bluetooth ®
player etc).
By reading the QR code » Fig. 38 using the associated application in the exter-
nal device (e.g. phone, tablet) or after typing the following address into the
web browser, information about the compatibility of phones and updates are
available for Bluetooth ®
device can be displayed.
http://go.skoda.eu/compatibility
Pairing and connection process
Pair the telephone with the device
›
Search available Bluetooth ®
devices in your telephone.
›
Select the device (name of the device
→
Bluetooth
→
Name:
).
›
Confirm or enter the PIN code to confirm the pairing.
The Telephone is connected to the device or merely paired, depending on the
number of already connected external devices and the use of the SIM card in-
serted in the external module (applies to Columbus).
Pair the device with the telephone
›
If there is no telephone connected to the device, then press the button
then tap the function surface
Find telephone
.
›
or: If a telephone is to the device, then tap the function surface in the phone
main menu
→ Tap
Find telephone
.
›
or: If a SIM card with activated telephone services is connected to the exter-
nal module, then in the main menu phone the functional surface
Tap
→
Findtelephone
.
›
Select the desired telephone from the list of selected external Bluetooth ®
devices.
›
Confirm the PIN code (enter and confirm if necessary to confirm the pairing.
If external Bluetooth ®
devices are already connected to the device, then dur-
ing the pairing and connection process messages and options for the possible
connection type (e.g. replacement of the connected external Bluetooth ®
de-
vice) are displayed.
Possible connection types for phones, for the SIM card in the external module
if necessary » page 40.
43Phone
Page 46 of 100
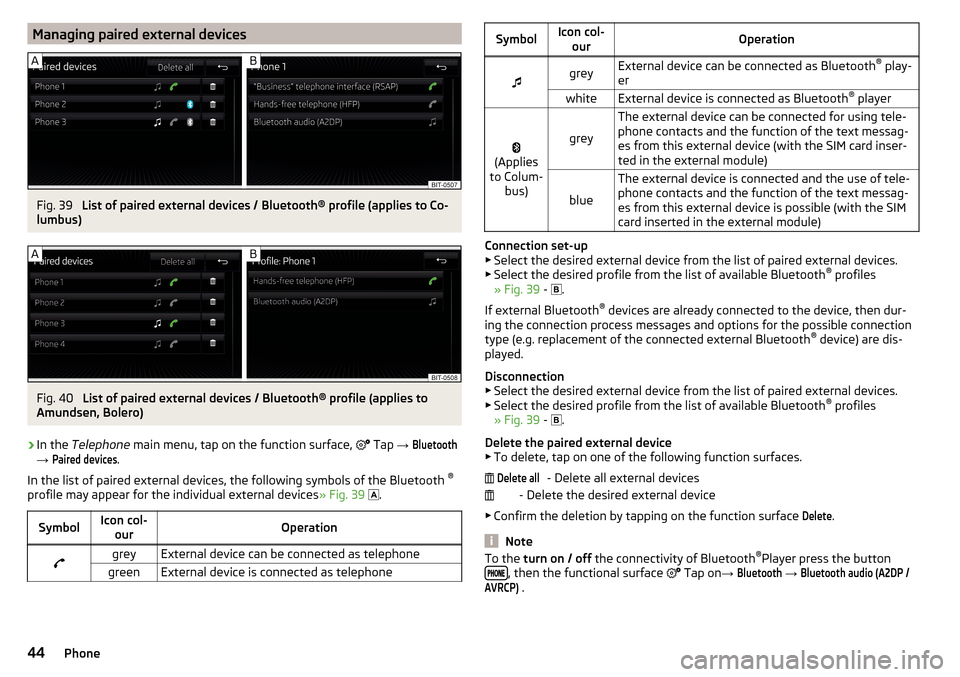
Managing paired external devicesFig. 39
List of paired external devices / Bluetooth® profile (applies to Co-
lumbus)
Fig. 40
List of paired external devices / Bluetooth® profile (applies to
Amundsen, Bolero)
›
In the Telephone main menu, tap on the function surface,
Tap →
Bluetooth
→
Paired devices
.
In the list of paired external devices, the following symbols of the Bluetooth ®
profile may appear for the individual external devices » Fig. 39
.
SymbolIcon col-
ourOperationgreyExternal device can be connected as telephonegreenExternal device is connected as telephoneSymbolIcon col-ourOperationgreyExternal device can be connected as Bluetooth ®
play-
erwhiteExternal device is connected as Bluetooth ®
player
(Applies
to Colum- bus)grey
The external device can be connected for using tele-
phone contacts and the function of the text messag-
es from this external device (with the SIM card inser-
ted in the external module)
blue
The external device is connected and the use of tele-
phone contacts and the function of the text messag-
es from this external device is possible (with the SIM
card inserted in the external module)
Connection set-up ▶ Select the desired external device from the list of paired external devices.
▶ Select the desired profile from the list of available Bluetooth ®
profiles
» Fig. 39 -
.
If external Bluetooth ®
devices are already connected to the device, then dur-
ing the connection process messages and options for the possible connection
type (e.g. replacement of the connected external Bluetooth ®
device) are dis-
played.
Disconnection
▶ Select the desired external device from the list of paired external devices.
▶ Select the desired profile from the list of available Bluetooth ®
profiles
» Fig. 39 -
.
Delete the paired external device ▶ To delete, tap on one of the following function surfaces.
- Delete all external devices
- Delete the desired external device
▶ Confirm the deletion by tapping on the function surface
Delete
.
Note
To the turn on / off the connectivity of Bluetooth ®
Player press the button
, then the functional surface Tap on →
Bluetooth
→
Bluetooth audio (A2DP /AVRCP)
.
Delete all44Phone
Page 47 of 100
Use the SIM card in the external moduleFig. 41
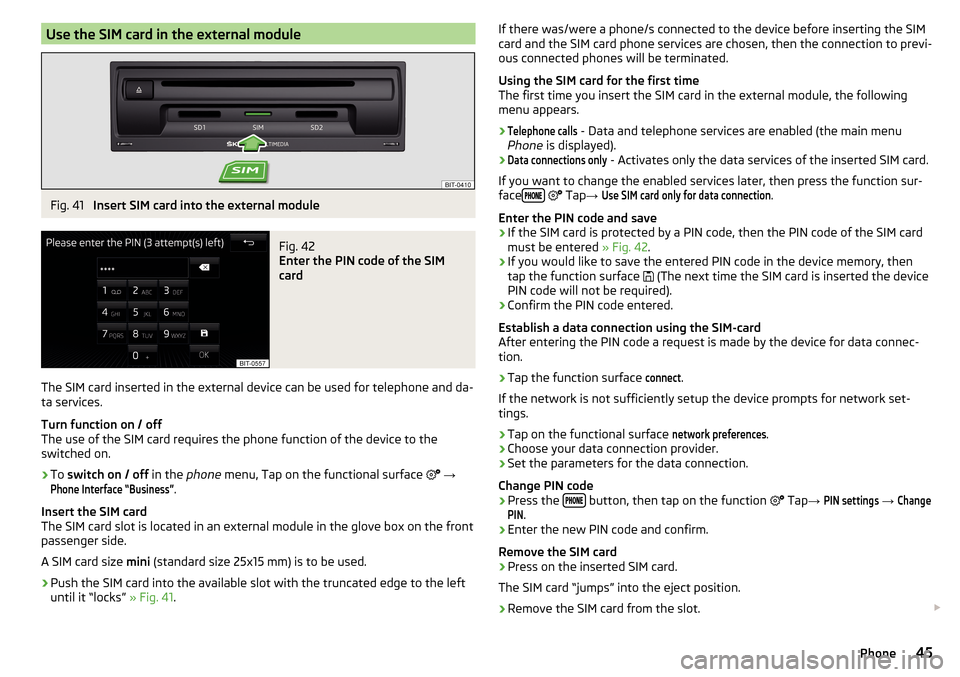
Insert SIM card into the external module
Fig. 42
Enter the PIN code of the SIM
card
The SIM card inserted in the external device can be used for telephone and da-
ta services.
Turn function on / off
The use of the SIM card requires the phone function of the device to the
switched on.
›
To switch on / off in the phone menu, Tap on the functional surface
→
Phone Interface “Business”
.
Insert the SIM card
The SIM card slot is located in an external module in the glove box on the front
passenger side.
A SIM card size mini (standard size 25x15 mm) is to be used.
›
Push the SIM card into the available slot with the truncated edge to the left
until it “locks” » Fig. 41.
If there was/were a phone/s connected to the device before inserting the SIM
card and the SIM card phone services are chosen, then the connection to previ-
ous connected phones will be terminated.
Using the SIM card for the first time
The first time you insert the SIM card in the external module, the following
menu appears.›Telephone calls
- Data and telephone services are enabled (the main menu
Phone is displayed).
›Data connections only
- Activates only the data services of the inserted SIM card.
If you want to change the enabled services later, then press the function sur-
face
Tap
→
Use SIM card only for data connection
.
Enter the PIN code and save
›
If the SIM card is protected by a PIN code, then the PIN code of the SIM card
must be entered » Fig. 42.
›
If you would like to save the entered PIN code in the device memory, then
tap the function surface (The next time the SIM card is inserted the device
PIN code will not be required).
›
Confirm the PIN code entered.
Establish a data connection using the SIM-card
After entering the PIN code a request is made by the device for data connec-
tion.
›
Tap the function surface
connect
.
If the network is not sufficiently setup the device prompts for network set-
tings.
›
Tap on the functional surface
network preferences
.
›
Choose your data connection provider.
›
Set the parameters for the data connection.
Change PIN code
›
Press the button, then tap on the function
Tap
→
PIN settings
→
ChangePIN
.
›
Enter the new PIN code and confirm.
Remove the SIM card
›
Press on the inserted SIM card.
The SIM card “jumps” into the eject position.
›
Remove the SIM card from the slot.
45Phone
Page 48 of 100
CAUTION■When inserting an improperly sized SIM card, there is a risk of damaging the
device.■
Avoid using an adapter for the SIM card as the SIM card may fall out while
driving due to vehicle vibrations - There is a risk of damage to the external
module.
■
If you let the SIM card protrude out from the slot, then it may fall out of the
slot while driving due to vehicle vibrations.
rSAP
The Bluetooth ®
profile RSAP (remote transfer of SIM data) enables the use of
data services of the connected phone (if this profile is supported by the phone
and data services are enabled in this phone) » page 53.
Turn function on / off
The use of Bluetooth ®
-profile RSAP requires the phone function of the device
to be switched on.
›
To Power on / off in the menu Telephone tap on the functional surface
→
Phone Interface “Business”
.
The pairing and connection process is carried out in the same way to the Blue-
tooth ®
-profile HFP » page 42.
If the rSAP profile supported by the phone to be connected, the device will at-
tempt to connect using this profile. Depending on the phone, it is possible to
ban or release the connection using the rSAP profile in the phone.
If there is a SIM card with enabled telephone services in the external module, then it is not possible to connect the telephone to the device using the rSAP
profile.
Telephone functions
Enter telephone number and select
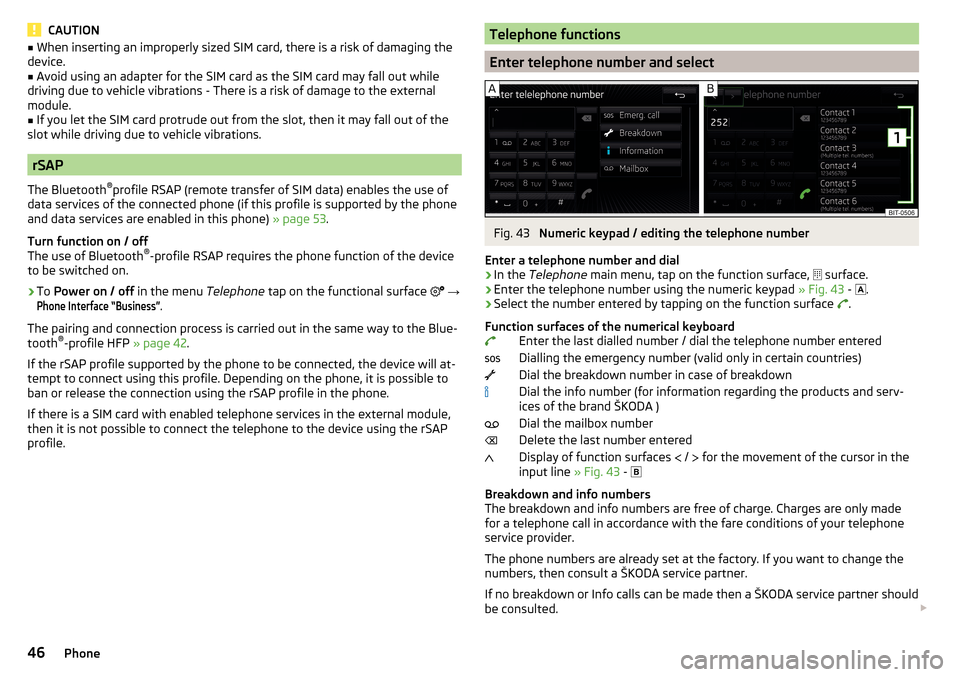
Fig. 43
Numeric keypad / editing the telephone number
Enter a telephone number and dial
›
In the Telephone main menu, tap on the function surface,
surface.
›
Enter the telephone number using the numeric keypad
» Fig. 43 -
.
›
Select the number entered by tapping on the function surface
.
Function surfaces of the numerical keyboard Enter the last dialled number / dial the telephone number entered
Dialling the emergency number (valid only in certain countries)
Dial the breakdown number in case of breakdown
Dial the info number (for information regarding the products and serv-
ices of the brand ŠKODA )
Dial the mailbox number
Delete the last number entered
Display of function surfaces /
for the movement of the cursor in the
input line » Fig. 43 -
Breakdown and info numbers
The breakdown and info numbers are free of charge. Charges are only made
for a telephone call in accordance with the fare conditions of your telephone
service provider.
The phone numbers are already set at the factory. If you want to change the
numbers, then consult a ŠKODA service partner.
If no breakdown or Info calls can be made then a ŠKODA service partner should
be consulted.
46Phone
Page 49 of 100
Search for a contact using the numeric keypad
The numeric keypad can also be used for a contact search.
For example, if you enter 32, the unit will display contacts with the letter se-
quence DA, FA, EB, etc. next to the numerical keypad in areas 1
» Fig. 43 .
Voice mailbox
If not import the voicemail number or was not imported or entered, then this
can be entered or changed as follows.
▶ In the Telephone main menu, tap on the function surface,
Tap →
user profile
→
voicemail number:
.
▶ To select the voice mailbox number, tap the functional surface
surface.
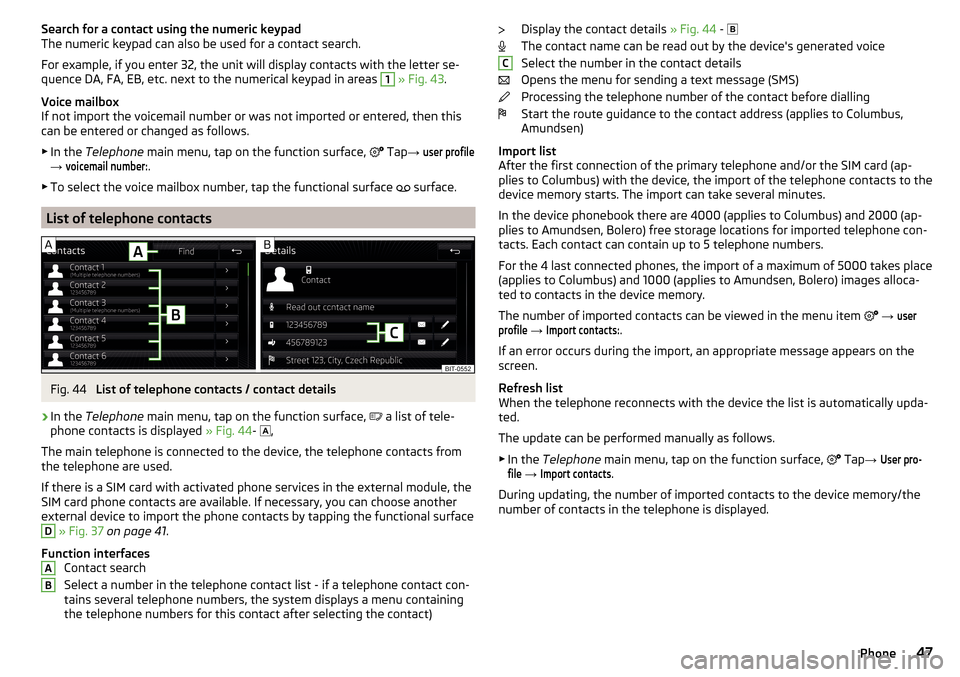
List of telephone contacts
Fig. 44
List of telephone contacts / contact details
›
In the Telephone main menu, tap on the function surface,
a list of tele-
phone contacts is displayed » Fig. 44-
,
The main telephone is connected to the device, the telephone contacts from
the telephone are used.
If there is a SIM card with activated phone services in the external module, the
SIM card phone contacts are available. If necessary, you can choose another
external device to import the phone contacts by tapping the functional surface
D
» Fig. 37 on page 41 .
Function interfaces Contact search
Select a number in the telephone contact list - if a telephone contact con-
tains several telephone numbers, the system displays a menu containing
the telephone numbers for this contact after selecting the contact)
ABDisplay the contact details » Fig. 44 -
The contact name can be read out by the device's generated voice
Select the number in the contact details
Opens the menu for sending a text message (SMS)
Processing the telephone number of the contact before dialling
Start the route guidance to the contact address (applies to Columbus,
Amundsen)
Import list
After the first connection of the primary telephone and/or the SIM card (ap-
plies to Columbus) with the device, the import of the telephone contacts to the
device memory starts. The import can take several minutes.
In the device phonebook there are 4000 (applies to Columbus) and 2000 (ap-
plies to Amundsen, Bolero) free storage locations for imported telephone con-
tacts. Each contact can contain up to 5 telephone numbers.
For the 4 last connected phones, the import of a maximum of 5000 takes place (applies to Columbus) and 1000 (applies to Amundsen, Bolero) images alloca-
ted to contacts in the device memory.
The number of imported contacts can be viewed in the menu item
→ userprofile
→
Import contacts:
.
If an error occurs during the import, an appropriate message appears on the
screen.
Refresh list
When the telephone reconnects with the device the list is automatically upda-
ted.
The update can be performed manually as follows. ▶ In the Telephone main menu, tap on the function surface,
Tap
→
User pro-file
→
Import contacts
.
During updating, the number of imported contacts to the device memory/the
number of contacts in the telephone is displayed.
C47Phone
Page 50 of 100
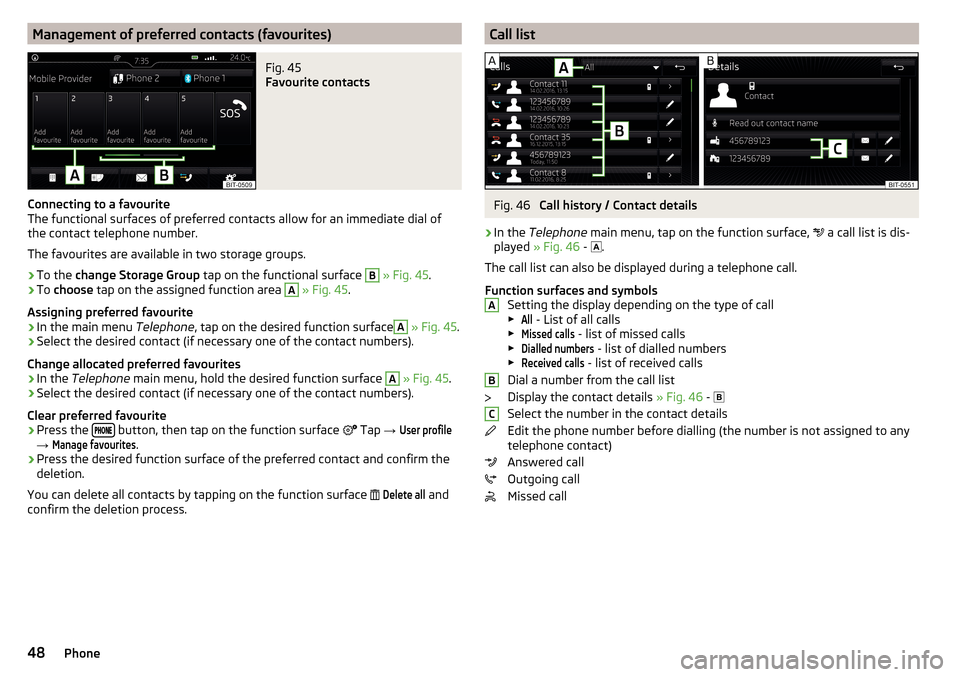
Management of preferred contacts (favourites)Fig. 45
Favourite contacts
Connecting to a favourite
The functional surfaces of preferred contacts allow for an immediate dial of
the contact telephone number.
The favourites are available in two storage groups.
›
To the change Storage Group tap on the functional surface
B
» Fig. 45 .
›
To choose tap on the assigned function area
A
» Fig. 45 .
Assigning preferred favourite
›
In the main menu Telephone, tap on the desired function surface
A
» Fig. 45 .
›
Select the desired contact (if necessary one of the contact numbers).
Change allocated preferred favourites
›
In the Telephone main menu, hold the desired function surface
A
» Fig. 45 .
›
Select the desired contact (if necessary one of the contact numbers).
Clear preferred favourite
›
Press the button, then tap on the function surface
Tap
→
User profile
→
Manage favourites
.
›
Press the desired function surface of the preferred contact and confirm the
deletion.
You can delete all contacts by tapping on the function surface
Delete all
and
confirm the deletion process.
Call listFig. 46
Call history / Contact details
›
In the Telephone main menu, tap on the function surface,
a call list is dis-
played » Fig. 46 -
.
The call list can also be displayed during a telephone call.
Function surfaces and symbols Setting the display depending on the type of call▶
All
- List of all calls
▶
Missed calls
- list of missed calls
▶
Dialled numbers
- list of dialled numbers
▶
Received calls
- list of received calls
Dial a number from the call list
Display the contact details » Fig. 46 -
Select the number in the contact details
Edit the phone number before dialling (the number is not assigned to any
telephone contact)
Answered call
Outgoing call
Missed call
ABC48Phone