coolant SKODA OCTAVIA 2016 3.G / (5E) User Guide
[x] Cancel search | Manufacturer: SKODA, Model Year: 2016, Model line: OCTAVIA, Model: SKODA OCTAVIA 2016 3.G / (5E)Pages: 324, PDF Size: 48.85 MB
Page 242 of 324

General Maintenance
Care and maintenance
Service work, adjustments and technical alterations
Introduction
This chapter contains information on the following subjects:
Vehicle operation in different weather conditions
240
Statutory checks
240
ŠKODA service partner
240
ŠKODA Original parts
241
ŠKODA Original accessories
241
Spoiler
241
Component protection
241
Airbags
241
Acceptance and recycling of used vehicles
242
The instructions and guidelines from ŠKODA AUTO a.s. must be observed when
using accessories or carrying out any modifications, repairs or technical altera-
tions to your vehicle.
Adhering to these instructions and guidelines helps ensure road safety and
helps keep your vehicle in a good technical condition.
WARNING■ Adjustments, repairs and technical changes to the vehicle should only be
carried out by a specialist. Work carried out incorrectly (including work on
the electronic components and their software) can result in malfunctions -
there is a risk of accident and, potentially, increased wear on parts!■
We recommend that you use only ŠKODA Original Accessories and ŠKODA
Original Parts which have been expressly approved for use on your vehicle.
Reliability, safety and suitability for your vehicle are guaranteed with these.
■
Do not use any products which have not been approved by ŠKODA AUTO,
even though these may be products with a type approval or which have
been approved by a nationally recognised testing laboratory.
Vehicle operation in different weather conditions
Read and observe
on page 240 first.
If you would like to operate your vehicle in countries other than those with its
intended weather conditions, please contact a ŠKODA Partner. He or she will
advise you if certain precautions need to be taken to ensure the full function-
ing of the vehicle or to prevent damage (e.g. coolant, changing the battery or
similar).
Statutory checks
Read and observe
on page 240 first.
Many countries have legislation requiring the operational reliability, safety and,
where applicable, roadworthiness and/or exhaust gas properties of a vehicle
to be tested at regular intervals. These tests can be carried out by workshops
or testing stations that have been legally authorized for this purpose.
The ŠKODA Service partners can prepare your vehicle for the official inspec-
tions, so as to ensure that it passes.
Even if you want to take your vehicle to an officially approved test centre for
prior checking in preparation for a legally required test, we recommend that
you consult your ŠKODA Service Partner beforehand.
ŠKODA service partner
Read and observe
on page 240 first.
All ŠKODA service partners work according to the instructions and guidelines
from ŠKODA AUTO a.s. All service and repair work is therefore carried out on
time and at the appropriate quality. Adhering to these instructions and guide-
lines helps ensure road safety and helps keep your vehicle in a good technical
condition.
We therefore advise you to have all modifications, repairs and technical altera-
tions to your vehicle carried out by a ŠKODA Service Partner.
240General Maintenance
Page 255 of 324
WARNINGNever cover the engine with additional insulation material (e.g. with a blan-
ket) – risk of fire!WARNINGWhen working in the engine compartment, the following instructions must
be observed - otherwise risk of injury or fire. The engine compartment of
your car is a hazardous area!WARNINGInstructions before beginning work in the engine compartment■Stop the engine and remove the ignition key, on vehicles with the KESSY
system, open the driver's door.■
Firmly apply the handbrake.
■
For vehicles with manual transmission the lever into the neutral position.
For vehicles with automatic transmission , place the selector lever in the P
position.
■
Allow the engine to cool.
■
Never open the bonnet if you can see steam or coolant flowing out of the
engine compartment – risk of scalding! Wait until the steam or coolant has
stopped escaping.
WARNINGInformation for working in the engine compartment■Keep everyone away from the engine compartment.■
Do not touch any hot engine parts – risk of burns!
■
Never touch the radiator fan. The radiator fan may still turn suddenly
about 10 minutes after switching off the ignition!
■
Do not smoke in the vicinity of the engine and avoid the use of open
flames or sparks.
■
Do not leave any items (e.g. cloths or tools) in the engine compartment.
This presents a fire hazard and the risk of engine damage.
■
Read the information and warning instructions on the fluid containers.
WARNINGInformation for working in the engine compartment with the engine run-
ning■
If it is necessary to work on the engine with the engine running, beware
of rotating engine parts and electrical plants - There is a risk to life!
■
Never touch the electric wiring on the ignition system.
■
Avoid short circuits in the electrical system, particularly on the vehicle's
battery.
CAUTION
Only refill using fluids with the proper specification - There is risk of damage to
the vehicle!
Note
■ Fluids with the proper specifications can be purchased from the ŠKODA Origi-
nal Accessories or from the ŠKODA Genuine Parts ranges.■
We recommend you have the operating fluids replaced by a specialist garage.
Opening and closing the bonnet
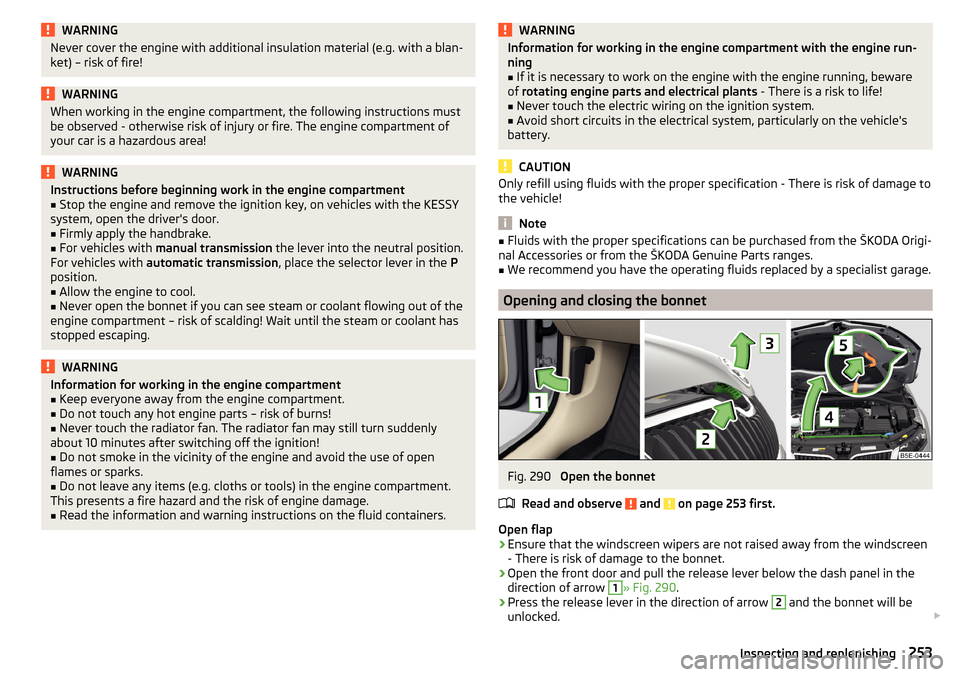
Fig. 290
Open the bonnet
Read and observe
and on page 253 first.
Open flap
›
Ensure that the windscreen wipers are not raised away from the windscreen
- There is risk of damage to the bonnet.
›
Open the front door and pull the release lever below the dash panel in the
direction of arrow
1
» Fig. 290 .
›
Press the release lever in the direction of arrow
2
and the bonnet will be
unlocked.
253Inspecting and replenishing
Page 256 of 324
›Raise the bonnet in the direction of the arrow 3.›Remove the lid prop in the direction of arrow 4 from the holder.›
Secure the open flap inserting the end of the post into the opening in the di-
rection of arrow
5
.
Close the flap
›
Lift the bonnet.
›
Decouple the bonnet support and press into the holder designed to hold it.
›
Drop down the bonnet lid from a height of about 20 cm applying light pres-
sure until it clicks safely into place.
If the bonnet lid is not properly closed, the display of the instrument cluster will show a representation of a vehicle with an open bonnet lid.
WARNING■ Never drive with the bonnet lid not properly closed - risk of accident!■Make sure that when closing the bonnet, no body parts are crushed -
there is danger of injury!
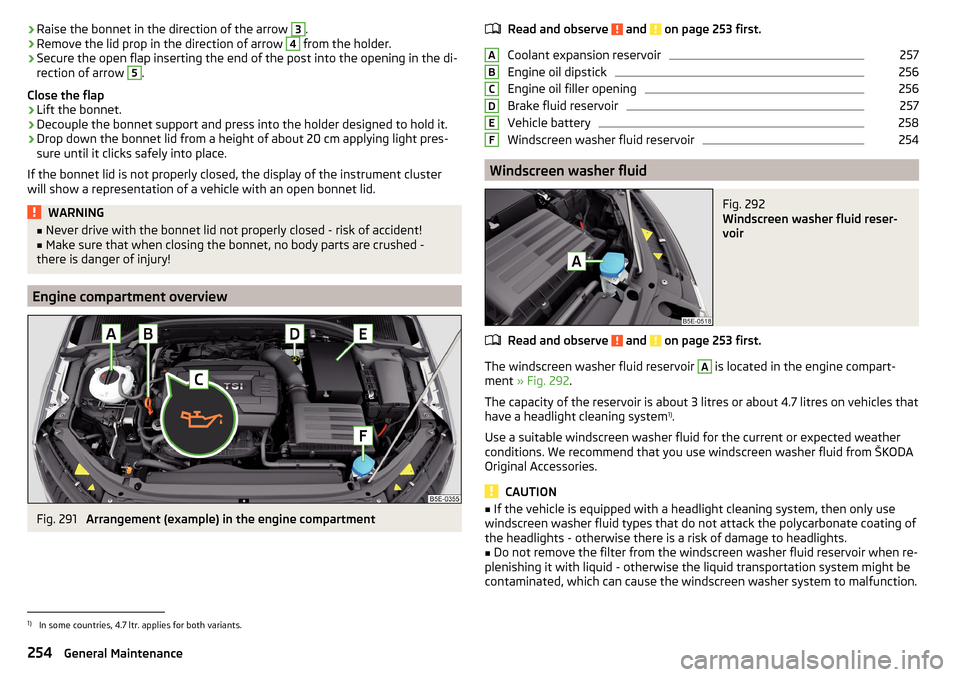
Engine compartment overview
Fig. 291
Arrangement (example) in the engine compartment
Read and observe and on page 253 first.
Coolant expansion reservoir
257
Engine oil dipstick
256
Engine oil filler opening
256
Brake fluid reservoir
257
Vehicle battery
258
Windscreen washer fluid reservoir
254
Windscreen washer fluid
Fig. 292
Windscreen washer fluid reser-
voir
Read and observe and on page 253 first.
The windscreen washer fluid reservoir
A
is located in the engine compart-
ment » Fig. 292 .
The capacity of the reservoir is about 3 litres or about 4.7 litres on vehicles that
have a headlight cleaning system 1)
.
Use a suitable windscreen washer fluid for the current or expected weather
conditions. We recommend that you use windscreen washer fluid from ŠKODA
Original Accessories.
CAUTION
■ If the vehicle is equipped with a headlight cleaning system, then only use
windscreen washer fluid types that do not attack the polycarbonate coating of
the headlights - otherwise there is a risk of damage to headlights.■
Do not remove the filter from the windscreen washer fluid reservoir when re-
plenishing it with liquid - otherwise the liquid transportation system might be
contaminated, which can cause the windscreen washer system to malfunction.
ABCDEF1)
In some countries, 4.7 ltr. applies for both variants.
254General Maintenance
Page 258 of 324
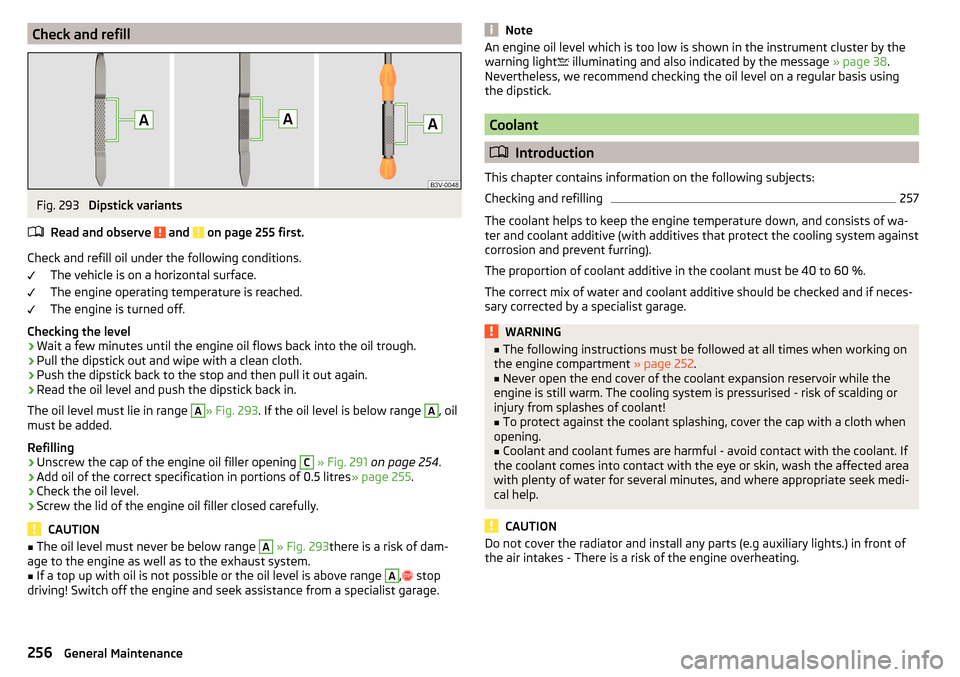
Check and refillFig. 293
Dipstick variants
Read and observe
and on page 255 first.
Check and refill oil under the following conditions. The vehicle is on a horizontal surface.
The engine operating temperature is reached.
The engine is turned off.
Checking the level
›
Wait a few minutes until the engine oil flows back into the oil trough.
›
Pull the dipstick out and wipe with a clean cloth.
›
Push the dipstick back to the stop and then pull it out again.
›
Read the oil level and push the dipstick back in.
The oil level must lie in range
A
» Fig. 293 . If the oil level is below range
A
, oil
must be added.
Refilling
›
Unscrew the cap of the engine oil filler opening
C
» Fig. 291 on page 254 .
›
Add oil of the correct specification in portions of 0.5 litres » page 255.
›
Check the oil level.
›
Screw the lid of the engine oil filler closed carefully.
CAUTION
■
The oil level must never be below range A » Fig. 293 there is a risk of dam-
age to the engine as well as to the exhaust system.■
If a top up with oil is not possible or the oil level is above range
A
,
stop
driving! Switch off the engine and seek assistance from a specialist garage.
NoteAn engine oil level which is too low is shown in the instrument cluster by the
warning light illuminating and also indicated by the message » page 38.
Nevertheless, we recommend checking the oil level on a regular basis using
the dipstick.
Coolant
Introduction
This chapter contains information on the following subjects:
Checking and refilling
257
The coolant helps to keep the engine temperature down, and consists of wa-
ter and coolant additive (with additives that protect the cooling system against
corrosion and prevent furring).
The proportion of coolant additive in the coolant must be 40 to 60 %.
The correct mix of water and coolant additive should be checked and if neces-
sary corrected by a specialist garage.
WARNING■ The following instructions must be followed at all times when working on
the engine compartment » page 252.■
Never open the end cover of the coolant expansion reservoir while the
engine is still warm. The cooling system is pressurised - risk of scalding or
injury from splashes of coolant!
■
To protect against the coolant splashing, cover the cap with a cloth when
opening.
■
Coolant and coolant fumes are harmful - avoid contact with the coolant. If
the coolant comes into contact with the eye or skin, wash the affected area
with plenty of water for several minutes, and where appropriate seek medi-
cal help.
CAUTION
Do not cover the radiator and install any parts (e.g auxiliary lights.) in front of
the air intakes - There is a risk of the engine overheating.256General Maintenance
Page 259 of 324
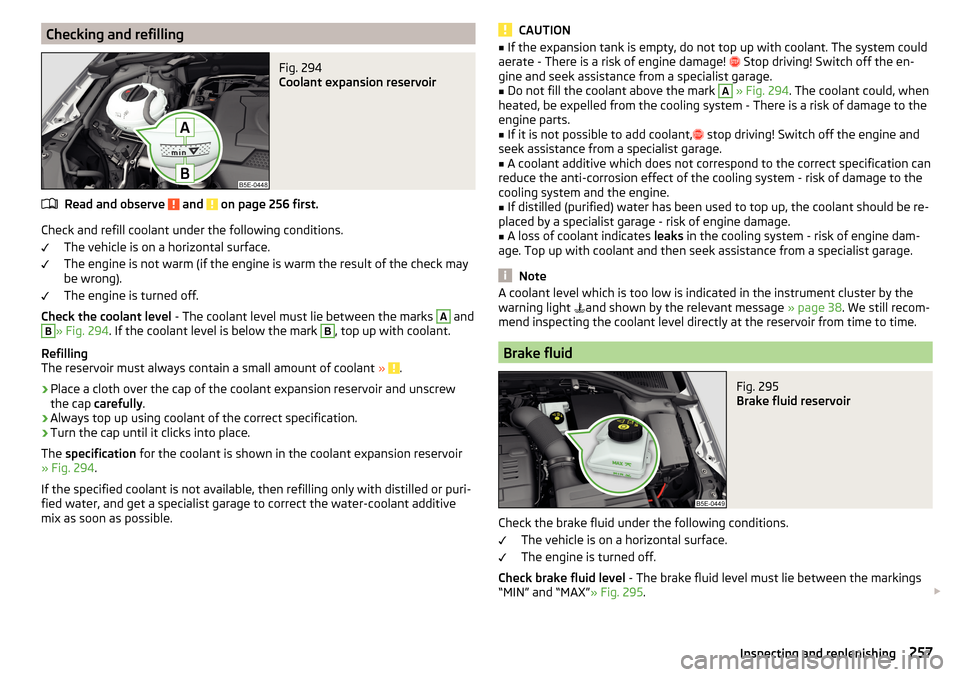
Checking and refillingFig. 294
Coolant expansion reservoir
Read and observe and on page 256 first.
Check and refill coolant under the following conditions.The vehicle is on a horizontal surface.
The engine is not warm (if the engine is warm the result of the check may
be wrong).
The engine is turned off.
Check the coolant level - The coolant level must lie between the marks
A
and
B
» Fig. 294. If the coolant level is below the mark
B
, top up with coolant.
Refilling
The reservoir must always contain a small amount of coolant »
.
›
Place a cloth over the cap of the coolant expansion reservoir and unscrew
the cap carefully .
›
Always top up using coolant of the correct specification.
›
Turn the cap until it clicks into place.
The specification for the coolant is shown in the coolant expansion reservoir
» Fig. 294 .
If the specified coolant is not available, then refilling only with distilled or puri-
fied water, and get a specialist garage to correct the water-coolant additive
mix as soon as possible.
CAUTION■ If the expansion tank is empty, do not top up with coolant. The system could
aerate - There is a risk of engine damage! Stop driving! Switch off the en-
gine and seek assistance from a specialist garage.■
Do not fill the coolant above the mark
A
» Fig. 294 . The coolant could, when
heated, be expelled from the cooling system - There is a risk of damage to the
engine parts.
■
If it is not possible to add coolant,
stop driving! Switch off the engine and
seek assistance from a specialist garage.
■
A coolant additive which does not correspond to the correct specification can
reduce the anti-corrosion effect of the cooling system - risk of damage to the
cooling system and the engine.
■
If distilled (purified) water has been used to top up, the coolant should be re-
placed by a specialist garage - risk of engine damage.
■
A loss of coolant indicates leaks in the cooling system - risk of engine dam-
age. Top up with coolant and then seek assistance from a specialist garage.
Note
A coolant level which is too low is indicated in the instrument cluster by the
warning light and shown by the relevant message » page 38. We still recom-
mend inspecting the coolant level directly at the reservoir from time to time.
Brake fluid
Fig. 295
Brake fluid reservoir
Check the brake fluid under the following conditions.
The vehicle is on a horizontal surface.
The engine is turned off.
Check brake fluid level - The brake fluid level must lie between the markings
“MIN” and “MAX” » Fig. 295.
257Inspecting and replenishing
Page 283 of 324
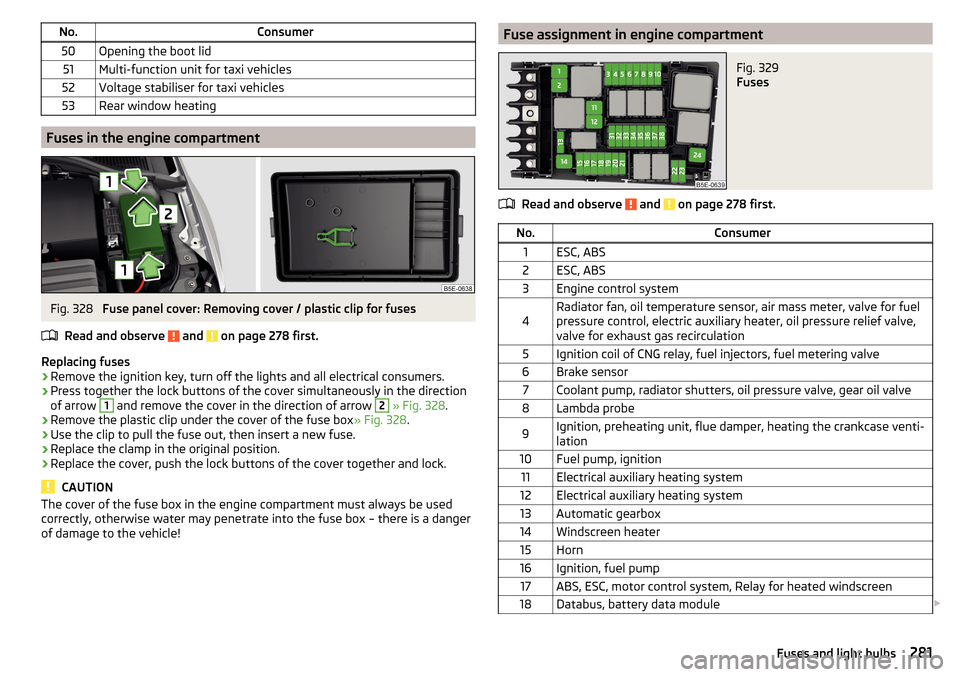
No.Consumer50Opening the boot lid51Multi-function unit for taxi vehicles52Voltage stabiliser for taxi vehicles53Rear window heating
Fuses in the engine compartment
Fig. 328
Fuse panel cover: Removing cover / plastic clip for fuses
Read and observe
and on page 278 first.
Replacing fuses
›
Remove the ignition key, turn off the lights and all electrical consumers.
›
Press together the lock buttons of the cover simultaneously in the direction
of arrow
1
and remove the cover in the direction of arrow
2
» Fig. 328 .
›
Remove the plastic clip under the cover of the fuse box » Fig. 328.
›
Use the clip to pull the fuse out, then insert a new fuse.
›
Replace the clamp in the original position.
›
Replace the cover, push the lock buttons of the cover together and lock.
CAUTION
The cover of the fuse box in the engine compartment must always be used
correctly, otherwise water may penetrate into the fuse box – there is a danger
of damage to the vehicle!Fuse assignment in engine compartmentFig. 329
Fuses
Read and observe and on page 278 first.
No.Consumer1ESC, ABS2ESC, ABS3Engine control system4Radiator fan, oil temperature sensor, air mass meter, valve for fuel
pressure control, electric auxiliary heater, oil pressure relief valve,
valve for exhaust gas recirculation5Ignition coil of CNG relay, fuel injectors, fuel metering valve6Brake sensor7Coolant pump, radiator shutters, oil pressure valve, gear oil valve8Lambda probe9Ignition, preheating unit, flue damper, heating the crankcase venti-
lation10Fuel pump, ignition11Electrical auxiliary heating system12Electrical auxiliary heating system13Automatic gearbox14Windscreen heater15Horn16Ignition, fuel pump17ABS, ESC, motor control system, Relay for heated windscreen18Databus, battery data module 281Fuses and light bulbs
Page 304 of 324
Ball headCheck fitting233
Ready position231
Battery Change in key
275
Replace the battery in the remote control in the auxiliary heating
275
Belts15
Belt tensioners17
Bluetooth A2DP / AVRCP
124
Name124
on / off124
Paired external devices124
rSAP155
Set131
set to124, 126
Set to124
Switch on/off131
Update122, 125
Updates131
Visibility124, 131
Bluetooth Player141
Bluetooth profile153
Bluetooth® update153
Bonnet Close
253
Open253
Boot Class N1 vehicles
100
see boot lid56
Stow roof rack103
Boot lid57
Automatic locking57
Open/close58
Open/Close56
Brake Assist (HBA)202
Brake booster191
Brake fluid257
Check257
specification257
Brake linings warning light
36
Brake pads new
191
Brake pedal (automatic gearbox) Warning light
37
Brakes Brake booster
191
Brake fluid257
Braking and stabilisation systems200
Handbrake192
Information on braking191
Run in196
Warning lights33
Brake system200
Breakdown call157
Breakdown kit270
Broadcasting133
See main menu133
Bulbs Replacing
282
Button in driver's door Electric windows
60
C
Call list Call list
159
Camera See reversing camera
207
CAR187
Car battery Automatic consumer shutdown
258
Check condition259
Cover259
Disconnecting and reconnecting260
Replacing260
Winter operation259
CAR button187
Car care Exterior
245, 247
Interior247
Car cleaning Exterior
247
Windscreens247
Car computer see multifunction display
44
Care and maintenance240
Cargo element99
CAR menu187
Car washing244
Interior247
washing244
CD139
Central locking51
Problems55
Central locking button53
Change battery
275
Changing Windscreen wiper blades
278
Changing a wheel266
Changing266
Changing gear Selector lever
194
Tiptronic195
Changing wheels Wheels
266
Charging a vehicle battery259
Check Brake fluid
257
Engine oil256
Fit ball head properly233
Oil level256
Checking Battery status
259
Coolant257
302Index
Page 305 of 324

ChecksStatutory checks240
Children and safety22
Child safety lock54
Child seat22
Classification24
Fitting25
Installation location24
in the passenger seat24
ISOFIX25
on the front passenger seat23, 24
TOP TETHER26
Cigarette lighter91
Clear calls126
Climatronic104
air distribution control107
Automatic operation107
Operate in Infotainment106
Operating elements105
Clothes hook88
CNG252
Gas gauge31
Gas leaks252
In an accident252
Refuel251
Regular checks252
Sticker252
Warning light37
cockpit29
Cockpit Lighting
69
Comfort flashing65
COMING HOME68
Compartments82
Compatible sources DVD video
146
Pictures145
Component protection241
Compressed natural gas see CNG
252
Computersee multifunction display44
Conditions for pairing152
Conference call160
Configuration wizard118
Convenience operation Tilting / sliding sunroof
62
Window61
Coolant256
Checking257
Refilling257
Temperature display31
Warning light38
CORNER See Fog lights with CORNER function
68
Correct routing of seat belt
16
Correct seated position12
Correct seating position14
Crew Protect Assist223
Cruise control212
Warning light37
Cruise Control System212
Cup holders85
Custom destination175
D
DAB
133
Additional information133
Radio Text and image presentation133
Set125, 132
DAB slideshow133
Data connection164
Data roaming124
Data transfer of external devices119
Date123, 130
DAY LIGHT See Daytime running lights
65
Daytime running lights65
DCC221
Warning light40
De-icing the windscreen and rear window71
Deactivation Airbag
21
Default settings187
Delayed locking of the boot lid See boot lid
57
Delete destination179
Demo mode129, 180
Departure angle295
destination Search for
171
Destination Custom destination
175
Enter destination using the address172
entered in map173
Favourite174, 179
final destinations173
Flagged destination174
Home address174
Image with GPS176
Memory179
Saved destination174
Telephone contact174
vCard174
Destination details179
Destination management Destination details
179
Favourite179
Storage179
Destination memory174
Detail of the traffic report186
Diesel250
Diesel fuel250
Diesel particle filter (DPF)39
Digital Clock42
Digital radio reception Set
132
303Index
Page 306 of 324
Digital Service Plan244
Dipped beam64
Dipstick256
display natural gas supply
31
Petrol / diesel storage31
Display Cardinal points
41
Coolant temperature31
Gear changes42
In the instrument cluster41
Service intervals48
Display MAXI DOT46
Disposal Acceptance and recycling of used vehicles
242
Distance warning219
Warning light40
Diverting calls126
Door Child safety lock
54
Emergency locking276
Emergency locking of the driver's door276
Opening/ Closing54
Door warning41
double hooks96
Drive Driving through water
198
DriveGreen197
Driving Emissions
291
Fuel consumption291
Maximum speed296
through water198
Driving data Show
45
Driving mode221
Adaptive Chassis Control (DCC)221
Comfort222
Eco221
Individual222
Individual mode settings223
Mode selection and Infotainment display223
Normal222
Offroad222
Sports222
Driving Mode Selection221
DSR202
DVD139
DVD video Compatible sources
146
Supported file formats146
Dynamic Road Sign Display Additional display
228
Operation227
Dynamic route switch on / off
186
E
Economical driving
197
ECO TIP41
Eco tips41
Edit route181
EDS201
Electrical boot lid set the top position of the lid
58
Electric boot lid Force limiter
57
Manual operation57
Open/close58
Electric power windows59, 61
Malfunctions61
Electric tailgate Malfunctions
58
Electric Windows Button in driver’s door’
60
Electronic Differential Lock (EDL, XDS)201
Electronic immobiliser188
Elevation169
emergency Jump-starting272
Starting the engine / stopping at the push of a button
190
Emergency Hazard warning light system
68
Jump-starting272
Lever-release277
Starting the engine / stopping the push of a button
189
Towing the using the tow hitch275
Towing the vehicle273
Tyre repair270
Unlocking/locking the door276
Unlocking / locking the door276
Emergency call157
Emergency equipment Fire extinguisher
265
First aid kit265
Jack266
Reflective vest265
Vehicle tool kit266
Warning triangle265
Emergency spare Removing / stowing
267
Emission control system35
Emissions291
Engine Information messages
38
Run in196
Engine compartment252
Brake fluid257
Coolant256
Engine oil255
Overview254
Vehicle battery258
Windscreen washer fluid254
Engine drag torque control (MSR)201
Engine number288
304Index
Page 312 of 324
Passive safetyBefore setting off12
Driving safety12
Passive Safety12
Pedals194
Floor mats194
Personalisation Configuration wizard
118
Personal POIs175
Petrol249
Petrol station logo128
Phone Bluetooth® update
153
Compatibility153
Introductory information149
rSAP155
Voice control119
Phonebox84
Phone compatibility153
Phone Premium SIM card
154
Pictures Compatible sources
145
File formats145
Requirements and restrictions145
Supported file formats145
Pin code set to
126
Playback Video DVD
145
Plsyback Media
137
Pockets88
Pockets in the luggage compartment95
POI175
Choose on the map176
Import175
My POIs175
Tap on the map176
Pop-up window Map178
Positioning the jack
269
Power limit Tilt / slide sunroof
62
Power steering33
Power windows Button in the front passenger door
60
Button in the rear doors60
Practical features Pockets
88
Seat backrest with long cargo channel89
Storage compartment for umbrella87
Waste container85
Preferred contacts159
Preheating unit35
Principles of Infotainment operation116
Proactive passenger protection223
Warning light35
R
Rack
103
Radiator shutters198
radio Select station
133
Radio Broadcasting
133
DAB - settings132
DAB settings125
FM - settings125, 131
L-band126
List of available stations134
Main menu133
Operation133
Preface133
Radio station logo135
Save station135
Scan133
Search stations133
set to125, 131
Station buttons135
Traffic program (TP)136
Voice control119
Radio station logo135
Radio station logos Update
125
Radio stations Choose
133
Logo135
Save station135
Search stations133
Select station133
Station buttons135
Raising the vehicle269
Rear fog light67
Warning light34
Rear seats79
Rear view mirror73
Rear window - heating71
Record waypoints184
Refilling Coolant
257
Engine oil256
Windscreen washer fluid254
Reflective vest265
Refuelling249
Fuel249
Regulation Headlight beam
64
Remote Change battery
275
Remote control Auxiliary heating (auxiliary heating and ventila- tion)
110
Synchronisation process55
Unlocking/locking the vehicle52
Remote transfer of SIM data155
Removable through-loading bag89
310Index