engine oil SKODA OCTAVIA 2016 3.G / (5E) Owner's Manual
[x] Cancel search | Manufacturer: SKODA, Model Year: 2016, Model line: OCTAVIA, Model: SKODA OCTAVIA 2016 3.G / (5E)Pages: 324, PDF Size: 48.85 MB
Page 5 of 324
Media136Operation136
Audio sources
139
Images
144
Image viewer
144
Video DVD
145
Video player
145
Media Command
147
Operation
147
Telephone
149
Introductory information
149
Pair and connect
152
Use the SIM card in the external module
154
rSAP
155
Telephone functions
157
Text messages (SMS)
161
Hotspot (WLAN) and data connection
163
Hotspot (WLAN)
163
Data connection
164
SmartLink
165
Introductory information
165
Android Auto
166
Apple CarPlay
167
MirrorLink®
167
Navigation
169
Introductory information
169
Search for destination and enter
171
Import my destinations
175
Map
176
Route guidance
179
Route
181Waypoint mode183Traffic reports185
Vehicle systems
187
CAR Vehicle settings
187
Driving
Starting-off and Driving
188
Starting and stopping the engine
188
START-STOPsystem
190
Brakes and Parking
191
Manual shifting of gears and pedals
193
Automatic transmission
194
Running in and economical driving
196
Avoiding damage to your vehicle
198
Assist systems
199
General information
199
Braking and stabilisation systems
200
OFF ROADmode
203
Parking aid (Park Pilot)
204
Reversing camera
207
Park Assist
209
Cruise Control System
212
Adaptive Cruise Control (ACC)
214
Front Assist
219
Select the driving mode (Driving Mode
Selection)
221
Proactive passenger protection (Crew Protect
Assist)
223
Lane Departure Warning (Lane Assist)
224
Traffic sign recognition
226
Fatigue detection
228
Tyre pressure monitoring
229
Towing device and trailer
230
Hitch
230
Using hitch
235General Maintenance
Care and maintenance240
Service work, adjustments and technical
alterations
240
Service intervals
242
Cleaning and care
244
Inspecting and replenishing
248
Fuel
248
Engine compartment
252
Engine oil
255
Coolant
256
Brake fluid
257
Vehicle battery
258
Wheels
260
Wheels and tyres
260
Operating in winter conditions
263
Do-it-yourself
Emergency equipment, and self-help
265
Emergency equipment
265
Changing a wheel
266
Breakdown kit
270
Jump-starting
272
Towing the vehicle
273
Remote - replacing battery
275
Emergency unlocking / locking of doors
276
Replacing windscreen wiper blades
277
Fuses and light bulbs
278
Fuses
278
Bulbs
282
Technical data
Technical data
288
Basic vehicle data
288
Vehicle-specific details per engine type
2963Table of Contents
Page 12 of 324
Structure of the Owner's Manual and further
information
Structure of the manual
The Owner's Manual is hierarchically divided into the following areas.
■ Section (e.g. Operating instructions) - the title of the section is shown down
in the left-hand corner
■ Main chapter (e.g. Checking and refilling) - the title of the main chapter is
shown down in the right-hand corner ■ Chapter (e.g. Engine oil)
■ Introductory information
- Module overview within the chapter, in-
troductory information about the chapter content and, where appropri-
ate, information relevant to the whole chapter
■ Module (e.g. Checking and refilling)
Information search
When searching for information in the Owner's Manual, we recommend using
the Index at the end of the manual.
Direction indications
All direction indications such as “left”, “right”, “front” and “rear” relate to the
forward direction of travel of the vehicle.
Units of measurement
The volume, weight, speed and length data is given in metric units, unless oth-
erwise indicated.
Display
In this Owner's Manual, the screen on the MAXI DOT display is used as the dis- play illustration, unless specified otherwise.
Emergency assistance
In case of breakdown, the breakdown service contact information required can
be found in the following places.
▶ Contact details for the ŠKODA Partner (e.g. window sticker)
▶ Infotainment (Telephone - breakdown service / information service menu)
▶ ŠKODA mobile application
▶ ŠKODA web pages10Structure of the Owner's Manual and further information
Page 14 of 324
Safety
Passive Safety
General information
Introduction
This chapter contains information on the following subjects:
Before setting off
12
Driving safety
12
In this section of the instructions you will find important information on the
subject of passive safety. We have combined everything here which you
should be familiar with, for example, regarding seat belts, airbags, safety of children and anything similar.
Other important safety information can also be found in the subsequent sec-
tions of this Owner's Manual. Therefore, the Owner's Manual should always be
kept in the vehicle.
Before setting off
For your own safety and the safety of the people travelling with you, please
pay attention to the following points before setting off.
▶ Check the lights and turn signal lights are functioning correctly.
▶ Check the wiper function and the wiper blades for wear. Check the wind-
screen washer fluid level.
▶ Ensure that all of the windows offer good visibility to the outside.
▶ Adjust the rear-view mirror so that vision to the rear is guaranteed. Ensure
that the mirrors are not covered.
▶ Check the tyre inflation pressure.
▶ Check the engine oil, brake fluid and coolant level.
▶ Secure all items of luggage.
▶ Do not exceed the permissible axle loads and permissible gross weight of the
vehicle.
▶ Close all doors as well as the bonnet and boot lid.
▶ Ensure that no objects can obstruct the pedals.
▶
Protect children using a suitable child seat » page 22, Transporting children
safely .
▶ Adopt the correct seated position. Tell your passengers to assume the cor-
rect seated position » page 12, Correct and safe seated position .
Driving safety
For safety in traffic, the following precautions must be observed. ▶ Do not become distracted from concentrating on the traffic situation, (e.g. by
your passengers or mobile phone calls).
▶ Never drive when your driving ability is impaired, (e.g. due to medication, al-
cohol, drugs or similar).
▶ Keep to the traffic regulations and the permissible speed limit.
▶ Always adjust the driving speed to the road, traffic and weather conditions.
▶ Take regular breaks on long journeys (at least every two hours).
Correct and safe seated position
Introduction
This chapter contains information on the following subjects:
Driver’s correct seated position
13
Adjusting the steering wheel position
13
Passenger’s correct seating position
14
Passengers’ correct seating position on the rear seats
14
Always assume the correct seated position before setting off and do not
change this position while driving. Also advise your passengers to adopt the
correct seated position and not to change this position while the car is moving.
The following list contains instructions for the Passenger which, if not ob-
served, may cause serious injuries or death. ▶ Do not lean against the dash panel.
▶ Do not put your feet on the dash panel.
The following list contains instructions for all Passengers which, if not ob-
served, may cause serious injuries or death.
▶ Do not sit only on the front area of the seat.
▶ Do not sit facing to one side.
▶ Do not lean out of the window.
▶ Do not put your limbs out of the window.
▶ Do not put your feet on the seat upholstery.
12Safety
Page 34 of 324
Warning lights
Introduction
This chapter contains information on the following subjects:
Handbrake
33
Braking system
33
Front seat belt warning light
33
Adaptive cruise control (ACC)
33
Power steering / steering lock (KESSY system)
33
Stability control (ESC) / Traction control (TCS)
34
Traction control (TCS) disabled
34
Anti-lock braking system (ABS)
34
Rear fog light
34
Emission control system
35
Preheating unit (diesel)
35
EPC warning light (petrol)
35
Safety systems
35
Tyre pressure
35
Brake linings
36
Low fuel - petrol / diesel
36
Lane assist (Lane Assist)
36
Turn signal system
36
Trailer turn signal lights
36
Fog lights
37
Cruise control
37
Brake pedal (automatic gearbox)
37
Natural gas operation
37
Main beam
37
Automatic gearbox
37
Rear seat belt warning light
37
Generator
37
Coolant
38
Engine oil pressure
38
Engine oil level
38
Lamp failure
39
Diesel particle filter (diesel)
39
Windscreen washer fluid level39High beam assistant39
START-STOPsystem
39
Display a low temperature
39
Water in the fuel filter (diesel)
40
Adaptive cruise control (ACC)
40
Distance warning (Front Assist)
40
Front assist
40
OFF ROAD mode
40
Adaptive Chassis Control (DCC)
40
Service
40
The warning lights in the instrument cluster indicate certain functions or
faults.
Some warning lights can be accompanied by acoustic signals and messages in
the display of the instrument cluster.
After switching on the ignition, some warning lights light up briefly as a func-
tion test. If the tested systems are OK, the corresponding warning lights go
out a few seconds after switching on the ignition or after starting the engine.
The warning lights are located at the following positions in the instrument
cluster » Fig. 17 on page 30 .
▶ Tachometer
1
▶Display
2
▶Speedometer
3
▶Bar with warning lights
5
Warning lights in the display
Depending on the importance the warning light (danger) or
(warning) illu-
minate along with some of the warning lights in the list with the warning
lights.
Depending on vehicle equipment, some warning lights can be displayed in col-
our on the display. For example. the coolant warning lamp may be represented
as follows.
▶ - Segment display / monochromatic (“black and white”) MAXI DOT display
▶ - Coloured MAXI DOT display
32Using the system
Page 40 of 324
CAUTIONIf in addition to the light the light lights up while driving, stop driving -
risk of engine damage! Switch off the engine and seek assistance from a spe-
cialist garage.
Coolant
Read and observe
on page 33 first.
Coolant level too low
Illumi-
nates
ENGINE COOLANT PLEASE CHECK! Log book!ENGINE COOLANT PLEASE CHECK
▶ Stop the vehicle, switch off the engine, and allow the engine to cool down.
▶ Check the coolant level » page 257.
If the coolant level is within the specified range and the warning light lights
up again, then there may be a malfunction of the cooling fan.
▶ Switch off the ignition.
▶ Check the fuse for the radiator fan, replace if necessary.
If the coolant level and fan fuse are both OK but the warning light lights up
again,
stop driving!
▶ Seek help from a specialist garage.
Coolant temperature too high
Illumi-
nates
Engine overheat. Stop! Log book!ENGINE OVERHEAT STOP
▶ Stop the vehicle, switch off the engine, and allow the engine to cool down.
▶ Continue your journey only after the warning light has disappeared.
Engine oil pressure
Read and observe
on page 33 first.
flashes – the engine oil pressure is too low.
▶ Stop the vehicle, switch off the engine, and check the engine oil level.
▶ Even if the oil level is correct,
do not drive any further if the warning light
is flashing. Also do not leave the engine running at an idling speed.
▶ Seek help from a specialist garage.
CAUTIONIf, under the given conditions, it is not possible to top up with engine oil,
stop driving - there is a risk of engine damage! Switch off the engine and seek
assistance from a specialist garage.
Engine oil level
Read and observe
on page 33 first.
Engine oil level too low
Illumi-
nates
Oil level: add oil!ADD OIL
▶ Stop the vehicle, switch off the engine, and check the engine oil level, top up
if necessary.
The warning light will go out if the bonnet is left open for more than 30 sec-
onds. If the engine oil is not refilled, the warning light will come on again after
driving about 100 km.
Engine oil level too high
Illumi-
nates
Reduce oil level!OIL LEVEL TOO HIGH
▶ Stop the vehicle, switch off the engine, and check the engine oil level.
▶ If the oil level is too high, you can driven on, exercising appropriate caution.
Seek assistance from a specialist garage immediately.
Fault on the engine oil level sensor
Illumi-
nates
Oil sensor: Workshop!OIL SENSOR WORKSHOP
▶ You can drive on, exercising appropriate caution. Seek assistance from a spe-
cialist garage immediately.
CAUTION
If, under the given conditions, it is not possible to top up with engine oil,
stop driving - there is a risk of engine damage! Switch off the engine and seek
assistance from a specialist garage.38Using the system
Page 46 of 324
Driving data (Multifunction display)
Introduction
This chapter contains information on the following subjects:
Data overview
44
Display Infotainment
45
Warning at when exceeding the set speed
45
Memory
45
The driving data display is only possible with the ignition switched on. After
the ignition is switched on, the function that was last selected before switch-
ing off the ignition is displayed.
If vehicles with MAXI DOTdisplay do not show the driving data after switching
on the ignition, select the menu item
Driving data
in the main menu and confirm
» page 46 .
The units and the display of some information can be adjusted in Infotainment
by tapping
→
→
Units
.
Data overview
Overview of driving data (depending on the vehicle equipment).
Range - Drive distance in km which can be covered with the existing tank ca-
pacity and with the same driving style. If you drive more efficiently this value
can increase. With G-TEC vehicles the following details are displayed - total
range / with natural gas / petrol.
Average fuel consumption - Is calculated continuously since the last time that
the memory was erased. After erasing the memory, no data will appear for the
first 100 m driven. With G-TEC vehicles, the average consumption of fuel cur-
rently being used is displayed.
Current fuel consumption - When the vehicle is stationary or moving slowly,
the fuel consumption is displayed in l/h (in models in some countries the fol-
lowing appears --,- km/l). With G-TEC vehicles the current consumption of the
fuel currently being used is displayed ( with regards to a stationary or slow
moving vehicle, the natural gas consumption is displayed in kg/h).
Oil temperature if the temperature is lower than 50 °C or if there is a fault in
the system for checking the oil temperature, the symbols are displayed.
Warning at when the preset speed is exceeded allows the setting of a speed
limit where, if exceeded, an acoustic warning signal and a warning message
appears on the display of the instrument cluster.
Dynamic Road Sign Display - traffic signs display » page 226, Traffic sign rec-
ognition .
Current Speed - Digital speedometer.
Average speed - Value constantly recalculated, for distance since last clearing
the memory. After erasing the memory, no data will appear for the first 300 m
driven.
Distance driven - Distance driven since the memory was last cleared.
Driving time - Driving time since last clearing the memory.
Conv. consumers - information about the total consumption of the comfort
consumers in l/h and a list of three consumers (e.g. air conditioning etc.), which
have the largest share of fuel consumption.
Refill amount 1)
After the consumption of about 10 litres of fuel from the fully
refuelled tank, an amount of fuel is displayed in l. This amount can now be
safely refilled.
Natural gas quality The details of the quality of natural gas are displayed as a
percentage of between 70% to 100%. The higher the value of natural gas, the lower is the consumption.
Coolant temperature - If the coolant temperature is in the range 70-120 °C,
the engine operating temperature has been reached. If the temperature is be-
low 70 ° C, high engine speeds and straining the engine should be avoided. If the temperature is over 120°C, the warning light » page 38
illuminates in the
instrument cluster .
There is the option to show/hide the representation of the menu items of the
multifunction display in Infotainment in the instrument cluster display by tap-
ping
→
→
Instrument cluster
and reset the driving data.
1)
Only valid for some countries.
44Using the system
Page 194 of 324
Before negotiating a long or steep gradient , reduce speed and shift down a
gear. As a result, the braking effect of the engine will be used, reducing the
load on the brakes. If, nevertheless, there is a need for additional braking, it
should be carried out at intervals.
Emergency braking warning - If it is necessary to brake hard, the system may
cause the brake lights to automatically flash, to alert the traffic behind.
New brake pads must first be““run in”” because these do not initially have the
best possible braking effect. Drive especially carefully for the first 200 km or
so.
If the brake fluid level is too low, it can cause faults in the braking system ;
the warning light will light up in the instrument cluster » page 33
,
Braking
system . If the warning light does not light up, yet the stopping distance is per-
ceived to be longer than before, the driving style should be adapted in view of
the unknown cause of the problem, and braking kept to a minimum - seek the
help of a specialist garage without delay.
The brake booster increases the pressure generated with the brake pedal. The
brake booster only operates when the engine is running.WARNING■ Greater physical effort for braking is required when the engine is switch-
ed off – risk of accident!■
During the braking procedure on a vehicle with manual transmission,
when the vehicle is in gear and at low revs, press the clutch pedal. Other-
wise, the functionality of the brake system may be impaired – risk of acci-
dent!
■
Do not depress the brake pedal, if there is no requirement to slow down.
This causes the brakes to overheat and can also result in a longer braking
distance and excessive wear - There is a risk of an accident!
■
Only brake for the purpose of drying and cleaning the brake discs if the
traffic conditions permit this. Do not place any other road users in jeopardy.
■
Recommendations for new brake pads should be followed.
■
When stopping and parking, the parking brake should always be applied
firmly, otherwise the vehicle could move off - There is a risk of an accident!
■
If a front spoiler, full wheel trim, etc. is mounted retrospectively, it must
be ensured that the air supply to the front wheel brakes is not reduced.
Otherwise, the front brakes could be in danger of overheating – There is a
risk of an accident!
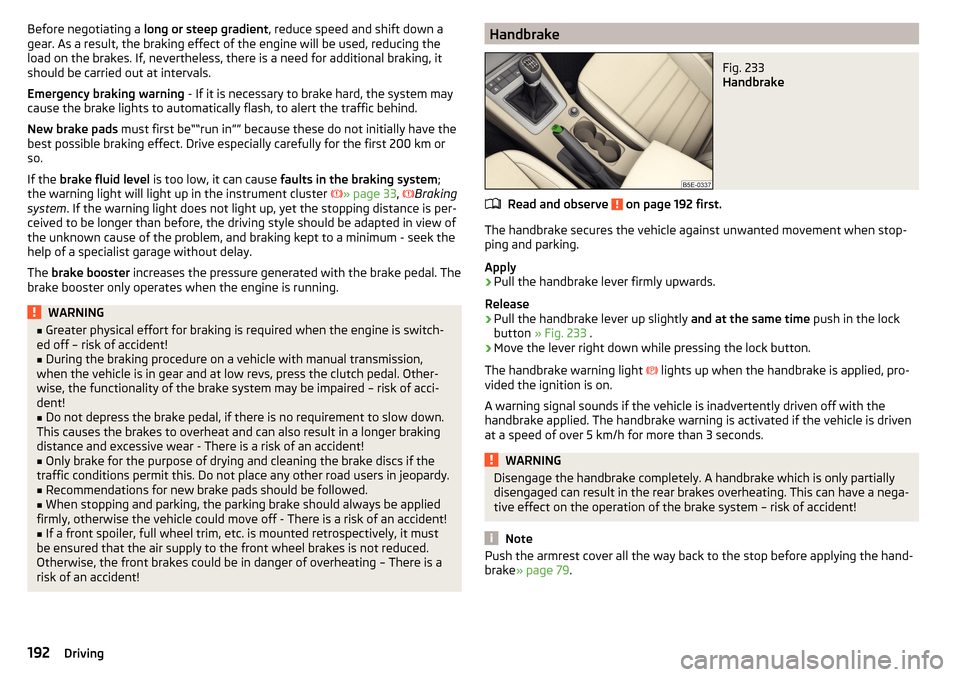
HandbrakeFig. 233
Handbrake
Read and observe on page 192 first.
The handbrake secures the vehicle against unwanted movement when stop- ping and parking.
Apply
›
Pull the handbrake lever firmly upwards.
Release
›
Pull the handbrake lever up slightly and at the same time push in the lock
button » Fig. 233 .
›
Move the lever right down while pressing the lock button.
The handbrake warning light lights up when the handbrake is applied, pro-
vided the ignition is on.
A warning signal sounds if the vehicle is inadvertently driven off with the
handbrake applied. The handbrake warning is activated if the vehicle is driven
at a speed of over 5 km/h for more than 3 seconds.
WARNINGDisengage the handbrake completely. A handbrake which is only partially
disengaged can result in the rear brakes overheating. This can have a nega-
tive effect on the operation of the brake system – risk of accident!
Note
Push the armrest cover all the way back to the stop before applying the hand-
brake » page 79 .192Driving
Page 202 of 324
The sensor is a component of the ACC » page 214 and Front Assist
» page 219 systems.
The sensor function may be impaired in the events of one of the following. ▶ The sensor cover is soiled (e.g. with mud, snow etc.).
▶ The area in front of and around the sensor cover is obscured (e.g. by labels,
auxiliary headlights etc.).
▶ When visibility is poor, (e.g. fog, heavy rain, thick snowfall).
If the sensor is covered or dirty, the corresponding message appears in the in-
strument cluster display for the ACC system » page 218, Malfunctions or Front
Assist system » page 221, Malfunctions .WARNING■
If you suspect that the sensor is damaged, deactivate the ACC system and
Front Assist system » page 216» page 220 . Have the sensor checked by a
specialist garage.■
A collision or damage in the front or lower area of the vehicle could affect
the sensor function - there is risk of accident! Have the sensor checked by
a specialist garage.
■
Do not cover the area in front of and around the sensor cover. This can
lead to impaired function of the sensor - risk of accidents!
CAUTION
Remove the snow with a brush and the ice with a solvent-free de-icer.
Braking and stabilisation systems
Introduction
This chapter contains information on the following subjects:
Stability Control (ESC)
200
ESC Sport
200
Anti-lock braking system (ABS)
201
Engine drag torque control (MSR)
201
Traction control (TCS)
201
Electronic Differential Lock (EDL and XDS)
201
Active steering assist (DSR)
202
Brake Assist (HBA)
202
Hill Start Assist (HHC)
202Multicollision brake (MCB)202Trailer stabilisation system (TSA)202
The brake and stabilization systems are automatically activated each time the
ignition is switched on, unless otherwise indicated.
The error display is in Chapter » page 32, Warning lights .
WARNINGThe general information relating to the use of assistance systems must be
observed » page 199, in section Introduction .
Stability Control (ESC)
Read and observe
on page 200 first.
ESC improves vehicle stability in critical driving situations (e.g. if the vehicle
starts to skid) by the braking the individual wheels to maintain the direction.
If there is a TCS intervention, the indicator light flashes in the instrument
cluster.
ESC Sport
Read and observe
on page 200 first.
ESC Sport allows for a sportier driving style. With ESC Sport activated, no ESC
intervention takes place when the vehicle slightly oversteers and understeers,
and ASR is so limited that the drive wheels can be spun.
Activation
›
Press and hold down the
» Fig. 241 on page 201 button.
›
or: On Infotainment, press the button
→ Press the function area
→
ESC system:
→
ESC Sport
.
With activation the warning light
lights up in the instrument cluster and an
appropriate message is displayed in the instrument cluster.
Deactivation
›
Press the
» Fig. 241 on page 201 button.
›
or: On Infotainment, press the button
→ Press the function area
→
ESC system:
→
Activated
.
With deactivation the warning light extinguishes in the instrument cluster
and an appropriate message is displayed in the instrument cluster.
200Driving
Page 206 of 324
The downhill gradient is at least 10 % (when driving over sleepers, the lim-
it can briefly drop to 8 %).
Neither the accelerator nor the brake pedal is operated.
Driving speed
Initiate the downhill decent at a reasonable speed of approx. 2 - 30 km / h the
assist maintains this speed when driving downhill constant.
If a forwards or reverse gear is engaged for vehicles with Manual transmis-
sion , the speed must be high enough to avoid “stalling the engine”.
The driving speed can be changed by the brake or accelerator pedal. This is
true even if the shift lever is in the neutral position and the selector lever in
the N position. The engagement of the assistant is resumed after the pedal is
released.WARNINGFor the correct operation of the assistant the road surface must be suffi-
ciently adherent. The assistant cannot properly fulfil its function on slushy
soil due to physical reasons (e.g. ice or mud). - there is a risk of an accident!
Note
When the wizard brakes the vehicle automatically, then the brake light does
not come on.
ESC OFF ROAD
Read and observe
and on page 203 first.
The ESC OFF ROAD makes driving on a dirt roads easier, as no ESC interven-tions occur when the vehicle is slightly over or under steered.
ASR OFF ROAD
Read and observe
and on page 203 first.
The TCS OFF ROAD makes starting and driving on an unpaved surface easier as
it partially allows wheel-spin.
Note
When disabled, the TCS » page 201 OFF ROAD mode works without the sup-
port of the TCS OFF ROAD.EDS OFF ROAD
Read and observe
and on page 203 first.
The EDS OFF ROAD supports the driver when driving on a surface with differ-
ent grip under the drive wheels or when driving over bumps.
A spinning wheel or wheels are braked earlier and with more force than with
the intervention of the standard EDS system.
ABS OFF ROAD
Read and observe
and on page 203 first.
The ABS OFF ROAD supports the driver when braking on an unpaved surface
(e.g. gravel, snow etc.).
The system generated by a controlled locking of the wheels braked wheel be-
fore a “wedge” of piled material, which shortens the braking distance.
Maximum system efficiency is achieved when the front wheels are in the
straight ahead position.
Parking aid (Park Pilot)
Introduction
This chapter contains information on the following subjects:
Settings in Infotainment
205
Operation
205
Display Infotainment screen
206
Activation / deactivation
206
Automatic system activation when moving forward
207
The parking aid (hereinafter referred to as system) uses acoustic signals on the
Infotainment screen when manoeuvring around obstacles in the vicinity of the
vehicle.
WARNING■ The general information relating to the use of assistance systems must
be observed » page 199, in section Introduction .■
Moving persons or objects may not be recognized by the system sensors.
204Driving
Page 244 of 324
WARNING■No changes may be made to airbag system components, the front bump-
er and the bodywork.■
Any work on the airbag system including the installation and removal of
system components due to other repair work (e.g. removal of the steering
wheel) must only be carried out by a specialist garage.
■
Do not manipulate individual parts of the airbag system, as this might re-
sult in the airbag being deployed.
■
If the airbag has been deployed, the airbag system must be replaced.
WARNINGThe airbag system operates using pressure sensors located in the front
doors. For this reason, no adjustments may be carried out to the doors or
door panels (e.g. installation of additional loudspeakers). Resulting damage
can impair the functioning of the airbag system -There is a risk of accidents
and fatal injuries! The following guidelines must therefore be observed.■
Any work on the front doors and their door panels must be carried out by
a specialist garage.
■
Never drive the vehicle with the inner door panels removed or with open-
ings in the panelling.
Acceptance and recycling of used vehicles
Read and observe
on page 240 first.
All new ŠKODA vehicles are 95% recyclable.
Service intervals
Introduction
This chapter contains information on the following subjects:
Overview of service intervals
243
Fixed service intervals QI1 - QI4
243
Variable service interval QI6
243
Digital Service Plan
244
The service interval display in the display of the instrument cluster will remind
you to carry out every service stipulated by the manufacturer at the right time
in order to prevent you from forgetting any » page 48.
The completion of services can be verified through the printed verification
from the digital service schedule and the respective receipts.
The specified service intervals are tailored to normal operating conditions.
In the case of aggravated operating conditions, it will be necessary to have
some service work carried out before the date of the next regular service or
between the specified service intervals. This applies mainly to the cleaning or
the replacement of the air filter insert in regions with heavy dust pollution as
well as checking and replacing the toothed belt, but also to vehicles with die-
sel particle filters, which can put greater strain on the engine oil.
The following is taken to mean aggravated operating conditions:
▶ Fuel containing sulphur.
▶ Frequent short trips.
▶ Longer periods of engine idling (e.g. taxis).
▶ Operation in areas with heavy dust pollution.
▶ Frequent trailer operation.
▶ Predominantly stop-and-go traffic as is e.g. often the case in city driving.
▶ Operation predominantly during winter.
You will be told at the specialist garage whether the operating conditions of
your vehicle may make it necessary for service work to be carried out between
the normal service intervals.
Different service charges may apply according to the particular scope of work
required, the vehicle type and specification, and your vehicle’s condition.
Note
■ The customer is responsible for covering the cost of all services including
changing or replenishing the oil, even during the warranty period, unless sta-
ted otherwise in the ŠKODA AUTO warranty terms or other agreements.■
You will be informed about the service checks and actions at each service by
the specialist garage.
242General Maintenance