wiper blades SKODA OCTAVIA 2016 3.G / (5E) Owner's Manual
[x] Cancel search | Manufacturer: SKODA, Model Year: 2016, Model line: OCTAVIA, Model: SKODA OCTAVIA 2016 3.G / (5E)Pages: 324, PDF Size: 48.85 MB
Page 5 of 324
Media136Operation136
Audio sources
139
Images
144
Image viewer
144
Video DVD
145
Video player
145
Media Command
147
Operation
147
Telephone
149
Introductory information
149
Pair and connect
152
Use the SIM card in the external module
154
rSAP
155
Telephone functions
157
Text messages (SMS)
161
Hotspot (WLAN) and data connection
163
Hotspot (WLAN)
163
Data connection
164
SmartLink
165
Introductory information
165
Android Auto
166
Apple CarPlay
167
MirrorLink®
167
Navigation
169
Introductory information
169
Search for destination and enter
171
Import my destinations
175
Map
176
Route guidance
179
Route
181Waypoint mode183Traffic reports185
Vehicle systems
187
CAR Vehicle settings
187
Driving
Starting-off and Driving
188
Starting and stopping the engine
188
START-STOPsystem
190
Brakes and Parking
191
Manual shifting of gears and pedals
193
Automatic transmission
194
Running in and economical driving
196
Avoiding damage to your vehicle
198
Assist systems
199
General information
199
Braking and stabilisation systems
200
OFF ROADmode
203
Parking aid (Park Pilot)
204
Reversing camera
207
Park Assist
209
Cruise Control System
212
Adaptive Cruise Control (ACC)
214
Front Assist
219
Select the driving mode (Driving Mode
Selection)
221
Proactive passenger protection (Crew Protect
Assist)
223
Lane Departure Warning (Lane Assist)
224
Traffic sign recognition
226
Fatigue detection
228
Tyre pressure monitoring
229
Towing device and trailer
230
Hitch
230
Using hitch
235General Maintenance
Care and maintenance240
Service work, adjustments and technical
alterations
240
Service intervals
242
Cleaning and care
244
Inspecting and replenishing
248
Fuel
248
Engine compartment
252
Engine oil
255
Coolant
256
Brake fluid
257
Vehicle battery
258
Wheels
260
Wheels and tyres
260
Operating in winter conditions
263
Do-it-yourself
Emergency equipment, and self-help
265
Emergency equipment
265
Changing a wheel
266
Breakdown kit
270
Jump-starting
272
Towing the vehicle
273
Remote - replacing battery
275
Emergency unlocking / locking of doors
276
Replacing windscreen wiper blades
277
Fuses and light bulbs
278
Fuses
278
Bulbs
282
Technical data
Technical data
288
Basic vehicle data
288
Vehicle-specific details per engine type
2963Table of Contents
Page 14 of 324
Safety
Passive Safety
General information
Introduction
This chapter contains information on the following subjects:
Before setting off
12
Driving safety
12
In this section of the instructions you will find important information on the
subject of passive safety. We have combined everything here which you
should be familiar with, for example, regarding seat belts, airbags, safety of children and anything similar.
Other important safety information can also be found in the subsequent sec-
tions of this Owner's Manual. Therefore, the Owner's Manual should always be
kept in the vehicle.
Before setting off
For your own safety and the safety of the people travelling with you, please
pay attention to the following points before setting off.
▶ Check the lights and turn signal lights are functioning correctly.
▶ Check the wiper function and the wiper blades for wear. Check the wind-
screen washer fluid level.
▶ Ensure that all of the windows offer good visibility to the outside.
▶ Adjust the rear-view mirror so that vision to the rear is guaranteed. Ensure
that the mirrors are not covered.
▶ Check the tyre inflation pressure.
▶ Check the engine oil, brake fluid and coolant level.
▶ Secure all items of luggage.
▶ Do not exceed the permissible axle loads and permissible gross weight of the
vehicle.
▶ Close all doors as well as the bonnet and boot lid.
▶ Ensure that no objects can obstruct the pedals.
▶
Protect children using a suitable child seat » page 22, Transporting children
safely .
▶ Adopt the correct seated position. Tell your passengers to assume the cor-
rect seated position » page 12, Correct and safe seated position .
Driving safety
For safety in traffic, the following precautions must be observed. ▶ Do not become distracted from concentrating on the traffic situation, (e.g. by
your passengers or mobile phone calls).
▶ Never drive when your driving ability is impaired, (e.g. due to medication, al-
cohol, drugs or similar).
▶ Keep to the traffic regulations and the permissible speed limit.
▶ Always adjust the driving speed to the road, traffic and weather conditions.
▶ Take regular breaks on long journeys (at least every two hours).
Correct and safe seated position
Introduction
This chapter contains information on the following subjects:
Driver’s correct seated position
13
Adjusting the steering wheel position
13
Passenger’s correct seating position
14
Passengers’ correct seating position on the rear seats
14
Always assume the correct seated position before setting off and do not
change this position while driving. Also advise your passengers to adopt the
correct seated position and not to change this position while the car is moving.
The following list contains instructions for the Passenger which, if not ob-
served, may cause serious injuries or death. ▶ Do not lean against the dash panel.
▶ Do not put your feet on the dash panel.
The following list contains instructions for all Passengers which, if not ob-
served, may cause serious injuries or death.
▶ Do not sit only on the front area of the seat.
▶ Do not sit facing to one side.
▶ Do not lean out of the window.
▶ Do not put your limbs out of the window.
▶ Do not put your feet on the seat upholstery.
12Safety
Page 74 of 324
›To
furl grab the screen at the handle B and remove from the holders A.
Hold the sunshade so that this can slowly roll back in without damaging.
Windscreen wipers and washers
Introduction
This chapter contains information on the following subjects:
Front wipers and washers
72
Rear wipers and washers / reversing camera cleaning system
73
Headlight cleaning system
73
The windscreen wipers and the wash system only operate if the ignition is
switched on and the bonnet and boot are closed.
WARNINGDo not use the windscreen washer system at low temperatures, without
heating the windscreen beforehand. Otherwise the window washer fluid
could freeze on the windscreen and restrict the view to the front.
CAUTION
■ If the windscreen wipers are in rest position, they cannot be folded out from
the windscreen. The wipers must be set to the service position to raise them
off the windscreen » page 277.■
In cold temperatures and during the winter, check before switching on the
ignition that the wiper blades are not frozen to the windscreen. If the wind-
screen wipers are switched on when the blades are frozen to the windscreen,
this may damage both the blades and windscreen wiper motor.
■
Carefully separate frozen windscreen wiper blades from the windscreen and
free from snow and ice.
■
Handle the windscreen wipers with care - there is a risk of damage to the
windscreen by the windscreen wiper arms.
■
Do not switch on the ignition when the wiper arm is raised from the wind-
screen - there is a risk of damage to the bonnet by the wiper arms.
■
If there is an obstacle on the windscreen, the wipers will try to push away
the obstacle five times. The wipers then stop to prevent themselves from be-
ing damaged. Only switch the wipers on again after the obstacle has been re-
moved.
Note■ Each time the ignition switches off for the third time, the position of the
windscreen wipers changes. This counteracts an early fatigue of the wiper
blades.■
The windscreen washer nozzles for the windscreen are heated when the en-
gine is running and the outside temperature is less than +10 °C.
Front wipers and washers
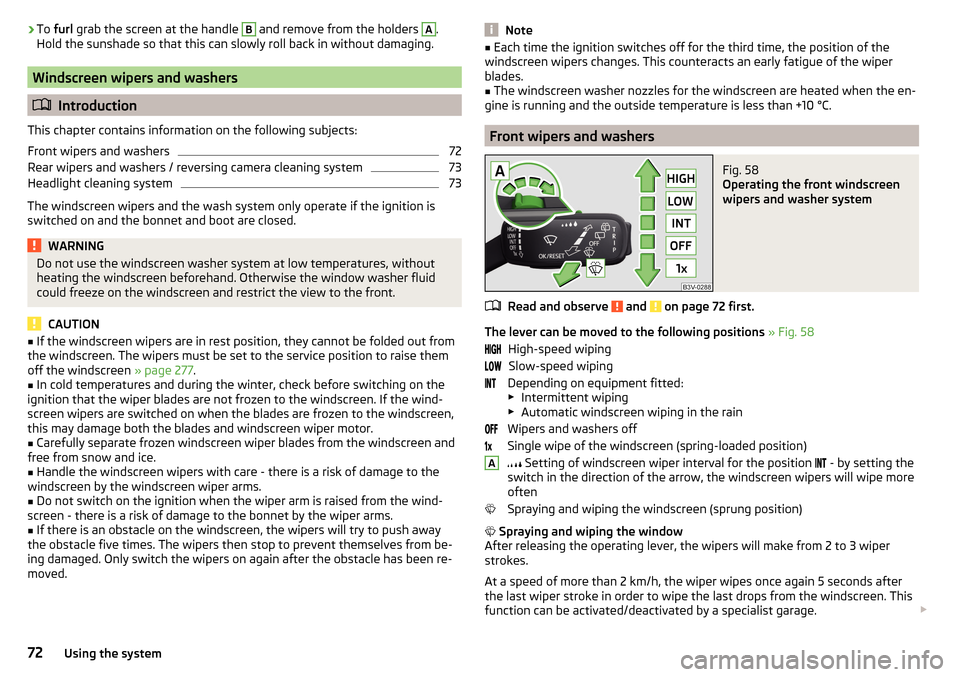
Fig. 58
Operating the front windscreen
wipers and washer system
Read and observe and on page 72 first.
The lever can be moved to the following positions » Fig. 58
High-speed wiping Slow-speed wiping
Depending on equipment fitted:
▶ Intermittent wiping
▶ Automatic windscreen wiping in the rain
Wipers and washers off
Single wipe of the windscreen (spring-loaded position)
Setting of windscreen wiper interval for the position
- by setting the
switch in the direction of the arrow, the windscreen wipers will wipe more
often
Spraying and wiping the windscreen (sprung position)
Spraying and wiping the window
After releasing the operating lever, the wipers will make from 2 to 3 wiper
strokes.
At a speed of more than 2 km/h, the wiper wipes once again 5 seconds after
the last wiper stroke in order to wipe the last drops from the windscreen. This
function can be activated/deactivated by a specialist garage.
A72Using the system
Page 247 of 324
The longer insect residues, bird droppings, road salt and other aggressive de-
posits remain on the paintwork of your vehicle, the more detrimental their de-
structive effect can be. High temperatures, such as those caused by intensive
sun's rays, accentuate this caustic effect.
It is also essential to thoroughly clean the underside of the vehicle at the end
of the winter.
Washing by hand
Wash the vehicle from top to bottom, with a soft sponge or a wash mitt and
plenty of water, and, if necessary, with the appropriate detergents. Wash out
the sponge or washing glove thoroughly at short intervals.
For wheels, door sills and lower areas of the vehicle use a different sponge.
Give the vehicle a good rinse after washing it and dry it off using a chamois
leather.
Automatic Car Washes
The usual precautionary measures must be taken before washing the vehicle
(e.g. closing the windows and the tilt/slide roof etc.).
If your vehicle is fitted with any particular attached parts (e.g. spoiler, roof rack system, two-way radio aerial etc.) it is best to consult the operator of the car
wash system beforehand.
After an automatic wash with wax treatment, the wiper blades should be
cleaned with cleaning agents specially designed for the purpose, and then de-
greased.
Pressure Washers
When washing the vehicle with a high-pressure cleaner, the instructions for
use of the equipment must be observed. This particularly applies to instruc-
tions regarding the pressure and spraying distance from the vehicle surface.WARNING■
When washing your vehicle in the winter: Water and ice in the braking
system can affect the braking efficiency – risk of accident!■
Take care when cleaning the underbody or the inside of the wheel wells -
there is a risk of injury from sharp metal parts!
CAUTION■ Do not wash the vehicle in direct sunlight, do not exert pressure on the body
while washing. The temperature of the washing water should be no more than
60 °C max. - otherwise there is a risk of damaging the vehicle paint.■
Before driving through a car wash fold in the exterior mirrors - There is a risk
of damage.
CAUTION
Washing the vehicle with high-pressure cleaners■Films should not be washed with any high-pressure cleaners - risk of dam-
age.■
Do not aim the water jet directly at the lock cylinders or the door or opening
joints when washing the vehicle in the winter – there is a risk of freezing.
■
During cleaning, always keep a sufficiently large spraying distance to the
parking sensors, the rear camera lens, to external decorative and protective
plastic parts (e.g. Roof racks, spoilers, protective strips) and other vehicle parts
made of non-metallic materials such as rubber hoses or insulation materials.
■
The sensors of the parking aid can be sprayed only for a short time and there
must be a minimum distance of 10 cm - there is a risk of damage.
Exterior vehicle care
Read and observe
and on page 244 first.
Vehicle compo- nentsCircumstancesRemedy
Paint
Spilled fuelClear water, cloth, (clean as soon as
possible)No water drop-
lets form on the
paintUse hard wax preserve (at least twice a
year), apply wax to clean and dry bodyPaint has gone
mattUse polish, then wax (if the polish does
not contain any preservative ingredi-
ents)Chrome
and anodised
partsSoilingclear water, cloth, possibly cleaners
provided for this purpose, clean then
polish with a soft dry clothFilmsSoilingSoft sponge and mild soap solution a)Windows
and door mirrorsSoilingWash with clean water and dry with a
wipe specifically for that purpose 245Care and maintenance
Page 248 of 324
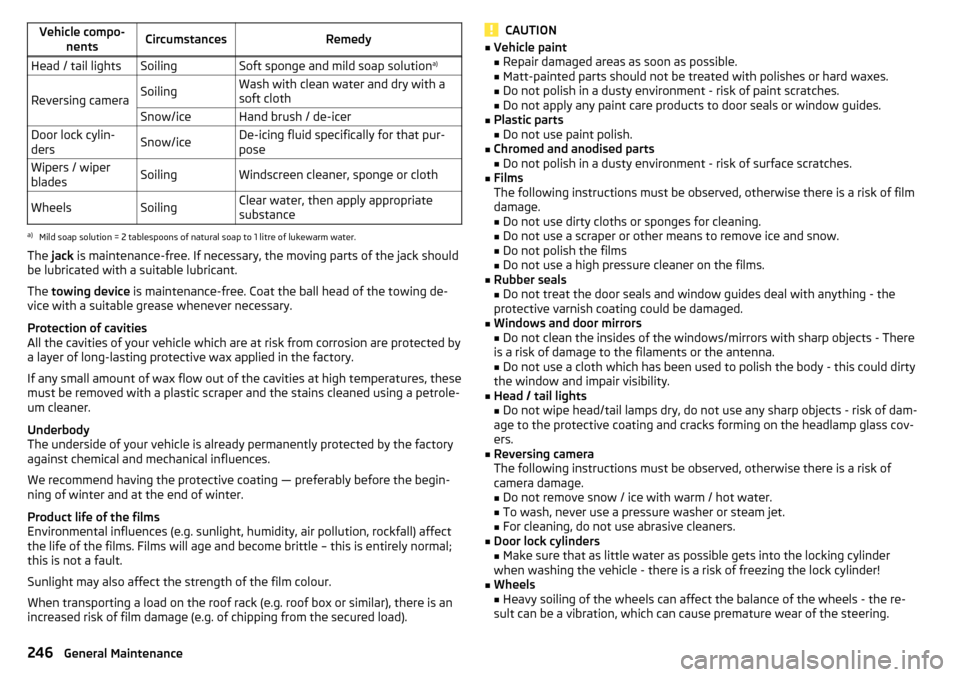
Vehicle compo-nentsCircumstancesRemedyHead / tail lightsSoilingSoft sponge and mild soap solution a)
Reversing cameraSoilingWash with clean water and dry with a
soft clothSnow/iceHand brush / de-icerDoor lock cylin-
dersSnow/iceDe-icing fluid specifically for that pur-
poseWipers / wiper
bladesSoilingWindscreen cleaner, sponge or clothWheelsSoilingClear water, then apply appropriate
substancea)
Mild soap solution = 2 tablespoons of natural soap to 1 litre of lukewarm water.
The jack is maintenance-free. If necessary, the moving parts of the jack should
be lubricated with a suitable lubricant.
The towing device is maintenance-free. Coat the ball head of the towing de-
vice with a suitable grease whenever necessary.
Protection of cavities
All the cavities of your vehicle which are at risk from corrosion are protected by
a layer of long-lasting protective wax applied in the factory.
If any small amount of wax flow out of the cavities at high temperatures, these
must be removed with a plastic scraper and the stains cleaned using a petrole-
um cleaner.
Underbody
The underside of your vehicle is already permanently protected by the factory
against chemical and mechanical influences.
We recommend having the protective coating — preferably before the begin-
ning of winter and at the end of winter.
Product life of the films
Environmental influences (e.g. sunlight, humidity, air pollution, rockfall) affect
the life of the films. Films will age and become brittle – this is entirely normal;
this is not a fault.
Sunlight may also affect the strength of the film colour.
When transporting a load on the roof rack (e.g. roof box or similar), there is an
increased risk of film damage (e.g. of chipping from the secured load).
CAUTION■ Vehicle paint
■ Repair damaged areas as soon as possible.
■ Matt-painted parts should not be treated with polishes or hard waxes.
■ Do not polish in a dusty environment - risk of paint scratches.
■ Do not apply any paint care products to door seals or window guides.■
Plastic parts
■ Do not use paint polish.
■
Chromed and anodised parts
■ Do not polish in a dusty environment - risk of surface scratches.
■
Films
The following instructions must be observed, otherwise there is a risk of film
damage. ■ Do not use dirty cloths or sponges for cleaning.
■ Do not use a scraper or other means to remove ice and snow.
■ Do not polish the films
■ Do not use a high pressure cleaner on the films.
■
Rubber seals
■ Do not treat the door seals and window guides deal with anything - the
protective varnish coating could be damaged.
■
Windows and door mirrors ■ Do not clean the insides of the windows/mirrors with sharp objects - There
is a risk of damage to the filaments or the antenna. ■ Do not use a cloth which has been used to polish the body - this could dirty
the window and impair visibility.
■
Head / tail lights
■ Do not wipe head/tail lamps dry, do not use any sharp objects - risk of dam-
age to the protective coating and cracks forming on the headlamp glass cov-
ers.
■
Reversing camera
The following instructions must be observed, otherwise there is a risk of
camera damage.
■ Do not remove snow / ice with warm / hot water.
■ To wash, never use a pressure washer or steam jet.
■ For cleaning, do not use abrasive cleaners.
■
Door lock cylinders
■ Make sure that as little water as possible gets into the locking cylinder
when washing the vehicle - there is a risk of freezing the lock cylinder!
■
Wheels
■ Heavy soiling of the wheels can affect the balance of the wheels - the re-
sult can be a vibration, which can cause premature wear of the steering.
246General Maintenance
Page 279 of 324
›Insert a screwdriver or similar tool into the recess or the opening in the
trim » Fig. 319 as far as the stop.›
Unlock the lid by moving it in the direction of the arrow.
Selector lever-emergency unlocking
Fig. 320
Remove / release the selector lever
›
Firmly apply the handbrake.
›
Open the stowage compartment in the front centre console.
›
Grab hold of the cover
A
in the area of the arrows and carefully raise it for-
wards in the direction of the arrow
1
and then backwards » Fig. 320.
›
Press on the yellow plastic part in the direction of arrow
2
, simultaneously
press the lock button in the selector lever handle and put the lever in posi-
tion N.
If the selector lever is moved again to position P, it is once again blocked.
CAUTION
Make sure when lifting not to damage cover parts by the screwdriver in the
shift lever environment.
Replacing windscreen wiper blades
Introduction
This chapter contains information on the following subjects:
Replacing the windscreen wiper blades
277
Replacing the rear window wiper blade
278WARNINGReplace the windscreen wiper blades once or twice a year for safety rea-
sons.
Replacing the windscreen wiper blades
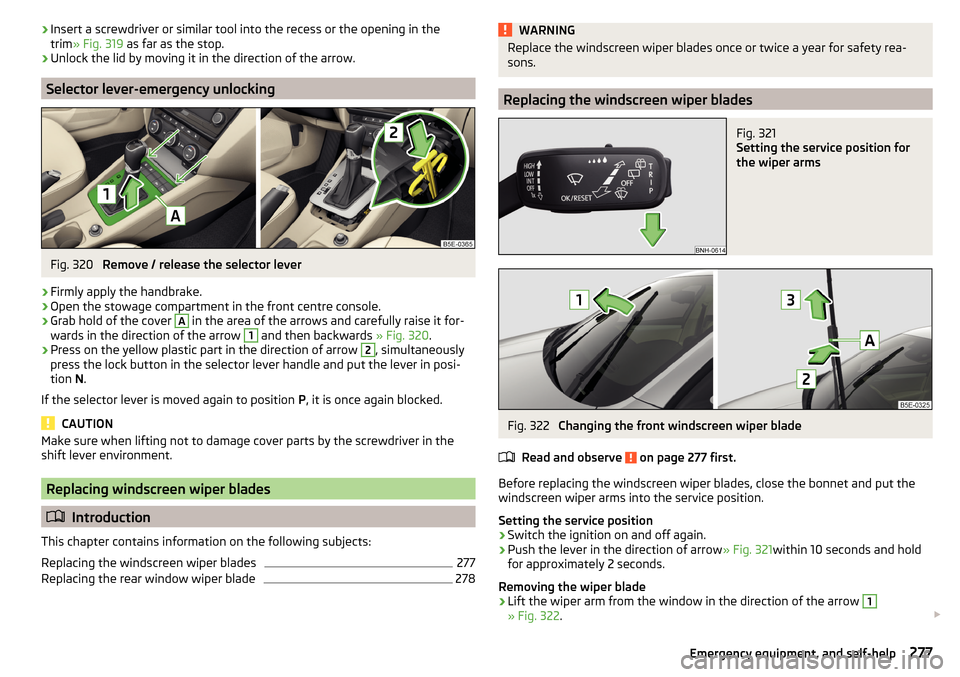
Fig. 321
Setting the service position for
the wiper arms
Fig. 322
Changing the front windscreen wiper blade
Read and observe
on page 277 first.
Before replacing the windscreen wiper blades, close the bonnet and put the windscreen wiper arms into the service position.
Setting the service position
›
Switch the ignition on and off again.
›
Push the lever in the direction of arrow » Fig. 321within 10 seconds and hold
for approximately 2 seconds.
Removing the wiper blade
›
Lift the wiper arm from the window in the direction of the arrow
1
» Fig. 322 .
277Emergency equipment, and self-help
Page 304 of 324
Ball headCheck fitting233
Ready position231
Battery Change in key
275
Replace the battery in the remote control in the auxiliary heating
275
Belts15
Belt tensioners17
Bluetooth A2DP / AVRCP
124
Name124
on / off124
Paired external devices124
rSAP155
Set131
set to124, 126
Set to124
Switch on/off131
Update122, 125
Updates131
Visibility124, 131
Bluetooth Player141
Bluetooth profile153
Bluetooth® update153
Bonnet Close
253
Open253
Boot Class N1 vehicles
100
see boot lid56
Stow roof rack103
Boot lid57
Automatic locking57
Open/close58
Open/Close56
Brake Assist (HBA)202
Brake booster191
Brake fluid257
Check257
specification257
Brake linings warning light
36
Brake pads new
191
Brake pedal (automatic gearbox) Warning light
37
Brakes Brake booster
191
Brake fluid257
Braking and stabilisation systems200
Handbrake192
Information on braking191
Run in196
Warning lights33
Brake system200
Breakdown call157
Breakdown kit270
Broadcasting133
See main menu133
Bulbs Replacing
282
Button in driver's door Electric windows
60
C
Call list Call list
159
Camera See reversing camera
207
CAR187
Car battery Automatic consumer shutdown
258
Check condition259
Cover259
Disconnecting and reconnecting260
Replacing260
Winter operation259
CAR button187
Car care Exterior
245, 247
Interior247
Car cleaning Exterior
247
Windscreens247
Car computer see multifunction display
44
Care and maintenance240
Cargo element99
CAR menu187
Car washing244
Interior247
washing244
CD139
Central locking51
Problems55
Central locking button53
Change battery
275
Changing Windscreen wiper blades
278
Changing a wheel266
Changing266
Changing gear Selector lever
194
Tiptronic195
Changing wheels Wheels
266
Charging a vehicle battery259
Check Brake fluid
257
Engine oil256
Fit ball head properly233
Oil level256
Checking Battery status
259
Coolant257
302Index
Page 313 of 324
Removing thebar ball, Step 1233
bar ball, Step 2234
Repairs and technical alterations240
Replace Battery
275
Replacing Bulbs
282
Fuses278
Windscreen wiper blades277
Restart Infotainment117
restaurant173
Rev counter30
Reversing camera207
Function surfaces208
Operation208
Orientation lines208
Rims260
Road sign178
Roller blind Luggage compartment cover
98
Roof Weight
103
Roof rack103
Route179
New route183
Route list183
Store route181
Route calculation179
Trailer towing180
Route details181
Route information181
Route list183
Route options128
rSAP155
Run-in Engine
196
Running inBrake pads191
Tyres260
S
SafeLock
53
Safe removal of the data source124, 130
safety air bag
18
ISOFIX25
Safety12
Child safety22
Child safety seats22
Correct seated position12
Headrests80
ISOFIX25
TOP TETHER26
SAFE, SAFELOCK See SafeLock
53
Save station135
Saving electrical energy197
Saving fuel197
Screen see Infotainment screen
115
Screen display116
SD card140
Safe removal130
Search for car park173
Search for destination171
Search for petrol station173
Search for restaurant173
Seat belt height adjustment
16
Warning light37
Seat belts15
Belt tensioners17
fastening and unfastening16
Inertia reels17
Warning light33
Seat electrical adjustment77
Seats Electrical adjustment
77
Folding front passenger seat78
front76
Front armrest79
Headrests80
Heating81
Manually adjusting76
Memory Function of the electrically adjustable seat
77
Rear79
Rear armrest80
Rear seat backrests79
Setting76
Storing in memory of remote control key78
Seats and head restraint76
see Instrument cluster see Instrument cluster
30
Select broadcasting See main menu
133
Select Image Source Images
144
Selector lever194
Selector lever control194
Selector lever lock Warning light
37
Select source Media
137
Select station See main menu
133
Select video source Video DVD
145
service240
Service Service interval display
48
Warning light40
Service Interval243
Service intervals242
Service Plan244
311Index
Page 318 of 324
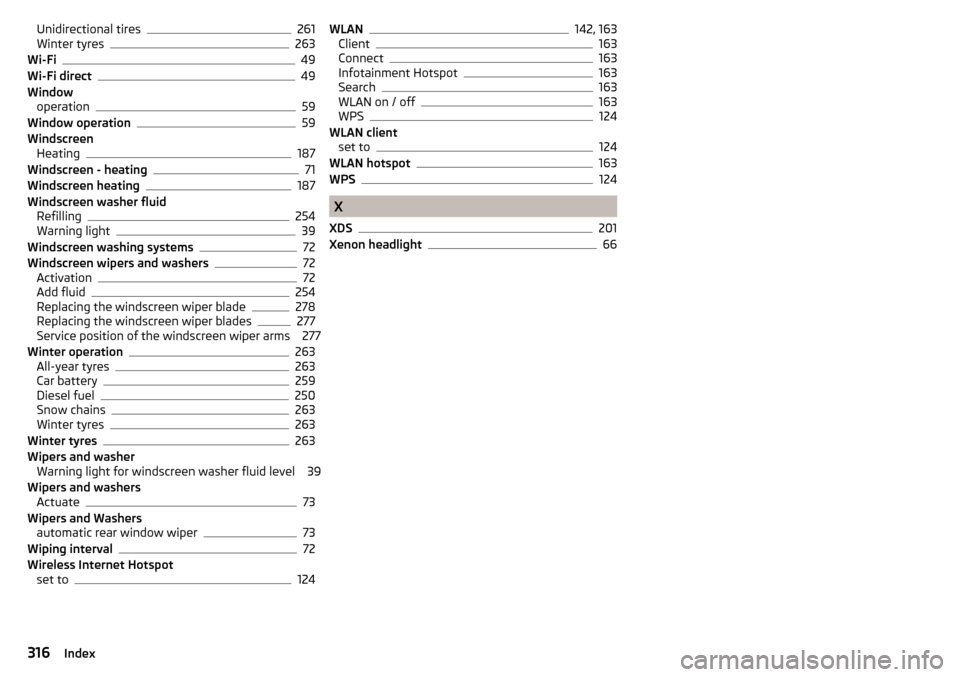
Unidirectional tires261
Winter tyres263
Wi-Fi49
Wi-Fi direct49
Window operation
59
Window operation59
Windscreen Heating
187
Windscreen - heating71
Windscreen heating187
Windscreen washer fluid Refilling
254
Warning light39
Windscreen washing systems72
Windscreen wipers and washers72
Activation72
Add fluid254
Replacing the windscreen wiper blade278
Replacing the windscreen wiper blades277
Service position of the windscreen wiper arms 277
Winter operation
263
All-year tyres263
Car battery259
Diesel fuel250
Snow chains263
Winter tyres263
Winter tyres263
Wipers and washer Warning light for windscreen washer fluid level 39
Wipers and washers Actuate
73
Wipers and Washers automatic rear window wiper
73
Wiping interval72
Wireless Internet Hotspot set to
124
WLAN142, 163
Client163
Connect163
Infotainment Hotspot163
Search163
WLAN on / off163
WPS124
WLAN client set to
124
WLAN hotspot163
WPS124
X
XDS
201
Xenon headlight66
316Index