size SKODA OCTAVIA TOUR 2009 1.G / (1U) Owner's Manual
[x] Cancel search | Manufacturer: SKODA, Model Year: 2009, Model line: OCTAVIA TOUR, Model: SKODA OCTAVIA TOUR 2009 1.G / (1U)Pages: 224, PDF Size: 13.53 MB
Page 61 of 224
Seats and Storage
60
Seats and StorageFront seatsBasic informationThe front seats have a wide range of different settings and can thus be matched to the physical characteristics of the driver and front passenger. Correct adjustment of the seats is particularly important for:•
safely and quickly reaching the controls;
•
a relaxed, fatigue-free body position;
•
achieving the maximum protection offere
d by the seat belts and the airbag
system.
WARNING
•
Never transport more occupants than the maximum seating in the
vehicle.•
Each occupant must correctly fasten
the seat belt belonging to the seat.
Children must be fastened
⇒page 123, “Transporting children safely” with
a suitable restraint system.•
The front seats and the head restraints must always be adjusted to match
the body size of the seat occupant as well as the seat belts must always be correctly fastened in order to provide an optimal protection for you and your occupants.•
Always keep your feet in the footwel
l when the vehicle is being driven -
never place your feet on the instrument panel, out of the window or on the surfaces of the seats. This is particularly important for the front seat passenger. You will be exposed to increased risk of injury if it becomes necessary to apply the brake or in the event of an accident. If an airbag is deployed, you may suffer fatal injuries
when adopting an incorrect seated
position!•
It is important for the driver and front passenger to maintain a distance
of at least 25 cm from the steering wheel
or dash panel. Not maintaining this
minimum distance will mean that the airbag system will not be able to prop- erly protect you - hazard! The front
seats and the head restraints must
always also be correctly adjusted to match the body size of the occupant.•
Ensure that there are no objects in
the footwell as any objects may get
behind the pedals during a driving or
braking manoeuvre. You would then
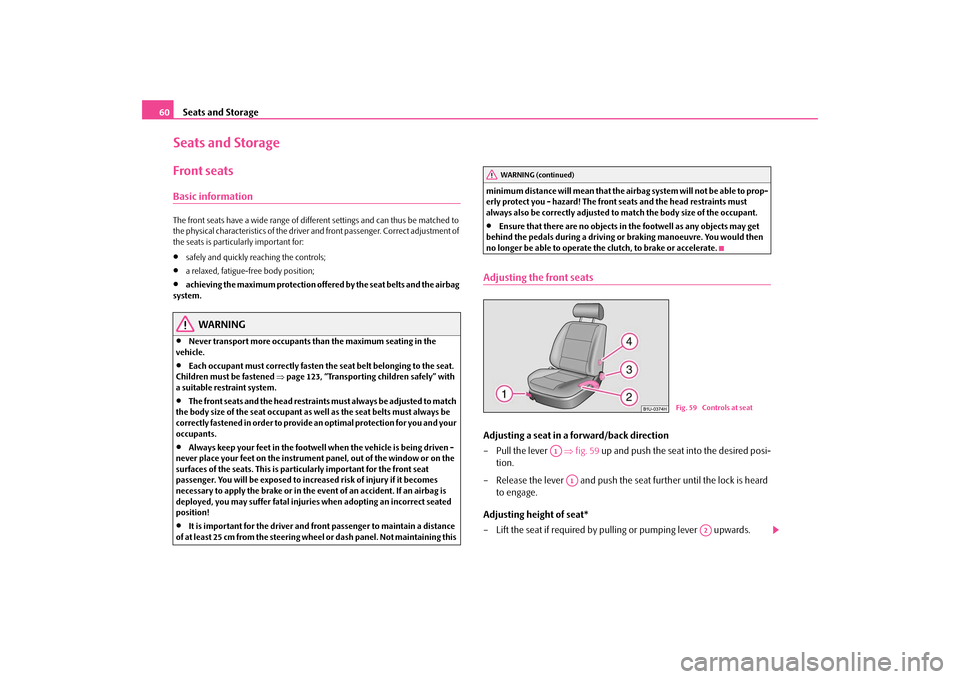
no longer be able to operate the clutch, to brake or accelerate.Adjusting the front seatsAdjusting a seat in a forward/back direction – Pull the lever
⇒
fig. 59
up and push the seat into the desired posi-
tion.
– Release the lever and push the seat further until the lock is heard
to engage.
Adjusting height of seat* – Lift the seat if required by pulling or pumping lever upwards.
WARNING (continued)
Fig. 59 Controls at seat
A1
A1
A2
s2g8.b.book Page 60 Tuesday, April 7, 2009 8:53 AM
Page 65 of 224
Seats and Storage
64
Information concerning the off switch of the memory systemAfter pressing the off switch of the memory system
⇒page 62, fig. 61
, the
memory system is deactivated. You can only adjust the seat and the exterior mirrors manually. You can switch on the memory sy
stem again by once
again pressing the
off switch of the memory system. The setting is not carried out to the end if a retrieved setting operation is interrupted. We recommend that you switch off the memory system with the off switch if the vehicle is used for a short period by a driver and you do not wish to store any partic-ular settings of the seat and mirrors in this case.Head restraints
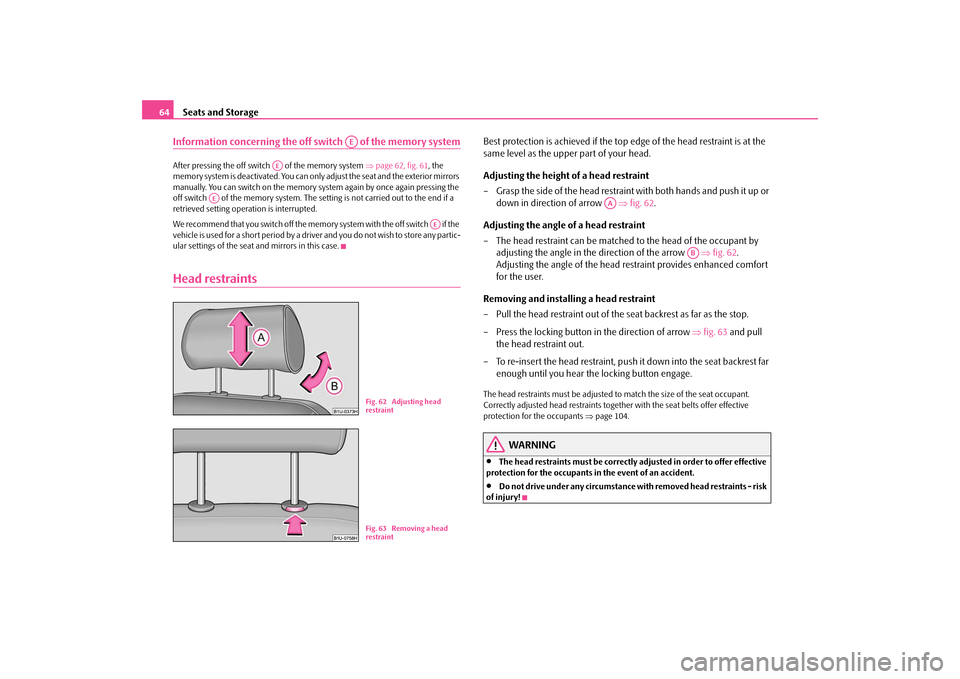
Best protection is achieved if the top
edge of the head restraint is at the
same level as the upper part of your head. Adjusting the height of a head restraint – Grasp the side of the head restraint with both hands and push it up or
down in direction of arrow
⇒
fig. 62
.
Adjusting the angle of a head restraint – The head restraint can be matched
to the head of the occupant by
adjusting the angle in the direction of the arrow
⇒
fig. 62
.
Adjusting the angle of the head re
straint provides enhanced comfort
for the user.
Removing and installing a head restraint – Pull the head restraint out of the
seat backrest as far as the stop.
– Press the locking button in the direction of arrow
⇒
fig. 63
and pull
the head restraint out.
– To re-insert the head restraint, push it down into the seat backrest far
enough until you hear the locking button engage.
The head restraints must be adjusted to
match the size of the seat occupant.
Correctly adjusted head restraints togeth
er with the seat belts offer effective
protection for the occupants
⇒page 104.
WARNING
•
The head restraints must be correctly adjusted in order to offer effective
protection for the occupants in the event of an accident.•
Do not drive under any circumstance with removed head restraints - risk
of injury!
AE
AE
AE
AE
Fig. 62 Adjusting head restraintFig. 63 Removing a head restraint
AA
AB
s2g8.b.book Page 64 Tuesday, April 7, 2009 8:53 AM
Page 66 of 224
Seats and Storage
65
Using the system
Safety
Driving Tips
General Maintenance
Breakdown assistance
Technical Data
Rear seatsFolding the rear seats forwardsThe luggage compartment can be increased in size by folding the rear seats forwards. Before folding the rear seats forwards, it is required to adapt the position of the front seats and the armrest in such a way that no mutual deformation or damage can occur to the seats.
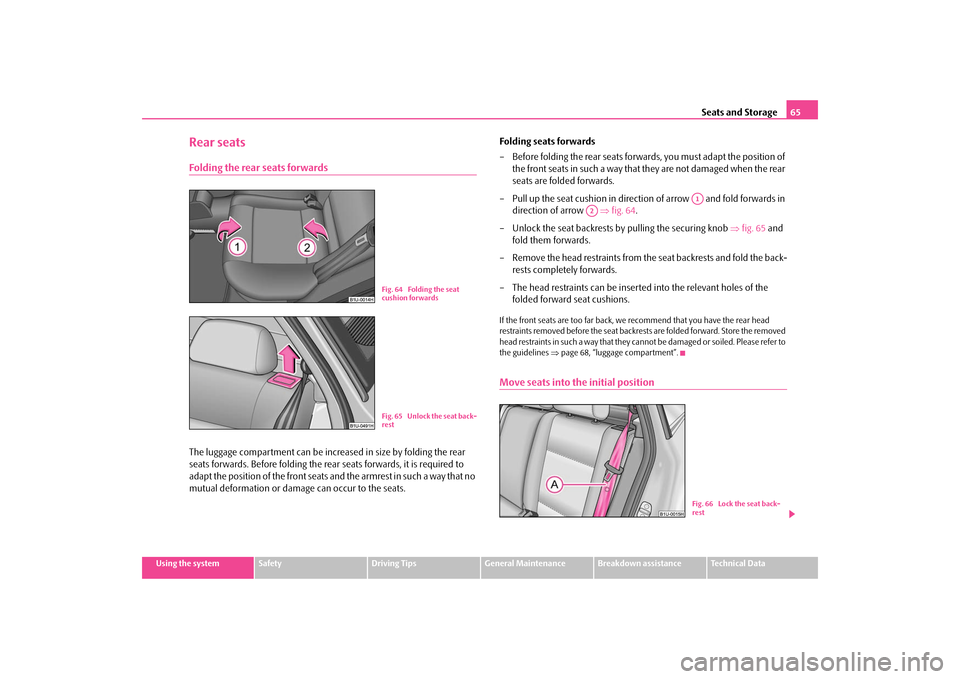
Folding seats forwards – Before folding the rear seats forwards, you must adapt the position of
the front seats in such a way that
they are not damaged when the rear
seats are folded forwards.
– Pull up the seat cushion in direction of arrow and fold forwards in
direction of arrow
⇒
fig. 64
.
– Unlock the seat backrests by
pulling the securing knob
⇒
fig. 65
and
fold them forwards.
– Remove the head restraints from the seat backrests and fold the back-
rests completely forwards.
– The head restraints can be inserted into the relevant holes of the
folded forward seat cushions.
If the front seats are too far back, we
recommend that you have the rear head
restraints removed before the seat backrests are folded forward. Store the removed head restraints in such a way that they cannot be damaged or soiled. Please refer to the guidelines
⇒page 68, “luggage compartment”.
Move seats into th
e initial position
Fig. 64 Folding the seat cushion forwardsFig. 65 Unlock the seat back-rest
A1
A2
Fig. 66 Lock the seat back-rest
s2g8.b.book Page 65 Tuesday, April 7, 2009 8:53 AM
Page 67 of 224
Seats and Storage
66
Move seats into the initial position – Install the head restraints in the slightly lifted seat backrest. – Place the rear lateral seat belt behind the edge of the side trim
panel
⇒
page 65, fig. 66
.
– Then push the seat backrest back
into the upright position until the
securing knob clicks into place - ch
eck by pulling on the seat backrest.
– Move the seat cushion into its original position.
WARNING
•
The belts and the belt locks must be in
their original position after folding
back the seat cushions and the seat backrests - they must be ready to use.•
The seat backrests must be securely interlocked in position so that no
objects in the luggage compartment ca
n slide into the passenger compart-
ment if there is sudden braking - risk of injury!•
Pay attention that the seat backrests are correctly interlocked. It is only
then that the three-point seat belt for the middle seat can reliably fulfil its function.•
Before folding the seat backrest back
into the secure position, place the
rear lateral seat belt behind the edge of the side trim panel. Take suitable measures to prevent that the seat belt
is jammed between the seat backrest
and the side trim panel and is thus damaged.
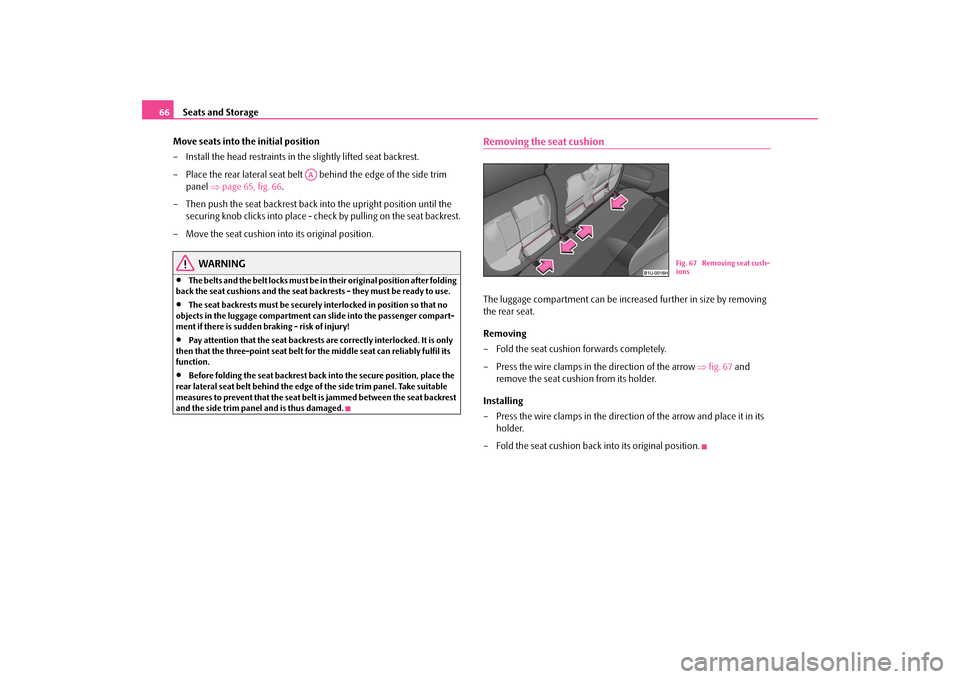
Removing the seat cushionThe luggage compartment can be increased further in size by removing the rear seat. Removing – Fold the seat cushion forwards completely. – Press the wire clamps in the direction of the arrow
⇒
fig. 67
and
remove the seat cushion from its holder.
Installing – Press the wire clamps in the direction of the arrow and place it in its
holder.
– Fold the seat cushion back into its original position.
AA
Fig. 67 Removing seat cush- ions
s2g8.b.book Page 66 Tuesday, April 7, 2009 8:53 AM
Page 105 of 224
Passive Safety
104
•
Ensure that the lighting and the turn signal system are functioning properly.
•
Inspect the tyre inflation pressure.
•
Ensure that all the windows offer a good visibility to the outside.
•
Safely attach the items of luggage
⇒page 68, “Loading the luggage compart-
ment”.•
Ensure that no objects can obstruct the pedal.
•
Adjust the mirror, the front seat and the head restraint to match your body size.
•
Point out to your occupants that the head restraints must be adjusted to match
their body size.•
Protect the children in suitable child se
ats with correctly fastened seat belts
⇒ page 123, “Transporting children safely”.•
Adopt the correct seated position
⇒page 104, “Correct seated position”. Also
inform your occupants to adop
t the correct seated position.
•
Fasten the seat belt correctly. Also inform your occupants to properly fasten the
seat belts
⇒page 110, “How are seat belts correctly fastened?”.
What influences the driving safety? The driving safety is primarily dete
rmined by the style of driving and
the personal behaviour of all the occupants.The driver is fully responsible for himself and his occupants. If your driving safety is effected, you place yourself and the oncomi
ng traffic at risk. Please refer to the
following guidelines.•
Do not get distracted from concentrating on the traffic situation, e.g. by your
occupants or mobile phone calls.•
Never drive when your driving ability is impaired, e.g. through medication,
alcohol, drugs.•
Keep to the traffic regulations and the permissible speed limit.
•
Adjust the driving speed at all times to the road condition as well as to the traffic
and weather conditions.•
Take regular breaks on long journe
ys - at the latest every two hours.
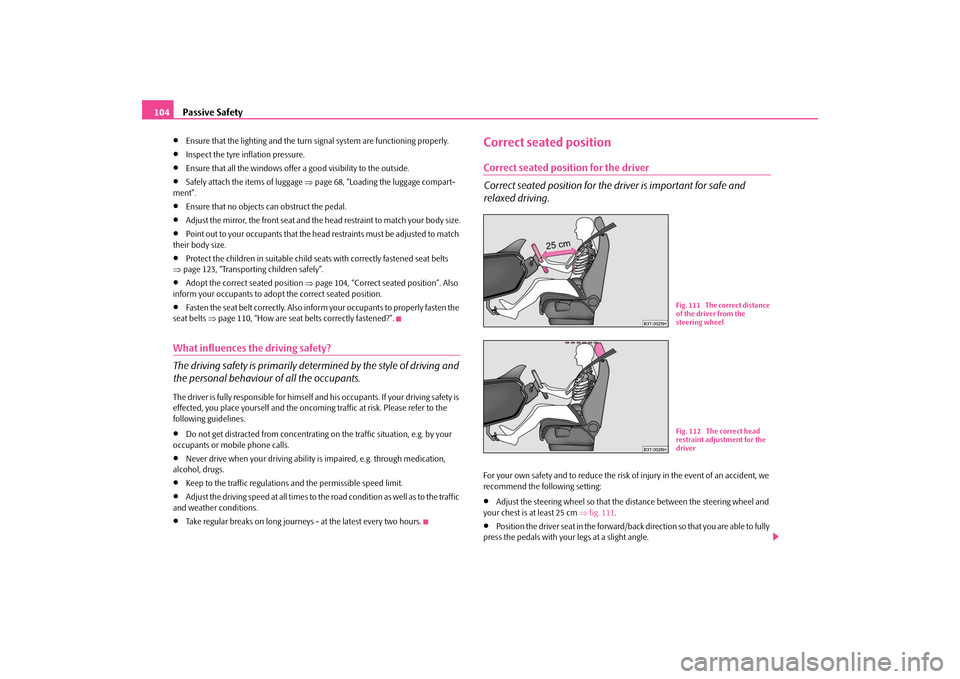
Correct seated positionCorrect seated position for the driver Correct seated position for the dr
iver is important for safe and
relaxed driving.For your own safety and to reduce the risk of injury in the event of an accident, we recommend the following setting:•
Adjust the steering wheel so that the distance between the steering wheel and
your chest is at least 25 cm
⇒fig. 111
.
•
Position the driver seat in the forward/back direction so that you are able to fully
press the pedals with your legs at a slight angle.
Fig. 111 The correct distance of the driver from the steering wheelFig. 112 The correct head restraint adjustment for the driver
s2g8.b.book Page 104 Tuesday, April 7, 2009 8:53 AM
Page 106 of 224
Passive Safety
105
Using the system
Safety
Driving Tips
General Maintenance
Breakdown assistance
Technical Data
•
Adjust the seat backrest so that you are able to reach the highest point of the
steering wheel with your arms at a slight angle.•
Adjust the head restraint so that the top edge of the head restraint is at the same
level as the upper part of your head
⇒page 104, fig. 112
.
•
Fasten the seat belt correctly
⇒page 110, “How are seat belts correctly
fastened?”. Manual driver seat adjustment
⇒page 60, “Adjusting the front seats”.
Electrical driver seat adjustment
⇒page 61, “Adjusting front seats electrically*”.
WARNING
•
The front seats and the head restraints must always be adjusted to match
the body size of the seat occupant as well as the seat belts must always be correctly fastened in order to provide an optimal protection for you and your occupants.•
The driver must maintain a distance of at least 25 cm to the steering
wheel
⇒page 104, fig. 111
. Not maintaining this minimum distance will
mean that the airbag system will not be able to properly protect you - hazard!•
When driving, hold the steering whee
l with both hands firmly on the
outer edge in the 9 o'clock and 3 o'clock position. Never hold the steering wheel firmly in the 12 o'clock position or in another way (e.g. in the middle of the steering wheel or at the inner
steering wheel edge). In such cases,
injuries to the arms, the hands and the head can occur when the driver airbag is deployed.•
The seat backrests must not be angled too far back when driving other-
wise this will affect proper operation of the seat belts and of the airbag system - risk of injury!•
Ensure that there are no objects in the footwell as any objects may get
behind the pedals during a driving or
braking manoeuvre.
You would then
no longer be able to operate the
clutch, to brake or accelerate.
Correct seated position for the front passenger The front passenger must maintain a distance of at least 25°cm from the dash panel so that the combination of the airbag and the seat belt offers the greatest possible sa
fety when an airbag is deployed.
For the safety of the front passenger and to
reduce the risk of injury in the event of
an accident, we recommend the following setting:•
Adjust the front passenger seat as far as possible to the rear.
•
Adjust the head restraint so that the top edge of the head restraint is at the same
level as the upper part of your head
⇒page 104, fig. 112
.
•
Fasten the seat belt correctly
⇒page 110, “How are seat belts correctly
fastened?”. In exceptional cases the front pass
enger airbag can be deactivated
⇒page 120,
“Deactivating an airbag”. Manual front passenger adjustment
⇒page 60, “Adjusting the front seats”.
Electrical front passenger seat adjustment
⇒page 61, “Adjusting front seats electri-
cally*”.
WARNING
•
The front seats and the head restraints must always be adjusted to match
the body size of the seat occupant as well as the seat belts must always be correctly fastened in order to provide an optimal protection for you and your occupants.•
The front passenger must maintain a distance of at least 25 cm to the
dash panel. Not maintaining this mi
nimum distance will mean that the
airbag system will not be able to properly protect you - hazard!•
Always keep your feet in
the footwell when the vehicle is being driven -
never place your feet on the instrument panel, out of the window or on the surfaces of the seats. You will be exposed to increased risk of injury if it becomes necessary to apply the brake or in the event of an accident. If an airbag is deployed, you may suffer fata
l injuries when adopting an incorrect
seated position!
s2g8.b.book Page 105 Tuesday, April 7, 2009 8:53 AM
Page 107 of 224
Passive Safety
106
•
The seat backrests must not be angl
ed too far back when driving other-
wise this will affect proper operation of the seat belts and of the airbag system - risk of injury!Correct seated position for the occupants on the rear seats Occupants on the rear seats must sit upright, keep the feet in the footwell and must have their se
at belts correctly fastened.
To reduce the risk of injury in the event of a sudden braking manoeuvre or an acci- dent, the occupants on the rear seats must observe the following:•
Adjust the head restraints so that the top edge of the head restraints are at the
same level as the upper part of your head
⇒page 104, fig. 112
.
•
Fasten the seat belt correctly
⇒page 110, “How are seat belts correctly
fastened?”.•
If you are transporting
⇒page 123, “Transporting children safely” children in
the vehicle, please use a suitable child restraint system.
WARNING
•
The head restraints must always be adjusted to match the body size, in
order to offer an optimal protection for you and your occupants.•
Always keep your feet in the footwell
when the car is being driven - never
put your feet out of the window or on the surfaces of the seats. You will be exposed to increased risk of injury if it becomes necessary to apply the brake or in the event of an accident. If an
airbag is deployed, you may suffer fatal
injuries when adopting an incorrect seated position!•
If the occupants on the rear seats are no
t sitting upright, the risk of injury
is increased due to incorrect routing of the seat belt.
Examples of an incorrect seated position An incorrect seated position can lead to severe injuries or death for the occupants.Seat belts offer their optimum protection on
ly if the webbing of the seat belts is
properly routed. Incorrect seated positio
ns considerably reduce the protective
functions of the seat belts and therefore incr
ease the risk of injury due to an incor-
rect routing of the seat belt. The driver is fully responsible for himself and the occu-pants, in particular for the children. Do
not permit an occupant to adopt an incor-
rect seated position when the car is moving. The following list contains
the examples of seated positions which are dangerous
for the occupants. This list is not comple
te, however we would like you to get inter-
ested in this subject. Therefore, while the car is moving never:•
stand up in the vehicle,
•
stand up on the seats,
•
kneel onto the seats,
•
tilt the seat backrest fully to the back,
•
lean against the dash panel,
•
lie on the rear seats,
•
only sit on the front area of the seat,
•
sit to the side,
•
lean out of the window,
•
put the feet out of the window,
•
put the feet on the dash panel,
•
put the feet on the seat upholstery,
•
occupy the footwell,
•
have the seat belt not fastened,
•
occupy the luggage compartment.
WARNING (continued)
s2g8.b.book Page 106 Tuesday, April 7, 2009 8:53 AM
Page 112 of 224
Seat belts
111
Using the system
Safety
Driving Tips
General Maintenance
Breakdown assistance
Technical Data
– Slowly pull the belt webbing at the to
ngue of the lock over your chest
and pelvis
⇒
.
– Insert the tongue of the lock into th
e seat belt buckle belonging to the
seat until it is heard to lock in place.
– Pull on the belt to check that it has also reliably engaged in the lock.Each three-point seat belt is equipped with an inertia reel. This inertia reel offers you complete freedom of movement if the
belt is unreeled slowly. If the brakes are
applied suddenly, the inertia reel will block. It also blocks the belts when the car accelerates, when driving uphill and when cornering. Expectant mothers must also wear the seat belt
⇒
.
WARNING
•
The shoulder part of the seat belt must never run across your neck but
must run approximately over the middl
e of the shoulder and fit snugly
against the chest. The lap part of the
belt must run across the hip and must
never be routed across the stomach. It must always fit snugly
⇒page 110,
fig. 116
. Adjust the belt webbing as required.
•
The lap part of the belt should be positioned as low as possible at the
pelvis of an expectant mother in order to avoid exerting any pressure on the lower abdomen.•
Always ensure that the webbing of the
seat belts is properly routed. Seat
belts which are not correctly adjusted ca
n themselves cause injuries even in
minor accidents.•
A seat belt which is hanging too loose can result in injuries as your body
is moved forward by the kinetic energy produced in an accident and is then suddenly held firm by the belt.•
Only insert the lock tongue into the lo
ck which is the correct one for your
seat. This will affect the protection whic
h the belt offers and increase the risk
of an injury.
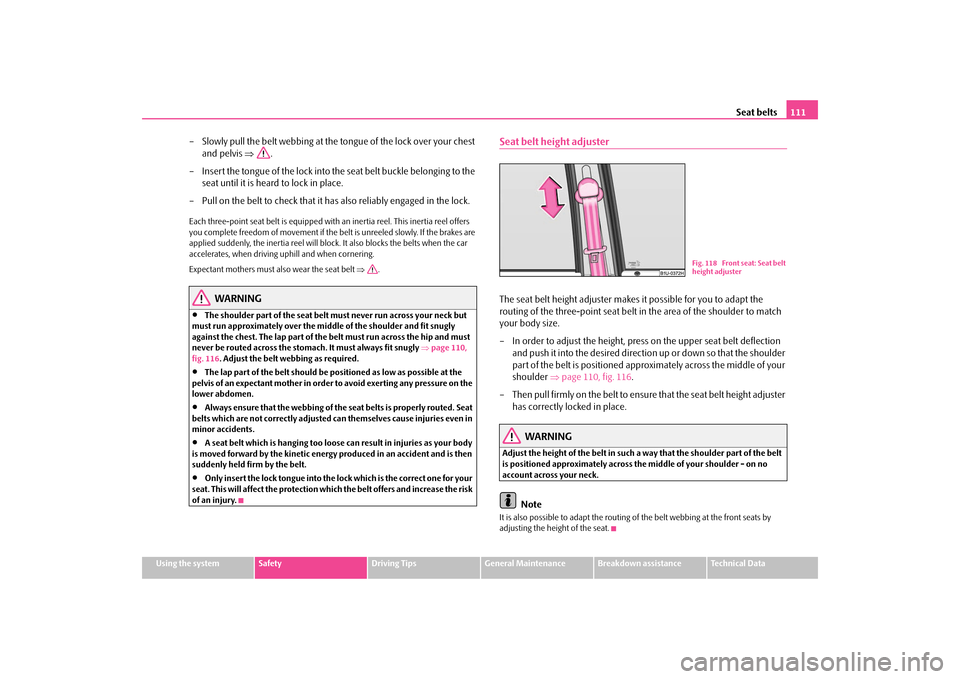
Seat belt height adjusterThe seat belt height adjuster makes it possible for you to adapt the routing of the three-point seat belt in
the area of the shoulder to match
your body size. – In order to adjust the height, press
on the upper seat belt deflection
and push it into the desired direction up or down so that the shoulder part of the belt is positioned appr
oximately across the middle of your
shoulder
⇒
page 110, fig. 116
.
– Then pull firmly on the belt to ensure
that the seat belt height adjuster
has correctly locked in place.
WARNING
Adjust the height of the belt in such a way that the shoulder part of the belt is positioned approximately across the middle of your shoulder - on no account across your neck.
Note
It is also possible to adapt the routing
of the belt webbing at the front seats by
adjusting the height of the seat.
Fig. 118 Front seat: Seat belt height adjuster
s2g8.b.book Page 111 Tuesday, April 7, 2009 8:53 AM
Page 116 of 224
Airbag system
115
Using the system
Safety
Driving Tips
General Maintenance
Breakdown assistance
Technical Data
Airbag systemDescription of the airbag systemGeneral information on the airbag systemThe front airbag system is complementary
to the three-point seat belts and offers
additional protection for the head and chest area of the driver and passenger in the event of a frontal collision. In the case of a violent side crash, the side airbags* reduce the risk of injuries to the occupants on the side of the collision
⇒
.
The airbag system is only functional af
ter the ignition has been switched on.
The operational readiness of the airbag system is monitored electronically. The airbag warning light comes on for a few seconds each time the ignition is switched on. The airbag system (according to vehicle equipment) consists of:•
an electronic control unit,
•
front airbag for the driver and the front seat passenger*,
•
side airbags*,
•
an airbag warning light in the instrument cluster,
•
Switch for front passenger airbag* in
front passenger storage compartment
⇒ page 121,•
Indicator light for a switched off front seat passenger airbag*
⇒page 121.
A fault in the airbag system exists if:•
the airbag indicator light do
es not light up when the ignition is switched on,
•
the warning light does not go out after
about 4 seconds after the ignition is
switched on,•
the airbag indicator light goes out and comes on again after the ignition is
switched on,•
the airbag indicator light comes
on or flickers when driving.
WARNING
•
To enable the occupants of a vehicle
to be protected with the greatest
possible effect when the airbag is deployed, the front seats must be ⇒ page 104, “Correct seated position” co
rrectly adjusted to
match the body
size of the occupant.•
If you do not fasten the seat belts when driving, lean too far forward or
adopt an incorrect seated position, yo
u are exposing yourself to increased
risk of injury in the event of an accident.•
Have the airbag system checked immedi
ately by a specialist garage if a
fault exists. Otherwise, there is a risk
of the airbag not being activated in the
event of an accident.•
No modifications of any kind may be
made to parts of the airbag system.
•
It is prohibited to manipulate individual parts of the airbag system as this
might result in the airbag being deployed.•
The protective function of the airbag system is sufficient for only one
accident. The airbag system must then
be replaced if the airbag has been
deployed.•
The airbag system needs no main
tenance during its working life.
•
If you sell your car, please hand over the complete vehicle documenta-
tion to the new owener. Please note that the documents relating to the possibility of deactivating the front passenger airbag are also part of the vehicle documents!•
If the vehicle or individual parts of the airbag system are scrapped, it is
essential to observe the relevant safety
precautions. Specialist garages are
familiar with these regulations.•
When disposing of vehicle or parts of the airbag system, it is important
to comply with the national legal requirements.
s2g8.b.book Page 115 Tuesday, April 7, 2009 8:53 AM
Page 119 of 224
Airbag system
118
Important safety information regarding the front airbag system Correct use of the airbag system considerably reduces the risk of injury!
WARNING
•
Never transport children on the front seat of a vehicle without using a
proper restraint system. If airbags are
deployed in the event of an accident,
the child might suffer severe
or even fatal injuries!
•
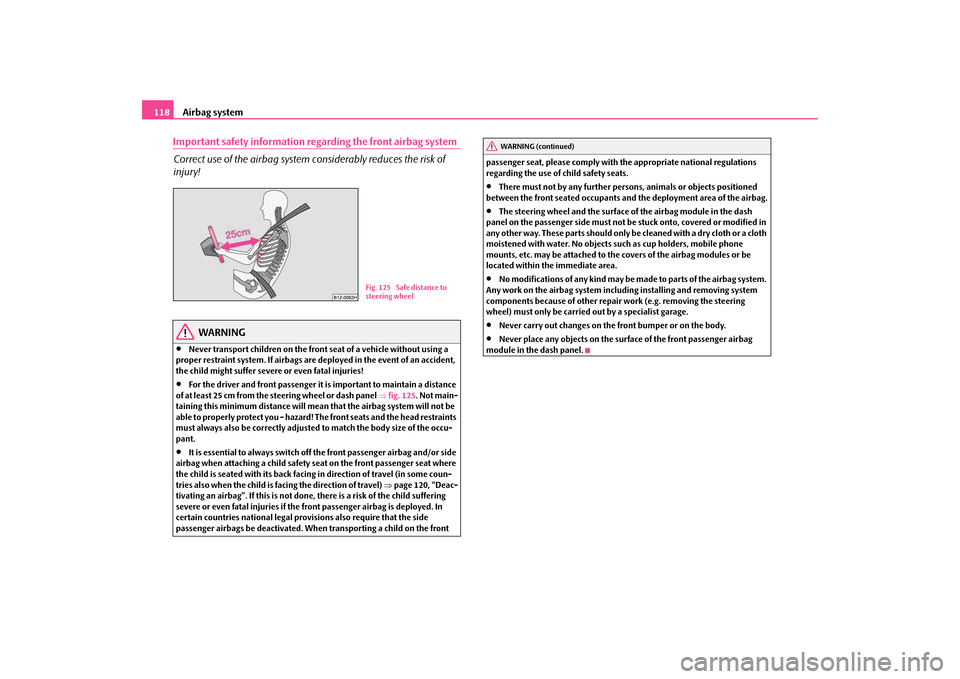
For the driver and front passenger it is important to maintain a distance
of at least 25 cm from the
steering wheel or dash panel
⇒fig. 125
. Not main-
taining this minimum distance will mean that the airbag system will not be able to properly protect you - hazard! The front seats and the head restraints must always also be correctly adjusted to match the body size of the occu- pant.•
It is essential to always switch off
the front passenger airbag and/or side
airbag when attaching a child safety seat on the front passenger seat where the child is seated with its back facing in direction of travel (in some coun- tries also when the child is facing the direction of travel)
⇒page 120, “Deac-
tivating an airbag”. If this is not done, there is a risk of the child suffering severe or even fatal injuries if the
front passenger airbag is deployed. In
certain countries national legal provisions also require that the side passenger airbags be deactivated. When transporting a child on the front
passenger seat, please comply with
the appropriate nati
onal regulations
regarding the use of child safety seats.•
There must not by any further persons, animals or objects positioned
between the front seated occupants and
the deployment area of the airbag.
•
The steering wheel and the surface of
the airbag module in the dash
panel on the passenger side must not be stuck onto, covered or modified in any other way. These parts should only be cleaned with a dry cloth or a cloth moistened with water. No objects such as cup holders, mobile phone mounts, etc. may be attached to the covers of the airbag modules or be located within the immediate area.•
No modifications of any kind may be made to parts of the airbag system.
Any work on the airbag system including installing and removing system components because of other repair work (e.g. removing the steering wheel) must only be carried out by a specialist garage.•
Never carry out changes on the front bumper or on the body.
•
Never place any objects on the surface of the front passenger airbag
module in the dash panel.
Fig. 125 Safe distance to steering wheel
WARNING (continued)
s2g8.b.book Page 118 Tuesday, April 7, 2009 8:53 AM