towing SKODA OCTAVIA TOUR 2009 1.G / (1U) Owner's Manual
[x] Cancel search | Manufacturer: SKODA, Model Year: 2009, Model line: OCTAVIA TOUR, Model: SKODA OCTAVIA TOUR 2009 1.G / (1U)Pages: 224, PDF Size: 13.53 MB
Page 5 of 224
Contents
4Driving Tips
. . . . . . . . . . . . . . . . . . . . . . . . . . . . . .
Intelligent Technology
. . . . . . . . . . . . . . . . . . . . . . . .
Electronic stability programme (ESP)* . . . . . . . . . . Brakes . . . . . . . . . . . . . . . . . . . . . . . . . . . . . . . . . . . . . . . Brake booster . . . . . . . . . . . . . . . . . . . . . . . . . . . . . . . . Antilock brake system (ABS)* . . . . . . . . . . . . . . . . . . Brake Assist* . . . . . . . . . . . . . . . . . . . . . . . . . . . . . . . . . Driving and the Environment
. . . . . . . . . . . . . . . . .
The first 1 500 kilometres and then afterwards . . Catalytic converter . . . . . . . . . . . . . . . . . . . . . . . . . . . . Driving in an economical and environmentally conscious manner . . . . . . . . . . . . . . . . . . . . . . . . . . . . Environmental compatibility . . . . . . . . . . . . . . . . . . . Motoring abroad . . . . . . . . . . . . . . . . . . . . . . . . . . . . . Avoiding damage to your vehicle . . . . . . . . . . . . . . To w i n g a t r a i l e r
. . . . . . . . . . . . . . . . . . . . . . . . . . . . . . . .
Towing a trailer . . . . . . . . . . . . . . . . . . . . . . . . . . . . . . . Detachable towing device* . . . . . . . . . . . . . . . . . . . . General Maintenance
. . . . . . . . . . . . . . .
Taking care of your ve
hicle and cleaning the
vehicle
. . . . . . . . . . . . . . . . . . . . . . . . . . . . . . . . . . . . . . . . .
General . . . . . . . . . . . . . . . . . . . . . . . . . . . . . . . . . . . . . . Care of the exterior of vehicle . . . . . . . . . . . . . . . . . . Care of the interior of vehicle . . . . . . . . . . . . . . . . . . Fuel
. . . . . . . . . . . . . . . . . . . . . . . . . . . . . . . . . . . . . . . . . . . . Petrol . . . . . . . . . . . . . . . . . . . . . . . . . . . . . . . . . . . . . . . . Diesel . . . . . . . . . . . . . . . . . . . . . . . . . . . . . . . . . . . . . . . Refuelling . . . . . . . . . . . . . . . . . . . . . . . . . . . . . . . . . . . . Emergency release of fuel filler flap . . . . . . . . . . . . Inspecting and replenishing
. . . . . . . . . . . . . . . . . .
Engine compartment . . . . . . . . . . . . . . . . . . . . . . . . . Engine oil . . . . . . . . . . . . . . . . . . . . . . . . . . . . . . . . . . . . Cooling system . . . . . . . . . . . . . . . . . . . . . . . . . . . . . . . Brake fluid . . . . . . . . . . . . . . . . . . . . . . . . . . . . . . . . . . .
Battery . . . . . . . . . . . . . . . . . . . . . . . . . . . . . . . . . . . . . . . Windshield washer system . . . . . . . . . . . . . . . . . . . .Wheels and Tyres
. . . . . . . . . . . . . . . . . . . . . . . . . . . . . .
Wheels . . . . . . . . . . . . . . . . . . . . . . . . . . . . . . . . . . . . . .Accessories, changes and replacement of partsAccessories and replacement parts . . . . . . . . . . . . . Technical changes . . . . . . . . . . . . . . . . . . . . . . . . . . . .Vehicles of the group N1 . . . . . . . . . . . . . . . . . . . . . .Breakdown assistance
. . . . . . . . . . . . . .
Breakdown assistance
. . . . . . . . . . . . . . . . . . . . . . . .
First-aid box*, Warning triangle* and bulb set* . . Fire extinguisher* . . . . . . . . . . . . . . . . . . . . . . . . . . . . .Vehicle tool kit . . . . . . . . . . . . . . . . . . . . . . . . . . . . . . . .Spray for repairing a tyre* . . . . . . . . . . . . . . . . . . . . .Tyre repair kit . . . . . . . . . . . . . . . . . . . . . . . . . . . . . . . . .Spare wheel* . . . . . . . . . . . . . . . . . . . . . . . . . . . . . . . . .Changing a wheel . . . . . . . . . . . . . . . . . . . . . . . . . . . . .Jump-starting . . . . . . . . . . . . . . . . . . . . . . . . . . . . . . . .Tow-starting and towing vehicle . . . . . . . . . . . . . . .Fuses and light bulbs
. . . . . . . . . . . . . . . . . . . . . . . . . .
Electric fuses . . . . . . . . . . . . . . . . . . . . . . . . . . . . . . . . . Bulbs . . . . . . . . . . . . . . . . . . . . . . . . . . . . . . . . . . . . . . . .Technical Data
. . . . . . . . . . . . . . . . . . . . . . . . . .
Technical Data
. . . . . . . . . . . . . . . . . . . . . . . . . . . . . . . . .
General information . . . . . . . . . . . . . . . . . . . . . . . . . . Used abbreviations . . . . . . . . . . . . . . . . . . . . . . . . . . .Performances . . . . . . . . . . . . . . . . . . . . . . . . . . . . . . . .Weight . . . . . . . . . . . . . . . . . . . . . . . . . . . . . . . . . . . . . . .Identification details . . . . . . . . . . . . . . . . . . . . . . . . . .Fuel consumption according to the regulations (99/100/EU) . . . . . . . . . . . . . . . . . . . . . . . . . . . . . . . . . . Dimensions . . . . . . . . . . . . . . . . . . . . . . . . . . . . . . . . . .1.4 ltr./55 kW - EU4 . . . . . . . . . . . . . . . . . . . . . . . . . . .1.6 ltr./75 kW - EU4/EU2 DDK . . . . . . . . . . . . . . . . . .
1.8 ltr./110 kW - EU4/EU3D . . . . . . . . . . . . . . . . . . . . 1.9 ltr./66 kW TDI - EU3 . . . . . . . . . . . . . . . . . . . . . . . .1.9 ltr./74 kW TDI PD - EU4 . . . . . . . . . . . . . . . . . . . .Octavia - Vehicles of the group N1 . . . . . . . . . . . . . .Octavia Combi - Vehicles of the group N1 . . . . . . .Index
. . . . . . . . . . . . . . . . . . . . . . . . . . . . . . . . . . . . . . . .
131 131 131 133134135135 137 137 138 138 142142143 144 144 146 147 147 147 147152 155 155 155156157 159 159 162165167
168 172 173 173 179 179 179179 181 181 181 181182182182183183188189 192 192 195 201 201 201 201201201201 202 203204206
208 210 212214214 215
s2g8.b.book Page 4 Tuesday, April 7, 2009 8:53 AM
Page 28 of 224
Instruments and Indicator/Warning Lights
27
Using the system
Safety
Driving Tips
General Maintenance
Breakdown assistance
Technical Data
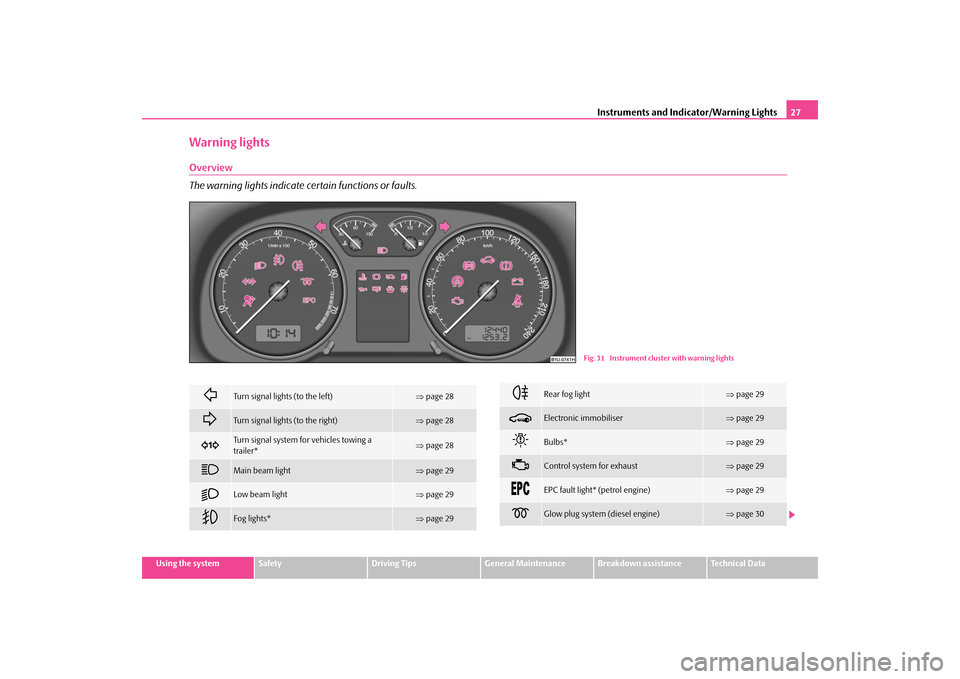
Warning lightsOverview The warning lights indicate certain functions or faults.
Fig. 31 Instrument cluster with warning lights
Turn signal lights (to the left)
⇒ page 28
Turn signal lights (to the right)
⇒page 28
Turn signal system fo
r vehicles towing a
trailer*
⇒ page 28
Main beam light
⇒page 29
Low beam light
⇒page 29
Fog lights*
⇒page 29
Rear fog light
⇒page 29
Electronic immobiliser
⇒page 29
Bulbs*
⇒page 29
Control system for exhaust
⇒page 29
EPC fault light* (petrol engine)
⇒page 29
Glow plug system (diesel engine)
⇒page 30
s2g8.b.book Page 27 Tuesday, April 7, 2009 8:53 AM
Page 29 of 224
Instruments and Indicator/Warning Lights
28
WARNING
•
If you do not pay attention to the wa
rning lights coming on and the corre-
sponding descriptions and warning notes, this may result in severe body injuries or major vehicle damage.•
The engine compartment of your car is
a hazardous area. There is a risk
of injuries, scalding, accidents and
fire when working in the engine
compartment, e.g. inspecting and replenis
hing oil and other fluids. It is also
essential to obse
rve all warnings
⇒page 160.
Note
•
Arrangement of the indicator lights depends on the model and model version.
The symbols shown in the following function
al description are to be found as indi-
cator lights in the instrument cluster.•
Operational faults are shown in the inst
rument cluster as red symbols (priority
1 - danger) or yellow symbols (priority 2 - warning).Turn signal system
Either the left
or right
indicator light flashes depending on the position of the
turn signal lever. The indicator light flashes at twice its normal rate if a turn signal light fails. This does not apply when towing a trailer. Switching off the hazard warning light system is switched on will cause all of the turn signal lights as well as both indicator lights to flash. Further information about the turn signal system
⇒page 52.
Turn signal system for vehicles towing a trailer
*
The warning light
flashes together with the other turn signal lights only if the
vehicle is towing a trailer. The indicator light does not flash if a turn si
gnal light on the trailer or on the vehicle
is not operating.
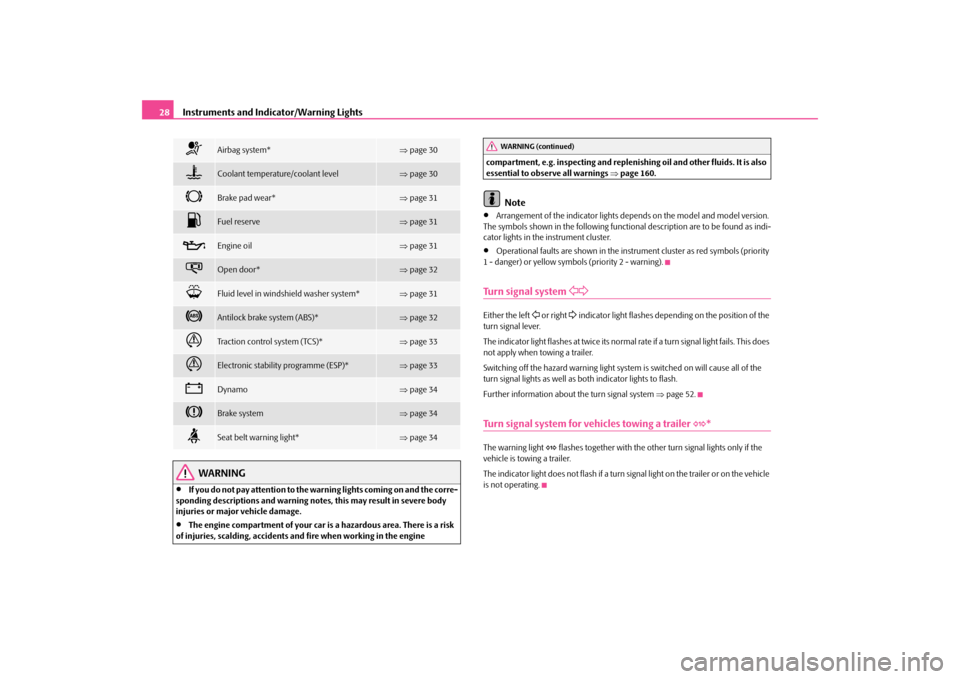
Airbag system*
⇒ page 30
Coolant temperature/coolant level
⇒page 30
Brake pad wear*
⇒page 31
Fuel reserve
⇒page 31
Engine oil
⇒page 31
Open door*
⇒page 32
Fluid level in windshield washer system*
⇒page 31
Antilock brake system (ABS)*
⇒page 32
Traction control system (TCS)*
⇒page 33
Electronic stability programme (ESP)*
⇒page 33
Dynamo
⇒page 34
Brake system
⇒page 34
Seat belt warning light*
⇒page 34
WARNING (continued)
s2g8.b.book Page 28 Tuesday, April 7, 2009 8:53 AM
Page 51 of 224
Lights and Visibility
50
•
The switching on of the described lights
should only be undertaken in accord-
ance with the legal requirements.•
If a fault occurs in the light switch
, the low beam comes on automatically
•
In the event of cool or humid weather co
nditions, the headligh
ts can be misted
up from inside.
− The temperature difference between interior and external area of the head- light lenses is decisive. − When the driving lights are switched on
, the light outlet surfaces are free
from mist after a short period. The headlight lenses can possibly mist up at the border areas. − It also concerns reverse light and turn signal lights. − This mist has no influence on th
e life of the lighting system.
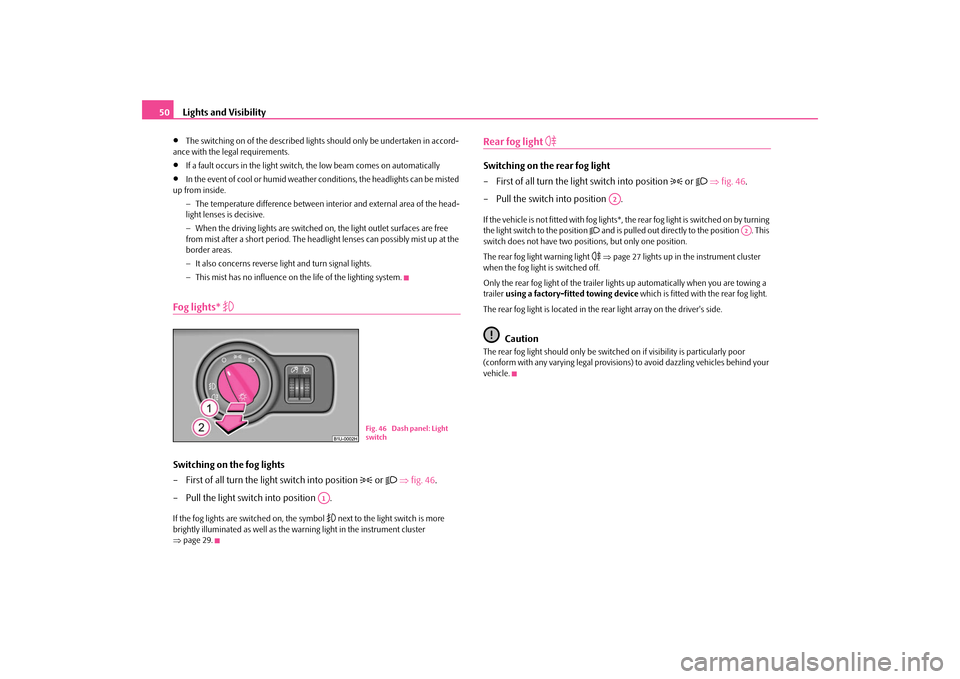
Fog lights*
Switching on the fog lights – First of all turn the light switch into position
or
⇒
fig. 46
.
– Pull the light switch into position .If the fog lights are switched on, the symbol
next to the light switch is more
brightly illuminated as well as the warning light in the instrument cluster ⇒ page 29.
Rear fog light
Switching on the rear fog light – First of all turn the light switch into position
or
⇒
fig. 46
.
– Pull the switch into position .If the vehicle is not fitted with fog lights*,
the rear fog light is switched on by turning
the light switch to the position
and is pulled out directly to the position . This
switch does not have two positions, but only one position. The rear fog light warning light
⇒page 27 lights up in the instrument cluster
when the fog light is switched off. Only the rear fog light of the trailer ligh
ts up automatically when you are towing a
trailer
using a factory-fitted towing device
which is fitted with the rear fog light.
The rear fog light is located in the rear light array on the driver's side.
Caution
The rear fog light should only be switched
on if visibility is particularly poor
(conform with any varying legal provisions) to avoid dazzling vehicles behind your vehicle.
Fig. 46 Dash panel: Light switch
A1
A2
A2
s2g8.b.book Page 50 Tuesday, April 7, 2009 8:53 AM
Page 99 of 224
Starting-off and Driving
98
Range of sensors The clearance warning begins at a distance of about 160 cm from the obstacle (area ⇒page 97, fig. 108
). The interval between the warning signals becomes shorter
as the clearance is reduced. A continuous tone
sounds from a distance of approx. 30 cm (area ) - danger
area.
You should not reverse any further after this signal sounds!
Activating The parking aid is activated automatically when
reverse gear
is engaged and the
ignition is turned on. This is confir
med by a brief acknowledgement signal.
Deactivating The parking aid is deactivated by removing the reverse gear.
WARNING
•
The parking aid is not a substitute fo
r the driver paying proper attention
and it is always the driver's responsibility to take care when parking the vehicle or carrying ou
t similar manoeuvres.
•
You should therefore satisfy yourself, before reversing, that there is no
small obstacle, such as a rock, thin post, trailer drawbar etc., behind your vehicle. Such an obstacle might not be within the range detected by the sensors.
Note
•
The parking aid does not operate if you
are towing a trailer (applies to models
which feature a factory-fitted towing device*).•
If a warning signal sounds for about 3 seconds after switching the ignition on
and engaging reverse gear, and there is no ob
stacle close to your vehicle, this indi-
cates a system fault. Have the fault rectified by a specialist workshop.•
The sensors must be kept clean and free
of ice to enable the parking aid to
operate properly.
Cruise control system (CCS)*IntroductionThe cruise control system (CCS) maintains a constant speed, more than 30 km/h (20 mph), once it has been set, without you
having to depress the accelerator pedal.
This is only possible within the range wh
ich is permitted by
the power output and
braking power of the engine. The cruise control system makes it possible - particu- larly on long journeys - for you to rest your “accelerator foot”.
WARNING
•
The cruise control system must not, for safety reasons, be used in dense
traffic or on unfavourable road surfaces
(such as icy roads, slippery roads or
loose chippings) - risk of accident!•
In order to prevent unintentional use of
the cruise control system, always
switch off the system after use.
Note
•
Models fitted with a manual gearbox: Al
ways depress the clutch pedal if you
switch on the cruise control system when
the gearbox is in Neutral. Otherwise the
engine can rev up unintentionally.•
The cruise control system is not able to maintain a constant speed when driving
on steep downhill sections. The weight of the vehicle increases the speed at which it travels. One should shift down in good
time to a lower gear or slow the vehicle
down by applying the foot brake.
AA
AB
s2g8.b.book Page 98 Tuesday, April 7, 2009 8:53 AM
Page 140 of 224

Driving and the Environment
139
Using the system
Safety
Driving Tips
General Maintenance
Breakdown assistance
Technical Data
number of tips on how to protect the environment and at the same time save money. The fuel consumption can naturally also be
influenced by factors which are beyond
the driver's control. It is,
for example, normal for the fu
el consumption to increase
in winter and under worsened
conditions such as poor road conditions, towing a
trailer, etc. The technical requirements for low fuel
usage and economic efficiency of the
vehicle have already been built into the ve
hicle at the works.
Special attention has
been given to minimising ne
gative effects on the environment. It is necessary to
take note of the guidelines given in this
chapter in order to make best use of these
characteristics and to maintain their effectiveness. The optimal engine speed should be obtained when accelerating, in order to avoid a high fuel consumption an
d resonance of the vehicle.
Looking ahead when driving A vehicle's highest fuel consumption occurs it accelerates.Avoid accelerating and brakin
g unnecessarily. If you drive
with forsight you will not
need to brake so often and will also then
not have to accelerate so much. Let your
vehicle coast to a stop, for example, if this
is possible, when you see that the next
set of traffic lights is at red.
Shifting gears and saving energy Shifting up early saves on fuel.Manual gearbox – Drive no more than about one length of your vehicle in first gear. – Always shift up into the next higher gear at approx. 2 000 to 2 500 revs.An effective way of achieving good
fuel economy is to shift up
early
. You will
consume more fuel if you drive at unnecessa
rily high revolutions in any given gear.
The
⇒fig. 141
shows the ratio of fuel consumption to the speed of your vehicle in
the relevant gears. Fuel consumption in 1st
gear is the highest and in 5th gear is the
lowest.
Note
Also use the information supplied by the multi-functional indicator*
⇒page 19.
Fig. 141 Fuel consumption in litres/100 km. and speed in km/h.
s2g8.b.book Page 139 Tuesday, April 7, 2009 8:53 AM
Page 145 of 224
Towing a trailer
144
Towing a trailerTo w i n g a t r a i l e rTechnical requirements The towing device must satisfy
certain technical requirements.
Your vehicle is designed primarily for tr
ansporting persons and luggage. It can,
however, also be used for towing a traile
r - provided certain te
chnical equipment is
fitted. If your vehicle has already been supplied with a
factory-fitted
towing device then
everything that is necessary
for towing a trailer in technical terms, and in terms of
the law, has already been taken into account. Your vehicle is fitted with a 13-pin po
wer socket for the electrical connection
between the vehicle and trailer. If th
e trailer which you wish to tow has a
7-pin
connector
, you can use a suitable adapter
5) from Škoda original accessories.
This work must be carried out in accordan
ce with the manufacturer's specifications
if a towing device is retrofitted. Specialist garages are familiar with details
relating to retrofitting a towing device
and for any necessary modifications to the cooling system.
WARNING
We recommend that you have the towing device from Škoda original acces-sories installed by a specialist garage.
He is familiar with all the relevant
details relating to retrofitting such equi
pment. There is a risk of an accident
if the towing device is not properly fitted!
General Maintenance There are a number of points to
pay attention to when towing a
trailer.Trailer load The permissible trailer load must
on no account be exceeded.
You can negotiate appropriatel
y steeper inclines and desc
ents if you do not make
full use of the perm
issible trailer load.
The trailer loads specified only apply for
altitudes
up to 1 000 metres above mean
sea level. The fact that the engine power ou
tput drops with increasing height due to
a lowering of air pressure and thus the abil
ity to climb, means that the towed weight
must be reduced by 10% for every further increase of 1 000 metres in height above sea level. The towed weight is the weight of the (laden) vehicle and the (laden) trailer together. One should take this into account before driving up to higher alti- tudes. The trailer and drawbar load information on the type plate of the towing device are merely test data for the tow
ing device The data relating to your
vehicle, which is often less than this test data, can be found in your vehicle registration documents. Distribution of the load Distribute the load in the trailer in such a way that any heavy items are located as close as possible to the axle. Secure
the items to prevent them slipping.
Tyre inflation pressure Select the tyre inflation pressure on your vehicle for that of “fully laden”, ⇒ page 173. The inflation pressure of the tyres fitted to the trailer adjust in accord- ance with the manufacturer's recommendation. Exterior mirrors You have to have additional
exterior mirrors fitted if you are not able to see the
traffic behind the trailer with the standard rear-view mirrors. Both exterior mirrors
5)In some countries the adapter is
supplied with the towing device.
s2g8.b.book Page 144 Tuesday, April 7, 2009 8:53 AM
Page 146 of 224
Towing a trailer
145
Using the system
Safety
Driving Tips
General Maintenance
Breakdown assistance
Technical Data
should be attached to folding arms. Adjust
the mirrors so that they provide you with
an adequate field of view to the rear. Headlights Before starting off with a hitched trailer, also check the setting of the headlights. Alter the setting as necessary with th
e aid of the headlight beam adjuster
⇒ page 51. Detachable ball head The ball rod is detachable on vehicles which feature a factory-fitted towing device. It is stowed together with separate fitting instructions in the spare wheel well in the luggage compartment of the vehicle. Further information on the towing device
⇒page 146.
Note
•
We recommend that you also have yo
ur vehicle inspected between service
intervals if you tow a trailer frequently.•
The handbrake on the towing vehicle
must be put on when coupling and
decoupling the trailer.Driving Tips Particular caution is required when towing a trailer.– Do not, as far as possible, drive
with your vehicle unladen and the
trailer laden.
– Do not make full use of the legal maximum speeds. This applies in
particular to downhill sections.
– Apply the brakes in good time.– Keep a check on the coolant temper
ature gauge if the outside temper-
ature is high.
Distribution of weight The distribution of the weight is very poor
if your vehicle is
unladen and the trailer
is laden. Maintain a particularly low speed if you cannot avoid driving with this combination. Driving speed Do not drive faster than 80 km/hour for safety reasons. This also applies for coun- tries in which higher speeds are allowed. The fact that the driving stability of the vehicle + trailer combination reduces with increasing speed means that the legally allowed speed should not be used when there are unfavourable road, weather or wind
conditions, particul
arly near accident
black spots. You must always reduce your speed immedi
ately as soon as you detect even just
the
slightest swaying
of the trailer. On no account attempt to stop the trailer from
“swaying” by
accelerating.
Apply the brakes in good time! If the trailer is fitted with a
trailer brake
, apply the
brakes gently at first and then brake firmly
. This will avoid brake jolts resulting from
the trailer wheels locking. Shift down gears
in good time before negotiating a down-
hill section to allow the engine to also act as a brake. Engine overheating Please keep a check on the coolant temperature gauge if you have to negotiate a lengthy slope in a low gear at a high engine speed when the outside temperature is very high
⇒page 16.
If the needle of the coolant temperature gauge moves into the right-hand area or even the red area of the scale, reduce yo
ur speed immediately. Stop and switch off
the engine if the warning light
in the instrument cluste
r begins flashing. Wait a
few minutes and check the level of coolant in the coolant expansion bottle ⇒ page 165, “Inspecting the coolant level”. Please refer to the following guidelines
⇒page 30, “Coolant temperature/ Coolant
quantity
”.
The coolant temperature can be reduced by switching on the heating.Any increase in the cooling effect of the coolant fan through shifting down a gear and increasing the engine speed is not possible since the fan speed is independent
s2g8.b.book Page 145 Tuesday, April 7, 2009 8:53 AM
Page 147 of 224
Towing a trailer
146
of the engine speed. One should also not
drop a gear for this reason when towing
a trailer as long as the en
gine can manage the slope
without any drop in speed.
Detachable towing device*The detachable ball head of the towing device
is stowed in a box for the car tool kit
in the spare wheel well in the luggage compartment. An instruction for correct installation an
d removal of the ball head of the towing
device is supplied
with the ball head
Inspect the ball head to ensure that it is pr
operly locked each time before setting off.
The inspection is performed by turning the closed locking lever downwards. If the locking lever can only be turned around a small angle (approx. 5°), the locking mechanism is O.K. After the inspection pull
the locking lever back again to its stop.
The towing device must not be used, if it does not wish to close or the locking lever turns slightly in the closed position.
WARNING
Do not use any aids or tools for installing or removing the ball head. This might result in damage to the locking mechanism to the extent that the safety of the towing device is no longer assured - risk of an accident.
Note
•
Do not carry out any modifications or repairs to the ball head or to any other
components on the towing device.•
Contact a specialist garage if you en
counter any problems using the device.
•
Never unlock the ball head with a trailer coupled to it.
•
You should take off the ball head if you drive without towing a trailer. Inspect
whether the end cover properly seals off the mounting shaft.•
Remove the ball head beforehand if yo
u wish to clean your vehicle using a
steam jet. Ensure that the end cover properly seals the mounting shaft.•
It is recommended to wear gloves
when installing and removing.
Fig. 144 Detachable ball head
s2g8.b.book Page 146 Tuesday, April 7, 2009 8:53 AM
Page 164 of 224
Inspecting and replenishing
163
Using the system
Safety
Driving Tips
General Maintenance
Breakdown assistance
Technical Data
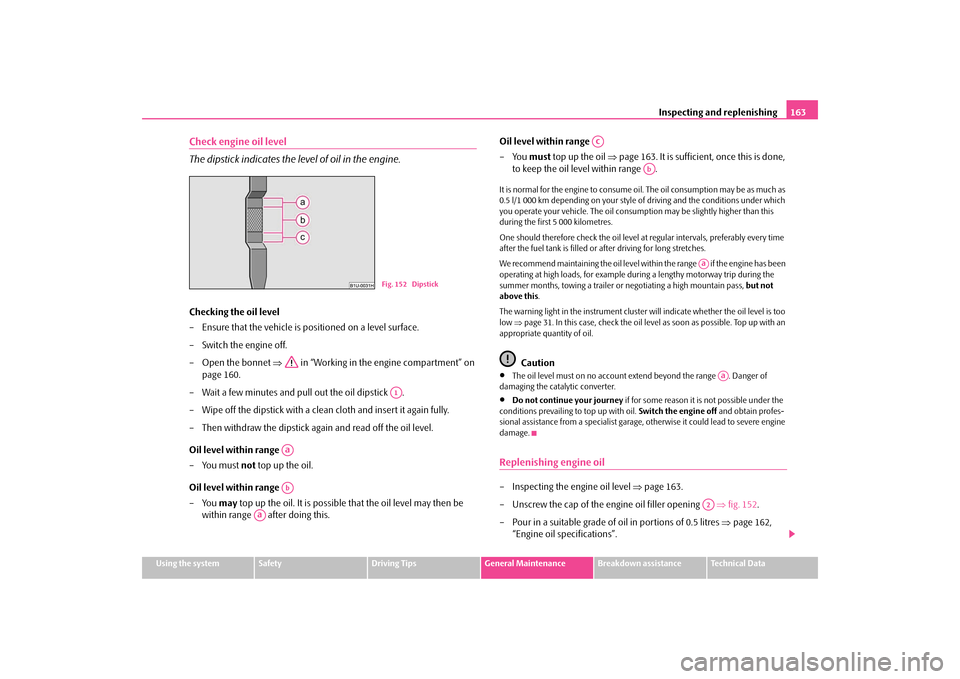
Check engine oil level The dipstick indicates the level of oil in the engine.Checking the oil level – Ensure that the vehicle is positioned on a level surface. – Switch the engine off.– Open the bonnet
⇒
in “Working in the engine compartment” on
page 160.
– Wait a few minutes and pull out the oil dipstick . – Wipe off the dipstick with a clea
n cloth and insert it again fully.
– Then withdraw the dipstick ag
ain and read off the oil level.
Oil level within range – You must
not
top up the oil.
Oil level within range – You
may
top up the oil. It is possible that the oil level may then be
within range after doing this.
Oil level within range –You
must
top up the oil
⇒
page 163. It is sufficient, once this is done,
to keep the oil level within range .
It is normal for the engine to consume oi
l. The oil consumption may be as much as
0.5 l/1 000 km depending on your style of driving and the conditions under which you operate your vehicle. The oil consumpt
ion may be slightly higher than this
during the first 5 000 kilometres. One should therefore check the oil level at regular intervals, preferably every time after the fuel tank is filled or after driving for long stretches. We recommend maintaining the oil level within the range if the engine has been operating at high loads, for example during a lengthy motorway trip during the summer months, towing a trailer or
negotiating a high mountain pass,
but not
above this
.
The warning light in the instrument cluster
will indicate whether the oil level is too
low
⇒page 31. In this case, check the oil level
as soon as possible. Top up with an
appropriate quantity of oil.
Caution
•
The oil level must on no account ex
tend beyond the range . Danger of
damaging the cata
lytic converter.
•
Do not continue your journey
if for some reason it is not possible under the
conditions prev
ailing to top up with oil.
Switch the engine off
and obtain profes-
sional assistance from a specialist garage, otherwise it could lead to severe engine damage.Replenishing engine oil– Inspecting the engine oil level
⇒
page 163.
– Unscrew the cap of the engine oil filler opening
⇒
fig. 152
.
– Pour in a suitable grade of oil in portions of 0.5 litres
⇒
page 162,
“Engine oil specifications”.
Fig. 152 DipstickA1
AaAb
Aa
Ac
Ab
Aa
Aa
A2
s2g8.b.book Page 163 Tuesday, April 7, 2009 8:53 AM