park assist SKODA OCTAVIA TOUR 2010 1.G / (1U) Columbus Navigation System Manual
[x] Cancel search | Manufacturer: SKODA, Model Year: 2010, Model line: OCTAVIA TOUR, Model: SKODA OCTAVIA TOUR 2010 1.G / (1U)Pages: 207, PDF Size: 12.63 MB
Page 170 of 207

Breakdown assistance169
Using the system
Safety
Driving Tips
General Maintenance
Breakdown assistance
Technical Data
The spare wheel lies in a well under the floor covering of the luggage compartment
and is fixed in place using special screws
page 168, fig. 159 .
Before removing the spare wheel, you must take out the box with the vehicle tool kit
box page 167, fig. 157.
One should check the inflation pressure in the spare wheel (at best when generally
checking the tyre air pressures - see sign on the fuel filler flap page 160) to ensure
that the spare wheel is always ready to use.
Temporary spare wheel
A warning label displayed on the rim of the temporary spare wheel indicates that your
vehicle is equippe d with a temporary spare wheel.
Please observe the following notes when driving with a temporary spare wheel:
The warning label must not be covered after installing the wheel.
Do not drive faster than 80 km/h with this spare wheel and pay particular attention
while driving. Avoid accelerating at full throttle, sharp braking and fast cornering.
The inflation pressure for this spare wheel is identical to the inflation pressure of
the standard tyres.
Use this spare wheel only to reach the nearest specialist garage as it is not intended
for continuous use.
Changing a wheelPreliminary workThe following steps should be carried ou t before actually changing the wheel.
– If it is necessary to change a wheel, park the vehicle as far away as possible from
the traffic flow. The place you choose should be level.
–Have all the occupants get out. While changing a wheel, the occupants of the
vehicle should not stand on the road (e.g. behind a crash barrier).
– Apply the handbrake firmly.
– Shift up into the 1st gear . – If a trailer is coupled, uncouple it.
–Take the
vehicle tool kit page 167 and the spare wheel* page 168 out of the
luggage compartment.
WARNING
If you find yourself in flowing traffic switch on the hazard warning lights
system and place the warning triangle on the side of the road at the prescribed
distance from your vehicle while observin g all national legal provisions. In this
way you are protecting not only yourself but also other road users.
Never start the engine with the vehicle si tting on the raised jack - danger of
suffering injury.Caution
If you have to change a wheel on a slope fi rst block the opposite wheel with a stone or
similar object in order to secure the vehicle from unexpectedly rolling away.
Note
Comply with the national legal regulations.Changing a wheelAlways change a wheel on a level surface as far as possible.
– Take off the full wheel trim* page 170 or the caps page 171.
– In the case of light alloy wheels remove the wheel trim cap page 171.
– Slacken the wheel bolts page 171.
– Jack up the vehicle until the wheel to be changed is clear of the ground
page 172.
– Unscrew the wheel bolts and place them on a clean surface (cloth, paper etc.).
– Take off the wheel.
– Fit on the new spare wheel* and tighten the wheel bolts slightly.
– Lower the car.
s2rc.book Page 169 Thursday, April 22, 2010 10:58 AM
Page 175 of 207

Breakdown assistance
174
Connecting positive terminals
– Attach one end to the positive terminal page 173, fig. 166 of the discharged
battery .
– Attach the other end to the positive term inal of the battery supplying the power
.Connecting negative terminal and engine block– Attach one end to the negative termin al of the battery supplying the power .
– Attach the other end to a solid metal part which is connected firmly to the
engine block, or to the engine block itself.Starting the engine– Start the engine of the vehicle providing current and run the engine at idling speed.
– Now start the engine of the vehicle with the discharged battery.
– Interrupt the attempt at starting an engine after 10 seconds if it does not start right
away and wait for about 30 seconds before repeating the attempt.
– Disconnect the cables on the engine in exactly the reverse order they were
connected up.
WARNING
The non-insulated parts of the terminal clamps must never make contact
with each other. Furthermore, the cable connected to the positive terminal of
the battery must not come into contact with electrically conducting parts of the
vehicle - risk of a short circuit!
Do not affix the jump starting cables to the negative terminal of the
discharged battery. There is the risk of detonating gas seeping out the battery
being ignited by the strong spark which results from the engine being started.
Run the jump-start cables so that they cannot be caught by any rotating
parts in the engine compartment.
Do not bend over the batteries - risk of caustic burns!
The vent screws of the battery cells must be tightened firmly.
Keep any sources of ignition (naked flame, smouldering cigarettes etc.)
away from the battery - risk of an explosion!
Tow-starting and towing vehicleGeneralPlease pay attention to the following instru ctions if you are going to use a tow rope:Driver of the towing vehicle– Do not drive off until the tow rope is taught.
– Release the clutch particularly gently when starting off.Driver of the towed vehicle– Switch the ignition on so that the steering wheel is not blocked and you can also
operate the turn signal lights, the headlight flasher, the windscreen wipers and
windscreen washer system.
– Take the vehicle out of gear.
– Note that the brake servo unit and power steering only operate if the engine is running. You will require significantly greater physical force to depress the brake
pedal and to steer the vehicle if the engine is not running.
– Ensure that the tow rope is always kept taught.
Tow rope or tow bar
A tow bar is safest way of towing a vehicle and also minimizes any shocks. You can use
a tow rope only if a suitable tow bar is not available.
The tow rope must be elastic to protect the vehicle. Thus one should only use plastic
fibre rope or a rope made out of a similarly elastic material.
Only attach the tow rope to the towing eyes provided for this purpose page 175,
“Front towing eye”.
A1
AA
A2
AB
A3
AB
A4
WARNING (continued)
s2rc.book Page 174 Thursday, April 22, 2010 10:58 AM
Page 180 of 207

Fuses and light bulbs179
Using the system
Safety
Driving Tips
General Maintenance
Breakdown assistance
Technical Data
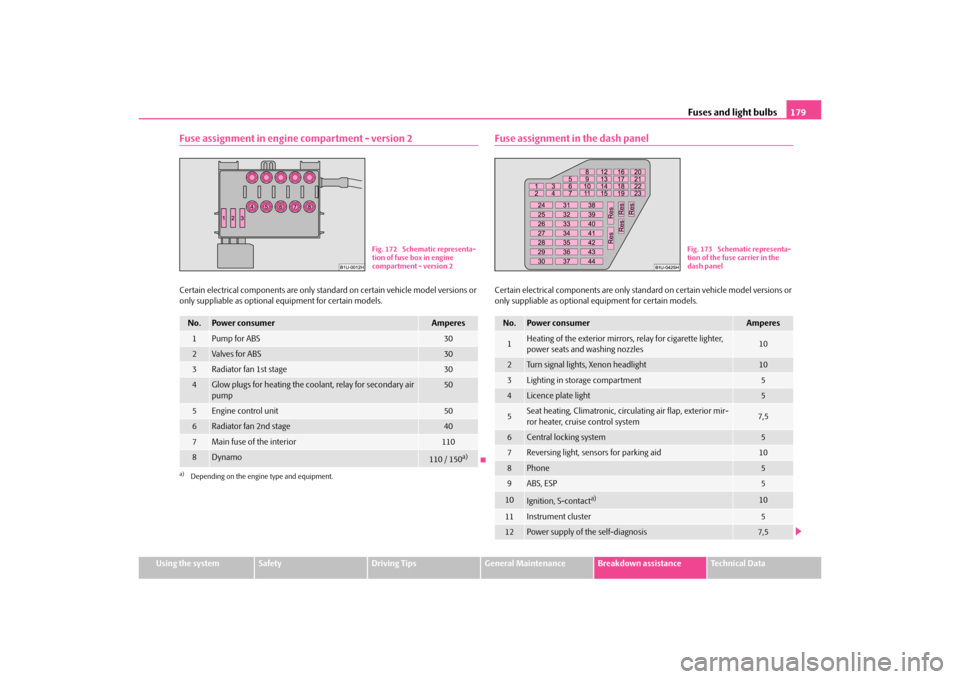
Fuse assignment in engine compartment - version 2Certain electrical components are only standard on certain vehicle model versions or
only suppliable as optional equipment for certain models.
Fuse assignment in the dash panelCertain electrical components are only stan dard on certain vehicle model versions or
only suppliable as optional equipment for certain models.
No.
Power consumer
Amperes
1
Pump for ABS
30
2
Va lve s for AB S
30
3
Radiator fan 1st stage
30
4
Glow plugs for heating the coolant, relay for secondary air
pump
50
5
Engine control unit
50
6
Radiator fan 2nd stage
40
7
Main fuse of the interior
110
8
Dynamo
110 / 150
a)
a)Depending on the engine type and equipment.
Fig. 172 Schematic representa-
tion of fuse box in engine
compartment - version 2
No.
Power consumer
Amperes
1
Heating of the exterior mirrors, relay for cigarette lighter,
power seats and washing nozzles
10
2
Turn signal lights, Xenon headlight
10
3
Lighting in storage compartment
5
4
Licence plate light
5
5
Seat heating, Climatronic, circulating air flap, exterior mir-
ror heater, cruise control system
7,5
6
Central locking system
5
7
Reversing light, sensors for parking aid
10
8
Phone
5
9
ABS, ESP
5
10
Ignition, S-contact
a)
10
11
Instrument cluster
5
12
Power supply of the self-diagnosis
7,5
Fig. 173 Schematic representa-
tion of the fuse carrier in the
dash panel
s2rc.book Page 179 Thursday, April 22, 2010 10:58 AM
Page 182 of 207

Fuses and light bulbs181
Using the system
Safety
Driving Tips
General Maintenance
Breakdown assistance
Technical Data
light bulbs. This applies, in particular, to
bulbs which can only be reached from the
engine compartment.
We therefore recommend that you have any bulbs changed by a specialist garage or,
in exceptional cases, by calling on other professional assistance.
Please note that the engine compartment is a hazardous area page 148.
We recommend that you always have a small box of replacement bulbs in your vehicle.
You can obtain replacement bulbs from Škoda original accessories or from a specialist
garage
8).
A stowage place for the bulbs is located in the box in the spare wheel*.
Fitted with a xenon headlight
Change of bulbs on vehicles with Xenon lights (low beam lights, parking lights and
main beam lights) should be und ertaken by a specialist garage.
Bulb - Overview
WARNING
Light bulbs H4 and H1 are pressurise d and may burst when changing the
bulb - risk of injury!
It is recommended to wear gloves and safety glasses when changing a bulb.
Gas discharge bulbs* (xenon bulbs) op erate with a high voltage, profes-
sional knowledge is required - danger to life!Caution
Do not take hold of the glass bulb with naked fingers (even the smallest amount of dirt
reduces the working life of the light bulb). Use a clean cloth, serviette or something
similar.
Note
This Owner's Manual only describes the replacement of bulbs where it is assumed that
no major complications will arise. Other li ght bulbs should be replaced by your
specialist garage.
8)The small box with replacement bulbs is part of th e basic equipping of the vehicle in some coun-
tries.Front headlight
Halogen headlight
Xenon headlight
Low beam light
H4
D2S
Main beam light
H4
H1
Parking lights
W5W
Tu r n s i g n a l s
PY21W
Fog lights
H3
Rear light unit
Bulb (Octavia)
Bulb (Combi)
Reversing light
P21W
P21W
Tu r n s i g n a l s
PY21W
PY21W
Brake lights
P21W
P21/5W
Parking lights
P21/4W
P21/5W
Fog lights
P21/4W
P21W
Others
Bulb (Octavia)
Bulb (Combi)
Side turn signal lights
WY5W
WY5W
Licence plate light
W5W
W5W
3. Brake light
W2, 3W
LED
Interior lighting
C10W
C10W
Reading light
W5W
W5W
Luggage compartment light
C5W
C10W
Storage compartment light -
front passenger side
C3W
C3W
Interior mirror light
W2, 3W
W2, 3W
s2rc.book Page 181 Thursday, April 22, 2010 10:58 AM