radio SKODA OCTAVIA TOUR 2011 2.G / (1Z) User Guide
[x] Cancel search | Manufacturer: SKODA, Model Year: 2011, Model line: OCTAVIA TOUR, Model: SKODA OCTAVIA TOUR 2011 2.G / (1Z)Pages: 183, PDF Size: 11.13 MB
Page 123 of 183
Taking care of your vehicle and cleaning the vehicle
122
I f y o u h a v e a n y p a r t i c u l a r a t t a c h e d p a r t s f i t t e d t o y o u r c a r - s u c h a s s p o i l e r , r o o f r a c k
system, two-way radio aerial - it is best to first of all consult the operator of the car
wash plant.
It is important to degrease the lips of the windscreen wiper rubbers after passing
through the automatic vehicle wash system.Washing vehicle by handIt is important to first soften the dirt with plenty of water and rinse it off as thor-
oughly as possible before washing your vehicle by hand.
One should then clean the vehicle using a soft washing sponge, washing glove or
a washing brush and only slight pressure. Work from the top to the bottom - begin-
ning with the roof. Only place slight pr essure on the vehicle paintwork during
cleaning Only use a car shampoo for stubborn dirt.
Wash out the sponge or washing gl ove thoroughly at short intervals.
Clean wheels, door sills and similar parts last. Use a second sponge for such areas.
Rinse off the vehicle well after giving it a wash and dry it off using a chamois leather.
WARNING
•
The ignition should always be switched off when you wash your vehicle - risk
of accident!
•
Protect your hands and arms from sharp-edged metal parts when you are
cleaning the underfloor, the inside of the wheel housings or the wheel trims -
risk of cuts.Caution
•
Do not wash your vehicle in bright sunlight - risk of paint damage.
•
Ensure that the jet of water is not aimed directly at the locking cylinders or at
the door and panel joints if you spray your vehicle in winter down with a hose - risk
of freezing.
•
Do not use any insect sponges, rough ki tchen sponges or similar cleaning prod-
ucts - risk of damage to the surface of paintwork.For the sake of the environment
Only wash your vehicle at washing bays specifically reserved for this purpose. This
ensures that no water which may be cont aminated by oil flows into the sewage system. It is not even permitted to wash your vehicle in certain areas except at such
specific washing bays.
Washing with a high-pressure cleanerWhen you wash your vehicle with a high-pressure cleaner, it is essential to comply
with the instructions for use of the cleaning equipment. This applies in particular to
the pressure used and to the
spraying distance. Maintain a sufficiently large
distance to soft materials such as rubber hoses or insulation material.
On no account use circular spray nozzles or so-called dirt cutters!
WARNING
It is particularly important that you do not clean tyres with circular spray jets.
Visible but also invisible damage to tyres may occur even at a relatively large
spraying distance and if sprayed only for a short time - risk of accident!
Caution
The water containing wax must be no hotter than 60 °C, otherwise the vehicle can
be damaged.Wax treatmentGood wax treatment is an effective way of protecting the paintwork from harmful
environmental influences and minor mechanical damage.
The vehicle must be treated with a high-qua lity hard wax polish at the latest, when
no more drops form on the clean paintwork.
A new layer of a high-quality hard wax polish can be applied to the clean bodywork
after it has dried thoroughly. Even if you use a wax preserver regularly we still
recommend that you treat the paintwork of the vehicle at least twice a year with
hard wax.
Caution
Never apply wax to the windows.
s2lk.2.book Page 122 Monday, April 18, 2011 7:41 AM
Page 140 of 183

Inspecting and replenishing139
Using the system
Safety
Driving Tips
General Maintenance
Breakdown assistance
Technical Data
– Switch the ignition and all electrical components off.
– Only for “quick-charging”: Disconnect both battery cables (first of all “negative”,
then “positive”).
– Carefully attach the termin al clamps of the charger to the battery terminals (red
= “positive”, black = “negative”).
– You can now plug the mains cable of the charger into the power socket and
switch on the charger.
– When charging is completed: switch the charger off and unplug the mains cable from the power socket.
– Only then should you disconnect th e terminal clamps of the charger.
– Reconnect the cables to the battery (first of all “positive”, then “negative”).
It is not normally necessary to disconnect the cables of the battery if you recharge
the battery using low amperages (as for example from a mini-charger). Please also
refer to the instructions fr om the charger manufacturer.
A charging current of 0.1 of the total batter y capacity (or lower) is that which should
be used until full charging is achieved.
It is, however, necessary to disconnect both cables before charging the battery with
high amperages, so-called “ quick-charging”.
“Quick-charging” a battery is dangerous in “Working on the battery” on
page 136. It requires a special charger and appropriate knowledge. We therefore
recommend that you have yo ur battery quick-charged only by your Škoda Service
Partner.
A discharged battery may already freeze at temperatures just below 0 °C . We
recommend that you no longer use a battery which has thawed out because the
casing of the battery may be cracked thro ugh the formation of ice and this would
allow battery electrolyte to flow out.
The vent plugs of the battery should not be opened for charging.
WARNING
•
Never charge a frozen or thawed batt ery - risk of explosion and caustic
burns. Replace a frozen battery.
•
Never charge a battery which has a too low electrolyte level - risk of explo-
sion and caustic burns.
Disconnecting and reconnecting the batteryOn disconnecting and reconnecting the batt ery the following functions are initially
deactivated or are no longer able to operate fault-free.
We recommend having the vehicle checked by a Škoda Service Partner to ensure
full functionality of all electrical systems.Replacing the batteryYou should only replace a battery with a new battery of the same capacity, voltage
(12 V), amperage and of the same size. Škoda Service Partners have a range of suit-
able batteries available.
We recommend that you only have an old battery disposed of by your Škoda Service
Partner since it does require special disposal.
For the sake of the environment
Batteries contain poisonous substances such as sulphuric acid and lead. They must
be disposed of in accordance with loca l environmental protection regulations and
on no account as domestic waste.•
I n v i e w o f t h e p r o b l e m s i n v o l v e d w i t h i t s p r o p e r d i s p o s a l , w e r e c o m m e n d h a v i n g
the battery replaced by a specialist garage.Operation
Operating measure
Electrical power window (operational faults)
page 39
Enter radio code number
see Radio Operating Instructions
Set hours
page 17
Data in the multi-functional indicator* are
deleted.
page 18
s2lk.2.book Page 139 Monday, April 18, 2011 7:41 AM
Page 147 of 183
Accessories, changing and replacing parts
146
Accessories, changing and replacing partsAccessories and replacement partsŠkoda vehicles have been built according to the latest discoveries in safety engi-
neering. Thus one should not change the condition in which the vehicle was deliv-
ered from the manufactur er without some thought.
The following guidelines should be observed when a vehicle is to be retrofitted with
accessories, have technical changes made to it or a part has to be replaced at some
time in the future.•
Advise should always be obtained from an authorised Škoda Service Partner
before buying any accessories and before making any technical changes .
•
This is particularly the case when accessories are bought in a foreign country.
•
Škoda Genuine Accessories and Skoda origin al parts can be bought from author-
ised Škoda Service Partners who also pr ofessionally undertake the assembly of
parts which were purchased there.
•
All Škoda original accessories which are li sted in the catalogue of original acces-
sories such as spoilers, transport systems, child seats, etc., are homologized.
•
Radios, aerials and other el ectrical accessories should only be installed by
authorised Škoda Service Partners.
•
The guidelines issued by Škoda Auto must be observed when making technical
changes.
•
This is to ensure that no technical damage occurs to the vehicle, that travelling
and operating safety are ma intained and that the changes are permissible. The
authorised Škoda Service Partners undertake this work professionally or refer it to
a specialist company in special cases.
Any damage which is done caused by technical changes made without consulting
a Skoda dealer is exclud ed from the guarantee.
WARNING
•
We advise you, in your own interest, to only use Škoda Genuine Accessories
and Škoda original parts which have been expressly approved for use on your
Škoda. Reliability, safety and suitability have been established for these Škoda
original parts.
•
We cannot guarantee suitability of installation into your vehicle of other
products despite keeping a constant eye on market developments (also not in
the case where there is an attestatio n or permission can be produced).
•
Škoda cannot meet its full warranty commitments if you use parts which are
not genuine accessories, which can lead to sustained damage to the vehicle.
Technical changesInterference on the electronic components and their software can lead to opera-
tional faults. This interference can also im pair not directly affected systems because
of the networking of the electronic co mponents. This means that the operating
safety of your vehicle can be considerably jeopardised, a greater wear of vehicle
parts can occur and finally the vehi cle registration documents expire.
We trust that you will understand that Škoda Auto cannot be liable for damage
resulting from unprofessional work.
We therefore recommend that you have al l work carried out using Škoda original
parts at authorised Škoda Service Partners.
WARNING
Work or modifications on your vehicle, which have been carried out unprofes-
sionally, can cause operational faults - risk of accident!Vehicles of category N1A vehicle of category N1 is a vehicle which is designed and manufactured for the
transportation of goods where the maximu m weight must not exceed 3.5 tonnes.
WARNING (continued)
s2lk.2.book Page 146 Monday, April 18, 2011 7:41 AM
Page 158 of 183
Fuses and light bulbs157
Using the system
Safety
Driving Tips
General Maintenance
Breakdown assistance
Technical Data
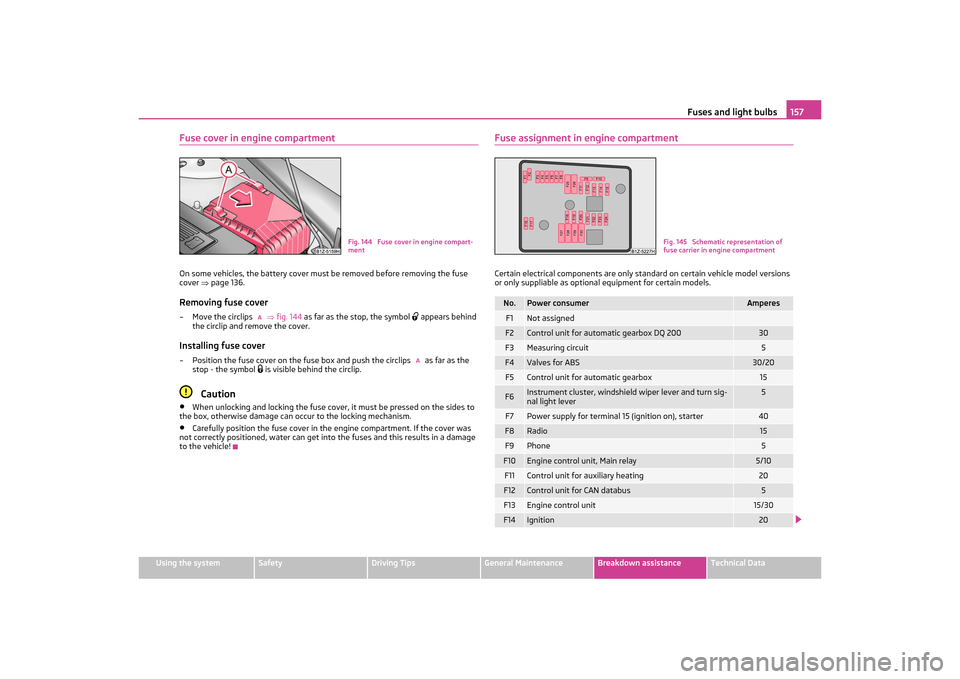
Fuse cover in engine compartmentOn some vehicles, the battery cover must be removed before removing the fuse
cover page 136.Removing fuse cover–Move the circlips fig. 144 as far as the stop, the symbol
appears behind
the circlip and remove the cover.
Installing fuse cover– Position the fuse cover on the fuse box and push the circlips as far as the stop - the symbol
is visible behind the circlip.
Caution
•
When unlocking and locking the fuse cover, it must be pressed on the sides to
the box, otherwise damage can occur to the locking mechanism.
•
Carefully position the fuse cover in the engine compartment. If the cover was
not correctly positioned, water can get into the fuses and this results in a damage
to the vehicle!
Fuse assignment in engine compartmentCertain electrical components are only st andard on certain vehicle model versions
or only suppliable as optional equipment for certain models.
Fig. 144 Fuse cover in engine compart-
ment
A
A
No.
Power consumer
Amperes
F1
Not assigned
F2
Control unit for automatic gearbox DQ 200
30
F3
Measuring circuit
5
F4
Valves for ABS
30/20
F5
Control unit for automatic gearbox
15
F6
Instrument cluster, windshield wiper lever and turn sig-
nal light lever
5
F7
Power supply for terminal 15 (ignition on), starter
40
F8
Radio
15
F9
Phone
5
F10
Engine control unit, Main relay
5/10
F11
Control unit for auxiliary heating
20
F12
Control unit for CAN databus
5
F13
Engine control unit
15/30
F14
Ignition
20
Fig. 145 Schematic representation of
fuse carrier in engine compartment
s2lk.2.book Page 157 Monday, April 18, 2011 7:41 AM
Page 179 of 183
Index
178
Replacing fuses . . . . . . . . . . . . . . . . . . . . . . . . . . . . . 156
Replacing the wiper blades . . . . . . . . . . . . . . . . . . . 47
Roof aerial . . . . . . . . . . . . . . . . . . . . . . . . . . . . . . . . . . 121
Running in the car . . . . . . . . . . . . . . . . . . . . . . . . . . . . 111SSafe securing . . . . . . . . . . . . . . . . . . . . . . . . . . . . . . . . 31
Safety . . . . . . . . . . . . . . . . . . . . . . . . . . . . . . . . . . . . . . . 81
Safety information
Engine compartment . . . . . . . . . . . . . . . . . . . . . 131
Safety wheel bolts . . . . . . . . . . . . . . . . . . . . . . . . . . 152
Saving electrical energy . . . . . . . . . . . . . . . . . . . . . 112
Seat belt height adjuster . . . . . . . . . . . . . . . . . . . . . 87
Seat belt warning light . . . . . . . . . . . . . . . . . . . . . . . 87
Seat belts . . . . . . . . . . . . . . . . . . . . . . . . . . . . . . . 85, 88 Belt tensioners . . . . . . . . . . . . . . . . . . . . . . . . . . . 88
Cleaning . . . . . . . . . . . . . . . . . . . . . . . . . . . . . . . . 126
fastening . . . . . . . . . . . . . . . . . . . . . . . . . . . . . . . . . 87
Height adjustment . . . . . . . . . . . . . . . . . . . . . . . . 87
Safety information . . . . . . . . . . . . . . . . . . . . . . . . 86
taking off . . . . . . . . . . . . . . . . . . . . . . . . . . . . . . . . 88
Warning light . . . . . . . . . . . . . . . . . . . . . . . . . . . . . 27
Seat heaters . . . . . . . . . . . . . . . . . . . . . . . . . . . . . . . . . 52
Service Display . . . . . . . . . . . . . . . . . . . . . . . . . . . . . . . 17
Service Interval Display . . . . . . . . . . . . . . . . . . . . . . . 17
Setting temperature Heating . . . . . . . . . . . . . . . . . . . . . . . . . . . . . . . . . . 67
Setting the clock . . . . . . . . . . . . . . . . . . . . . . . . . . . . . 17
Shifting . . . . . . . . . . . . . . . . . . . . . . . . . . . . . . . . . . . . . . 76
Side airbag . . . . . . . . . . . . . . . . . . . . . . . . . . . . . . . . . . . 92
Side lights . . . . . . . . . . . . . . . . . . . . . . . . . . . . . . . . . . . 40
Snow chains . . . . . . . . . . . . . . . . . . . . . . . . . . . . . . . . 145
Spare wheel . . . . . . . . . . . . . . . . . . . . . . . . . . . . . . . . 148
Speedometer . . . . . . . . . . . . . . . . . . . . . . . . . . . . . . . . 16
Stability system . . . . . . . . . . . . . . . . . . . . . . . . . . . . . 105
Starting the engine . . . . . . . . . . . . . . . . . . . . . . . . . . . 74 after fuel tank has run empty . . . . . . . . . . . . . . 75
Diesel engines . . . . . . . . . . . . . . . . . . . . . . . . . . . . 75
Petrol engines . . . . . . . . . . . . . . . . . . . . . . . . . . . . 75 Steering
active driver-steering recommendation . . . 107
Steering force assistance . . . . . . . . . . . . . . . . . . . . 109
Storage compartments . . . . . . . . . . . . . . . . . . . . . . . 61
Storage facilities . . . . . . . . . . . . . . . . . . . . . . . . . . . . . 61
Sun visors . . . . . . . . . . . . . . . . . . . . . . . . . . . . . . . . . . . 45
Switching lights on and off . . . . . . . . . . . . . . . . . . . 40
Switching off the engine . . . . . . . . . . . . . . . . . . . . . 75
TTaking care of your vehicle . . . . . . . . . . . . . . . . . . 121
TCS Warning light . . . . . . . . . . . . . . . . . . . . . . . . . . . . . 25
Temperature outside . . . . . . . . . . . . . . . . . . . . . . . . . . . . . . . . . . 19
the first 1 500 kilometres . . . . . . . . . . . . . . . . . . . . . 111
The roof luggage rack system . . . . . . . . . . . . . . . . . 58
Thickness of brake pads Warning light . . . . . . . . . . . . . . . . . . . . . . . . . . . . . 27
Tool . . . . . . . . . . . . . . . . . . . . . . . . . . . . . . . . . . . . . . . . 147
Top Tether . . . . . . . . . . . . . . . . . . . . . . . . . . . . . . . . . 103
Towing a trailer . . . . . . . . . . . . . . . . . . . . . . . . . . . . . 118
Towing device . . . . . . . . . . . . . . . . . . . . . . . . . . . . . . 119
towing vehicle . . . . . . . . . . . . . . . . . . . . . . . . . . . . . . 154
Tow-starting . . . . . . . . . . . . . . . . . . . . . . . . . . . . . . . . 154
Traction control system . . . . . . . . . . . . . . . . . . . . . 106
Traction control system (TCS) Warning light . . . . . . . . . . . . . . . . . . . . . . . . . . . . . 25
Trailer . . . . . . . . . . . . . . . . . . . . . . . . . . . . . . . . . . . . . . 118 General Maintenance . . . . . . . . . . . . . . . . . . . . 118
Transporting children . . . . . . . . . . . . . . . . . . . . . . . . . 97
Tread depth . . . . . . . . . . . . . . . . . . . . . . . . . . . . . . . . 142
Turn signal lights . . . . . . . . . . . . . . . . . . . . . . . . . . . . . 42 Warning light . . . . . . . . . . . . . . . . . . . . . . . . . . . . . 23
Two-way radio systems . . . . . . . . . . . . . . . . . . . . . . 80
Tyre . . . . . . . . . . . . . . . . . . . . . . . . . . . . . . . . . . . . . . . . 141
Tyre inflation pressure Warning light . . . . . . . . . . . . . . . . . . . . . . . . . . . . . 26
Tyre repair kit . . . . . . . . . . . . . . . . . . . . . . . . . . . . . . . 148 Tyres
Winter tyres . . . . . . . . . . . . . . . . . . . . . . . . . . . . . 144
UUnderbody protection . . . . . . . . . . . . . . . . . . . . . . . 124
Unlocking . . . . . . . . . . . . . . . . . . . . . . . . . . . . . . . . . . . 30Remote control . . . . . . . . . . . . . . . . . . . . . . . . . . . 35VVehicle tool kit . . . . . . . . . . . . . . . . . . . . . . . . . . . . . . 147
Visors . . . . . . . . . . . . . . . . . . . . . . . . . . . . . . . . . . . . . . . 45WWarning lights . . . . . . . . . . . . . . . . . . . . . . . . . . . . . . . 21
Warning symbols . . . . . . . . . . . . . . . . . . . . . . . . . . . . . 21
Warning triangle . . . . . . . . . . . . . . . . . . . . . . . . . . . . 147
Washing . . . . . . . . . . . . . . . . . . . . . . . . . . . . . . . . . . . . . 121with a high-pressure cleaner . . . . . . . . . . . . . 122
Washing the vehicle . . . . . . . . . . . . . . . . . . . . . . . . . . 121
Washing vehicle by hand . . . . . . . . . . . . . . . . . . . . 122
Wax treatment . . . . . . . . . . . . . . . . . . . . . . . . . . . . . . 122
Wheel Changing . . . . . . . . . . . . . . . . . . . . . . . . . . . . . . . . 149
Spare . . . . . . . . . . . . . . . . . . . . . . . . . . . . . . . . . . . 148
Wheel bolts . . . . . . . . . . . . . . . . . . . . . . . . . . . . . . . . . 144
Wheel trim . . . . . . . . . . . . . . . . . . . . . . . . . . . . . . 141, 150
Wheels . . . . . . . . . . . . . . . . . . . . . . . . . . . . . . . . . . . . . 141
Window . . . . . . . . . . . . . . . . . . . . . . . . . . . . . . . . . . . . . 37
Windows de-icing . . . . . . . . . . . . . . . . . . . . . . . . . . . . . . . . . 123
Windscreen washer nozzles . . . . . . . . . . . . . . . . . . 45
Windshield washer fluid reservoir . . . . . . . . . . . . 140
Windshield washer system . . . . . . . . . . . . . . . . . . 140
Windshield wiper . . . . . . . . . . . . . . . . . . . . . . . . . . . . . 45
Winter tyres . . . . . . . . . . . . . . . . . . . . . . . . . . . . . . . . 144
Wiper blades Replacing the wiper blades . . . . . . . . . . . . . . . . 47
s2lk.2.book Page 178 Monday, April 18, 2011 7:41 AM