fuel cap SKODA OCTAVIA TOUR 2011 2.G / (1Z) Owner's Manual
[x] Cancel search | Manufacturer: SKODA, Model Year: 2011, Model line: OCTAVIA TOUR, Model: SKODA OCTAVIA TOUR 2011 2.G / (1Z)Pages: 183, PDF Size: 11.13 MB
Page 14 of 183
The brief instruction13
Using the system
Safety
Driving Tips
General Maintenance
Breakdown assistance
Technical Data
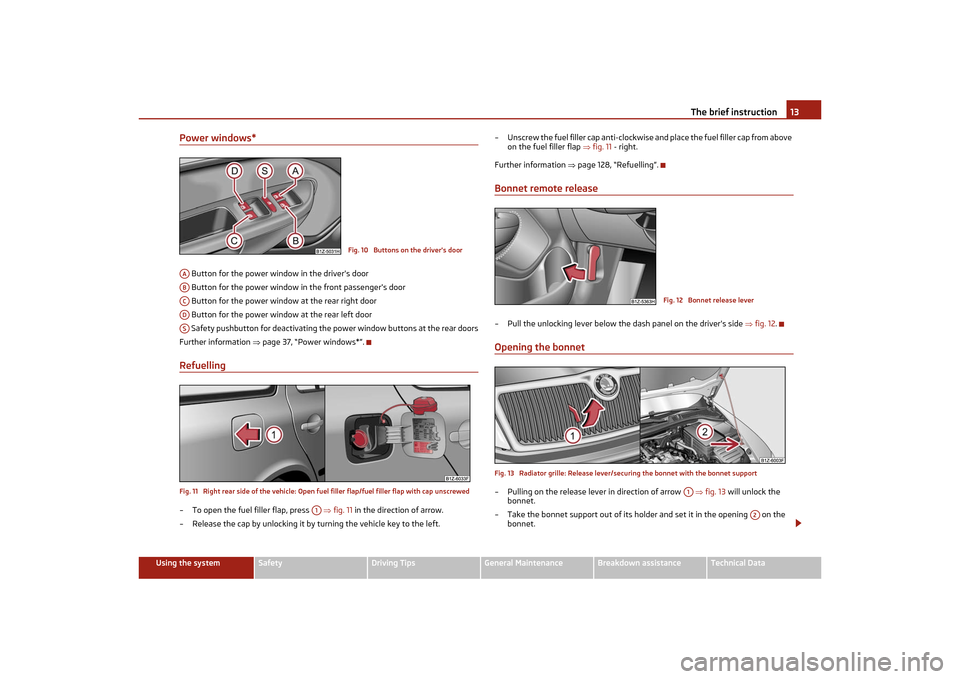
Power windows* Button for the power window in the driver's door
Button for the power window in the front passenger's door
Button for the power window at the rear right door
Button for the power window at the rear left door
Safety pushbutton for deactivating the power window buttons at the rear doors
Further information page 37, “Power windows*”.RefuellingFig. 11 Right rear side of the vehicle: Open fuel filler flap/fuel filler flap with cap unscrewed– To open the fuel filler flap, press fig. 11 in the direction of arrow.
– Release the cap by unlocking it by turning the vehicle key to the left. – Unscrew the fuel filler cap anti-clockwise and place the fuel filler cap from above
on the fuel filler flap fig. 11 - right.
Further information page 128, “Refuelling”.
Bonnet remote release– Pull the unlocking lever below the dash panel on the driver's side fig. 12 .Opening the bonnetFig. 13 Radiator grille: Release lever/ securing the bonnet with the bonnet support– Pulling on the release lever in direction of arrow fig. 13 will unlock the
bonnet.
– Take the bonnet support out of its holder and set it in the opening on the bonnet.
Fig. 10 Buttons on the driver's door
AAABACADAS
A1
Fig. 12 Bonnet release lever
A1
A2
s2lk.2.book Page 13 Monday, April 18, 2011 7:41 AM
Page 17 of 183
Instruments and Indicator/Warning Lights
16For the sake of the environment
Shifting up early helps you save fuel and reduce the operating noise of your
vehicle.SpeedometerThe speedometer shows the current speed of the car.Engine coolant temperature DisplayThe coolant temperature gauge page 15, fig. 15 operates only when the igni-
tion is switched on.
In order to avoid any damage to the engine, please pay attention to the following
notes regarding the temperature ranges:
Cold range
If the pointer is in the left-hand area of the scale it means that the engine has not
yet reached its operating temperature. Avoid running at high engine speeds, at full
throttle and at severe engine loads.
The operating range
The engine has reached its operating temp erature as soon as the pointer moves
into the mid-range of the scale. The pointer may also move further to the right at
high engine loads and high outside temperat ures. This is not critical provided the
warning symbol
in the instrument cluster does not flash.
If the symbol
in the instrument cluster flashes it means that either the coolant
temperature is too high or the coolant level is too low. Observe the guidelines
page 25, “Coolant temperature/coolant level ”.
WARNING
Pay attention to the warning notes page 131, “Working in the engine compart-
ment” before opening the bonnet and inspecting the coolant level.
Caution
Additional headlights and other attached components in front of the fresh air inlet
impair the cooling efficiency of the coolant. There is then a risk of the engine over-
heating at high outside temperatures and high engine loads!
Fuel gaugeThe fuel gauge page 15, fig. 15 only works when the ig nition is switched on.
The fuel tank has a capacity of ab out 55 litres. The warning symbol
in the instru-
ment cluster lights up when the pointer reaches the reserve marking. There are
now about 9 litres of fuel remaining in the tank. This symbol is a reminder for you,
that you must refuel .
An acoustic signal sounds as an additional reminder.
Caution
Never run the fuel tank completely empty! The irregular supply of the fuel system
can lead to irregular running of the engine. Unburnt fuel may get into the exhaust
system and damage the catalytic converter.Counter for distance drivenThe distance which you have driven with yo ur vehicle is shown in kilometres (km).
In some countries the measuring unit “mile” is used.
Reset button
Hold the reset button page 15, fig. 15 pressed for approx. 1 second. The trip
counter is reset to zero.
Trip counter for distance driven
The trip counter shows the distance driven since the time the trip counter was last
erased. The trip is shown in steps of 100 metres or 1/10 of a mile.
Odometer
The odometer indicates the total distance in kilometres or miles which the vehicle
has been driven.
Fault display
If there is a fault in the instrument cluster Error will appear in the display. Contact a
specialist garage.
WARNING
Never seek to adjust the trip counter fo r distance driven while driving for safety
reasons!
A3
A6
A5
s2lk.2.book Page 16 Monday, April 18, 2011 7:41 AM
Page 73 of 183
Heating and air conditioning system
72
Recirculated air mode
In recirculated air mode air is sucked out of the interior of the vehicle
and then fed back into the interior.Recirculated air mode prevents polluted ai r outside the vehicle from getting into the
vehicle, for example when driving through a tunnel or when standing in a traffic jam.Switching recirculated air mode on– Press the button page 70, fig. 82 the warning light lights up in the
button.Switching recirculated air mode off– Once again press the button . The warning light in the button goes out.
The recirculated air mode is switched off au tomatically if the air distribution control
is in position
page 70, fig. 82 . You can also switch recirculated air mode on
again from this setting by re peatedly pressing pushbutton .
WARNING
You should not leave recirculated air mode on over a longer period of time, as
“stale” air may result in fatigue in the dr iver and occupants, divert your attention
and also cause the windows to mist up. Th e risk of having an accident increases.
Switch recirculated air mode off as soon as the windows begin misting up.Using the air conditioning system economicallyThe compressor on the air conditioning system uses power from the engine when
in cooling mode which will effect the fuel consumption.
It recommended to open the windows or the doors of a vehicle for which the interior
has been strongly heated through the effect of direct sunlight in order to allow the
heated air to escape.
The cooling system should not be switched on while travelling when the window is
open.
The desired interior temperature can also be achieved without switching in the
cooling system just by switching to fresh air mode.
For the sake of the environment
When you economize on fuel, you also reduce pollutant emissions.Operational malfunctionsIf the cooling system does not operate at outside temperatures higher than +5 °C,
there is a problem in the system. The reasons for this may be:•
The fuse on the air conditioning system has blown. Check the fuse, replace it if
necessary page 156.
•
The cooling system has switched off automatically for a short time because the
coolant temperature of the engine is too hot page 16.
If you are not able to rectify the operat ional problem yourself, or if the cooling
capacity decreases, switch the cooling system off. Contact a specialist garage.
3
C
s2lk.2.book Page 72 Monday, April 18, 2011 7:41 AM
Page 129 of 183
Fuel
128Caution
•
Therefore, only operate your vehicle with diesel fuel which complies with the
standard EN 590 (standard DIN 51628 in Germany, standard ÖNORM C 1590 in
Austria). Filling the tank even only once wi th diesel fuel that does not comply with
the standard can result in damage to the engine parts, the lubrication system, the
fuel and exhaust system.
•
If you inadvertently fill up the vehicle with fuel other than the prescribed diesel
fuel, e.g. petrol, do not under any circumstan ces start the engine or turn on the igni-
tion. Extensive engine damage is possible! Contact a specialist garage who will
clean out the fuel system.
•
Water which has collected in the fuel filter can result in engine problems.
•
Your vehicle is not adapted for use of bio-diesel (RME), therefore this fuel must
not be refuelled and driven. Using this biodiesel can lead to damage to the engine
or the fuel system.
Operation in winterWinter-grade diesel fuel
A different grade of diesel fuel is available at filling stations in winter than during
the summer. Using “summer-grade diesel fuel” at temperatures below 0 °C can
result in operational problems because th e diesel becomes viscous as a result of
paraffin separation.
It is therefore the case that the standard EN 590 (standard DIN 51628 in Germany,
standard ÖNORM C 1590 in Austria) is the diesel fuel class prescribed for certain
periods of the year which can also be purchased at the corresponding time during
the year. “Winter-grade diesel fuel” will still operate properly even at a temperature
of -20 °C.
It is often the case in countries with diff erent climatic conditions that diesel fuels
available have a different te mperature characteristic. Th e authorised Škoda Service
Partners and filling stations in the country concerned will be able to provide you
with information regarding the diesel fuels available.
Prewarming fuel
The vehicle is fitted with a fuel filter pr ewarming system. This secures operation of
a vehicle using diesel fuel down to an environmental temperature of -25 °C.
Caution
It is not permitted to add the various fuel additives on the market, including petrol,
to diesel fuel in order to improve its flow properties.
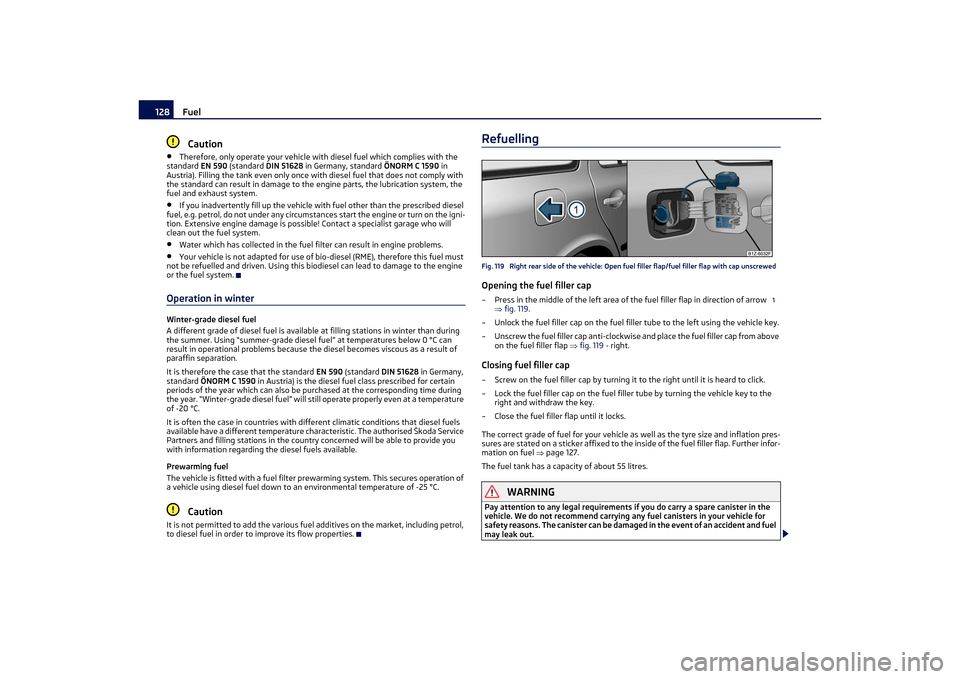
RefuellingFig. 119 Right rear side of the vehicle: Open fuel filler flap/fuel filler flap with cap unscrewedOpening the fuel filler cap– Press in the middle of the left area of the fuel filler flap in direction of arrow
fig. 119 .
– Unlock the fuel filler cap on the fuel filler tube to the left using the vehicle key.
– Unscrew the fuel filler cap anti-clockwise and place the fuel filler cap from above on the fuel filler flap fig. 119 - right.Closing fuel filler cap– Screw on the fuel filler cap by turning it to the right until it is heard to click.
– Lock the fuel filler cap on the fuel filler tube by turning the vehicle key to the right and withdraw the key.
– Close the fuel filler flap until it locks.
The correct grade of fuel for your vehicle as well as the tyre size and inflation pres-
sures are stated on a sticker affixed to the in side of the fuel filler flap. Further infor-
mation on fuel page 127.
The fuel tank has a capacity of about 55 litres.
WARNING
Pay attention to any legal requirements if you do carry a spare canister in the
vehicle. We do not recommend carrying any fuel canisters in your vehicle for
safety reasons. The canister can be damaged in the event of an accident and fuel
may leak out.
1
s2lk.2.book Page 128 Monday, April 18, 2011 7:41 AM
Page 132 of 183
Inspecting and replenishing131
Using the system
Safety
Driving Tips
General Maintenance
Breakdown assistance
Technical Data
Working in the engine compartment
Particular care is required when carrying out any work in the engine
compartment!There is a risk of injuries, scalding, acci dents and fire when working in the engine
compartment, e.g. inspecting and replen ishing oil and other fluids. For this
reason, it is essential to comply with the warning instructions stated below and
with the general applicable rules of safety . The engine compartment of your car is
a hazardous area .
WARNING
•
Never open the bonnet if you see that steam or coolant is flowing out of the
engine compartment - risk of scalding! Wait long enough until the steam or
coolant has stopped escaping.
•
Switch off the engine and pull out the ignition key.
•
Apply the handbrake firmly.
•
Move the gear lever into the Neutral position.
•
Allow the engine to cool down.
•
Keep children clear of the engine compartment.
•
Never spill oil and other fluids over the hot engine. Such fluids (e.g. the anti-
freeze contained in the coolant) may ignite!
•
Avoid short circuits in the electrical system - particularly on the battery.
•
Never place your hand into the radiator fan as long as the engine is still
warm. The fan might suddenly start running!
•
Never open the cap of the coolant expans ion bottle as long as the engine is
still warm. The cooling system is pressurized!
•
Cover over the cap of the coolant expans ion reservoir with a large cloth when
opening it as protection for your face , hands and arms from hot steam or hot
coolant.
•
Do not let objects, such as e.g. cle aning cloth or tools lie in the engine
compartment.
•
If you wish to work under the vehicl e, you must secure the vehicle from
rolling away and support it with suitable supporting blocks; the lifting jack* is
not sufficient for this - risk of injury!
•
In cases where it be necessary to carry out inspection work when the engine
is running there is an additi onal risk from rotating parts (e.g. the V-ribbed belt,
alternator, radiator fan) and from the high-voltage ignition system. Please
observe in addition the following: −
Never touch the electrical cables of the ignition system.
− Absolutely avoid any jewellery, loose items of clothing or long hair from
getting into the rotating parts of the engine - Hazard! Therefore remove any
jewellery beforehand, tie up your hair and wear tight fitting clothing.
•
Please also comply with the warnin g instructions stated below when
carrying out any essential work on the fuel system or on the electrical system:
− Always separate the car batter y from the electrical system.
− Do not smoke.
− Never carry out any work close to naked flames.
− Always keep a working fire extinguisher at hand.Caution
When replenishing fluids in the engine, always ensure that the fluids are on no
account mixed up. This may result in ma jor operating problems and also vehicle
damage!Overview of the engine compartment
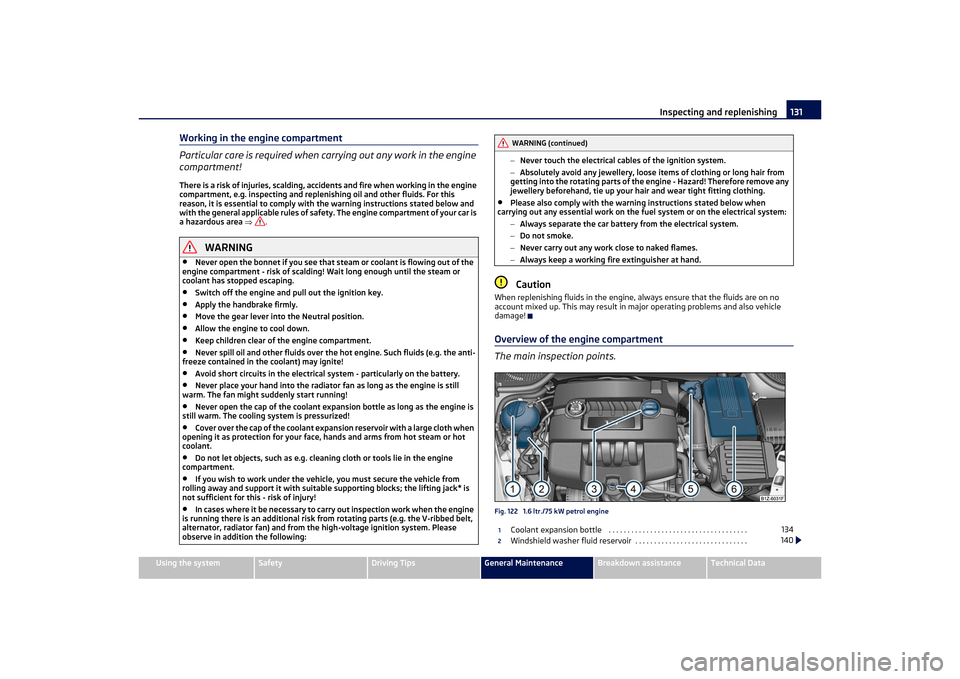
The main inspection points.Fig. 122 1.6 ltr./75 kW petrol engine
Coolant expansion bottle . . . . . . . . . . . . . . . . . . . . . . . . . . . . . . . . . . . . .
Windshield washer fluid reservoir . . . . . . . . . . . . . . . . . . . . . . . . . . . . . . WARNING (continued)
1
134
2
140
s2lk.2.book Page 131 Monday, April 18, 2011 7:41 AM
Page 133 of 183
Inspecting and replenishing
132Engine oil filler opening . . . . . . . . . . . . . . . . . . . . . . . . . . . . . . . . . . . . . . .
Engine oil dipstick . . . . . . . . . . . . . . . . . . . . . . . . . . . . . . . . . . . . . . . . . . . .
Brake fluid reservoir . . . . . . . . . . . . . . . . . . . . . . . . . . . . . . . . . . . . . . . . . .
Battery (below a cover) . . . . . . . . . . . . . . . . . . . . . . . . . . . . . . . . . . . . . . . Note
The location of the inspection points in the engine compartment of petrol and diesel
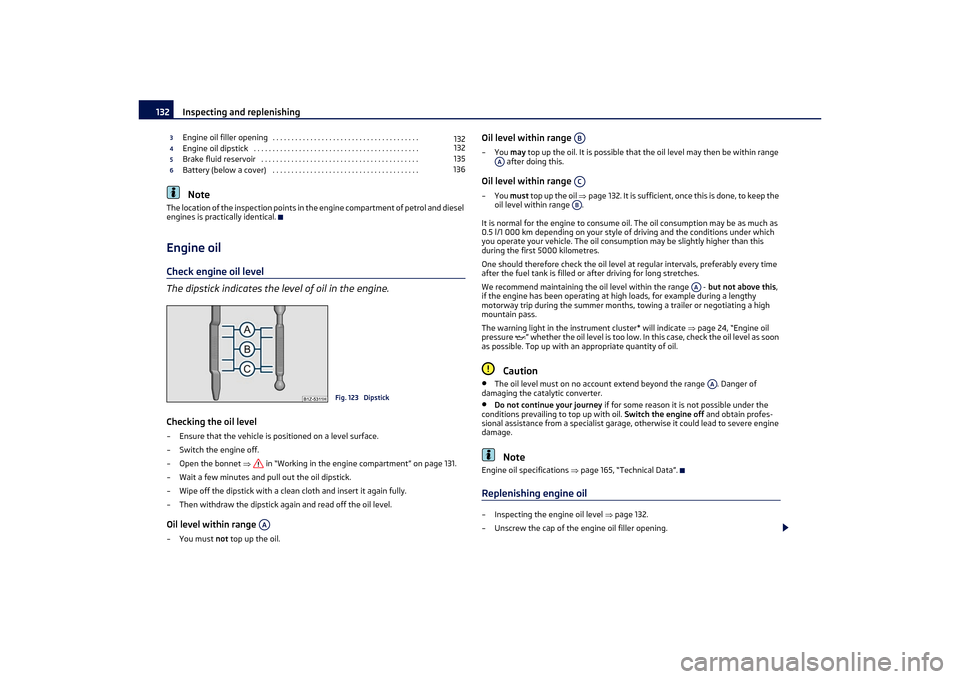
engines is practically identical.Engine oilCheck engine oil level
The dipstick indicates the level of oil in the engine.Checking the oil level– Ensure that the vehicle is positioned on a level surface.
– Switch the engine off.
–Open the bonnet in “Working in the engine compartment” on page 131.
– Wait a few minutes and pull out the oil dipstick.
– Wipe off the dipstick with a clea n cloth and insert it again fully.
– Then withdraw the dipstick ag ain and read off the oil level.Oil level within range –You must not top up the oil.
Oil level within range –You may top up the oil. It is possible that the oil level may then be within range
after doing this.Oil level within range –You must top up the oil page 132. It is sufficient, once this is done, to keep the
oil level within range .
It is normal for the engine to consume oil. The oil consumption may be as much as
0.5 l/1 000 km depending on your style of driving and the conditions under which
you operate your vehicle. The oil consumption may be slightly higher than this
during the first 5000 kilometres.
One should therefore check the oil level at regular intervals, preferably every time
after the fuel tank is filled or after driving for long stretches.
We recommend maintaining the oil level within the range - but not above this,
if the engine has been operating at high loads, for example during a lengthy
motorway trip during the summer months, towing a trailer or negotiating a high
mountain pass.
The warning light in the instrument cluster* will indicate page 24, “Engine oil
pressure ” whether the oil level is too low. In this case, check the oil level as soon
as possible. Top up with an appropriate quantity of oil.
Caution
•
The oil level must on no account extend beyond the range . Danger of
damaging the catalytic converter.
•
Do not continue your journey if for some reason it is not possible under the
conditions prevailing to top up with oil. Switch the engine off and obtain profes-
sional assistance from a specialist garage, otherwise it could lead to severe engine
damage.Note
Engine oil specifications page 165, “Technical Data”.Replenishing engine oil– Inspecting the engine oil level page 132.
– Unscrew the cap of the engine oil filler opening.
3
132
4
132
5
135
6
136
Fig. 123 Dipstick
AA
AB
AA
ACAB
AA
AA
s2lk.2.book Page 132 Monday, April 18, 2011 7:41 AM
Page 142 of 183
Wheels and Tyres141
Using the system
Safety
Driving Tips
General Maintenance
Breakdown assistance
Technical Data
Wheels and TyresWheelsGeneral information•
New tyres do not offer optimal grip at fi rst and should therefore be run in for
about 500 km at a moderate speed and an appropriately cautious style of driving.
You will also profit from longer tyre life.
•
The tread depth of new tyres may differ because of design features and the
configuration of the tread (depending on the type of tyre and the manufacturer).
•
Drive over curbs on the side of the road and other such obstacles slowly and,
where possible, at a right angle in order to avoid damage to tyres and wheel trims.
•
Inspect your tyres from ti me to time for damage (punctures, cuts, splits and
bulges). Remove foreign bodies from the tyre profile.
•
Damage to tyres and wheels is frequently not visible. Unusual vibrations or
pulling of the vehicle to one side could be a sign of tyre damage. Please reduce your
speed immediately and stop if you suspect that a wheel is damaged. Inspect the
tyres for signs of damage (bulges, splits, etc.) If no visible damage is present, please
drive at an appropriately slow speed and ca refully to the nearest specialist garage
in order to have your vehicle inspected.
•
Also protect your tyres from contact with oil, grease and fuel.
•
Immediately replace any dust caps of the valves which have got lost.
•
Mark wheels before removing them so that their previous direction of running
can be maintained when mounted them again.
•
Always store wheels or tyres which been removed in a cool, dry and, where
possible, dark place. Tyres which are not fixed to a wheel trim should be stored
upright.
Unidirectional tyres*
The direction of rotation of the tyres is marked by arrows on the wall of the tyre.
This indicates the direction of rotation of the tyre, and it is essential that the tyres
are fitted on to run in this direction. Only then are the tyres able to provide the
optimal properties in terms of grip, lo w noise, wear-and-tear and aquaplaning.
Further information concerning the use of unidirectional tyres page 145.
WARNING
•
New tyres during the first 500 km do not offer optimal grip and should there-
fore be run appropriatel y - risk of accident!
•
Never drive with damaged tyres - risk of accident!Note
Please observe the various differing legal requirements regarding tyres.Tyre lifeThe life of your tyres very much depends on the following points:
Tyre pressure
The working life of tyres will be shortened considerably if the tyres are insufficiently
or over-inflated and this will have an adverse effect on the handling of your vehicle.
Correctly inflated tyres are of partic ular importance when travelling at high speeds.
It is therefore good to check the pressure at least once a month and also before
setting off on a long trip. Please do not forget the spare wheel when checking the
tyres.
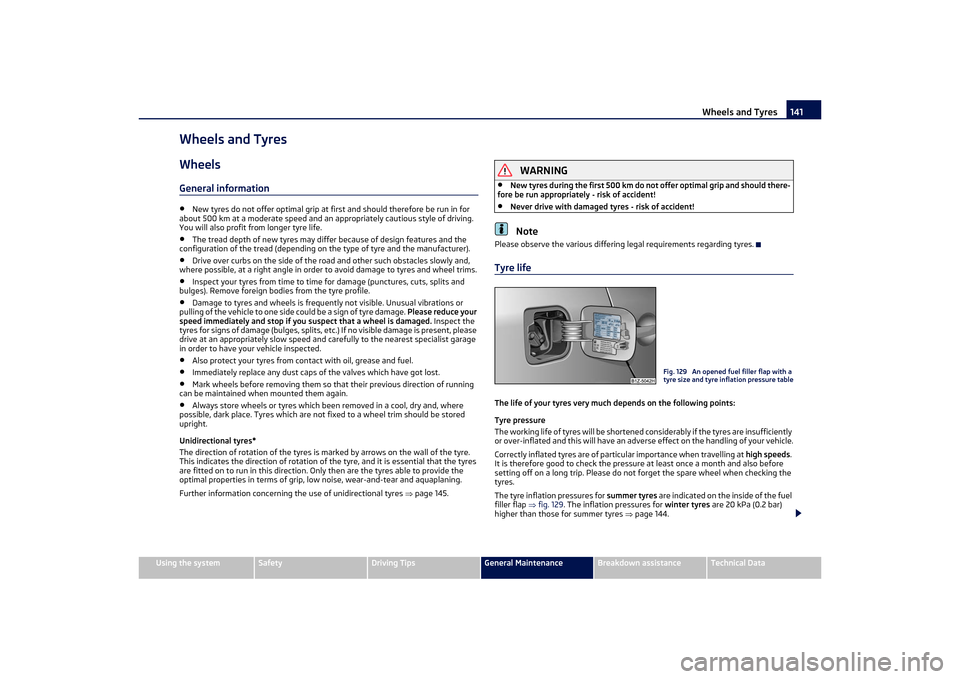
The tyre inflation pressures for summer tyres are indicated on the inside of the fuel
filler flap fig. 129 . The inflation pressures for winter tyres are 20 kPa (0.2 bar)
higher than those for summer tyres page 144.
Fig. 129 An opened fuel filler flap with a
tyre size and tyre inflation pressure table
s2lk.2.book Page 141 Monday, April 18, 2011 7:41 AM
Page 167 of 183
Technical Data
166
Sticker on inside of fuel filler flap
The stickers are affixed to the inside of the fuel filler flap and contain the following
information:•
The prescribed types of fuel,
•
Tyre size,
•
Tyre pressure.
Fuel consumption based on ECE regulations and EC guidelinesDepending on the range of the special equipment, style of driving, traffic situation,
weather influences and vehicle condition, the consumption values which in practice
result when using the vehicle can deviate from the indicated values.
Urban traffic
The consumption measurement in urban traffic begins with starting of the cold
engine. Afterwards the normal urban traffic is simulated.
Non-urban traffic
For the consumption measurement in non-ur ban traffic the vehicle, as in daily
motoring, is accelerated and braked several times in all gears. The vehicle speed
changes within the range from 0 to 120 km/h.
Combined traffic
The consumption value in the combined traffic consists of 37 % from the value for
the urban traffic and of 63 % from the value for the non-urban traffic.DimensionsDimensions (mm)
Engine oil specificationsThe grade of engine oil should be selected in accordance with
precise specifications.The engine of your vehicle has been factory-filled with a high-grade oil which you
can use throughout the year - except in extreme climatic regions.
You can mix various oils together with each other when refilling with oil. This does
not, however, apply for models with flexible service intervals (QG1).
Engine oils are, of course , undergoing continuous further development. Thus the
information stated in this Owner's Manual is only correct at the time of publication.
Authorised Škoda Service Partners are informed by Škoda Auto about current
changes. This why you should always have engine oil changed by an authorised
Škoda Service Partner.
The specifications (VW standards) stated in the following must be indicated sepa-
rately or together with other specifications on the bottle.
Engine oil specifications for models with flexible service intervals (QG1)
OCTAVIA
COMBI
Length
4572
4572
Width
1769
1769
Width including exterior mirror
2018
2018
Height
1462
1485
a)
1468
1490
a)
Clearance
140
164a)
140
164a)
Wheel base
2578
2578
Track gauge front/rear
1541/1514
1541/1514
a)The value corresponds to the status with rough road package.Petrol engines
Specification
Filling level
a)
a)Oil capacity with oil filter change. Inspect oil le vel when filling; do not fill up too much. The oil
level must be between the markings page 132.1.4 ltr./59 kW - EU5
VW 503 00, VW 504 00
3,2
1.6 ltr./75 kW - EU4, EU2
VW 503 00, VW 504 00
4,5
Diesel engine
Specification
Filling level
a)
2.0 l/81 kW TDI CR EU4
VW 507 00
4,3
OCTAVIA
COMBI
s2lk.2.book Page 166 Monday, April 18, 2011 7:41 AM