ECO mode SKODA PRAKTIK 2014 1.G Blues Car Radio Manual
[x] Cancel search | Manufacturer: SKODA, Model Year: 2014, Model line: PRAKTIK, Model: SKODA PRAKTIK 2014 1.GPages: 13, PDF Size: 1.77 MB
Page 4 of 13
General information
Important information
Introductory information
Please read this Radio Blues (hereinafter referred to only as device) Owner's Manual carefully, because operation in accordance with these instructions is a
prerequisite for proper use of the unit.
This Owner's Manual describes all possible equipment variants without identify-
ing them as special equipment, model variants or market-driven equipment.
Consequently, this vehicle does not need to contain all of the equipment compo-
nents described in these operating instructions.
The scope of equipment of your vehicle is related to your purchase contract for
the vehicle. More information is available from the ŠKODA Partner 1)
where you
bought the vehicle.
Please note that these instructions are meant only as an addendum to the infor-
mation presented in the Vehicle Manual for your vehicle. Therefore, they can be
used only in conjunction with the latest manual for this vehicle. For a detailed de-scription of some functions listed in these instructions, see the Vehicle Manual
for your vehicle.
If you have any questions about your device, please contact a ŠKODA Partner.
The illustrations can differ in minor details from your device; they are only inten-
ded for general information.
Device operation
The device should only be used when traffic conditions permit safe use.
WARNING■ Concentrate fully at all times on your driving! As the driver, you are fully re-
sponsible for the operation of your vehicle.■
Only use the device in a way that ensures that you are in full control of your
vehicle in every traffic situation - there is a risk of accidents occurring!
■
Adjust the volume to ensure that acoustic signals from outside the vehicle,
e.g. sirens from vehicles to give way to, such as the police, ambulance and fire
brigade , can be heard at all times.
■
High volumes can cause hearing damage!
Screen care
CAUTION
■ Do not use solvents such as petrol or turpentine which could damage the
screen surface.■
Treat the screen with care, as finger pressure or contact with sharp objects may
cause dents and scratches on the surface.
Note
The screen can be cleaned with a soft cloth and alcohol if necessary.
Anti-theft protection
Anti-theft coding
Your device is equipped with a convenience coding. If the device is being operat-
ed for the first time, the safety code is not only stored in the device but also in
the vehicle.
After disconnecting and reconnecting the battery, you must switch on the igni-
tion using the ignition key before switching on the device.
If you want to install the device in another vehicle you will need to enter the safe-
ty code. In this case you will have to call on a specialist garage.
1)
Explanation of terms
» Owner's Manual , chapter Foreword .
2General information
Page 5 of 13
As the unit only functions after entering the safety code, this practically excludes
its use after a theft - a contribution to increased anti-theft safety.
Note
The code is stored in the instrument cluster. This ensures that it is automatically
decoded (convenience coding). Manual input of the code is normally not necessa- ry.
Enter code
›
Switch on the radio with the ignition turned on. SAFE is displayed and then
1000 .
›
Use the selection buttons 1 - 4
8
to enter the safety code.
›
Confirm the safety code by pressing the selection buttons 6
8
.
If an incorrectly entered code is confirmed, the procedure can be repeated once
again.
If the code number is entered incorrectly for the second time, the unit will be
blocked for approx. one hour. It is possible to enter the safety code again after
one hour has expired if both the device and the ignition have stayed turned on
during that time.
The cycle - two attempts, blocked for an hour - will continue to apply.
Device specification and operation
Device specification
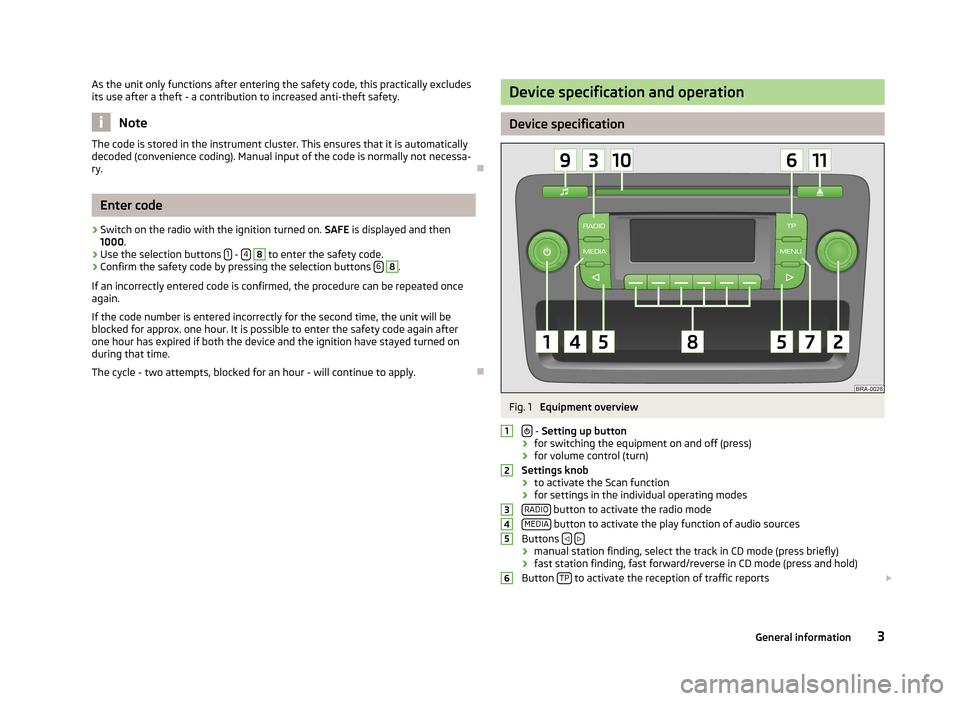
Fig. 1
Equipment overview
- Setting up button
› for switching the equipment on and off (press)
› for volume control (turn)
Settings knob › to activate the Scan function
› for settings in the individual operating modes
RADIO
button to activate the radio mode
MEDIA button to activate the play function of audio sources
Buttons › manual station finding, select the track in CD mode (press briefly)
› fast station finding, fast forward/reverse in CD mode (press and hold)
Button TP
to activate the reception of traffic reports
1234563General information
Page 7 of 13
Radio
Using the system
Change frequency range
Your device is capable of receiving a radio reception in the FM and AM analogue frequency range.
›
To change the frequency range, briefly press the RADIO button followed by the
function key FM1, FM2 , AM1 or AM2 .
or
›
Briefly press the RADIO button.
There are 6 memory slots available for each of these frequency range groups.
Searching for and storing radio stations
Manual search
›
Set the frequency of the desired radio station by turning the settings knob
2
.
Automatic station search
›
The device searches for the next radio station in the selected waveband by pressing the button or briefly.
Function SCAN
›
Pressing the menu button
2
or the MENU button and then pressing the func-
tion key SCN
8
briefly (for 10 seconds) enables the radio channels of current
waveband to be played.
›
This function is ended by pressing menu knob
2
, which will mean the current
station is played again.
Function AS
›
Press the MENU button and then the
AS
8
function button. An automatic sta-
tion finding is started during which the 6 stations with the strongest signal in the memory level FM1 and/or AM1 are stored.
Store station
›
After selecting the radio station, press the selection button
8
, on which the
station should be stored and hold it pressed in until the radio station briefly switches to mute and a brief signal sounds.
RDS Function
Certain radio stations transmit additional text information - designated as radio
text.
Note
■ The text information must not be available to all radio stations.■Depending on the quality of the signal, the device may need some time in order
to load all the displayed characters.
Traffic news function
Switching on/off
›
Flick the TP switch.
The traffic service are deactivated by flicking the TP
switch again. The displayed
icon goes out.
Activating/deactivating traffic reports
Functional readiness of the traffic news service is indicated via the
icon.
During playback in Media mode, the last selected radio station that supports traf-
fic news will continue to be received in the background. If a traffic news station
has not been set recently, then the most appropriate traffic news station is set
automatically in the background. While searching for an appropriate station, TP
SEEK is displayed on the screen.
If the set radio station does not broadcast traffic news,
is displayed on the
screen.
An incoming traffic report automatically interrupts playback or listening to a radio
station that is not currently transmitting traffic news. INFO and station name is
displayed on the screen. Once the traffic news have ended, the device automati-
cally returns to the original playback mode.
Note
Some radio stations misleadingly identify themselves as traffic programs. It is
therefore not an error with the unit that there are no traffic news on these sta-
tions.
5Radio
Page 8 of 13
CD player
Using the system
Information on how to use a CD
The internal drive can play CD-ROM, CD-R, CD-RW discs.
Insert the CD
With the labelled side facing up, only insert a CD into CD slot
10
until it is auto-
matically drawn in.
The play function will start automatically.
Taking out the CD
Press the
button – the CD is ejected.
If the “ejected” CD is not taken out within 10 seconds, it will be drawn in again for
safety reasons.
Buttons on the unit for controlling the current audio source
The arrow buttons
or on the unit will always affect the audio source current-
ly being listened to, irrespective of the current menu used.
- brief pressing within 2 seconds of playback takes you to the beginning of the
previous track or chapter, or after 2 seconds to the beginning of the current title
or chapter.
- pressing this briefly changes over to the beginning of the next title or chap-
ter, repeated pressing changes over to the beginning of the subsequent title or
chapter.
Changing between the audio sources
Press the MEDIA
button to select the audio source:
CD (internal CD drive), EXT (CD
changer, if it is connected to the device) or AUX.
WARNINGThe CD-player is a laser product. On the manufacturing date, this unit was
classified as a class 1 laser product in accordance with the national/interna-
tional standards DIN EN 60825-1: 2008-05 and DHHS Rules 21 CFR,
Subchapter J classed as a class 1 laser product. The laser used in this class 1 laser product is so weak that there is no risk of danger when operated cor-
rectly. This product is designed such that the laser is restricted to the inside of
the unit. However, the installed laser could be classified in a higher class were the housing to be removed. For this reason, never remove the housing of the
unit.
CAUTION
■ Never insert CDs with the designation “ into the internal drive. Do not insert in
drives without a drawer ” or use Eco Discs.■
After pressing the button there is a time delay of a few seconds before the
CD is ejected. During this time the lock in front of the CD-slot is open.
■
Be sure to wait until the CD has been fully ejected before you try to insert a new
CD. Otherwise you can damage the drive inside the unit.
■
A dirty, mechanically damaged, unreadable or incorrectly inserted CD can cause
playback problems. The CD may not be playable because of this or may cause it to
jump. Check the CD and insert it properly into the unit. Should problems persist ,
try using another CD and visit a specialist garage if necessary.
■
If the internal temperature of the device is too high, no CDs will be accepted.
The unit switches into the last active operating mode.
■
Never use liquids such as gasoline, paint thinner or record cleaner to clean the
surface of the CD - this may cause damage.
■
Never expose the CD to direct sunlight!
■
Only write on the CD using appropriate pens.
■
Do not stick anything to the CD.
Note
■ Poor or unsealed road surfaces and severe vibrations may cause the CD to jump.■In cold weather or after rain showers, moisture (condensate) may deposit in the
unit. This can effect the CD jump or impair the play function. In that case, wait un- til the moisture has dissipated.■
If a CD is dirty, never clean it in a circular motion, but instead work from the in-
side out. Use a soft, lint-free cloth. For heavy stains, we recommend that you
clean the CD with a commercially available CD cleaner and allow it to dry.
6CD player
Page 9 of 13
■It is possible that CDs protected by copyright and home-made CD-R and CD-RW
will not be played back at all or only in certain circumstances.■
Please also note the additional information for MP3 mode.
■
The national copyright laws that apply in your country must be observed.
■
The CD-player does not contain parts that need to be serviced or repaired. In
the case of a defective CD player, visit a specialist garage.
■
If the ejected CD is not taken out, it will be retracted again for safety reasons.
■
If a TP station was set before changing to CD mode, CD playback will be inter-
rupted during the traffic news and the unit switches to radio mode. Once the traf- fic news have ended, CD playback will resume.
General information for MP3 operation
MP3 file and MP3 storage device requirements
› CD-ROM, CD-R, CD-RW with a capacity of 650 MB and 700 MB.
› The CDs must meet the ISO 9660 Level 2 standard and the Joliet file system
(single and multi-session).
› Data names must be no longer than 64 characters.
› The list structure is restricted to a depth of 8 list levels.
› The name of the artist, the album and the title of the played MP3 data can be
displayed if such information is available in the form of so-called ID3 tags. The
directory and data name will be displayed if no ID3 tag is available.
› To scroll through folders or playlists (if available on the CD) press the respective
selection button for the folder icon using the
8
arrow (applies to MP3 files).
Bit rate (data flow per time unit)
› The system supports MP3 files with bit rates of 32 to 320 kb/s as well as MP3
files with variable bit rates.
› The indicated playing time data with variable bit rates is not reliable.
Function SCAN
Consecutive play back of each title for the first 10 seconds.
›
Press the menu button
2
to start scrolling through the CD.
›
To return to normal operation, press the menu knob
2
again.
›
To select the previous or next track, press or .
MIX function
Play function of titles in random order.
› Press the menu button 2 to open a menu for CD playback.›Switch the function on/off by pressing the menu button
MIX 8.›
By pressing MIX
8
again, another menu for random playback opens if this op-
tion is available.
MIX
The activated MIX function is underlined to highlight it.
› MIX CD
- playback of tracks on a CD in random order;
› MIX FOLDER
- Playback of tracks in a specific folder in random order;
› MIX PLAYLIST
- Playback of playlist (folder of selected tracks from individual
folders, which is stored on the CD). Is only displayed when a playlist has been
created for the CD to be played.
INF function
Display of information for the MP3 track being played from the ID3 tag. The textu-
al information is limited by the length of the display line.
›
Press the menu button
2
to open a menu for CD playback.
›
The function can be activated by pressing the INF
8
function key.
SCR function
Display of full information for the MP3 track being played from the ID3 tag. The textual information will appear gradually in the display line and is repeated.
The function is only available when the INF function is activated.
›
Press the menu button
2
to open a menu for CD playback.
›
The function is activated by pressing the SCR
8
function button.
7CD player