oil change SKODA RAPID 2013 1.G Owner's Manual
[x] Cancel search | Manufacturer: SKODA, Model Year: 2013, Model line: RAPID, Model: SKODA RAPID 2013 1.GPages: 226, PDF Size: 15.16 MB
Page 16 of 226
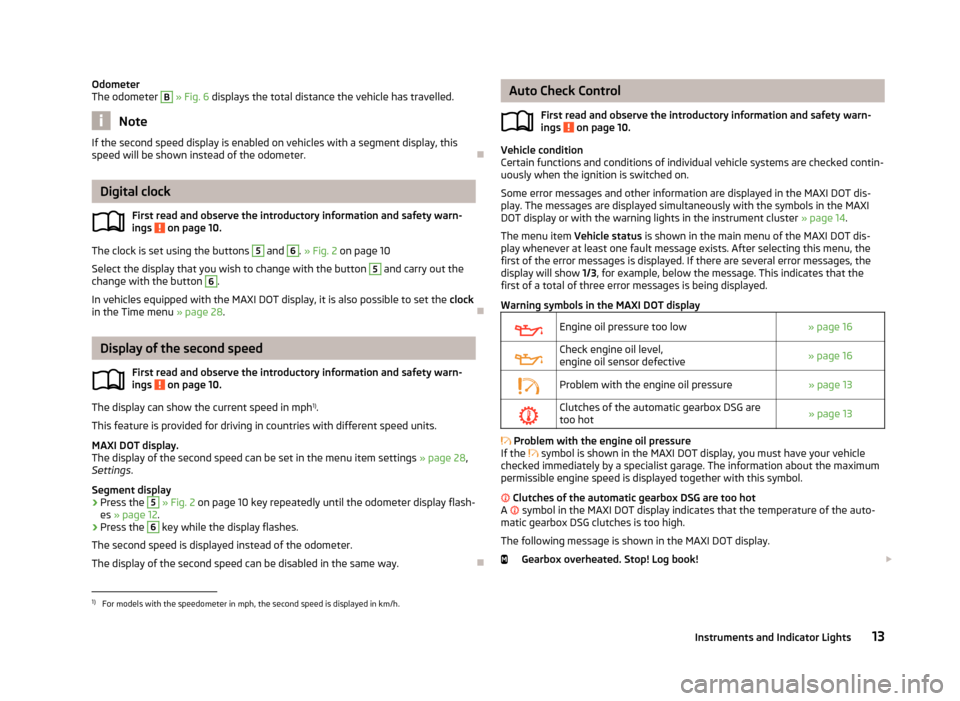
Odometer
The odometer B » Fig. 6 displays the total distance the vehicle has travelled.
Note
If the second speed display is enabled on vehicles with a segment display, this
speed will be shown instead of the odometer.
Digital clock
First read and observe the introductory information and safety warn-ings
on page 10.
The clock is set using the buttons
5
and
6
. » Fig. 2 on page 10
Select the display that you wish to change with the button
5
and carry out the
change with the button
6
.
In vehicles equipped with the MAXI DOT display, it is also possible to set the clock
in the Time menu » page 28.
Display of the second speed
First read and observe the introductory information and safety warn-
ings
on page 10.
The display can show the current speed in mph 1)
.
This feature is provided for driving in countries with different speed units.
MAXI DOT display.
The display of the second speed can be set in the menu item settings » page 28,
Settings .
Segment display
›
Press the
5
» Fig. 2 on page 10 key repeatedly until the odometer display flash-
es » page 12 .
›
Press the
6
key while the display flashes.
The second speed is displayed instead of the odometer. The display of the second speed can be disabled in the same way.
Auto Check Control
First read and observe the introductory information and safety warn-
ings
on page 10.
Vehicle condition
Certain functions and conditions of individual vehicle systems are checked contin-
uously when the ignition is switched on.
Some error messages and other information are displayed in the MAXI DOT dis-play. The messages are displayed simultaneously with the symbols in the MAXI DOT display or with the warning lights in the instrument cluster » page 14.
The menu item Vehicle status is shown in the main menu of the MAXI DOT dis-
play whenever at least one fault message exists. After selecting this menu, the
first of the error messages is displayed. If there are several error messages, the
display will show 1/3, for example, below the message. This indicates that the
first of a total of three error messages is being displayed.
Warning symbols in the MAXI DOT display
Engine oil pressure too low» page 16Check engine oil level,
engine oil sensor defective» page 16Problem with the engine oil pressure» page 13Clutches of the automatic gearbox DSG are too hot» page 13
Problem with the engine oil pressure
If the
symbol is shown in the MAXI DOT display, you must have your vehicle
checked immediately by a specialist garage. The information about the maximum
permissible engine speed is displayed together with this symbol.
Clutches of the automatic gearbox DSG are too hot
A
symbol in the MAXI DOT display indicates that the temperature of the auto-
matic gearbox DSG clutches is too high.
The following message is shown in the MAXI DOT display. Gearbox overheated. Stop! Log book!
1)
For models with the speedometer in mph, the second speed is displayed in km/h.
13Instruments and Indicator Lights
Page 30 of 226
The display is updated regularly while you are driving.Current driving speed
The current speed displayed is identical to the display on the speedometer3
» Fig. 2 on page 10.
Oil temperature
If the engine oil temperature is in the range of 80-110 °C, the engine operating
temperature has been reached.
If the oil temperature is lower than 80 °C or above 110 °C, avoid high engine revs, full throttle and high engine loads.
If the oil temperature is lower than 50 °C or if a fault in the system for checking
the oil temperature is present, the following
is displayed instead of the oil
temperature.
Warning at excessive speeds
Set the speed limit, e.g. for the maximum permissible speed in towns » page 27,
Warning at excessive speeds .
Warning at excessive speeds
First read and observe the introductory information and safety warn-
ings
on page 25.
Adjust the speed limit while the vehicle is stationary
›
Select the menu item Speed warning (MAXI DOT display) or
(segment dis-
play).
›
Activate the speed limit option by confirming this menu item 1)
.
›
Set the desired speed limit, e.g. 50 km/h.
›
Store the speed limit by confirming the set value, or wait several seconds; your
settings will be saved automatically.
The speed limit can be adjusted from 30 km/h to 250 km/h in 5 km/h increments.
Adjusting the speed limit while the vehicle is moving
›
Select the menu item Speed warning (MAXI DOT display) or
(segment dis-
play).
›
Drive at the desired speed, e.g. 50 km/h.
›
Confirm the current speed as the speed limit.
If you wish to adjust the set speed limit, you can do so in 5 km/h intervals (e.g. the
accepted speed of 47 km/h increases to 50 km/h or decreases to 45 km/h).›
Store the speed limit, or wait several seconds; your settings will be saved auto-
matically.
Change or disable speed limit
›
Select the menu item Speed warning (MAXI DOT display) or (segment dis-
play).
›
By confirming the stored value, the speed limit is disabled.
›
By reconfirming, the option to change the speed limit is activated.
If the set speed limit is exceeded, an audible signal will sound as a warning. The menu item Speed warning (MAXI DOT display) or (Segment display) appears in
the display at the same time as the set threshold.
The set speed limit value remains stored even after switching off the ignition.
MAXI DOT display
Introduction
This chapter contains information on the following subjects:
Main menu
28
Settings
28
The MAXI DOT display provides you with information about the current operating
state of your vehicle. Depending on the vehicle equipment, it also provides you
with data relating to the radio, multifunction display (MFD), mobile phone, naviga-
tion system, automatic gearbox » page 101 and devices connected via the MDI in-
put.
WARNINGConcentrate fully on your driving at all times! As the driver, you are fully re-
sponsible for the operation of your vehicle.
1)
If no value is set the output value 30 km/h is automatically displayed.
27Information system
Page 32 of 226
Before the next service interval is reached, a message concerning the kilometres
and days remaining until the next service is due is shown for about 10 seconds
after the ignition is switched on. Alternatively, this information can be displayed
manually at any time if required.
The kilometre indicator or the days indicator reduces in steps of 100 km or, where
applicable, days until the service due date is reached.
Note
■ Information is retained in the Service Interval Display even after the vehicle bat-
tery is disconnected.■
If the instrument cluster is exchanged after a repair, the correct values must be
entered in the counter for the Service Interval Display. This work is carried out by a specialist garage.
■
In certain national versions, the displays appear with Imperial values.
■
For more information on the service intervals, see » page 147, Service intervals .
Prompt in the segment display
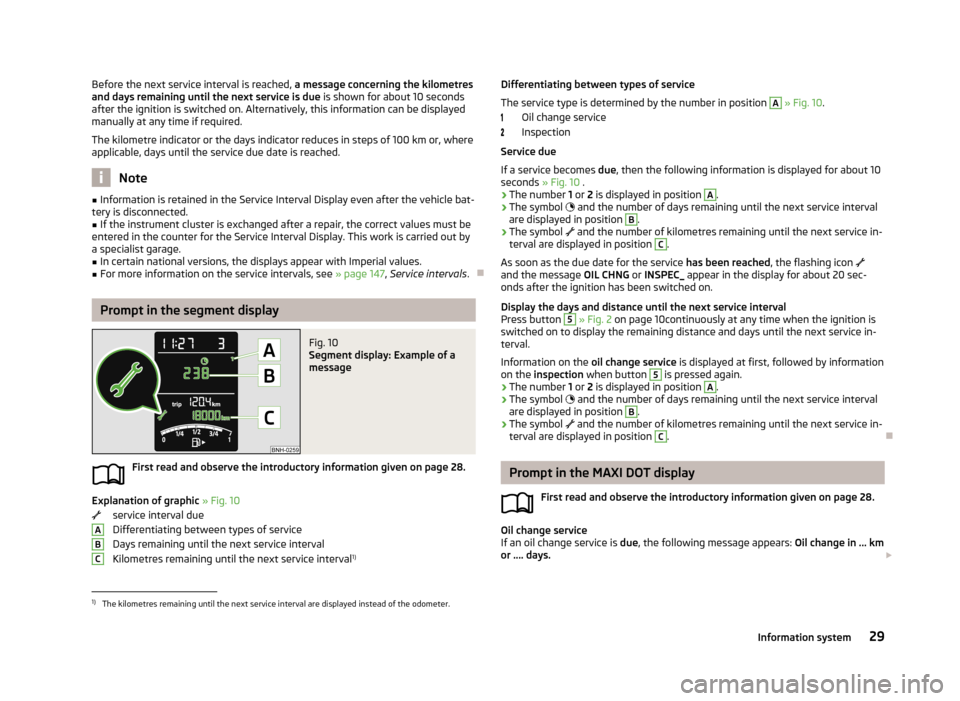
Fig. 10
Segment display: Example of a
message
First read and observe the introductory information given on page 28.
Explanation of graphic » Fig. 10
service interval due
Differentiating between types of service Days remaining until the next service interval
Kilometres remaining until the next service interval 1)
ABCDifferentiating between types of service
The service type is determined by the number in position A
» Fig. 10 .
Oil change service
Inspection
Service due
If a service becomes due, then the following information is displayed for about 10
seconds » Fig. 10 .
› The number
1 or 2 is displayed in position
A
.
› The symbol
and the number of days remaining until the next service interval
are displayed in position
B
.
› The symbol
and the number of kilometres remaining until the next service in-
terval are displayed in position
C
.
As soon as the due date for the service has been reached, the flashing icon
and the message OIL CHNG or INSPEC_ appear in the display for about 20 sec-
onds after the ignition has been switched on.
Display the days and distance until the next service interval
Press button
5
» Fig. 2 on page 10continuously at any time when the ignition is
switched on to display the remaining distance and days until the next service in- terval.
Information on the oil change service is displayed at first, followed by information
on the inspection when button
5
is pressed again.
› The number
1 or 2 is displayed in position
A
.
› The symbol
and the number of days remaining until the next service interval
are displayed in position
B
.
› The symbol
and the number of kilometres remaining until the next service in-
terval are displayed in position
C
.
Prompt in the MAXI DOT display
First read and observe the introductory information given on page 28.
Oil change service
If an oil change service is due, the following message appears: Oil change in ... km
or .... days.
1)
The kilometres remaining until the next service interval are displayed instead of the odometer.
29Information system
Page 33 of 226
As soon as the service interval date has been reached, the message Oil change
now! appears once the ignition has been switched on.
Inspection
If an inspection is due, the following message appears: Inspection in ... km or ...
days.
As soon as the service interval date has been reached, the message Inspection
now! appears once the ignition has been switched on.
Displaying the distance and days until the next service interval You can view the remaining distance and days until the next service appointmentat any time when the ignition is switched on by going to the Settings menu
item » page 28 or from the vehicle status in the main menu of the Maxi DOTdis-
play. » page 28
The following message is displayed for 10 seconds. Oil change ... km / ... days
Inspection ... km / ... days
30Using the system
Page 134 of 226
WARNINGObserve the following instructions for the proper use of the seat belts.■Never use one seat belt to secure two persons (including children). The
seatbelt must not be placed over a child who is sitting on the lap of another
passenger.■
The lock tongue should only be inserted into the lock which is the correct
one for your seat. Wrong use of the safety belt will reduce its capacity to pro-
tect and the risk of injury increases.
■
The slot of the belt tongue must not be blocked, otherwise the belt tongue
will not lock in place properly.
■
Many layers of clothing and loose clothing (e. g. a winter coat over a jacket)
do not allow you to be correctly seated and impairs proper operation of the
seat belts.
■
It is prohibited to use clamps or other objects to adjust seat belts (e. g. for
shortening the belts for smaller persons).
■
The seat belts for the rear seats can only fulfil their function reliably when
the seat backrests are correctly locked into position » page 55.
WARNINGObserve the following instructions for proper maintenance of the seat belts.■The belt webbing must always be kept clean. Soiled belt webbing may im-
pair proper operation of the inertia reel » page 159.■
The seat belts must not be removed or changed in any way. Do not attempt
to repair the seat belts yourself.
■
Check the condition of all the seat belts on a regular basis. If any damage to
the seat belts, seat belt connections, inertia reel or the lock is detected, the
relevant seat belt must be replaced by a specialist garage.
■
Damaged seat belts which have been subjected to stress in an accident and
were therefore stretched, must be replaced – this is best done by a specialist
garage. The anchorage points of the belts must also be inspected. The an-
chorage points for the belts should also be checked.
Note
The national legal requirements must be observed when using seat belts.
The physical principle of a frontal collisionFig. 115
Driver without a fastened seat belt/rear passenger without a fas-
tened seat belt
First read and observe the introductory information and safety warn-ings
on page 130.
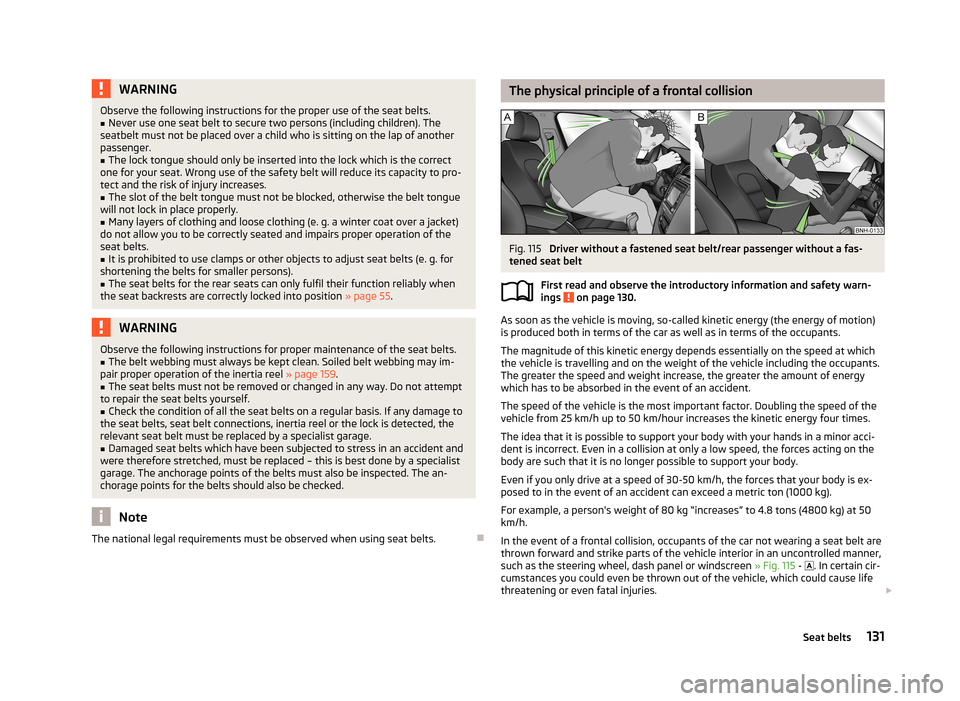
As soon as the vehicle is moving, so-called kinetic energy (the energy of motion)
is produced both in terms of the car as well as in terms of the occupants.
The magnitude of this kinetic energy depends essentially on the speed at which
the vehicle is travelling and on the weight of the vehicle including the occupants.
The greater the speed and weight increase, the greater the amount of energy
which has to be absorbed in the event of an accident.
The speed of the vehicle is the most important factor. Doubling the speed of the
vehicle from 25 km/h up to 50 km/hour increases the kinetic energy four times.
The idea that it is possible to support your body with your hands in a minor acci-dent is incorrect. Even in a collision at only a low speed, the forces acting on the
body are such that it is no longer possible to support your body.
Even if you only drive at a speed of 30-50 km/h, the forces that your body is ex-
posed to in the event of an accident can exceed a metric ton (1000 kg).
For example, a person's weight of 80 kg “increases” to 4.8 tons (4800 kg) at 50
km/h.
In the event of a frontal collision, occupants of the car not wearing a seat belt are thrown forward and strike parts of the vehicle interior in an uncontrolled manner,such as the steering wheel, dash panel or windscreen » Fig. 115 -
. In certain cir-
cumstances you could even be thrown out of the vehicle, which could cause life
threatening or even fatal injuries.
131Seat belts
Page 151 of 226
In order to operate a vehicle with a variable service interval, it must only be fil-
led and topped up with the prescribed engine oil.
If this engine oil is not available, the oil change is subject to a fixed service inter-
val. In this case, the vehicle must be changed to the fixed service interval.
Note
■
The corresponding motor oil specifications » page 167.■A specialist garage can perform the changeover from the variable service inter-
val to the fixed service interval, or from the fixed service interval to the variable
service interval.
Fixed service intervals QI1 - QI4
First read and observe the introductory information given on page 147.
InspectionQI1 - QI4
After the first 30,000 km or 2 years a)
, then every
30,000 km or every 1 year a)
.Every 15,000 km or every 1 year a)
(applies to Rus-
sia).
Oil change service
QI1Every 5000 km or every 1 year a)
.QI2Every 7500 km or every 1 year a)
.QI3Every 10,000 km or every 1 year a)
.QI4Every 15,000 km or every 1 year a)
.Brake fluid
change First change after 3 years, then every 2 yearsa)
(whichever comes first).
WARNINGThe brake fluid must always be changed after the first 3 years and then every
2 years. Longer intervals between changing the brake fluid can cause vapour
bubbles to form in the brake system on sharp braking. This can impair the effi- ciency of the brakes – risk of accident!NoteFor diesel operation with a high sulphur content, the oil must be changed every
7500 km. Ask your specialist garage for information on the countries where diesel fuel has a high sulphur content.
Variable service interval QI6
First read and observe the introductory information given on page 147.
The service intervals depend on the intensity at which the vehicle is driven and
the local conditions in which the vehicle is used. For example, your vehicle is sub-
jected to different loads when driven over short distances than when driven over
long distances. The service intervals are therefore variable.
InspectionAfter the first 30,000 km or 2 years a)
, then every 30,000 km
or every 1 year a)
.Oil change serviceAccording to the service interval display (at the latest after
30,000 km or 2 years a)
).Brake fluid
changeFirst change after 3 years, then every 2 yearsa)
(whichever comes first).
WARNINGThe brake fluid must always be changed after the first 3 years and then every
2 years. Longer intervals between changing the brake fluid can cause vapour
bubbles to form in the brake system on sharp braking. This can impair the effi- ciency of the brakes – risk of accident!
Information about the ŠKODA service
First read and observe the introductory information given on page 147.
You have access to an extensive servicing network of ŠKODA Service Partners for
the maintenance of your vehicle.
148General Maintenance
Page 161 of 226
Natural leatherFirst read and observe the introductory information and safety warn-
ings
on page 157.
Leather is a natural material with specific properties, and requires regular clean-
ing and maintenance.
The leather should be cleaned on a regular basis depending on the amount of
wear-and-tear.
Dust and dirt in the pores and folds act as abrasive materials. This leads to severe corrosion and the premature brittleness of the leather surface.
We recommend that you remove dust regularly and at short intervals using a
cloth or vacuum cleaner.
Clean soiled leather surfaces with a water-dampened cotton or woollen cloth and
then dry with a clean, dry cloth »
.
Clean severely soiled areas with a cloth soaked in a mild soap solution (2 table-
spoons of neutral soap to 1 litre of water).
To remove stains , use a cleaning agent specially designed for this purpose.
Treat the leather regularly and at suitable intervals using a suitable leather care
product.
CAUTION
■ Ensure that no part of the leather is soaked through during cleaning and that
no water gets into the seams. Otherwise, the leather could become brittle or
cracked.■
Avoid leaving the vehicle for lengthy periods in bright sunlight to avoid the
leather from bleaching. If the vehicle is parked in the open for lengthy periods, protect the leather from direct sunlight by covering it.
■
Sharp-edged objects on items of clothing such as zip fasteners, rivets, sharp-
edged belts, jewellery and pendants may leave permanent scratches or signs of
rubbing on the surface. Such damage cannot be subsequently recognised as a
justified complaint.
■
The use of a mechanical steering wheel lock may damage the leather surface of
the steering wheel.
■ Use a care cream with light blocker and impregnation effect on a regular basis
and each time after cleaning. The cream nourishes the leather, allows it to
breathe and keeps it supple and also provides moisture. It also creates surface
protection.■
Some clothing materials, e.g. dark denim, do not have sufficient colour fastness.
This can cause damage or clearly visible discolouration to seat covers, even when used correctly. This applies particularly to light-coloured seat covers. This does
not relate to a fault in the seat cover, but rather to poor colour fastness of the
clothing textiles.
Note
When using the vehicle, minor visible changes may occur to the leather parts of
the covers (e.g. wrinkles or creases) as a result of the stress applied to the covers.
Artificial leather, cloths and Alcantara ®
First read and observe the introductory information and safety warn- ings
on page 157.
Artificial leather
Clean artificial leather with a damp cloth.
If this method does not completely clean the artificial leather, use a mild soap sol- ution or cleaning products specially designed for this purpose.
Fabric
Clean upholstery cover materials and cloth trims on doors, boot cover, etc. using
specific cleaning agents, e.g., dry foam.
Use a soft sponge, brush, or commercially available microfibre cloth.
Use a cloth and a cleaning agent specifically designed for this purpose to clean
the roof trim.
Remove any lumps on the cover fabric and any fabric residue using a brush.
Remove stubborn hair using a “cleaning glove”.
Alcantara ®
Dust and fine dirt particles in pores, creases and seams may chafe and damage the surface.
If you leave your vehicle parked in the open for lengthy periods, protect the Al-
cantara ®
seat covers from the direct rays of the sun to prevent fading.
158General Maintenance
Page 169 of 226
The filling level of the container is about 3.5 litres and about 5.4 litres on vehicles
that have a headlight washing system 1)
.
Clear water is not sufficient to intensively clean the windscreen and headlights. We recommend using clean water together with a screen cleaner from the range
of ŠKODA Original Accessories (with antifreeze in winter), which will remove any
stubborn dirt.
In Winter, the washing water should always be mixed with antifreeze even if the
vehicle has heated windscreen washer nozzles.
Under exceptional circumstances, methylated spirits can also be used if no screen
cleaner with antifreeze is available. The concentration of methylated spirits must
not be more than 15 %. The freeze protection at this concentration is sufficient
only to -5 °C.
CAUTION
■ Under no circumstances must radiator antifreeze or other additives be added to
the windscreen washer fluid.■
If the vehicle is fitted with a headlight cleaning system, only cleaning products
which do not attack the polycarbonate coating of the headlights must be added
to the windscreen washer fluid.
■
Do not remove the filter from the windscreen washer fluid reservoir when refill-
ing, as this may cause contamination of the liquid transportation system, leading
in turn to a windscreen washer system malfunction.
Engine oil
Introduction
This chapter contains information on the following subjects:
Specifications and capacity
167
Checking the oil level
167
Replenishing
168
Changing
168
The engine has been factory-filled with a high-grade oil that can be use through-
out the year - except in extreme climate zones.
The engine oils are undergoing continuous further development. Thus the infor-
mation stated in this Owner's Manual is only correct at the time of publication.
ŠKODA Service Partners are informed about the latest changes by the manufac-
turer. We therefore recommend that the oil change be completed by a ŠKODA
Service Partner.
The specifications (VW standards) stated in the following can be indicated sepa-
rately or together with other specifications on the bottle.
The oil capacities include oil filter change. Check the oil level when filling; do not
over fill. The oil level must be between the markings » page 167.WARNING■
The engine compartment of your car is a hazardous area. The following
warning instructions must be followed at all times when working in the en-
gine compartment » page 162.■
Do not continue your journey if for some reason it is not possible to top up
the engine oil ! Switch off the engine and seek assistance from a specialist
garage.
■
If the oil level is above level
A
» Fig. 136 on page 167, do not continue to
drive! Switch off the engine and seek assistance from a specialist garage.
CAUTION
Do not pour any additives into the engine oil – risk of serious damage to the en-
gine parts!
Note
■ Before a long drive we recommend that you purchase and carry with you engine
oil which complies with the specification for your vehicle.■
We recommend that you use oils from ŠKODA Original Accessories.
■
If your skin has come into contact with oil, it must be washed thoroughly.
1)
In some countries, 5.4 l. applies for both variants.
166General Maintenance
Page 171 of 226
Oil level within range CThe engine must be topped up with oil so that the oil level at least reaches the
range B
.
The engine consumes a little oil. The oil consumption may be as much as 0.5 l/
1 000 km depending on your style of driving and the conditions under which you
operate your vehicle. Consumption may be slightly higher than this during the
first 5 000 kilometres.
The oil level must be checked at regular intervals. We recommend after each time
you refuel or prior to making a long journey.
We recommend maintaining the oil level within the range
A
, but not above , if
the engine has been operating at high loads, for example, during a lengthy motor-
way trip during the summer months, towing a trailer or negotiating a high moun- tain pass.
If the oil level is too low, this will be indicated by an indicator light in the instru- ment cluster » page 16,
Engine Oil . Check the oil level using the dipstick as
soon as possible. Add oil accordingly.
CAUTION
The oil level must not exceed level A » Fig. 136 - risk of damaging the exhaust
system!
Replenishing
First read and observe the introductory information and safety warn-
ings
on page 166.
›
Check the oil level » page 167.
›
Unscrew the cap of the engine oil filler opening » Fig. 134
on page 165.
›
Replenish the oil in portions of 0.5 litres in accordance with the correct specifi-
cations » page 167 .
›
Check the oil level » page 167.
›
Carefully screw on the oil filler opening cap and push the dipstick in fully.
Changing
First read and observe the introductory information and safety warn-ings
on page 166.
The engine oil must be changed according to prescribed service inter-
vals » page 147 or according to the service interval display » page 28, Service in-
terval display .
Coolant
Introduction
This chapter contains information on the following subjects:
Capacity
169
Checking the coolant level
169
Replenishing
170
The coolant consists of water with coolant additive. This mixture guarantees anti- freeze protection, protects the cooling/heater system against corrosion and pre-
vents lime formation.
Vehicles exported to countries with a mild climate are already factory-filled with
a coolant which offers antifreeze protection down to about -25 ℃. In these coun-
tries, the concentration of coolant additive should be at least 40%.
Vehicles exported to countries with a cold climate are already factory-filled with a
coolant which offers antifreeze protection down to about -35 °C. In these coun-
tries, the concentration of coolant additive should be at least 50%.
If a higher concentration of antifreeze is required for climatic reasons, the con-centration of coolant additive can be increased up to a maximum of 60% (anti-
freeze protection down to approx. -40 °C).
When refilling, only use antifreeze with the name specified on the coolant expan- sion tank » Fig. 137 on page 169.
168General Maintenance
Page 217 of 226
Diesel particle filter19
Information messages19
Digital clock13
Dipstick167
Disconnecting and reconnecting vehicle battery
174
Display11
Compass points24
Coolant temperature11
Correct gear changes24
Fuel supply12
Service intervals28
Display of the second speed13
Distance driven12
Door Child safety lock
35
Closing35
Indicator light for an open door15
Opening35
Door locking Emergency
194
Doors Emergency locking
194
Double-sided floor covering70
Driving Abroad
110
Driving through water on streets109
Emissions207
Fuel consumption207
Maximum speed209
Driving economically Economical gear changing
106
Driving through water109
E
Economical and environmentally friendly driving 105
Economical driving Ballast
107
Driving at full throttle106
Idling106
Looking ahead106
Regular maintenance107
Saving energy108
Short distances107
Tyre inflation pressure107
EDL112
Electrical power windows Button in the driver's door
38, 39
Button in the rear door39
Electronic Differential Lock (EDL)112
Electronic immobiliser98
Electronic Stability Control (ESC)111
Emergency Changing a wheel
184
Door locking194
Hazard warning light system44
jump-starting190
Jump-starting189
Selector lever-unlocking195
Towing the using the tow hitch192
Towing the vehicle191
Tyre repair187
Unlocking the tailgate194
Emergency equipment Fire extinguisher
183
First aid kit182
Jack183
Vehicle tool kit183
Warning triangle182
Emissions207
Engine Running in
104
Switching off the engine99
Engine compartment162
Brake fluid170
Coolant169
Overview165
Vehicle battery171
Engine oil166
Capacity167
Changing168
Checking167
Indicator light16
Information messages16
Replenishing168
Specifications167
Environment105
Environmental compatibility108
Environmentally friendly driving105
EPC Indicator light
19
ESC Function
111
Warning light17
Exhaust inspection system Indicator light
18
F
Fastening elements
65
Films155
Fire extinguisher183
First aid kit182
Flashing43
Flexible storage compartment69
Fog lights43
Indicator light21
Fog lights with CORNER function43
Footmats101
see footmats101
Force limit Power windows
40
Front airbag137
Fuel160
Diesel162
Fuel gauge12
refer to Fuel160
Refuelling160
Unleaded petrol161
Fuel consumption105
214Index