door lock SKODA RAPID 2014 1.G Owner's Guide
[x] Cancel search | Manufacturer: SKODA, Model Year: 2014, Model line: RAPID, Model: SKODA RAPID 2014 1.GPages: 200, PDF Size: 25.57 MB
Page 113 of 200
NoteFor vehicles without stabilization control (ESC), during a TCS intervention the
control indicator in the instrument cluster flashes.
Electronic Differential Lock (EDL)
Read and observe
on page 109 first.
EDL prevents the turning of the respective wheel of the driven axle. EDL
brakes the spinning wheel, if necessary, and transmits the driving force to the
other driving wheel. Driving becomes easier on road surfaces with different
traction under each wheel of the driven axle.
The EDL switches off automatically in order to avoid excessive heat generation
on the brake of the wheel being braked. The vehicle can continue to be driven
and has the same characteristics as a vehicle not fitted with EDL. Once the
brakes have cooled down, there is an automatic re-activation of EDL.
Hydraulic Brake Assist (HBA)
Read and observe
on page 109 first.
The HBA increases the braking effect and helps to reduce the braking dis-
tance.
The HBA is activated by the very quick operation of the brake pedal. In order to
achieve the shortest possible braking distance, the brake pedal must be ap-
plied firmly until the vehicle has come to a standstill.
The HBA function is automatically deactivated when the brake pedal is re-
leased.
Hill Hold Control (HHC)
Read and observe
on page 109 first.
When driving on slopes, HHC allows you to move your foot from the brake ped-al to the accelerator pedal without having to use the handbrake.
The system holds the brake pressure produced by the activation of the brake pedal for approx. 2 seconds after the brake pedal is released.
The brake pressure drops gradually the more you operate the accelerator ped-
al. If the vehicle does not start off within 2 seconds, it starts to roll back.
The HHC is active from a 5% slope if the driver's door is closed. HHC is only ev-
er active on slopes when in forward or reverse start off.
Parking aid
Introduction
This chapter contains information on the following subjects:
Function
111
Activation/deactivation
111
The parking aid (hereinafter referred to only as a system) draws attention via
acoustic signals and an indication in the radio or navigation display when ma-
noeuvring around obstacles in the vicinity of the vehicle.
The system uses ultrasound waves to calculate the distance between the
bumper and an obstacle. The ultrasonic sensors are integrated in the rear
bumper » Fig. 98 on page 111 .
WARNING■
The system only serves to support and does not relieve the driver of the
responsibility for the vehicle operation.■
Moving persons or objects may not be recognized by the system sensors.
■
Under certain circumstances, surfaces of certain objects and types of
clothing cannot reflect the system signals. For this reason, such people or
objects may not be recognised by the system sensors.
■
External noise sources may affect the signals of the system sensors. Un-
der adverse conditions, this may cause objects or people not to be recog-
nised by the system.
■
Before reversing, you should make sure that there are no small obstacles,
such as rocks, thin posts, trailer drawbars etc. behind your vehicle. Such ob-
stacles may not be recognised by the system sensors.
CAUTION
■ Keep the system sensors clean, snow-and ice-free and do not cover with any
objects of any kind, otherwise the system functioning may be impaired.■
Under adverse weather conditions (heavy rain, water vapour, very low or
high temperatures etc.), the system function may be limited - “incorrect recog-
nition of obstacle”.
■
Additionally installed accessories such as e.g. bicycle carriers can impair the
system function.
110Driving
Page 131 of 200
Automatic car wash systemsRead and observe
and on page 127 first.
The usual precautionary measures must be taken before washing the vehicle
in an automatic car wash system (e.g. closing the windows and the sliding/tilt-
ing roof etc.).
If your vehicle is fitted with any particular attached parts, such as a spoiler,
roof rack system, two-way radio aerial etc., it is best to consult the operator of
the car wash system beforehand.
After an automatic wash with wax treatment, the lips of the wipers should be
cleaned with cleaning agents specially designed for the purpose, and then de-
greased.
CAUTION
Fold in the exterior mirrors to prevent damage before washing the vehicle in
an automatic car wash system. Never manually fold in electric exterior mirrors -
always use the electric controls.
Washing with a high-pressure cleaner
Read and observe
and on page 127 first.
When washing the vehicle with a high-pressure cleaner, the instructions for
use of the equipment must be observed. This applies in particular to the pres-
sure used and to the spraying distance .
Maintain a sufficiently large distance to the parking aid sensors and soft mate-
rials such as rubber hoses or insulation material.
CAUTION
■ If washing the vehicle in the winter using a hose or high-pressure cleaner,
ensure that the jet of water is not aimed directly at the locking cylinders or the
door/panel joints – risk of freezing!■
To avoid damaging the parking aid sensors while cleaning with high-pressure
cleaners or steam jets, the sensors must only be directly sprayed for short pe-
riods while a minimum distance of 10 cm must be observed.
Note
See also Washing cars with decorative films using a high-pressure clean-
er » page 130 .Cleaning vehicle exterior
Introduction
This chapter contains information on the following subjects:
Vehicle paint work
129
Plastic parts
129
Rubber seals
129
Chrome parts
129
Decorative films
130
Windows and external mirrors
130
Headlight glasses
130
Door closing cylinder
131
Cavity protection
131
Jack
131
Wheels
131
Towing device and mounting recess
131
Under-body protection
131
Wiper blades
132
We recommend using vehicle care products from ŠKODA Original Accessories.
These are available from ŠKODA Partners. The usage instructions on the pack-
age must be observed.
WARNING■ Vehicle care products may be harmful to your health if not used according
to the instructions.■
Always keep the vehicle care products safe from people who are not com-
pletely independent, e.g. children - there is a danger of poisoning!
■
Protect your hands and arms from sharp-edged metal parts when clean-
ing the underfloor, the inside of the wheel housings or the wheel trims –
risk of cuts!
CAUTION
■ Do not use any insect sponges, rough kitchen sponges or similar cleaning
products – risk of damaging the paintwork surface.■
Cleaner that contain solvents can damage the material being cleaned.
128General Maintenance
Page 134 of 200
Door closing cylinderRead and observe
and on page 128 first.
Specific products must be used for de-icing door lock cylinders.
CAUTION
Make sure that as little water as possible gets into the locking cylinder when
washing the vehicle - there is a risk of freezing the lock cylinder!
Cavity protection
Read and observe
and on page 128 first.
All the cavities of your vehicle which are at risk from corrosion are protected
for life by a layer of protective wax applied in the factory.
This wax protection does not need to be inspected or re-applied.
If any small amount of wax flow out of the cavities at high temperatures, these
must be removed with a plastic scraper and the stains cleaned using a petrole-
um cleaner.
WARNINGSafety regulations should be observed when using petroleum cleaner to re-
move wax – risk of fire!
Jack
Read and observe
and on page 128 first.
The jack is maintenance-free.
If necessary, the moving parts of the jack should be lubricated with a suitable
lubricant.
Wheels
Read and observe
and on page 128 first.
Wheel rims
Also thoroughly wash the wheel rims when washing the vehicle on a regular
basis.
Regularly remove salt and brake abrasion, otherwise the rim material will be
corroded.
Light alloy wheels
After washing thoroughly and treat the wheel rims with a protective product
for light alloy wheels.
For the treatment of wheel rims do not use products which may cause damage
to the paint on the rims.
CAUTION
■ Damage to the paint layer on the wheel rims must be touched up immediate-
ly.■
Severe layers of dirt on the wheels can also result in wheel imbalance. This
may show itself in the form of a wheel vibration which is transmitted to the
steering wheel which, in certain circumstances, can cause premature wear of
the steering. This means it is necessary to remove the dirt.
Towing device and mounting recess
Read and observe
and on page 128 first.
Close the mounting recess with the cover to prevent any dirt from getting in.
If dirt is present, clean the inner surfaces of the mounting recess and treat
with a suitable preservative.
Always check the ball head before hitching a trailer. Apply a suitable grease, if
necessary.
Use the protective cover when stowing away the tow bar, in order to stop the
boot from getting dirty.
CAUTION
Apply grease to the inner part of the mounting recess. Make sure you do not
remove any grease.
Under-body protection
Read and observe
and on page 128 first.
The underside of your vehicle is already permanently protected by the factory
against chemical and mechanical influences.
It is not possible to guarantee that the protective coating will not suffer any
damage as the vehicle is driven.
131Care and maintenance
Page 136 of 200
Dust and dirt in pores and creases cause abrasions on the surface and lead to
premature embrittlement of the leather surface. Therefore, they must be re-
moved regularly at short intervals with a cloth or vacuum cleaner.
Clean soiled leather surfaces with a water-dampened cotton or woollen cloth and then dry with a clean, dry cloth »
.
Clean severely soiled areas with a cloth soaked in a mild soap solution (2 ta-
blespoons of neutral soap to 1 litre of water).
To remove stains , use a cleaning agent specially designed for this purpose.
Treat the leather periodically with a suitable leather protector and use a skin
care cream with light blocker and impregnation after each cleaning.
CAUTION
■ Ensure that no part of the leather is soaked through during cleaning and that
no water gets into the seams. Otherwise, the leather could become brittle or
cracked.■
Avoid leaving the vehicle for lengthy periods in bright sunlight to avoid the
leather from bleaching. If the vehicle is parked in the open for lengthy periods,
protect the leather from direct sunlight by covering it.
■
The use of an additional mechanical steering wheel lock may damage the
leather surface of the steering wheel.
■
Some clothing materials, e.g. dark denim, do not have sufficient colour fast-
ness. This can cause damage or clearly visible discolouration to seat covers,
even when used correctly. This applies particularly to light-coloured seat cov-
ers. This does not relate to a fault in the seat cover, but rather to poor colour
fastness of the clothing textiles.
■
Sharp-edged objects on items of clothing such as zip fasteners, rivets, sharp-
edged belts etc may leave permanent scratches or signs of rubbing on the sur-
face or damage these. Such damage cannot be subsequently recognised as a
justified complaint.
Note
When using the vehicle, minor visible changes may occur to the leather parts
of the covers (e.g. wrinkles or creases) as a result of the stress applied to the
covers.Artificial leather, materials and Alcantara ®
Read and observe
and on page 132 first.
Artificial leather
Clean artificial leather with a damp cloth.
If this method does not completely clean the artificial leather, use a mild soap solution or cleaning products specially designed for this purpose.
Fabric
Clean upholstery cover materials and cloth trims on doors, boot cover, etc. us-
ing specific cleaning agents, e.g., dry foam.
Use a soft sponge, brush, or commercially available microfibre cloth.
Use a cloth and a cleaning agent specifically designed for this purpose to clean
the roof trim.
Remove any lumps on the cover fabric and any fabric residue using a brush.
Remove stubborn hair using a “cleaning glove”.
Alcantara ®
Dust and dirt in pores, creases and seams may chafe and damage the surface.
Therefore, they must be removed regularly at short intervals with a cloth or
vacuum cleaner.
Minor changes in colour caused by use are normal.
CAUTION
■ For Alcantara ®
seat covers, do not use any solvents, floor wax, shoe cream,
stain remover, leather cleaners or similar agents.■
Avoid leaving the vehicle in bright sunlight for long periods of time in order
to stop the artificial leather, materials or Alcantara ®
from bleaching. During ex-
tended periods of standing outdoors, protect artificial leather, fabrics or Alcan-
tara ®
by covering.
■
Some clothing materials, e.g. dark denim, do not have sufficient colour fast-
ness. This can cause damage or clearly visible discolouration to seat covers,
even when used correctly. This applies particularly to light-coloured seat cov-
ers. This does not relate to a fault in the seat cover, but rather to poor colour
fastness of the clothing textiles.
133Care and maintenance
Page 141 of 200
WARNINGInformation for working in the engine compartment with the engine run-
ning■
Pay particular attention to moving engine parts, e.g. V-ribbed belt, gener-
ator, radiator fan - danger to life!
■
Never touch the electric wiring on the ignition system.
■
Avoid short circuits in the electrical system – particularly on the vehicle's
battery.
■
Always make sure that no jewellery, loose clothing or long hair can get
caught in rotating engine parts – risk to life! Always remove any jewellery,
tie back long hair and wear tight fitting clothing before completing any
work.
WARNINGInformation for working on the fuel system or the electrical system■Always disconnect the vehicle battery from the electrical system.■
Do not smoke.
■
Never work near open flames.
■
Always have a functioning fire extinguisher nearby.
WARNING■ Read and observe the information and warning instructions on the fluid
containers.■
Keep the working fluids in sealed original containers and safe from peo-
ple who are not completely independent, e.g. children.
■
Never spill operating fluids over the hot engine - risk of fire.
■
If you intend to work underneath the vehicle, you must secure the vehicle
from rolling away and support it with suitable supporting blocks; the car
jack is not sufficient – risk of injury!
CAUTION
Always top up using the correct specification of fluids. This may result in major
operating problems and also vehicle damage!
For the sake of the environment
In view of the requirements for the environmentally friendly disposal of fluids and the special tools and knowledge required for such work, we recommend
that fluids be changed by a specialist garage.Note■ Please consult a specialist garage for any questions relating to fluids.■Fluids with the proper specifications can be purchased from the ŠKODA Origi-
nal Accessories or from the ŠKODA Genuine Parts ranges.
Opening and closing the bonnet
Fig. 117
Opening the bonnet
Read and observe
and on page 137 first.
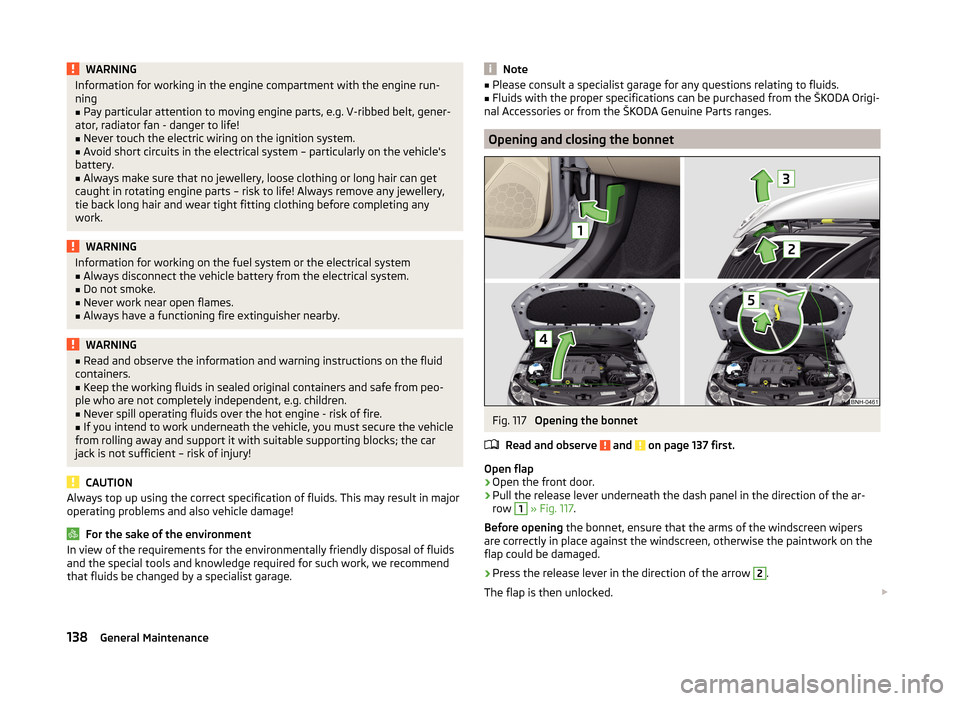
Open flap
›
Open the front door.
›
Pull the release lever underneath the dash panel in the direction of the ar-
row
1
» Fig. 117 .
Before opening the bonnet, ensure that the arms of the windscreen wipers
are correctly in place against the windscreen, otherwise the paintwork on the
flap could be damaged.
›
Press the release lever in the direction of the arrow
2
.
The flap is then unlocked.
138General Maintenance
Page 162 of 200
›Grasp the end of the wrench and turn the bolt about
one turn in the direction
of the arrow » Fig. 133.
Tightening›
Push the wheel wrench onto the wheel bolt to the stop 1)
.
›
Grasp the end of the wrench and turn the bolt against the direction of the
arrow » Fig. 133 until it is tight.
After tightening the wheel bolts, the covering caps must be replaced.
WARNINGIf it proves difficult to undo the bolts, carefully apply pressure to the end of
the wrench with your foot. Keep hold of the vehicle when doing so, and
make sure you keep your footing.
Raising the vehicle
Fig. 134
Jacking points for positioning
lifting jack
Fig. 135
Attach lifting jack
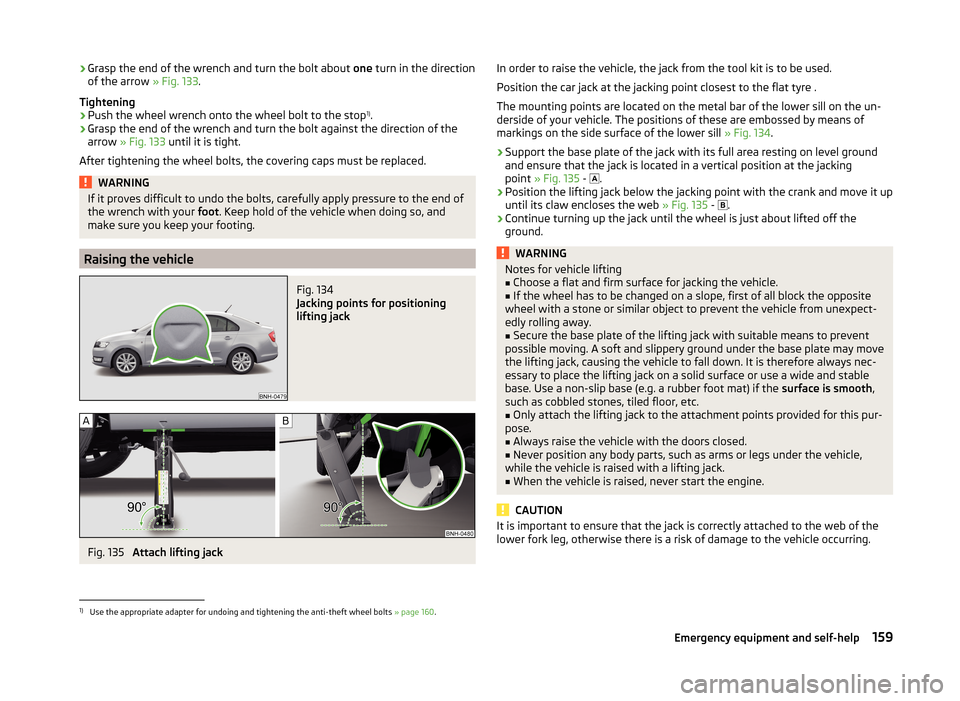
In order to raise the vehicle, the jack from the tool kit is to be used.
Position the car jack at the jacking point closest to the flat tyre .
The mounting points are located on the metal bar of the lower sill on the un-
derside of your vehicle. The positions of these are embossed by means of
markings on the side surface of the lower sill » Fig. 134.›
Support the base plate of the jack with its full area resting on level ground
and ensure that the jack is located in a vertical position at the jacking
point » Fig. 135 -
.
›
Position the lifting jack below the jacking point with the crank and move it up
until its claw encloses the web » Fig. 135 -
.
›
Continue turning up the jack until the wheel is just about lifted off the
ground.
WARNINGNotes for vehicle lifting■Choose a flat and firm surface for jacking the vehicle.■
If the wheel has to be changed on a slope, first of all block the opposite
wheel with a stone or similar object to prevent the vehicle from unexpect-
edly rolling away.
■
Secure the base plate of the lifting jack with suitable means to prevent
possible moving. A soft and slippery ground under the base plate may move
the lifting jack, causing the vehicle to fall down. It is therefore always nec-
essary to place the lifting jack on a solid surface or use a wide and stable
base. Use a non-slip base (e.g. a rubber foot mat) if the surface is smooth,
such as cobbled stones, tiled floor, etc.
■
Only attach the lifting jack to the attachment points provided for this pur-
pose.
■
Always raise the vehicle with the doors closed.
■
Never position any body parts, such as arms or legs under the vehicle,
while the vehicle is raised with a lifting jack.
■
When the vehicle is raised, never start the engine.
CAUTION
It is important to ensure that the jack is correctly attached to the web of the
lower fork leg, otherwise there is a risk of damage to the vehicle occurring.1)
Use the appropriate adapter for undoing and tightening the anti-theft wheel bolts » page 160.
159Emergency equipment and self-help
Page 169 of 200
CAUTIONThe detachable ball rod and/or the vehicle can be damaged if an unsuitable
tow bar is used.
Remote control
Introduction
This chapter contains information on the following subjects:
Replacing the battery in the remote control key
166
Synchronising the remote control
166
CAUTION
■ The replacement battery must have the same specification as the original
battery.■
We recommend having faulty rechargeable batteries replaced by a ŠKODA
service partner.
■
Pay attention to the correct polarity when changing the battery.
For the sake of the environment
Dispose of the used battery in accordance with national legal provisions.
Replacing the battery in the remote control key
Fig. 143
Remove cover/take out battery
Read and observe
on page 166 first.
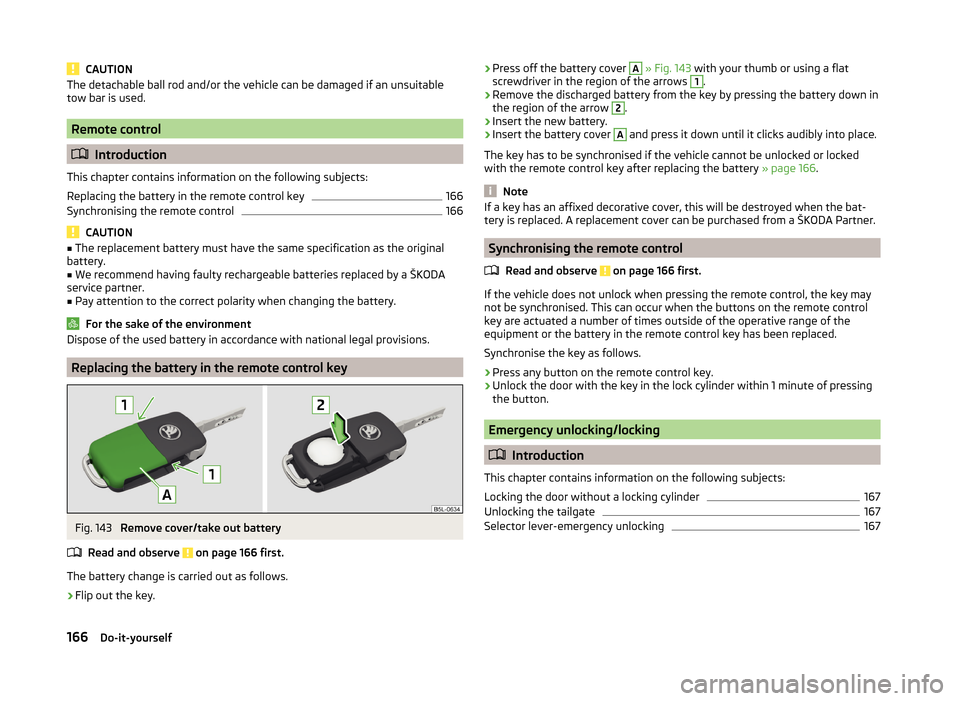
The battery change is carried out as follows.
›
Flip out the key.
› Press off the battery cover A
» Fig. 143 with your thumb or using a flat
screwdriver in the region of the arrows 1.›
Remove the discharged battery from the key by pressing the battery down in
the region of the arrow
2
.
›
Insert the new battery.
›
Insert the battery cover
A
and press it down until it clicks audibly into place.
The key has to be synchronised if the vehicle cannot be unlocked or locked
with the remote control key after replacing the battery » page 166.
Note
If a key has an affixed decorative cover, this will be destroyed when the bat-
tery is replaced. A replacement cover can be purchased from a ŠKODA Partner.
Synchronising the remote control
Read and observe
on page 166 first.
If the vehicle does not unlock when pressing the remote control, the key may
not be synchronised. This can occur when the buttons on the remote control
key are actuated a number of times outside of the operative range of the
equipment or the battery in the remote control key has been replaced.
Synchronise the key as follows.
›
Press any button on the remote control key.
›
Unlock the door with the key in the lock cylinder within 1 minute of pressing the button.
Emergency unlocking/locking
Introduction
This chapter contains information on the following subjects:
Locking the door without a locking cylinder
167
Unlocking the tailgate
167
Selector lever-emergency unlocking
167166Do-it-yourself
Page 170 of 200
Locking the door without a locking cylinderFig. 144
Emergency locking: Left/right rear door
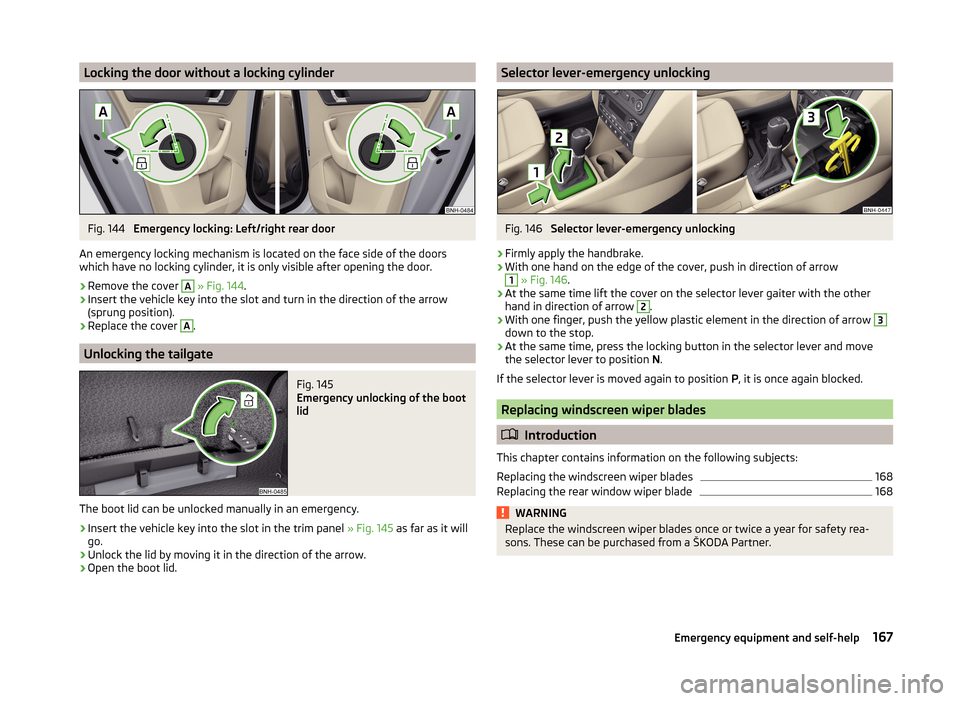
An emergency locking mechanism is located on the face side of the doors
which have no locking cylinder, it is only visible after opening the door.
›
Remove the cover
A
» Fig. 144 .
›
Insert the vehicle key into the slot and turn in the direction of the arrow
(sprung position).
›
Replace the cover
A
.
Unlocking the tailgate
Fig. 145
Emergency unlocking of the boot
lid
The boot lid can be unlocked manually in an emergency.
›
Insert the vehicle key into the slot in the trim panel » Fig. 145 as far as it will
go.
›
Unlock the lid by moving it in the direction of the arrow.
›
Open the boot lid.
Selector lever-emergency unlockingFig. 146
Selector lever-emergency unlocking
›
Firmly apply the handbrake.
›
With one hand on the edge of the cover, push in direction of arrow
1
» Fig. 146 .
›
At the same time lift the cover on the selector lever gaiter with the other
hand in direction of arrow
2
.
›
With one finger, push the yellow plastic element in the direction of arrow
3
down to the stop.
›
At the same time, press the locking button in the selector lever and movethe selector lever to position N.
If the selector lever is moved again to position P, it is once again blocked.
Replacing windscreen wiper blades
Introduction
This chapter contains information on the following subjects:
Replacing the windscreen wiper blades
168
Replacing the rear window wiper blade
168WARNINGReplace the windscreen wiper blades once or twice a year for safety rea-
sons. These can be purchased from a ŠKODA Partner.167Emergency equipment and self-help
Page 189 of 200
Brakeinformation messages35
warning light35
Brake booster103
brake fluid specification
144
Brake fluid143
Checking144
information messages35
brake pedal (automatic gearbox) indicator light
41
brakes Driving in
107
Brakes Brake booster
103
Brake fluid144
Braking and stabilisation systems109
Handbrake103
Brakes and parking102
Braking Information on braking
102
Buttons in the door Power windows
55
C
Car care Jack
131
Car computer See multifunction display
43
Care and maintenance124
Cargo element83
Car park ticket holder74
Carrier Roof rack
84
Cavity protection131
Central locking49
Problems53
Central locking button52
Change Engine oil140
light bulb in tail light175
Changing bulbs
172
Front turn signal bulb174
Wheels156
Changing a wheel Follow-up work
158
Preliminary work157
Remove and attaching a wheel158
Charging a vehicle battery146
Check Fit ball head properly
119
Checking Battery electrolyte level
146
Brake fluid144
Coolant143
Engine oil141
Oil level141
Windscreen washer fluid139
Checks Statutory checks
124
Children and safety22
Child safety Side airbag
24
Child safety lock53
Child seat Classification
24
ISOFIX25
on the front passenger seat23
TOP TETHER26
Use of child seats24
Use of ISOFIX child seats25
Chrome parts see vehicle care
129
Cigarette lighter75
cleaning chrome parts
129
CleaningAlcantara133
and maintaining belts134
artificial leather133
headlight glasses130
materials133
natural leather132
plastic parts129
seats covers of the electrically heated seats134
wheels131
Cleaning safety belt
134
Cleaning seat covers
134
Cleaning the interior artificial leather
133
Seat covers134
Cleaning the outside of the vehicle Decorative films
130
Cleaning the vehicle exterior Cavity protection
131
Door locking cylinder131
Headlight glasses130
Towing device131
Under-body protection131
wheels131
Windows and external mirrors130
Cleaning vehicle127
Cleaning vehicle exterior128
Plastic parts129
Rubber seals129
Vehicle paint work129
Wiper blades132
Clean interior Safety belt
134
clean outside of vehicle chrome parts
129
Climatronic air distribution control
87
Operating elements88
186Index
Page 190 of 200
Clothes hook79
Cockpit 12-Volt power outlet
76
Ashtray76
Cigarette lighter75
General view29
Lights63
storage compartments73
useful equipment73
COMING HOME62
compartments73
Components of the puncture repair kits161
Computer See multifunction display
43
convenience turn signal60
Coolant142
Checking143
Indicator light36
Information messages36
Replenishing143
Temperature gauge32
Cooling system cost-effective use
89
malfunctions89
CORNER See Fog lights with CORNER function
61
Correct seated position9
Driver9
Front passenger10
Instructions11
Rear seats11
Counter for distance driven33
cruise control operation
111
operation Description112
Cruise control system Warning light
41
Cruise Control System111
Cup holders74
D
DAY LIGHT See Daytime running lights
59
Daytime running lights59
De-icing windows
130
Deactivating an airbag20
Decorative films130
Defrosting rear window64
Delayed locking of the boot lid see boot lid
55
Departure angle180
Diesel refer to Fuel
136
Diesel fuel Operation in winter
136
Diesel particulate filter Information messages
38
Warning light38
Digital Clock Time
33
Dipstick141
Disconnecting and reconnecting vehicle battery
147
Display31
Compass points47
Coolant temperature32
Fuel supply32
Gear changes43
Service intervals47
Display a low temperature42
Display of the second speed33
Disposal Acceptance and recycling of used vehicles
127
Distance driven33
Door Child safety lock
53
Closing51
Emergency locking167
Opening51
Warning light door open36
Door open Warning light
36
Double-sided floor covering84
Driving Driving through water
107
Emissions178
Fuel consumption178
Maximum speed181
off of made-up roads107
Driving in Brake linings
107
engine107
Tyres107
Driving off of made-up roads107
Driving through water107
E
Economical driving Tips
107
EDL110
Electrical power windows Button in the passenger door
56
Buttons in the driver's door56
Electronic Differential Lock (EDL)110
Electronic immobilizer100
Electronic Stability Control (ESC)109
Emergency Changing a wheel
156
Hazard warning light system62
Jump-starting162, 163
Locking the door without a locking cylinder167
Selector lever-unlocking167
Towing the using the tow hitch165
Towing the vehicle164
tyre repair160
Unlocking the tailgate167
187Index