display SKODA RAPID 2014 1.G Workshop Manual
[x] Cancel search | Manufacturer: SKODA, Model Year: 2014, Model line: RAPID, Model: SKODA RAPID 2014 1.GPages: 200, PDF Size: 25.57 MB
Page 147 of 200
Note■The brake fluid is changed as part of a compulsory inspection service.■We recommend using brake fluids from the ŠKODA Original Accessories
range.
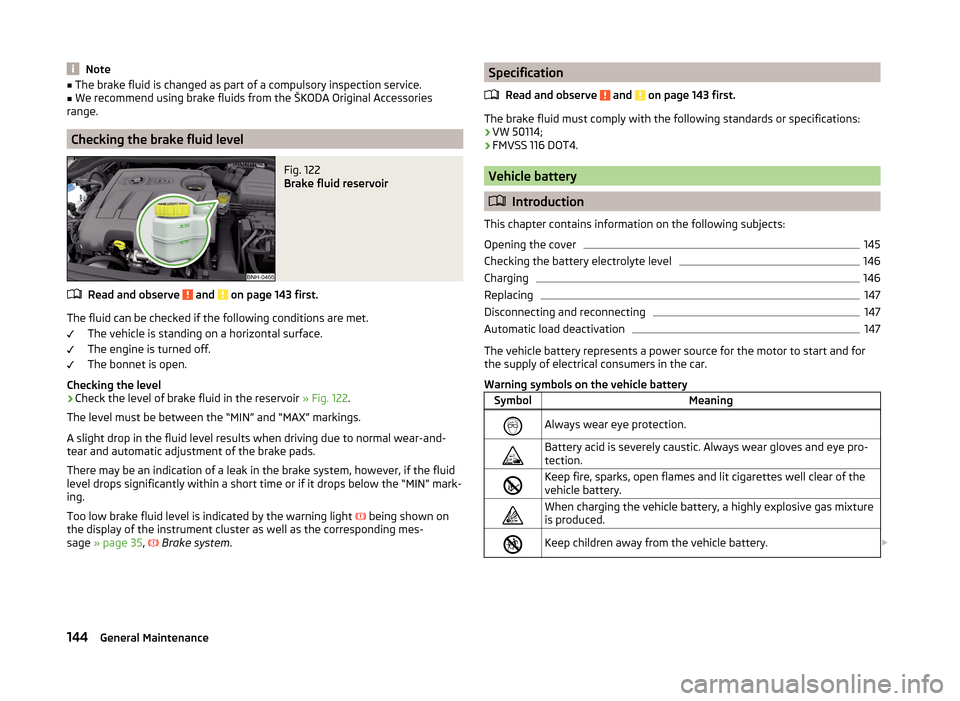
Checking the brake fluid level
Fig. 122
Brake fluid reservoir
Read and observe and on page 143 first.
The fluid can be checked if the following conditions are met.
The vehicle is standing on a horizontal surface.
The engine is turned off.
The bonnet is open.
Checking the level
›
Check the level of brake fluid in the reservoir » Fig. 122.
The level must be between the “MIN” and “MAX” markings.
A slight drop in the fluid level results when driving due to normal wear-and-
tear and automatic adjustment of the brake pads.
There may be an indication of a leak in the brake system, however, if the fluid
level drops significantly within a short time or if it drops below the “MIN” mark-
ing.
Too low brake fluid level is indicated by the warning light
being shown on
the display of the instrument cluster as well as the corresponding mes-
sage » page 35 ,
Brake system .
Specification
Read and observe
and on page 143 first.
The brake fluid must comply with the following standards or specifications:› VW 50114;
› FMVSS 116 DOT4.
Vehicle battery
Introduction
This chapter contains information on the following subjects:
Opening the cover
145
Checking the battery electrolyte level
146
Charging
146
Replacing
147
Disconnecting and reconnecting
147
Automatic load deactivation
147
The vehicle battery represents a power source for the motor to start and for
the supply of electrical consumers in the car.
Warning symbols on the vehicle battery
SymbolMeaningAlways wear eye protection.Battery acid is severely caustic. Always wear gloves and eye pro-
tection.Keep fire, sparks, open flames and lit cigarettes well clear of the
vehicle battery.When charging the vehicle battery, a highly explosive gas mixture
is produced.Keep children away from the vehicle battery. 144General Maintenance
Page 149 of 200

Checking the battery electrolyte levelFig. 124
Electrolyte level indicator
Read and observe and on page 145 first.
On vehicles with a vehicle battery fitted with a colour indicator » Fig. 124, the
electrolyte level can be determined by looking at the change in colour of this
display.
Air bubbles can influence the colour of the indicator. For this reason carefully
knock on the indicator before carrying out the check.
› Black colour – electrolyte level is correct.
› Colourless or light yellow colour – electrolyte level too low, the battery must
be replaced.
Vehicles with a START-STOP system are fitted with a battery control unit for
checking the energy level for the recurring engine start.
We recommend that you have the acid level checked regularly by a specialist
garage, especially in the following cases.
› High external temperatures.
› Longer day trips.
› After each charge.
Winter time
The vehicle battery only has a proportion of the starting power in lower tem-
peratures. A discharged vehicle battery may already freeze at temperatures
just below 0 °C .
We therefore recommend that you have the battery checked and, if necessary,
recharged by a specialist garage before the start of the winter.
Note■ The battery acid level is also checked regularly by a specialist garage as part
of the inspection service.■
For technical reasons, on vehicles with the description “AGM”, the electrolyte
level cannot be checked.
Charging
Read and observe
and on page 145 first.
A properly charged vehicle battery is essential for reliably starting the engine.A charging operation can be performed if the following conditions are satis-
fied.
The engine is turned off.
The ignition is switched off.
All consumers are turned off.
The bonnet is open.
“Fast charging” with high currents
›
Disconnect both battery cables (first of all “negative”, then “positive”).
›
Attach the terminal clamps of the charger to the battery terminals (red =
“positive”, black = “negative”).
›
Plug the mains cable of the charger into the power socket and switch on the
device.
›
After charging has been successful: Switch off the charger and remove the
mains cable from the power socket.
›
Only then disconnect the charger's terminal clamps.
›
Reconnect the cables to the battery (first “positive”, then “negative”).
Charging with low voltages
It is not necessary to disconnect the cables from the battery if you recharge
the vehicle battery, for example from a mini-charger.
Refer to the instructions of the charger manufacturer .
A charging current of 0.1 multiple of the total vehicle battery capacity (or low-
er) must be used until full charging is achieved.
The vent plugs of the vehicle battery should not be opened for charging.
146General Maintenance
Page 150 of 200

WARNING■When you charge a battery, hydrogen is released, and a highly explosive
gas mixture is also produced. An explosion can be caused through sparkling
over during unclamping or loosening of the cable plug while the ignition is
on.■
Creating a bridge between the poles on the battery (e.g. with metal ob-
jects - cables) creates a short circuit - risk of damage to the battery, explo-
sion and burning of the battery, jets of acid spurting out.
■
Avoid creating sparks when working with cables and electrical devices.
Strong sparking represents a risk of injury.
■
Before carrying out any work on the electrical system, switch off the en-
gine, the ignition and all electrical consumers and disconnect the negative
terminal
.
■
“Quick-charging” the vehicle battery is dangerous and requires a special
charger and specialist knowledge.
■
We therefore recommend that vehicle batteries be “rapidly charged” by a
specialist garage.
CAUTION
On vehicles with the START/STOP system, the pole terminal of the charger
must not be connected directly to the negative terminal of the vehicle battery,
but only to the engine earth » page 163, Jump-starting using the battery from
another vehicle .
Replacing
Read and observe
and on page 145 first.
The new vehicle battery must have the same capacity, voltage, current and
size as the original battery. Suitable vehicle battery types can be purchased
from a specialist garage.
We recommend having the battery replaced by a specialist garage, where the
new vehicle battery will be installed properly and the original battery will be
disposed of in accordance with national regulations.
Disconnecting and reconnecting
Read and observe
and on page 145 first.
Disconnecting
›
Switch off the ignition.
›First, disconnect the negative terminal
first, then the positive terminal
of the battery.
Connecting›
First, connect the positive
first, then the negative
battery terminal.
After disconnecting and re-connecting the vehicle battery, the following func-
tions or devices are partially or completely inoperative.
Function / deviceOperating measureRadio or navigation systemEnter code number » User radio
manual or » navigation system
user manualTime settings» page 33
CAUTION
■ Disconnect the vehicle battery only with the ignition turned off - there is a
risk of damaging the electrical system of the vehicle.■
Under no circumstances must the battery cables be connected incorrectly –
risk of a cable fire.
Note
■ After disconnecting and re-connecting the vehicle battery, we recommend
having the vehicle checked by a specialist to ensure that the full functionality
of all electrical systems is guaranteed.■
The data of the multi-function display will be reset.
Automatic load deactivation
Read and observe
and on page 145 first.
The vehicle voltage control unit automatically prevents the battery from dis-
charging when the battery is put under high levels of strain. This manifests it-
self by the following.
› The idling speed is raised to allow the generator to deliver more electricity to
the electrical system.
› Where necessary, large convenience consumers such as seat heaters and
rear window heaters have their power limited or are shut off completely in
the event of an emergency.
147Inspecting and replenishing
Page 156 of 200

Winter tyres
Summer tyres have less grip on ice, snow and at temperatures below 7 °C. This
is especially true of vehicles fitted with wide tyres or high-speed tyres .
Fitting winter tyres will significantly improve the handling of your vehicle when
driving in wintry road conditions.
To get best possible handling, winter tyres must be fitted to all four wheels. The minimum tread depth must be 4 mm.
Winter tyres (marked with M+S and a peak/snowflake symbol) of a lower speed
category can be used provided that the permissible maximum speed of these
tyres is not exceeded even if the possible maximum speed of the vehicle is
higher.
The speed limit for winter tyres can be set in the MAXI DOT display in the
menu item Winter tyres » page 47 .
Only use those tyres or wheel rims which have been approved by ŠKODA for
your model of vehicle.
For the sake of the environment
Fit the summer tyres on again in good time as they provide better handling
properties, a shorter braking distance, less tyre noise, and reduced tyre wear
on roads which are free of snow and ice as well as at temperatures above 7 °C.
The fuel consumption is also lower.
Snow chains
When driving in wintry road conditions, snow chains improve not only traction,
but also the braking performance.
Snow chains must only be mounted on the front wheels.
For technical reasons, it is only permissible to fit snow chains with the follow-
ing wheel/tyre combinations.
Wheel sizeDepth DTyre size5J x 14 a)35 mm175/70 R146J x 15 b)38 mm185/60 R156J x 15b)38 mm195/55 R15a)
Only fit snow chains with links and locks not larger than
9 mm.
b)
Only fit snow chains with links and locks not larger than 13 mm.
Remove the full wheel trims before installing the snow chains » page 157.WARNINGObserve the national legal regulations relating to the use of snow chains.
CAUTION
The chains are to be removed when driving on snow-free paths. They would
otherwise cause loss of performance and damage the tyres.153Wheels
Page 159 of 200

WARNING■If, in the case of puncture occurring, the spare tyre with a non-bound di-
rection or an opposite direction of rotation must be mounted, then drive
carefully. The best properties of the tyre are no longer present in this situa-
tion.■
If the dimensions or design of the spare wheel differ from the tyres fitted
to the vehicle (e.g. winter tyres or low-profile tyres), it must only be used
briefly in the event of a puncture and if an appropriately cautious style of
driving is adopted.
■
If the dimensions or design of the temporary spare wheel differ from the
fitted tyres, never drive faster than 80 km/h (or 50 mph).
■
Never use the temporary spare wheel if it is damaged.
Remove / store wheel
Fig. 131
Taking the wheel out
Read and observe on page 156 first.
The spare wheel is located in a well under the floor covering in the boot and is
fixed in place with a special bolt » Fig. 131.
Take out the wheel
›
Open the boot lid.
›
Lift up the floor in the luggage compartment.
›
Loosen the belt and take out the box with the tool kit.
›
Unscrew the nut in direction of arrow » Fig. 131.
›
Take out the wheel.
Stow the wheel
›
Place the wheel into the spare wheel well with the wheel rim pointing down-
ward.
›
Pull the fixing band through the opposite holes in the wheel rim.
› Screw on the nut in the opposite direction to the arrow
» Fig. 131 until the
wheel is safely secured.›
Place the box with the tool kit back into the spare wheel and secure it with
the tape.
›
Fold back the floor in the luggage compartment.
›
Close the boot lid.
Spare wheel
Read and observe
on page 156 first.
A warning label is displayed on the rim of the temporary spare wheel.
Please note the following if you intend to use the temporary spare wheel. › The warning label must not be covered after installing the wheel.
› Be particularly observant when driving.
› The temporary spare wheel is inflated to the maximum inflation pressure for
the vehicle » page 149.
› Only use this temporary spare wheel to reach the nearest specialist garage,
since it is not intended for permanent use.
WARNING■ Never drive with more than one temporary spare wheel mounted!■Only use the temporary spare wheel when absolutely necessary.■
Avoid accelerating at full throttle, sharp braking and fast cornering.
■
The snow chains cannot be used on the temporary spare wheel.
■
Observe the instructions on the warning sign of the temporary spare
wheel.
Changing a wheel
Introduction
This chapter contains information on the following subjects:
Preliminary work
157
Full wheel trim
157
Wheel bolts
157
Changing a wheel
158
Follow-up work
158
Loosening/tightening wheel bolts
158
156Do-it-yourself
Page 189 of 200
Brakeinformation messages35
warning light35
Brake booster103
brake fluid specification
144
Brake fluid143
Checking144
information messages35
brake pedal (automatic gearbox) indicator light
41
brakes Driving in
107
Brakes Brake booster
103
Brake fluid144
Braking and stabilisation systems109
Handbrake103
Brakes and parking102
Braking Information on braking
102
Buttons in the door Power windows
55
C
Car care Jack
131
Car computer See multifunction display
43
Care and maintenance124
Cargo element83
Car park ticket holder74
Carrier Roof rack
84
Cavity protection131
Central locking49
Problems53
Central locking button52
Change Engine oil140
light bulb in tail light175
Changing bulbs
172
Front turn signal bulb174
Wheels156
Changing a wheel Follow-up work
158
Preliminary work157
Remove and attaching a wheel158
Charging a vehicle battery146
Check Fit ball head properly
119
Checking Battery electrolyte level
146
Brake fluid144
Coolant143
Engine oil141
Oil level141
Windscreen washer fluid139
Checks Statutory checks
124
Children and safety22
Child safety Side airbag
24
Child safety lock53
Child seat Classification
24
ISOFIX25
on the front passenger seat23
TOP TETHER26
Use of child seats24
Use of ISOFIX child seats25
Chrome parts see vehicle care
129
Cigarette lighter75
cleaning chrome parts
129
CleaningAlcantara133
and maintaining belts134
artificial leather133
headlight glasses130
materials133
natural leather132
plastic parts129
seats covers of the electrically heated seats134
wheels131
Cleaning safety belt
134
Cleaning seat covers
134
Cleaning the interior artificial leather
133
Seat covers134
Cleaning the outside of the vehicle Decorative films
130
Cleaning the vehicle exterior Cavity protection
131
Door locking cylinder131
Headlight glasses130
Towing device131
Under-body protection131
wheels131
Windows and external mirrors130
Cleaning vehicle127
Cleaning vehicle exterior128
Plastic parts129
Rubber seals129
Vehicle paint work129
Wiper blades132
Clean interior Safety belt
134
clean outside of vehicle chrome parts
129
Climatronic air distribution control
87
Operating elements88
186Index
Page 190 of 200
Clothes hook79
Cockpit 12-Volt power outlet
76
Ashtray76
Cigarette lighter75
General view29
Lights63
storage compartments73
useful equipment73
COMING HOME62
compartments73
Components of the puncture repair kits161
Computer See multifunction display
43
convenience turn signal60
Coolant142
Checking143
Indicator light36
Information messages36
Replenishing143
Temperature gauge32
Cooling system cost-effective use
89
malfunctions89
CORNER See Fog lights with CORNER function
61
Correct seated position9
Driver9
Front passenger10
Instructions11
Rear seats11
Counter for distance driven33
cruise control operation
111
operation Description112
Cruise control system Warning light
41
Cruise Control System111
Cup holders74
D
DAY LIGHT See Daytime running lights
59
Daytime running lights59
De-icing windows
130
Deactivating an airbag20
Decorative films130
Defrosting rear window64
Delayed locking of the boot lid see boot lid
55
Departure angle180
Diesel refer to Fuel
136
Diesel fuel Operation in winter
136
Diesel particulate filter Information messages
38
Warning light38
Digital Clock Time
33
Dipstick141
Disconnecting and reconnecting vehicle battery
147
Display31
Compass points47
Coolant temperature32
Fuel supply32
Gear changes43
Service intervals47
Display a low temperature42
Display of the second speed33
Disposal Acceptance and recycling of used vehicles
127
Distance driven33
Door Child safety lock
53
Closing51
Emergency locking167
Opening51
Warning light door open36
Door open Warning light
36
Double-sided floor covering84
Driving Driving through water
107
Emissions178
Fuel consumption178
Maximum speed181
off of made-up roads107
Driving in Brake linings
107
engine107
Tyres107
Driving off of made-up roads107
Driving through water107
E
Economical driving Tips
107
EDL110
Electrical power windows Button in the passenger door
56
Buttons in the driver's door56
Electronic Differential Lock (EDL)110
Electronic immobilizer100
Electronic Stability Control (ESC)109
Emergency Changing a wheel
156
Hazard warning light system62
Jump-starting162, 163
Locking the door without a locking cylinder167
Selector lever-unlocking167
Towing the using the tow hitch165
Towing the vehicle164
tyre repair160
Unlocking the tailgate167
187Index
Page 192 of 200
I
Ice scrapers
130
Ignition101
Ignition lock101
Immobilizer100
Indicator lights34
Individual settings Locking
52
Unlocking52
Inertia reels15
Information system41
Compass point display47
Display a low temperature42
Door warning43
Gear recommendation43
MAXI DOT display46
Multifunction display43
Operation42
Service interval display47
instrument cluster Auto Check Control
33
Instrument cluster30
Counter for distance driven33
Display31
Display of the second speed33
Fuel gauge32
Indicator lights34
Overview30
Revolution counter31
see instrument cluster30
Speedometer31
Temperature gauge32
Interior care132
Natural leather132
interior light Front
63
Interior monitor54
ISOFIX25
J
Jack
155
Maintenance131
Jacking points Raise vehicle
159
Jump-starting162, 163
K
Key Lock
50
Start engine101
Unlock50
L
lamp failure warning lamp
38
lamps warning lamp
38
Leather Natural leather care
132
LEAVING HOME62
Lever Main beam
60
Turn signal60
Windscreen wipers66
lever lock selection (automatic gearbox) indicator light
41
Light COMING HOME / LEAVING HOME
62
Daytime running lights59
Fog lights with CORNER function61
Parking light63
Lighting Luggage compartment
80
Lights58
Automatic driving lamp control60
Beam range adjustment58
Cockpit63
Fog lights61
Hazard warning light system62
Headlight flasher60
Indicator lights34
Low beam58
Main beam60
Parking light58
Rear fog light61
Replacing bulbs172
switching on/off58
Turn signal60
Lock Key
50
Lock/unlock steering lock101
Locking Individual settings
52
Remote control50
Locking and unlocking the vehicle from the in- side
52
Locking the door without a locking cylinder Emergency
167
Low beam58
Low tyre pressure warning refer to the tyre pressure monitoring
115
Luggage compartment80
Cover82
Emergency unlocking167
Fastening elements81
Fixing nets81
Lighting80
Unlocking the tailgate167
Luggage compartment cover82
Luggage compartment lid54
M
Main beam
60
Warning light41
Maintenance see vehicle care
129
189Index
Page 193 of 200
Manual air conditioningAir distribution control87
Operating elements88
Manual gear changing see gear changing
104
MAXI DOT See MAXI DOT display
46
MAXI DOT display46
Main menu46
Operation42
Settings47
Maximum permissible weights
177
Maximum speed181
MDI97
Mechanical windows57
open and close57
Media see radio / navigation system
4
MFD See multifunction display
43
Mirror Exterior mirror
68
Make-up65
Mobile phone90
Connecting to the hands-free system93
Modifications124
Modifications and technical alterations Airbags
126
Service125
Spoiler126
Multifunction display Functions
43
Information45
Memory44
Operation42
Multimedia96
Multimedia holder77
N
N1
84
Nameplate177
Navigation system4
Nets81
Notes for driving with tyre repaired162
Notes on using wheels148
O
oil information messages
36
Oil See Engine oil
141
oil pressure information messages
36
On-board computer See multifunction display
43
Operating weight178
Operation in winter Diesel fuel
136
Vehicle battery146
Original accessories125
Outside temperature45
Overview Engine compartment
139
Indicator lights34
P
Parking
103
Parking aid110
Parking aid110
Function111
Parking light58
Parking space103
Parking vehicle Parking
103
Part replacement124
Passive safety Before setting off8
Driving safety8
Safety equipment8
Passive Safety8
Payload178
Pedals104
Footmats104
Petrol see fuel
135
Plastic parts129
Pockets on the front seat rests80
Polishing vehicle paint work see vehicle care
129
Power outlet 12 V
76
Power steering Warning light
37
Power windows55
Practical equipment 12-Volt power outlet
76
Net pockets on the front seat rests80
Reflective Vest154
Practical features Storage pockets on the front seats
79
Waste container77
Puncture set160
R
Radiator fan
139
Radio4
Raise vehicle159
Rear interior light
64
Rear fog light61
Warning light38
Rear mirror66
Exterior mirror68
Interior mirror67
190Index
Page 194 of 200
Refuelling135
Fuel135
Remote control Locking
50
Replacing the battery166
Synchronisation process166
Unlocking50
Remote control key Replacing the battery
166
Removing the bar ball, Step 1
119
bar ball, Step 2119
Repairs and technical alterations124
Replacing Bulb for main beam, daytime running lights andparking light
173
Bulb for the fog light174
Bulb for the licence plate light175
Bulb in rear light176
Fuses169
Fuses in the dash panel169
Fuses in the engine compartment171
High beam bulb (halogen headlights)173
Rear window wiper blade168
Vehicle battery147
windscreen wiper blades168
Replenishing Coolant
143
Engine oil142
Windscreen washer fluid139
Retraction and economical driving107
Revolution counter31
Roof Load
85
Roof rack84
mounting points85
Roof load85
Rubber seals129
S
SAFE See Safe securing system
51
SAFELOCK See Safe securing system
51
Safe securing system51
Safety8
Child safety22
Child safety seats22
Correct seated position9
Head restraints70
ISOFIX25
TOP TETHER26
Save electrical energy107
Save fuel107
Seals Vehicle care
129
Seat Adjusting
69
Seat belt warning light
35
Seat belts12
Belt tensioners15
fastening and unfastening14
Height adjustment15
Inertia reels15
The physical principle of a frontal collision13
Seat features71
Seats Front armrest
72
Head restraints70
Heating71
Rear armrest72
Seat backrests72
Seats and head restraint69
Selector lever Refer to Selector lever
105
Service125
Service interval display47
Setting33
seats and head restraints69
Setting the33
Side airbag18
SmartGate connection
98
Password99
Settings99
Smart Gate Website
99
Snow chains153
Spare change
156
spare wheel155
change156
instructions156
Speedometer31
See speedometer31
Speed symbol See Wheels
151
Spoiler126
Staring engine Jump-starting
163
START-STOP112
Jump-starting163
Manually deactivating/activating the system114
Operating conditions of the system113
operation in vehicles with automatic gearbox113
operation in vehicles with manual gearbox113
system-related automatic start-up114
Start engine101
Starting engine Jump-starting
162
START STOP Information messages
114
Stating and turning off the engine100
Steering wheel10
Stopping103
Storage73
191Index