lock SKODA RAPID 2015 1.G Swing Infotinment Car Radio Manual
[x] Cancel search | Manufacturer: SKODA, Model Year: 2015, Model line: RAPID, Model: SKODA RAPID 2015 1.GPages: 43, PDF Size: 4.7 MB
Page 9 of 43
Touch screen » page 8
SD card slot » page 19
Touch screen
The device is equipped with a touch screen that can be operated by light fin-
ger pressure on the screen surface.
The brightness level of the screen can be set » page 10.
CAUTION
■
The screen can only be operated by a slight touch of a finger. If there is too
much pressure there is a risk of damage to the screen!■
To protect the screen, you can use a suitable screen protector for touch pads
that does not affect its functionality.
■
Dirt can be removed from the screen by using a soft cloth and, if necessary,
methylated spirits.
Switch the device on/off
Manual Power On/Off
›
Press to switch the device on or off.
Automatic Power On of the device
If the device was not turned off with the control switch
before the ignition
was turned off, it will automatically switch on after the ignition is switched on.
Automatic Power Off of the device
If the vehicle key is pulled out of the ignition lock while the unit is switched on,
the device will switch off automatically.
If the vehicle is fitted with the starter button, the device will switch off auto-
matically after the engine is switched off and the door is opened.
With the ignition off, the device will automatically turn off after about 30 mi-
nutes.
The device turns off automatically under certain circumstances. The device in-
forms you for a few seconds by means of a text message on the device screen.
78› Warning: battery low. Please start the engine or switch off the infotain-
ment system. - The vehicle battery is low. It is recommended you switch off
the device or start the engine.
› Battery almost empty. The Infotainment system will be switched off.
- The
vehicle battery is discharged, the device switches itself off.
› Operating temperature not maintained. The Infotainment system will be
switched off. - The device temperature is too low or too high, the device
switches itself off.
Adjusting the volume
Every change in volume is displayed on the screen.
Increase volume
›
Turn the control to the right.
Decrease volume
›
Turn the control to the left.
Muting
›
Press the key or turn the control to the left and set the volume to 0.
The following symbol appears in the display when the sound is muted .
If at the time of muting a sound is made in the menu Media, then the playback
is interrupted (pause) 1)
.
CAUTION
If the volume is too high sound resonance can occur in the vehicle which can
lead to damaged speakers.1)
Does not apply for AUX.
7Introductory information
Page 12 of 43
Unit settings
Setup menu
Introduction
This chapter contains information on the following subjects:
Sound settings
10
Screen settings
10
Time and date settings
10
Setting the device language
10
Setting the keyboard layout
11
Additional keypad language settings
11
Unit settings
11
Safe removal of the data source
11
Restore factory settings
11
Bluetooth ®
settings
11
System information
11
This chapter covers the device settings.
Sound settings
The scope of the following menu is dependent on the vehicle equipment with the sound system.
›
Press the button.
■ Volume - Volume settings
■ Max. switch-on volume - Sets the maximum volume after switching on the
device
■ Announcements - Adjustment of traffic announcements volume (TP)
■ Speed-dep. vol. adjust. - Speed-dependent volume adaptation
■ Lower. entertain. - Lowers the audio volume (e.g. radio volume) with acti-
vated parking aid
■ AUX volume: - Sets the volume for the device connected through AUX
■
BT audio: - Volume settings of the Bluetooth ®
audio profile connected de-
vice
■ iPod: - Volume setting of the connected iPod
■ Balance - Fader - Sets the balance between left and right, front and rear
■ Bass - Mid. - Treble - Setting the equalizer
■ ŠKODA Surround - Switching the surround sound
■ Virtual Subwoofer - Switching the virtual sub woofer
■ Confirmation tone - Switch on/off confirmation tone when touching the
screen
Screen settings
›
Press the button
→ Screen .
■ Screen off (in 10 s) - Enable / disable the automatic power off function 1)
■ Brightness: - Adjusts the brightness of the screen
■ Confirmation tone - Switch on/off audible tone when touching the screen
■ Show clock in stdby mode - Time and date displayed on the screen when the
ignition is switched on and the unit is switched off
Time and date settings
›
Press
→ Time and date .
■ Time: - Time settings
■ Time format: - Set the time format
■ Summer time - Switches the summer setting on/off
■ Date: - Date settings
■ Date format: - Set the date format
Note
With the model Yeti, the time and date settings are done via the MAXI DOT
display. See » Operating Instructions .
Setting the device language
›
Press the button
→ Language .
A menu with languages appears:
1)
The unit turns the screen off when no touch screen is performed or none of the keys are pressed / rota-
ted for more than 10 seconds.
10Unit settings
Page 21 of 43
AUX - input20Supported audio sources and file formats21
The device allows you to play audio files in various formats and to connect dif-
ferent source types » page 21.
WARNING■
Never place audio sources close to the airbags. They could be thrown into
the passenger compartment when the airbags are deployed, injuring the
occupants.■
Never place audio sources on the dash panel, in your hand or on your
knees. They could be thrown into the passenger compartment during sud-
den driving manoeuvres, thereby injuring the occupants.
■
Always route the connection cable of the audio source such that is does
not restrict you when driving.
CAUTION
Do not store any important data on the connected sources. ŠKODA assumes
no responsibility for lost or damaged files or connected audio sources.
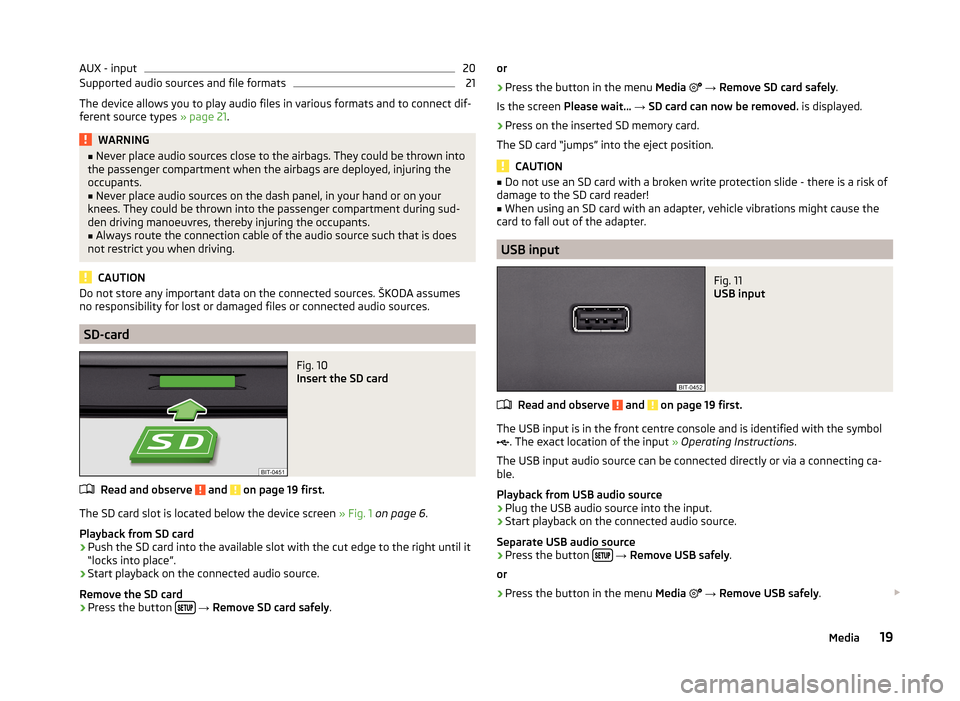
SD-card
Fig. 10
Insert the SD card
Read and observe and on page 19 first.
The SD card slot is located below the device screen » Fig. 1 on page 6 .
Playback from SD card
›
Push the SD card into the available slot with the cut edge to the right until it
“locks into place”.
›
Start playback on the connected audio source.
Remove the SD card
›
Press the button
→ Remove SD card safely .
or›
Press the button in the menu Media
→ Remove SD card safely .
Is the screen Please wait... → SD card can now be removed. is displayed.
›
Press on the inserted SD memory card.
The SD card “jumps” into the eject position.
CAUTION
■ Do not use an SD card with a broken write protection slide - there is a risk of
damage to the SD card reader!■
When using an SD card with an adapter, vehicle vibrations might cause the
card to fall out of the adapter.
USB input
Fig. 11
USB input
Read and observe and on page 19 first.
The USB input is in the front centre console and is identified with the symbol
. The exact location of the input » Operating Instructions .
The USB input audio source can be connected directly or via a connecting ca-
ble.
Playback from USB audio source
›
Plug the USB audio source into the input.
›
Start playback on the connected audio source.
Separate USB audio source
›
Press the button
→ Remove USB safely .
or
›
Press the button in the menu Media
→ Remove USB safely .
19Media
Page 25 of 43
■Imp. contacts - Import telephone contacts
■ Select ringtone - Selecting the ring tone
■ Remember your mobile - Turn on/off the warning mode before forgetting
the phone in the vehicle (if the phone was connected to the device)
Function problems
Read and observe
on page 22 first.
If there are problems with the availability of the mobile network or with theBluetooth ®
function, one of the following messages may appear on the device
screen.
MessageMeaningNet. search…The phone scans for available wire-
less networks.
No network
The telephone has no connection to a
mobile network, it may not support
sending information on the network
state.
Rejected
The telephone service provider has
rejected the connection (e.g. not
enough mobile telephone credit, SIM
card blocked, roaming not available).To use the Bluetooth function,
please switch on the ignition.Switch-on the ignition.Please switch on Bluetooth.Switch on the Bluetooth ®
function on
the device.Please connect a mobile telephone.Find telephone and connect to the
device.Telephone not available.A problem with the Bluetooth ®
unit in
the device, consult a specialist.Telephone is currently unavailable.Unknown
(Name of the telephone service pro-
vider)The telephone did not provide any in-
formation regarding the telephone
service provider.Pair and connect
Introduction
This chapter contains information on the following subjects:
conditions for pairing
23
Telephone search
24
Coupling - no telephone connected
24
Coupling - a telephone connection
24
Coupling from the telephone
24
Pairing confirmation
25
Administering paired devices
25
To connect a telephone with the device, the two devices must be paired via
Bluetooth ®
.
The pairing process is dependent on whether another telephone is connected
or not connected to the device at the time of pairing.
A connection with a telephone that is already paired does not require pairing.
It is enough to find the telephone that has been paired in the list of paired
phones and make the connection.
Note
■ The range of the connection to the hands-free system is limited to the pas-
senger compartment.■
The maximum number of paired phones is 20. Pairing a new telephone after
reaching the maximum number causes the telephone that has not been paired
for the longest time to be automatically replaced.
conditions for pairing
The telephone can be paired with the device under the following conditions. The ignition is switched on.
The Bluetooth ®
function of the device » page 11 and the telephone is
switched on.
The visibility of the device » page 11 and the telephone is switched on.
The telephone is within range of the Bluetooth ®
signal of the device.
The telephone is compatible with the device.
The pairing can be initiated from the device or from the telephone.
23Telephone
Page 27 of 43
Pairing confirmation
Depending on the type of telephone, the pairing confirmation takes place in
one of the following ways.
Confirmation with the pairing from the device
Version 1
› Confirm the 6-digit PIN code displayed on the device screen and the tele-
phone display within 30 seconds on both the device and the telephone.
Version 2
› Confirm the pairing request in the telephone.
› Enter the 4 digit PIN code shown on the unit display into the telephone with-
in 30 seconds 1)
.
Confirmation with the pairing from the telephone
Version 1
› Confirm the pairing request on the device.
› Confirm the 6-digit PIN code displayed on the device screen and the tele-
phone display within 30 seconds on both the device and the telephone.
Version 2 › Enter a 4 digit PIN code into the telephone.
› Confirm the pairing request on the device.
› Enter the same PIN code into the device that is in the telephone and con-
firm 1)
.
Version 3
› Confirm the pairing request on the device.
› The device generates a 4-digit PIN code.
› The PIN code can be changed manually to a 4 - 16 digit code.
› Enter the same PIN code into the telephone that is in the device screen and
confirm 1)
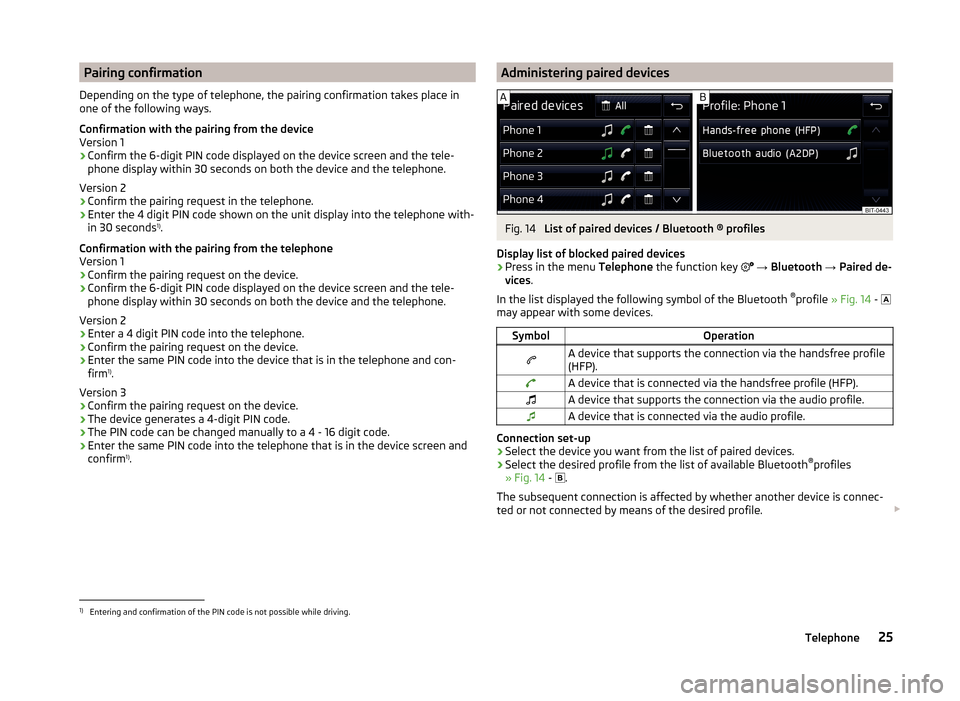
.Administering paired devicesFig. 14
List of paired devices / Bluetooth ® profiles
Display list of blocked paired devices
›
Press in the menu Telephone the function key
→ Bluetooth → Paired de-
vices .
In the list displayed the following symbol of the Bluetooth ®
profile » Fig. 14 -
may appear with some devices.
SymbolOperationA device that supports the connection via the handsfree profile
(HFP).A device that is connected via the handsfree profile (HFP).A device that supports the connection via the audio profile.A device that is connected via the audio profile.
Connection set-up
› Select the device you want from the list of paired devices.
› Select the desired profile from the list of available Bluetooth ®
profiles
» Fig. 14 -
.
The subsequent connection is affected by whether another device is connec-
ted or not connected by means of the desired profile.
1)
Entering and confirmation of the PIN code is not possible while driving.
25Telephone
Page 34 of 43
■“Coming/leaving home” - Setting the COMING HOME / LEAVING HOME-func-
tion
■ Coming home - Set the period that the lights remain on after you leave the
vehicle (0 - 30 seconds; 0 = function deactivated)
■ Leaving home - Sets the period that the lights remain on after you unlock
the vehicle (0 - 30 seconds; 0 = function deactivated)
Interior lighting
›
Press the button
→
→ Background lighting .
■ Colour - Illumination colour selection
■ Colour: - Selecting the illumination colour (or switching off the lighting)
■ Areas - Brightness adjustment
■ All - Brightness setting for all areas at the same time
■ Instrument panel - Brightness setting for the control panel area
■ Doors - Brightness setting for the door area
■ Footwell lighting - Brightness setting for the footwell area
Mirror and wiper
›
Press the button
→
→ Mirrors and wipers .
■ Mirrors - Adjusts the mirrors
■ Synchronous adjustment - Activate/deactivate synchronous mirror adjust-
ment
■ Lowering (reverse) - Activation / deactivation of the lowering of the pas-
senger's side mirror when reversing
■ Fold in (when parked) - Activation / deactivation of the full collapse of the
mirror housing when the vehicle is locked
■ Wipers - Adjusts the windscreen wipers
■ Automatic wiping (rain) - Activate/deactivate automatic windscreen wiping
in rain
■ Automatic rear wiper - Activate/deactivate automatic rear window wiping
Opening and closing
›
Press the button
→
→ Opening and closing .
■
Window operation - Window operation settings
■ Conven. open.: - Set the convenience opening feature
■ All - All windows
■ Driver - Driver's window only
■ Off - Deactivates the convenience opening
■ Central locking - Settings for opening and closing of doors
■ Door unlock.: - Set the door unlocking feature
■ All - All doors
■ Single door - Driver's or passenger's door (when unlocking via the sensor
in the passenger door handle)
■ Side - Doors on the driver or passenger side (when unlocking via the sen-
sor in the passenger door handle)
■ Automatic locking - Activate/deactivate automatic locking when starting
off
■ “Easy Open” - Activation/deactivation of the contactless opening of the
boot lid
■ Acoustic confirmation - Activate/deactivate acoustic signals when lock-
ing/unlocking the vehicle with an anti-theft alarm system
■ Auto. lugg. comp. cover - Enable / disable automatic reeling of the roll-up
cargo cover
Seats
›
Press the button
→
→ Seats .
■ Store seat position - Storage of the driver's seat and exterior mirror positions
in the remote control key when locking the vehicle ■ Vehicle key activated - Activate/deactivate storing the driver's seat posi-
tion and exterior mirror position when locking the vehicle
Instrument cluster (multifunction display)
›
Press the button
→
→ Instrument cluster .
In this menu it is possible to hide/show the appearance of the menu items in the instrument cluster multifunction display and reset the trip data.
■ Current consumption - Display of current fuel consumption on/off
■ Average consumption - Display of average fuel consumption on/off
■ Refuel quantity - Display of refuel quantity on/off
■ Convenience consumers - Display of fuel consumption of convenience con-
sumers on/off
■ Eco tips - Switch on/off the display for tips on saving fuel
32Vehicle systems
Page 36 of 43
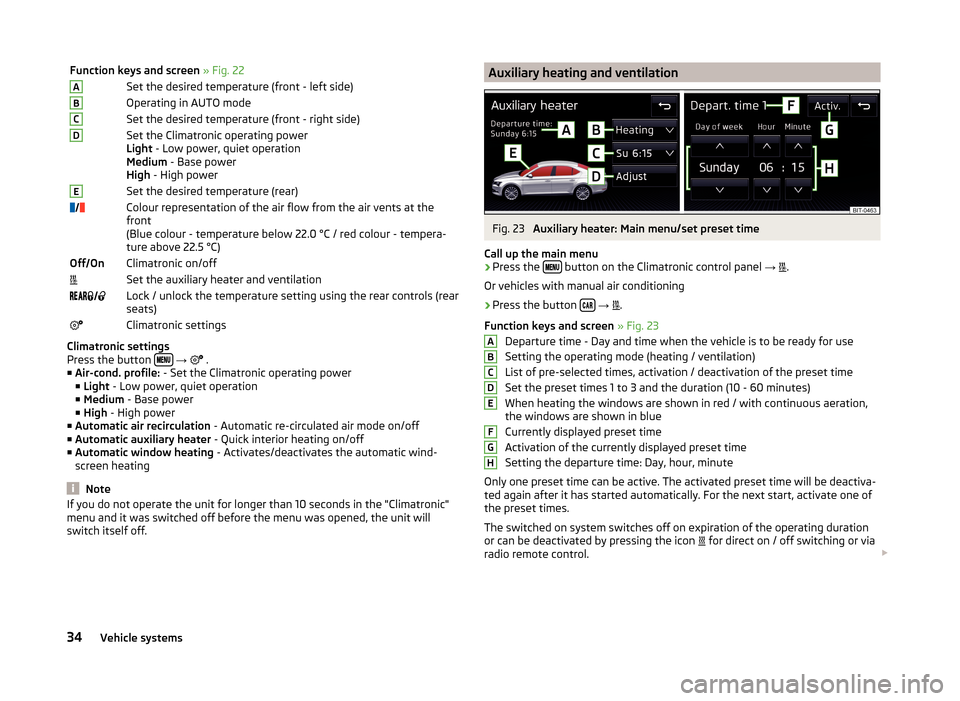
Function keys and screen » Fig. 22ASet the desired temperature (front - left side)BOperating in AUTO modeCSet the desired temperature (front - right side)DSet the Climatronic operating power
Light - Low power, quiet operation
Medium - Base power
High - High powerESet the desired temperature (rear)Colour representation of the air flow from the air vents at the
front
(Blue colour - temperature below 22.0 °C / red colour - tempera-
ture above 22.5 °C)Off OnClimatronic on/offSet the auxiliary heater and ventilation Lock / unlock the temperature setting using the rear controls (rear
seats)Climatronic settings
Climatronic settings
Press the button
→
.
■ Air-cond. profile: - Set the Climatronic operating power
■ Light - Low power, quiet operation
■ Medium - Base power
■ High - High power
■ Automatic air recirculation - Automatic re-circulated air mode on/off
■ Automatic auxiliary heater - Quick interior heating on/off
■ Automatic window heating - Activates/deactivates the automatic wind-
screen heating
Note
If you do not operate the unit for longer than 10 seconds in the "Climatronic"
menu and it was switched off before the menu was opened, the unit will
switch itself off.Auxiliary heating and ventilationFig. 23
Auxiliary heater: Main menu/set preset time
Call up the main menu
›
Press the button on the Climatronic control panel
→
.
Or vehicles with manual air conditioning
›
Press the button
→
.
Function keys and screen » Fig. 23
Departure time - Day and time when the vehicle is to be ready for use
Setting the operating mode (heating / ventilation)
List of pre-selected times, activation / deactivation of the preset time
Set the preset times 1 to 3 and the duration (10 - 60 minutes) When heating the windows are shown in red / with continuous aeration,
the windows are shown in blue
Currently displayed preset time
Activation of the currently displayed preset time
Setting the departure time: Day, hour, minute
Only one preset time can be active. The activated preset time will be deactiva-
ted again after it has started automatically. For the next start, activate one of
the preset times.
The switched on system switches off on expiration of the operating duration
or can be deactivated by pressing the icon for direct on / off switching or via
radio remote control.
ABCDEFGH34Vehicle systems
Page 38 of 43
Index
A
ACC
30
Additional keyboard languages11
Administering paired devices25
Air conditioning33
Alphanumeric with keyboard9
AM12
Anti-theft device6
Assistance systems30
Audio Media
16
Radio12
Audio source18
Automatic air conditioning33
Automatic air recirculation33
Automatic cruise control30
Automatic driving lights when raining31
Automatic locking32
Automatic rear window wiper32
Automatic wiping when raining32
AUX20
Auxiliary heating34
B
Blind spot monitoring
30
Bluetooth Settings
11
Switch on/off11
Updates11
Visibility11
Bluetooth Player20
Bluetooth profile25
Breakdown service26
Broadcasting sector12
Button CAR29
C
Call list Call list
28
CAR29
Climatronic Automatic mode
33
Operating mode33
Closing32
Comfort flashing31
COMING HOME31
Component protection6
Conditions for pairing23
Convenience consumer30
Cooling system33
Couple device a telephone connection
24
no telephone connected24
Couple telephone Telephone to the device
24
D
DAB
12
Settings15
Date10
Daytime running lights31
Description of the device6
Device connect to the telephone
23
Device language10
Device menu CAR
29
Media (Audio)16
Radio12
Device Menu Telephone
22
Device operation8
Device screen8
device screen keyboard9
Device screen10
Areas8
important information7
Maintenance7
Operation8
Digital radio reception Settings
15
DriveGreen30
Driver Alert System30
Driver assistance30
Driving abroad - light31
Driving data Display
29
Power on/off32
Driving lights when raining31
DTMF28
E
Easy opening
32
Eco Tips - Multi-function display32
ESC sport30
ESC system30
F
Factory settings
11 , 33
File formats21
Prerequisites and restrictions21
FM12
Settings15
Frequency range See main menu
12
Front Assist30
Function keys8
Function problems Telephone
23
36Index
Page 39 of 43
H
Heated windscreen
33
Heating33
High beam31
I
Important notes
6
Import contacts22
Information service26
Input screen Language characters
11
Input screen with keyboard9
Inspection33
Instrument cluster
32
Instrument lighting31
Interior - Lighting32
Interior lighting32
Introductory information6
Component protection6
K
Key - memory function
32
keyboard9
Keyboard11
L
Lane Assist
30
LEAVING HOME31
Light31
Light sensor - switch on the light31
List Media
17
of available stations13
of telephone contacts27
List of paired devices25
List of paired telephones24
Locking/unlocking - warning 32
Locking door32
Luggage compartment - opening32
M
Main menu CAR
29
Media16
Radio12
Manage favourites22
Manoeuvring31
Media16
Audio source18
AUX20
Bluetooth Audio20
File formats21
Foreword16
List17
Main menu16
Multimedia database18
Operation16
Playback17
Prerequisites and restrictions21
safe removal of the data source11
SD-card19
Select audio source17
Settings18
Supported media21
USB19
Memory function of remote control key32
Menu Setup
10
Unit settings10
Menu CAR29
MFL see operating instructions
8
Mirror Fold in when parked
32
Lower while reversing32
Synchronous adjustment32
Multi-function display32
Multi-media AUX20
Multifunction steering wheel see operating instructions
8
Multimedia USB
19
Multimedia database Media
18
Mute7
O
Opening
32
Operating lever see operating instructions
8
Operation Media
16
Radio12
Telephone22
P
Pair device Pairing confirmation
25
Parking31
Parking aid31
ParkPilot31
Playback Media
17
Preferred contacts27
Principles of device operation8
Proactive occupant protection30
PTY - filter13
R
Radio
12
Broadcasting sector12
DAB - settings15
FM - settings15
List of available stations13
Main menu12
37Index
Page 41 of 43
Touch screen7
Traffic programme (TP)14
Travel mode - light31
Turning off the device7
Turning on the device7
Tyre pressure values30
Tyres30
U
Unit overview
6
Units11
Unlocking door32
USB19
safe removal11
User profile22
V
Vehicle - settings
29
Vehicle condition30
Vehicle identification number33
Vehicle systems29
Ventilation34
VIN number33
Volume7
Volume setting7
W
Warning messages
7, 30
Warning when locking/unlocking 32
Window - operation32
Window comfort operation32
Window operations32
Windscreen Automatic wiping when raining
32
Heating29, 33
Windscreen heating29
Wiper32
39Index