audio SKODA RAPID 2016 1.G Columbus Amundsen Bolero Infotainment System Navigation Manual
[x] Cancel search | Manufacturer: SKODA, Model Year: 2016, Model line: RAPID, Model: SKODA RAPID 2016 1.GPages: 100, PDF Size: 12.8 MB
Page 30 of 100
■Do not affix anything to the CD/DVDs!■If the ambient temperature is too high or too low, the CD / DVD playback may
not work.■
Damp (condensation) may affect the device in cold weather or after showers.
This can cause the CD to jump or impair the play function. Once the moisture
has dissipated, playback is fully functional again.
Note
■ After pressing the symbol key it takes a few seconds for the CD / DVD to
be ejected.■
With uneven or unpaved roads playback jumps may occur.
■
If the CD/DVD is damaged, is not readable or is inserted incorrectly, the fol-
lowing message is displayed:
Error: CD/DVD
.
■
It is possible that CD/DVDs protected by copyright cannot be played back at
all or only in certain circumstances.
SD card
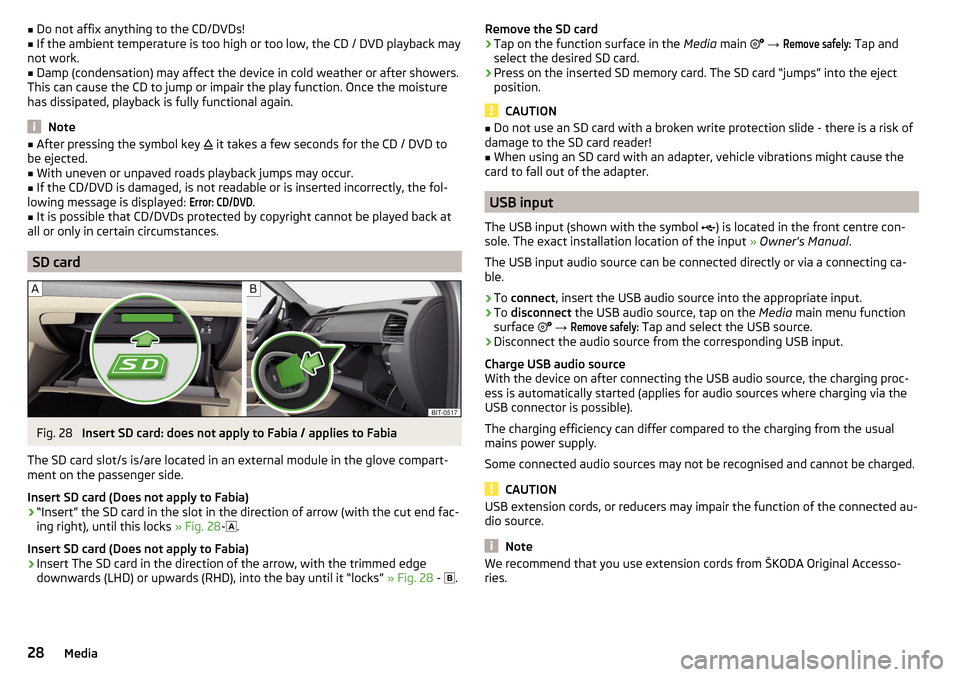
Fig. 28
Insert SD card: does not apply to Fabia / applies to Fabia
The SD card slot/s is/are located in an external module in the glove compart-
ment on the passenger side.
Insert SD card (Does not apply to Fabia)
›
“Insert” the SD card in the slot in the direction of arrow (with the cut end fac-
ing right), until this locks » Fig. 28-
.
Insert SD card (Does not apply to Fabia)
›
Insert The SD card in the direction of the arrow, with the trimmed edge
downwards (LHD) or upwards (RHD), into the bay until it “locks” » Fig. 28 -
.
Remove the SD card›Tap on the function surface in the Media main →
Remove safely:
Tap and
select the desired SD card.›
Press on the inserted SD memory card. The SD card “jumps” into the eject position.
CAUTION
■ Do not use an SD card with a broken write protection slide - there is a risk of
damage to the SD card reader!■
When using an SD card with an adapter, vehicle vibrations might cause the
card to fall out of the adapter.
USB input
The USB input (shown with the symbol ) is located in the front centre con-
sole. The exact installation location of the input » Owner's Manual .
The USB input audio source can be connected directly or via a connecting ca-
ble.
›
To connect , insert the USB audio source into the appropriate input.
›
To disconnect the USB audio source, tap on the Media main menu function
surface
→
Remove safely:
Tap and select the USB source.
›
Disconnect the audio source from the corresponding USB input.
Charge USB audio source
With the device on after connecting the USB audio source, the charging proc-
ess is automatically started (applies for audio sources where charging via the
USB connector is possible).
The charging efficiency can differ compared to the charging from the usual
mains power supply.
Some connected audio sources may not be recognised and cannot be charged.
CAUTION
USB extension cords, or reducers may impair the function of the connected au-
dio source.
Note
We recommend that you use extension cords from ŠKODA Original Accesso-
ries.28Media
Page 31 of 100
AUX - input
The AUX input (marked with the
lettering) is located in the front centre
console. The exact installation location of the input » Owner's Manual .›
To connect , insert the plug of the AUX audio source into the appropriate con-
nector.
›
To disconnect , pull the plug out of the AUX audio source.
CAUTION
■
The AUX input must only be used for audio devices!■If an external audio source is connected to the AUX input, which is equipped
with an adapter for external power supply, the sound may be impaired.
Note
■ The 3.5 mm stereo jack plug is used for the AUX input.■We recommend that you use extension cords from ŠKODA Original Accesso-
ries.
Bluetooth ®
player
The unit allows audio files of a connected Bluetooth ®
player to play using the
A2DP and AVRCP audio profile.
With the device, multiple devices can be paired using Bluetooth ®
, but only one
of them can be used as a Bluetooth ®
player.
Connect the Bluetooth ®
player
›
Connect the player to the device - follow the same instructions as for pairing
the device with a telephone » page 43.
Separate the Bluetooth ®
player
›
Terminate the connection in the list of paired devices » page 44.
Automatic playback stop and disconnection
If an Apple device is connected as a Bluetooth ®
player, and this is connected to
the USB input, then the Bluetooth ®
connection is not dropped. If playback is
cancelled, playback must be started again. Only if USB is selected as the audio
source will the Apple device disconnect as a Bluetooth ®
player. In this regard,
an appropriate warning message appears on the device screen.
If the USB audio source is an Apple device, this unit cannot be connected as a
Bluetooth ®
player. In this regard, an appropriate warning message appears on
the device screen.
If the Bluetooth ®
player audio source is connected to the AUX input, then the
audio output is switched from the AUX input of the external connected device.
For further playback the audio source is to be switched to AUX.
Replace Bluetooth ®
player(applies to Amundsen, Bolero)
If you would like to replace a Bluetooth ®
Player which is connected to the ma-
chine as a phone at the same time, , then a relevant information message ap-
pears in the device screen.›
End the connection to the currently connected Bluetooth ®
player and repeat
the pairing procedure » page 44, Managing paired external devices .
CAUTION
If an external device is connected to the device using Apple CarPlay ™
orAndroid Auto ™
, then it cannot be connected using Bluetooth ®
.
WLAN
Applies to Columbus, Amundsen (does not apply to Yeti).
The device allows you to play audio files from one of the external devices con-
nected to the device WLAN.
›
connect an external device that supports the DLNA (Digital Living Network
Alliance), with the device WLAN » page 52.
›
If necessary use the UPnP application (Universal Plug and Play) in the con-
nected device, which allows playback to start.
›
Select the audio source Select
WLAN
.
29Media
Page 32 of 100
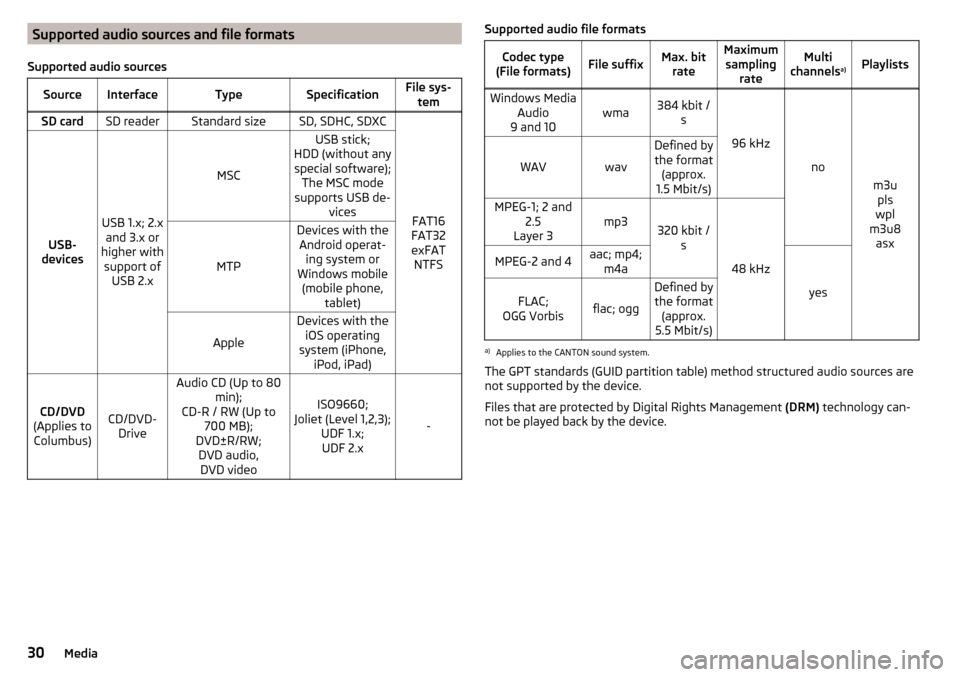
Supported audio sources and file formats
Supported audio sourcesSourceInterfaceTypeSpecificationFile sys- temSD cardSD readerStandard sizeSD, SDHC, SDXC
FAT16
FAT32
exFAT NTFSUSB-
devices
USB 1.x; 2.x and 3.x or
higher with support of USB 2.x
MSC
USB stick;
HDD (without any special software); The MSC mode
supports USB de- vices
MTP
Devices with theAndroid operat- ing system or
Windows mobile (mobile phone, tablet)
Apple
Devices with theiOS operating
system (iPhone, iPod, iPad)
CD/DVD
(Applies to Columbus)CD/DVD- Drive
Audio CD (Up to 80 min);
CD-R / RW (Up to 700 MB);
DVD±R/RW; DVD audio,DVD video
ISO9660;
Joliet (Level 1,2,3); UDF 1.x;UDF 2.x
-
Supported audio file formatsCodec type
(File formats)File suffixMax. bit rateMaximumsampling rateMulti
channels a)PlaylistsWindows Media
Audio
9 and 10wma384 kbit / s
96 kHz
no
m3upls
wpl
m3u8 asx
WAVwav
Defined bythe format (approx.
1.5 Mbit/s)MPEG-1; 2 and 2.5
Layer 3mp3320 kbit / s
48 kHz
MPEG-2 and 4aac; mp4;m4a
yes
FLAC;
OGG Vorbisflac; ogg
Defined by the format (approx.
5.5 Mbit/s)a)
Applies to the CANTON sound system.
The GPT standards (GUID partition table) method structured audio sources are
not supported by the device.
Files that are protected by Digital Rights Management (DRM) technology can-
not be played back by the device.
30Media
Page 36 of 100
Settings›
In the main menu Video DVD press the function surface
surface.
Depending on the DVD some of the following menu items are displayed.
■
Format:
- Set the screen width/height ratio
■
Audio channel:
- Audio channel selection
■
Subtitles:
- Selecting subtitle
■
Enter/change PIN for parental settings
- Management of the PIN code for parental
control
■
Parental settings:
- Parental
settings selection
TV tuner
TV function
Main menu
Applies to Columbus.
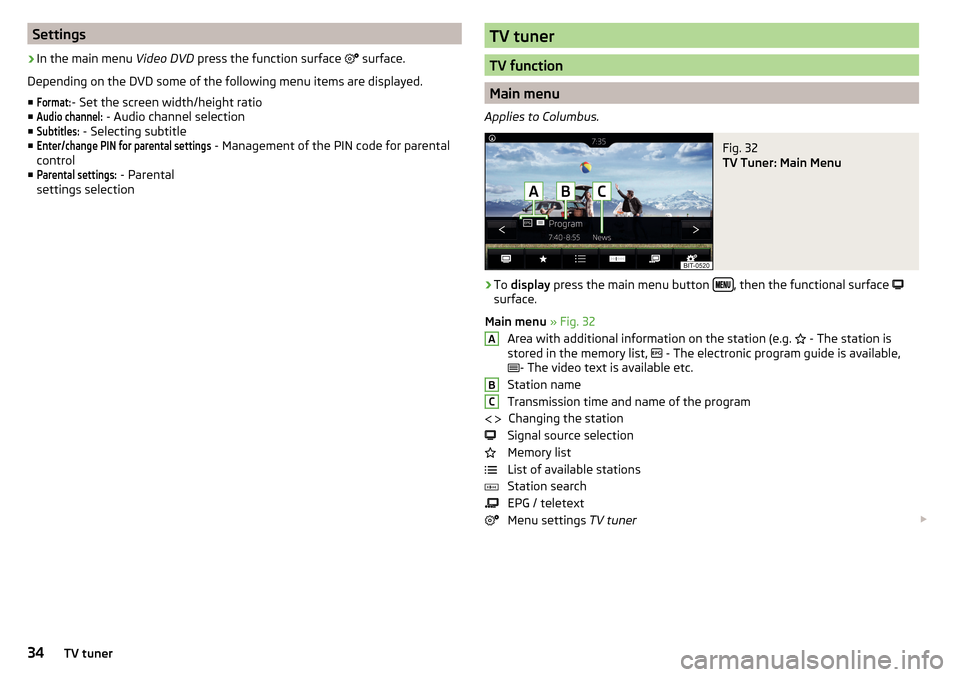
Fig. 32
TV Tuner: Main Menu
›
To display press the main menu button , then the functional surface
surface.
Main menu » Fig. 32
Area with additional information on the station (e.g. - The station is
stored in the memory list, - The electronic program guide is available,
- The video text is available etc.
Station name
Transmission time and name of the program Changing the station
Signal source selection
Memory list
List of available stations
Station search
EPG / teletext
Menu settings TV tuner
ABC
34TV tuner
Page 37 of 100
Note■For safety reasons, the image display is switched off at speeds over 5 km/h.
Only the sound continues. The message: Vehicle is in motion.
appears on the
screen.
The display has been switched off for your safety.■
Tap on the function
Also offers the option to select AV (Audio Video Sig-
nal) as a signal source. However, no input is present in the vehicle for this
source.
List of available stations and preset list
In the list of available stations, stations that have an adequately strong signal
are presented in alphabetical order.
›
to Display the list of available stations From theTV tuner main menu , tap on
the functional surface Tap or the controller
Turn.
›
To
Store a station on a station button in the list of available stations first
tap on the functional surface
Save
and then the corresponding preset button.
Up to 99 stations can be stored in the preset list.
Find available stations and select
The unit has a TV tuner to receive digital TV channels DVB-T and DVB-T2 (only
Codec h. 264).
Setting stations
›
In the main menu TV tuner press the function surface
→
or
surface.
A search commences in the selected direction and stops at the next station
group with sufficient signal strength.
The search is performed again by pressing the function surface or
stopped.
Select a station from the preset list
›
In the main menu TV tuner press the function surface
surface.
›
Select the desired station.
Select the station from the station list
›
In the main menu TV tuner turn the control
turn or the functional surface
surface.
›
Select the desired station.
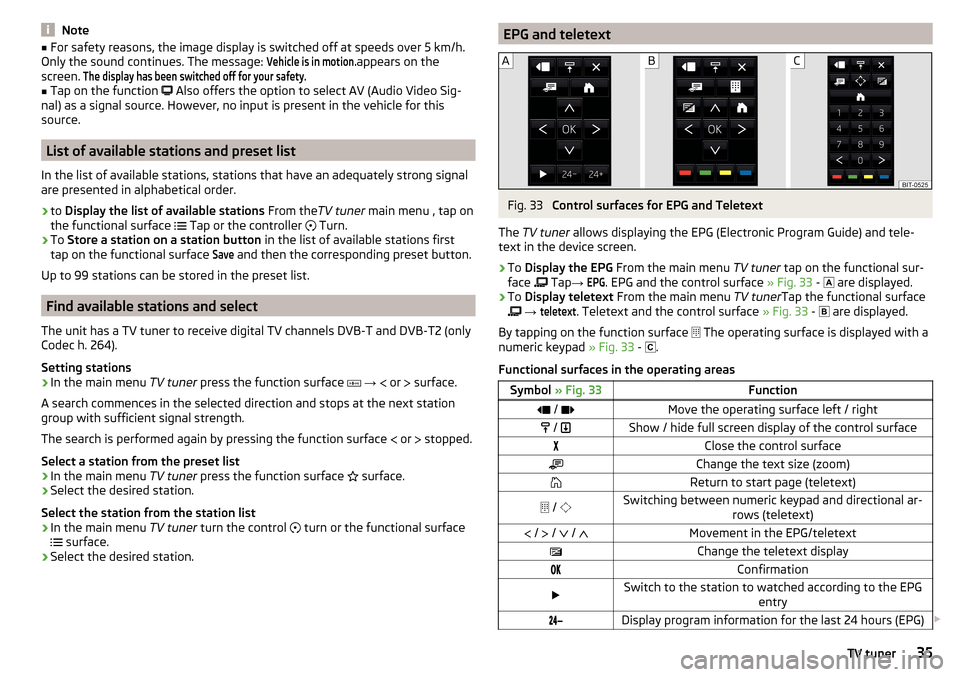
EPG and teletextFig. 33
Control surfaces for EPG and Teletext
The TV tuner allows displaying the EPG (Electronic Program Guide) and tele-
text in the device screen.
›
To Display the EPG From the main menu TV tuner tap on the functional sur-
face Tap
→
EPG
. EPG and the control surface » Fig. 33 -
are displayed.
›
To
Display teletext From the main menu TV tunerTap the functional surface
→
teletext
. Teletext and the control surface » Fig. 33 -
are displayed.
By tapping on the function surface The operating surface is displayed with a
numeric keypad » Fig. 33 -
.
Functional surfaces in the operating areas
Symbol » Fig. 33Function / Move the operating surface left / right / Show / hide full screen display of the control surfaceClose the control surfaceChange the text size (zoom)Return to start page (teletext) / Switching between numeric keypad and directional ar-
rows (teletext) / / / Movement in the EPG/teletextChange the teletext displayConfirmationSwitch to the station to watched according to the EPG
entryDisplay program information for the last 24 hours (EPG) 35TV tuner
Page 38 of 100
Symbol » Fig. 33FunctionDisplay program information for the next 24 hours (EPG) / / / Display the specified line in the lower teletext page (the
same colour field or number)
Settings
›
In the main menu TV tuner press the function surface
surface.
■
Arrow buttons
- Set the station select function in the TV tuner menu
■
Preset list
- Change between stations stored in the preset list
■
Station list
- Switch between all available TV stations
■
Screen
- Brightness, contrast and colour settings
■
Format:
- Selection of aspect ratio
■
Audio channel:
- Audio channel selection
■
TV standard:
- Selection of TV-Region
■
Subtitles
- Enable / disable the subtitle display
■
Sound
- sound settings
■
Automatic station tracking
- Switch on / off the automatic station tracking
■
Preset list
- Management of the storage list
Media Command
Using the system
Introduction to the subject
Applies to Amundsen (Does not apply to Yeti).
The Media Commandfunction allows playback of audio files or videos in up to
two Tablets That are connected to the device via WLAN, to control the device.
The Media Command function enables operation of tablets with the operating
system Android or iOS and with the running application ŠKODA Media
Command.
Connect tablet with device
›
Turn on the device hotspot (WLAN) (press the button then the functional
surface Tap
→
WLAN
→
Mobile hotspot
→
Mobile hotspot
.
›
Turn on WiFi in tablet.
›
The hotspot of the device (if necessary, enter the password for the connec-
tion setup according to the setting of the device hotspots » page 52).
›
In the tablet, start the application ŠKODA Media Command.
CAUTION
If several devices are connected to the device via WLAN, there is a risk that the
quality of the WLAN connection, and thus the function of Media Command may
be affected.
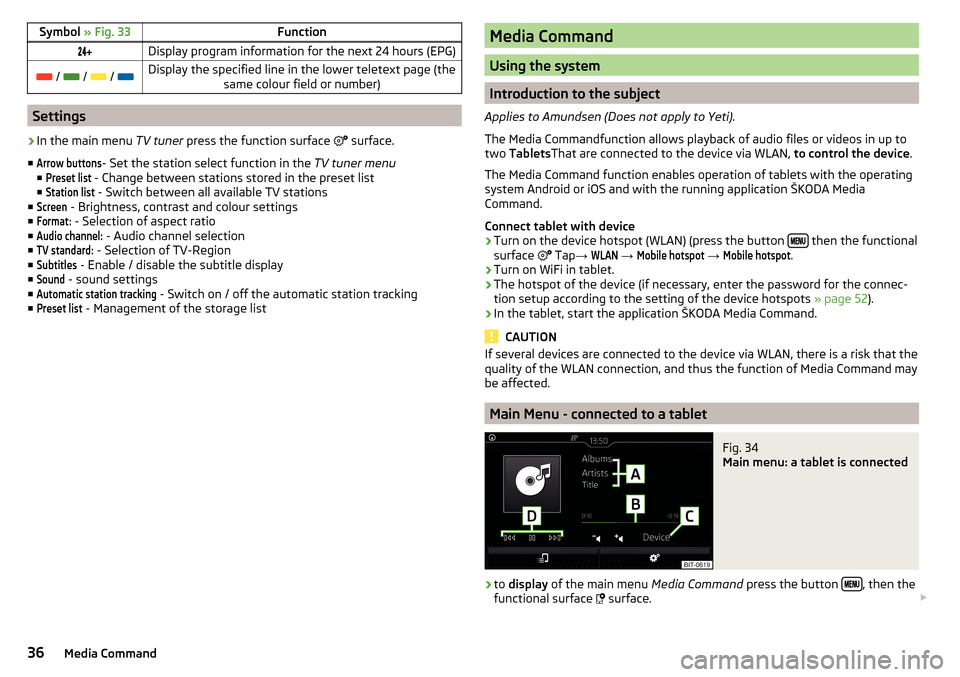
Main Menu - connected to a tablet
Fig. 34
Main menu: a tablet is connected
›
to display of the main menu Media Command press the button , then the
functional surface
surface.
36Media Command
Page 40 of 100
NoteSome Tablet types allow playback of audio files or videos by an inserted SD
card in the tablet. Playback of these tracks may be limited.
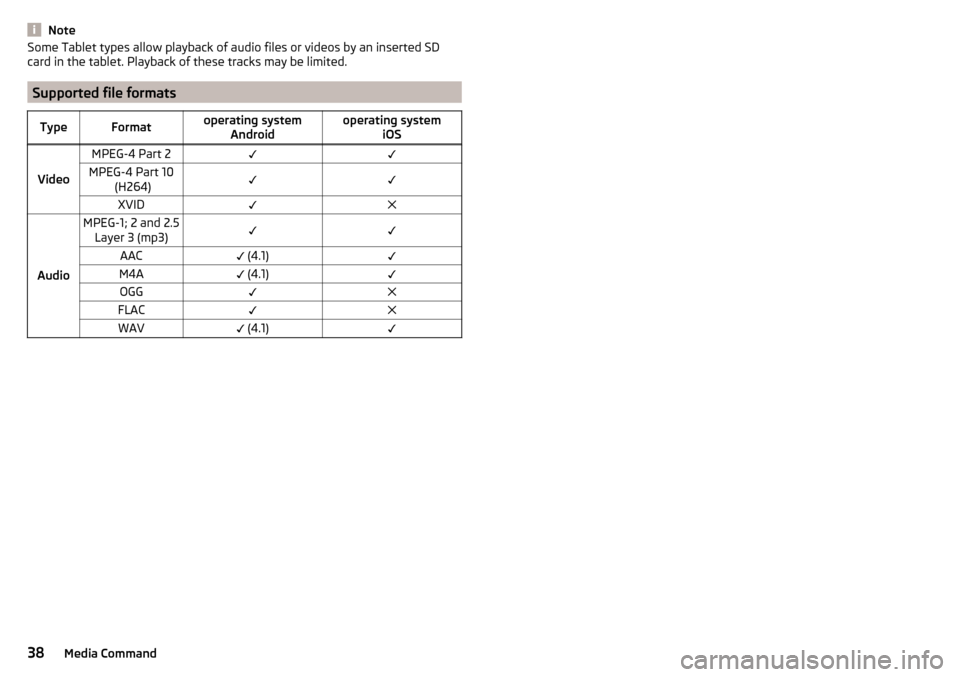
Supported file formats
TypeFormatoperating system Androidoperating system iOS
Video
MPEG-4 Part 2MPEG-4 Part 10 (H264)XVID
Audio
MPEG-1; 2 and 2.5Layer 3 (mp3)AAC (4.1)M4A (4.1)OGGFLACWAV (4.1)38Media Command
Page 46 of 100
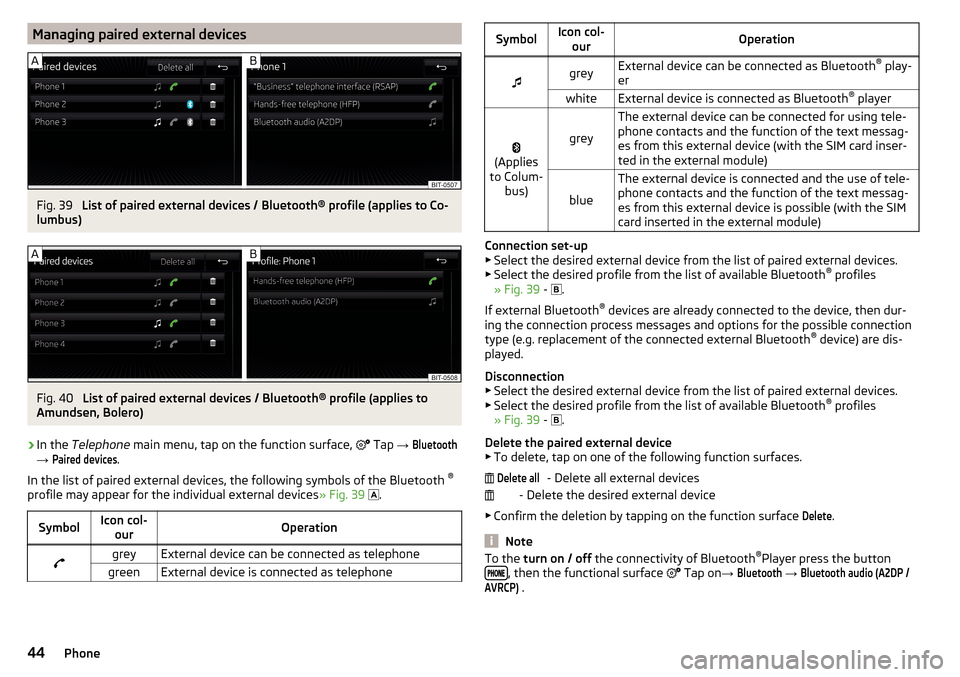
Managing paired external devicesFig. 39
List of paired external devices / Bluetooth® profile (applies to Co-
lumbus)
Fig. 40
List of paired external devices / Bluetooth® profile (applies to
Amundsen, Bolero)
›
In the Telephone main menu, tap on the function surface,
Tap →
Bluetooth
→
Paired devices
.
In the list of paired external devices, the following symbols of the Bluetooth ®
profile may appear for the individual external devices » Fig. 39
.
SymbolIcon col-
ourOperationgreyExternal device can be connected as telephonegreenExternal device is connected as telephoneSymbolIcon col-ourOperationgreyExternal device can be connected as Bluetooth ®
play-
erwhiteExternal device is connected as Bluetooth ®
player
(Applies
to Colum- bus)grey
The external device can be connected for using tele-
phone contacts and the function of the text messag-
es from this external device (with the SIM card inser-
ted in the external module)
blue
The external device is connected and the use of tele-
phone contacts and the function of the text messag-
es from this external device is possible (with the SIM
card inserted in the external module)
Connection set-up ▶ Select the desired external device from the list of paired external devices.
▶ Select the desired profile from the list of available Bluetooth ®
profiles
» Fig. 39 -
.
If external Bluetooth ®
devices are already connected to the device, then dur-
ing the connection process messages and options for the possible connection
type (e.g. replacement of the connected external Bluetooth ®
device) are dis-
played.
Disconnection
▶ Select the desired external device from the list of paired external devices.
▶ Select the desired profile from the list of available Bluetooth ®
profiles
» Fig. 39 -
.
Delete the paired external device ▶ To delete, tap on one of the following function surfaces.
- Delete all external devices
- Delete the desired external device
▶ Confirm the deletion by tapping on the function surface
Delete
.
Note
To the turn on / off the connectivity of Bluetooth ®
Player press the button
, then the functional surface Tap on →
Bluetooth
→
Bluetooth audio (A2DP /AVRCP)
.
Delete all44Phone
Page 54 of 100
Hotspot (WLAN) and data connection
Hotspot (WLAN)
Introduction to the subject
Applies to Columbus, Amundsen (not applicable to Yeti).
WLAN can be used to connect to the Internet, to playback audio files in the menu media or for operating the device using an application in the external
device (e.g. ŠKODA Media Command).
The requirement for the WLAN function is the ignition is switched on. After
switching on the ignition, the last-used WLAN connection appears.
It is possible to connect up to 8 external devices on the device hotspot and at
the same time to connect the device to the Hotspot of other external devices.
Applies to Columbus: If there is a SIM card with active data services in the ex-
ternal module, or if there a connection to the telephone via Bluetooth ®profile
RSAP, it's not possible to connect to the external device hotspot.
connect an external device to the hotspot (WLAN) of the device
Device hotspot on / off
›
Press the button, then tap on the function surface
Tap
→
WLAN
→
Mo-bile hotspot
→
Mobile hotspot
.
Set device hotspot
▶ Press the
button, then tap on the function surface
Tap
→
WLAN
→
Mo-bile hotspot
→
Mobile hotspot
.
▶ Setting required menu items the following menu.
■
Security level:
- Setting connection security
■
Network key
- Entering the access password
■
SSID: ...
- Name of the device hotspot
■
Do not send network name (SSID)
-Turn WLAN hotspot visibility on/off
▶ Tap the functional surface
Save
to save the parameters of the devices hot-
spot.
Connect ▶ Enable the Wi-Fi in the external device and search for any available hotspots
▶ Select the device hotspot (if necessary enter the required password).
▶ Confirm the connection establishment.
Establish secure connection using WPS (applies to Amundsen) ▶ WLAN in device on.
▶ Press the
button, then tap on the function
Tap →
WLAN
→
WLAN
→
WPS Quick Connect (WPS button)
.
▶ Turn on the option to connect to the device hotspot using WPS.
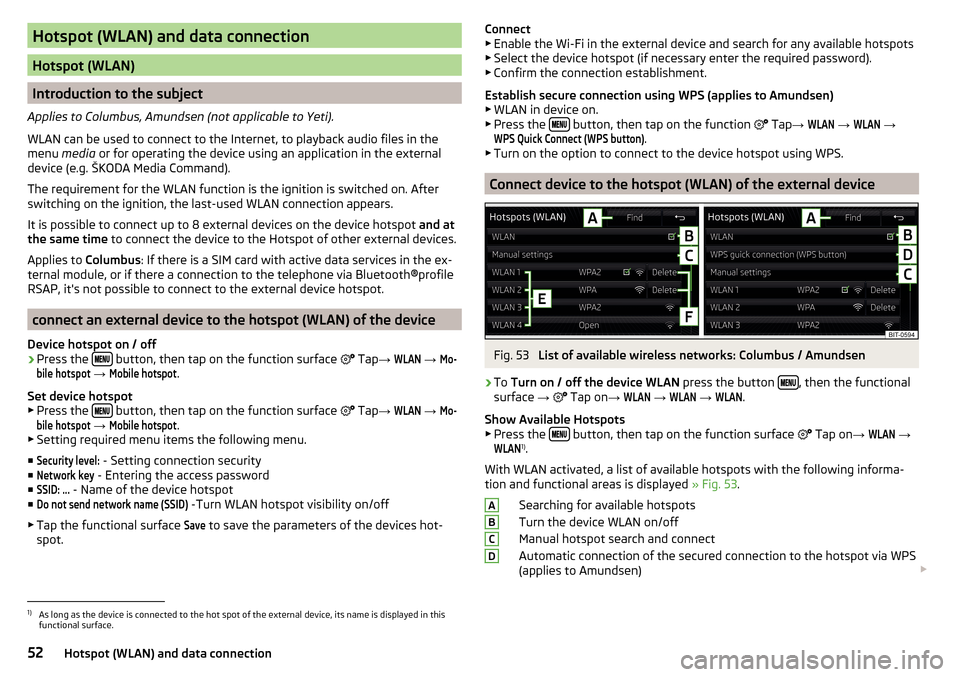
Connect device to the hotspot (WLAN) of the external device
Fig. 53
List of available wireless networks: Columbus / Amundsen
›
To Turn on / off the device WLAN press the button , then the functional
surface →
Tap on
→
WLAN
→
WLAN
→
WLAN
.
Show Available Hotspots
▶ Press the
button, then tap on the function surface
Tap on
→
WLAN
→
WLAN
1)
.
With WLAN activated, a list of available hotspots with the following informa-
tion and functional areas is displayed » Fig. 53.
Searching for available hotspots
Turn the device WLAN on/off
Manual hotspot search and connect
Automatic connection of the secured connection to the hotspot via WPS
(applies to Amundsen)
ABCD1)
As long as the device is connected to the hot spot of the external device, its name is displayed in this
functional surface.
52Hotspot (WLAN) and data connection
Page 57 of 100
Disconnection (appears with active connections)
Settings for the menu SmartLink » page 55
Connection set-up ▶ Connect the external device via a connecting cable to the USB input » Own-
er's Manual .
▶ In the main menu SmartLink Choose the connected external device and the
type of communication system if necessary » Fig. 55 -
.
Return to the main menu of the active connection from another device menu
(E.g. From the Radiomenu)
▶ Press the button
→ active connection (
/
/
).
Disconnection
▶ To end the connection, in the main menu SmartLink the functional surface
Interface » Fig. 55 -
.
▶ or Disconnect the device from the USB input.
If the connection was ended by pressing the function surface From the main
menu SmartLink , it is necessary to re-establish the connection when the ex-
ternal device is connected again.
If the connection was terminated by disconnecting the cable from the USB
port, then the last active connection is shown in the main menu when the ex-
ternal device is reconnected.
Settings
›
In the SmartLink main menu, tap on the function surface
surface.
■
Activate data transfer for ŠKODA apps
- turn on/off the data transfer for the con-
nected device for ŠKODA applications
■ MirrorLink® - Settings of the communication system MirrorLink ®
■
Screen orientation
- Setting the screen display
■
Landscape
- Width display
■
Portrait
- Height display
■
Turned 180 degrees
- Turn on / off the 180 ° inversion
■
Allow MirrorLink® Notes display
- Turn on / off the display of messages of Mirror
link ®
applications in the device screen
Android Auto ™
Introduction to the subject
The Android Auto ™
connection can be set up under the following conditions.
The ignition is switched on.
The unit is switched on.
The external device to be connected is switched on.
Some applications require the data connection in the connected external de-
vice to be turned on.
If the device is connected to an external device via Android Auto ™
then all the
phones currently connected, as well as the Bluetooth ®
Players are disconnec-
ted. The external device to be connected will automatically establish a new
telephone connection using Bluetooth ®
as a main phone. Connecting an addi-
tional telephone and using telephone services of the SIM card inserted in the
external module is not possible throughout the duration of the connection. A
possible data connection by using the SIM card inserted in the external module
remains operational » page 53.
An external device connected using Android Auto ™
cannot be used as an audio
source in the menu Media.
If route guidance is taking place at this moment in the device, then there is
the option to start the route guidance in the Android Auto ™
application. This is
also true reciprocally.
A list of devices and applications that the Android Auto ™
connection supports
can be found on the ™
Google website. Functionality is not guaranteed outside
of the supported regions.
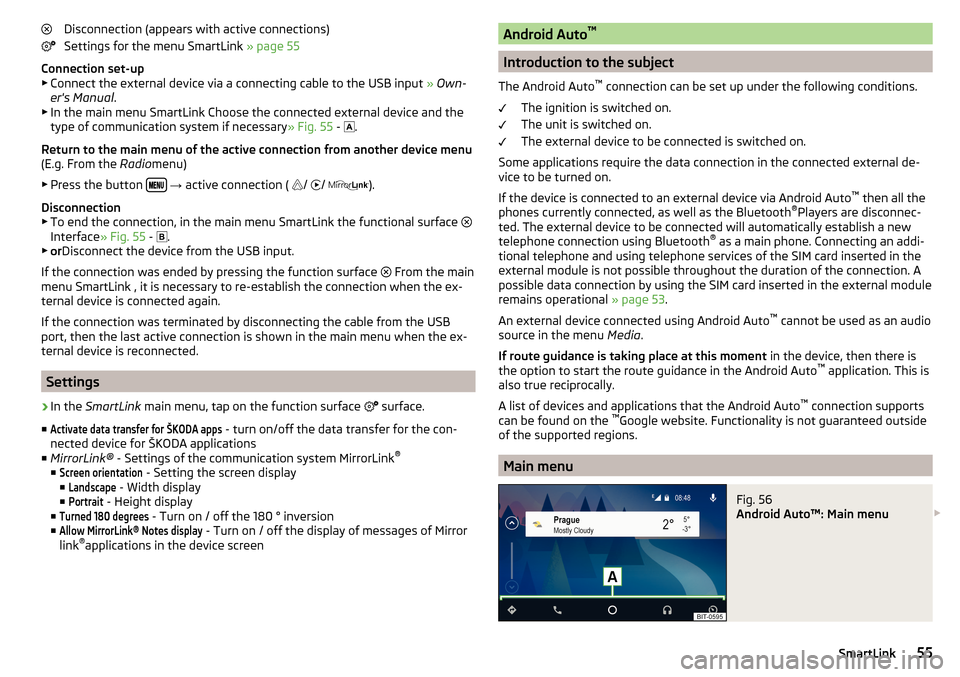
Main menu
Fig. 56
Android Auto™: Main menu
55SmartLink