display SKODA RAPID 2016 1.G Columbus Amundsen Bolero Infotainment System Navigation Manual
[x] Cancel search | Manufacturer: SKODA, Model Year: 2016, Model line: RAPID, Model: SKODA RAPID 2016 1.GPages: 100, PDF Size: 12.8 MB
Page 29 of 100
CAUTION■Do not save any important data or that which has not been backed up on the
connected audio sources. ŠKODA assumes no responsibility for lost or dam-
aged files or connected audio sources.■
When changing or connecting an audio source, this may cause sudden
changes in volume. Reduce the volume before changing or connecting an au-
dio source.
■
When connecting an external audio source, the external source information
messages can be displayed. These messages must be observed and if neces-
sary confirmed (e.g. enabling data transfer etc).
Note
The national copyright laws that apply in your country must be observed.
Jukebox
Applies to Columbus.
In the Jukebox (in the unit's internal memory), supported audio / video files can
be imported from the connected audio sources.
Import files
›
Tap on the function
Tap →
Manage jukebox
→
Import
.
›
Select the desired source.
›
Select the desired folders or files.
›
Tap on the function
surface.
Delete files
›
Tap on the function
Tap →
Manage jukebox
→
Delete
.
›
Select the desired folder or files in the selected category.
›
Tap on the function
Tap →
Delete
.
Show level of the device memory
›
Tap on the function
Tap
Manage jukebox
.
It displays information about the occupied and free space on the device mem-
ory and the number of files that can not be imported.
Note
■ Files that have already been copied are recognized and cannot be copied
again (shown in grey).■
It is not possible to copy files while simultaneously playing back audio or vid-
eo files in the CD/DVD drive.
CD / DVD
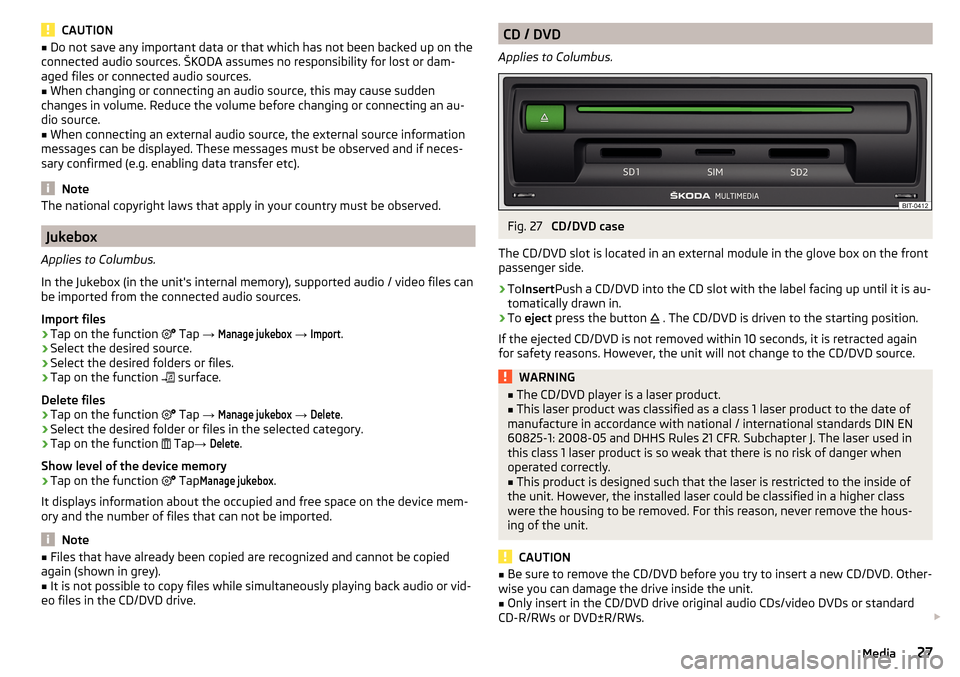
Applies to Columbus.Fig. 27
CD/DVD case
The CD/DVD slot is located in an external module in the glove box on the front
passenger side.
›
To Insert Push a CD/DVD into the CD slot with the label facing up until it is au-
tomatically drawn in.
›
To eject press the button
. The CD/DVD is driven to the starting position.
If the ejected CD/DVD is not removed within 10 seconds, it is retracted again
for safety reasons. However, the unit will not change to the CD/DVD source.
WARNING■ The CD/DVD player is a laser product.■This laser product was classified as a class 1 laser product to the date of
manufacture in accordance with national / international standards DIN EN 60825-1: 2008-05 and DHHS Rules 21 CFR. Subchapter J. The laser used in
this class 1 laser product is so weak that there is no risk of danger when
operated correctly.■
This product is designed such that the laser is restricted to the inside of
the unit. However, the installed laser could be classified in a higher class
were the housing to be removed. For this reason, never remove the hous-
ing of the unit.
CAUTION
■ Be sure to remove the CD/DVD before you try to insert a new CD/DVD. Other-
wise you can damage the drive inside the unit.■
Only insert in the CD/DVD drive original audio CDs/video DVDs or standard
CD-R/RWs or DVD±R/RWs.
27Media
Page 30 of 100
■Do not affix anything to the CD/DVDs!■If the ambient temperature is too high or too low, the CD / DVD playback may
not work.■
Damp (condensation) may affect the device in cold weather or after showers.
This can cause the CD to jump or impair the play function. Once the moisture
has dissipated, playback is fully functional again.
Note
■ After pressing the symbol key it takes a few seconds for the CD / DVD to
be ejected.■
With uneven or unpaved roads playback jumps may occur.
■
If the CD/DVD is damaged, is not readable or is inserted incorrectly, the fol-
lowing message is displayed:
Error: CD/DVD
.
■
It is possible that CD/DVDs protected by copyright cannot be played back at
all or only in certain circumstances.
SD card
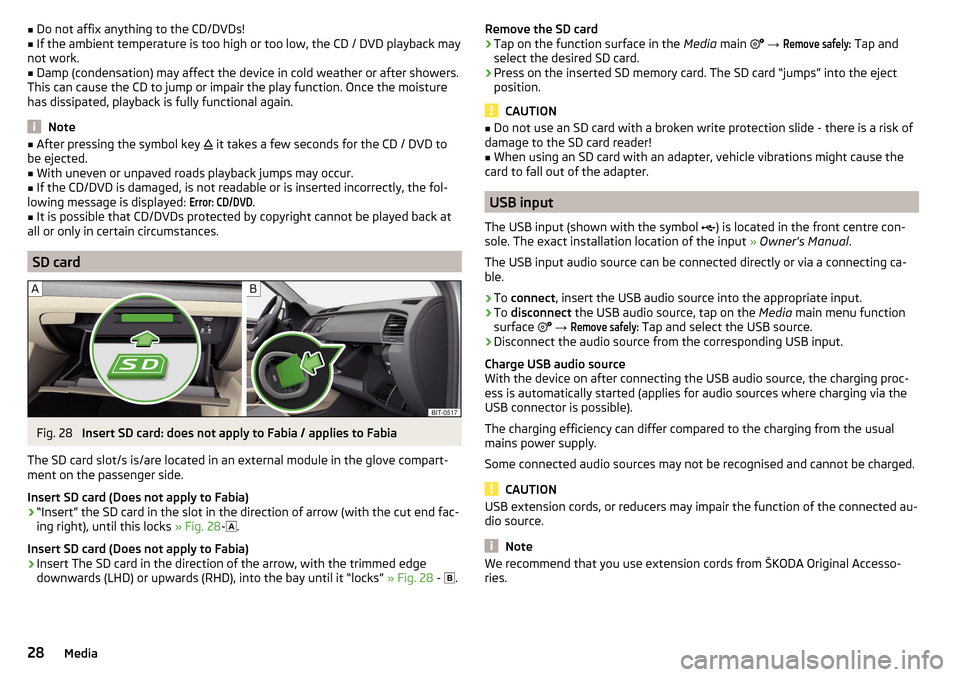
Fig. 28
Insert SD card: does not apply to Fabia / applies to Fabia
The SD card slot/s is/are located in an external module in the glove compart-
ment on the passenger side.
Insert SD card (Does not apply to Fabia)
›
“Insert” the SD card in the slot in the direction of arrow (with the cut end fac-
ing right), until this locks » Fig. 28-
.
Insert SD card (Does not apply to Fabia)
›
Insert The SD card in the direction of the arrow, with the trimmed edge
downwards (LHD) or upwards (RHD), into the bay until it “locks” » Fig. 28 -
.
Remove the SD card›Tap on the function surface in the Media main →
Remove safely:
Tap and
select the desired SD card.›
Press on the inserted SD memory card. The SD card “jumps” into the eject position.
CAUTION
■ Do not use an SD card with a broken write protection slide - there is a risk of
damage to the SD card reader!■
When using an SD card with an adapter, vehicle vibrations might cause the
card to fall out of the adapter.
USB input
The USB input (shown with the symbol ) is located in the front centre con-
sole. The exact installation location of the input » Owner's Manual .
The USB input audio source can be connected directly or via a connecting ca-
ble.
›
To connect , insert the USB audio source into the appropriate input.
›
To disconnect the USB audio source, tap on the Media main menu function
surface
→
Remove safely:
Tap and select the USB source.
›
Disconnect the audio source from the corresponding USB input.
Charge USB audio source
With the device on after connecting the USB audio source, the charging proc-
ess is automatically started (applies for audio sources where charging via the
USB connector is possible).
The charging efficiency can differ compared to the charging from the usual
mains power supply.
Some connected audio sources may not be recognised and cannot be charged.
CAUTION
USB extension cords, or reducers may impair the function of the connected au-
dio source.
Note
We recommend that you use extension cords from ŠKODA Original Accesso-
ries.28Media
Page 33 of 100
Pictures
Image viewer
main menu
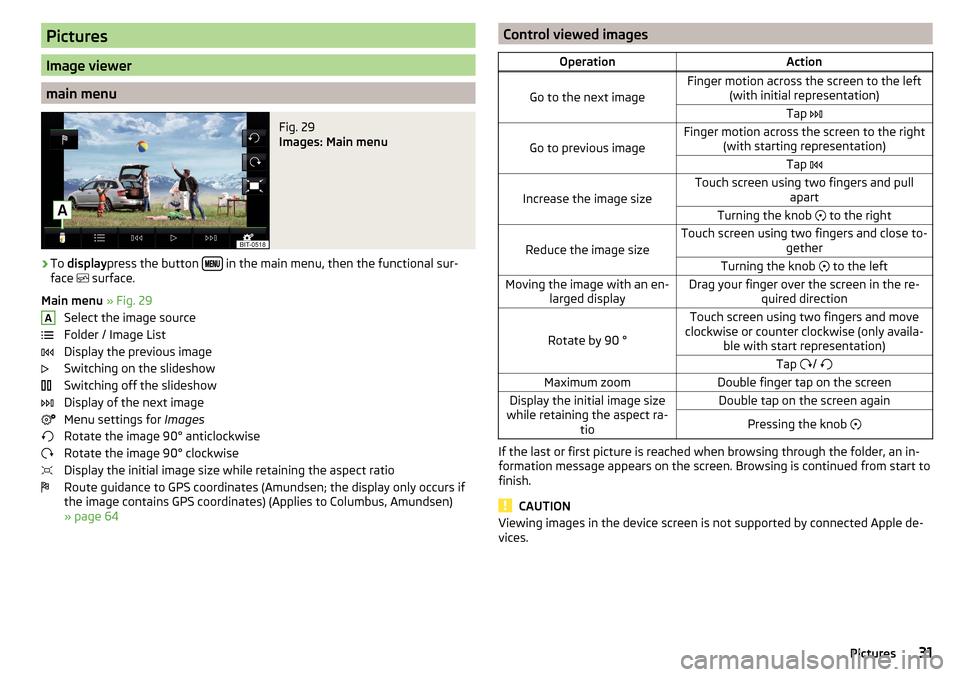
Fig. 29
Images: Main menu
›
To display press the button in the main menu, then the functional sur-
face surface.
Main menu » Fig. 29
Select the image source
Folder / Image List
Display the previous image
Switching on the slideshow
Switching off the slideshow
Display of the next image
Menu settings for Images
Rotate the image 90° anticlockwise
Rotate the image 90° clockwise
Display the initial image size while retaining the aspect ratio
Route guidance to GPS coordinates (Amundsen; the display only occurs if
the image contains GPS coordinates) (Applies to Columbus, Amundsen)
» page 64
AControl viewed imagesOperationAction
Go to the next image
Finger motion across the screen to the left (with initial representation)Tap
Go to previous image
Finger motion across the screen to the right
(with starting representation)Tap
Increase the image size
Touch screen using two fingers and pull
apartTurning the knob to the right
Reduce the image size
Touch screen using two fingers and close to-
getherTurning the knob to the leftMoving the image with an en-
larged displayDrag your finger over the screen in the re- quired direction
Rotate by 90 °
Touch screen using two fingers and move
clockwise or counter clockwise (only availa- ble with start representation)Tap / Maximum zoomDouble finger tap on the screenDisplay the initial image size
while retaining the aspect ra- tioDouble tap on the screen againPressing the knob
If the last or first picture is reached when browsing through the folder, an in-
formation message appears on the screen. Browsing is continued from start to
finish.
CAUTION
Viewing images in the device screen is not supported by connected Apple de-
vices.31Pictures
Page 34 of 100
Supported image file formats and sources
Supported image sourcesSourceTypeSpecificationfile systemSD cardStandard sizeSD, SDHC, SDXCFAT16 VFAT
FAT32
exFAT NTFS
USB devicesUSB stick;
HDD (without
special software)USB 1.x; 2.x and
3.x or higher with support of USB 2.xCD / DVD (Applies
to Columbus)CD-R / RW (Up to 700 MB);
DVD±R/RWISO9660;
Joliet (Level 1,2,3); UDF 1.x;UDF 2.x
-
Supported file formats
Codec type
(File formats)File suffixMax. resolution (Megapixels)BMPbmp4JP (E) Gjpg; jpeg4; 64GIFgif4PNGpng4
Note
■ The max. supported image size is 20 MB.■The GPT standards (GUID partition table) method structured image sources
are not supported by the device.
Settings
›
In the images main menu, tap on the function surface
surface.
■
Image view:
- Image view settings
■
Full
- Display the maximum image size while retaining the aspect ratio
■
Automatic
- Full screen display
■
Display time:
- Set the display time for the slideshow
■
Repeat slide show
- Switching on/off the slideshow repeat
Video DVD
Video player
Main menu
Applies to Columbus.
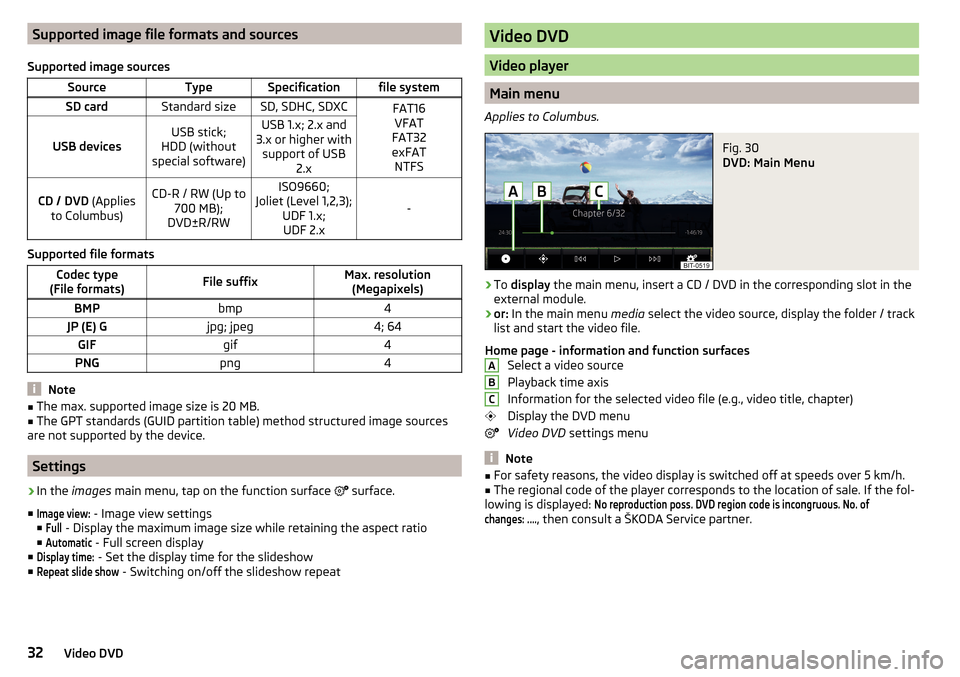
Fig. 30
DVD: Main Menu
›
To display the main menu, insert a CD / DVD in the corresponding slot in the
external module.
›
or: In the main menu media select the video source, display the folder / track
list and start the video file.
Home page - information and function surfaces Select a video source
Playback time axis
Information for the selected video file (e.g., video title, chapter)
Display the DVD menu
Video DVD settings menu
Note
■
For safety reasons, the video display is switched off at speeds over 5 km/h.■The regional code of the player corresponds to the location of sale. If the fol-
lowing is displayed:
No reproduction poss. DVD region code is incongruous. No. ofchanges: ....
, then consult a ŠKODA Service partner.
ABC32Video DVD
Page 35 of 100
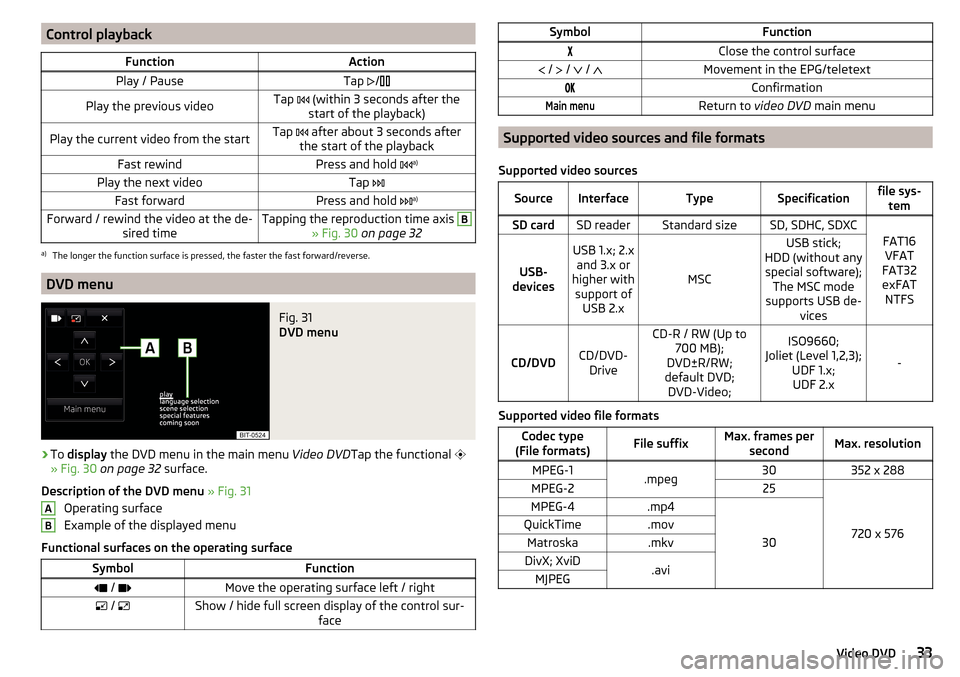
Control playbackFunctionActionPlay / PauseTap /Play the previous videoTap (within 3 seconds after the
start of the playback)Play the current video from the startTap after about 3 seconds after
the start of the playbackFast rewindPress and hold a)Play the next videoTap
Fast forwardPress and hold a)Forward / rewind the video at the de-
sired timeTapping the reproduction time axis B
» Fig. 30 on page 32
a)
The longer the function surface is pressed, the faster the fast forward/reverse.
DVD menu
Fig. 31
DVD menu
›
To display the DVD menu in the main menu Video DVDTap the functional
» Fig. 30 on page 32 surface.
Description of the DVD menu » Fig. 31
Operating surface
Example of the displayed menu
Functional surfaces on the operating surface
SymbolFunction / Move the operating surface left / right / Show / hide full screen display of the control sur-
faceABSymbolFunctionClose the control surface / / / Movement in the EPG/teletextConfirmationMain menuReturn to video DVD main menu
Supported video sources and file formats
Supported video sources
SourceInterfaceTypeSpecificationfile sys- temSD cardSD readerStandard sizeSD, SDHC, SDXC
FAT16VFAT
FAT32
exFAT NTFSUSB-
devices
USB 1.x; 2.x and 3.x or
higher with support of USB 2.x
MSC
USB stick;
HDD (without any special software); The MSC mode
supports USB de- vices
CD/DVDCD/DVD-Drive
CD-R / RW (Up to 700 MB);
DVD±R/RW;
default DVD; DVD-Video;ISO9660;
Joliet (Level 1,2,3); UDF 1.x;UDF 2.x
-
Supported video file formats
Codec type
(File formats)File suffixMax. frames per secondMax. resolutionMPEG-1.mpeg30352 x 288MPEG-225
720 x 576
MPEG-4.mp4
30
QuickTime.movMatroska.mkvDivX; XviD.aviMJPEG33Video DVD
Page 36 of 100
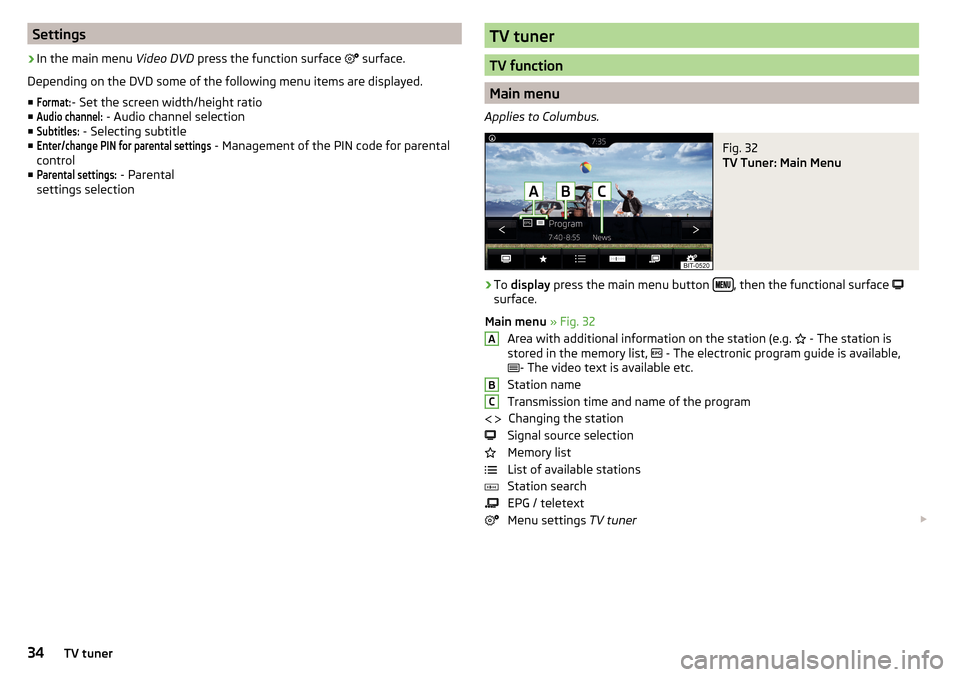
Settings›
In the main menu Video DVD press the function surface
surface.
Depending on the DVD some of the following menu items are displayed.
■
Format:
- Set the screen width/height ratio
■
Audio channel:
- Audio channel selection
■
Subtitles:
- Selecting subtitle
■
Enter/change PIN for parental settings
- Management of the PIN code for parental
control
■
Parental settings:
- Parental
settings selection
TV tuner
TV function
Main menu
Applies to Columbus.
Fig. 32
TV Tuner: Main Menu
›
To display press the main menu button , then the functional surface
surface.
Main menu » Fig. 32
Area with additional information on the station (e.g. - The station is
stored in the memory list, - The electronic program guide is available,
- The video text is available etc.
Station name
Transmission time and name of the program Changing the station
Signal source selection
Memory list
List of available stations
Station search
EPG / teletext
Menu settings TV tuner
ABC
34TV tuner
Page 37 of 100
Note■For safety reasons, the image display is switched off at speeds over 5 km/h.
Only the sound continues. The message: Vehicle is in motion.
appears on the
screen.
The display has been switched off for your safety.■
Tap on the function
Also offers the option to select AV (Audio Video Sig-
nal) as a signal source. However, no input is present in the vehicle for this
source.
List of available stations and preset list
In the list of available stations, stations that have an adequately strong signal
are presented in alphabetical order.
›
to Display the list of available stations From theTV tuner main menu , tap on
the functional surface Tap or the controller
Turn.
›
To
Store a station on a station button in the list of available stations first
tap on the functional surface
Save
and then the corresponding preset button.
Up to 99 stations can be stored in the preset list.
Find available stations and select
The unit has a TV tuner to receive digital TV channels DVB-T and DVB-T2 (only
Codec h. 264).
Setting stations
›
In the main menu TV tuner press the function surface
→
or
surface.
A search commences in the selected direction and stops at the next station
group with sufficient signal strength.
The search is performed again by pressing the function surface or
stopped.
Select a station from the preset list
›
In the main menu TV tuner press the function surface
surface.
›
Select the desired station.
Select the station from the station list
›
In the main menu TV tuner turn the control
turn or the functional surface
surface.
›
Select the desired station.
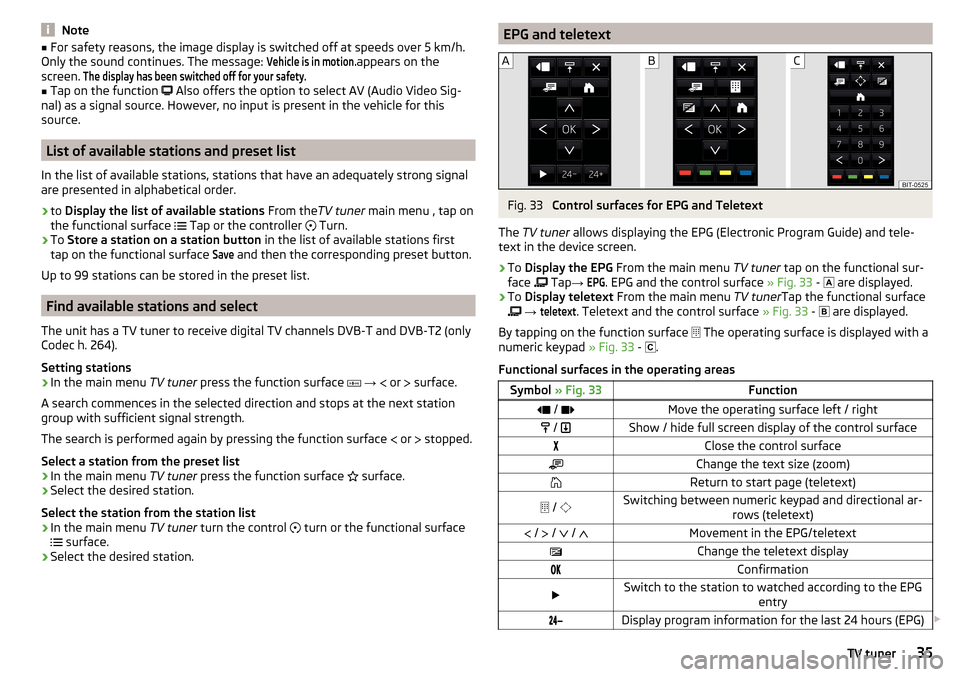
EPG and teletextFig. 33
Control surfaces for EPG and Teletext
The TV tuner allows displaying the EPG (Electronic Program Guide) and tele-
text in the device screen.
›
To Display the EPG From the main menu TV tuner tap on the functional sur-
face Tap
→
EPG
. EPG and the control surface » Fig. 33 -
are displayed.
›
To
Display teletext From the main menu TV tunerTap the functional surface
→
teletext
. Teletext and the control surface » Fig. 33 -
are displayed.
By tapping on the function surface The operating surface is displayed with a
numeric keypad » Fig. 33 -
.
Functional surfaces in the operating areas
Symbol » Fig. 33Function / Move the operating surface left / right / Show / hide full screen display of the control surfaceClose the control surfaceChange the text size (zoom)Return to start page (teletext) / Switching between numeric keypad and directional ar-
rows (teletext) / / / Movement in the EPG/teletextChange the teletext displayConfirmationSwitch to the station to watched according to the EPG
entryDisplay program information for the last 24 hours (EPG) 35TV tuner
Page 38 of 100
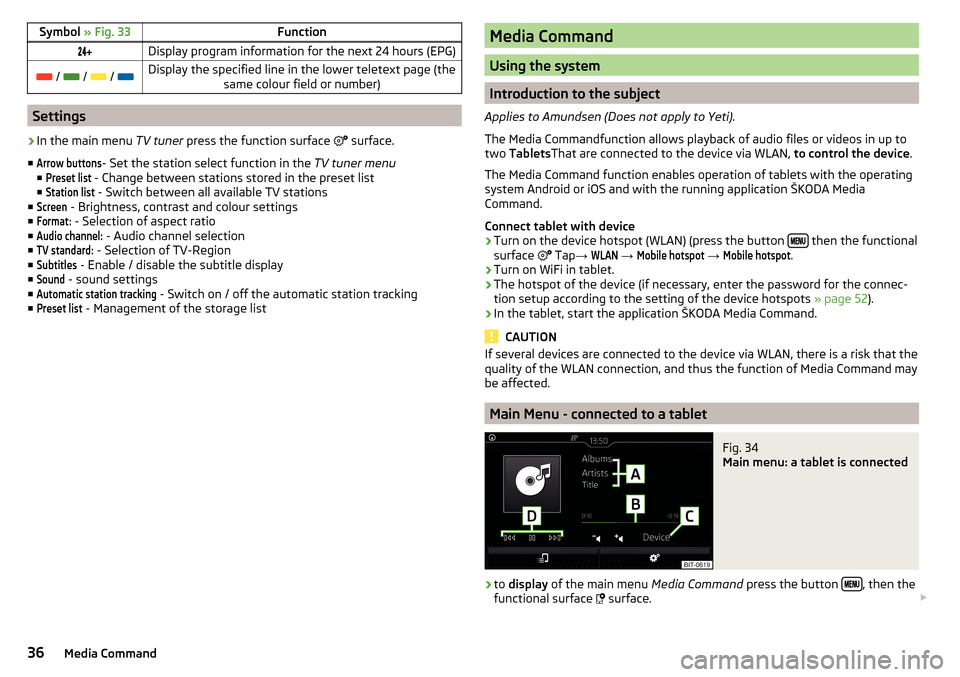
Symbol » Fig. 33FunctionDisplay program information for the next 24 hours (EPG) / / / Display the specified line in the lower teletext page (the
same colour field or number)
Settings
›
In the main menu TV tuner press the function surface
surface.
■
Arrow buttons
- Set the station select function in the TV tuner menu
■
Preset list
- Change between stations stored in the preset list
■
Station list
- Switch between all available TV stations
■
Screen
- Brightness, contrast and colour settings
■
Format:
- Selection of aspect ratio
■
Audio channel:
- Audio channel selection
■
TV standard:
- Selection of TV-Region
■
Subtitles
- Enable / disable the subtitle display
■
Sound
- sound settings
■
Automatic station tracking
- Switch on / off the automatic station tracking
■
Preset list
- Management of the storage list
Media Command
Using the system
Introduction to the subject
Applies to Amundsen (Does not apply to Yeti).
The Media Commandfunction allows playback of audio files or videos in up to
two Tablets That are connected to the device via WLAN, to control the device.
The Media Command function enables operation of tablets with the operating
system Android or iOS and with the running application ŠKODA Media
Command.
Connect tablet with device
›
Turn on the device hotspot (WLAN) (press the button then the functional
surface Tap
→
WLAN
→
Mobile hotspot
→
Mobile hotspot
.
›
Turn on WiFi in tablet.
›
The hotspot of the device (if necessary, enter the password for the connec-
tion setup according to the setting of the device hotspots » page 52).
›
In the tablet, start the application ŠKODA Media Command.
CAUTION
If several devices are connected to the device via WLAN, there is a risk that the
quality of the WLAN connection, and thus the function of Media Command may
be affected.
Main Menu - connected to a tablet
Fig. 34
Main menu: a tablet is connected
›
to display of the main menu Media Command press the button , then the
functional surface
surface.
36Media Command
Page 39 of 100
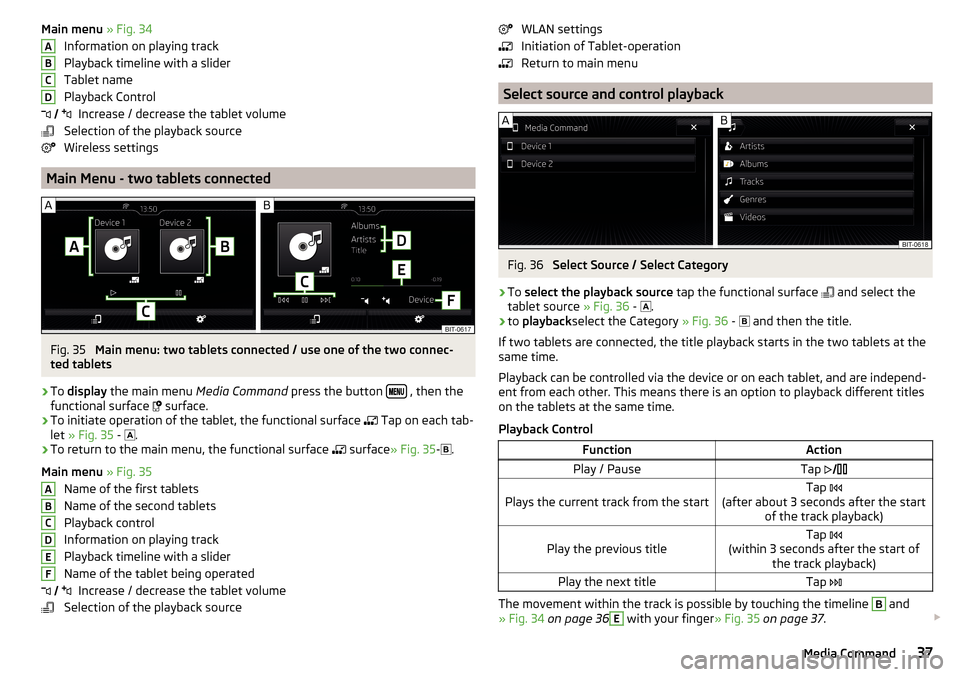
Main menu » Fig. 34
Information on playing track
Playback timeline with a slider
Tablet name
Playback Control Increase / decrease the tablet volume
Selection of the playback source
Wireless settings
Main Menu - two tablets connected
Fig. 35
Main menu: two tablets connected / use one of the two connec-
ted tablets
›
To display the main menu Media Command press the button , then the
functional surface surface.
›
To initiate operation of the tablet, the functional surface
Tap on each tab-
let » Fig. 35 -
.
›
To return to the main menu, the functional surface
surface
» Fig. 35 -
.
Main menu » Fig. 35
Name of the first tablets
Name of the second tablets
Playback control
Information on playing track
Playback timeline with a slider
Name of the tablet being operated Increase / decrease the tablet volume
Selection of the playback source
ABCD ABCDEF WLAN settings
Initiation of Tablet-operation
Return to main menu
Select source and control playback
Fig. 36
Select Source / Select Category
›
To select the playback source tap the functional surface
and select the
tablet source » Fig. 36 -
.
›
to
playback select the Category » Fig. 36 -
and then the title.
If two tablets are connected, the title playback starts in the two tablets at the
same time.
Playback can be controlled via the device or on each tablet, and are independ-
ent from each other. This means there is an option to playback different titles
on the tablets at the same time.
Playback Control
FunctionActionPlay / PauseTap Plays the current track from the startTap
(after about 3 seconds after the start of the track playback)Play the previous titleTap
(within 3 seconds after the start of the track playback)Play the next titleTap
The movement within the track is possible by touching the timeline
B
and
» Fig. 34 on page 36
E
with your finger » Fig. 35 on page 37 .
37Media Command
Page 43 of 100
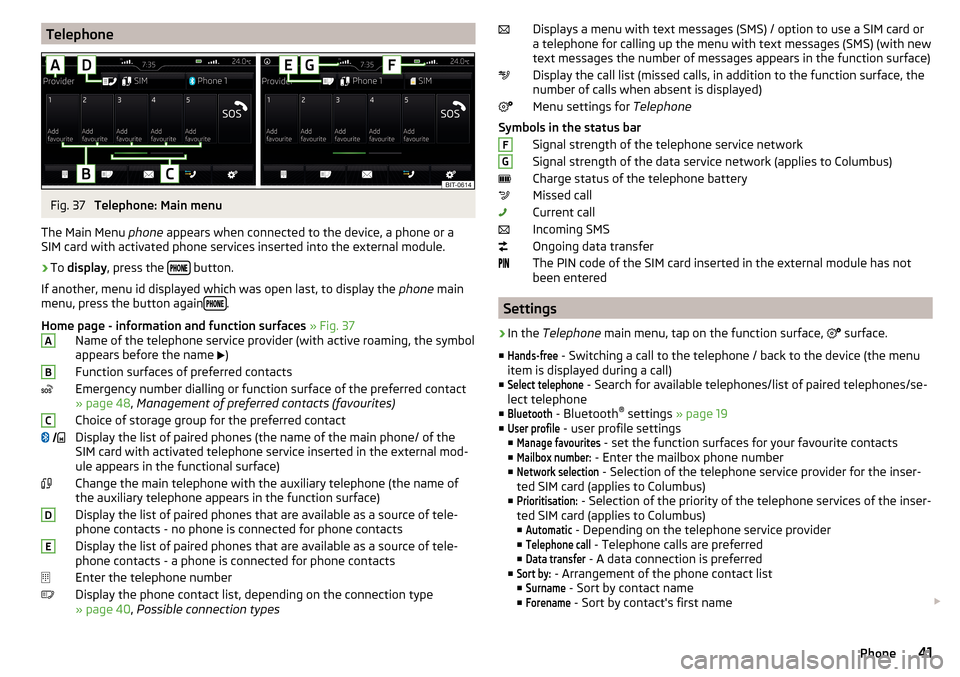
TelephoneFig. 37
Telephone: Main menu
The Main Menu phone appears when connected to the device, a phone or a
SIM card with activated phone services inserted into the external module.
›
To display , press the button.
If another, menu id displayed which was open last, to display the phone main
menu, press the button again
.
Home page - information and function surfaces » Fig. 37
Name of the telephone service provider (with active roaming, the symbol
appears before the name )
Function surfaces of preferred contacts
Emergency number dialling or function surface of the preferred contact
» page 48 , Management of preferred contacts (favourites)
Choice of storage group for the preferred contact
Display the list of paired phones (the name of the main phone/ of the
SIM card with activated telephone service inserted in the external mod-
ule appears in the functional surface)
Change the main telephone with the auxiliary telephone (the name of
the auxiliary telephone appears in the function surface)
Display the list of paired phones that are available as a source of tele-
phone contacts - no phone is connected for phone contacts
Display the list of paired phones that are available as a source of tele- phone contacts - a phone is connected for phone contacts
Enter the telephone number
Display the phone contact list, depending on the connection type
» page 40 , Possible connection types
ABC DEDisplays a menu with text messages (SMS) / option to use a SIM card or
a telephone for calling up the menu with text messages (SMS) (with new
text messages the number of messages appears in the function surface)
Display the call list (missed calls, in addition to the function surface, the
number of calls when absent is displayed)
Menu settings for Telephone
Symbols in the status bar Signal strength of the telephone service network
Signal strength of the data service network (applies to Columbus)
Charge status of the telephone battery
Missed call
Current call
Incoming SMS
Ongoing data transfer
The PIN code of the SIM card inserted in the external module has not
been entered
Settings
›
In the Telephone main menu, tap on the function surface,
surface.
■
Hands-free
- Switching a call to the telephone / back to the device (the menu
item is displayed during a call)
■
Select telephone
- Search for available telephones/list of paired telephones/se-
lect telephone
■
Bluetooth
- Bluetooth ®
settings » page 19
■
User profile
- user profile settings
■
Manage favourites
- set the function surfaces for your favourite contacts
■
Mailbox number:
- Enter the mailbox phone number
■
Network selection
- Selection of the telephone service provider for the inser-
ted SIM card (applies to Columbus)
■
Prioritisation:
- Selection of the priority of the telephone services of the inser-
ted SIM card (applies to Columbus)
■
Automatic
- Depending on the telephone service provider
■
Telephone call
- Telephone calls are preferred
■
Data transfer
- A data connection is preferred
■
Sort by:
- Arrangement of the phone contact list
■
Surname
- Sort by contact name
■
Forename
- Sort by contact's first name
FG41Phone