SKODA RAPID 2016 1.G Manual PDF
Manufacturer: SKODA, Model Year: 2016, Model line: RAPID, Model: SKODA RAPID 2016 1.GPages: 184, PDF Size: 27.06 MB
Page 71 of 184
Closing takes place in reverse order.
Replace bags›
Remove the waste container from the slot.
›
Press the two locking lugs on the frame in the direction of arrow
1
» Fig. 69 .
›
Pull the bag together with the frame down in the direction of arrow
2
.
›
Remove the bag from the frame.
›
Pull the new bag through the frame and pull it over the frame in the direction
of arrow
3
.
›
Place the bag with the frame in the direction of arrow
4
into the container
body, so that the two lugs engage audibly on the frame.
Note
We recommend that you use 20x30 cm bags.
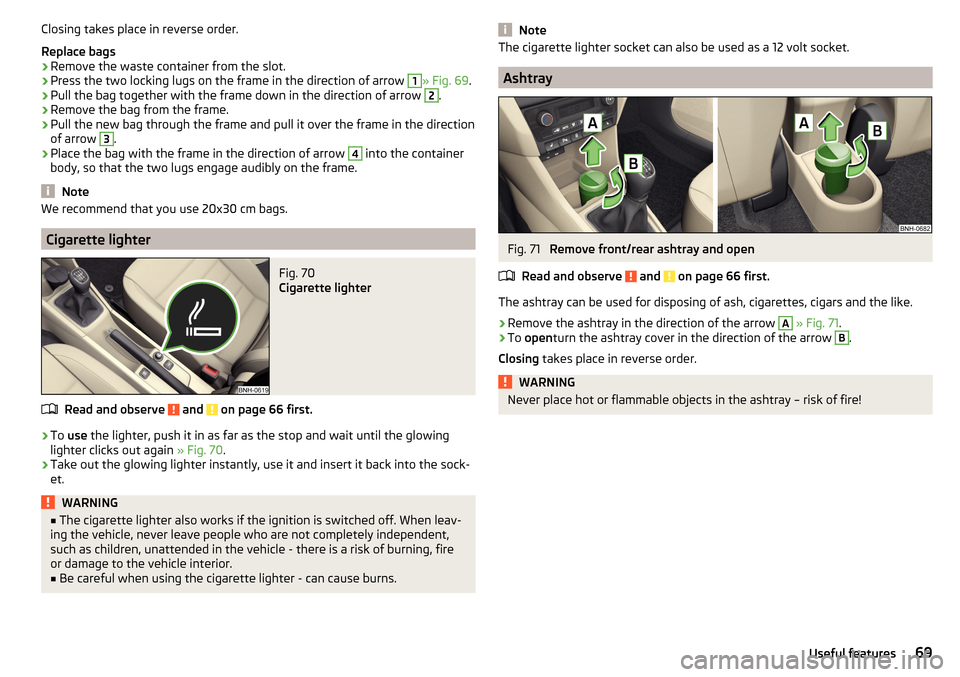
Cigarette lighter
Fig. 70
Cigarette lighter
Read and observe and on page 66 first.
›
To use the lighter, push it in as far as the stop and wait until the glowing
lighter clicks out again » Fig. 70.
›
Take out the glowing lighter instantly, use it and insert it back into the sock-
et.
WARNING■ The cigarette lighter also works if the ignition is switched off. When leav-
ing the vehicle, never leave people who are not completely independent,
such as children, unattended in the vehicle - there is a risk of burning, fire
or damage to the vehicle interior.■
Be careful when using the cigarette lighter - can cause burns.
NoteThe cigarette lighter socket can also be used as a 12 volt socket.
Ashtray
Fig. 71
Remove front/rear ashtray and open
Read and observe
and on page 66 first.
The ashtray can be used for disposing of ash, cigarettes, cigars and the like.
›
Remove the ashtray in the direction of the arrow
A
» Fig. 71 .
›
To open turn the ashtray cover in the direction of the arrow
B
.
Closing takes place in reverse order.
WARNINGNever place hot or flammable objects in the ashtray – risk of fire!69Useful features
Page 72 of 184
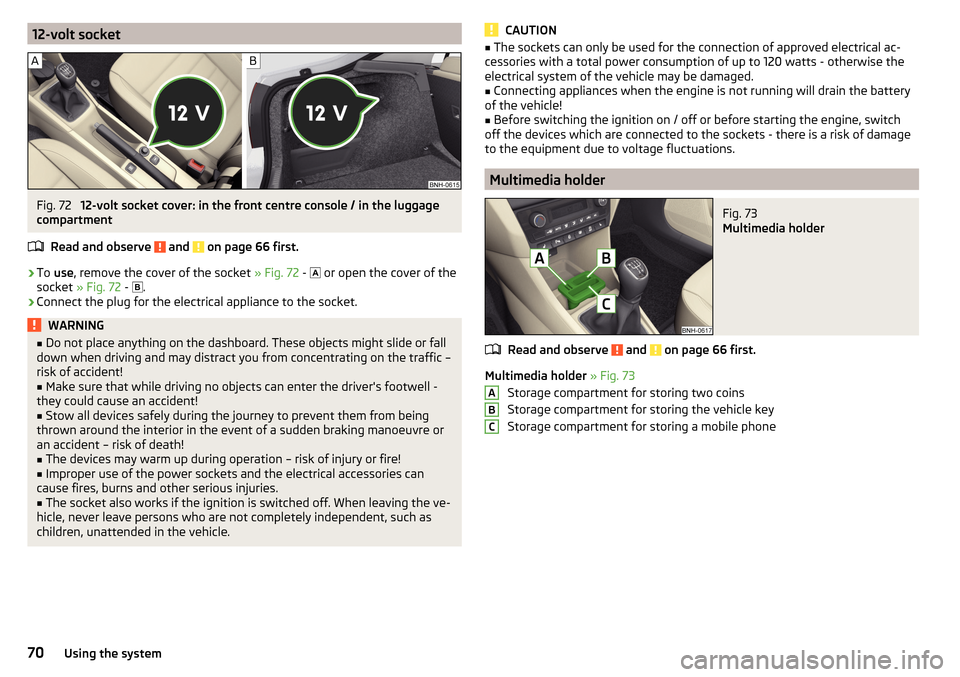
12-volt socketFig. 72
12-volt socket cover: in the front centre console / in the luggage
compartment
Read and observe
and on page 66 first.
›
To use , remove the cover of the socket » Fig. 72 -
or open the cover of the
socket » Fig. 72 -
.
›
Connect the plug for the electrical appliance to the socket.
WARNING■
Do not place anything on the dashboard. These objects might slide or fall
down when driving and may distract you from concentrating on the traffic –
risk of accident!■
Make sure that while driving no objects can enter the driver's footwell -
they could cause an accident!
■
Stow all devices safely during the journey to prevent them from being
thrown around the interior in the event of a sudden braking manoeuvre or
an accident – risk of death!
■
The devices may warm up during operation – risk of injury or fire!
■
Improper use of the power sockets and the electrical accessories can
cause fires, burns and other serious injuries.
■
The socket also works if the ignition is switched off. When leaving the ve-
hicle, never leave persons who are not completely independent, such as
children, unattended in the vehicle.
CAUTION■ The sockets can only be used for the connection of approved electrical ac-
cessories with a total power consumption of up to 120 watts - otherwise the
electrical system of the vehicle may be damaged.■
Connecting appliances when the engine is not running will drain the battery
of the vehicle!
■
Before switching the ignition on / off or before starting the engine, switch
off the devices which are connected to the sockets - there is a risk of damage
to the equipment due to voltage fluctuations.
Multimedia holder
Fig. 73
Multimedia holder
Read and observe and on page 66 first.
Multimedia holder » Fig. 73
Storage compartment for storing two coins
Storage compartment for storing the vehicle key
Storage compartment for storing a mobile phone
ABC70Using the system
Page 73 of 184
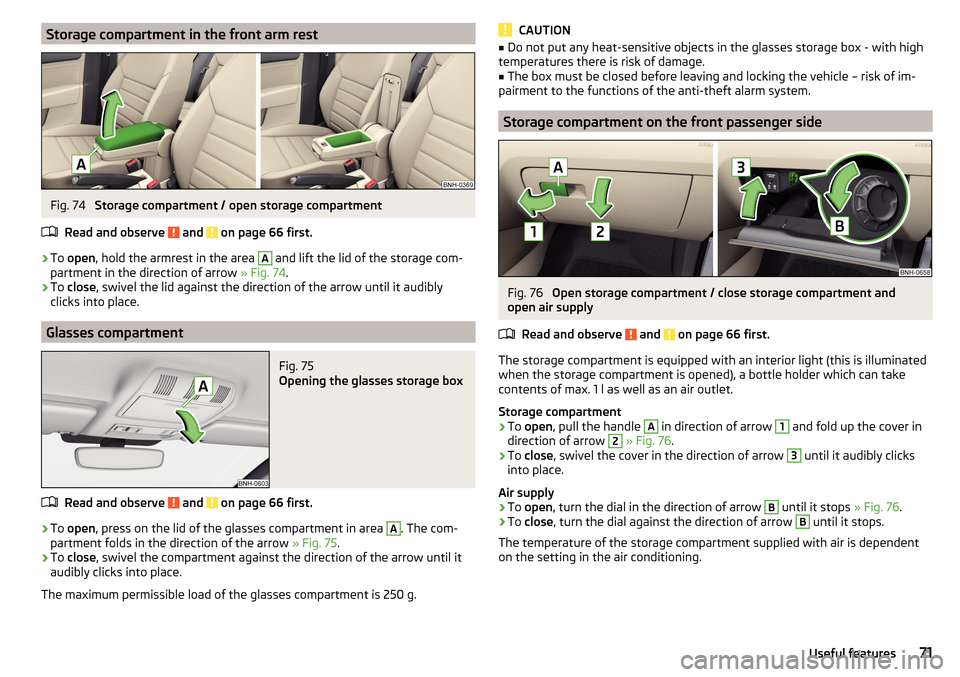
Storage compartment in the front arm restFig. 74
Storage compartment / open storage compartment
Read and observe
and on page 66 first.
›
To open , hold the armrest in the area
A
and lift the lid of the storage com-
partment in the direction of arrow » Fig. 74.
›
To close , swivel the lid against the direction of the arrow until it audibly
clicks into place.
Glasses compartment
Fig. 75
Opening the glasses storage box
Read and observe and on page 66 first.
›
To open , press on the lid of the glasses compartment in area
A
. The com-
partment folds in the direction of the arrow » Fig. 75.
›
To close , swivel the compartment against the direction of the arrow until it
audibly clicks into place.
The maximum permissible load of the glasses compartment is 250 g.
CAUTION■ Do not put any heat-sensitive objects in the glasses storage box - with high
temperatures there is risk of damage.■
The box must be closed before leaving and locking the vehicle – risk of im-
pairment to the functions of the anti-theft alarm system.
Storage compartment on the front passenger side
Fig. 76
Open storage compartment / close storage compartment and
open air supply
Read and observe
and on page 66 first.
The storage compartment is equipped with an interior light (this is illuminated
when the storage compartment is opened), a bottle holder which can take
contents of max. 1 l as well as an air outlet.
Storage compartment
›
To open , pull the handle
A
in direction of arrow
1
and fold up the cover in
direction of arrow
2
» Fig. 76 .
›
To
close , swivel the cover in the direction of arrow
3
until it audibly clicks
into place.
Air supply
›
To open , turn the dial in the direction of arrow
B
until it stops » Fig. 76.
›
To close , turn the dial against the direction of arrow
B
until it stops.
The temperature of the storage compartment supplied with air is dependent
on the setting in the air conditioning.
71Useful features
Page 74 of 184
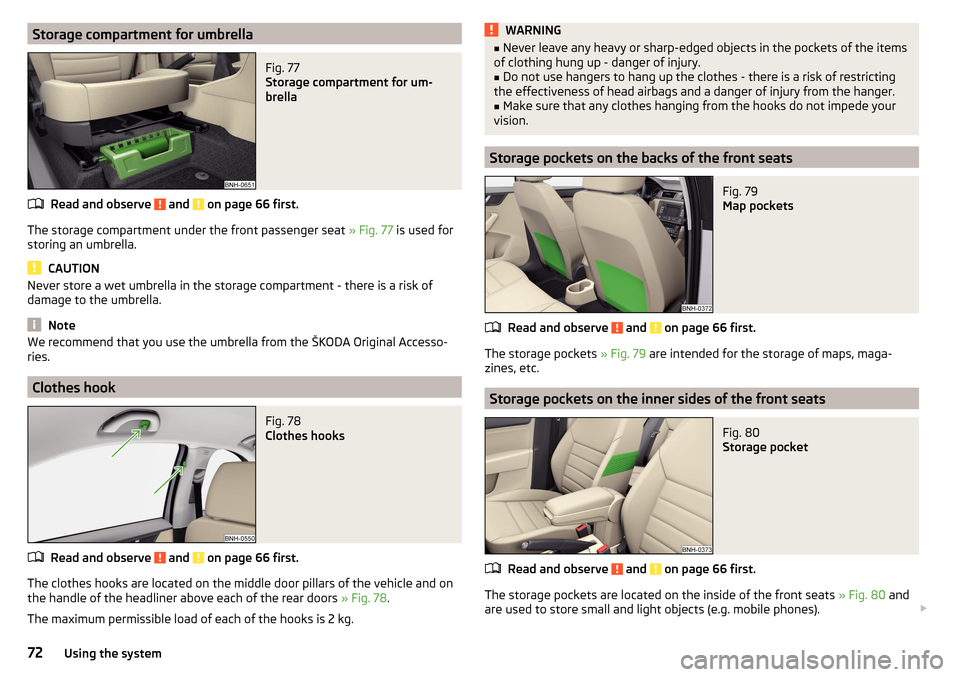
Storage compartment for umbrellaFig. 77
Storage compartment for um-
brella
Read and observe and on page 66 first.
The storage compartment under the front passenger seat » Fig. 77 is used for
storing an umbrella.
CAUTION
Never store a wet umbrella in the storage compartment - there is a risk of
damage to the umbrella.
Note
We recommend that you use the umbrella from the ŠKODA Original Accesso-
ries.
Clothes hook
Fig. 78
Clothes hooks
Read and observe and on page 66 first.
The clothes hooks are located on the middle door pillars of the vehicle and on the handle of the headliner above each of the rear doors » Fig. 78.
The maximum permissible load of each of the hooks is 2 kg.
WARNING■ Never leave any heavy or sharp-edged objects in the pockets of the items
of clothing hung up - danger of injury.■
Do not use hangers to hang up the clothes - there is a risk of restricting
the effectiveness of head airbags and a danger of injury from the hanger.
■
Make sure that any clothes hanging from the hooks do not impede your
vision.
Storage pockets on the backs of the front seats
Fig. 79
Map pockets
Read and observe and on page 66 first.
The storage pockets » Fig. 79 are intended for the storage of maps, maga-
zines, etc.
Storage pockets on the inner sides of the front seats
Fig. 80
Storage pocket
Read and observe and on page 66 first.
The storage pockets are located on the inside of the front seats » Fig. 80 and
are used to store small and light objects (e.g. mobile phones).
72Using the system
Page 75 of 184
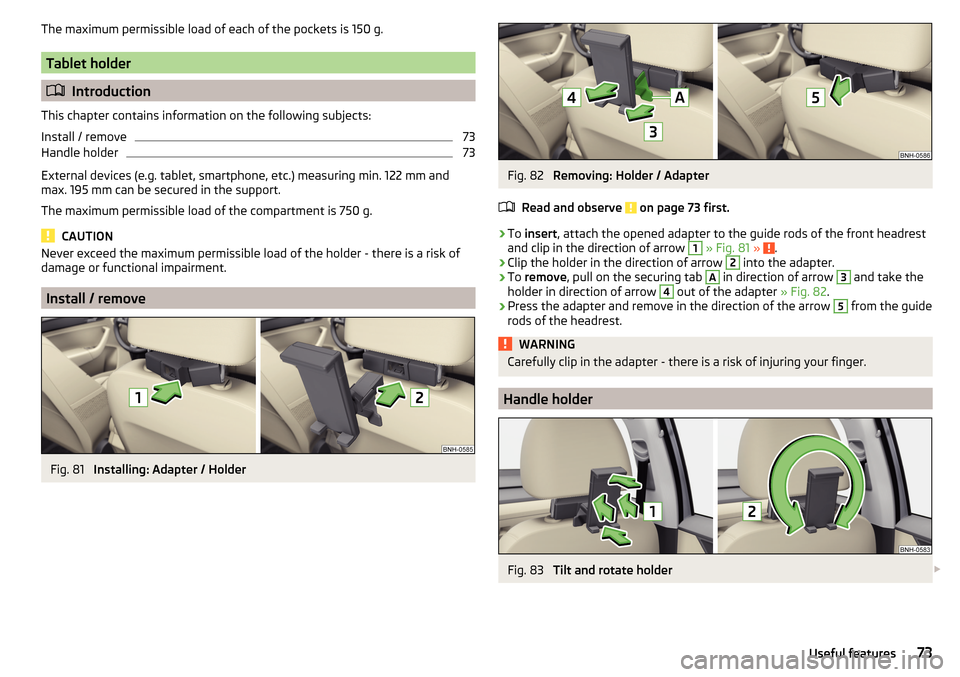
The maximum permissible load of each of the pockets is 150 g.
Tablet holder
Introduction
This chapter contains information on the following subjects:
Install / remove
73
Handle holder
73
External devices (e.g. tablet, smartphone, etc.) measuring min. 122 mm and
max. 195 mm can be secured in the support.
The maximum permissible load of the compartment is 750 g.
CAUTION
Never exceed the maximum permissible load of the holder - there is a risk of
damage or functional impairment.
Install / remove
Fig. 81
Installing: Adapter / Holder
Fig. 82
Removing: Holder / Adapter
Read and observe
on page 73 first.
›
To insert , attach the opened adapter to the guide rods of the front headrest
and clip in the direction of arrow
1
» Fig. 81 » .
›
Clip the holder in the direction of arrow
2
into the adapter.
›
To remove , pull on the securing tab
A
in direction of arrow
3
and take the
holder in direction of arrow
4
out of the adapter » Fig. 82.
›
Press the adapter and remove in the direction of the arrow
5
from the guide
rods of the headrest.
WARNINGCarefully clip in the adapter - there is a risk of injuring your finger.
Handle holder
Fig. 83
Tilt and rotate holder
73Useful features
Page 76 of 184
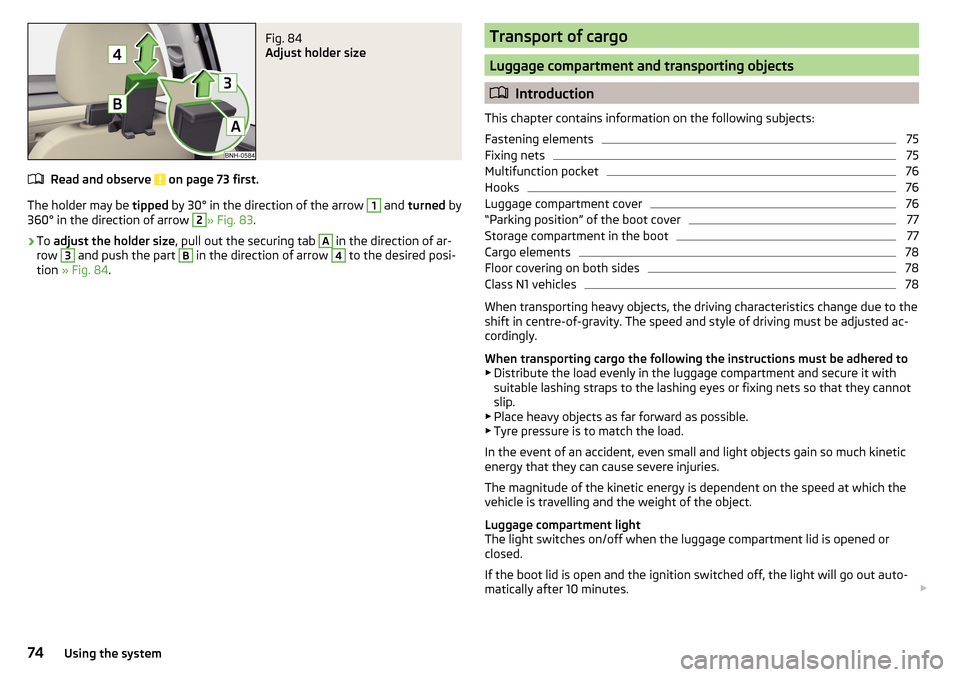
Fig. 84
Adjust holder size
Read and observe on page 73 first.
The holder may be tipped by 30° in the direction of the arrow
1
and turned by
360° in the direction of arrow
2
» Fig. 83 .
›
To adjust the holder size , pull out the securing tab
A
in the direction of ar-
row
3
and push the part
B
in the direction of arrow
4
to the desired posi-
tion » Fig. 84 .
Transport of cargo
Luggage compartment and transporting objects
Introduction
This chapter contains information on the following subjects:
Fastening elements
75
Fixing nets
75
Multifunction pocket
76
Hooks
76
Luggage compartment cover
76
“Parking position” of the boot cover
77
Storage compartment in the boot
77
Cargo elements
78
Floor covering on both sides
78
Class N1 vehicles
78
When transporting heavy objects, the driving characteristics change due to the
shift in centre-of-gravity. The speed and style of driving must be adjusted ac-
cordingly.
When transporting cargo the following the instructions must be adhered to
▶ Distribute the load evenly in the luggage compartment and secure it with
suitable lashing straps to the lashing eyes or fixing nets so that they cannot
slip.
▶ Place heavy objects as far forward as possible.
▶ Tyre pressure is to match the load.
In the event of an accident, even small and light objects gain so much kinetic
energy that they can cause severe injuries.
The magnitude of the kinetic energy is dependent on the speed at which the
vehicle is travelling and the weight of the object.
Luggage compartment light
The light switches on/off when the luggage compartment lid is opened or
closed.
If the boot lid is open and the ignition switched off, the light will go out auto-
matically after 10 minutes.
74Using the system
Page 77 of 184
WARNING■Never exceed the maximum permissible load of the respective fasteners,
nets, hooks etc. Heavy objects were not secured sufficiently – risk of injury!■
Do not exceed the permissible axle loads and permissible gross weight of
the vehicle – risk of accident!
■
An unsecured dirt or improperly attached load could slip during a sudden
manoeuvre or in an accident - danger of injury!
■
Loose cargo could hit a deployed airbag and injure occupants – danger of
death!
■
When transporting loads in the luggage compartment that has been en-
larged by folding the rear seats forward, ensure the safety of the passen-
gers transported on the other rear seats .
CAUTION
■ Never exceed the maximum permissible load of the respective fasteners,
nets, hooks etc. - these could be damaged.■
Please ensure that the heating elements for the rear window heater are not
damaged as a result of abrasive objects.
■
Do not place sharp objects in the nets and storage compartments in the lug-
gage compartment - there is a risk of damage to the net as well as the com-
partments.
■
Put the items in the storage compartments carefully and not load these
punctiform - there is a risk of damage to the compartments.
Fastening elements
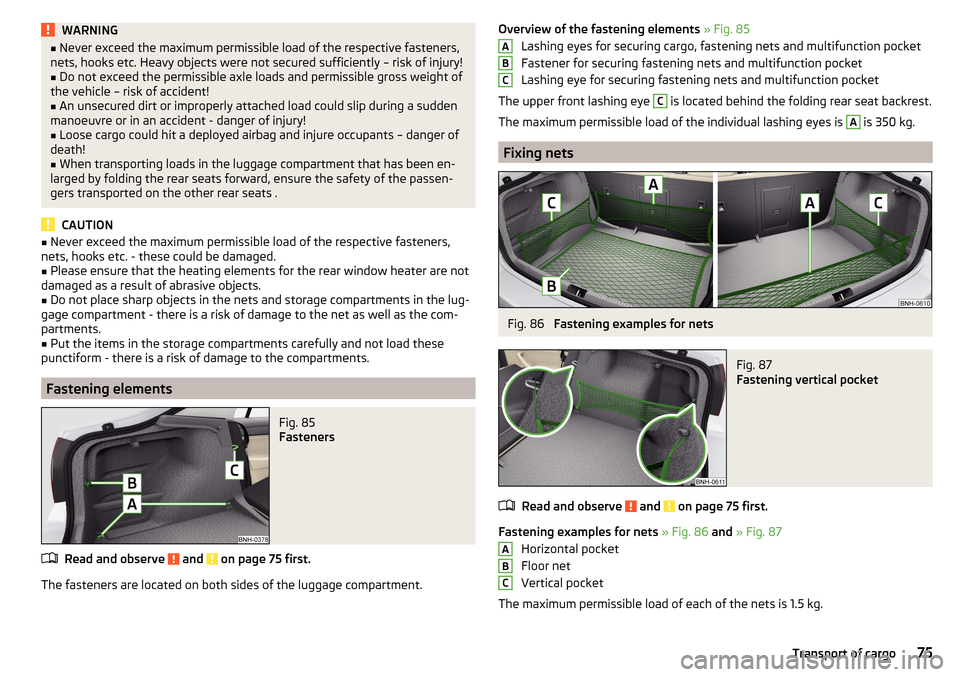
Fig. 85
Fasteners
Read and observe and on page 75 first.
The fasteners are located on both sides of the luggage compartment.
Overview of the fastening elements » Fig. 85
Lashing eyes for securing cargo, fastening nets and multifunction pocket
Fastener for securing fastening nets and multifunction pocket
Lashing eye for securing fastening nets and multifunction pocket
The upper front lashing eye C
is located behind the folding rear seat backrest.
The maximum permissible load of the individual lashing eyes is
A
is 350 kg.
Fixing nets
Fig. 86
Fastening examples for nets
Fig. 87
Fastening vertical pocket
Read and observe and on page 75 first.
Fastening examples for nets » Fig. 86 and » Fig. 87
Horizontal pocket
Floor net
Vertical pocket
The maximum permissible load of each of the nets is 1.5 kg.
ABCABC75Transport of cargo
Page 78 of 184
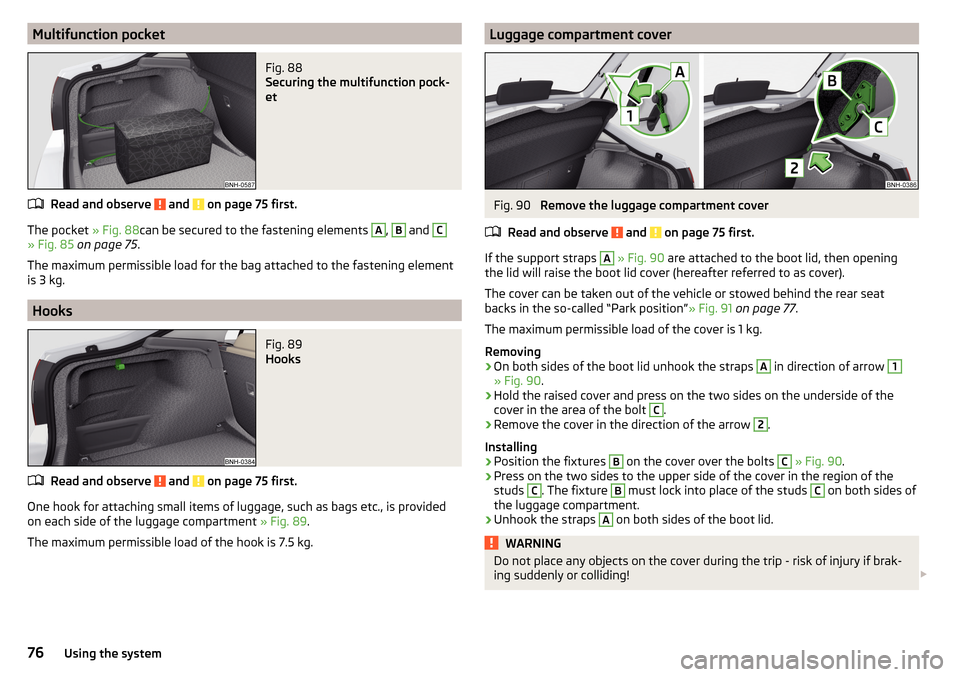
Multifunction pocketFig. 88
Securing the multifunction pock-
et
Read and observe and on page 75 first.
The pocket » Fig. 88can be secured to the fastening elements
A
,
B
and
C
» Fig. 85 on page 75 .
The maximum permissible load for the bag attached to the fastening element
is 3 kg.
Hooks
Fig. 89
Hooks
Read and observe and on page 75 first.
One hook for attaching small items of luggage, such as bags etc., is provided
on each side of the luggage compartment » Fig. 89.
The maximum permissible load of the hook is 7.5 kg.
Luggage compartment coverFig. 90
Remove the luggage compartment cover
Read and observe
and on page 75 first.
If the support straps
A
» Fig. 90 are attached to the boot lid, then opening
the lid will raise the boot lid cover (hereafter referred to as cover).
The cover can be taken out of the vehicle or stowed behind the rear seat
backs in the so-called “Park position” » Fig. 91 on page 77 .
The maximum permissible load of the cover is 1 kg.
Removing
›
On both sides of the boot lid unhook the straps
A
in direction of arrow
1
» Fig. 90 .
›
Hold the raised cover and press on the two sides on the underside of the
cover in the area of the bolt
C
.
›
Remove the cover in the direction of the arrow
2
.
Installing
›
Position the fixtures
B
on the cover over the bolts
C
» Fig. 90 .
›
Press on the two sides to the upper side of the cover in the region of the
studs
C
. The fixture
B
must lock into place of the studs
C
on both sides of
the luggage compartment.
›
Unhook the straps
A
on both sides of the boot lid.
WARNINGDo not place any objects on the cover during the trip - risk of injury if brak-
ing suddenly or colliding! 76Using the system
Page 79 of 184
CAUTION■Observe the following instructions to avoid canting and the subsequent
damage to the cover or the side trim. ■ The cover must be inserted properly and the load must not exceed the
height of the cover.
■ The cover must not be jammed in the surrounding seal of the luggage com-
partment lid when it is in the raised position. ■ There must be no object in the gap between the cover in the raise position
and the rear backrest.
“Parking position” of the boot cover
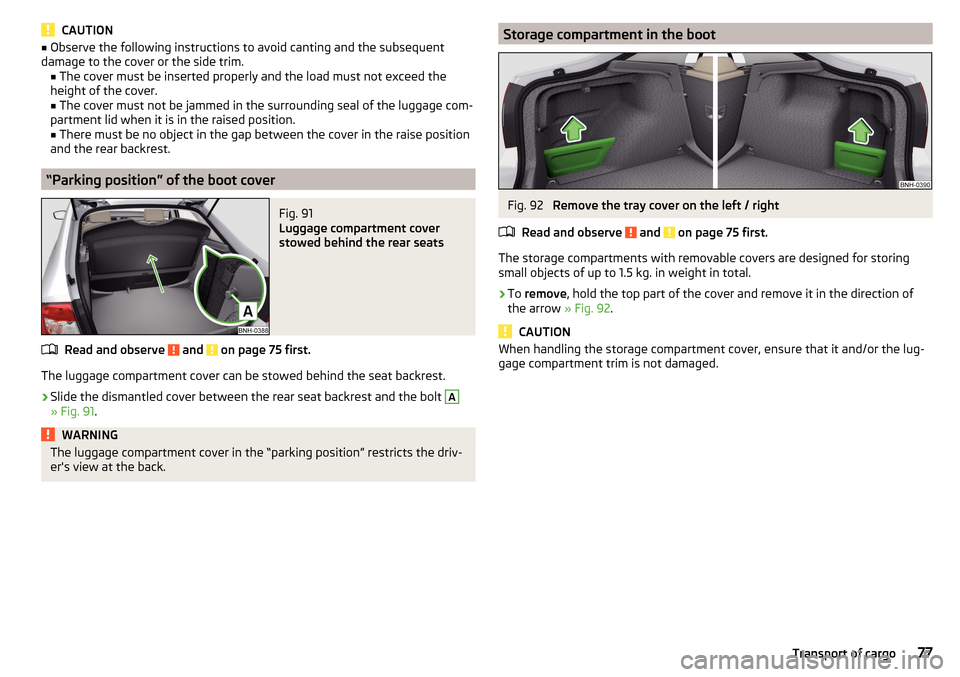
Fig. 91
Luggage compartment cover
stowed behind the rear seats
Read and observe and on page 75 first.
The luggage compartment cover can be stowed behind the seat backrest.
›
Slide the dismantled cover between the rear seat backrest and the bolt
A
» Fig. 91 .
WARNINGThe luggage compartment cover in the “parking position” restricts the driv-
er's view at the back.Storage compartment in the bootFig. 92
Remove the tray cover on the left / right
Read and observe
and on page 75 first.
The storage compartments with removable covers are designed for storing
small objects of up to 1.5 kg. in weight in total.
›
To remove , hold the top part of the cover and remove it in the direction of
the arrow » Fig. 92.
CAUTION
When handling the storage compartment cover, ensure that it and/or the lug-
gage compartment trim is not damaged.77Transport of cargo
Page 80 of 184
Cargo elementsFig. 93
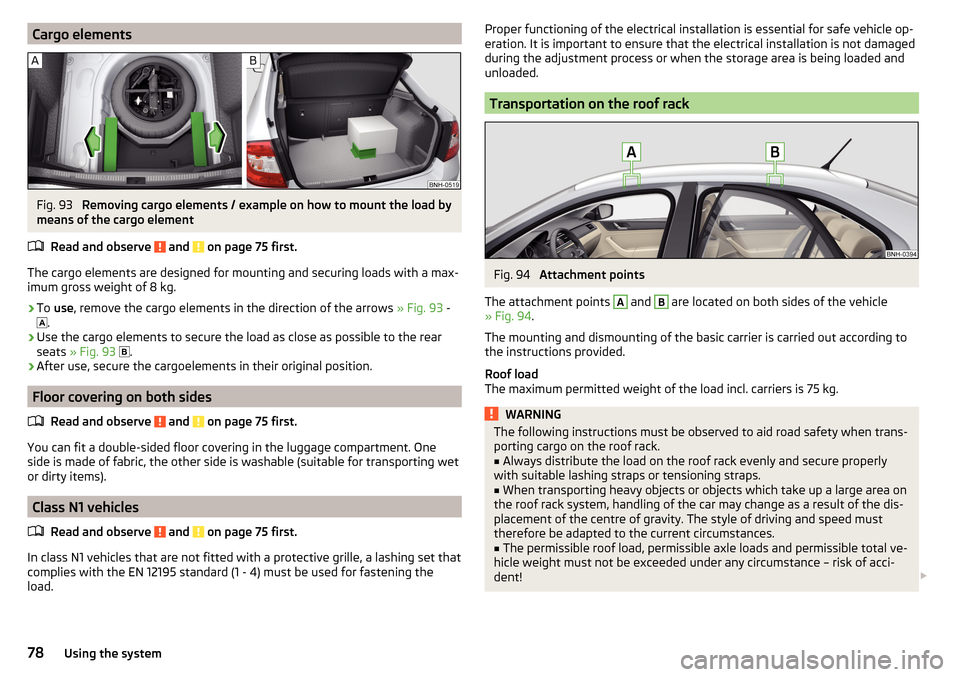
Removing cargo elements / example on how to mount the load by
means of the cargo element
Read and observe
and on page 75 first.
The cargo elements are designed for mounting and securing loads with a max-imum gross weight of 8 kg.
›
To use , remove the cargo elements in the direction of the arrows » Fig. 93 -
.
›
Use the cargo elements to secure the load as close as possible to the rear
seats » Fig. 93
.
›
After use, secure the cargoelements in their original position.
Floor covering on both sides
Read and observe
and on page 75 first.
You can fit a double-sided floor covering in the luggage compartment. One
side is made of fabric, the other side is washable (suitable for transporting wet
or dirty items).
Class N1 vehicles
Read and observe
and on page 75 first.
In class N1 vehicles that are not fitted with a protective grille, a lashing set that
complies with the EN 12195 standard (1 - 4) must be used for fastening the
load.
Proper functioning of the electrical installation is essential for safe vehicle op-
eration. It is important to ensure that the electrical installation is not damaged
during the adjustment process or when the storage area is being loaded and
unloaded.
Transportation on the roof rack
Fig. 94
Attachment points
The attachment points
A
and
B
are located on both sides of the vehicle
» Fig. 94 .
The mounting and dismounting of the basic carrier is carried out according to
the instructions provided.
Roof load
The maximum permitted weight of the load incl. carriers is 75 kg.
WARNINGThe following instructions must be observed to aid road safety when trans- porting cargo on the roof rack.■
Always distribute the load on the roof rack evenly and secure properly
with suitable lashing straps or tensioning straps.
■
When transporting heavy objects or objects which take up a large area on
the roof rack system, handling of the car may change as a result of the dis-
placement of the centre of gravity. The style of driving and speed must
therefore be adapted to the current circumstances.
■
The permissible roof load, permissible axle loads and permissible total ve-
hicle weight must not be exceeded under any circumstance – risk of acci-
dent!
78Using the system