jacking points SKODA RAPID SPACEBACK 2014 1.G Owner's Manual
[x] Cancel search | Manufacturer: SKODA, Model Year: 2014, Model line: RAPID SPACEBACK, Model: SKODA RAPID SPACEBACK 2014 1.GPages: 204, PDF Size: 27.11 MB
Page 166 of 204

›Grasp the end of the wrench and turn the bolt about
one turn in the direction
of the arrow » Fig. 141.
Tightening›
Push the wheel wrench onto the wheel bolt to the stop 1)
.
›
Grasp the end of the wrench and turn the bolt against the direction of the
arrow » Fig. 141 until it is tight.
After tightening the wheel bolts, the covering caps must be replaced.
WARNINGIf it proves difficult to undo the bolts, carefully apply pressure to the end of
the wrench with your foot. Keep hold of the vehicle when doing so, and
make sure you keep your footing.
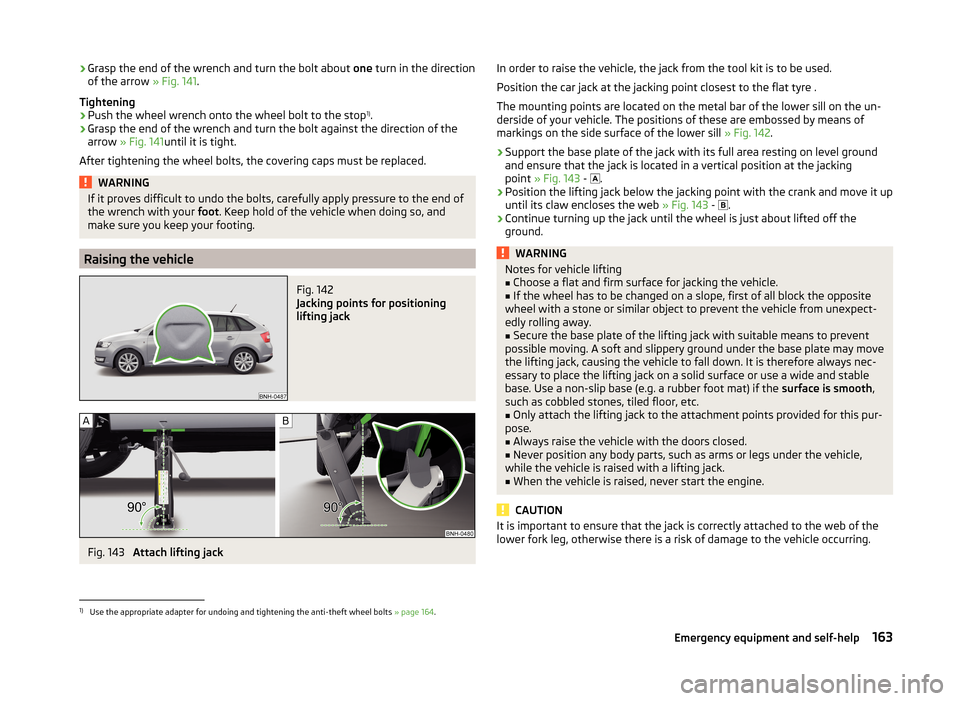
Raising the vehicle
Fig. 142
Jacking points for positioning
lifting jack
Fig. 143
Attach lifting jack
In order to raise the vehicle, the jack from the tool kit is to be used.
Position the car jack at the jacking point closest to the flat tyre .
The mounting points are located on the metal bar of the lower sill on the un-
derside of your vehicle. The positions of these are embossed by means of
markings on the side surface of the lower sill » Fig. 142.›
Support the base plate of the jack with its full area resting on level ground
and ensure that the jack is located in a vertical position at the jacking
point » Fig. 143 -
.
›
Position the lifting jack below the jacking point with the crank and move it up
until its claw encloses the web » Fig. 143 -
.
›
Continue turning up the jack until the wheel is just about lifted off the
ground.
WARNINGNotes for vehicle lifting■Choose a flat and firm surface for jacking the vehicle.■
If the wheel has to be changed on a slope, first of all block the opposite
wheel with a stone or similar object to prevent the vehicle from unexpect-
edly rolling away.
■
Secure the base plate of the lifting jack with suitable means to prevent
possible moving. A soft and slippery ground under the base plate may move
the lifting jack, causing the vehicle to fall down. It is therefore always nec-
essary to place the lifting jack on a solid surface or use a wide and stable
base. Use a non-slip base (e.g. a rubber foot mat) if the surface is smooth,
such as cobbled stones, tiled floor, etc.
■
Only attach the lifting jack to the attachment points provided for this pur-
pose.
■
Always raise the vehicle with the doors closed.
■
Never position any body parts, such as arms or legs under the vehicle,
while the vehicle is raised with a lifting jack.
■
When the vehicle is raised, never start the engine.
CAUTION
It is important to ensure that the jack is correctly attached to the web of the
lower fork leg, otherwise there is a risk of damage to the vehicle occurring.1)
Use the appropriate adapter for undoing and tightening the anti-theft wheel bolts » page 164.
163Emergency equipment and self-help
Page 196 of 204

Hitch120
Accessories124
Drawback load120
Hooks82
Horn29
Hydraulic Brake Assist (HBA)114
I
Ice scrapers
134
Ignition105
Ignition lock105
Immobilizer104
Indicator lights34
Individual settings Locking
52
Unlocking52
Inertia reels15
Information system41
Compass point display47
Display a low temperature42
Door warning43
Gear recommendation43
MAXI DOT display46
Multifunction display43
Operation42
Service interval display47
instrument cluster Auto Check Control
33
Instrument cluster30
Counter for distance driven33
Display31
Display of the second speed33
Fuel gauge32
Indicator lights34
Overview30
Revolution counter31
see instrument cluster30
Speedometer31
Temperature gauge32
Interior care136
Natural leather136
interior light Front
63
Interior monitor54
ISOFIX25
J
Jack
159
Maintenance135
Jacking points Raise vehicle
163
Jump-starting166, 167
K
Key Lock
50
Start engine105
Unlock50
L
Leather Natural leather care
136
LEAVING HOME62
Lever Main beam
60
Turn signal60
Windscreen wipers66
lever lock selection (automatic gearbox) indicator light
41
Light COMING HOME / LEAVING HOME
62
Daytime running lights59
Fog lights with CORNER function61
Parking light63
Lighting Luggage compartment
80
Lights58
Automatic driving lamp control60
Beam range adjustment58
Cockpit63
Fog lights61
Hazard warning light system62
Headlight flasher60
Indicator lights34
Low beam58
Main beam60
Parking light58
Rear fog light61
Replacing bulbs176
switching on/off58
Turn signal60
Lock Key
50
Lock/unlock steering lock104
Locking Individual settings
52
Remote control50
Locking and unlocking the vehicle from the in- side
52
Locking the door without a locking cylinder Emergency
171
Low beam58
Low tyre pressure warning refer to the tyre pressure monitoring
119
Luggage compartment80
Cover82
Emergency unlocking171
Fastening elements81
Fixing nets81
Flexible storage compartment84
Lighting80
Unlocking the tailgate171
Variable loading floor85
Luggage compartment cover82
Luggage compartment lid54
193Index