steering SKODA RAPID SPACEBACK 2015 1.G User Guide
[x] Cancel search | Manufacturer: SKODA, Model Year: 2015, Model line: RAPID SPACEBACK, Model: SKODA RAPID SPACEBACK 2015 1.GPages: 208, PDF Size: 29.2 MB
Page 34 of 208
Warning lights in the display
Depending on the importance the warning light (danger) or (warning) illu-
minate along with some of the warning lights in the list with the warning
lights 4
» Fig. 20 on page 28 and » Fig. 21 on page 28 .
WARNING■
Ignoring illuminated indicator lights and related messages or instructions
in the instrument cluster display may lead to serious personal injury or
damage to the vehicle.■
If you have to stop for technical reasons, then park the vehicle at a safe
distance from the traffic, switch off the engine and switch on the hazard
warning lights » page 62. Place the warning triangle at the prescribed dis-
tance.
■
The engine compartment of your car is a hazardous area. The following
warning instructions must be followed at all times when working in the en-
gine compartment » page 143, Engine compartment .
Handbrake
Read and observe
on page 32 first.
illuminates – the hand brake is applied.
An acoustic signal will sound if you drive the vehicle above 5 km/h while the
handbrake is still on.
Release the handbrake!RELEASE HANDBRAKE
Brake system
Read and observe
on page 32 first.
illuminates – the brake fluid level in the braking system is too low.
Brake fluid: owner's manual!BRAKE FLUID PLEASE CHECK›
Stop the vehicle, switch off the engine, and check the level of the brake fluid
» page 150 .
WARNING■
If the warning light illuminates simultaneously with warning light
» page 33 , Anti-lock braking system (ABS) , do not continue your
journey! Seek help from a specialist garage.■
A fault to the ABS system or the braking system can increase the vehi-
cle's braking distance – risk of accident!
Seat belt warning light
Read and observe
on page 32 first.
illuminates - the driver or front passenger has not fastened their seat belt.
At a speed of more than approximately 25 km/h the warning light flashes
and an audible warning sounds at a time.
If the seat belt is not fastened by the driver or front passenger during the next
approx. 2 seconds, the warning signal is deactivated and the warning light
lights up permanently.
Power steering/steering lock (KESSY system)
Read and observe
on page 32 first.
Fault in the power steering
illuminates – this indicates a complete failure of the power steering and the
steering assist has failed (significantly higher steering forces).
illuminates – this indicates a partial failure of the power steering and the
steering forces can be greater.
Seek help from a specialist garage.
Steering lock defect (KESSY system)
An audible signal sounds as a warning.
flashes
Steering lock faulty. Stop!STOP VEHICLE STEERING FAULTY
Park the vehicle, and
stop driving . After switching off the ignition, it is no
longer possible to lock the steering, to activate the electrical components (e.g.
Infotainment etc.), to switch on the ignition again and to start the engine. Seek
help from a specialist garage.
32Using the system
Page 35 of 208
flashes
Steering lock: Workshop!STEERING WORKSHOP
Seek help from a specialist garage.
Steering column lock not unlocked (System KESSY)
flashes
Move the steering wheel!MOVE STEERING WHEEL
▶ Move the steering wheel slightly back and forth, thereby facilitating unlock-
ing the steering lock.
If the steering does also not unlock then, the help of a specialist garage is re-
quired.
Disconnecting the vehicle battery
If the vehicle's battery has been disconnected and reconnected, the indicator
light can come on after switching on the ignition.
The warning light should go out after driving a short distance.
If, after the motor is restarted and a short drive, the indicator light does not go
out, there is a system error.
Seek help from a specialist garage.
Stability control (ESC) / Traction control (TCS)
Read and observe
on page 32 first.
flashes – the ESC or TCS is currently being activated.
illuminates – there is an ESC or TCS fault.
ESC or TCS fault
illumi-
nates
Error: stabilisation control (ESC)ESC ERROR
or
illumi-
nates
Error: traction controlASR ERROR
Seek help from a specialist garage.
If the warning light comes on after starting the engine, the TCS may be
switched off for technical reasons. ▶ Switch the ignition off and on again.
If the warning light does not illuminate after you switch the engine back on,
the ASR is fully functional again.
Disconnecting the vehicle battery
If the vehicle's battery has been disconnected and reconnected, the indicator
light
comes on after switching on the ignition.
The warning light should go out after driving a short distance.
If, after a short drive, the indicator light does not go out, there is a system er-
ror.
Seek help from a specialist garage.
For more information on the ESC system » page 110, Stability Control (ESC) or
TCS system » page 110, Traction control (TCS) .
Traction control system (TCS) off
Read and observe
on page 32 first.
illuminates – the TCS system is disabled.
Anti-lock braking system (ABS)
Read and observe
on page 32 first.
illuminates – there is an ABS fault.
Error: ABSABS ERROR
The vehicle will only be braked by the normal brake system without the ABS.
Seek help from a specialist garage.
WARNING■ If the warning light illuminates simultaneously with warning light
» page 32 , Brake system , do not continue your journey! Seek help
from a specialist garage.■
A fault to the ABS system or the braking system can increase the vehi-
cle's braking distance – risk of accident!
33Instruments and Indicator Lights
Page 36 of 208
Rear fog lightRead and observe
on page 32 first.
illuminates – the rear fog light is switched on.
Emission control system
Read and observe
on page 32 first.
illuminates – there is a fault in the emission control system. The system
makes possible operation emergency mode - there may be a noticeable reduc-
tion in engine performance.
Seek help from a specialist garage.
Glow plug system (diesel engine)
Read and observe
on page 32 first.
flashes – there is a fault in the engine management system. The system
makes possible operation emergency mode - there may be a noticeable reduc-
tion in engine performance.
There is a fault in the glow plug system if the warning light does not come
on or illuminates continuously.
Seek help from a specialist garage.
Engine performance check (petrol engine)
Read and observe
on page 32 first.
illuminates – there is a fault in the engine management system. The system
makes possible operation emergency mode - there may be a noticeable reduc-
tion in engine performance.
Seek help from a specialist garage.
Airbag system
Read and observe
on page 32 first.
System fault
illuminates – there is a fault in the airbag system.
Error: airbagAIRBAG ERROR
Seek help from a specialist garage.
The front passenger airbag has been disabled with the key switch
Illuminates for around 4 seconds after the ignition has been switched on.
under the letters
in the middle of the dash panel illumi-
nates after switching on the ignition » page 18.
One of the airbags or a belt tensioner has been disabled by the diagnostic
tool
illuminates for approximately 4 seconds after the ignition is switched on
and then flashes for approximately 12 seconds.
Airbag/ belt tensioner deactivated.AIRBAG/ BELT TENSIONER OFFWARNINGWhen a fault in the airbag system occurs, there is a risk of the system not
being triggered in the event of an accident. Therefore, this must be
checked immediately by a specialized garage.
Tyre pressure
Read and observe
on page 32 first.
Change of tyre pressure values
illuminates – there was a pressure change in one of the tyres.
An audible signal sounds as a warning.
›
Immediately reduce speed and avoid sudden steering and braking manoeu-
vres.
›
Stop the vehicle, turn the ignition off and check the tyres and their inflation
pressure » page 155 .
›
Correct the tyre pressure, if necessary or replace the affected wheel
» page 161 or use the repair kit » page 165.
›
Store the tyre pressure values in the system » page 120.
System fault
flashes for approximately 1 minute and remains lit – there may be a fault in
the tyre pressure monitoring system.
›
Stop the vehicle, turn the ignition off and start the engine again.
34Using the system
Page 42 of 208
For vehicles with automatic transmission the recommended gear will be
shown provided the mode for manual switching (Tiptronic) is selected.WARNINGThe driver is always responsible for selecting the correct gear in different
driving situations, such as overtaking.
Driving data (Multifunction display)
Introduction
This chapter contains information on the following subjects:
Operation
40
Information overview
40
Warning when exceeding the set speed
41
Memory
42
The driving data display is only possible with the ignition switched on.
After the ignition is switched on, the function that was last selected before
switching off the ignition is displayed.
For vehicles with a MAXI DOT display, the menu item
Driving data
must be selec-
ted and confirmed in the main menu » page 42, MAXI DOT display .
The setting of the units and the switching on / off the display of some infor-
mation is available possible in the Infotainment » Owner´s Manual Infotain-
ment , chapter CAR - Vehicle Settings .
WARNINGConcentrate fully at all times on your driving! As the driver you are fully re-
sponsible for the operation of your vehicle.OperationFig. 28
Buttons/dial: on the control lever/multifunction steering wheel
Read and observe
on page 40 first.
The selection as well as the settings of the data values can be operated with the buttons on the operating lever as well as on the multi-function steering
wheel » Fig. 28 .
Description of the operation
Button / dialActionOperationABriefly press at the top or downSelect data / set data valuesBPress brieflyView information / confirm specifica- tionCTurn upwards or down-wardsSelect data / set data valuesPress brieflyView information / confirm specifica- tion
Information overview
Read and observe
on page 40 first.
Overview of driving data (depending on the vehicle equipment).
Range
The detail provides information about the distance in km, that can be travelled
with the current tank and with the same driving style.
40Using the system
Page 44 of 208
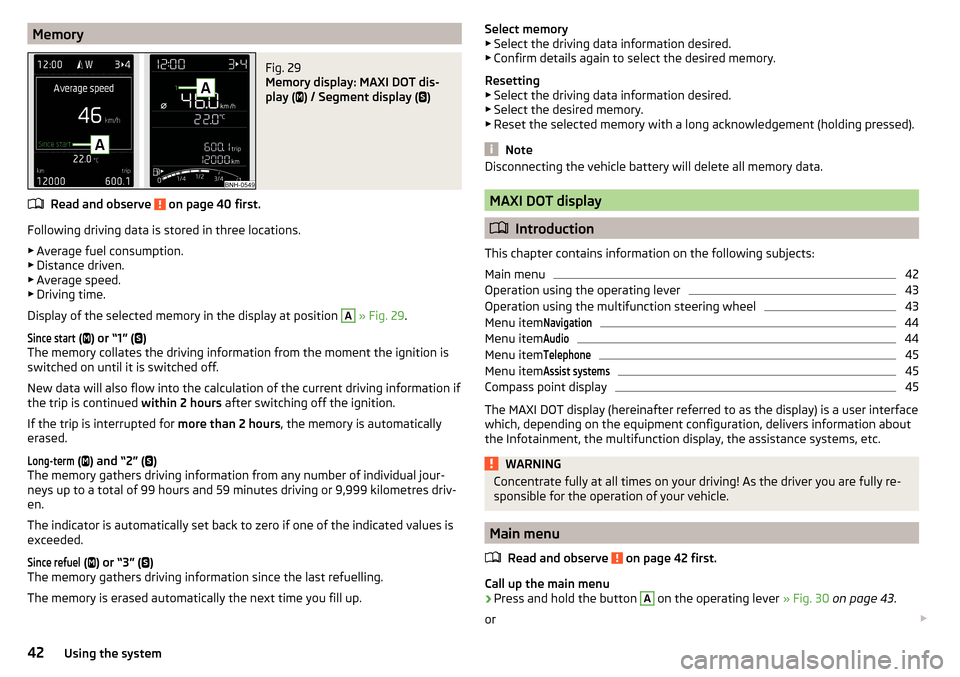
MemoryFig. 29
Memory display: MAXI DOT dis-
play (
) / Segment display (
)
Read and observe on page 40 first.
Following driving data is stored in three locations.
▶ Average fuel consumption.
▶ Distance driven.
▶ Average speed.
▶ Driving time.
Display of the selected memory in the display at position
A
» Fig. 29 .
Since start
(
) or “1” (
)
The memory collates the driving information from the moment the ignition is
switched on until it is switched off.
New data will also flow into the calculation of the current driving information if
the trip is continued within 2 hours after switching off the ignition.
If the trip is interrupted for more than 2 hours, the memory is automatically
erased.
Long-term
( ) and “2” (
)
The memory gathers driving information from any number of individual jour-
neys up to a total of 99 hours and 59 minutes driving or 9,999 kilometres driv-
en.
The indicator is automatically set back to zero if one of the indicated values is
exceeded.
Since refuel
( ) or “3” (
)
The memory gathers driving information since the last refuelling.
The memory is erased automatically the next time you fill up.
Select memory
▶ Select the driving data information desired.
▶ Confirm details again to select the desired memory.
Resetting ▶ Select the driving data information desired.
▶ Select the desired memory.
▶ Reset the selected memory with a long acknowledgement (holding pressed).
Note
Disconnecting the vehicle battery will delete all memory data.
MAXI DOT display
Introduction
This chapter contains information on the following subjects:
Main menu
42
Operation using the operating lever
43
Operation using the multifunction steering wheel
43
Menu item
Navigation44
Menu item
Audio44
Menu item
Telephone45
Menu item
Assist systems45
Compass point display
45
The MAXI DOT display (hereinafter referred to as the display) is a user interface
which, depending on the equipment configuration, delivers information about
the Infotainment, the multifunction display, the assistance systems, etc.
WARNINGConcentrate fully at all times on your driving! As the driver you are fully re-
sponsible for the operation of your vehicle.
Main menu
Read and observe
on page 42 first.
Call up the main menu
›
Press and hold the button
A
on the operating lever » Fig. 30 on page 43 .
or
42Using the system
Page 45 of 208
›Press and hold the dial G on the multifunction steering wheel
» Fig. 31 on
page 43 .
Main menu items (depending on vehicle equipment) ■Driving data
» page 40
■
Assist systems
» page 45
■
Navigation
» page 44
■
Audio
» page 44
■
Telephone
» page 45 ;
■
Vehicle
» page 39 , Auto-check control
The menus can be opened using the buttons on the control lever » Fig. 30 on
page 43 or on the multi-function steering wheel » Fig. 31 on page 43 .
Note
■
If warning messages are displayed, these messages must first be confirmed
to access the main menu.■
The travel mode can be set in the Infotainment » Owner´s Manual Infotain-
ment , chapter Vehicle settings (SET-UP button) .
■
For vehicles without Infotainment, the display language can only be adjusted
by a specialist garage.
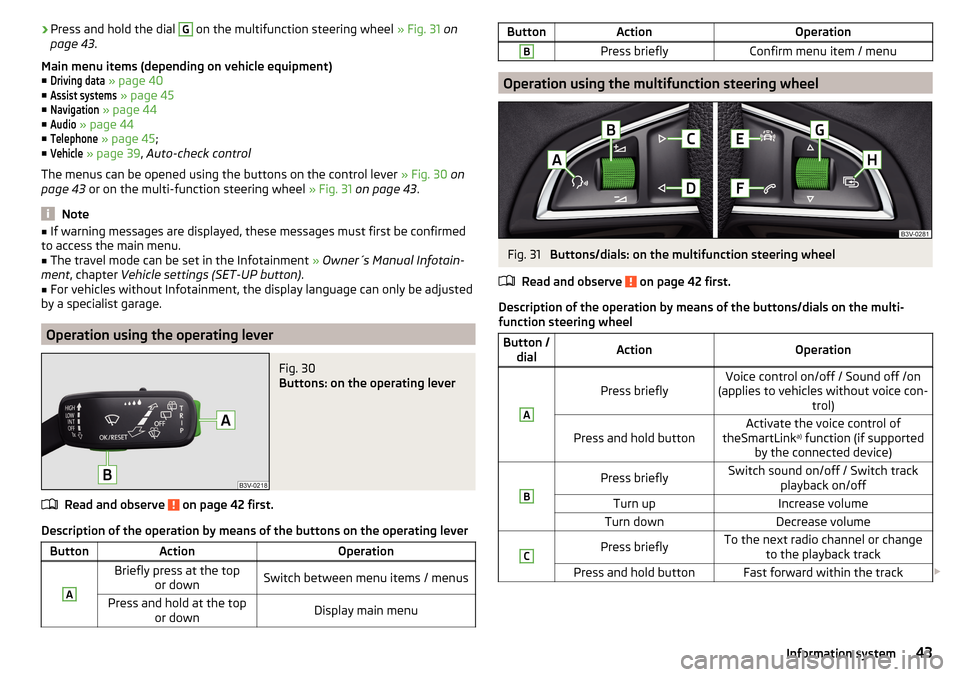
Operation using the operating lever
Fig. 30
Buttons: on the operating lever
Read and observe on page 42 first.
Description of the operation by means of the buttons on the operating lever
ButtonActionOperationABriefly press at the top or downSwitch between menu items / menusPress and hold at the top or downDisplay main menuButtonActionOperationBPress brieflyConfirm menu item / menu
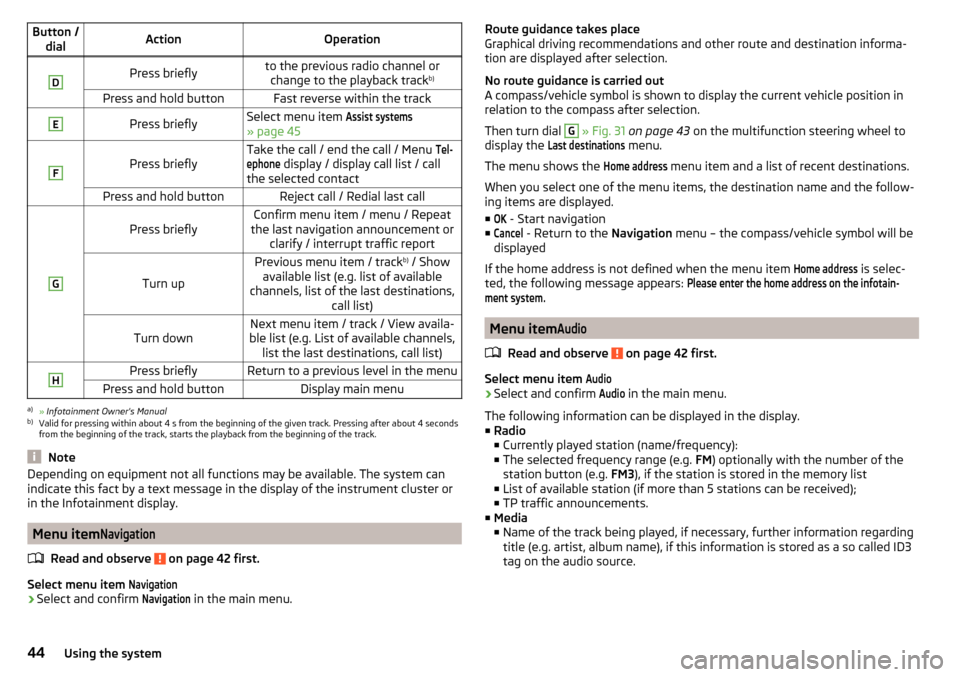
Operation using the multifunction steering wheel
Fig. 31
Buttons/dials: on the multifunction steering wheel
Read and observe
on page 42 first.
Description of the operation by means of the buttons/dials on the multi-
function steering wheel
Button / dialActionOperationA
Press brieflyVoice control on/off / Sound off /on
(applies to vehicles without voice con- trol)Press and hold buttonActivate the voice control of
theSmartLink a)
function (if supported
by the connected device)BPress brieflySwitch sound on/off / Switch track playback on/offTurn upIncrease volumeTurn downDecrease volumeCPress brieflyTo the next radio channel or changeto the playback trackPress and hold buttonFast forward within the track 43Information system
Page 46 of 208
Button /dialActionOperationDPress brieflyto the previous radio channel orchange to the playback track b)Press and hold buttonFast reverse within the trackEPress brieflySelect menu item Assist systems
» page 45
F
Press brieflyTake the call / end the call / Menu Tel-ephone
display / display call list / call
the selected contactPress and hold buttonReject call / Redial last callG
Press brieflyConfirm menu item / menu / Repeat
the last navigation announcement or clarify / interrupt traffic report
Turn up
Previous menu item / track b)
/ Show
available list (e.g. list of available
channels, list of the last destinations, call list)Turn downNext menu item / track / View availa-
ble list (e.g. List of available channels, list the last destinations, call list)HPress brieflyReturn to a previous level in the menuPress and hold buttonDisplay main menua)
» Infotainment Owner's Manual
b)
Valid for pressing within about 4 s from the beginning of the given track. Pressing after about 4 seconds
from the beginning of the track, starts the playback from the beginning of the track.
Note
Depending on equipment not all functions may be available. The system can
indicate this fact by a text message in the display of the instrument cluster or
in the Infotainment display.
Menu item
Navigation
Read and observe on page 42 first.
Select menu item
Navigation›
Select and confirm
Navigation
in the main menu.
Route guidance takes place
Graphical driving recommendations and other route and destination informa-
tion are displayed after selection.
No route guidance is carried out
A compass/vehicle symbol is shown to display the current vehicle position in relation to the compass after selection.
Then turn dial G
» Fig. 31 on page 43 on the multifunction steering wheel to
display the
Last destinations
menu.
The menu shows the
Home address
menu item and a list of recent destinations.
When you select one of the menu items, the destination name and the follow-
ing items are displayed.
■
OK
- Start navigation
■
Cancel
- Return to the Navigation menu – the compass/vehicle symbol will be
displayed
If the home address is not defined when the menu item
Home address
is selec-
ted, the following message appears:
Please enter the home address on the infotain-ment system.
Menu item
Audio
Read and observe on page 42 first.
Select menu item
Audio›
Select and confirm
Audio
in the main menu.
The following information can be displayed in the display.
■ Radio
■ Currently played station (name/frequency):
■ The selected frequency range (e.g. FM) optionally with the number of the
station button (e.g. FM3), if the station is stored in the memory list
■ List of available station (if more than 5 stations can be received);
■ TP traffic announcements.
■ Media
■ Name of the track being played, if necessary, further information regarding
title (e.g. artist, album name), if this information is stored as a so called ID3
tag on the audio source.
44Using the system
Page 47 of 208

Menu itemTelephone
Read and observe on page 42 first.
Select menu item
Telephone›
Select and confirm
Telephone
in the main menu.
›
Turn dial
G
» Fig. 31 on page 43 .
The system displays a call list.
If the call list includes no entries, the following message appears
No entries avail-able.
The following symbols are displayed next to each entry in the call list. Incoming call
Outgoing call
Missed call
Outgoing call
■
Cancel
- Ends the call
Incoming call
■
Answer
– Answer incoming call
■
Reject
– Reject incoming call
■
Ignore
- Mute the ringer (this option is only available if there is no other call)
Ongoing conversation or conference call
■
Hang up
- End a call
■
Hold
– Hold a call
■
Continue
– Continue held call
■
Mic. off
– Microphone off
■
Mic. on
– Microphone on
■
Private
– Switch the call to the telephone
■
Hands-free
– Toggles the call to the device
Ongoing and held call ■
Hang up
– End an ongoing call
■
Call wait.
– Switch to a held call
■
Conference
– Make a conference call 1)
■
Mic. off
– Microphone off
■
Mic. on
– Microphone on
■
Private – Switch ongoing call to the telephone
■Hands-free
– Switch ongoing call to the device
Symbols in the display Charge status of the telephone battery 1)
Signal strength 1)
A telephone is connected to the unit
Missed calls (if there are several missed calls, the number of calls is shown
next to the symbol)
Switch-off microphone
Menu item
Assist systems
Read and observe on page 42 first.
Select menu item
Assist systems›
Select and confirm
Assist systems
in the main menu.
or
›
Press the button on the multi-function steering wheel .
In the
Assist systems
menu item, the Front Assist system can be activated/deac-
tivated.
Compass point display
Fig. 32
Compass display
Read and observe on page 42 first.
Applies to vehicles with factory-installed navigation system.
1)
This function is only supported by some mobile phones.
45Information system
Page 62 of 208
Note■The light switch is in position or and the ignition is turned off, the low
beam is switched off automatically 1)
and the status light is lit. The side light is
switched off when the ignition key is removed, for vehicles with the start but-
ton after switching off the ignition and opening the driver's door.■
If there is a fault in the light switch, the low beam comes on automatically.
Daytime running lights(DAY LIGHT)
Read and observe
on page 59 first.
The daytime running light (hereinafter referred to as "function") lights the
front and rear vehicle area (only valid for some countries).
The lights are switched on automatically if the following conditions are met. The light switch is in the position or
.
The ignition is switched on.
The function is activated.
Activating/deactivating function on vehicles with Infotainment
The function can be disabled/enabled in the Infotainment » Owner´s Manual
Infotainment , chapter CAR - vehicle settings .
Deactivating on vehicles without Infotainment
›
Switch off the ignition.
›
Pull the indicator / main beam lever towards the steering wheel, push down
and hold in this position.
›
Switch on the ignition.
›
Wait until the left turn signal light flashes 4 times.
›
Switch off the ignition – an audible signal sounds which confirms the deacti-
vation of the function.
›
Release the turn signal stalk.
Activating on vehicles without Infotainment
›
Switch off the ignition.
›
Pull the indicator / main beam lever towards the steering wheel, push up and
hold in this position.
›
Switch on the ignition.
›
Wait until the right turn signal light flashes 4 times.
› Switch off the ignition – an audible signal sounds which confirms the activa-
tion of the function.›
Release the turn signal stalk.
WARNINGAlways switch on the low beam when visibility is poor.
Turn signal and main beam
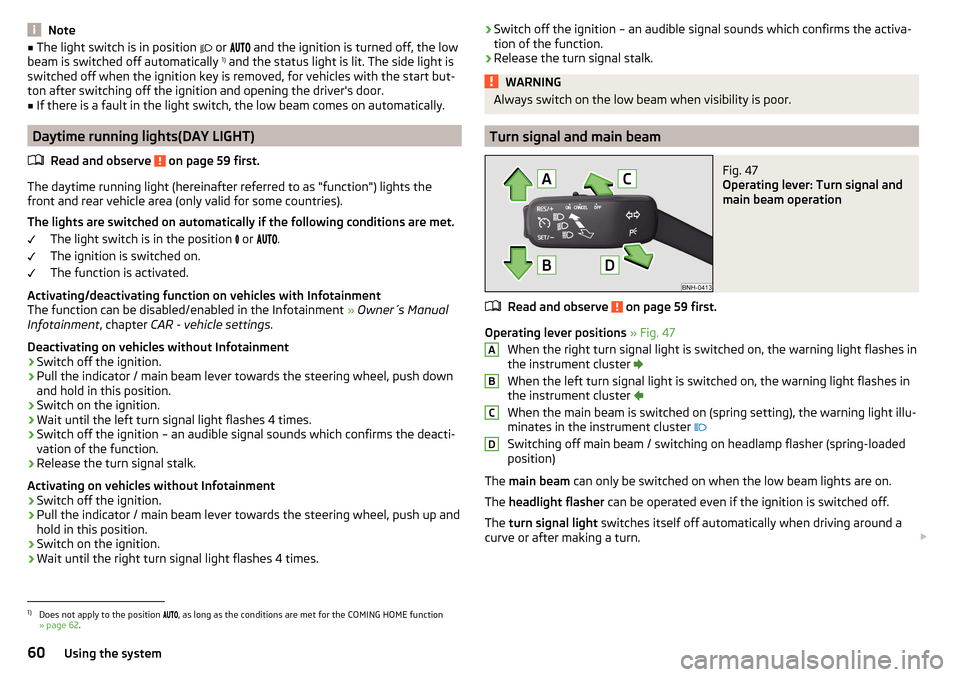
Fig. 47
Operating lever: Turn signal and
main beam operation
Read and observe on page 59 first.
Operating lever positions » Fig. 47
When the right turn signal light is switched on, the warning light flashes in
the instrument cluster
When the left turn signal light is switched on, the warning light flashes in
the instrument cluster
When the main beam is switched on (spring setting), the warning light illu-
minates in the instrument cluster
Switching off main beam / switching on headlamp flasher (spring-loaded position)
The main beam can only be switched on when the low beam lights are on.
The headlight flasher can be operated even if the ignition is switched off.
The turn signal light switches itself off automatically when driving around a
curve or after making a turn.
ABCD1)
Does not apply to the position
, as long as the conditions are met for the COMING HOME function
» page 62 .
60Using the system
Page 97 of 208
Driving
Starting-off and Driving
Starting and stopping the engine using the key
Introduction
This chapter contains information on the following subjects:
Electronic immobilizer
95
Steering lock locking / unlocking
96
Turn ignition on / off and start the engine
96
Stopping the engine
96
With the key in the ignition, the ignition can be switched on and off and the
engine can be started / stopped.
WARNING■ While driving with the engine stopped, the ignition must always be
switched on » page 96, Turn ignition on / off and start the engine .
■ With the ignition off, the steering may lock » page 96 - danger of an
accident!■
Do not withdraw the ignition key from the ignition lock until the vehicle
has come to a stop » page 103, Parking . Otherwise, the steering may lock -
danger of an accident!
■
Never leave the key in the vehicle when you exit the vehicle. Unauthor-
ized persons, such as children, for example, could lock the car, turn on the
ignition or start the engine - there is a danger of injury, accidents and dam-
age!
■
Never leave the vehicle unattended with the engine running - there is
risk of accident, damage or theft!
■
Never switch off the engine before the vehicle is stationary – risk of acci-
dent!
WARNING■ Never (e.g. in garages) run the engine in a closed place - there is the dan-
ger of poisoning and death!■
Do not leave any items (e.g. cloths or tools) in the engine compartment.
This presents a fire hazard and the risk of engine damage.
■
Never cover the engine with additional insulation material (e.g. with a
cover) – risk of fire!
CAUTION
■ Only start the engine when the engine and the vehicle are stationary - there
is a danger of starter and engine damage!■
Do not push-start the engine – risk of damaging the engine and the catalytic
converter. The battery from another vehicle can be used as a jump-start aid
» page 168 .
Note
Do not warm up the engine while the vehicle is stationary. If possible, start
your journey as soon as the engine has started. Through this, the engine rea-
ches its operating temperature faster.
Electronic immobilizer
Read and observe
and on page 95 first.
The electronic immobiliser (hereinafter referred to as the immobiliser) makesthe attempted theft or unauthorised use of your vehicle more difficult.
An electronic chip is integrated in the head of the key. The immobiliser is deac-
tivated with the aid of this chip when the key is inserted in the ignition lock.
As soon as the ignition key is removed from the ignition lock, the immobiliser is
automatically activated.
Operational problems
If the immobiliser components in the key fail, it is not possible to start the en-
gine. A corresponding message appears in the display of the instrument clus-
ter to explain that the immobiliser is active.
To start, use the other vehicle key or seek help from a specialist garage.
95Starting-off and Driving