window SKODA RAPID SPACEBACK 2015 1.G Owner's Guide
[x] Cancel search | Manufacturer: SKODA, Model Year: 2015, Model line: RAPID SPACEBACK, Model: SKODA RAPID SPACEBACK 2015 1.GPages: 208, PDF Size: 29.2 MB
Page 95 of 208
Note■As soon as the windscreen mists up, press the symbol button . Press the
button once the windscreen has demisted.■
During operation of the Climatronic, an increase in engine idle speed can oc-
cur under certain circumstances in order to ensure adequate heating comfort.
Climatronic - automatic mode
Read and observe
and on page 91 first.
The automatic mode is used in order to maintain a constant temperature andto demist the windows in the interior of the car.
To switch on press the
button. The display shows
(pos.
4
» Fig. 108
on page 92 ).
Automatic mode can be switched off by pressing one of the buttons for the air
distribution or by increasing/decreasing the blower speed. The temperature is
nevertheless regulated.
Air distribution control
Read and observe
and on page 91 first.
The recirculation mode prevents contaminated outside air getting into the In-terior of the vehicle.
In recirculated air mode air is sucked out of the interior of the vehicle and then
fed back into the interior.
Switching on/off
›
Press the button.
Heating and manual air conditioning system
If the air distribution control is set to position when the recirculation modes
is switched on, the recirculated-air mode is switched off. Recirculated air mode
can be switched on again from this setting by repeatedly pressing the symbol
button .
Climatronic
With the recirculated-air mode switched on the symbol appears in the dis-
play.
The symbol disappears from the display after turning off the air recircula-
tion.
Depending on the moisture conditions in the vehicle interior the air recircula-
tion may shut-down automatically.WARNINGThe recirculation system cannot be switched on for a longer period of time,
because there is no supply of fresh air from the outside. “Stale air” may re-
sult in fatigue in the driver and occupants, reduce attention levels and also
cause the windows to mist up. The risk of having an accident increases.
Switch off recirculated air mode as soon as the windows start to mist up.
CAUTION
We recommend not smoking in the vehicle when the recirculating air operation
is switched on. The smoke sucked from inside the vehicle is deposited on the
evaporator of the air conditioner. This produces a permanent odour when the
air conditioning system is operating which can only be eliminated through con-
siderable effort and expense (replacement of compressor).
Note
If recirculated air mode is switched on for around 15 minutes, the symbol
will begin to flash in the Climatronic display as a sign that the recirculated air
mode is switched on long-term. If the recirculated air mode is not switched off,
the symbol flashes for around 5 minutes.93Heating and ventilation
Page 109 of 208
Avoid full throttle and high speeds
Fuel consumption can be reduced by half if only three-quarters of the possible
top speed of your vehicle is used.
Reducing idling
If the vehicle is fitted with the START - STOP system there is an automatic re-
duction of the idling. If the engine is stopped on vehicles without START-STOP
system, such as when waiting in a traffic jam, the fuel economy is already
greater after 30 - 40 s than the fuel quantity which is required for engine re-
start.
Avoid short distances
When driving a short distance of less than about 4 km, the engine cannot
reach its operating temperature. As long as the engine has not reached oper-
ating temperature, the fuel consumption is significantly higher than with the
engine hot.
Pay attention to the correct tyre inflation pressure being maintained
Further information » page 155.
Avoid unnecessary ballast
Per 100 kg of weight, consumption increases by about 0.3 l/100 km. At a speed
of 100 - 120 km/h, a vehicle fitted with a roof rack cross member without a load
will use about 10 % more fuel than normal due to the increased aerodynamic
drag.
Saving electricity
Only turn on electrical consumers (e.g. seat, window and mirror heating and
the like) for as long as necessary.
Use the cooling system economically
The air conditioning system compressor uses power from the engine when in
cooling mode, which will affect the fuel consumption.
It recommended to open the windows or the doors of a vehicle for which the
interior has been strongly heated through the effect of direct sunlight in order
to allow the heated air to escape.
The cooling system should not be on if the windows are open.DriveGreen functionFig. 120
Shown in the infotainment dis-
play
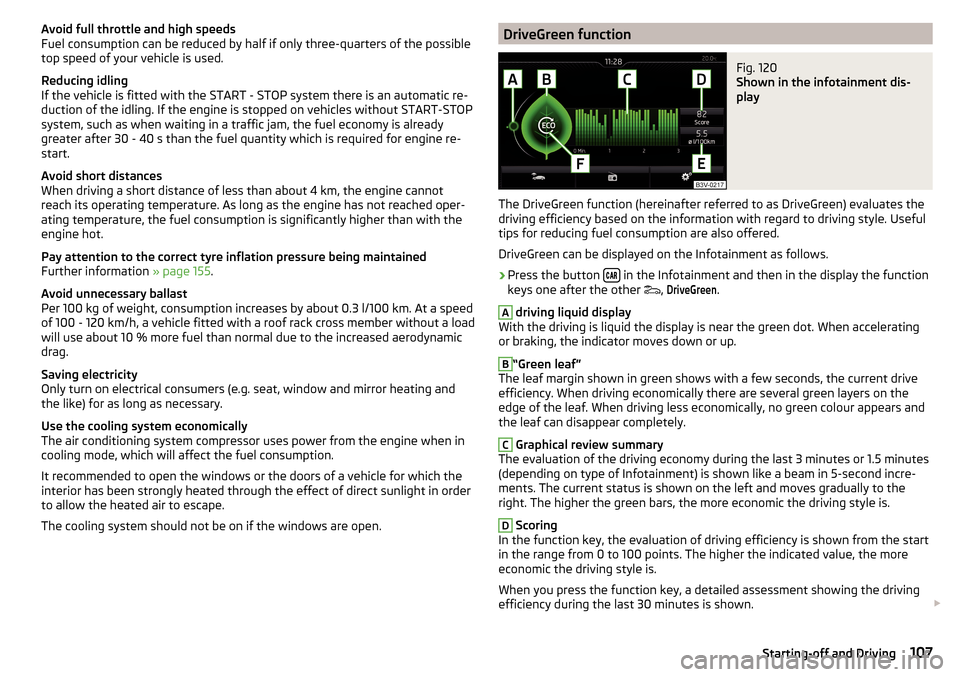
The DriveGreen function (hereinafter referred to as DriveGreen) evaluates the
driving efficiency based on the information with regard to driving style. Useful
tips for reducing fuel consumption are also offered.
DriveGreen can be displayed on the Infotainment as follows.
›
Press the button in the Infotainment and then in the display the function
keys one after the other ,
DriveGreen
.
A
driving liquid display
With the driving is liquid the display is near the green dot. When accelerating
or braking, the indicator moves down or up.
B
“Green leaf”
The leaf margin shown in green shows with a few seconds, the current drive
efficiency. When driving economically there are several green layers on the
edge of the leaf. When driving less economically, no green colour appears and
the leaf can disappear completely.
C
Graphical review summary
The evaluation of the driving economy during the last 3 minutes or 1.5 minutes
(depending on type of Infotainment) is shown like a beam in 5-second incre-
ments. The current status is shown on the left and moves gradually to the
right. The higher the green bars, the more economic the driving style is.
D
Scoring
In the function key, the evaluation of driving efficiency is shown from the start
in the range from 0 to 100 points. The higher the indicated value, the more
economic the driving style is.
When you press the function key, a detailed assessment showing the driving
efficiency during the last 30 minutes is shown.
107Starting-off and Driving
Page 136 of 208
Automatic car wash systemsRead and observe
and on page 133 first.
The usual precautionary measures must be taken before washing the vehicle
in an automatic car wash system (e.g. closing the windows and the sliding/tilt-
ing roof etc.).
If your vehicle is fitted with any particular attached parts, such as a spoiler,
roof rack system etc., it is best to consult the operator of the car wash system
beforehand.
After an automatic wash with wax treatment, the lips of the wipers should be
cleaned with cleaning agents specially designed for the purpose, and then de-
greased.
CAUTION
■ Before driving through a car wash fold in the exterior mirrors - there is a risk
of damage.■
For vehicles with roof antenna the antenna rod should be unscrewed before
driving through a car wash - there is a risk of damage.
Washing with a high-pressure cleaner
Read and observe
and on page 133 first.
When washing the vehicle with a high-pressure cleaner, the instructions for
use of the equipment must be observed. This applies in particular to the pres-
sure used and to the spraying distance .
Maintain a sufficiently large distance to the parking aid sensors and soft mate-
rials such as rubber hoses or insulation material.
CAUTION
■ The films should not be washed with any high-pressure cleaners - risk of
damage » page 135 .■
Do not aim the water jet directly at the lock cylinders or the door or opening
joints when washing the vehicle in the winter – there is a risk of freezing.
■
The sensors of the parking aid can be sprayed only for a short time and there
must be a minimum distance of 10 cm - there is a risk of damage.
Cleaning vehicle exterior
Introduction
This chapter contains information on the following subjects:
Vehicle paint work
135
Films
135
Plastic parts
135
Rubber seals
136
Chrome and anodized parts
136
Windows and external mirrors
136
Headlight glasses
136
Door closing cylinder
137
Cavity protection
137
Jack
137
Wheels
137
Towing device and mounting recess
137
Under-body protection
138
Wiper blades
138
We recommend using vehicle care products from ŠKODA Original Accessories.
These are available from ŠKODA Partners. The usage instructions on the pack-
age must be observed.
WARNING■ Vehicle care products may be harmful to your health if not used according
to the instructions.■
Always keep the vehicle care products safe from people who are not com-
pletely independent, e.g. children - there is a danger of poisoning!
■
Protect your hands and arms from sharp-edged metal parts when clean-
ing the underfloor, the inside of the wheel housings or the wheel trims –
risk of cuts!
CAUTION
■ Do not use any insect sponges, rough kitchen sponges or similar cleaning
products – risk of damaging the paintwork surface.■
Cleaners that contain solvents can damage the material being cleaned.
134General Maintenance
Page 137 of 208

NoteDue to the special tools and knowledge required, and to avoid any potential
problems with the cleaning and care of your vehicle's exterior, we recommend
that the cleaning and care of your vehicle be carried out by a ŠKODA Service
Partner.
Vehicle paint work
Read and observe
and on page 134 first.
Preserving the vehicle paintwork
A thorough wax treatment provides the vehicle's paintwork with highly effec-
tive protection against harmful environmental influences.
The vehicle must be treated with a high-quality hard wax polish at the latest, when no more drops form on the clean paintwork.
A new layer of a high-quality hard wax polish can be applied to the clean body- work after it has dried thoroughly.
Even if you use a wax preserver regularly, we still recommend that you treat
the paintwork of the vehicle at least twice a year with hard wax.
Polishing
Polishing is necessary if the vehicle's paintwork has become unattractive and if it is no longer possible to achieve a gloss with wax preservatives.
If the polish does not contain any preserving elements, the paint must be trea- ted with a preservative afterwards.
CAUTION
■ Paint damage is to be repaired immediately.■Never apply wax to the windows.■
Mat painted or plastic parts must not be treated with polishing products or
hard waxes.
■
Do not polish the paintwork in a dusty environment - risk of paint scratches.
■
Do not apply any paint care products to door seals or window guides.
■
If possible, do not apply any paint care products to parts of the bodywork
that come into contact with door seals or window guides.
Films
Read and observe
and on page 134 first.
Cleaning
Films (e.g. roof, decorative, protective films, etc.) must be cleaned more care-
fully than the vehicle paint.
The films may not be washed with a high-pressure cleaner.
Only wash the films with a soft cloth, mild soap solution and clean, warm wa-
ter.
Service life
Environmental influences (e.g. sunlight, humidity, air pollution, rockfall) affect
the life of the films.
Sunlight may also affect the strength of the film colour.
Films will age and become brittle – this is entirely normal; this is not a fault.
CAUTION
■ Never use aggressive cleaning agents or chemical solvents for the glued sur-
faces with films - there is a danger of film damage.■
Never use dirty cloths or chemical solvents for the glued surfaces with films -
there is a danger of damaging the film.
■
In the winter months, do not use an ice scraper to remove ice and snow from
the areas with films. Do not use any other objects to remove frozen layers of
snow or ice – risk of film damage.
■
Do not polish the films - risk of damage!
■
When transporting a load on the roof rack (e.g. roof box or similar), there is
an increased risk of film damage (e.g. of chipping from the secured load).
Plastic parts
Read and observe
and on page 134 first.
Clean plastic parts with a damp cloth.
If this method does not completely clean the plastic parts, use cleaning prod-
ucts specially designed for this purpose.
CAUTION
Do not use paint care products on plastic parts.135Care and maintenance
Page 138 of 208

Rubber sealsRead and observe
and on page 134 first.
All door seals and window guides are factory-treated with a colourless mattvarnish layer to prevent the freezing of painted body parts and to protect
against driving noise.
CAUTION
■ Do not treat the door seals and window guides with any products whatsoev-
er .■
Applying additional treatments to the seals can corrode the protective coat-
ing, and driving noise may occur.
Chrome and anodized parts
Read and observe
and on page 134 first.
First clean the chrome parts and anodized parts with a damp cloth and thenpolish them with a soft, dry cloth.
If this method does not completely clean the parts, use cleaning products spe-
cially designed for this purpose.
CAUTION
■ Do not polish the chrome parts and anodized parts in a dusty environment -
risk of surface scratches.■
Never use aggressive cleaning agents or chemical solvents for these parts -
there is risk of damage.
Windows and external mirrors
Fig. 149
Fuel filler flap: Remove ice scra-
per
Read and observe and on page 134 first.
Removing snow and ice
Use a plastic ice scraper for removing snow and ice from the windows and mir-
rors.
The ice scraper can be found on the inside of the fuel filler flap.
›
Open the fuel filler flap.
›
Slide out the ice scraper in the direction of the arrow » Fig. 149.
Cleaning windows
Regularly clean windows from the inside with clean water.
Dry the glass surfaces with a clean chamois leather or a cloth intended for this
purpose.
CAUTION
Instructions for removing snow and ice■The ice scraper should not be moved forward and backward but in one direc-
tion to avoid any damage to the surface of the glass.■
Snow or ice that is contaminated with coarse dirt such as fine gravel, sand or
salt must not be removed from the windows and mirrors – there is a risk of
damage to the surface of the windows and mirrors.
■
Do not remove snow or ice from glass parts using warm or hot water – risk of
cracks forming in the glass.
■
Make sure that when removing snow and ice from the windows, the labels
attached to the vehicle by the factory are not damaged.
CAUTION
Information for cleaning windows■Do not clean the inside of the windows with sharp-edged objects or corro-
sive and acidic cleaning agents – there is a risk of damaging the heating ele-
ments or window aerial.■
When drying the windows after washing the vehicle, do not use window
leathers that have been used to polish the bodywork. Residues of preserva-
tives in the window leather can make the window dirty and reduce visibility.
Headlight glasses
Read and observe
and on page 134 first.
Clean plastic front headlight lenses using clean, warm water and soap.
136General Maintenance
Page 147 of 208
Close the flap›Lift the bonnet.›
Decouple the bonnet support and press into the holder designed to hold it.
›
Let the bonnet drop into the lock carrier lock from a height of around 20 cm –
do not push it in !
Check that the bonnet is closed properly.
WARNING■ If you notice that the lock is not properly engaged while driving, stop the
vehicle immediately and close the bonnet – risk of accident!■
Make sure that when closing the bonnet, no body parts are crushed -
there is danger of injury!
CAUTION
Never open the bonnet by the locking lever » Fig. 151.
Engine compartment overview
Fig. 152
Principle sketch: Engine compartment
Read and observe
and on page 143 first.
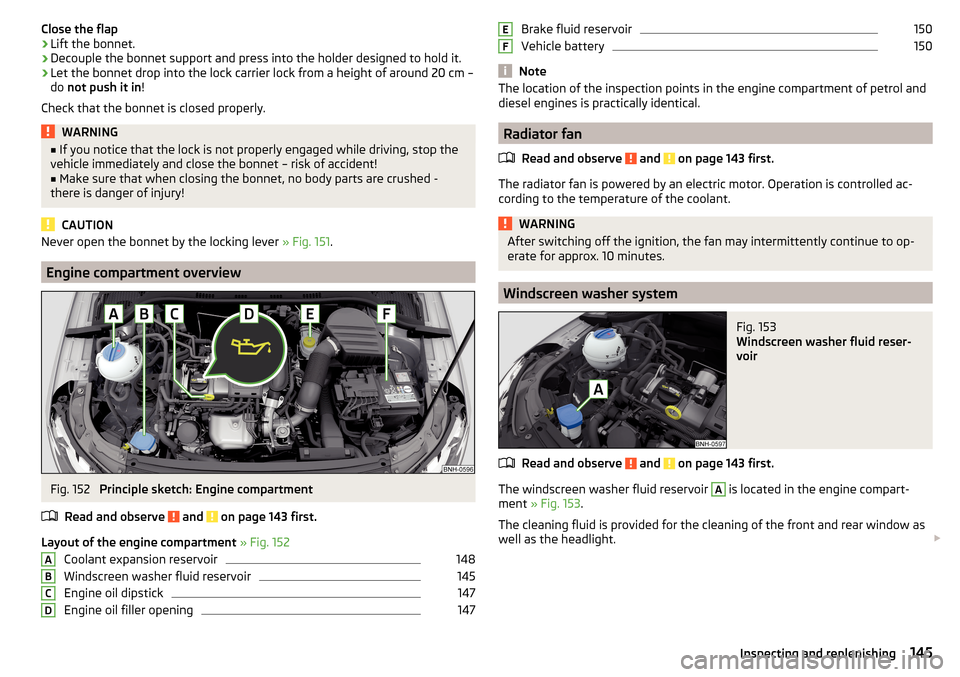
Layout of the engine compartment » Fig. 152
Coolant expansion reservoir
148
Windscreen washer fluid reservoir
145
Engine oil dipstick
147
Engine oil filler opening
147ABCDBrake fluid reservoir150
Vehicle battery
150
Note
The location of the inspection points in the engine compartment of petrol and
diesel engines is practically identical.
Radiator fan
Read and observe
and on page 143 first.
The radiator fan is powered by an electric motor. Operation is controlled ac-
cording to the temperature of the coolant.
WARNINGAfter switching off the ignition, the fan may intermittently continue to op-
erate for approx. 10 minutes.
Windscreen washer system
Fig. 153
Windscreen washer fluid reser-
voir
Read and observe and on page 143 first.
The windscreen washer fluid reservoir
A
is located in the engine compart-
ment » Fig. 153 .
The cleaning fluid is provided for the cleaning of the front and rear window as
well as the headlight.
EF145Inspecting and replenishing
Page 155 of 208
WARNING■When you charge a battery, hydrogen is released, and a highly explosive
gas mixture is also produced. An explosion can be caused through sparkling
over during unclamping or loosening of the cable plug while the ignition is
on.■
Creating a bridge between the poles on the battery (e.g. with metal ob-
jects - cables) creates a short circuit - risk of damage to the battery, explo-
sion and burning of the battery, jets of acid spurting out.
■
Avoid creating sparks when working with cables and electrical devices.
Strong sparking represents a risk of injury.
■
Before carrying out any work on the electrical system, switch off the en-
gine, the ignition and all electrical consumers and disconnect the negative
terminal
.
■
“Quick-charging” the vehicle battery is dangerous and requires a special
charger and specialist knowledge.
■
We therefore recommend that vehicle batteries be “rapidly charged” by a
specialist garage.
CAUTION
On vehicles with the START/STOP system, the pole terminal of the charger
must not be connected directly to the negative terminal of the vehicle battery,
but only to the engine earth » page 168, Jump-starting using the battery from
another vehicle .
Replacing
Read and observe
and on page 151 first.
The new vehicle battery must have the same capacity, voltage, current and
size as the original battery. Suitable vehicle battery types can be purchased
from a specialist garage.
We recommend you have the battery replaced by a specialist garage.
Disconnecting and reconnecting
Read and observe
and on page 151 first.
Disconnecting
›
Switch off the ignition.
›
First, disconnect the negative terminal
first, then the positive
terminal
of the battery.
Connecting›First, connect the positive first, then the negative battery terminal.
After disconnecting and re-connecting the vehicle battery, the following func-
tions or devices are partially or completely inoperative.Function / deviceCommissioningTime settings» page 31
CAUTION
■ Disconnect the vehicle battery only with the ignition turned off - there is a
risk of damaging the electrical system of the vehicle.■
Under no circumstances must the battery cables be connected incorrectly –
risk of a cable fire.
Note
■ After disconnecting and re-connecting the vehicle battery, we recommend
having the vehicle checked by a specialist to ensure that the full functionality
of all electrical systems is guaranteed.■
The data of the multi-function display will be reset.
Automatic load deactivation
Read and observe
and on page 151 first.
The vehicle's electrical system automatically prevents the battery from dis-
charging when the battery is being heavily used. This manifests itself by the
following. ▶ The idling speed is raised to allow the generator to deliver more electricity to
the electrical system.
▶ Where necessary, large convenience consumers such as seat heaters and
rear window heaters have their power limited or are shut off completely in
the event of an emergency.
CAUTION
■ Despite such intervention by the vehicle electric system management, the
vehicle battery may be drained. For example, when the ignition is switched on
a long time with the engine turned off or the side or parking lights are turned
on during longer parking.■
Consumers that are supplied via a 12-V power socket can cause the vehicle
battery to discharge when the ignition is switched off.
153Inspecting and replenishing
Page 175 of 208

›At the same time lift the cover on the selector lever gaiter with the other
hand in direction of arrow 2.›
With one finger, push the yellow plastic element in the direction of arrow
3
down to the stop.
›
At the same time, press the locking button in the selector lever and move
the selector lever to position N.
If the selector lever is moved again to position P, it is once again blocked.
Replacing windscreen wiper blades
Introduction
This chapter contains information on the following subjects:
Replacing the windscreen wiper blades
173
Replacing the rear window wiper blade
173WARNINGReplace the windscreen wiper blades once or twice a year for safety rea-
sons. These can be purchased from a ŠKODA Partner.
Replacing the windscreen wiper blades
Fig. 181
Windscreen wiper blade
Read and observe
on page 173 first.
Before replacing the windscreen wiper blade, put the windscreen wiper arms
into the service position.
Service position for changing wiper blades
›
Close the bonnet.
› Switch the ignition on and off again.›Place the operating lever in position 4
» page 66 , Activating the windscreen
wipers and washers .
The windscreen wiper arms move into the service position.
Removing the wiper blade›
Lift the wiper arm from the window in the direction of
1
» Fig. 181 .
›
Tilt the wiper blade to the stop in the same direction.
›
Hold the upper part of the wiper arm and press the securing mechanism
A
in the direction of arrow
2
.
›
Remove the wiper blade in the direction of the arrow
3
.
Attaching the windscreen wiper blade
›
Push the windscreen wiper blade to the stop until it locks into place.
›
Check that the windscreen wiper blade is correctly attached.
›
Fold the windscreen wiper arm back to the windscreen.
›
Turn on the ignition and press the lever into position
4
» page 66 , Activat-
ing the windscreen wipers and washers .
The windscreen wiper arms move into the home position.
Replacing the rear window wiper blade
Fig. 182
Rear window wiper blade
Read and observe
on page 173 first.
Removing the wiper blade
›
Lift the wiper arm from the window in the direction of
1
» Fig. 182 .
›
Tilt the wiper blade to the stop in the same direction.
›
Hold the upper part of the wiper arm and press the securing mechanism
A
in the direction of arrow
2
.
›
Remove the wiper blade in the direction of the arrow
3
.
173Emergency equipment and self-help
Page 177 of 208
CAUTION■“Never repair” fuses, and do not replace them with fuses of a higher amper-
age – risk of fire! This may also cause damage at other points in the electrical
system.■
If a newly inserted fuse blows again after a short time, have the electrical
system checked as quickly as possible by a specialist garage.
■
A blown fuse is recognisable by the molten metal strip. Replace the faulty
fuse with a new one of the same amperage.
Note
■
We recommend always carrying replacement fuses in the vehicle. A box of
replacement fuses and bulbs can be purchased from ŠKODA Genuine Accesso-
ries.■
There can be several power-consuming devices for one fuse.
■
Multiple fuses may exist for a single power-consuming device.
Fuses in the dash panel
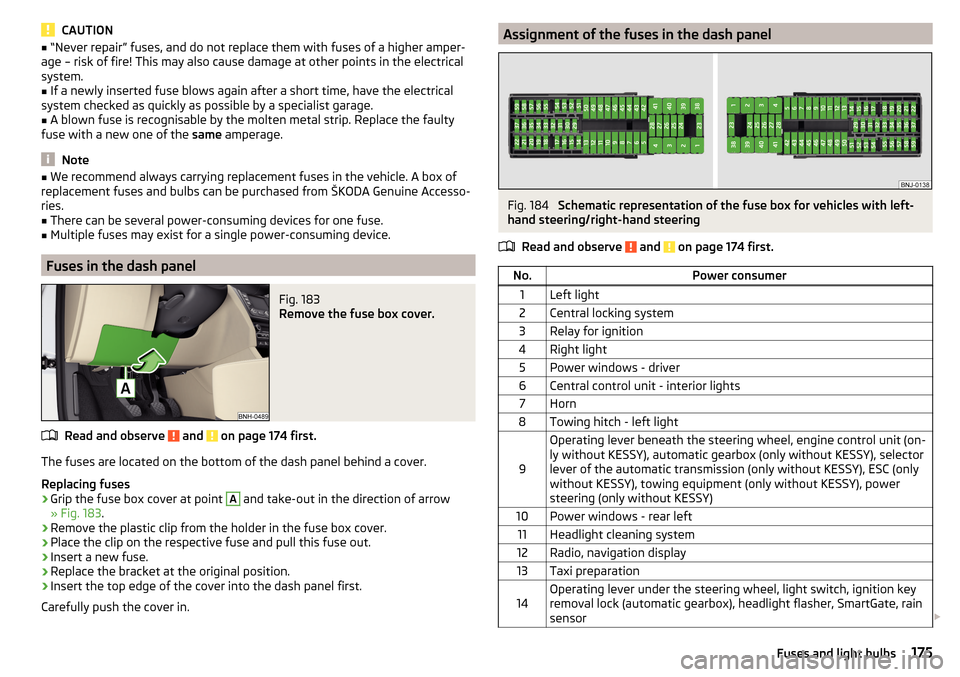
Fig. 183
Remove the fuse box cover.
Read and observe and on page 174 first.
The fuses are located on the bottom of the dash panel behind a cover.
Replacing fuses
›
Grip the fuse box cover at point
A
and take-out in the direction of arrow
» Fig. 183 .
›
Remove the plastic clip from the holder in the fuse box cover.
›
Place the clip on the respective fuse and pull this fuse out.
›
Insert a new fuse.
›
Replace the bracket at the original position.
›
Insert the top edge of the cover into the dash panel first.
Carefully push the cover in.
Assignment of the fuses in the dash panelFig. 184
Schematic representation of the fuse box for vehicles with left-
hand steering/right-hand steering
Read and observe
and on page 174 first.
No.Power consumer1Left light2Central locking system3Relay for ignition4Right light5Power windows - driver6Central control unit - interior lights7Horn8Towing hitch - left light
9
Operating lever beneath the steering wheel, engine control unit (on-
ly without KESSY), automatic gearbox (only without KESSY), selector
lever of the automatic transmission (only without KESSY), ESC (only
without KESSY), towing equipment (only without KESSY), power
steering (only without KESSY)10Power windows - rear left11Headlight cleaning system12Radio, navigation display13Taxi preparation14Operating lever under the steering wheel, light switch, ignition key
removal lock (automatic gearbox), headlight flasher, SmartGate, rain
sensor 175Fuses and light bulbs
Page 178 of 208
No.Power consumer15Air conditioning system, selector lever of the automatic gearbox, di-
agnosis terminal16Instrument cluster17Alarm system, horn18Not assigned19Not assigned20Not assigned21Not assigned22Front- and rear windscreen wiper system23Heated front seats24Blower fan for air conditioning system, heating, air conditioning,
heating25Not assigned26Switch for front seat heating27Rear window wiper28Not assigned29airbag30Electric power windows, light switches, reverse light switches, air
conditioning system, Park Assist, exterior mirror, power feed for cen-
tre button strip, power feed for side button strip, interior mirror31Fuel pump, radiator fan, cruise control, coil of the relay for the front
and rear windscreen wipers32Diagnostic terminal, headlight range control, operating lever under
the steering wheel, interior lighting33Coil on starter relay, clutch pedal switch34Heated windscreen washer jets35Not assigned36Not assigned37Radar38Not assigned39Electrical auxiliary heating system40Not assigned41Rear window heaterNo.Power consumer42Power windows - front passenger43Towing hitch - contact in the socket44Cigarette lighter, 12-volt power socket45Power windows - rear right46Front and rear window washer, operating lever under the steering
wheel47Towing hitch - contact in the socket48Towing hitch - right light49Fuel pump50Radio51Heating of the external mirror52KESSY53Steering lock (KESSY)54ABS or ESC55Not assigned56Not assigned57Not assigned58Not assigned59Not assigned
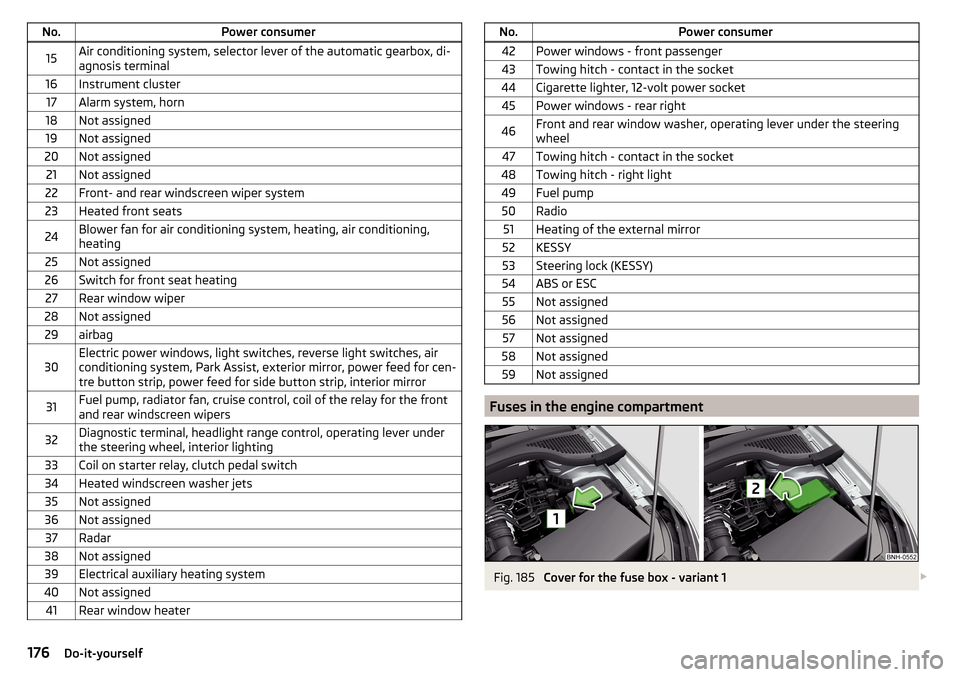
Fuses in the engine compartment
Fig. 185
Cover for the fuse box - variant 1
176Do-it-yourself