change time SKODA RAPID SPACEBACK 2015 1.G Swing Infotinment Car Radio Manual
[x] Cancel search | Manufacturer: SKODA, Model Year: 2015, Model line: RAPID SPACEBACK, Model: SKODA RAPID SPACEBACK 2015 1.GPages: 43, PDF Size: 4.7 MB
Page 5 of 43
Important information about this manual
This Owner's Manual is valid for the different versions of the Infotainment
Swing (hereinafter referred to only as device). The device may differ depending
on the vehicle model, in which it is installed in both its appearance and in the
arrangement of the controls.
This Owner's Manual describes all possible device functions without identify-
ing them as special equipment, model variants or market-dependent equip-
ment. Consequently, the device on this vehicle does not need to contain all of
the functions described in this Owner's Manual.
For example, if the vehicle is not factory equipped with the sound system, the
menu points ŠKODA Surround and Virtual Subwoofer are not displayed in the
sound settings menu.
The availability of some features described in this manual depends on the
type of external devices (for example, phone, music player, etc.).
Information on the compatibility of external devices can be found on ŠKODAIn-
ternet pages http://infotainment.skoda-auto.com .
The Images in these Operating Instructions are for illustrative purposes only.
The illustrations can differ in minor details from your vehicle; they are only in-
tended to provide general information.
ŠKODA AUTO a.s. pursues a policy of ongoing product and model development
with all vehicles. Changes in terms of supply scope are possible at any time
with regard to design, equipment and technology. The information listed in
these Operating Instructions corresponds to the information available at the
time of going to press.
It is therefore not possible for legal claims to be made based on the technical
data, illustrations and information contained in these Operating Instructions.
Declaration of conformity
ŠKODA AUTO a.s. hereby declares that the ŠKODA Infotainment systems meet
the basic requirements and additional provisions of Directive 1999/5/EC with
reference to radio equipment and telecommunications devices.
Applies to Nigeria: ŠKODA AUTO a.s. hereby declares that the “connection and
the use of this communication device is granted by the Nigerian Communica-
tions Commission.”3Important information about this manual
Page 9 of 43
Touch screen » page 8
SD card slot » page 19
Touch screen
The device is equipped with a touch screen that can be operated by light fin-
ger pressure on the screen surface.
The brightness level of the screen can be set » page 10.
CAUTION
■
The screen can only be operated by a slight touch of a finger. If there is too
much pressure there is a risk of damage to the screen!■
To protect the screen, you can use a suitable screen protector for touch pads
that does not affect its functionality.
■
Dirt can be removed from the screen by using a soft cloth and, if necessary,
methylated spirits.
Switch the device on/off
Manual Power On/Off
›
Press to switch the device on or off.
Automatic Power On of the device
If the device was not turned off with the control switch
before the ignition
was turned off, it will automatically switch on after the ignition is switched on.
Automatic Power Off of the device
If the vehicle key is pulled out of the ignition lock while the unit is switched on,
the device will switch off automatically.
If the vehicle is fitted with the starter button, the device will switch off auto-
matically after the engine is switched off and the door is opened.
With the ignition off, the device will automatically turn off after about 30 mi-
nutes.
The device turns off automatically under certain circumstances. The device in-
forms you for a few seconds by means of a text message on the device screen.
78› Warning: battery low. Please start the engine or switch off the infotain-
ment system. - The vehicle battery is low. It is recommended you switch off
the device or start the engine.
› Battery almost empty. The Infotainment system will be switched off.
- The
vehicle battery is discharged, the device switches itself off.
› Operating temperature not maintained. The Infotainment system will be
switched off. - The device temperature is too low or too high, the device
switches itself off.
Adjusting the volume
Every change in volume is displayed on the screen.
Increase volume
›
Turn the control to the right.
Decrease volume
›
Turn the control to the left.
Muting
›
Press the key or turn the control to the left and set the volume to 0.
The following symbol appears in the display when the sound is muted .
If at the time of muting a sound is made in the menu Media, then the playback
is interrupted (pause) 1)
.
CAUTION
If the volume is too high sound resonance can occur in the vehicle which can
lead to damaged speakers.1)
Does not apply for AUX.
7Introductory information
Page 13 of 43
NoteWith the model Yeti the setting of the device language is done on the MAXI
DOT display. See » Operating Instructions .
Setting the keyboard layout
›
Press the button
→ Keypad: .
■ ABC - Keyboard character assignment in alphabetical order
■ QWERTY - Keyboard character assignment QWERTY system
Additional keypad language settings
›
Press the button
→ More keypad languages .
In this menu, a keyboard language set can be added to allow the entering of
characters other than those in the currently selected language (function but-
ton ).
Unit settings
›
Press the button
→ Units .
■ Distance: - Distance units
■ Speed: - Speed units
■ Temperature: - Temperature units
■ Volume: - Volume units
■ Consumption: - Fuel consumption units
■ CNG consump.: - CNG consumption units
■ Pressure: - Pressure units for tyre pressure
Safe removal of the data source
›
Press the button
→ Remove SD card safely .
Is the screen Please wait... → SD card can now be removed. is displayed.
›
Press on the inserted SD memory card.
The SD card “jumps” into the eject position. or
›
Press the button
→ Remove USB safely .
Is the screen Please wait... → USB device can be removed. is displayed.
›Disconnect the audio source from the corresponding USB input.
Restore factory settings
›
Press the button
→ Factory settings .
In this menu individual settings or all settings can be restored at the same
time.
Bluetooth ®
settings
›
Press the button
→ Bluetooth .
■ Bluetooth - Switch on/off Bluetooth ®
function
■ Visibility: - Switch on/off the visibility of the Bluetooth ®
device for other de-
vices
■ 1st name - Change the device name
■ Paired devices - Display the list of paired Bluetooth ®
Devices
■ Find devices - Searches for available devices
■ BT audio (A2DP/AVRCP) - Turn on/off the ability to connect an audio device
(e.g. MP3 player, tablet etc...)
System information
›
Press the button
→ System information .
■ Update software - Software update (e.g. Bluetooth ®
)
■ Bluetooth: ... - Version number of the Bluetooth ®
software
■ Device part number: ... - Part number of the unit
■ Hardware: ... - Version of the hardware used
■ Software: ... - Version of the software used
The information about available software updates can be found on the ŠKODA
Internet pages www.infotainment.skoda-auto.com .
11Unit settings
Page 18 of 43
Automatic change from DAB to FM
With bad DAB reception the device tries to find an FM transmitter.
The station name is followed by (
) while the station is being received on the
FM band. The (
) marker disappears when the relevant DAB station can be re-
ceived again.
If a DAB station is also not available in the FM band due to poor reception, the
device will be switched to mute.Media
Operation
Introduction
This chapter contains information on the following subjects:
Main menu
16
Select audio source
17
Playback
17
Folder / track list
17
Multimedia database
18
Media settings
18
The device allows you to play audio files from different media and connected
devices (hereinafter referred to only as “audio sources”).
Main menu
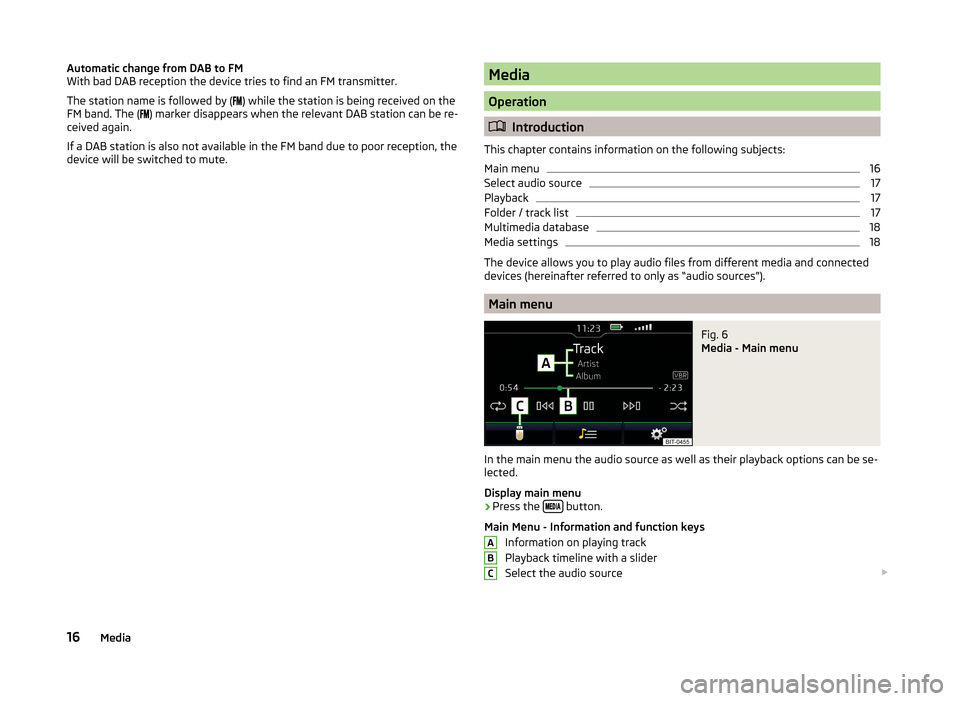
Fig. 6
Media - Main menu
In the main menu the audio source as well as their playback options can be se-
lected.
Display main menu
›
Press the button.
Main Menu - Information and function keys Information on playing track
Playback timeline with a slider
Select the audio source
ABC16Media
Page 19 of 43
Depending on the audio source type:› Folder / Title list
› Multimedia database
Menu settings Media
Note
■
Information concerning the given title appears on the screen, if they are stor-
ed as so-called ID3 Tag on the audio source. If no ID3 tag is available, only the
title name is displayed.■
The remaining playback time indicated does not correspond to the actual re-
maining playback time for titles with variable bitrates.
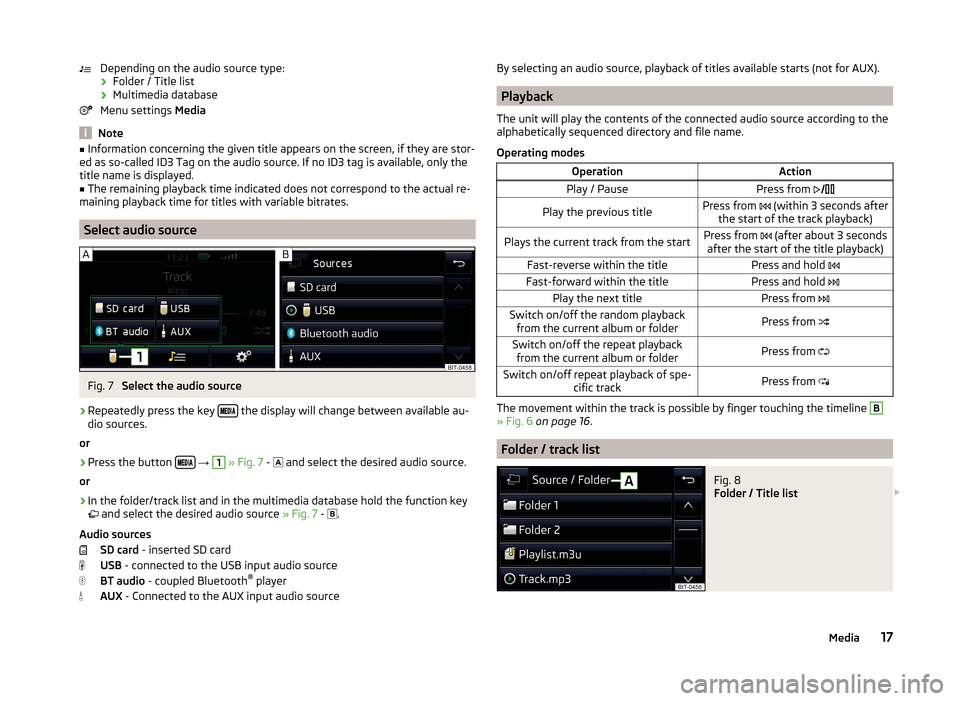
Select audio source
Fig. 7
Select the audio source
›
Repeatedly press the key the display will change between available au-
dio sources.
or
›
Press the button
→
1
» Fig. 7 -
and select the desired audio source.
or
›
In the folder/track list and in the multimedia database hold the function key
and select the desired audio source » Fig. 7 -
.
Audio sources SD card - inserted SD card
USB - connected to the USB input audio source
BT audio - coupled Bluetooth ®
player
AUX - Connected to the AUX input audio source
By selecting an audio source, playback of titles available starts (not for AUX).
Playback
The unit will play the contents of the connected audio source according to the
alphabetically sequenced directory and file name.
Operating modes
OperationActionPlay / PausePress from Play the previous titlePress from (within 3 seconds after
the start of the track playback)Plays the current track from the startPress from (after about 3 seconds
after the start of the title playback)Fast-reverse within the titlePress and hold Fast-forward within the titlePress and hold Play the next titlePress from Switch on/off the random playback
from the current album or folderPress from Switch on/off the repeat playback
from the current album or folderPress from Switch on/off repeat playback of spe-
cific trackPress from
The movement within the track is possible by finger touching the timeline
B
» Fig. 6 on page 16 .
Folder / track list
Fig. 8
Folder / Title list
17Media
Page 33 of 43
■ACC (cruise control) - Sets the adaptive cruise control
■ Driving progr.: - Set the vehicle acceleration when adaptive cruise control
is activated 1)
■ Normal - Normal
■ Sport - Sports
■ Eco - Economical
■ Last distance selected - Switch on/off of the last distance selected
■ Distance: - Set the distance monitoring to the vehicles ahead
■ Very close - Very small distance
■ Close - Small distance
■ Medium - Medium distance
■ Far - Large distance
■ Very far - Very large distance
■ Front Assist - Sets the assistant for monitoring the distance to the vehicles
ahead
■ Active - Activate/deactivate the assistant
■ Advance warning (Version 1) - Activate/deactivate advance warning
■ Advance warning (Version 2) - Activating/deactivating and setting the dis-
tance level at which a warning occurs
■ Early - Longer distance
■ Medium - Medium distance
■ Late - Short distance
■ Off - Deactivation of the warning
■ Display distance warning - Activate/deactivate distance warnings
■ Lane Assist - Settings for Lane Assist
■ Active - Activate/deactivate the assistant
■ Adaptive lane guidance - Activate/deactivate adaptive lane guidance
■ Blind Spot Monitor - Activation / deactivation of the assistant “Blind Spot
Monitor”
■ Driver Alert System - Activate/deactivate the driver alert system
■ Proactive pass. protection - Activate/deactivate proactive passenger protec-
tion
Parking and manoeuvring
›
Press the button
→
→ Parking and manoeuvring .
■
ParkPilot - Settings for the parking aid
■ Activate automatically - Activate/deactivate the compact parking aid dis-
play (when driving forward)
■ Front volume - Adjust the volume of the beeps for obstacle detection in
front
■ Front tone setting - Setting the pitch of the beeps for obstacle detection in
front
■ Rear volume - Set the volume level of the beeps for the rear obstacle de-
tection
■ Rear tone setting - Setting the pitch of the beeps for the rear obstacle de-
tection
■ Lower. entertain. - Lowers the audio volume (e.g. radio volume) with acti-
vated parking aid
■ Rear Traffic Alert - Activate/deactivate the Rear Traffic Alert
Light
›
Press the button
→
→ Light .
■ Background lighting - Sets the interior lighting
■ Instrument panel - Sets the brightness of the instrument/switch lighting
■ Footwell lighting - Sets the brightness of the footwell light
■ Light assistance - Setting of outdoor lighting
■ Dynamic Light Assist - Activation/deactivation of the function Dynamic
Light Assist
■ Light Assist - Activation / deactivation of the Light Assist function
■ Switch-on time: - Sensitivity adjustment of the sensor for the automatic
headlight control
■ Early - High sensibility
■ Medium - Medium sensibility
■ Late - Low sensibility
■ !Aut. headlight contr. (rain) - Activate/deactivate automatic headlight con-
trol in rain
■ Daytime running lights - Activate/deactivate daytime running lights
■ Comfort turn signal - Activate/deactivate lane change flashing
■ Travel mode: - Light setting for the right/left-hand traffic
■ Left - For left-hand traffic
■ Right - For right-hand traffic
1)
On vehicles with the choice of travel mode, this setting is done
» Vehicle Owner's Manual , chapter Selec-
tion of travel mode (MODE button) .
31Vehicle systems
Page 35 of 43
■Travelling time - Display of travelling time on/off
■ Distance - Display of distance travelled on/off
■ Average speed - Display of average speed on/off
■ Digital speed display - Display of current speed on/off
■ Speed warning - Winter tyres warning on/off
■ Oil temperature - Oil temperature on/off
■ Reset "Since start" data - Reset the single-trip memory in the device screen
and in the display of the instrument cluster
■ Reset "Long-term" data - Reset the long-term memory in the device screen
and in the display of the instrument cluster
Time, date and unit setting
›
Press
→ Time and date .
Description of the time and date settings » page 10 .
›
Press the button
→ Units .
Description of unit settings » page 11.
Service
›
Press the button
→
→ Service .
■ VIN: ... - Display of the vehicle identification number
■ Inspection: in … or … days - Number of km / day until the next service event
■ Oil change service: in … or … days - Number of km / day until the next oil
change
Reset to factory settings
›
Press the button
→
→ Factory settings .
In this menu you have the possibility to reset the menu items in the settings of the vehicle systems to factory settings.
■ All settings
■ All settings - Restoration of the settings all menu items
■ Individual settings
■ Driver assistance - Restoration of the Driver assistance menus
■ Parking and manoeuvring - Restoration of the Parking and manoeuvring
menu items
■ Light - Restoration of the Light menus
■ Background lighting - Restoration of the Background lighting menu
■
Mirrors and wipers - Restoration of the Mirrors and wipers menu
■ Opening and closing - Restoration of the Opening and closing menu
■ Instrument cluster - Restoration of the Instrument cluster menu
If one of the above menu items is selected, the system will ask you whether
you really want to restore the settings.
■ Cancel - Return to higher-level menu
■ Reset - Restore the settings
Adjustment of the heating and cooling system
Introduction
Applies to Superb and Octavia
This chapter contains information on the following subjects:
Climatronic (automatic air conditioning)
33
Auxiliary heating and ventilation
34
In the display some of the settings for the Climatronic, the auxiliary heating
and ventilation can be made.
Description of the individual systems » Vehicle Owner's Manual .
Note
The settings can only be made when the ignition is switched on.
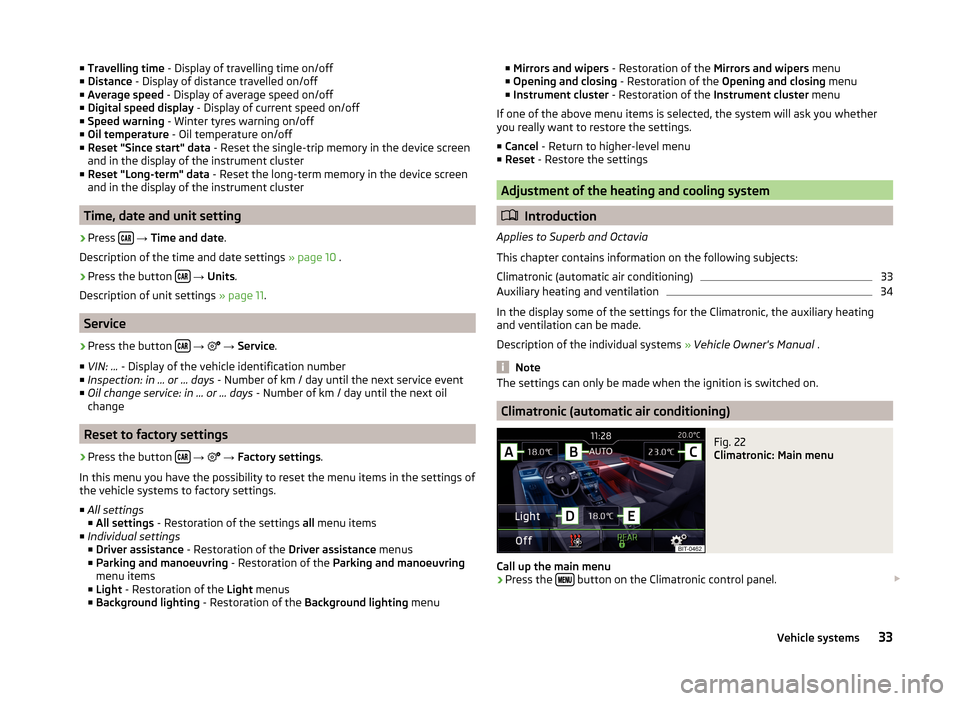
Climatronic (automatic air conditioning)
Fig. 22
Climatronic: Main menu
Call up the main menu
›
Press the button on the Climatronic control panel.
33Vehicle systems