phone SKODA RAPID SPACEBACK 2016 1.G Amundsen Bolero Infotainment System Navigation Manual
[x] Cancel search | Manufacturer: SKODA, Model Year: 2016, Model line: RAPID SPACEBACK, Model: SKODA RAPID SPACEBACK 2016 1.GPages: 76, PDF Size: 9.64 MB
Page 16 of 76
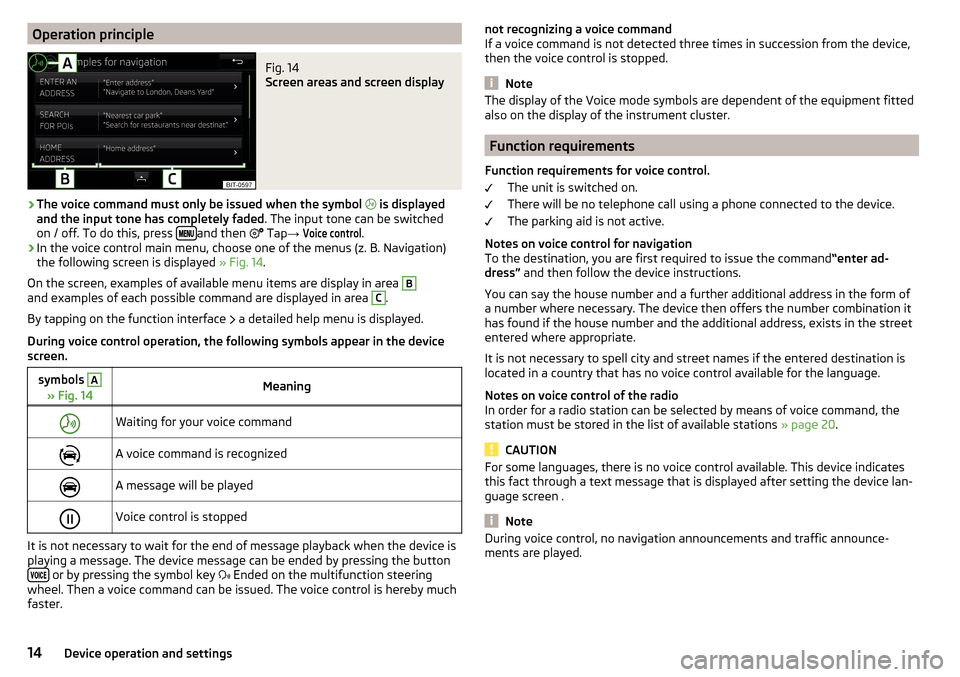
Operation principleFig. 14
Screen areas and screen display
›
The voice command must only be issued when the symbol
is displayed
and the input tone has completely faded . The input tone can be switched
on / off. To do this, press
and then
Tap
→
Voice control
.
›
In the voice control main menu, choose one of the menus (z. B. Navigation)
the following screen is displayed » Fig. 14.
On the screen, examples of available menu items are display in area
Band examples of each possible command are displayed in area C
.
By tapping on the function interface a detailed help menu is displayed.
During voice control operation, the following symbols appear in the device
screen.
symbols A
» Fig. 14MeaningWaiting for your voice commandA voice command is recognizedA message will be playedVoice control is stopped
It is not necessary to wait for the end of message playback when the device is
playing a message. The device message can be ended by pressing the button
or by pressing the symbol key Ended on the multifunction steering
wheel. Then a voice command can be issued. The voice control is hereby much
faster.
not recognizing a voice command
If a voice command is not detected three times in succession from the device,
then the voice control is stopped.
Note
The display of the Voice mode symbols are dependent of the equipment fitted
also on the display of the instrument cluster.
Function requirements
Function requirements for voice control. The unit is switched on.
There will be no telephone call using a phone connected to the device.
The parking aid is not active.
Notes on voice control for navigation To the destination, you are first required to issue the command “enter ad-
dress” and then follow the device instructions.
You can say the house number and a further additional address in the form of
a number where necessary. The device then offers the number combination it
has found if the house number and the additional address, exists in the street
entered where appropriate.
It is not necessary to spell city and street names if the entered destination is
located in a country that has no voice control available for the language.
Notes on voice control of the radio
In order for a radio station can be selected by means of voice command, the
station must be stored in the list of available stations » page 20.
CAUTION
For some languages, there is no voice control available. This device indicates
this fact through a text message that is displayed after setting the device lan-
guage screen .
Note
During voice control, no navigation announcements and traffic announce-
ments are played.14Device operation and settings
Page 17 of 76
voice commands
Requirements for optimum voice command recognition
▶ Speak with a normal tone of voice without intonation and excessive pauses.
▶ Avoid bad pronunciation.
▶ Close the doors, windows and sliding roof, in order to avoid disturbing envi-
ronmental influences on the function of the voice commands.
▶ You are recommended to speak louder at higher speeds, so that the sound of
your voice is not drowned out by the increased ambient noise.
▶ During voice control, limit additional noise in the vehicle, e.g. passengers
talking at the same time.
Voice commands can be used anytime during voice control.Voice commandFunction“ Back ”Return to the previous menu“Help ”reproducing and displaying possible voice com-
mands
Voice commands that can be used while browsing the list entries.
Voice commandFunction“ Next page ”
Browse menu / list / directory
“Previous page ”“First page ”“Last page ”
Correction of a voice command input
A voice command can be corrected, modified or re-entered by pressing the
button
or the icon key
Actuated on the multifunction steering wheel.
However, this is only possible as long as the symbol appears on the screen.
You do not have to wait until the voice command is recognized by the device.
Stop/restore voice command input
Stop
This allows you more time for the voice command input.
The process for voice command input can by turning the dial stopped.
When stopping, the symbol changes from
.
Restore
The procedure for voice command input can be restarted in one of the follow-
ing ways.
▶ By tapping on the function interface
.
▶ By pressing the button
on the device.
▶ By pressing the icon key
on the multifunction steering wheel.
Device settings
Configuration wizard
Fig. 15
Configuration wizard
The Configuration Wizard is automatically displayedif there are at least two
non-selected menu items after turning on the device.
Disable the automatic display of the Configuration wizard by tapping the func-
tion surface
Don´t show again
.
›
For manual display , press the button, then tap the function surface Con-
figuration wizard Tap
→
Configuration wizard
.
The Configuration wizard allows you to set the following menu items in se-
quence.
Time and date format (not applicable to Yeti)
Storing the radio stations with the currently strongest reception signal in the first memory group of each individual broadcast area
Pairing and connecting a phone to the device
Home address (applies to Amundsen)
The selected menu item is with the symbol provided.
Menu items which can be set by tapping on the respective function surface in
the
A
» Fig. 15 area.
15Device operation and settings
Page 18 of 76
Sound settings
The scope of the following menu is dependent on the vehicle equipment with the sound system.›
Press the button, then tap on the function surface
surface.
■
Volume
- Volume settings
■
Announcements
- Adjustment of traffic announcements volume (TP)
■
Navigation announcements
- sets the volume for the navigation announce-
ments
■
Voice control
- volume setting for voice output
■
Maximum switch-on volume
- Sets the maximum volume after switching on the
device
■
Speed-dependent vol. adjustment
- increases the volume as speed increases
■
AUX volume:
- Sets the volume for the device connected via AUX
■
Quiet
- low volume
■
Medium
- Medium volume
■
Loud
- High volume
■
Bluetooth audio:
- Volume setting of the device connected via Bluetooth ®
au-
dio profile of the connected external device
■
Entertainment fading while parking
- Lowers the audio volume (e.g. radio volume)
with activated parking aid
■
Entertainment fading (nav. announcements)
- Lowers the audio volume (e.g. radio
volume) in the event of a nav. announcements
■
Bass - Mid - Treble
- setting the equalizer
■
Balance - Fader
- Sets the balance between left and right, front and rear
■
Subwoofer
- Subwoofer volume settings
■
ŠKODA Surround
- Turn surround sound on/off (Cannot be used in Radio mode)
■
Virtual Subwoofer
-Turn virtual subwoofer on/off (Cannot be used in Radio
mode)
■
Sound Character
- Select the sound character (applies to Yeti)
■
Surround
- Optimising the sound for the room (applies to Yeti)
■
Sound focus
-Setting the optimum room sound perception
■
All
- Optimising the sound for the entire vehicle interior
■
Driver
- Optimising the sound for the driver
■
Touchscreen tone
- Switch on/off audible tone when touching the screen
■
No navigation announcements during call
- Switches on or off the navigation
prompts during a telephone conversation
Screen settings
›
Press the button, then tap on the function surface
Tap
→
screen
.
■Switch off screen (in 10 seconds) - Enable / disable the automatic power off func-
tion
■Brightness:
- Adjusts the brightness of the screen
■
Touchscreen tone
- Switch on/off audible tone when touching the screen
■
Proximity sensor
- Turn the proximity sensors on/off (When the function is on,
e.g. Navigation will be shown in the main menu when moving a finger to-
wards the bottom bar with the functional surfaces on the screen)
■
Show clock in standby mode
- Time and date displayed on the screen when the
ignition is switched on and the unit is switched off
Time and date settings
›
Press the button, then tap on the function surface
Tap on
→
Time anddate
.
■
Clock time source:
- Setting the time source: manual / GPS (applies to Amund-
sen)
■
Time:
- Time settings
■
Summer (DST)
- Switches the summer time setting on/off (applies to Amund-
sen)
■
automatically adjust DST
- Turn on / off the automatic switch to daylight saving
time
■
Time zone:
- Select the time zone
■
Time format:
- Set the time format
■
Date:
- Date settings
■
Date format:
- Set the date format
Note
With the Yeti model, the time and date settings are set via the MAXI DOT dis-
play » Owner's Manual .
Setting the device language
›
Press the button, then tap on the function surface
Tap on
→
Language
.
›
Select the device language or tap the function surface
Automatic
to set the
MAXI DOT display matching language (applies to the Yeti).
In some languages, after selecting the function surface
Female
and
Male
are dis-
played for the choice of voice prompts for the device.
16Device operation and settings
Page 27 of 76
The SD card slot/s is/are located in an external module in the glove compart-
ment on the passenger side.
Insert SD card (Does not apply to Fabia)›
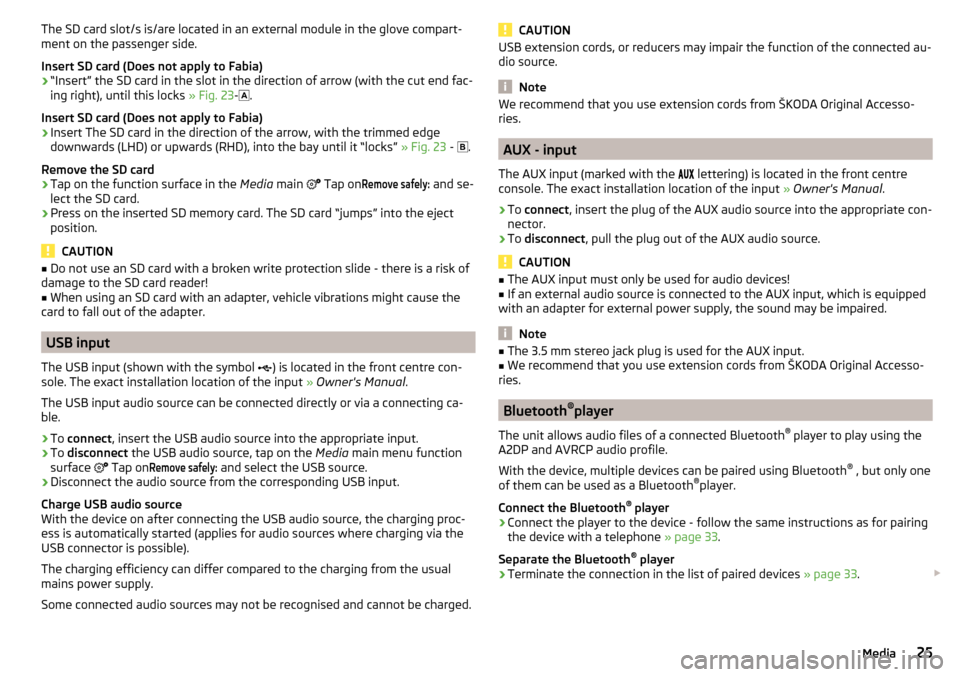
“Insert” the SD card in the slot in the direction of arrow (with the cut end fac-
ing right), until this locks » Fig. 23-
.
Insert SD card (Does not apply to Fabia)
›
Insert The SD card in the direction of the arrow, with the trimmed edge
downwards (LHD) or upwards (RHD), into the bay until it “locks” » Fig. 23 -
.
Remove the SD card
›
Tap on the function surface in the Media main
Tap on
Remove safely:
and se-
lect the SD card.
›
Press on the inserted SD memory card. The SD card “jumps” into the eject position.
CAUTION
■ Do not use an SD card with a broken write protection slide - there is a risk of
damage to the SD card reader!■
When using an SD card with an adapter, vehicle vibrations might cause the
card to fall out of the adapter.
USB input
The USB input (shown with the symbol ) is located in the front centre con-
sole. The exact installation location of the input » Owner's Manual .
The USB input audio source can be connected directly or via a connecting ca-
ble.
›
To connect , insert the USB audio source into the appropriate input.
›
To
disconnect the USB audio source, tap on the Media main menu function
surface Tap on
Remove safely:
and select the USB source.
›
Disconnect the audio source from the corresponding USB input.
Charge USB audio source
With the device on after connecting the USB audio source, the charging proc-
ess is automatically started (applies for audio sources where charging via the
USB connector is possible).
The charging efficiency can differ compared to the charging from the usual
mains power supply.
Some connected audio sources may not be recognised and cannot be charged.
CAUTIONUSB extension cords, or reducers may impair the function of the connected au-
dio source.
Note
We recommend that you use extension cords from ŠKODA Original Accesso-
ries.
AUX - input
The AUX input (marked with the lettering) is located in the front centre
console. The exact installation location of the input » Owner's Manual .
›
To connect , insert the plug of the AUX audio source into the appropriate con-
nector.
›
To disconnect , pull the plug out of the AUX audio source.
CAUTION
■
The AUX input must only be used for audio devices!■If an external audio source is connected to the AUX input, which is equipped
with an adapter for external power supply, the sound may be impaired.
Note
■ The 3.5 mm stereo jack plug is used for the AUX input.■We recommend that you use extension cords from ŠKODA Original Accesso-
ries.
Bluetooth ®
player
The unit allows audio files of a connected Bluetooth ®
player to play using the
A2DP and AVRCP audio profile.
With the device, multiple devices can be paired using Bluetooth ®
, but only one
of them can be used as a Bluetooth ®
player.
Connect the Bluetooth ®
player
›
Connect the player to the device - follow the same instructions as for pairing
the device with a telephone » page 33.
Separate the Bluetooth ®
player
›
Terminate the connection in the list of paired devices » page 33.
25Media
Page 28 of 76
Automatic playback stop and disconnection
If an Apple device is connected as a Bluetooth ®
player, and this is connected to
the USB input, then the Bluetooth ®
connection is not dropped. If playback is
cancelled, playback must be started again. Only if USB is selected as the audio
source will the Apple device disconnect as a Bluetooth ®
player. In this regard,
an appropriate warning message appears on the device screen.
If the USB audio source is an Apple device, this unit cannot be connected as a
Bluetooth ®
player. In this regard, an appropriate warning message appears on
the device screen.
If the Bluetooth ®
player audio source is connected to the AUX input, then the
audio output is switched from the AUX input of the external connected device.
For further playback the audio source is to be switched to AUX.
Replace the Bluetooth ®
player
If you would like to replace a Bluetooth ®
Player which is connected to the ma-
chine as a phone at the same time, , then a relevant information message ap-
pears in the device screen.›
End the connection to the currently connected Bluetooth ®
player and repeat
the pairing procedure » page 33, Managing paired external devices .
CAUTION
If an external device is connected to the device using Apple CarPlay ™
orAndroid Auto ™
, then it cannot be connected using Bluetooth ®
.
WLAN
Applies to Amundsen (Does not apply to Yeti).
The device allows you to play audio files from one of the external devices con-
nected to the device WLAN.
›
connect an external device that supports the DLNA (Digital Living Network
Alliance), with the device WLAN » page 39.
›
If necessary use the UPnP application (Universal Plug and Play) in the con-
nected device, which allows playback to start.
›
Select the audio source Select WLAN.
Supported audio sources and file formats
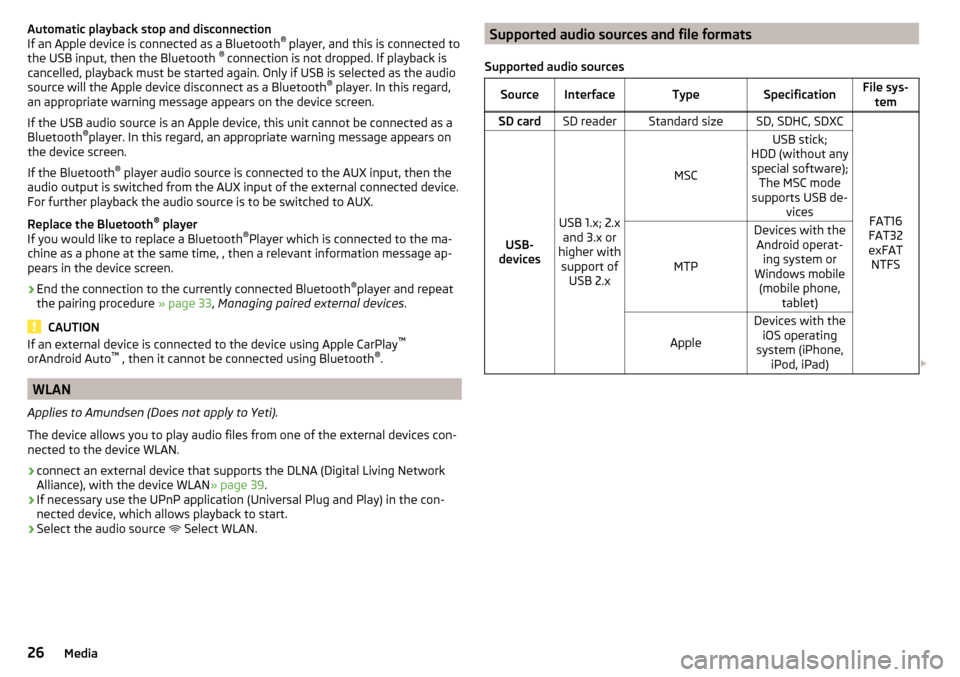
Supported audio sourcesSourceInterfaceTypeSpecificationFile sys- temSD cardSD readerStandard sizeSD, SDHC, SDXC
FAT16
FAT32
exFAT NTFSUSB-
devices
USB 1.x; 2.x and 3.x or
higher with support of USB 2.x
MSC
USB stick;
HDD (without any special software); The MSC mode
supports USB de- vices
MTP
Devices with theAndroid operat- ing system or
Windows mobile (mobile phone, tablet)
Apple
Devices with theiOS operating
system (iPhone, iPod, iPad) 26Media
Page 33 of 76
Telephone
Introductory information
Introduction to the subject
This chapter covers the operation of a Bluetooth ®
device connected to the tel-
ephone.
Depending on the Bluetooth ®
-profile used it is possible to connect to a tele-
phone or two phones simultaneously to the device.
If telephones are connected to the device with multiple SIM cards, then calls
can be accepted by all SIM cards of the connected telephones.
For outgoing calls, it depends on the type of connected telephone, either only
the primary SIM card or one of the other SIM cards can be selected.
The device allows you to work with text messages from the main telephone, (if
supported by the telephone).
If the device to is connected to an external device via Apple CarPlay ™
, then the
use of the Bluetooth ®
Connection is not possible and the phone menu is not
available.
If the device is connected to an external device via Android Auto ™
then the
connected phones and the Bluetooth ®
player are automatically disconnected
by connecting to external device and it connects to the device via Bluetooth ®
.
Connecting an extension phone while the timer using Android car ™
is not pos-
sible. If the Bluetooth ®
Feature was not turned on in external device to be con-
nected, it will be automatically switched on usingAndroid Auto ™
switched
when setting up the connection.WARNINGThe general binding country-specific regulations for operating mobile
phones in the vehicle must be observed.
Possible connection typesDepending on the number of connected Bluetooth ®
Devices and the connection type, the following functions are available.The first device (main phone)The second device (additional phone)HFP (Incoming / outgoing calls), SMS,
Phone contacts,
Bluetooth ®
player a)HFP
(incoming calls),
Bluetooth ®
player a)a)
Only an external device can be connected to the device as a Bluetooth
®
player.
Telephone
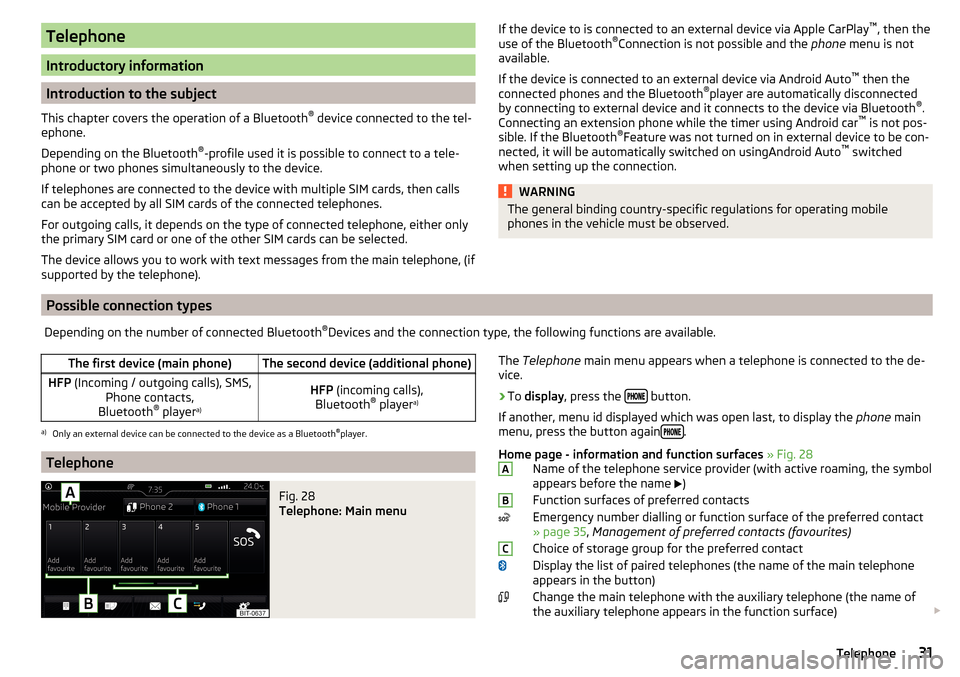
Fig. 28
Telephone: Main menu
The Telephone main menu appears when a telephone is connected to the de-
vice.›
To display , press the button.
If another, menu id displayed which was open last, to display the phone main
menu, press the button again
.
Home page - information and function surfaces » Fig. 28
Name of the telephone service provider (with active roaming, the symbol
appears before the name
)
Function surfaces of preferred contacts
Emergency number dialling or function surface of the preferred contact
» page 35 , Management of preferred contacts (favourites)
Choice of storage group for the preferred contact
Display the list of paired telephones (the name of the main telephone appears in the button)
Change the main telephone with the auxiliary telephone (the name of
the auxiliary telephone appears in the function surface)
ABC31Telephone
Page 34 of 76
Enter the telephone number
Display the phone contact list, depending on the connection type
» page 31 , Possible connection types
Display a collection of text messages (SMS) (with new messages the
number of messages appears next to the functional surface)
Display the call list (missed calls, in addition to the function surface, the
number of calls when absent is displayed)
Menu settings for Telephone
Symbols in the status bar Signal strength of the telephone service network
Charge status of the telephone battery
Missed call
Current call
Incoming SMS
Ongoing data transfer
Settings
›
In the Telephone main menu, tap on the function surface,
surface.
■
Hands-free
- Switching a call to the telephone / back to the device (the menu
item is displayed during a call)
■
Select telephone
- Search for available telephones/list of paired telephones/se-
lect telephone
■
Bluetooth
- Bluetooth ®
settings » page 17
■
User profile
- user profile settings
■
Manage favourites
- set the function surfaces for your favourite contacts
■
Mailbox number:
- Enter the voice mail phone number
■
Sort by:
- Arrangement of telephone contact list
■
Surname
- Sort by contact name
■
Forename
- Sort by contact's first name
■
Import contacts:
- Import telephone contacts
■
Select ring tone
- Selecting the ring tone
■
Reminder: Remember your mobile
- Turn on/off the warning mode before forget-
ting the phone in the vehicle (if the phone was connected to the device)
■
Show pictures for contacts
- Switch on/off the display of the image assigned to
the contact
■
Conference
- Activates/deactivates conference calls
Pair and connect
Introduction to the subject
The range of the connection to the hands-free system is limited to the passen-
ger compartment.
To connect a telephone with the device, the two devices must be paired via
Bluetooth ®
.
The coupling procedure depends on the number of telephones that are already
connected » page 31, Possible connection types .
Up to 20 external devices can be paired with the device. After reaching the
maximum number, the pairing of the next external device will replace that of
the device that has not been used for the longest period of time.
A connection with a telephone that is already paired does not require coupling.
It is enough to find the telephone that has been coupled in the list of coupled
phones and make the connection.
WARNINGPair and connect a telephone to the device only when the vehicle is at a
standstill - there is risk of accident!
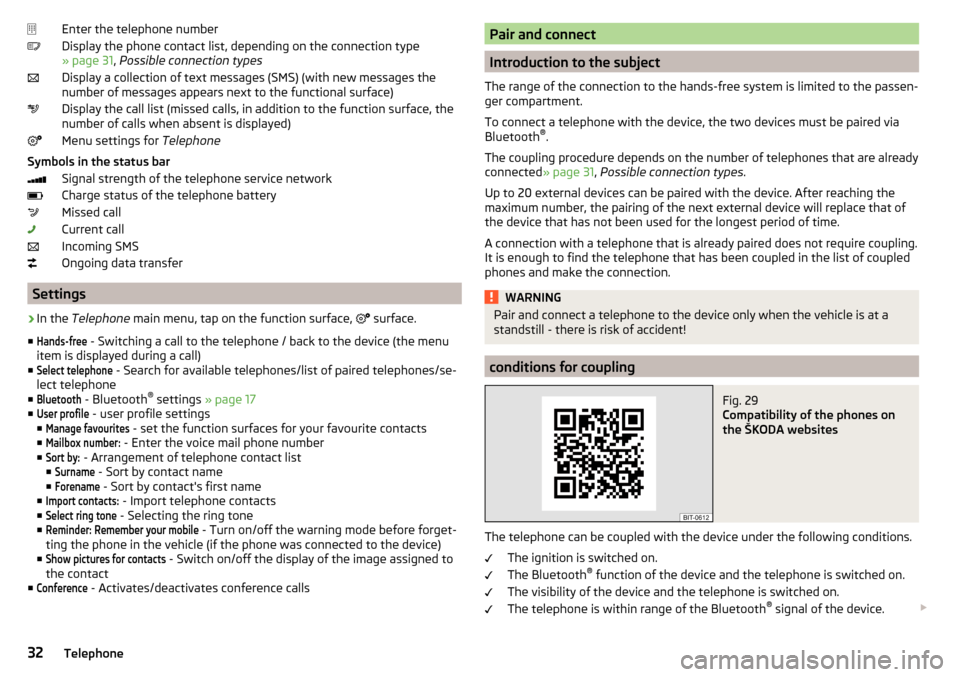
conditions for coupling
Fig. 29
Compatibility of the phones on
the ŠKODA websites
The telephone can be coupled with the device under the following conditions.
The ignition is switched on.
The Bluetooth ®
function of the device and the telephone is switched on.
The visibility of the device and the telephone is switched on.
The telephone is within range of the Bluetooth ®
signal of the device.
32Telephone
Page 35 of 76
The telephone is compatible with the device.
There is no external device connected to the device using Apple CarPlay ™
.
The pairing can be initiated from the device or from the telephone.
During the pairing and connection process, information messages are dis-
played in the device screen and the telephone screen. These messages must
be observed and if necessary confirmed (e.g. enabling the contact import or
connecting the Bluetooth ®
player etc).
By reading the QR code » Fig. 29 using the associated application in the exter-
nal device (e.g. phone, tablet) or after typing the following address into the
web browser, information about the compatibility of phones and updates are
available for Bluetooth ®
device can be displayed.
http://go.skoda.eu/compatibility
Pairing and connection process
Pair the telephone with the device
›
Search available Bluetooth ®
devices in your telephone.
›
Select the device (name of the device
→
Bluetooth
→
Name:
).
›
Confirm or enter the PIN code to confirm the pairing.
The phone is connected to the device or just paired, depending on the number
of external devices that are already connected.
Pair the device with the telephone
›
If there is no telephone connected to the device, then press the button
then tap the function surface
Find telephone
.
›
or: If the device is connected to a phone, then in the main menu phone tap
on the functional surface
→
Search phone
.
›
Select the desired telephone from the list of selected external Bluetooth ®
devices.
›
Confirm the PIN code (enter and confirm if necessary to confirm the pairing.
If external Bluetooth ®
devices are already connected to the device, then dur-
ing the pairing and connection process messages and options for the possible
connection type (e.g. replacement of the connected external Bluetooth ®
de-
vice) are displayed.
Possible connection types for phones » page 31.
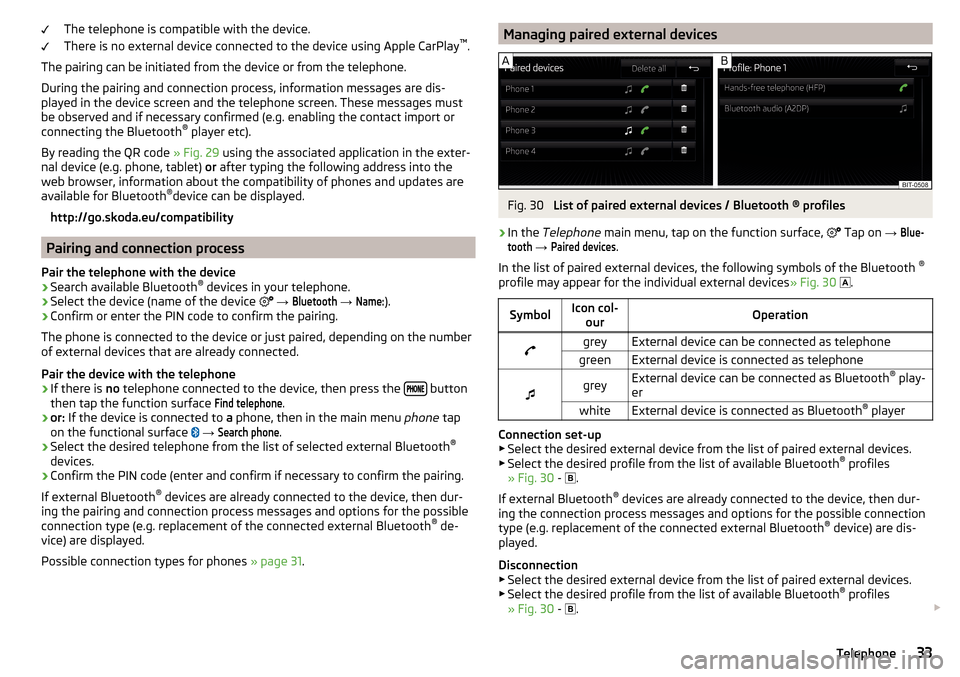
Managing paired external devicesFig. 30
List of paired external devices / Bluetooth ® profiles
›
In the Telephone main menu, tap on the function surface,
Tap on
→
Blue-tooth
→
Paired devices
.
In the list of paired external devices, the following symbols of the Bluetooth ®
profile may appear for the individual external devices » Fig. 30
.
SymbolIcon col-
ourOperationgreyExternal device can be connected as telephonegreenExternal device is connected as telephone
greyExternal device can be connected as Bluetooth ®
play-
erwhiteExternal device is connected as Bluetooth ®
player
Connection set-up
▶ Select the desired external device from the list of paired external devices.
▶ Select the desired profile from the list of available Bluetooth ®
profiles
» Fig. 30 -
.
If external Bluetooth ®
devices are already connected to the device, then dur-
ing the connection process messages and options for the possible connection
type (e.g. replacement of the connected external Bluetooth ®
device) are dis-
played.
Disconnection
▶ Select the desired external device from the list of paired external devices.
▶ Select the desired profile from the list of available Bluetooth ®
profiles
» Fig. 30 -
.
33Telephone
Page 36 of 76
Delete the paired external device▶ To delete, tap on one of the following function surfaces.
- Delete all external devices
- Delete the desired external device
▶ Confirm the deletion by tapping on the function surface Delete
.
Note
To the turn on / off the connectivity of Bluetooth ®
Player press the button
, then the functional surface Tap →
Bluetooth
→
Bluetooth audio (A2DP /AVRCP)
.
Telephone functions
Enter telephone number and select
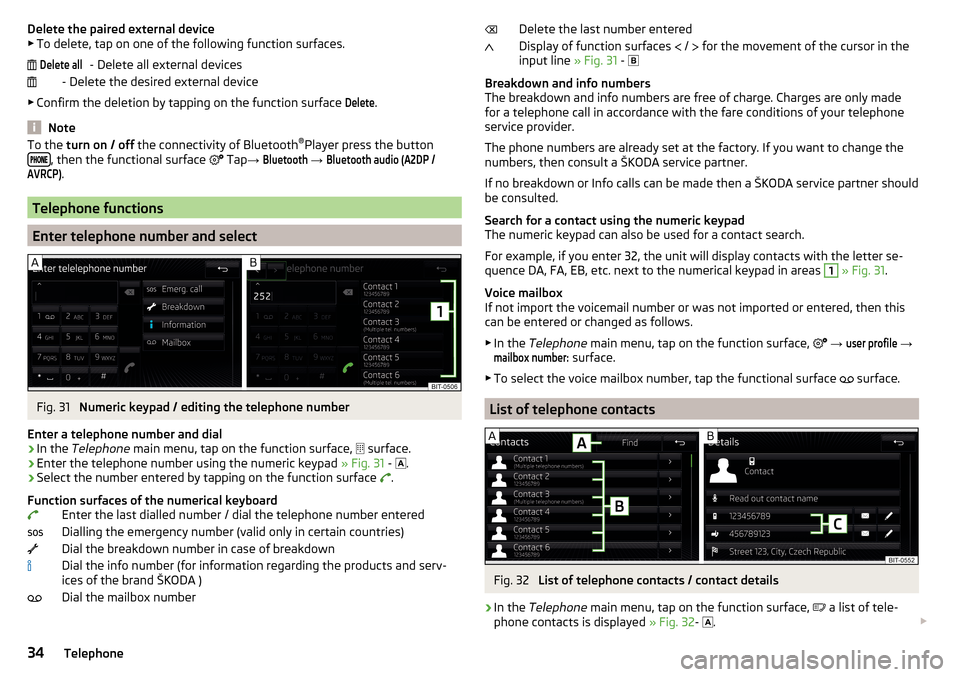
Fig. 31
Numeric keypad / editing the telephone number
Enter a telephone number and dial
›
In the Telephone main menu, tap on the function surface,
surface.
›
Enter the telephone number using the numeric keypad » Fig. 31 -
.
›
Select the number entered by tapping on the function surface
.
Function surfaces of the numerical keyboard Enter the last dialled number / dial the telephone number entered
Dialling the emergency number (valid only in certain countries)
Dial the breakdown number in case of breakdown
Dial the info number (for information regarding the products and serv-
ices of the brand ŠKODA )
Dial the mailbox number
Delete allDelete the last number entered
Display of function surfaces
/
for the movement of the cursor in the
input line » Fig. 31 -
Breakdown and info numbers
The breakdown and info numbers are free of charge. Charges are only made
for a telephone call in accordance with the fare conditions of your telephone
service provider.
The phone numbers are already set at the factory. If you want to change the
numbers, then consult a ŠKODA service partner.
If no breakdown or Info calls can be made then a ŠKODA service partner should
be consulted.
Search for a contact using the numeric keypad
The numeric keypad can also be used for a contact search.
For example, if you enter 32, the unit will display contacts with the letter se-
quence DA, FA, EB, etc. next to the numerical keypad in areas 1
» Fig. 31 .
Voice mailbox
If not import the voicemail number or was not imported or entered, then this
can be entered or changed as follows.
▶ In the Telephone main menu, tap on the function surface,
→
user profile
→
mailbox number:
surface.
▶ To select the voice mailbox number, tap the functional surface surface.
List of telephone contacts
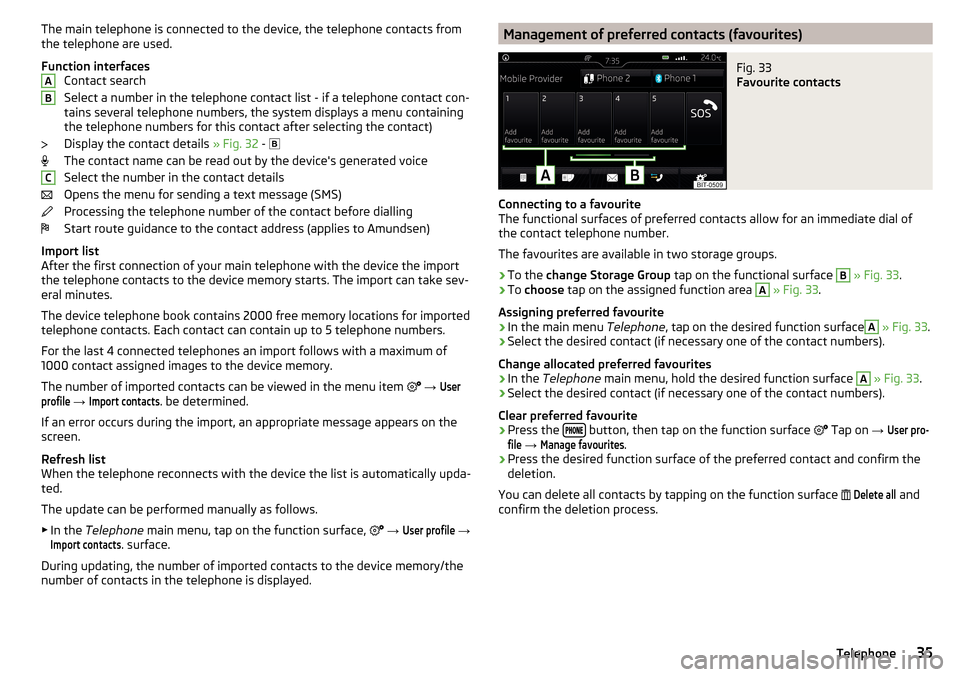
Fig. 32
List of telephone contacts / contact details
›
In the
Telephone main menu, tap on the function surface,
a list of tele-
phone contacts is displayed » Fig. 32-
.
34Telephone
Page 37 of 76
The main telephone is connected to the device, the telephone contacts from
the telephone are used.
Function interfaces Contact search
Select a number in the telephone contact list - if a telephone contact con-
tains several telephone numbers, the system displays a menu containing
the telephone numbers for this contact after selecting the contact)
Display the contact details » Fig. 32 -
The contact name can be read out by the device's generated voice
Select the number in the contact details
Opens the menu for sending a text message (SMS)
Processing the telephone number of the contact before dialling
Start route guidance to the contact address (applies to Amundsen)
Import list
After the first connection of your main telephone with the device the import
the telephone contacts to the device memory starts. The import can take sev-
eral minutes.
The device telephone book contains 2000 free memory locations for imported
telephone contacts. Each contact can contain up to 5 telephone numbers.
For the last 4 connected telephones an import follows with a maximum of
1000 contact assigned images to the device memory.
The number of imported contacts can be viewed in the menu item
→ Userprofile
→
Import contacts
. be determined.
If an error occurs during the import, an appropriate message appears on the
screen.
Refresh list
When the telephone reconnects with the device the list is automatically upda-
ted.
The update can be performed manually as follows. ▶ In the Telephone main menu, tap on the function surface,
→
User profile
→
Import contacts
. surface.
During updating, the number of imported contacts to the device memory/the
number of contacts in the telephone is displayed.
ABCManagement of preferred contacts (favourites)Fig. 33
Favourite contacts
Connecting to a favourite
The functional surfaces of preferred contacts allow for an immediate dial of
the contact telephone number.
The favourites are available in two storage groups.
›
To the change Storage Group tap on the functional surface
B
» Fig. 33 .
›
To choose tap on the assigned function area
A
» Fig. 33 .
Assigning preferred favourite
›
In the main menu Telephone, tap on the desired function surface
A
» Fig. 33 .
›
Select the desired contact (if necessary one of the contact numbers).
Change allocated preferred favourites
›
In the Telephone main menu, hold the desired function surface
A
» Fig. 33 .
›
Select the desired contact (if necessary one of the contact numbers).
Clear preferred favourite
›
Press the button, then tap on the function surface
Tap on
→
User pro-file
→
Manage favourites
.
›
Press the desired function surface of the preferred contact and confirm the
deletion.
You can delete all contacts by tapping on the function surface
Delete all
and
confirm the deletion process.
35Telephone