stop start SKODA RAPID SPACEBACK 2016 1.G Amundsen Bolero Infotainment System Navigation Manual
[x] Cancel search | Manufacturer: SKODA, Model Year: 2016, Model line: RAPID SPACEBACK, Model: SKODA RAPID SPACEBACK 2016 1.GPages: 76, PDF Size: 9.64 MB
Page 17 of 76
voice commands
Requirements for optimum voice command recognition
▶ Speak with a normal tone of voice without intonation and excessive pauses.
▶ Avoid bad pronunciation.
▶ Close the doors, windows and sliding roof, in order to avoid disturbing envi-
ronmental influences on the function of the voice commands.
▶ You are recommended to speak louder at higher speeds, so that the sound of
your voice is not drowned out by the increased ambient noise.
▶ During voice control, limit additional noise in the vehicle, e.g. passengers
talking at the same time.
Voice commands can be used anytime during voice control.Voice commandFunction“ Back ”Return to the previous menu“Help ”reproducing and displaying possible voice com-
mands
Voice commands that can be used while browsing the list entries.
Voice commandFunction“ Next page ”
Browse menu / list / directory
“Previous page ”“First page ”“Last page ”
Correction of a voice command input
A voice command can be corrected, modified or re-entered by pressing the
button
or the icon key
Actuated on the multifunction steering wheel.
However, this is only possible as long as the symbol appears on the screen.
You do not have to wait until the voice command is recognized by the device.
Stop/restore voice command input
Stop
This allows you more time for the voice command input.
The process for voice command input can by turning the dial stopped.
When stopping, the symbol changes from
.
Restore
The procedure for voice command input can be restarted in one of the follow-
ing ways.
▶ By tapping on the function interface
.
▶ By pressing the button
on the device.
▶ By pressing the icon key
on the multifunction steering wheel.
Device settings
Configuration wizard
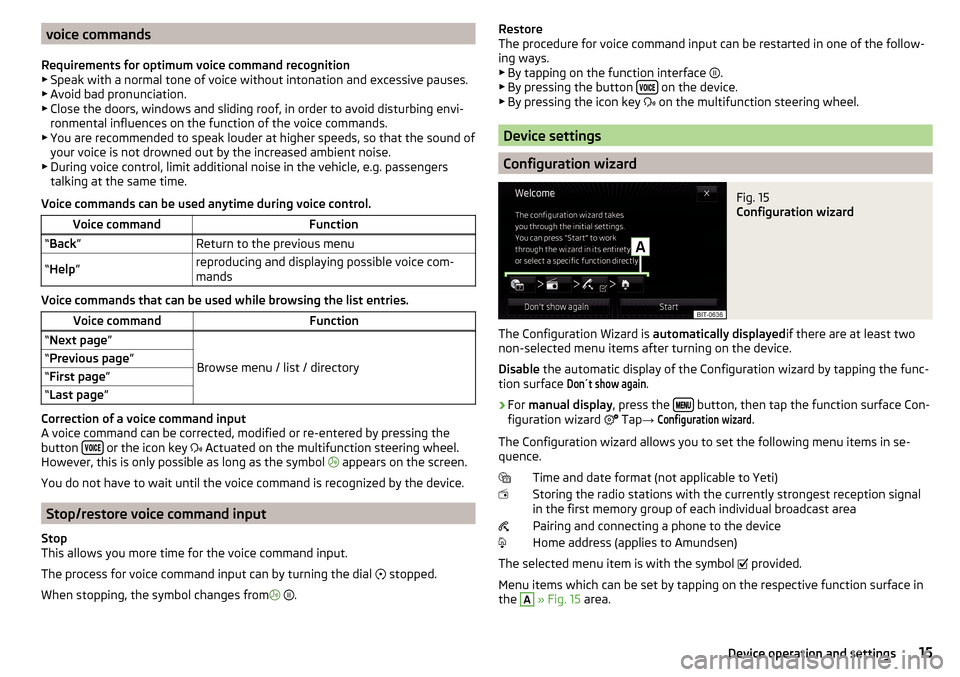
Fig. 15
Configuration wizard
The Configuration Wizard is automatically displayedif there are at least two
non-selected menu items after turning on the device.
Disable the automatic display of the Configuration wizard by tapping the func-
tion surface
Don´t show again
.
›
For manual display , press the button, then tap the function surface Con-
figuration wizard Tap
→
Configuration wizard
.
The Configuration wizard allows you to set the following menu items in se-
quence.
Time and date format (not applicable to Yeti)
Storing the radio stations with the currently strongest reception signal in the first memory group of each individual broadcast area
Pairing and connecting a phone to the device
Home address (applies to Amundsen)
The selected menu item is with the symbol provided.
Menu items which can be set by tapping on the respective function surface in
the
A
» Fig. 15 area.
15Device operation and settings
Page 26 of 76
Currently playing title / track playback stopped
The title cannot be played (tapping on the function surface shows the
cause).
Note
■ In the list, the first 1000 entries (titles, directories etc.) are displayed with the
oldest creation date.■
The scanning speed of the folder / track list depends on the connection
speed and volume of data.
Multimedia database
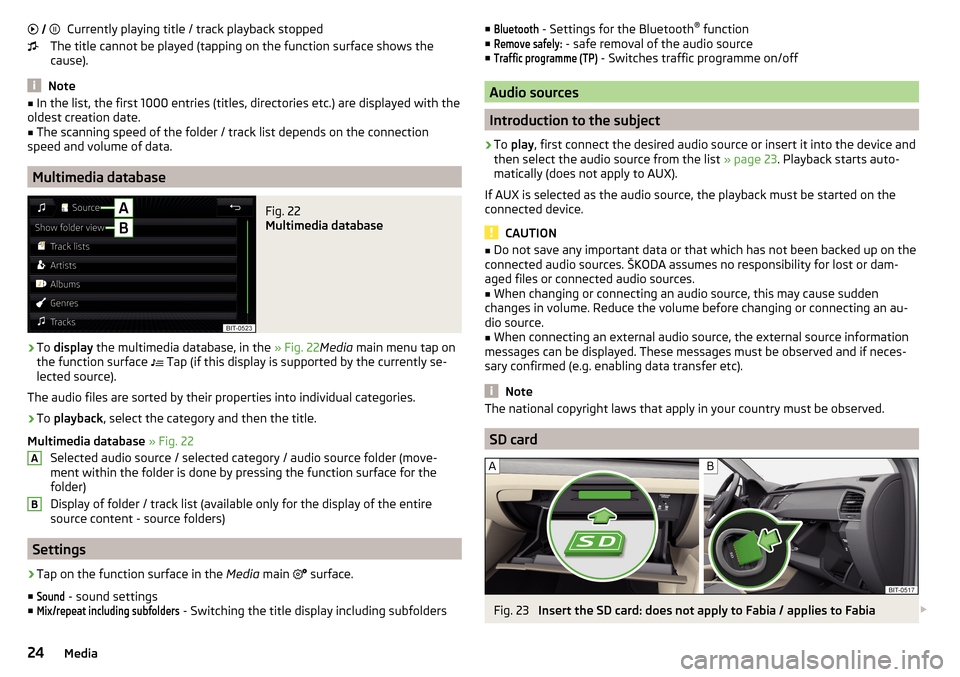
Fig. 22
Multimedia database
›
To display the multimedia database, in the » Fig. 22Media main menu tap on
the function surface
Tap (if this display is supported by the currently se-
lected source).
The audio files are sorted by their properties into individual categories.
›
To playback , select the category and then the title.
Multimedia database » Fig. 22
Selected audio source / selected category / audio source folder (move-
ment within the folder is done by pressing the function surface for the
folder)
Display of folder / track list (available only for the display of the entire
source content - source folders)
Settings
›
Tap on the function surface in the Media main
surface.
■
Sound
- sound settings
■
Mix/repeat including subfolders
- Switching the title display including subfolders
AB■Bluetooth - Settings for the Bluetooth ®
function
■Remove safely:
- safe removal of the audio source
■
Traffic programme (TP)
- Switches traffic programme on/off
Audio sources
Introduction to the subject
›
To play , first connect the desired audio source or insert it into the device and
then select the audio source from the list » page 23. Playback starts auto-
matically (does not apply to AUX).
If AUX is selected as the audio source, the playback must be started on the
connected device.
CAUTION
■ Do not save any important data or that which has not been backed up on the
connected audio sources. ŠKODA assumes no responsibility for lost or dam-
aged files or connected audio sources.■
When changing or connecting an audio source, this may cause sudden
changes in volume. Reduce the volume before changing or connecting an au-
dio source.
■
When connecting an external audio source, the external source information
messages can be displayed. These messages must be observed and if neces-
sary confirmed (e.g. enabling data transfer etc).
Note
The national copyright laws that apply in your country must be observed.
SD card
Fig. 23
Insert the SD card: does not apply to Fabia / applies to Fabia
24Media
Page 28 of 76
Automatic playback stop and disconnection
If an Apple device is connected as a Bluetooth ®
player, and this is connected to
the USB input, then the Bluetooth ®
connection is not dropped. If playback is
cancelled, playback must be started again. Only if USB is selected as the audio
source will the Apple device disconnect as a Bluetooth ®
player. In this regard,
an appropriate warning message appears on the device screen.
If the USB audio source is an Apple device, this unit cannot be connected as a
Bluetooth ®
player. In this regard, an appropriate warning message appears on
the device screen.
If the Bluetooth ®
player audio source is connected to the AUX input, then the
audio output is switched from the AUX input of the external connected device.
For further playback the audio source is to be switched to AUX.
Replace the Bluetooth ®
player
If you would like to replace a Bluetooth ®
Player which is connected to the ma-
chine as a phone at the same time, , then a relevant information message ap-
pears in the device screen.›
End the connection to the currently connected Bluetooth ®
player and repeat
the pairing procedure » page 33, Managing paired external devices .
CAUTION
If an external device is connected to the device using Apple CarPlay ™
orAndroid Auto ™
, then it cannot be connected using Bluetooth ®
.
WLAN
Applies to Amundsen (Does not apply to Yeti).
The device allows you to play audio files from one of the external devices con-
nected to the device WLAN.
›
connect an external device that supports the DLNA (Digital Living Network
Alliance), with the device WLAN » page 39.
›
If necessary use the UPnP application (Universal Plug and Play) in the con-
nected device, which allows playback to start.
›
Select the audio source Select WLAN.
Supported audio sources and file formats
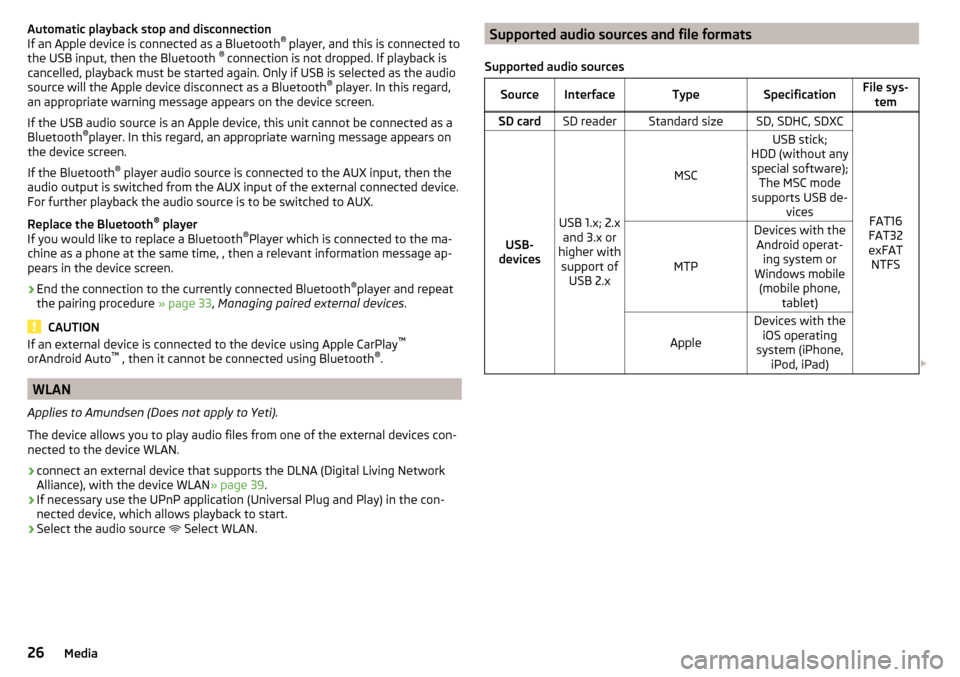
Supported audio sourcesSourceInterfaceTypeSpecificationFile sys- temSD cardSD readerStandard sizeSD, SDHC, SDXC
FAT16
FAT32
exFAT NTFSUSB-
devices
USB 1.x; 2.x and 3.x or
higher with support of USB 2.x
MSC
USB stick;
HDD (without any special software); The MSC mode
supports USB de- vices
MTP
Devices with theAndroid operat- ing system or
Windows mobile (mobile phone, tablet)
Apple
Devices with theiOS operating
system (iPhone, iPod, iPad) 26Media
Page 54 of 76
›Tap on the function
Surface in the image, a menu opens with the option to
start route guidance.
Map
Map description
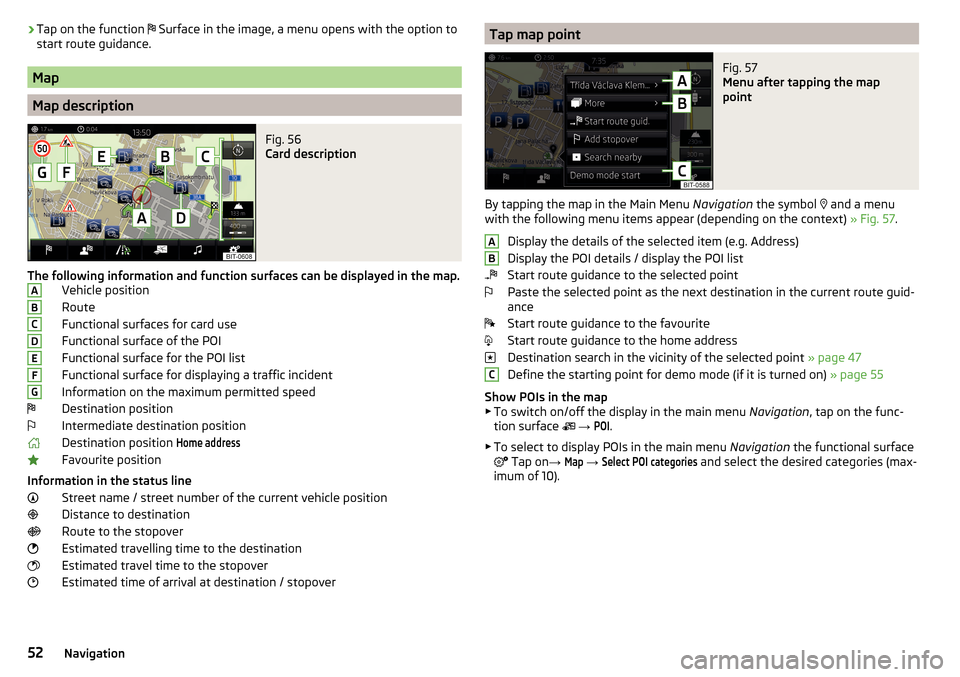
Fig. 56
Card description
The following information and function surfaces can be displayed in the map. Vehicle position
Route
Functional surfaces for card use
Functional surface of the POI
Functional surface for the POI list
Functional surface for displaying a traffic incident
Information on the maximum permitted speed Destination position
Intermediate destination position
Destination position
Home address
Favourite position
Information in the status line Street name / street number of the current vehicle position
Distance to destination
Route to the stopover
Estimated travelling time to the destination
Estimated travel time to the stopover
Estimated time of arrival at destination / stopover
ABCDEFGTap map pointFig. 57
Menu after tapping the map
point
By tapping the map in the Main Menu Navigation the symbol
and a menu
with the following menu items appear (depending on the context) » Fig. 57.
Display the details of the selected item (e.g. Address)
Display the POI details / display the POI list
Start route guidance to the selected point
Paste the selected point as the next destination in the current route guid-
ance
Start route guidance to the favourite
Start route guidance to the home address
Destination search in the vicinity of the selected point » page 47
Define the starting point for demo mode (if it is turned on) » page 55
Show POIs in the map
▶ To switch on/off the display in the main menu Navigation, tap on the func-
tion surface
→
POI
.
▶ To select to display POIs in the main menu Navigation the functional surface
Tap on
→
Map
→
Select POI categories
and select the desired categories (max-
imum of 10).
ABC52Navigation
Page 57 of 76
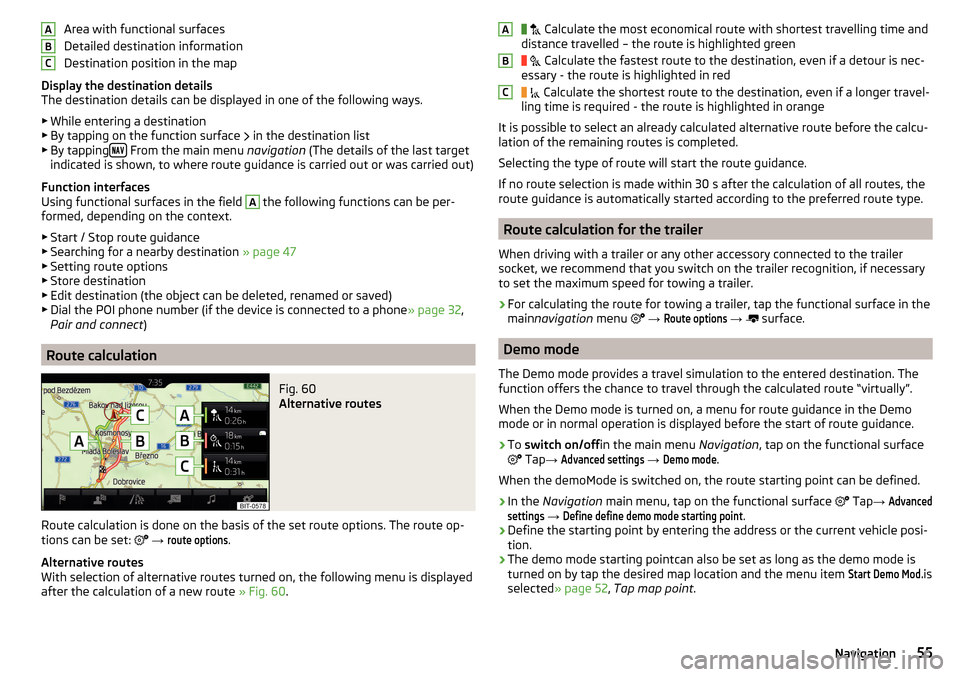
Area with functional surfaces
Detailed destination information
Destination position in the map
Display the destination details
The destination details can be displayed in one of the following ways.
▶ While entering a destination
▶ By tapping on the function surface
in the destination list
▶ By tapping
From the main menu
navigation (The details of the last target
indicated is shown, to where route guidance is carried out or was carried out)
Function interfaces
Using functional surfaces in the field
A
the following functions can be per-
formed, depending on the context.
▶ Start / Stop route guidance
▶ Searching for a nearby destination » page 47
▶ Setting route options
▶ Store destination
▶ Edit destination (the object can be deleted, renamed or saved)
▶ Dial the POI phone number (if the device is connected to a phone » page 32,
Pair and connect )
Route calculation
Fig. 60
Alternative routes
Route calculation is done on the basis of the set route options. The route op-
tions can be set:
→
route options
.
Alternative routes
With selection of alternative routes turned on, the following menu is displayed
after the calculation of a new route » Fig. 60.
ABC Calculate the most economical route with shortest travelling time and
distance travelled – the route is highlighted green
Calculate the fastest route to the destination, even if a detour is nec-
essary - the route is highlighted in red
Calculate the shortest route to the destination, even if a longer travel-
ling time is required - the route is highlighted in orange
It is possible to select an already calculated alternative route before the calcu- lation of the remaining routes is completed.
Selecting the type of route will start the route guidance.
If no route selection is made within 30 s after the calculation of all routes, the
route guidance is automatically started according to the preferred route type.
Route calculation for the trailer
When driving with a trailer or any other accessory connected to the trailer
socket, we recommend that you switch on the trailer recognition, if necessary
to set the maximum speed for towing a trailer.
›
For calculating the route for towing a trailer, tap the functional surface in the
main navigation menu
→
Route options
→
surface.
Demo mode
The Demo mode provides a travel simulation to the entered destination. The
function offers the chance to travel through the calculated route “virtually”.
When the Demo mode is turned on, a menu for route guidance in the Demo
mode or in normal operation is displayed before the start of route guidance.
›
To switch on/off in the main menu Navigation, tap on the functional surface
Tap
→
Advanced settings
→
Demo mode
.
When the demoMode is switched on, the route starting point can be defined.
›
In the Navigation main menu, tap on the functional surface
Tap
→
Advancedsettings
→
Define define demo mode starting point
.
›
Define the starting point by entering the address or the current vehicle posi-
tion.
›
The demo mode starting pointcan also be set as long as the demo mode is
turned on by tap the desired map location and the menu item
Start Demo Mod.
is
selected » page 52 , Tap map point .
ABC55Navigation
Page 58 of 76
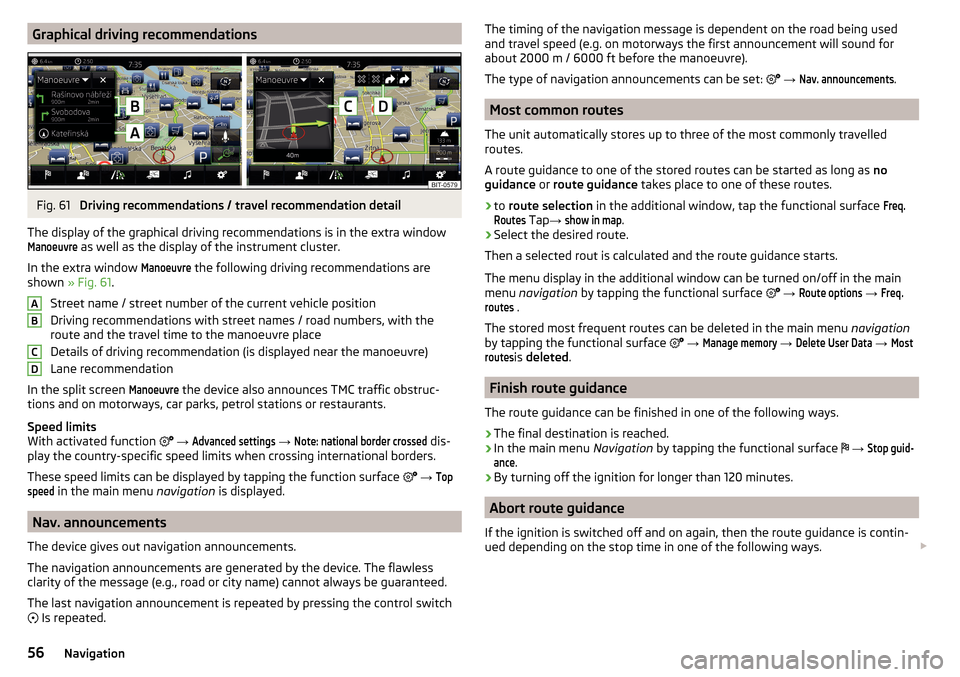
Graphical driving recommendationsFig. 61
Driving recommendations / travel recommendation detail
The display of the graphical driving recommendations is in the extra window
Manoeuvre
as well as the display of the instrument cluster.
In the extra window
Manoeuvre
the following driving recommendations are
shown » Fig. 61 .
Street name / street number of the current vehicle position
Driving recommendations with street names / road numbers, with the
route and the travel time to the manoeuvre place
Details of driving recommendation (is displayed near the manoeuvre)
Lane recommendation
In the split screen
Manoeuvre
the device also announces TMC traffic obstruc-
tions and on motorways, car parks, petrol stations or restaurants.
Speed limits
With activated function
→
Advanced settings
→
Note: national border crossed
dis-
play the country-specific speed limits when crossing international borders.
These speed limits can be displayed by tapping the function surface
→
Topspeed
in the main menu navigation is displayed.
Nav. announcements
The device gives out navigation announcements.
The navigation announcements are generated by the device. The flawless
clarity of the message (e.g., road or city name) cannot always be guaranteed.
The last navigation announcement is repeated by pressing the control switch
Is repeated.
ABCDThe timing of the navigation message is dependent on the road being used
and travel speed (e.g. on motorways the first announcement will sound for
about 2000 m / 6000 ft before the manoeuvre).
The type of navigation announcements can be set:
→ Nav. announcements
.
Most common routes
The unit automatically stores up to three of the most commonly travelled
routes.
A route guidance to one of the stored routes can be started as long as no
guidance or route guidance takes place to one of these routes.
›
to route selection in the additional window, tap the functional surface
Freq.Routes
Tap→
show in map
.
›
Select the desired route.
Then a selected rout is calculated and the route guidance starts.
The menu display in the additional window can be turned on/off in the main menu navigation by tapping the functional surface
→
Route options
→
Freq.routes
.
The stored most frequent routes can be deleted in the main menu navigation
by tapping the functional surface
→
Manage memory
→
Delete User Data
→
Mostroutes
is deleted .
Finish route guidance
The route guidance can be finished in one of the following ways.
›
The final destination is reached.
›
In the main menu Navigation by tapping the functional surface
→
Stop guid-ance
.
›
By turning off the ignition for longer than 120 minutes.
Abort route guidance
If the ignition is switched off and on again, then the route guidance is contin-
ued depending on the stop time in one of the following ways.
56Navigation
Page 60 of 76
Store route
▶ In the area A, tap the functional surface
Save
.
▶ Save the edited route as a new route or replace the existing saved route.
Stop route guidance ▶ In the area A
, tap the functional surface
stop
.
Route management
›
In the Navigation main menu, tap on the functional surface
Tap
→
routes
.
New route ▶ Tap the function surface
New route
.
Insert a route destination in one of the following ways.
▶ Tap on The functional surface
Name destination
and enter a new destination.
▶ or: Tap on the function key
destinations
and select a destination from the list
of saved destinations.
▶ To save the created route, tap the functional surface
Save
.
▶ Tap the functional surface
Start
to start route guidance.
Route management
▶ Choose the desired saved route, and then select one of the following menu
items.
Clear saved route
- Edit route
- Calculate route and start route guidance
Traffic reports
List of traffic reports
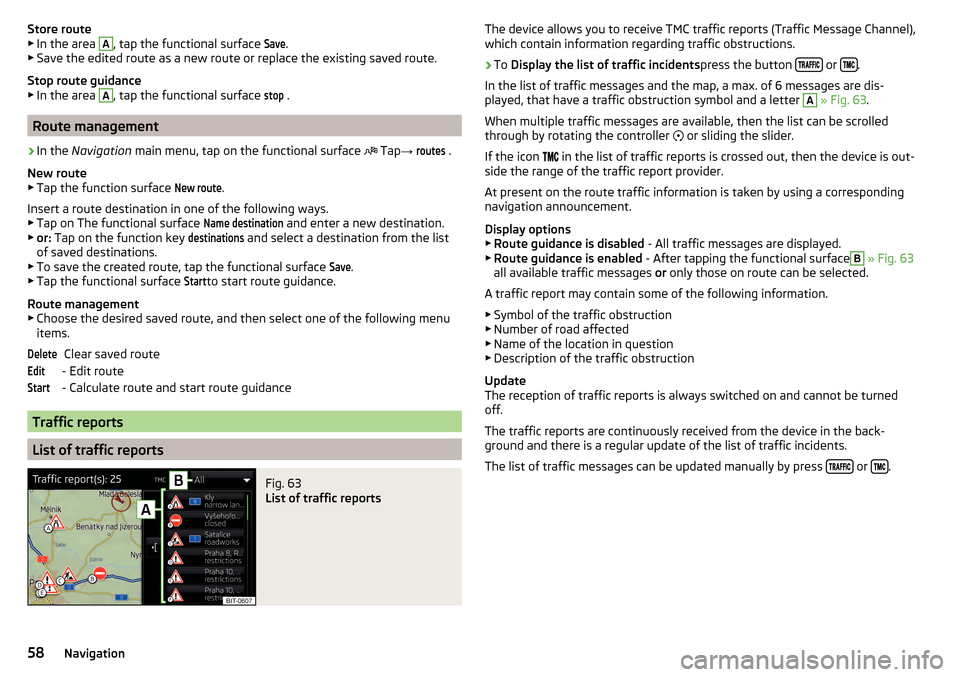
Fig. 63
List of traffic reports
DeleteEditStartThe device allows you to receive TMC traffic reports (Traffic Message Channel),
which contain information regarding traffic obstructions.›
To Display the list of traffic incidents press the button or .
In the list of traffic messages and the map, a max. of 6 messages are dis-
played, that have a traffic obstruction symbol and a letter
A
» Fig. 63 .
When multiple traffic messages are available, then the list can be scrolled
through by rotating the controller
or sliding the slider.
If the icon
in the list of traffic reports is crossed out, then the device is out-
side the range of the traffic report provider.
At present on the route traffic information is taken by using a corresponding
navigation announcement.
Display options ▶ Route guidance is disabled - All traffic messages are displayed.
▶ Route guidance is enabled - After tapping the functional surface
B
» Fig. 63
all available traffic messages or only those on route can be selected.
A traffic report may contain some of the following information. ▶ Symbol of the traffic obstruction
▶ Number of road affected
▶ Name of the location in question
▶ Description of the traffic obstruction
Update
The reception of traffic reports is always switched on and cannot be turned
off.
The traffic reports are continuously received from the device in the back-
ground and there is a regular update of the list of traffic incidents.
The list of traffic messages can be updated manually by press
or .
58Navigation
Page 65 of 76
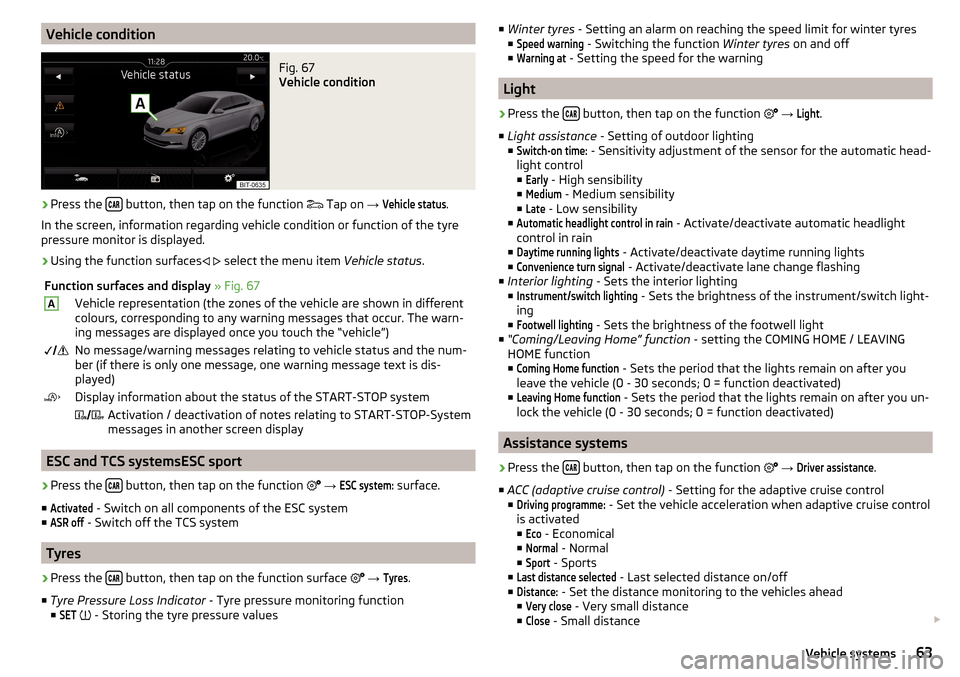
Vehicle conditionFig. 67
Vehicle condition
›
Press the button, then tap on the function
Tap on
→
Vehicle status
.
In the screen, information regarding vehicle condition or function of the tyre
pressure monitor is displayed.
›
Using the function surfaces
select the menu item
Vehicle status.
Function surfaces and display » Fig. 67AVehicle representation (the zones of the vehicle are shown in different
colours, corresponding to any warning messages that occur. The warn-
ing messages are displayed once you touch the “vehicle”) No message/warning messages relating to vehicle status and the num-
ber (if there is only one message, one warning message text is dis-
played)Display information about the status of the START-STOP system Activation / deactivation of notes relating to START-STOP-System
messages in another screen display
ESC and TCS systemsESC sport
›
Press the button, then tap on the function
→
ESC system:
surface.
■
Activated
- Switch on all components of the ESC system
■
ASR off
- Switch off the TCS system
Tyres
›
Press the button, then tap on the function surface
→
Tyres
.
■ Tyre Pressure Loss Indicator - Tyre pressure monitoring function
■
SET
- Storing the tyre pressure values
■
Winter tyres - Setting an alarm on reaching the speed limit for winter tyres
■Speed warning
- Switching the function Winter tyres on and off
■
Warning at
- Setting the speed for the warning
Light
›
Press the button, then tap on the function
→
Light
.
■ Light assistance - Setting of outdoor lighting
■
Switch-on time:
- Sensitivity adjustment of the sensor for the automatic head-
light control ■
Early
- High sensibility
■
Medium
- Medium sensibility
■
Late
- Low sensibility
■
Automatic headlight control in rain
- Activate/deactivate automatic headlight
control in rain
■
Daytime running lights
- Activate/deactivate daytime running lights
■
Convenience turn signal
- Activate/deactivate lane change flashing
■ Interior lighting - Sets the interior lighting
■
Instrument/switch lighting
- Sets the brightness of the instrument/switch light-
ing
■
Footwell lighting
- Sets the brightness of the footwell light
■ “Coming/Leaving Home” function - setting the COMING HOME / LEAVING
HOME function
■
Coming Home function
- Sets the period that the lights remain on after you
leave the vehicle (0 - 30 seconds; 0 = function deactivated)
■
Leaving Home function
- Sets the period that the lights remain on after you un-
lock the vehicle (0 - 30 seconds; 0 = function deactivated)
Assistance systems
›
Press the button, then tap on the function
→
Driver assistance
.
■ ACC (adaptive cruise control) - Setting for the adaptive cruise control
■
Driving programme:
- Set the vehicle acceleration when adaptive cruise control
is activated
■
Eco
- Economical
■
Normal
- Normal
■
Sport
- Sports
■
Last distance selected
- Last selected distance on/off
■
Distance:
- Set the distance monitoring to the vehicles ahead
■
Very close
- Very small distance
■
Close
- Small distance
63Vehicle systems
Page 72 of 76
Route54
New route58
Route import58
Route memory58
Route calculation55
Trailer towing55
Route import58
Route information57
Route memory58
Route options59
Route plan57
Route schedule57
S
Safe removal of the data source
17
Save station20
Screen See device screen
9
Screen display11
SD card24
Search for car park49
Search for petrol station49
Search for restaurant49
Select broadcasting See main menu
19
Select Image Source Images
27
Select source Media
23
Select station See main menu
19
service Images
27
Service64
Settings Additional keyboard languages
17
AUX24
Bluetooth17, 32
Codecs24
Configuration Wizard15
DAB21
Device15
Device language16
Device screen16
Equalizer16
external device data transfer17
FM21
Images28
Manage favourites35
Media24
Navigation59
Phone32
Pin code32
Radio21
Reset to factory settings17
SmartLink42
Software update10
Sound16
Sound system16
Subwoofer16
Surround16
System information10, 18
Text messages32
Time and date16
Units17
Update software18
User profile35
Vehicle62
Voice control17
Volume11
WLAN18
Settings Call32
Set up15
Show POIs on the map52
SmartLink41
Android Auto™42
Apple CarPlay™43
Main menu41
MirrorLink®43
set42
SMS37
new38
Operation37
received38
Software update10
Software Update18
Sound16
Sound system16
Speed limitations56
Speedlimit for winter tyres63
SSID18
START-STOP 63
Station See main menu
19
Station logos Update
10
Status line11, 52
Navigation61
Telephone31
Stored destinations Destination memory
50
Final destinations49
Store destination54
Subwoofer16
Supported sources media
26
Surround16
System information10, 18
T
TCS
63
telephone conditions for coupling
32
Telephone31
Bluetooth profile33
Breakdown service34
Call list36
Conference call37
connect to the device32
70Index