gearbox SKODA RAPID SPACEBACK 2016 1.G User Guide
[x] Cancel search | Manufacturer: SKODA, Model Year: 2016, Model line: RAPID SPACEBACK, Model: SKODA RAPID SPACEBACK 2016 1.GPages: 184, PDF Size: 28.1 MB
Page 94 of 184

Only a floor mat (ex-factory or from the ŠKODA Original Accessories range)
which can be secured to the attachment points should be used in the driver's
footwell.WARNINGThere should be no objects in the driver's footwell, otherwise the pedal op-
eration can be impeded - risk of accident!
Automatic gearbox
Introduction
This chapter contains information on the following subjects:
Select selector lever position
92
Selector lever lock
93
Manual shifting (Tiptronic)
93
Starting-off and driving
94
The automatic transmission performs an automatic gear change irrespective of
the engine load, the operation of the accelerator, the vehicle speed and the
selected driving mode.
The modes of the automatic transmission can be adjusted by the driver by
means of the selector lever.
WARNING■ Do not accelerate when selecting drive mode prior to moving off - risk of
accident!■
Never move the selector lever to mode R or P when driving – risk of acci-
dent!
■
If the vehicle stalls, with engine running, in the D, S , R or Tiptronic mode,
the vehicle must be prevented from rolling away by means of the brake
pedal or the parking brake. Even when the engine is idling, the power
transmission is never completely interrupted – the vehicle crawls forward.
■
When leaving the vehicle, the selector lever must always be set to P. Oth-
erwise, the vehicle could be set in motion - risk of accident.
CAUTION
If you want to move the selector lever from position N to position D / S whilst
driving, the engine must be running at idling speed.Select selector lever positionFig. 110
Selector lever/display
Read and observe and on page 92 first.
The selector lever can be moved by shifting to one of the following positions » Fig. 110 . In some positions you have to push the locking button » page 93.
When the ignition is switched on, the gearbox mode and the currently selected
gear are indicated in the display » Fig. 110.
Parking - the position can be set only when the vehicle is at a standstill.
The drive wheels are mechanically locked.
Reverse gear - the position can only be selected when the vehicle is sta-
tionary and the engine is idling.
Neutral (idle position) - power transmission to the drive wheels is inter-
rupted.
Forward mode / sports programme - the gear change takes place in the
position S at higher engine speeds than in mode D
(Sprung position) - choice between positions D and S
In mode D or S, the forward gears are shifted automatically depending on the
engine load, the operation of the accelerator pedal, the vehicle speed, and the
selected driving mode .
PRND/S92Driving
Page 95 of 184
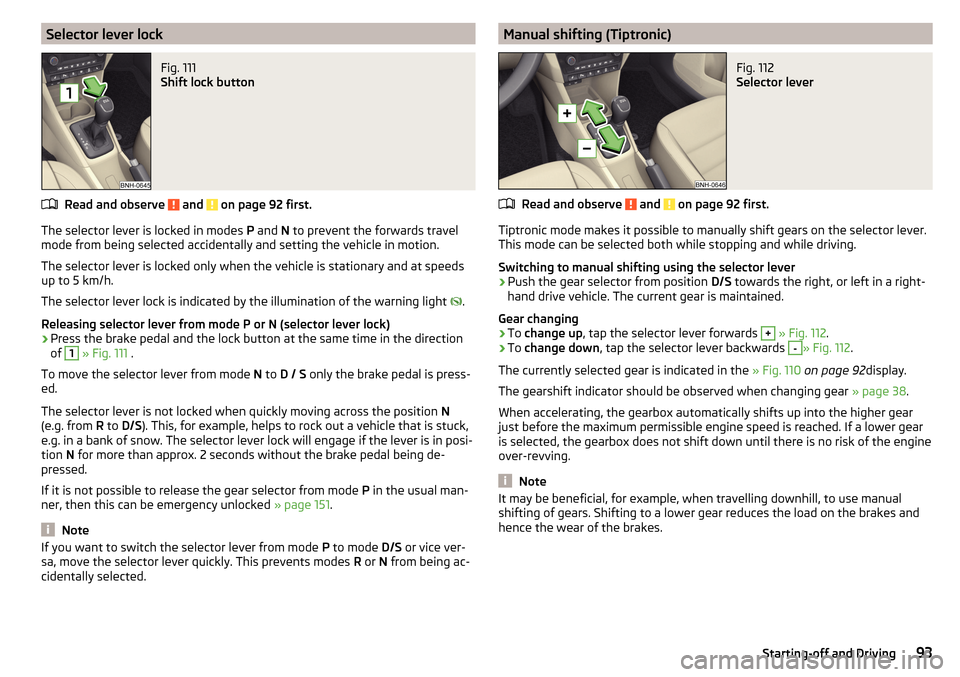
Selector lever lockFig. 111
Shift lock button
Read and observe and on page 92 first.
The selector lever is locked in modes P and N to prevent the forwards travel
mode from being selected accidentally and setting the vehicle in motion.
The selector lever is locked only when the vehicle is stationary and at speeds
up to 5 km/h.
The selector lever lock is indicated by the illumination of the warning light .
Releasing selector lever from mode P or N (selector lever lock)
›
Press the brake pedal and the lock button at the same time in the direction
of
1
» Fig. 111 .
To move the selector lever from mode N to D / S only the brake pedal is press-
ed.
The selector lever is not locked when quickly moving across the position N
(e.g. from R to D/S ). This, for example, helps to rock out a vehicle that is stuck,
e.g. in a bank of snow. The selector lever lock will engage if the lever is in posi-
tion N for more than approx. 2 seconds without the brake pedal being de-
pressed.
If it is not possible to release the gear selector from mode P in the usual man-
ner, then this can be emergency unlocked » page 151.
Note
If you want to switch the selector lever from mode P to mode D/S or vice ver-
sa, move the selector lever quickly. This prevents modes R or N from being ac-
cidentally selected.Manual shifting (Tiptronic)Fig. 112
Selector lever
Read and observe and on page 92 first.
Tiptronic mode makes it possible to manually shift gears on the selector lever. This mode can be selected both while stopping and while driving.
Switching to manual shifting using the selector lever
›
Push the gear selector from position D/S towards the right, or left in a right-
hand drive vehicle. The current gear is maintained.
Gear changing
›
To change up , tap the selector lever forwards
+
» Fig. 112 .
›
To change down , tap the selector lever backwards
-
» Fig. 112.
The currently selected gear is indicated in the » Fig. 110 on page 92 display.
The gearshift indicator should be observed when changing gear » page 38.
When accelerating, the gearbox automatically shifts up into the higher gear
just before the maximum permissible engine speed is reached. If a lower gear
is selected, the gearbox does not shift down until there is no risk of the engine
over-revving.
Note
It may be beneficial, for example, when travelling downhill, to use manual
shifting of gears. Shifting to a lower gear reduces the load on the brakes and
hence the wear of the brakes.93Starting-off and Driving
Page 118 of 184
Exterior mirrors
You should have additional exterior mirrors fitted if you are not able to see the
traffic behind the trailer using the standard rear-view mirrors.
Headlights
The front of the vehicle may lift up when a trailer (accessory) is being towed
and the headlights may dazzle other road users. Set the range of the head-
lights » page 54 .
Power supply of the trailer / accessory power system
In the electrical connection between the vehicle and trailer (accessory), the
trailer (accessories) is supplied with power from the vehicle (with ignition
switched on and off).
With the engine switched off, the vehicle battery is discharged by the connec-
ted consumers.
At low charge state of the vehicle battery, the power supply to the trailer (ac-
cessories) is interrupted.WARNING■ An improperly connected electrical installation of the trailer (accessories)
may result in an accident or serious injury from electrical shock.■
Do not make any adjustments to the electrical installation of the vehicle
and the trailer (accessories) - risk of an accident or serious injury from elec-
trical shock.
WARNING (Continued)■ After the electrical connection between the vehicle and trailer (accessory)
the trailer / accessory lights should be checked for function.■
Never use the securing eye to tow - risk of accident!
CAUTION
■ An improperly connected electrical installation of the trailer (accessories) can
lead to the inoperability of the vehicle electronics.■
The total power consumption of all the connected consumers to the trailer
power supply must not exceed 350 watts, otherwise there is a risk of damage
to the electrical system of the vehicle.
Loading a trailer
Correct the tyre inflation pressure on the vehicle for “full load” » page 137.
Distribution of the cargo
Distribute the cargo in the trailer in such a way that heavy items are located as
close to the trailer axle as possible. Secure the load from slipping.
The distribution of the weight is very poor if your vehicle is unladen and the
trailer is laden. Nevertheless, maintain a particularly low speed if you cannot
avoid driving with this combination.
WARNINGA sliding cargo can significantly adversely affect stability and driving safety
- there is a risk of accident!
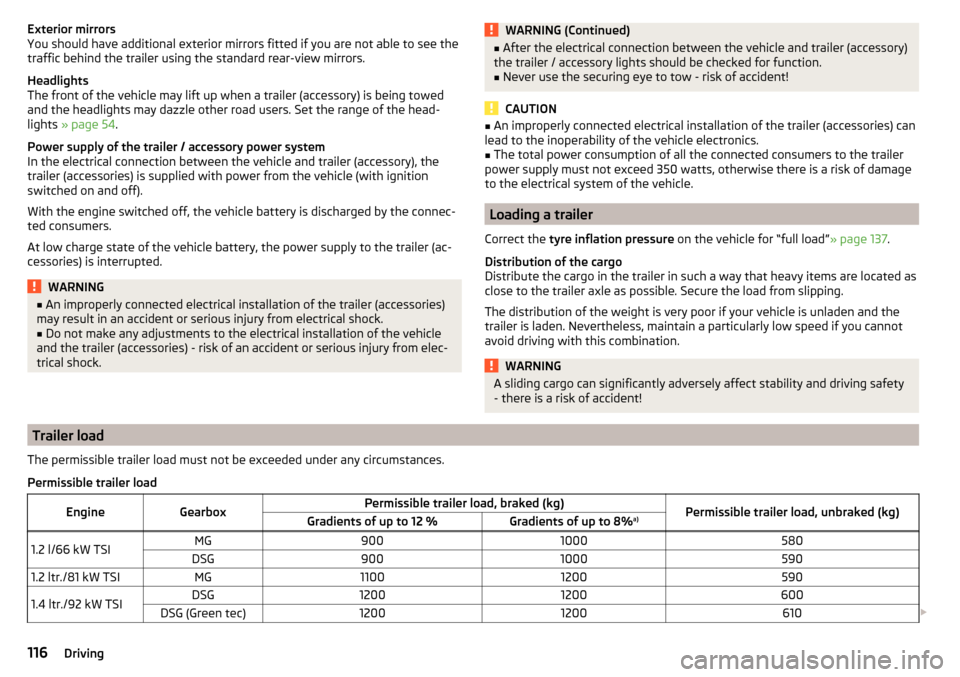
Trailer load
The permissible trailer load must not be exceeded under any circumstances.Permissible trailer loadEngineGearboxPermissible trailer load, braked (kg)Permissible trailer load, unbraked (kg)Gradients of up to 12 %Gradients of up to 8% a)1.2 l/66 kW TSIMG9001000580DSG90010005901.2 ltr./81 kW TSIMG110012005901.4 ltr./92 kW TSIDSG12001200600DSG (Green tec)12001200610
116Driving
Page 119 of 184
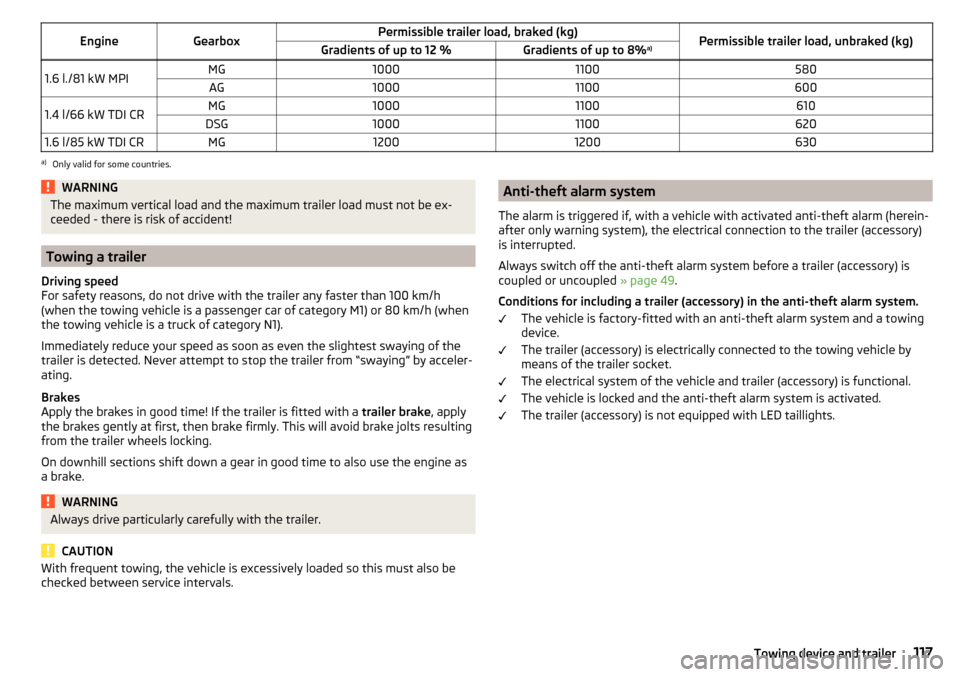
EngineGearboxPermissible trailer load, braked (kg)Permissible trailer load, unbraked (kg)Gradients of up to 12 %Gradients of up to 8%a)1.6 l./81 kW MPIMG10001100580AG100011006001.4 l/66 kW TDI CRMG10001100610DSG100011006201.6 l/85 kW TDI CRMG12001200630a)
Only valid for some countries.
WARNINGThe maximum vertical load and the maximum trailer load must not be ex-
ceeded - there is risk of accident!
Towing a trailer
Driving speed
For safety reasons, do not drive with the trailer any faster than 100 km/h
(when the towing vehicle is a passenger car of category M1) or 80 km/h (when
the towing vehicle is a truck of category N1).
Immediately reduce your speed as soon as even the slightest swaying of the
trailer is detected. Never attempt to stop the trailer from “swaying” by acceler-
ating.
Brakes
Apply the brakes in good time! If the trailer is fitted with a trailer brake, apply
the brakes gently at first, then brake firmly. This will avoid brake jolts resulting
from the trailer wheels locking.
On downhill sections shift down a gear in good time to also use the engine as
a brake.
WARNINGAlways drive particularly carefully with the trailer.
CAUTION
With frequent towing, the vehicle is excessively loaded so this must also be
checked between service intervals.Anti-theft alarm system
The alarm is triggered if, with a vehicle with activated anti-theft alarm (herein-
after only warning system), the electrical connection to the trailer (accessory)
is interrupted.
Always switch off the anti-theft alarm system before a trailer (accessory) is
coupled or uncoupled » page 49.
Conditions for including a trailer (accessory) in the anti-theft alarm system. The vehicle is factory-fitted with an anti-theft alarm system and a towing
device.
The trailer (accessory) is electrically connected to the towing vehicle by
means of the trailer socket.
The electrical system of the vehicle and trailer (accessory) is functional.
The vehicle is locked and the anti-theft alarm system is activated.
The trailer (accessory) is not equipped with LED taillights.117Towing device and trailer
Page 150 of 184
›Attach clamp 3 to the negative terminal of the power-supplying battery.›For vehicles
with the START-STOPsystem, attach clamp 4 to the earth point
of the engine A
» Fig. 171 .
›
For vehicles without the START-STOPsystem, attach clamp
4
to a solid
metal part firmly attached to the engine block or directly to the engine block.
Installation location of the positive terminal and the earth point in vehicles
with the vehicle battery in the luggage compartment
The positive terminal
B
is located under a cover in the engine compartment
» Fig. 172 .
›
Unlock the lock buttons of the cover in the direction of arrow
1
and remove
the cover in the direction of arrow
2
.
›
Clamp the positive terminal of the jumper cable to the position
B
» Fig. 172 .
›
Clamp the negative terminal of the jumper cable to the earth point of the en-
gine
A
or on a metal part firmly connected to the engine block or directly on
the engine block.
Starting engine
›
Start the engine on the vehicle providing the power and allow it to idle.
›
Initiate the starting process in the vehicle with the discharged battery.
›
If the engine does not start within 10 s, then cancel the starting procedure
and repeat after half a minute.
›
Remove the jump start cables in the reverse order as attachment.
WARNING■
Never clamp the jump cable to the negative terminal of the discharged
battery - risk of explosion.■
The non-insulated parts of the terminal clamps must never touch each
other – there is a risk of short circuit!
■
The jump-start cable connected to the positive terminal of the battery
must not come into contact with electrically conducting parts of the vehicle
– there is a risk of short circuit!
■
Position the jump cables so that they cannot be caught in rotating parts
in the engine compartment - danger of injuries and the risk of vehicle dam-
age.
Towing the vehicle
Information about the towing process
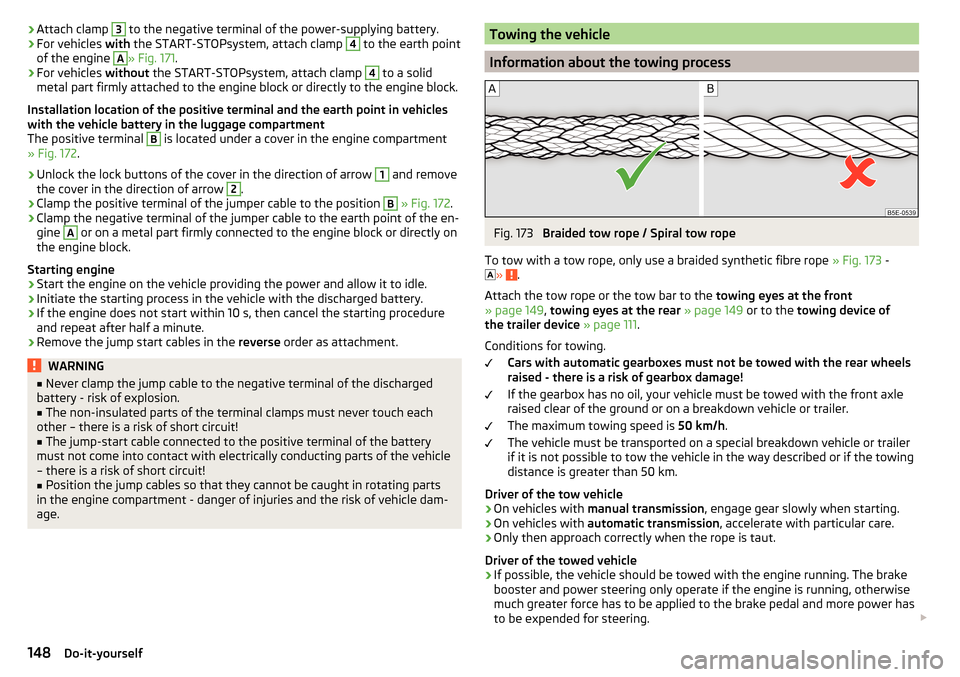
Fig. 173
Braided tow rope / Spiral tow rope
To tow with a tow rope, only use a braided synthetic fibre rope » Fig. 173 -
»
.
Attach the tow rope or the tow bar to the towing eyes at the front
» page 149 , towing eyes at the rear » page 149 or to the towing device of
the trailer device » page 111 .
Conditions for towing. Cars with automatic gearboxes must not be towed with the rear wheels
raised - there is a risk of gearbox damage!
If the gearbox has no oil, your vehicle must be towed with the front axle
raised clear of the ground or on a breakdown vehicle or trailer.
The maximum towing speed is 50 km/h.
The vehicle must be transported on a special breakdown vehicle or trailer
if it is not possible to tow the vehicle in the way described or if the towing
distance is greater than 50 km.
Driver of the tow vehicle
›
On vehicles with manual transmission , engage gear slowly when starting.
›
On vehicles with automatic transmission , accelerate with particular care.
›
Only then approach correctly when the rope is taut.
Driver of the towed vehicle
›
If possible, the vehicle should be towed with the engine running. The brake
booster and power steering only operate if the engine is running, otherwise
much greater force has to be applied to the brake pedal and more power has
to be expended for steering.
148Do-it-yourself
Page 151 of 184
›If it is not possible to start the engine, switch on the ignition so that the
steering wheel does not lock and so that the turn signal lights, windscreen
wipers and windscreen washer system can be used.›
Take the vehicle out of gear or move the selector lever into position N if the
vehicle is fitted with an automatic gearbox.
›
Keep the tow rope taut at all times during the towing procedure.
WARNING■ Spiral tow ropes must not be used for towing » Fig. 173- , the towing
eye may unscrew out of the vehicle - risk of accident.■
The tow rope should not be twisted - there is a risk of accidents.
CAUTION
■ Do not tow-start the engine – risk of damaging the engine! The battery from
another vehicle can be used as a jump-start aid » page 147, Jump-starting .■
For off-road towing manoeuvres, there is a risk to both vehicles that the fas-
teners may become overloaded and damaged.
Note
We recommend that you use a tow rope from ŠKODA Original Accessories.
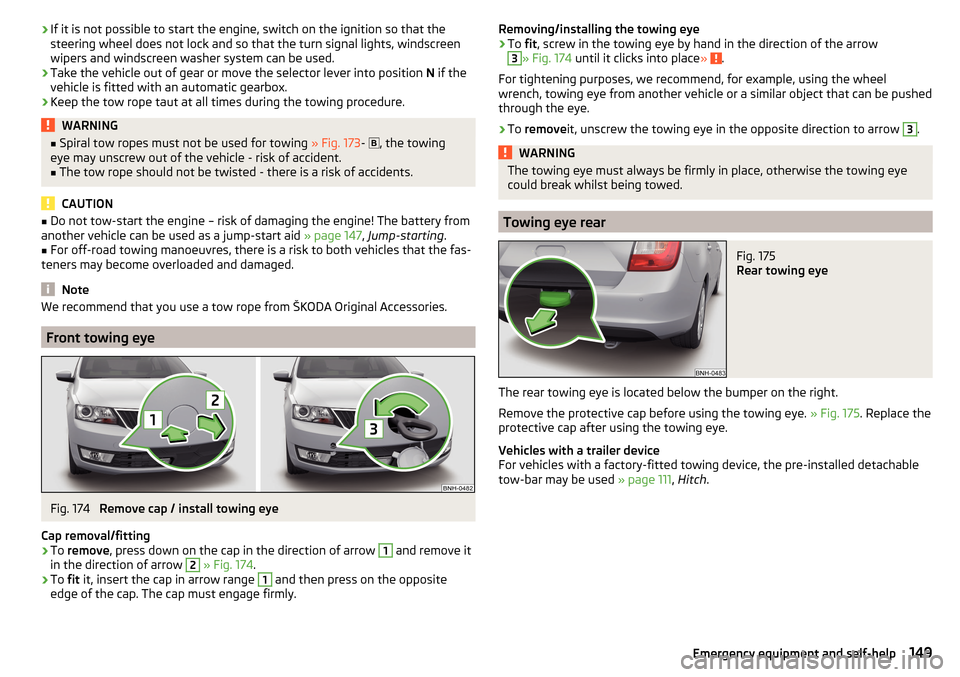
Front towing eye
Fig. 174
Remove cap / install towing eye
Cap removal/fitting
›
To remove , press down on the cap in the direction of arrow
1
and remove it
in the direction of arrow
2
» Fig. 174 .
›
To fit it, insert the cap in arrow range
1
and then press on the opposite
edge of the cap. The cap must engage firmly.
Removing/installing the towing eye›To fit, screw in the towing eye by hand in the direction of the arrow3
» Fig. 174 until it clicks into place » .
For tightening purposes, we recommend, for example, using the wheel
wrench, towing eye from another vehicle or a similar object that can be pushed through the eye.
›
To remove it, unscrew the towing eye in the opposite direction to arrow
3
.
WARNINGThe towing eye must always be firmly in place, otherwise the towing eye
could break whilst being towed.
Towing eye rear
Fig. 175
Rear towing eye
The rear towing eye is located below the bumper on the right.
Remove the protective cap before using the towing eye. » Fig. 175. Replace the
protective cap after using the towing eye.
Vehicles with a trailer device
For vehicles with a factory-fitted towing device, the pre-installed detachable
tow-bar may be used » page 111, Hitch .
149Emergency equipment and self-help
Page 156 of 184
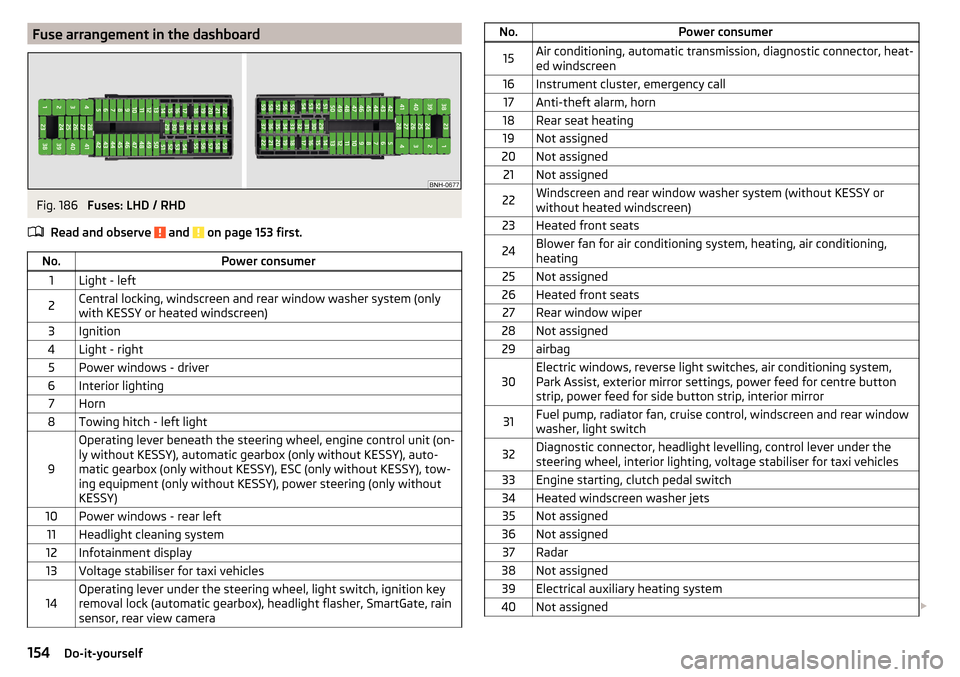
Fuse arrangement in the dashboardFig. 186
Fuses: LHD / RHD
Read and observe
and on page 153 first.
No.Power consumer1Light - left2Central locking, windscreen and rear window washer system (only
with KESSY or heated windscreen)3Ignition4Light - right5Power windows - driver6Interior lighting7Horn8Towing hitch - left light
9
Operating lever beneath the steering wheel, engine control unit (on-
ly without KESSY), automatic gearbox (only without KESSY), auto-
matic gearbox (only without KESSY), ESC (only without KESSY), tow-
ing equipment (only without KESSY), power steering (only without
KESSY)10Power windows - rear left11Headlight cleaning system12Infotainment display13Voltage stabiliser for taxi vehicles14Operating lever under the steering wheel, light switch, ignition key
removal lock (automatic gearbox), headlight flasher, SmartGate, rain
sensor, rear view cameraNo.Power consumer15Air conditioning, automatic transmission, diagnostic connector, heat-
ed windscreen16Instrument cluster, emergency call17Anti-theft alarm, horn18Rear seat heating19Not assigned20Not assigned21Not assigned22Windscreen and rear window washer system (without KESSY or
without heated windscreen)23Heated front seats24Blower fan for air conditioning system, heating, air conditioning,
heating25Not assigned26Heated front seats27Rear window wiper28Not assigned29airbag30Electric windows, reverse light switches, air conditioning system,
Park Assist, exterior mirror settings, power feed for centre button
strip, power feed for side button strip, interior mirror31Fuel pump, radiator fan, cruise control, windscreen and rear window
washer, light switch32Diagnostic connector, headlight levelling, control lever under the
steering wheel, interior lighting, voltage stabiliser for taxi vehicles33Engine starting, clutch pedal switch34Heated windscreen washer jets35Not assigned36Not assigned37Radar38Not assigned39Electrical auxiliary heating system40Not assigned 154Do-it-yourself
Page 158 of 184
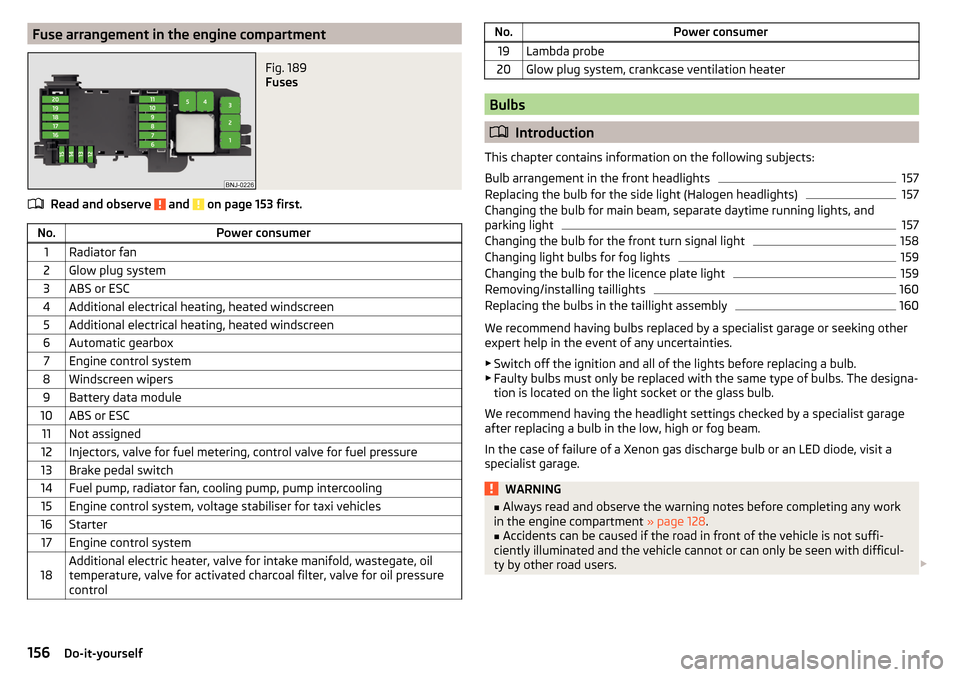
Fuse arrangement in the engine compartmentFig. 189
Fuses
Read and observe and on page 153 first.
No.Power consumer1Radiator fan2Glow plug system3ABS or ESC4Additional electrical heating, heated windscreen5Additional electrical heating, heated windscreen6Automatic gearbox7Engine control system8Windscreen wipers9Battery data module10ABS or ESC11Not assigned12Injectors, valve for fuel metering, control valve for fuel pressure13Brake pedal switch14Fuel pump, radiator fan, cooling pump, pump intercooling15Engine control system, voltage stabiliser for taxi vehicles16Starter17Engine control system18Additional electric heater, valve for intake manifold, wastegate, oil
temperature, valve for activated charcoal filter, valve for oil pressure
controlNo.Power consumer19Lambda probe20Glow plug system, crankcase ventilation heater
Bulbs
Introduction
This chapter contains information on the following subjects:
Bulb arrangement in the front headlights
157
Replacing the bulb for the side light (Halogen headlights)
157
Changing the bulb for main beam, separate daytime running lights, and
parking light
157
Changing the bulb for the front turn signal light
158
Changing light bulbs for fog lights
159
Changing the bulb for the licence plate light
159
Removing/installing taillights
160
Replacing the bulbs in the taillight assembly
160
We recommend having bulbs replaced by a specialist garage or seeking other
expert help in the event of any uncertainties.
▶ Switch off the ignition and all of the lights before replacing a bulb.
▶ Faulty bulbs must only be replaced with the same type of bulbs. The designa-
tion is located on the light socket or the glass bulb.
We recommend having the headlight settings checked by a specialist garage after replacing a bulb in the low, high or fog beam.
In the case of failure of a Xenon gas discharge bulb or an LED diode, visit a
specialist garage.
WARNING■ Always read and observe the warning notes before completing any work
in the engine compartment » page 128.■
Accidents can be caused if the road in front of the vehicle is not suffi-
ciently illuminated and the vehicle cannot or can only be seen with difficul-
ty by other road users.
156Do-it-yourself
Page 164 of 184
Technical data
Technical data
Basic vehicle data
Introduction
This chapter contains information on the following subjects:
Vehicle data
162
Operating weight
163
Payload
163
Measurement of fuel consumption and CO 2 emissions according to ECE
Regulations and EU Directives
163
Dimensions
165
Departure angle
166
The details given in the vehicle's technical documentation always take prece-
dence over the details in the Owner's Manual.
The performance values listed were determined without performance-reduc- ing equipment, e.g. air conditioning system.
The values given have been determined in accordance with regulations and in
conditions prescribed by legal or technical provisions for determining the oper-
ating and technical data of vehicles.
The listed values are for the basic model without optional equipment.
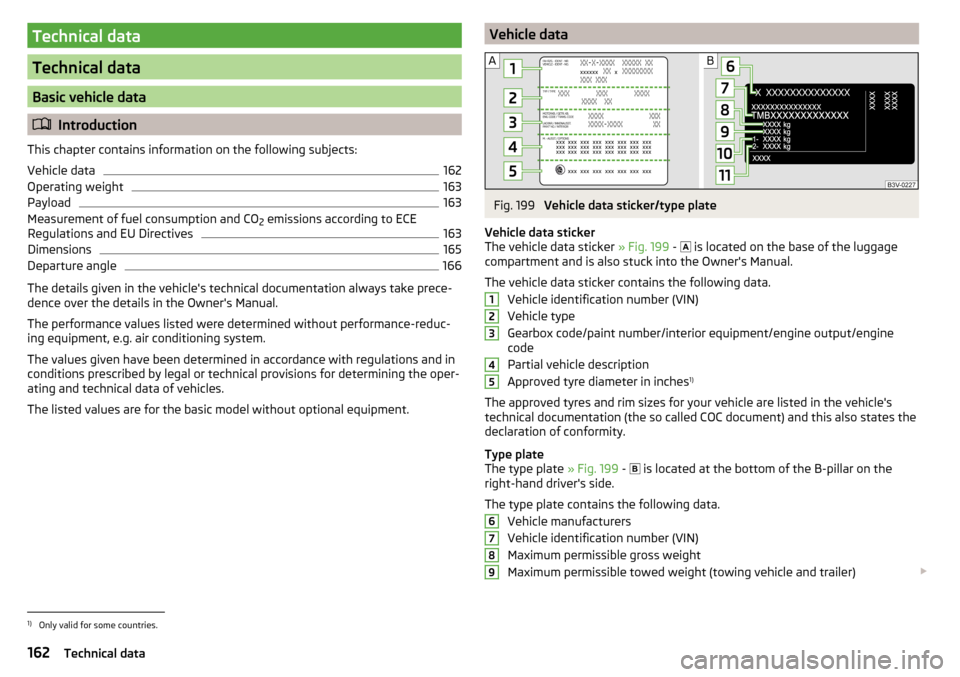
Vehicle dataFig. 199
Vehicle data sticker/type plate
Vehicle data sticker
The vehicle data sticker » Fig. 199 -
is located on the base of the luggage
compartment and is also stuck into the Owner's Manual.
The vehicle data sticker contains the following data. Vehicle identification number (VIN)
Vehicle type
Gearbox code/paint number/interior equipment/engine output/engine code
Partial vehicle description
Approved tyre diameter in inches 1)
The approved tyres and rim sizes for your vehicle are listed in the vehicle's
technical documentation (the so called COC document) and this also states the
declaration of conformity.
Type plate
The type plate » Fig. 199 -
is located at the bottom of the B-pillar on the
right-hand driver's side.
The type plate contains the following data. Vehicle manufacturers
Vehicle identification number (VIN)
Maximum permissible gross weight
Maximum permissible towed weight (towing vehicle and trailer)
1234567891)
Only valid for some countries.
162Technical data
Page 165 of 184

Maximum permissible front axle load
Maximum permissible rear axle load
Vehicle identification number (VIN)
The vehicle identification number - VIN (vehicle body number) is stamped into
the engine compartment on the right hand suspension strut dome. This num-
ber is also located on a sign on the lower left hand edge below the windscreen
(together with a VIN bar code), and on the type plate.
The VIN number can also be displayed in Infotainment » Owner´s Manual - In-
fotainment .
Engine number
The engine number (three-digit identifier and serial number) is stamped on the
engine block.
Supplementary Information (applies to Russia)
The full type approval number of the means of transport is indicated in the
registration documents, field 17.
Maximum permissible towed weight
The listed maximum allowable trailer weight is only valid for altitudes up to
1000 m above sea level.
The engine output falls as altitude increases, as does the vehicle's climbing
power. Therefore, for every additional 1,000 m in height (or part), the maximum
permissible towed weight must be reduced by 10%.
The towed weight is made up of the actual weights of the loaded towing vehi-
cle and the loaded trailer.WARNINGDo not exceed the specified maximum permissible weights – risk of acci-
dent and damage!
Operating weight
This value is only a guide value and corresponds to the lowest possible operat-
ing weight without any equipment added that would also increase the weight
(e.g. air conditioning, emergency or spare wheel etc.). It also includes a weight
allowance for the driver (75 kg), the weight of the operating fluids, the tool kit
and a fuel tank filled to 90 % capacity.
1011Operating weightEngineGearboxOperating weight (kg)1.2 l/66 kW TSIMG1160DSG11941.2 ltr./81 kW TSIMG11801.4 ltr./92 kW TSIDSG1212DSG (Green tec)12211.6 l./81 kW MPIMG1160AG12001.4 l/66 kW TDI CRMG1229DSG12501.6 l/85 kW TDI CRMG1275
Note
If required, you can find out the precise weight of your vehicle at a specialist
garage.
Payload
It is possible to calculate the approximate maximum payload from the differ-
ence between the permissible total weight and the operating weight.
The payload consists of the following weights.
▶ The weight of the passengers.
▶ The weight of all items of luggage and other loads.
▶ The weight of the roof, including the roof rack system.
▶ The weight of the equipment that is excluded from the operating weight.
▶ Trailer draw-bar load when towing a trailer (max. 50 kg).
Measurement of fuel consumption and CO
2 emissions according to
ECE Regulations and EU Directives
The data on fuel consumption and CO 2 emissions were not available at the
time of going to press.
The data on fuel consumption and CO 2 emissions are given on the ŠKODA
websites or in the sales and technical vehicle documentation.
The measurement of the intra-urban cycle begins with a cold start of the en-
gine. Afterwards urban driving is simulated.
163Technical data