window SKODA RAPID SPACEBACK 2016 1.G User Guide
[x] Cancel search | Manufacturer: SKODA, Model Year: 2016, Model line: RAPID SPACEBACK, Model: SKODA RAPID SPACEBACK 2016 1.GPages: 184, PDF Size: 28.1 MB
Page 55 of 184
Force limiterRead and observe
and on page 51 first.
If there is an obstacle, the closing process is stopped and the window goes
down by several centimetres.
If the obstacle prevents the window from being closed during the next 10 sec-
onds, the closing process is interrupted once again and the window goes down
by several centimetres.
If you attempt to close the window again within 10 seconds of the window be-
ing moved down for the second time, even though the obstacle was not yet
been removed, the closing process is only stopped. During this time it is not
possible to automatically close the window. The force limiter is still switched
on.
The force limiter is only not operational if you attempt to close the window
again within the next 10 seconds – the window will now close with full force!
If you wait longer than 10 seconds, the force limiter is switched on again.
WARNINGThe front passenger window with the electric window has no force limiter.
The windows should nevertheless be closed carefully – risk of injury!
Operational faults
Read and observe
and on page 51 first.
Repeatedly opening and closing the window can cause the window mecha-
nism to overheat and become temporarily blocked. You will be able to operate
the window again as soon as the operating mechanism has cooled down.
The electric power windows are deactivated after the vehicle battery has been
disconnected. After connecting the vehicle battery, the system is activated as
follows.
›
Switch on the ignition.
›
Pull the top edge of the button and close the window.
›
Release the button.
›
Pull up the respective button and hold for 1 second.
Lights and visibility
Lights
Introduction
This chapter contains information on the following subjects:
Operating the light function
54
Daytime running lights(DAY LIGHT)
54
Turn signal and main beam
55
Automatic driving light control
55
Fog lights/rear fog light
56
Fog lights with the CORNER function
56
COMING HOME / LEAVING HOME
56
Hazard warning light system
57
Parking light
57
Driving abroad
57
Unless otherwise stated, the lights only work when the ignition is switched on.
The layout of the controls on right-hand drive vehicles differs partially from
that shown in this layout » Fig. 40 on page 54 .
WARNINGThe automatic driving lamp control only operates as a support and
does not release the driver from his responsibility to check the lights and, if
necessary, to switch on the light depending on the prevailing light condi-
tions.
Note
The headlights may mist up temporarily. When the light is on, the light-emit-
ting surface demists after a short time.53Lights and visibility
Page 61 of 184
The rear light - variant 1 is operated together with the automatic operation of
the light at the front 1)
.
▶ When the front lighting is switched on, the rear lighting also turns on auto-
matically.
▶ When the front lighting is switched off, the rear lighting can be switched
on/off as required.
Visibility
Introduction
This chapter contains information on the following subjects:
Windscreen and rear window heater
59
Sun visors
59
Sun screen of the panoramic roof
60WARNINGNo objects should be attached to the sun visor that could restrict the view
or endanger the vehicle occupants during sudden braking or in a collision.
Windscreen and rear window heater
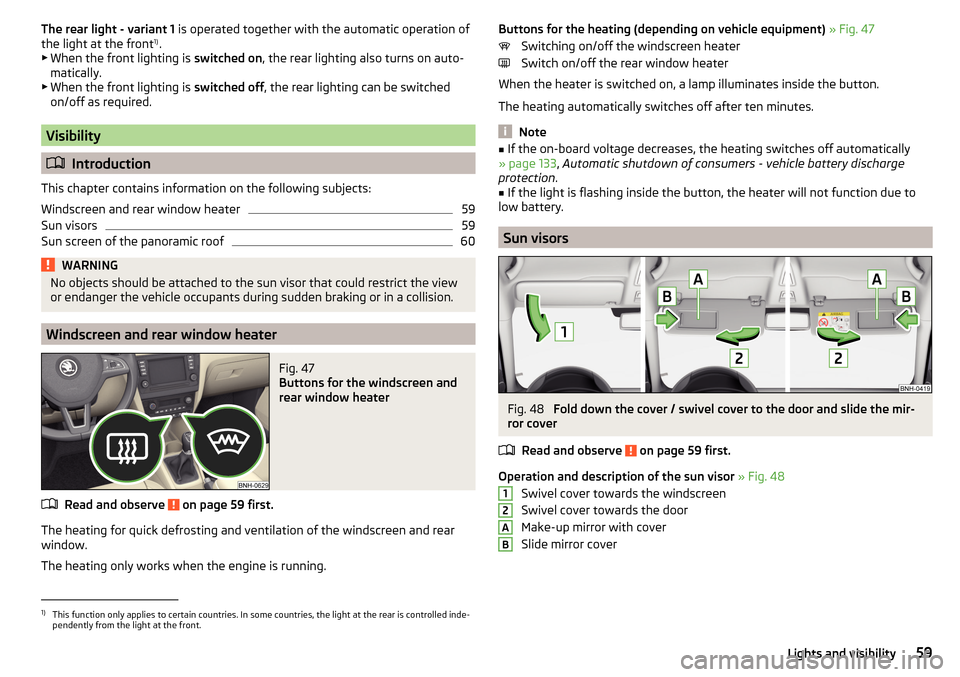
Fig. 47
Buttons for the windscreen and
rear window heater
Read and observe on page 59 first.
The heating for quick defrosting and ventilation of the windscreen and rear window.
The heating only works when the engine is running.
Buttons for the heating (depending on vehicle equipment) » Fig. 47
Switching on/off the windscreen heater
Switch on/off the rear window heater
When the heater is switched on, a lamp illuminates inside the button.
The heating automatically switches off after ten minutes.
Note
■ If the on-board voltage decreases, the heating switches off automatically
» page 133 , Automatic shutdown of consumers - vehicle battery discharge
protection .■
If the light is flashing inside the button, the heater will not function due to
low battery.
Sun visors
Fig. 48
Fold down the cover / swivel cover to the door and slide the mir-
ror cover
Read and observe
on page 59 first.
Operation and description of the sun visor » Fig. 48
Swivel cover towards the windscreen
Swivel cover towards the door
Make-up mirror with cover
Slide mirror cover
12AB1)
This function only applies to certain countries. In some countries, the light at the rear is controlled inde-
pendently from the light at the front.
59Lights and visibility
Page 62 of 184
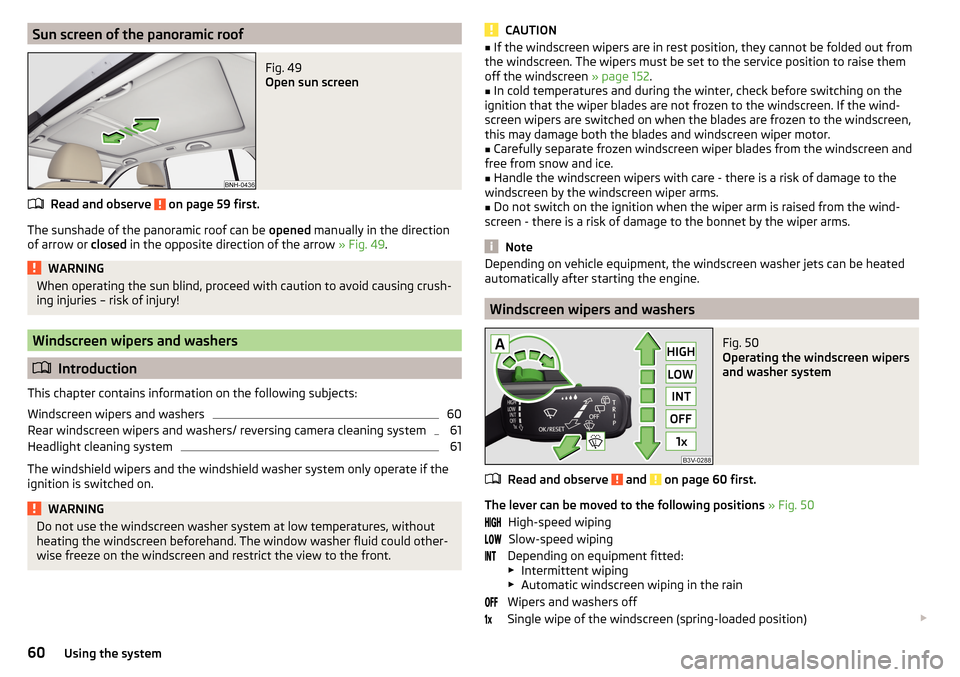
Sun screen of the panoramic roofFig. 49
Open sun screen
Read and observe on page 59 first.
The sunshade of the panoramic roof can be opened manually in the direction
of arrow or closed in the opposite direction of the arrow » Fig. 49.
WARNINGWhen operating the sun blind, proceed with caution to avoid causing crush-
ing injuries – risk of injury!
Windscreen wipers and washers
Introduction
This chapter contains information on the following subjects:
Windscreen wipers and washers
60
Rear windscreen wipers and washers/ reversing camera cleaning system
61
Headlight cleaning system
61
The windshield wipers and the windshield washer system only operate if the
ignition is switched on.
WARNINGDo not use the windscreen washer system at low temperatures, without
heating the windscreen beforehand. The window washer fluid could other-
wise freeze on the windscreen and restrict the view to the front.CAUTION■ If the windscreen wipers are in rest position, they cannot be folded out from
the windscreen. The wipers must be set to the service position to raise them
off the windscreen » page 152.■
In cold temperatures and during the winter, check before switching on the
ignition that the wiper blades are not frozen to the windscreen. If the wind-
screen wipers are switched on when the blades are frozen to the windscreen,
this may damage both the blades and windscreen wiper motor.
■
Carefully separate frozen windscreen wiper blades from the windscreen and
free from snow and ice.
■
Handle the windscreen wipers with care - there is a risk of damage to the
windscreen by the windscreen wiper arms.
■
Do not switch on the ignition when the wiper arm is raised from the wind-
screen - there is a risk of damage to the bonnet by the wiper arms.
Note
Depending on vehicle equipment, the windscreen washer jets can be heated
automatically after starting the engine.
Windscreen wipers and washers
Fig. 50
Operating the windscreen wipers
and washer system
Read and observe and on page 60 first.
The lever can be moved to the following positions » Fig. 50
High-speed wiping Slow-speed wiping
Depending on equipment fitted:
▶ Intermittent wiping
▶ Automatic windscreen wiping in the rain
Wipers and washers off
Single wipe of the windscreen (spring-loaded position)
60Using the system
Page 63 of 184
Setting of windscreen wiper interval for the position - by setting the
switch in the direction of the arrow, the windscreen wipers will wipe more
often
Spraying and wiping the disc (spring-loaded position) - after releasing the
operating lever the wipers continue for another 1 to 3 strokes
Automatic windscreen wiping in the rain can be activated/deactivated in In-
fotainment » Owner´s Manual - Infotainment .WARNINGAutomatic wiping during rain is only a support. The driver is not released
from the responsibility to set the function of the windscreen wipers man-
ually depending on the visibility conditions.
Rear windscreen wipers and washers/ reversing camera cleaning
system
Fig. 51
Operating the windscreen wipers
and washing system
Read and observe and on page 60 first.
The lever can be moved to the following positions » Fig. 51
Spraying and wiping the windscreen (sprung position) - after releasing the
control stalk, the wipers perform another 1 to 3 wiper strokes
Spraying the rear view camera (sprung position)
Rear screen wiping
Wipers and washers off
Automatic rear wiper
If the windscreen wipers switched on and reverse gear selected, is selected,
the regular intermittent wiping of the rear window takes place automatically.
Depending on the equipment, the function can be enabled / disabled in Info-
tainment » Owner´s Manual - Infotainment or by a specialist garage.
AHeadlight cleaning system
Read and observe
and on page 60 first.
The headlights are cleaned with every first and after every tenth spraying of
the windscreen under the following conditions.
The ignition is switched on.
The low beam is switched on.
The outside temperature is about -11° C to +36° C.
To ensure the correct functioning of the system, even in winter, this needs to be regularly cleared of snow and ice (e.g. using the de-icing spray).
Rear view mirror
Introduction
This chapter contains information on the following subjects:
Interior mirror dimming
62
Exterior mirrors
62WARNINGExterior mirrors increase the field of view, however, they make objects ap-
pear smaller and further away. Therefore, use the interior mirror whenever
possible, for assessing the distances to the vehicles following behind.61Lights and visibility
Page 65 of 184
Folding in the exterior mirrors
The mirror can be manually folded in towards the side window. To put it back
into its original position, it should be folded back from the side window until it
audibly clicks into place.WARNINGDo not touch the exterior mirror surfaces, if the exterior mirror heating is
switched on - hazard of burning.Seats and head restraints
Front seats
Introduction
This chapter contains information on the following subjects:
Adjusting the front seats
63
Setting the armrest height
64WARNING■ Only adjust the driver's seat when the vehicle is stationary – otherwise
risk of accident!■
Caution when adjusting the seat! You may suffer injuries or bruises as a
result of adjusting the seat without paying proper attention.
Adjusting the front seats
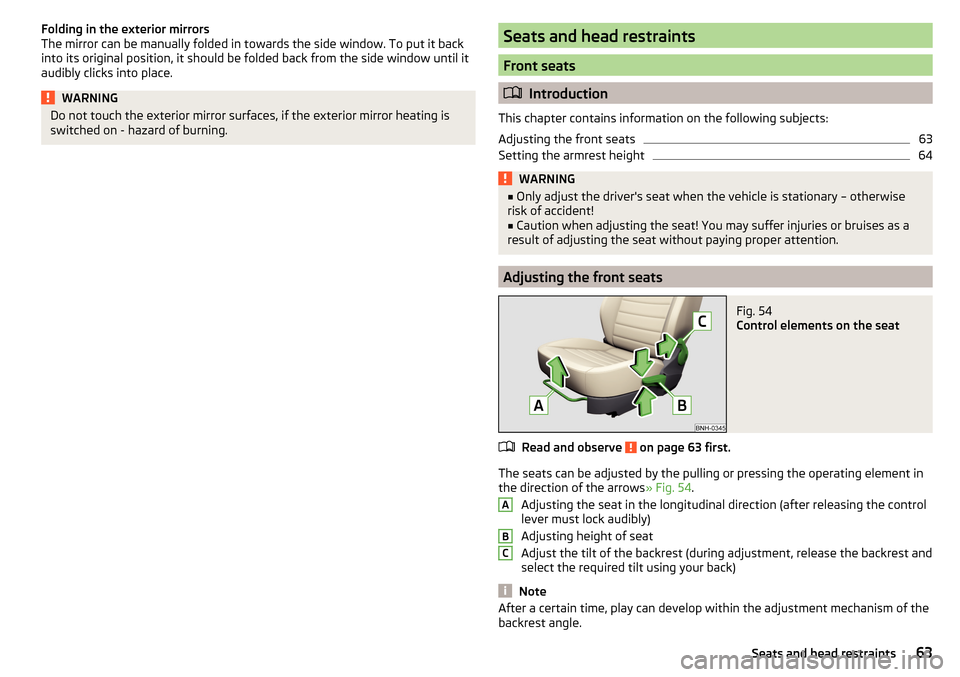
Fig. 54
Control elements on the seat
Read and observe on page 63 first.
The seats can be adjusted by the pulling or pressing the operating element in
the direction of the arrows » Fig. 54.
Adjusting the seat in the longitudinal direction (after releasing the control
lever must lock audibly)
Adjusting height of seat
Adjust the tilt of the backrest (during adjustment, release the backrest and
select the required tilt using your back)
Note
After a certain time, play can develop within the adjustment mechanism of the
backrest angle.ABC63Seats and head restraints
Page 78 of 184
WARNING■Never exceed the maximum permissible load of the respective fasteners,
nets, hooks etc. Heavy objects were not secured sufficiently – risk of injury!■
Do not exceed the permissible axle loads and permissible gross weight of
the vehicle – risk of accident!
■
An unsecured dirt or improperly attached load could slip during a sudden
manoeuvre or in an accident - danger of injury!
■
Loose cargo could hit a deployed airbag and injure occupants – danger of
death!
■
When transporting loads in the luggage compartment that has been en-
larged by folding the rear seats forward, ensure the safety of the passen-
gers transported on the other rear seats .
CAUTION
■ Never exceed the maximum permissible load of the respective fasteners,
nets, hooks etc. - these could be damaged.■
Please ensure that the heating elements for the rear window heater are not
damaged as a result of abrasive objects.
■
Do not place sharp objects in the nets and storage compartments in the lug-
gage compartment - there is a risk of damage to the net as well as the com-
partments.
■
Put the items in the storage compartments carefully and do not put point-
shaped objects - there is a risk of damage to the compartments.
Fastening elements
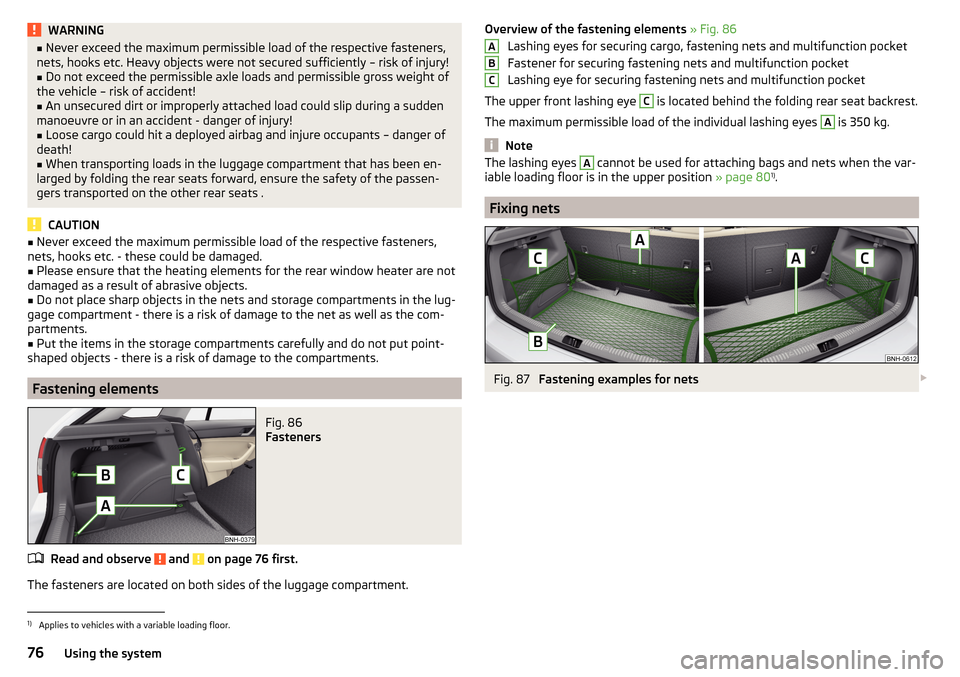
Fig. 86
Fasteners
Read and observe and on page 76 first.
The fasteners are located on both sides of the luggage compartment.
Overview of the fastening elements » Fig. 86
Lashing eyes for securing cargo, fastening nets and multifunction pocket
Fastener for securing fastening nets and multifunction pocket
Lashing eye for securing fastening nets and multifunction pocket
The upper front lashing eye C
is located behind the folding rear seat backrest.
The maximum permissible load of the individual lashing eyes
A
is 350 kg.
Note
The lashing eyes A cannot be used for attaching bags and nets when the var-
iable loading floor is in the upper position » page 801)
.
Fixing nets
Fig. 87
Fastening examples for nets
ABC1)
Applies to vehicles with a variable loading floor.
76Using the system
Page 84 of 184
Heating and ventilation
Heating, manual air conditioning system, Climatronic
Introduction
This chapter contains information on the following subjects:
Heating and manual air conditioning
82
Climatronic (automatic air conditioning)
83
Climatronic - automatic mode
84
Air distribution control
84
Air outlet vents
84
The heater heats and ventilates the vehicle interior. The air conditioning sys-
tem also cools and dehumidifies the vehicle interior.
The heating effect is dependent upon the coolant temperature, thus full heat
output only occurs when the engine has reached its operating temperature.
The cooling system works under the following conditions. The cooling system is switched on.
The engine is running.
The outside temperature is above 2 °C.
The blower is switched on.
When the cooling system is switched on, it prevents misting of the windscreen
and windows.
It is possible to boost the effectiveness of the cooling system by briefly acti-
vating the air recirculation system » page 84.
Health protection
To reduce health risks (e.g. common colds), the following instructions for the
use of the cooling system are to be observed. ▶ The difference between the outside temperature and the inside temperature
should not be greater than 5 °C.
▶ The cooling system should be turned off about 10 minutes before the end of
the journey.
▶ Once a year, a disinfection of the air conditioner is to be carried out by a spe-
cialist company.
WARNING■ The blower should always be on to prevent the windows from misting.
Otherwise there is a risk of accident.■
Under certain circumstances, air at a temperature of about 5 °C can flow
out of the vents when the cooling system is switched on.
Note
■ The air inlet in front of the windscreen must be free of e.g. ice, snow or
leaves to ensure that the heating and cooling system operates properly.■
After switching on the cooling Condensation from the evaporator of the air
conditioning may drip down and form a puddle below the vehicle. This is not a
leak!
■
If the coolant temperature is too high, the cooling system is switched off to
ensure that the engine cools down.
Heating and manual air conditioning
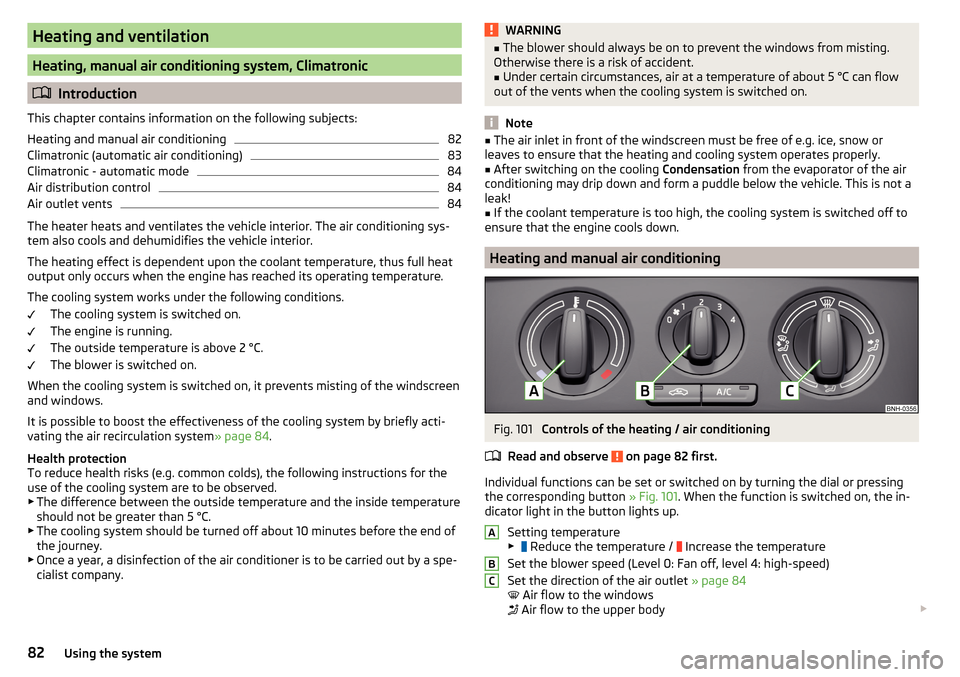
Fig. 101
Controls of the heating / air conditioning
Read and observe
on page 82 first.
Individual functions can be set or switched on by turning the dial or pressing the corresponding button » Fig. 101. When the function is switched on, the in-
dicator light in the button lights up.
Setting temperature
▶ Reduce the temperature /
Increase the temperature
Set the blower speed (Level 0: Fan off, level 4: high-speed)
Set the direction of the air outlet » page 84
Air flow to the windows
Air flow to the upper body
ABC82Using the system
Page 85 of 184
Air flow in the footwell
Air flow to the windows and the footwell
Switch recirculation on/off » page 84
Switch the cooling system on/off
Information on the cooling system
After pressing the button
» Fig. 101 , the warning light on the button lights
up, even if not all the conditions for the cooling system have been met. The
cooling system starts to work as soon as the following conditions have been
met » page 82 .
Note
To ensure adequate thermal comfort, during operation of the manual air condi-
tioning there could be an increase in the engine idle speed in some circum-
stances.
Climatronic (automatic air conditioning)
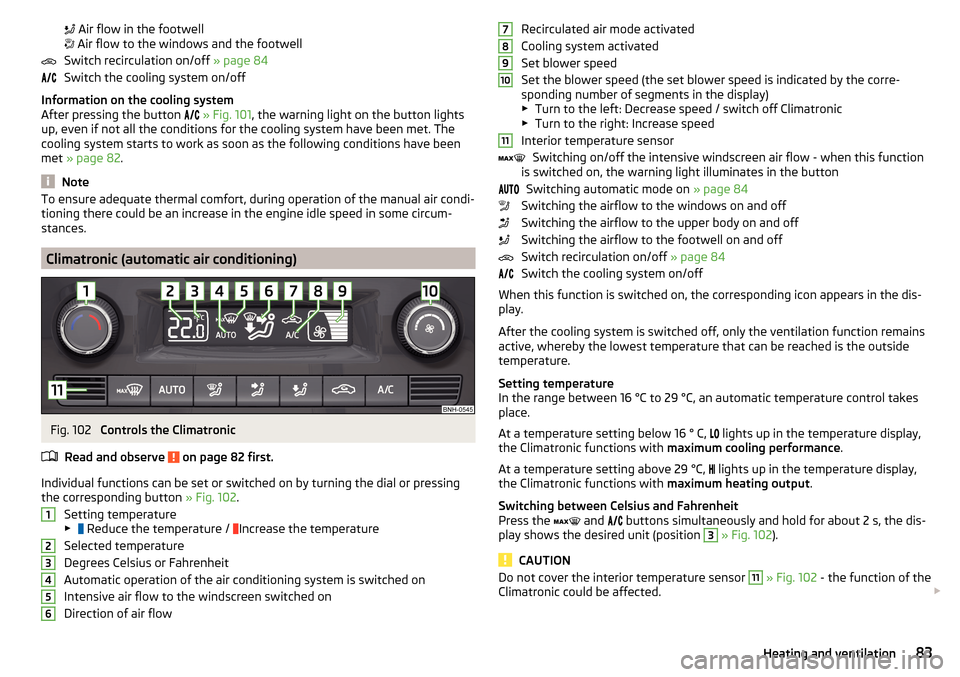
Fig. 102
Controls the Climatronic
Read and observe
on page 82 first.
Individual functions can be set or switched on by turning the dial or pressing the corresponding button » Fig. 102.
Setting temperature
▶ Reduce the temperature /
Increase the temperature
Selected temperature
Degrees Celsius or Fahrenheit
Automatic operation of the air conditioning system is switched on
Intensive air flow to the windscreen switched on
Direction of air flow
123456Recirculated air mode activated
Cooling system activated
Set blower speed
Set the blower speed (the set blower speed is indicated by the corre-
sponding number of segments in the display)
▶ Turn to the left: Decrease speed / switch off Climatronic
▶ Turn to the right: Increase speed
Interior temperature sensor Switching on/off the intensive windscreen air flow - when this function
is switched on, the warning light illuminates in the button
Switching automatic mode on » page 84
Switching the airflow to the windows on and off
Switching the airflow to the upper body on and off
Switching the airflow to the footwell on and off
Switch recirculation on/off » page 84
Switch the cooling system on/off
When this function is switched on, the corresponding icon appears in the dis-
play.
After the cooling system is switched off, only the ventilation function remains
active, whereby the lowest temperature that can be reached is the outside
temperature.
Setting temperature
In the range between 16 °C to 29 °C, an automatic temperature control takes
place.
At a temperature setting below 16 ° C, lights up in the temperature display,
the Climatronic functions with maximum cooling performance .
At a temperature setting above 29 °C, lights up in the temperature display,
the Climatronic functions with maximum heating output.
Switching between Celsius and Fahrenheit
Press the and
buttons simultaneously and hold for about 2 s, the dis-
play shows the desired unit (position 3
» Fig. 102 ).
CAUTION
Do not cover the interior temperature sensor 11 » Fig. 102 - the function of the
Climatronic could be affected. 789101183Heating and ventilation
Page 86 of 184
NoteIn order to ensure adequate thermal comfort, there may be an increase in en-
gine idle speed during operation of the Climatronic in some circumstances.
Climatronic - automatic mode
Read and observe
on page 82 first.
The automatic mode is used in order to maintain a constant temperature andto demist the windows in the interior of the car.
›
To switch on press the
button. The display shows
(pos.
4
» Fig. 102
on page 83 ).
›
To turn off , press any button for the air distribution or change the blower
speed. The temperature regulation is continued.
Air distribution control
Read and observe
on page 82 first.
The recirculation mode prevents contaminated outside air getting into the In-terior of the vehicle. In recirculated air mode air is sucked out of the interior of
the vehicle and then fed back into the interior.
›
To switch on/off , press the
symbol button repeatedly.
Heating and manual air conditioning system
If the air distribution control is set to position when the recirculation modes
is switched on, the recirculated-air mode is switched off. Recirculated air mode
can be switched on again from this setting by repeatedly pressing the symbol
button .
Climatronic
With the recirculated-air mode switched on the symbol appears in the dis-
play.
The symbol disappears from the display after turning off the air recircula-
tion.
If the humidity increases in the vehicle, an automatic shutdown of air recircula-
tion can occur.
WARNINGThe recirculation system cannot be switched on for a longer period of time,
because no fresh air is fed through from the outside. “Stale air” may result
in fatigue in the driver and occupants, reduce attention levels and also
cause the windows to mist up. As soon as windows mist up, turn on the re-
circulation system immediately - risk of accident!
CAUTION
We recommend not smoking in the vehicle when the recirculating air operation
is switched on. The smoke sucked from the interior is deposited on the evapo-
rator of the air conditioner. This produces a permanent odour when the air
conditioning system is operating which can only be eliminated through consid-
erable effort and expense (replacement of compressor).
Note
If recirculated air mode is switched on for around 15 minutes, the symbol
will begin to flash in the Climatronic display as a sign that the recirculated air
mode is switched on long-term. If the recirculated air mode is not switched off,
the symbol
flashes for around 5 minutes.
Air outlet vents
Fig. 103
Air outlet vents
Read and observe
on page 82 first.
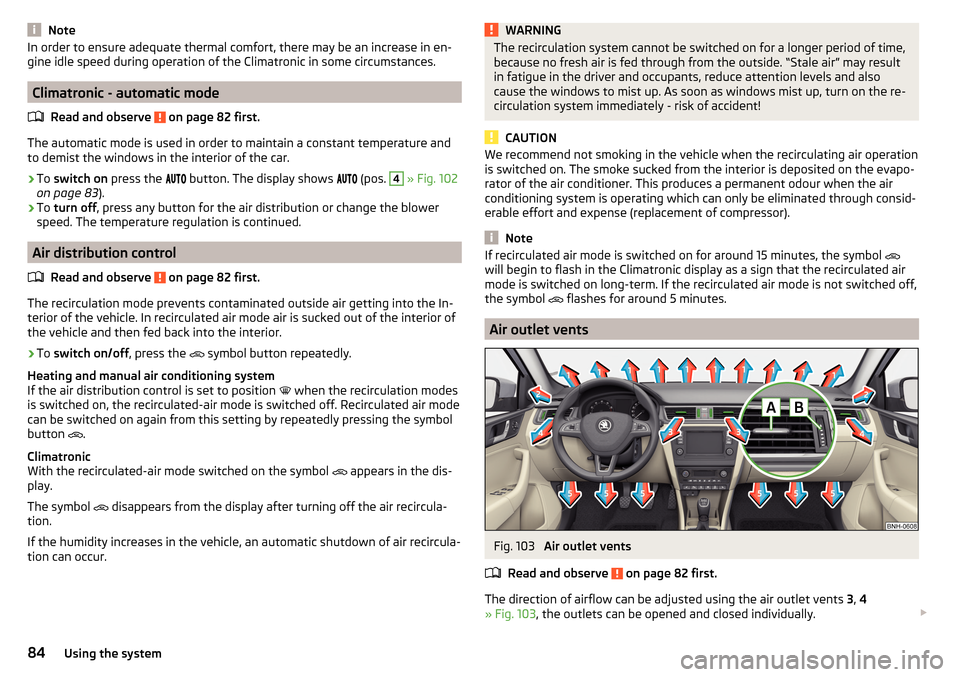
The direction of airflow can be adjusted using the air outlet vents 3, 4
» Fig. 103 , the outlets can be opened and closed individually.
84Using the system
Page 96 of 184
Starting-off and drivingRead and observe
and on page 92 first.
Moving off and pausing temporarily
›
Firmly depress and hold the brake pedal.
›
Start the engine.
›
Press the locking button and move the selector lever to the desired position
» page 92 .
›
Release the brake pedal and accelerate.
The selector lever position N does not have to be selected when stopping for a
short time (e.g. at a crossroads). However, the brake pedal should be de-
pressed, in order to prevent the vehicle from rolling.
Accelerating at maximum speed during the journey (kickdown function)
If the accelerator pedal is depressed while the vehicle is in forward drive mode,
the kick-down function is turned on.
The gear change is adjusted accordingly to achieve maximum acceleration.
WARNINGRapid acceleration ( e.g. on slippery roads) can lead to a loss of control over
the vehicle – risk of accident!
Running in and economical driving
Introduction
This chapter contains information on the following subjects:
Running in the engine
94
Tips on economical driving
94
DriveGreen function
94
Running in the engine
During the first 1,500 km, the driving style is decisive for successful the run-
ning in process is.
During the first 1,000 km , the engine should not be charged with more than
3/4 of the maximum permitted engine revs and without the trailer.
From about 1,000 to 1,500 km , the engine can be pushed up to the maximum
permitted engine speed.
Tips on economical driving
Fuel consumption depends on the driving style, road and weather conditions,
and similar such factors.
For an economical driving style, the following instructions must be observed. ▶ Avoid unnecessary acceleration and braking.
▶ Engage the recommended gear » page 38.
▶ Avoid full throttle and high speeds.
▶ Reduce idling.
▶ Avoid short distances.
▶ Ensure the correct tyre inflation pressure is maintained » page 137.
▶ Avoid unnecessary ballast.
▶ Remove the roof rack before driving if it is not needed.
▶ Only turn on electrical consumers (e.g. seat heating) for as long as necessary.
▶ Briefly ventilate before turning on the cooling system, do not use the cooling
system with the windows open.
▶ Do not leave windows open at high speeds.
DriveGreen function
Fig. 113
Shown in the infotainment dis-
play
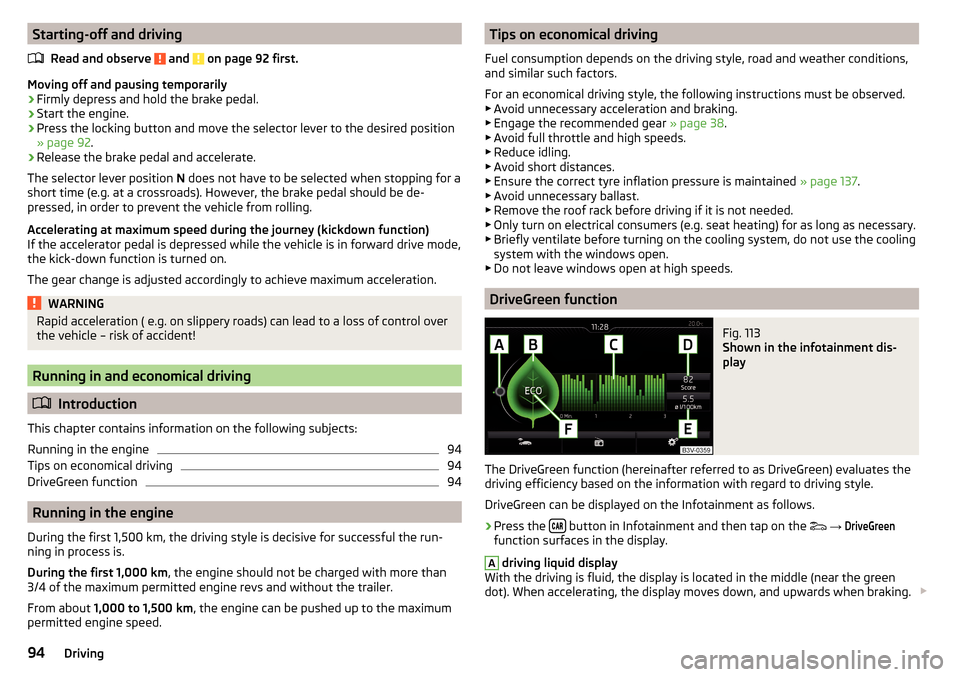
The DriveGreen function (hereinafter referred to as DriveGreen) evaluates the
driving efficiency based on the information with regard to driving style.
DriveGreen can be displayed on the Infotainment as follows.
›
Press the button in Infotainment and then tap on the
→
DriveGreen
function surfaces in the display.
A
driving liquid display
With the driving is fluid, the display is located in the middle (near the green
dot). When accelerating, the display moves down, and upwards when braking.
94Driving