seats SKODA RAPID SPACEBACK 2016 1.G Owner's Guide
[x] Cancel search | Manufacturer: SKODA, Model Year: 2016, Model line: RAPID SPACEBACK, Model: SKODA RAPID SPACEBACK 2016 1.GPages: 184, PDF Size: 28.1 MB
Page 69 of 184
Useful features
Interior fittings
Introduction
This chapter contains information on the following subjects:
Ticket holder
67
stowage compartments in the doors
68
Storage compartment in the centre console
68
USB and AUX input
68
Storage compartment on the dashboard
68
Cup holders
69
Waste container
69
Cigarette lighter
70
Ashtray
70
12-volt socket
71
Multimedia holder
71
Storage compartment in the front arm rest
72
Glasses compartment
72
Storage compartment on the front passenger side
72
Storage compartment for umbrella
73
Clothes hook
73
Storage pockets on the backs of the front seats
73
Storage pockets on the inner sides of the front seats
73WARNING■ Do not place anything on the dashboard. These objects might slide or fall
down when driving and may distract you from concentrating on the traffic –
risk of accident!■
Make sure that while driving no objects can enter the driver's footwell -
they could cause an accident!
■
Do not carry any objects on the front passenger seat, except objects de-
signed for this purpose (e.g. child seats) – risk of accident!
■
No objects should be placed in the storage compartments nor in the
drinks holders; the vehicle occupants could be endangered if there is sud-
den braking or the vehicle collides with something.
WARNING (Continued)■ For safety reasons, lockable storage compartments should be closed
while driving - there is a risk of injury from the opened lid or through the
loose objects in the compartment.■
Make sure no objects protrude from the storage compartments - danger
of injury!
■
Do not exceed the permissible loads for the storage compartments and
pockets - risk of injury and risk of damage to the compartments and pock-
ets!
■
Ash, cigarettes, cigars and the like should only be stored in the ashtray -
danger of fire/burns!
■
The storage compartments, multimedia holder and waste container are
not a substitute for the ashtray and must not be used for such purposes –
risk of fire!
CAUTION
Do not place any large or sharp objects in the storage compartments and pock-
ets - there is a risk of damage to the compartments and pockets.
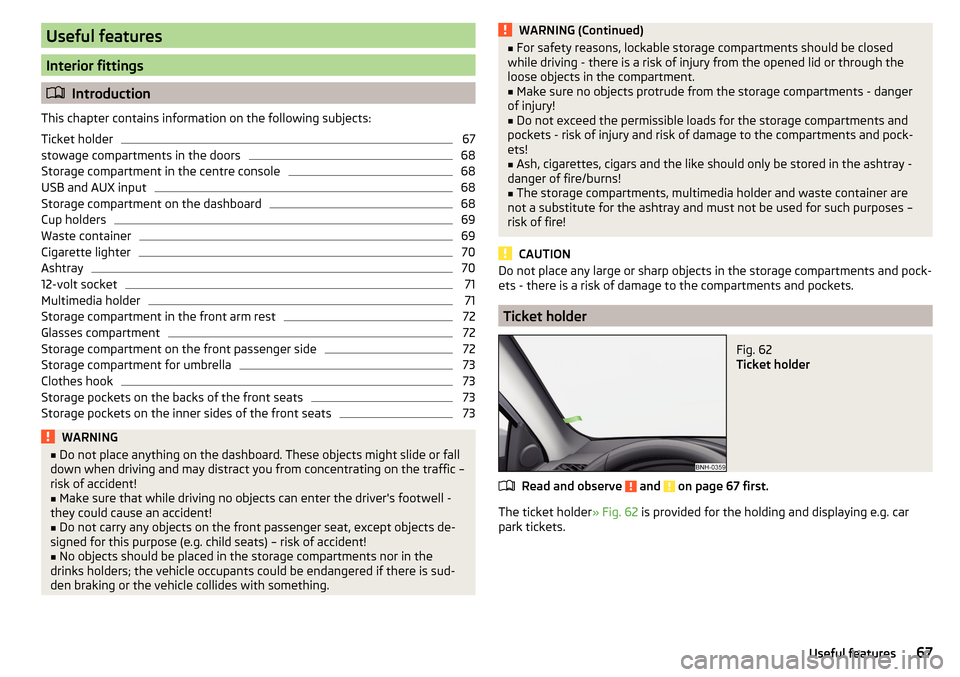
Ticket holder
Fig. 62
Ticket holder
Read and observe and on page 67 first.
The ticket holder » Fig. 62 is provided for the holding and displaying e.g. car
park tickets.
67Useful features
Page 75 of 184
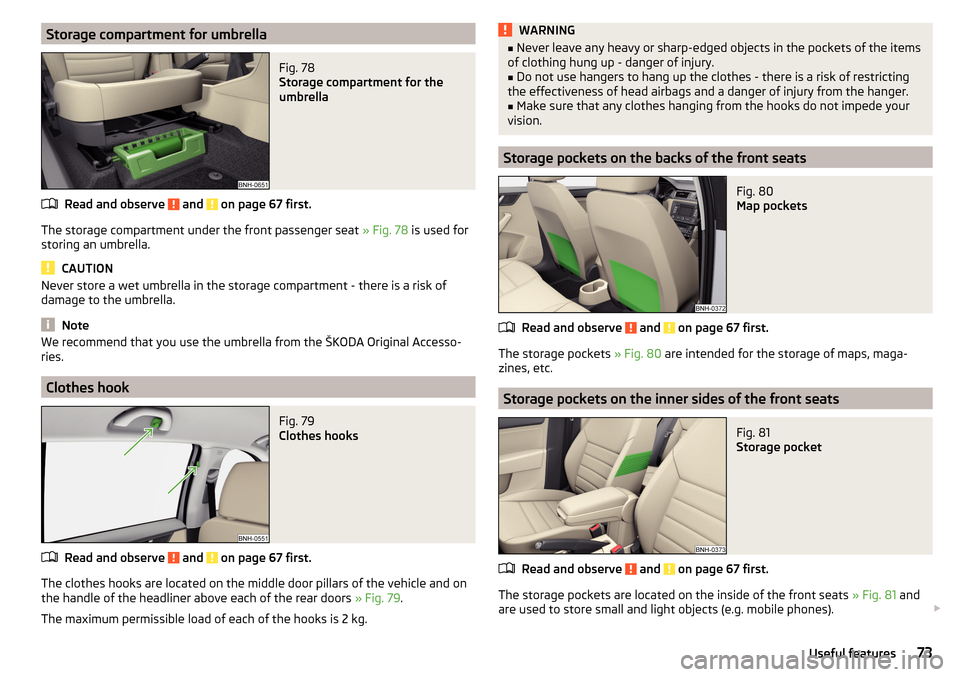
Storage compartment for umbrellaFig. 78
Storage compartment for the
umbrella
Read and observe and on page 67 first.
The storage compartment under the front passenger seat » Fig. 78 is used for
storing an umbrella.
CAUTION
Never store a wet umbrella in the storage compartment - there is a risk of
damage to the umbrella.
Note
We recommend that you use the umbrella from the ŠKODA Original Accesso-
ries.
Clothes hook
Fig. 79
Clothes hooks
Read and observe and on page 67 first.
The clothes hooks are located on the middle door pillars of the vehicle and on the handle of the headliner above each of the rear doors » Fig. 79.
The maximum permissible load of each of the hooks is 2 kg.
WARNING■ Never leave any heavy or sharp-edged objects in the pockets of the items
of clothing hung up - danger of injury.■
Do not use hangers to hang up the clothes - there is a risk of restricting
the effectiveness of head airbags and a danger of injury from the hanger.
■
Make sure that any clothes hanging from the hooks do not impede your
vision.
Storage pockets on the backs of the front seats
Fig. 80
Map pockets
Read and observe and on page 67 first.
The storage pockets » Fig. 80 are intended for the storage of maps, maga-
zines, etc.
Storage pockets on the inner sides of the front seats
Fig. 81
Storage pocket
Read and observe and on page 67 first.
The storage pockets are located on the inside of the front seats » Fig. 81 and
are used to store small and light objects (e.g. mobile phones).
73Useful features
Page 78 of 184
WARNING■Never exceed the maximum permissible load of the respective fasteners,
nets, hooks etc. Heavy objects were not secured sufficiently – risk of injury!■
Do not exceed the permissible axle loads and permissible gross weight of
the vehicle – risk of accident!
■
An unsecured dirt or improperly attached load could slip during a sudden
manoeuvre or in an accident - danger of injury!
■
Loose cargo could hit a deployed airbag and injure occupants – danger of
death!
■
When transporting loads in the luggage compartment that has been en-
larged by folding the rear seats forward, ensure the safety of the passen-
gers transported on the other rear seats .
CAUTION
■ Never exceed the maximum permissible load of the respective fasteners,
nets, hooks etc. - these could be damaged.■
Please ensure that the heating elements for the rear window heater are not
damaged as a result of abrasive objects.
■
Do not place sharp objects in the nets and storage compartments in the lug-
gage compartment - there is a risk of damage to the net as well as the com-
partments.
■
Put the items in the storage compartments carefully and do not put point-
shaped objects - there is a risk of damage to the compartments.
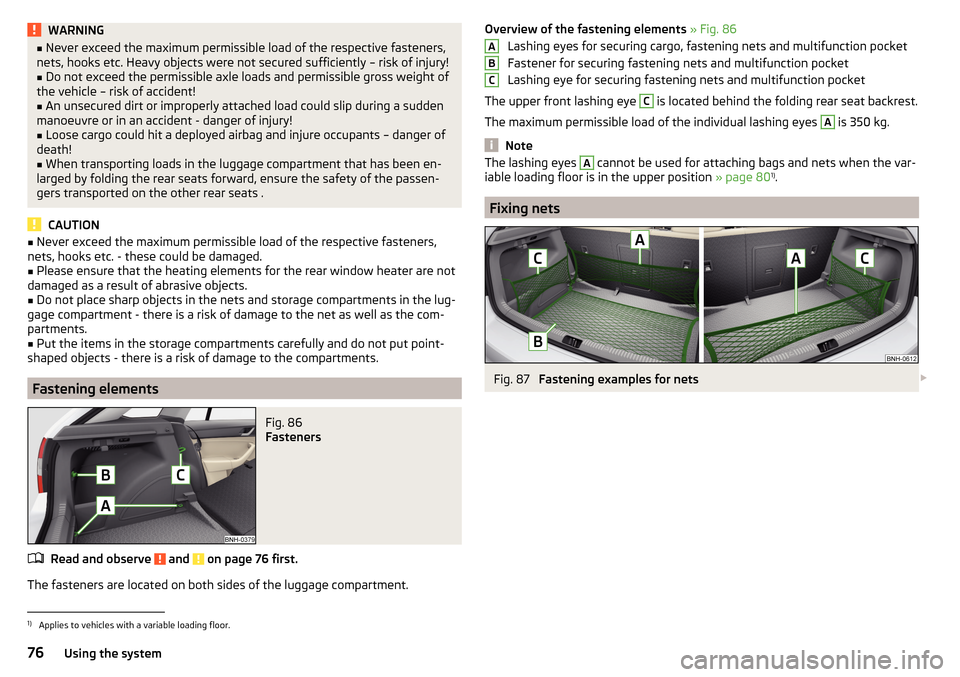
Fastening elements
Fig. 86
Fasteners
Read and observe and on page 76 first.
The fasteners are located on both sides of the luggage compartment.
Overview of the fastening elements » Fig. 86
Lashing eyes for securing cargo, fastening nets and multifunction pocket
Fastener for securing fastening nets and multifunction pocket
Lashing eye for securing fastening nets and multifunction pocket
The upper front lashing eye C
is located behind the folding rear seat backrest.
The maximum permissible load of the individual lashing eyes
A
is 350 kg.
Note
The lashing eyes A cannot be used for attaching bags and nets when the var-
iable loading floor is in the upper position » page 801)
.
Fixing nets
Fig. 87
Fastening examples for nets
ABC1)
Applies to vehicles with a variable loading floor.
76Using the system
Page 80 of 184
Removing›On both sides of the boot lid unhook the straps A in direction of arrow 1
» Fig. 91.
›
Hold the raised cover and press on the two sides on the underside of the
cover in the area of the recess
C
.
›
Remove the cover in the direction of the arrow
2
.
Installing
›
Position the fixtures
B
on the cover over the studs
C
» Fig. 91 .
›
On both sides, press on the top of the cover in the area of the studs
C
. The
fixture
B
must lock into place on the studs
C
on both sides of the luggage
compartment.
›
Hook in the straps
A
on both sides of the boot lid.
WARNINGDo not place any objects on the cover during the trip - risk of injury if brak-
ing suddenly or colliding!
CAUTION
■ Observe the following instructions to avoid canting and the subsequent
damage to the cover or the side trim. ■ The cover must be inserted properly and the load must not exceed the
height of the cover.
■ The cover must not be jammed in the surrounding seal of the luggage com-
partment lid when it is in the raised position. ■ There must be no object in the gap between the cover in the raise position
and the rear backrest.
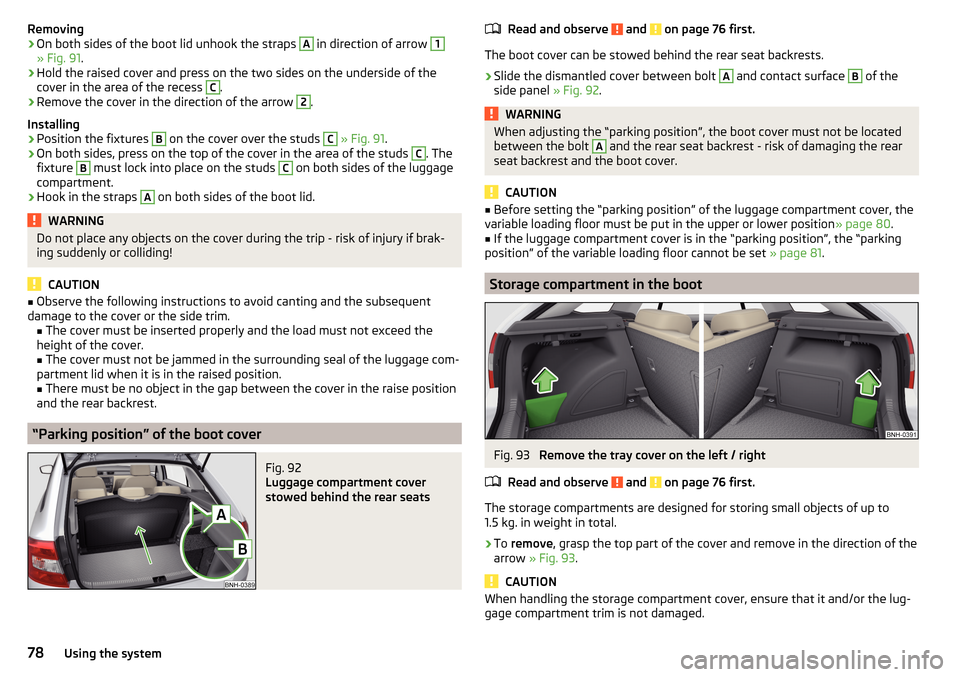
“Parking position” of the boot cover
Fig. 92
Luggage compartment cover
stowed behind the rear seats
Read and observe and on page 76 first.
The boot cover can be stowed behind the rear seat backrests.
›
Slide the dismantled cover between bolt
A
and contact surface
B
of the
side panel » Fig. 92.
WARNINGWhen adjusting the “parking position”, the boot cover must not be located
between the bolt A and the rear seat backrest - risk of damaging the rear
seat backrest and the boot cover.
CAUTION
■ Before setting the “parking position” of the luggage compartment cover, the
variable loading floor must be put in the upper or lower position » page 80.■
If the luggage compartment cover is in the “parking position”, the “parking
position” of the variable loading floor cannot be set » page 81.
Storage compartment in the boot
Fig. 93
Remove the tray cover on the left / right
Read and observe
and on page 76 first.
The storage compartments are designed for storing small objects of up to
1.5 kg. in weight in total.
›
To remove , grasp the top part of the cover and remove in the direction of the
arrow » Fig. 93 .
CAUTION
When handling the storage compartment cover, ensure that it and/or the lug-
gage compartment trim is not damaged.78Using the system
Page 81 of 184

Storage net bagFig. 94
Meshed pocket for storage
Read and observe and on page 76 first.
The meshed pocket for storage is located on the right-hand side of the boot» Fig. 94 .
The meshed pocket for storage is designed for storing small objects of up to
1.5 kg. in weight in total.
Cargo elements
Fig. 95
Remove cargo element: Version 1/version 2
Fig. 96
Remove cargo element: Version 3 / Mounting example of the car-
go using the cargo elements
Read and observe
and on page 76 first.
The cargo elements are designed for mounting and securing loads with a max-imum gross weight of 8 kg.
›
To use , remove the cargo elements in the direction of the arrows » Fig. 95
and » Fig. 96
.
›
Use the cargo elements to secure the load as close as possible to the rear
seats » Fig. 96
.
›
After use, secure the cargoelements in their original position.
Floor covering on both sides
Read and observe
and on page 76 first.
You can fit a double-sided floor covering in the luggage compartment. One
side is made of fabric, the other side is washable (suitable for transporting wet
or dirty items).
Class N1 vehicles
Read and observe
and on page 76 first.
In class N1 vehicles that are not fitted with a protective grille, a lashing set that
complies with the EN 12195 standard (1 - 4) must be used for fastening the
load.
79Transport of cargo
Page 127 of 184
CAUTION■Move the scraper in one direction only, otherwise there is a risk of damage to
the glass surface.■
Do not remove snow / ice on the surface that is soiled (e.g. pea gravel, sand,
road salt) - there is a risk of damaging the surface.
■
Remove snow / ice carefully, otherwise there is a risk of damaging the labels
that have been fitted by the factory.
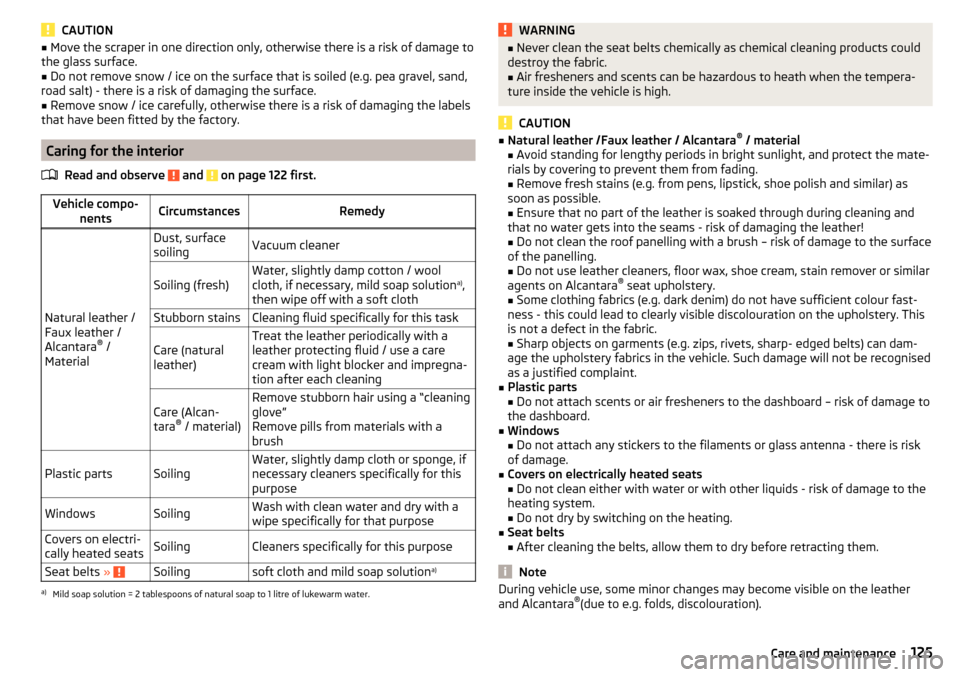
Caring for the interior
Read and observe
and on page 122 first.
Vehicle compo- nentsCircumstancesRemedy
Natural leather /
Faux leather /
Alcantara ®
/
Material
Dust, surface
soilingVacuum cleanerSoiling (fresh)Water, slightly damp cotton / wool
cloth, if necessary, mild soap solution a)
,
then wipe off with a soft clothStubborn stainsCleaning fluid specifically for this taskCare (natural
leather)Treat the leather periodically with a
leather protecting fluid / use a care
cream with light blocker and impregna-
tion after each cleaningCare (Alcan-
tara ®
/ material)Remove stubborn hair using a “cleaning
glove”
Remove pills from materials with a
brushPlastic partsSoilingWater, slightly damp cloth or sponge, if
necessary cleaners specifically for this
purposeWindowsSoilingWash with clean water and dry with a
wipe specifically for that purposeCovers on electri-
cally heated seatsSoilingCleaners specifically for this purposeSeat belts » Soilingsoft cloth and mild soap solution a)a)
Mild soap solution = 2 tablespoons of natural soap to 1 litre of lukewarm water.
WARNING■
Never clean the seat belts chemically as chemical cleaning products could
destroy the fabric.■
Air fresheners and scents can be hazardous to heath when the tempera-
ture inside the vehicle is high.
CAUTION
■ Natural leather /Faux leather / Alcantara ®
/ material
■ Avoid standing for lengthy periods in bright sunlight, and protect the mate-
rials by covering to prevent them from fading.
■ Remove fresh stains (e.g. from pens, lipstick, shoe polish and similar) as
soon as possible.
■ Ensure that no part of the leather is soaked through during cleaning and
that no water gets into the seams - risk of damaging the leather!
■ Do not clean the roof panelling with a brush – risk of damage to the surface
of the panelling.
■ Do not use leather cleaners, floor wax, shoe cream, stain remover or similar
agents on Alcantara ®
seat upholstery.
■ Some clothing fabrics (e.g. dark denim) do not have sufficient colour fast-
ness - this could lead to clearly visible discolouration on the upholstery. This
is not a defect in the fabric.
■ Sharp objects on garments (e.g. zips, rivets, sharp- edged belts) can dam-
age the upholstery fabrics in the vehicle. Such damage will not be recognised
as a justified complaint.■
Plastic parts
■ Do not attach scents or air fresheners to the dashboard – risk of damage to
the dashboard.
■
Windows
■ Do not attach any stickers to the filaments or glass antenna - there is risk
of damage.
■
Covers on electrically heated seats ■ Do not clean either with water or with other liquids - risk of damage to the
heating system.
■ Do not dry by switching on the heating.
■
Seat belts
■ After cleaning the belts, allow them to dry before retracting them.
Note
During vehicle use, some minor changes may become visible on the leather
and Alcantara ®
(due to e.g. folds, discolouration).125Care and maintenance
Page 135 of 184

Brake fluidFig. 156
Brake fluid reservoir
Check the brake fluid under the following conditions.The vehicle is on a horizontal surface.
The engine is turned off.
Check brake fluid level - the brake fluid level must lie between the markings
“MIN” and “MAX” » Fig. 156.
Specification - the brake fluid must comply with the standard VW 501 14 (this
standard meets the requirements of FMVSS 116 DOT4).
WARNING■ The following instructions must be followed at all times when working on
the engine compartment » page 128.■
If the fluid level drops significantly within a short time or if it drops below
the “MIN” » Fig. 156mark, this may be an indication of a leak in the brake
system.
Stop driving - There is a risk of an accident! Seek help from a
specialist garage.
Note
■ The brake fluid is changed as part of a compulsory inspection service.■Too low brake fluid level is indicated by the warning light being shown on
the display of the instrument cluster as well as the corresponding message
» page 30 . We still recommend inspecting the brake fluid level in the reservoir
from time to time.Vehicle battery
Introduction
This chapter contains information on the following subjects:
Check condition
134
Charging
135
Disconnect/reconnect and change
135
The vehicle battery represents a power source for the motor to start and for the supply of electrical consumers in the car.
Depending on the engine, the vehicle battery is either in the engine compart-
ment or the luggage compartment.
Automatic shutdown of consumers - vehicle battery discharge protection
The on-board power supply system tries to prevent the vehicle battery from
discharging in the following ways when it is subject to heavy loading. ▶ By increasing the engine idle speed.
▶ Through the power limitation of certain consumers.
▶ By switching off some consumers (e.g. heated seats) for as long as necessa-
ry.
Warning symbols on the vehicle battery
SymbolMeaningAlways wear eye protection!Battery acid is severely caustic. Always wear gloves and eye pro-
tection!Keep fire, sparks, open flames and lit cigarettes well clear of the
vehicle battery!When charging the vehicle battery, a highly explosive gas mixture
is produced!Keep children away from the vehicle battery! 133Inspecting and replenishing
Page 156 of 184
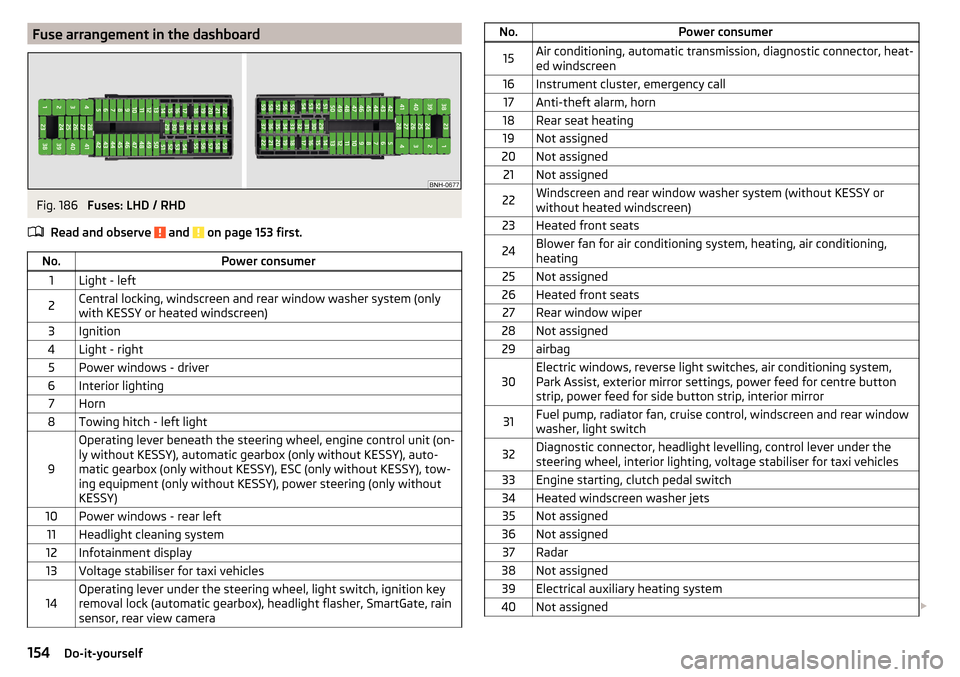
Fuse arrangement in the dashboardFig. 186
Fuses: LHD / RHD
Read and observe
and on page 153 first.
No.Power consumer1Light - left2Central locking, windscreen and rear window washer system (only
with KESSY or heated windscreen)3Ignition4Light - right5Power windows - driver6Interior lighting7Horn8Towing hitch - left light
9
Operating lever beneath the steering wheel, engine control unit (on-
ly without KESSY), automatic gearbox (only without KESSY), auto-
matic gearbox (only without KESSY), ESC (only without KESSY), tow-
ing equipment (only without KESSY), power steering (only without
KESSY)10Power windows - rear left11Headlight cleaning system12Infotainment display13Voltage stabiliser for taxi vehicles14Operating lever under the steering wheel, light switch, ignition key
removal lock (automatic gearbox), headlight flasher, SmartGate, rain
sensor, rear view cameraNo.Power consumer15Air conditioning, automatic transmission, diagnostic connector, heat-
ed windscreen16Instrument cluster, emergency call17Anti-theft alarm, horn18Rear seat heating19Not assigned20Not assigned21Not assigned22Windscreen and rear window washer system (without KESSY or
without heated windscreen)23Heated front seats24Blower fan for air conditioning system, heating, air conditioning,
heating25Not assigned26Heated front seats27Rear window wiper28Not assigned29airbag30Electric windows, reverse light switches, air conditioning system,
Park Assist, exterior mirror settings, power feed for centre button
strip, power feed for side button strip, interior mirror31Fuel pump, radiator fan, cruise control, windscreen and rear window
washer, light switch32Diagnostic connector, headlight levelling, control lever under the
steering wheel, interior lighting, voltage stabiliser for taxi vehicles33Engine starting, clutch pedal switch34Heated windscreen washer jets35Not assigned36Not assigned37Radar38Not assigned39Electrical auxiliary heating system40Not assigned 154Do-it-yourself
Page 171 of 184
Index
A
ABS Operation
97
Warning light32
Acceptance and recycling of used vehicles
120
Accessories118
Adjusting Steering wheel
11
Adjusting the seats10
Adjustment Beam range
54
Advance warning / emergency braking37
Advice on tyre/wheel usage136
Air-conditioning system Air outlet vents
84
Airbag15
Adjustments and impairments to the airbag system
119
Deactivation18
Deployment16
Warning light32
Airbag system15
Air conditioning82
Air distribution control84
Climatronic83
Manual air conditioning82
Air distribution control84
Air outlet vents84
Alarm49
Trailer117
All-year tyres139
Anti-lock braking system (ABS)97
Anti-theft alarm system49
Trailer117
Anti-theft wheel bolts143
Armrest Front64
Rear65
Ashtray70
Assembling the tow bar, Step 1
113
tow bar, Step 2113
Assist systems96
Auto Check Control38
Automatic drive Selector lever
92
Automatic driving light control55
Automatic gearbox92
Kickdown94
Malfunction34
Selector lever-emergency unlocking151
Selector lever lock93
Starting-off and driving94
Tiptronic93
Warning light34
Automatic shutdown of consumers133
Automatic transmission Selector lever lock
93
AUX68
Avoiding damage to your vehicle95
B
Ball bar Standby position
112
Ball head Check fitting
114
Ready position112
Battery Change in key
150
Belts12
Belt tensioners14
Bluetooth See Owner´s Manual -Infotainment
6
Bonnet Closing129
Opening129
Boot Cargo element
79
Class N1 vehicles79
Hooks77
See boot lid51
Storage compartments78
Boot cover Parking position
78
Boot lid Automatic locking
51
Open/Close51
Brake Assist (HBA)98
Brake booster89
Brake fluid133
Check133
specification133
Brake pads New
89
Brake pedal (automatic transmission) Warning light
34
Brakes Brake booster
89
Brake fluid133
Braking and stabilisation systems96
Handbrake90
Information on braking89
Warning lights30
Brake system96
Braking Running in
94
Breakdown kit145
Breakdown service see Help in an emergency
8
Buttons in the door Electric window
52
169Index
Page 173 of 184
DisposalAcceptance and recycling of used vehicles120
Distance warning107
Warning light36
Door Child safety lock
49
Emergency locking151
Emergency locking of the driver's door150
Opening/Closing48
Door alarm37
Drive Driving through water
95
DriveGreen94
Driving Emissions
163
Fuel consumption163
Maximum speed167
through water95
E
Economical driving
94
EDL98
Electric power windows Operational faults
53
Electric window51
Buttons in the driver´s door52
Electronic Differential Lock (EDL)98
Electronic immobiliser86
Emergency Hazard warning light system
57
Jump-starting147
Selector lever-unlocking151
Starting / stopping the engine with the push of a button
87
Starting the engine / stopping with the push of a button
88
Towing the vehicle148
Towing the vehicle using the trailer device149
Tyre repair145
Unlocking/locking the door150
Unlocking / locking the door151
Emergency equipment Fire extinguisher
140
First aid kit140
Jack141
Reflective vest140
Vehicle tool kit141
Warning triangle140
Emergency spare Removing / stowing
142
Emission control system32
Emissions163
Engine Information messages
35
Running in94
Engine compartment128
Brake fluid133
Coolant131
Engine oil130
Overview129
Vehicle battery133
Windscreen washer fluid130
Engine drag torque control (MSR)97
Engine number162
engine oil specification
130
Engine oil130
Check131
Oil changing130
Refilling131
Warning light35
EPC32
ESC Operation
97
Warning light31
Extended warranty5
F
Fastening elements
76
Fatigue detection108
Films123
Fire extinguisher140
First aid kit140
Flashing55
Floor covering in the luggage compartment79
Fog lights Warning light
34
Fog lights/rear fog light56
Fog lights with the CORNER function56
Footmats91
refer to footmats91
Force limiter Window
53
Front Assist105
Deactivation/activation108
Distance warning107
Malfunctions108
Operation106
Radar sensor106
Warning and automatic braking107
Warning light36, 37
Front seats63
Fuel126
Diesel127
Fuel gauge29
refer to Fuel126
Refuelling126
Unleaded petrol126
Warning light33
Fuel consumption163
Fuel reserve33
Fuses153
in the dashboard153, 154
in the engine compartment155, 156
G
Gearbox Information messages
34
171Index