steering SKODA ROOMSTER 2006 1.G User Guide
[x] Cancel search | Manufacturer: SKODA, Model Year: 2006, Model line: ROOMSTER, Model: SKODA ROOMSTER 2006 1.GPages: 274, PDF Size: 48.64 MB
Page 65 of 274
Lights and Visibility
64
Slow wipe
– Position the lever up into position .
Fast wipe
– Position the lever up into position .
Automatic wipe/wash for windscreen
– Pull the lever towards the steering wheel into position and the widescreen wiper and wash system will operate - in the
sprung position.
– Release the lever. The winds creen wash system stops and
the wiper continues for another 1 - 3 wiper strokes (depending
on the period of spraying of the windscreen).
Wiping the rear window pane*
– Push the lever away from the steering wheel into position ⇒page 63, fig. 42 , the widescreen wiper will operate every 6
seconds.
Automatic wipe/wash for the rear window pane*
– Push the lever away from the steering wheel into position - the widescreen wiper and wash system will operate - in the
sprung position.
– Letting go of the lever will cause the windscreen wash system to stop and the wiper to continue for another 1 - 3 wiper
strokes (depending on the period of spraying of the wind-
screen). The lever will stay in position after releasing it .
Switching windscreen wipers off
– Move the lever back into its home position .
The windscreen wipers and the windscreen washer system only operate
if the ignition is switched on.
The rear window will be wiped again if the front window wipers are on
when reverse gear is selected.
The windscreen washer nozzles are heated* when the ignition is switched
on.
Top up with wash liquid ⇒page 224.
WARNING
•Properly maintained windscreen wiper blades are essential for
clear visibility and safe driving ⇒page 65.
•Do not use the windscreen washer system at low temperatures,
without heating the windscreen beforehand. Otherwise the window
cleaner could freeze on the windscreen and restrict the view to the
front.
•In the event of a freezing up of the windscreen, first of all elimi-
nate the ice ⇒page 200 and then operate the windscreen wiper
otherwise the windscreen wiper blades could be damaged.
Caution
In frosty weather, please first of all check whether the windscreen wiper
blades are not frozen to the windscreen before switching them on.
Switching on windscreen wipers when the blades are frozen to the wind-
screen may result in damage both to the blades and the motor of the wind-
screen wipers!
A2
A3
A5
A6
A7
A6
A0
NKO 20 A05.book Page 64 Wednesday, June 21, 2006 1:42 PM
Page 69 of 274
Seats and Stowage
68
Seats and Stowage
Front seats
Basic information
The front seats have a wide range of different settings and can thus be
matched to the physical characteristics of the driver and front passenger.
Correct adjustment of the seats is particularly important for
•safely and quickly reaching the controls,
•a relaxed, fatigue-free body position,
•achieving the maximum protection offered by the seat belts and
the airbag system.
The chapters which follow describe the procedure which you should adopt
for adjusting the seats.
WARNING
•Never transport more occupants than the maximum seating in
the vehicle.
•Each occupant must correctly fasten the seat belt belonging to
the seat. Children must be fastened ⇒page 166, “Transporting
children safely” with a suitable restraint system.
•The front seats and the head restraints must always be adjusted
to match the body size of the seat occupant as well as the seat belts
must always be correctly fastened in order to provide an optimal
protection for you and your occupants.
•Always keep your feet in the footwell when the car is being
driven - never place your feet on the instrument panel, out of the
window or on the surfaces of the seats. This is particularly impor- tant for the front seat passenger. You will be exposed to increased
risk of injury if it becomes nece
ssary to apply the brake or in the
event of an accident. If an airbag is deployed, you may suffer fatal
injuries when adopting an incorrect seated position!
•It is important for the driver and front passenger to maintain a
distance of at least 25 cm from the steering wheel or dash panel.
Not maintaining this minimum distance will mean that the airbag
system will not be able to properly protect you - hazard! The front
seats and the head restraints must always also be correctly
adjusted to match the body size of the occupant.
•Ensure that there are no objects in the footwell as any objects
may get behind the pedals during a driving or braking manoeuvre.
You would then no longer be able to operate the clutch, to brake or
accelerate.
WARNING (continued)
NKO 20 A05.book Page 68 Wednesday, June 21, 2006 1:42 PM
Page 70 of 274
Seats and Stowage69
Using the systemSafetyDriving TipsGeneral MaintenanceBreakdown assistanceTechnical Data
Adjusting the front seats
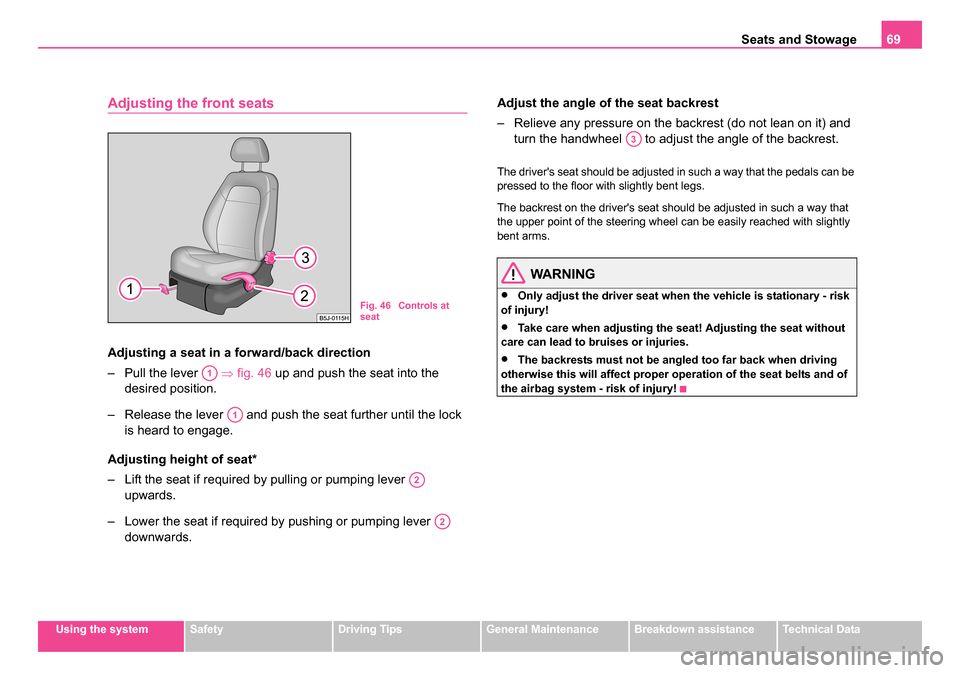
Adjusting a seat in a forward/back direction
– Pull the lever ⇒fig. 46 up and push the seat into the
desired position.
– Release the lever and push the seat further until the lock is heard to engage.
Adjusting height of seat*
– Lift the seat if required by pulling or pumping lever upwards.
– Lower the seat if required by pushing or pumping lever downwards. Adjust the angle of
the seat backrest
– Relieve any pressure on the backrest (do not lean on it) and turn the handwheel to adjust the angle of the backrest.
The driver's seat should be adjusted in such a way that the pedals can be
pressed to the floor with slightly bent legs.
The backrest on the driver's seat should be adjusted in such a way that
the upper point of the steering wheel can be easily reached with slightly
bent arms.
WARNING
•Only adjust the driver seat when the vehicle is stationary - risk
of injury!
•Take care when adjusting the sea t! Adjusting the seat without
care can lead to bruises or injuries.
•The backrests must not be angled too far back when driving
otherwise this will affect proper operation of the seat belts and of
the airbag system - risk of injury!
Fig. 46 Controls at
seat
A1
A1
A2
A2
A3
NKO 20 A05.book Page 69 Wednesday, June 21, 2006 1:42 PM
Page 85 of 274
Seats and Stowage
84
Secure the stability of the bicycles with a strap
– To slacken the rubber part of the clamp, push both parts
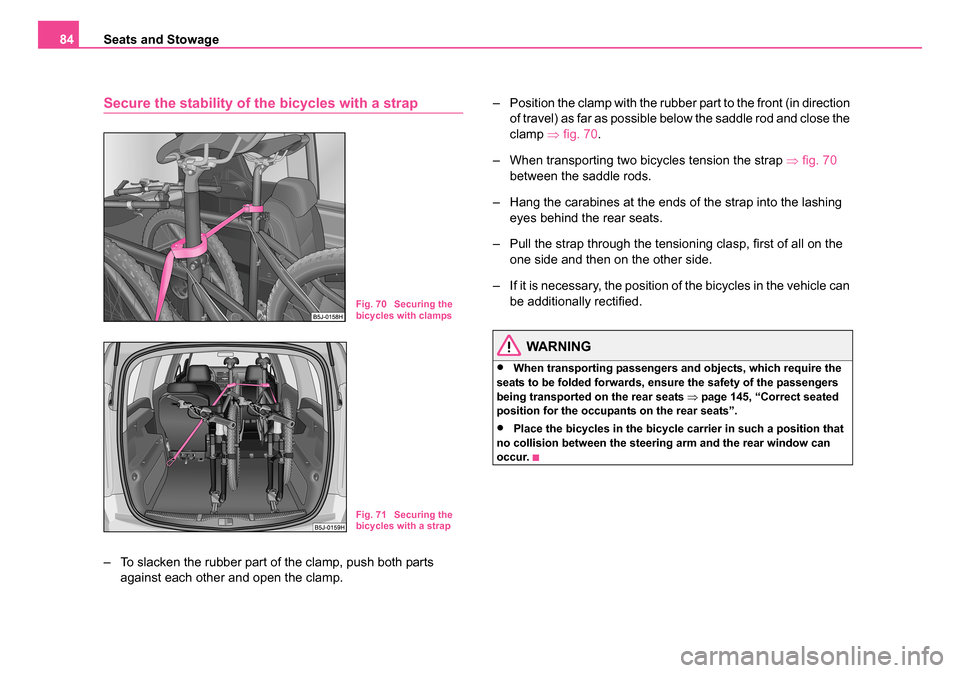
against each other and open the clamp. – Position the clamp with the rubber part to the front (in direction
of travel) as far as possible below the saddle rod and close the
clamp ⇒fig. 70 .
– When transporting two bicycles tension the strap ⇒fig. 70
between the saddle rods.
– Hang the carabines at the ends of the strap into the lashing eyes behind the rear seats.
– Pull the strap through the tensioning clasp, first of all on the one side and then on the other side.
– If it is necessary, the position of the bicycles in the vehicle can be additionally rectified.
WARNING
•When transporting passengers and objects, which require the
seats to be folded forwards, ensure the safety of the passengers
being transported on the rear seats ⇒page 145, “Correct seated
position for the occupants on the rear seats”.
•Place the bicycles in the bicycle carrier in such a position that
no collision between the steering arm and the rear window can
occur.
Fig. 70 Securing the
bicycles with clamps
Fig. 71 Securing the
bicycles with a strap
NKO 20 A05.book Page 84 Wednesday, June 21, 2006 1:42 PM
Page 92 of 274
Seats and Stowage91
Using the systemSafetyDriving TipsGeneral MaintenanceBreakdown assistanceTechnical Data
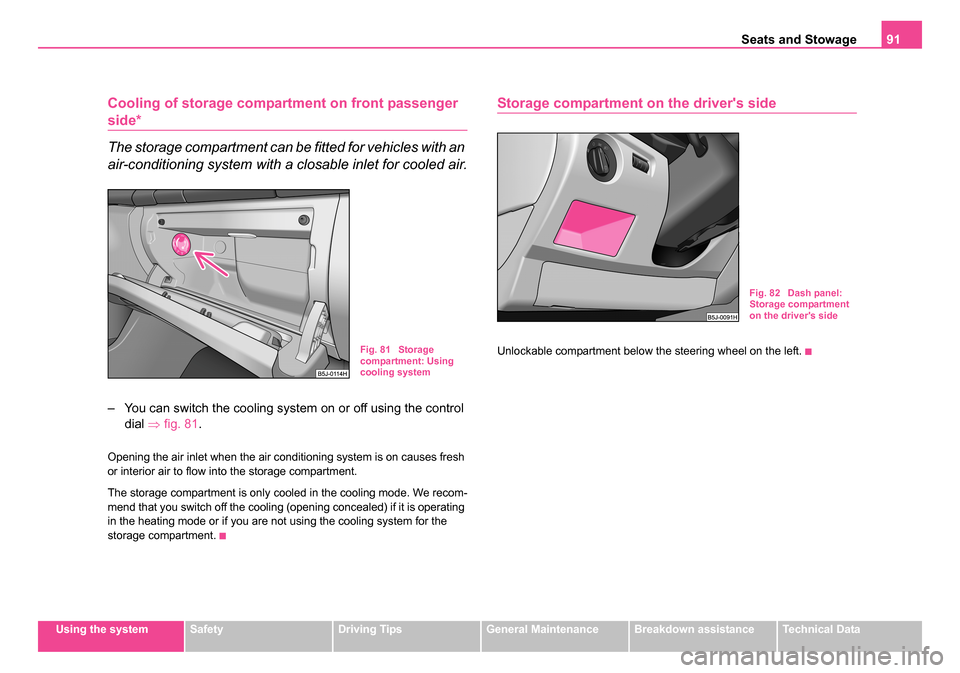
Cooling of storage compar tment on front passenger
side*
The storage compartment can be fitted for vehicles with an
air-conditioning system with a closable inlet for cooled air.
– You can switch the cooling system on or off using the control
dial ⇒fig. 81 .
Opening the air inlet when the air conditioning system is on causes fresh
or interior air to flow into the storage compartment.
The storage compartment is only cooled in the cooling mode. We recom-
mend that you switch off the cooling (opening concealed) if it is operating
in the heating mode or if you are not using the cooling system for the
storage compartment.
Storage compartment on the driver's side
Unlockable compartment below the steering wheel on the left.Fig. 81 Storage
compartment: Using
cooling system
Fig. 82 Dash panel:
Storage compartment
on the driver's side
NKO 20 A05.book Page 91 Wednesday, June 21, 2006 1:42 PM
Page 110 of 274
Starting-off and Driving109
Using the systemSafetyDriving TipsGeneral MaintenanceBreakdown assistanceTechnical Data
Starting-off and Driving
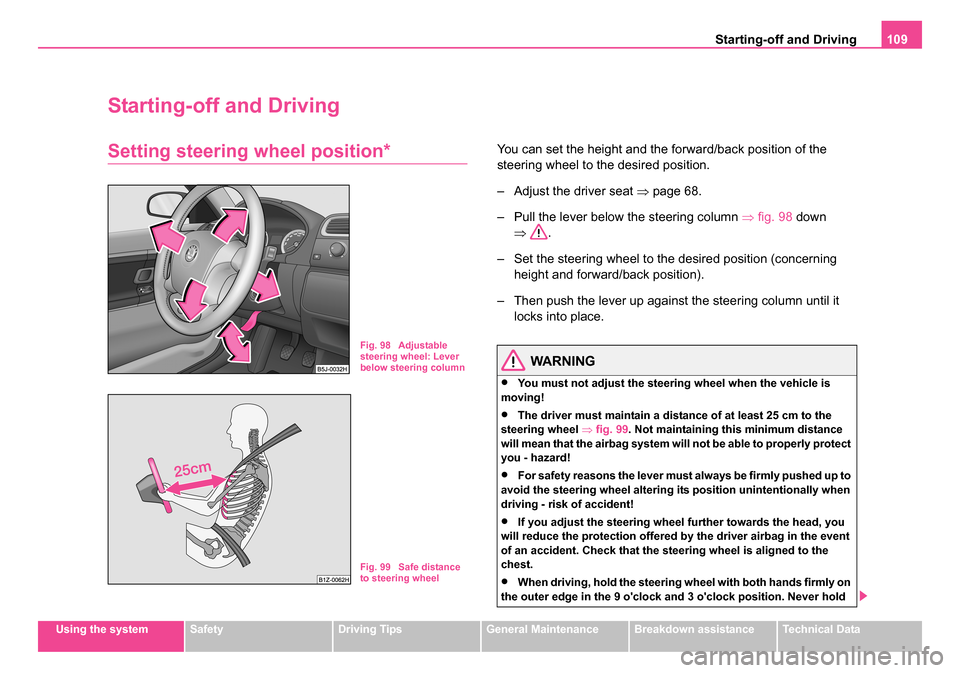
Setting steering wheel position*You can set the height and the forward/back position of the
steering wheel to the desired position.
– Adjust the driver seat ⇒page 68.
– Pull the lever below the steering column ⇒fig. 98 down
⇒ .
– Set the steering wheel to the desired position (concerning height and forward/back position).
– Then push the lever up against the steering column until it locks into place.
WARNING
•You must not adjust the steering wheel when the vehicle is
moving!
•The driver must maintain a distance of at least 25 cm to the
steering wheel ⇒fig. 99 . Not maintaining this minimum distance
will mean that the airbag system will not be able to properly protect
you - hazard!
•For safety reasons the lever must always be firmly pushed up to
avoid the steering wheel altering its position unintentionally when
driving - risk of accident!
•If you adjust the steering wheel further towards the head, you
will reduce the protection offered by the driver airbag in the event
of an accident. Check that the steering wheel is aligned to the
chest.
•When driving, hold the steering wheel with both hands firmly on
the outer edge in the 9 o'clock and 3 o'clock position. Never hold
Fig. 98 Adjustable
steering wheel: Lever
below steering column
Fig. 99 Safe distance
to steering wheel
NKO 20 A05.book Page 109 Wednesday, June 21, 2006 1:42 PM
Page 111 of 274
Starting-off and Driving
110
the steering wheel firmly in the 12 o'clock position or in another
way (e.g. in the middle of the steering wheel or at the inner steering
wheel edge). In such cases, injuries to the arms, the hands and the
head can occur when the driver airbag is deployed.
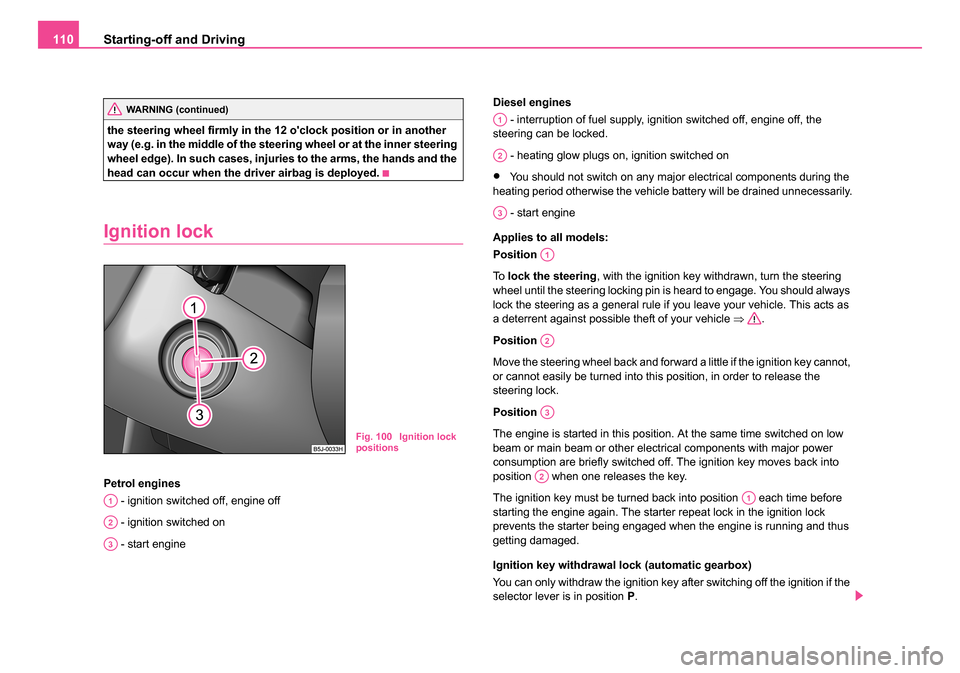
Ignition lock
Petrol engines
- ignition switched off, engine off
- ignition switched on
- start engine Diesel engines
- interruption of fuel supply, ignition switched off, engine off, the
steering can be locked.
- heating glow plugs on, ignition switched on
•You should not switch on any major electrical components during the
heating period otherwise the vehicle battery will be drained unnecessarily.
- start engine
Applies to all models:
Position
To lock the steering , with the ignition key withdrawn, turn the steering
wheel until the steering locking pin is heard to engage. You should always
lock the steering as a general rule if you leave your vehicle. This acts as
a deterrent against possible theft of your vehicle ⇒.
Position
Move the steering wheel back and forward a little if the ignition key cannot,
or cannot easily be turned into this position, in order to release the
steering lock.
Position
The engine is started in this position. At the same time switched on low
beam or main beam or other electrical components with major power
consumption are briefly switched off. The ignition key moves back into
position when one releases the key.
The ignition key must be turned back into position each time before
starting the engine again. The starter repeat lock in the ignition lock
prevents the starter being engaged when the engine is running and thus
getting damaged.
Ignition key withdrawal lock (automatic gearbox)
You can only withdraw the ignition key after switching off the ignition if the
selector lever is in position P.
WARNING (continued)
Fig. 100 Ignition lock
positions
A1
A2
A3
A1
A2
A3
A1
A2
A3
A2
A1
NKO 20 A05.book Page 110 Wednesday, June 21, 2006 1:42 PM
Page 112 of 274
Starting-off and Driving111
Using the systemSafetyDriving TipsGeneral MaintenanceBreakdown assistanceTechnical Data
WARNING
•When driving, the ignition key must always be in the position
(ignition switched on) without the en gine running. This position is
indicated by the warning lights coming on. If this is not the case, it
could result in unexpected locking of the steering wheel - risk of
accident!
•Do not withdraw the ignition key from the lock until the car has
come to a stop. The steering lock can engage immediately - risk of
accident!
•Always withdraw the ignition key if you are going to leave the
vehicle, even for a short time. This is particularly important if chil-
dren are left in the vehicle. The children might otherwise start the
engine or operate electrical equi pment (e.g. power windows) - risk
of injury!
Starting the engine
General
You can only start the engine only using an original ignition
key.
•Place the gearshift lever into neutral and put on the handbrake firmly
before starting the engine.
•The clutch pedal should be fully depressed when starting the engine
which means that the starter only has to crank the engine.
•Let go of the key as soon as the engine starts otherwise there may be
damage to the starter. The engine running noises may louder at first be louder for a short time
after starting the cold engine until oil pressure can be built up in the
hydraulic valve clearance compensation. This is quite normal and is not
an operating problem.
If the engine does not start ...
You can use the battery of another vehicle as a jump-start aid
⇒
page 243.
It is only possible to tow-start vehicles fitted with a manual gearbox. The
tow-starting distance must not be more than 50 metres ⇒page 247.
WARNING
•Never run the engine in non ventilated or enclosed areas. The
exhaust gases of the engine contain besides the odorless and
colourless carbon monoxide a poisonous gas - hazard! Carbon
monoxide can cause unconsciousness and death.
•Never leave your vehicle unattended with the engine running.
Caution
•The starter may only be operated (ignition key position ), if the
engine is not running. If the starter is immediately operated after switching
off the engine, the starter or the engine can be damaged.
•Avoid high engine revolutions, full throttle and high engine loads as
long as the engine has not yet reached its normal operating temperature
- risk of damaging the engine!
•Vehicles which are fitted with an exhaust gas catalytic converter
should not be tow-started over a distance of more than 50 metres.
A2
A3
NKO 20 A05.book Page 111 Wednesday, June 21, 2006 1:42 PM
Page 127 of 274
Communication
126
Communication
Operating the radio
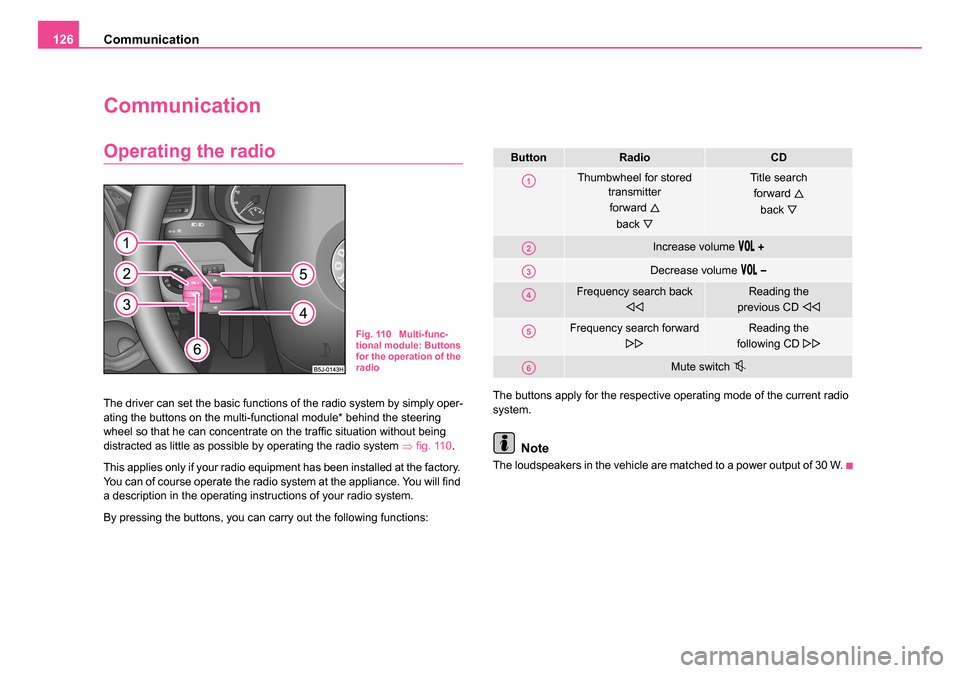
The driver can set the basic functions of the radio system by simply oper-
ating the buttons on the multi-functional module* behind the steering
wheel so that he can concentrate on the traffic situation without being
distracted as little as possible by operating the radio system ⇒fig. 110 .
This applies only if your radio equipment has been installed at the factory.
You can of course operate the radio system at the appliance. You will find
a description in the operating instructions of your radio system.
By pressing the buttons, you can carry out the following functions: The buttons apply for the respective operating mode of the current radio
system.
Note
The loudspeakers in the vehicle are matched to a power output of 30 W.
Fig. 110 Multi-func-
tional module: Buttons
for the operation of the
radio
ButtonRadioCD
Thumbwheel for stored
transmitter
forward
back
Title search forward
back
Increase volume
Decrease volume
Frequency search back
Reading the
previous CD
Frequency search forward
Reading the
following CD
Mute switch
A1
A2
A3
A4
A5
A6
NKO 20 A05.book Page 126 Wednesday, June 21, 2006 1:42 PM
Page 128 of 274
Communication127
Using the systemSafetyDriving TipsGeneral MaintenanceBreakdown assistanceTechnical Data
Radio and mobile phone operation
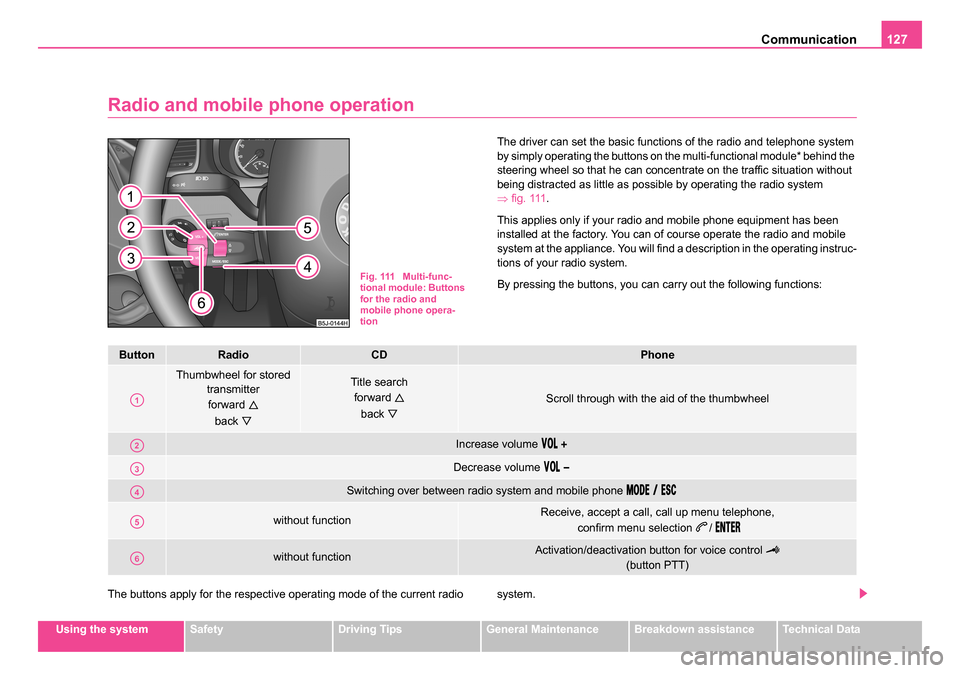
The driver can set the basic functions of the radio and telephone system
by simply operating the buttons on the multi-functional module* behind the
steering wheel so that he can concentrate on the traffic situation without
being distracted as little as possible by operating the radio system
⇒fig. 111 .
This applies only if your radio and mobile phone equipment has been
installed at the factory. You can of course operate the radio and mobile
system at the appliance. You will find a description in the operating instruc-
tions of your radio system.
By pressing the buttons, you can carry out the following functions:
The buttons apply for the respective operating mode of the current radio system.
Fig. 111 Multi-func-
tional module: Buttons
for the radio and
mobile phone opera-
tion
ButtonRadioCDPhone
Thumbwheel for stored transmitter
forward
back
Title search forward
back
Scroll through with the aid of the thumbwheel
Increase volume
Decrease volume
Switching over between radio system and mobile phone
without functionReceive, accept a call, call up menu telephone, confirm menu selection
/
without functionActivation/deactivation button for voice control
(button PTT)
A1
A2
A3
A4
A5
A6
NKO 20 A05.book Page 127 Wednesday, June 21, 2006 1:42 PM