battery SKODA ROOMSTER 2006 1.G Owner's Guide
[x] Cancel search | Manufacturer: SKODA, Model Year: 2006, Model line: ROOMSTER, Model: SKODA ROOMSTER 2006 1.GPages: 274, PDF Size: 48.64 MB
Page 222 of 274
Inspecting and Replenishing221
Using the systemSafetyDriving TipsGeneral MaintenanceBreakdown assistanceTechnical Data
Melting of lead struts, explosion and burning of the battery, jets of
acid spurting out.
•It is prohibited to work with a naked flame and light, to smoke or
to carry out any activities which produce sparks. Avoid creating
sparks when working with cables and electrical devices. Strong
sparking represents a risk of injury.
•Before carrying out any work on the electrical system, switch
off the engine, the ignition as well as all electrical components and
disconnect the negative cable (-) on the battery. If you wish to
replace a bulb it is sufficient to switch off the appropriate light.
•Never charge a frozen or thawed battery - risk of explosion and
caustic burns! Replace a frozen battery.
•Never use a battery which is damaged - risk of explosion! Imme-
diately replace a damaged battery.
Caution
•You must only disconnect the battery if the ignition is switched off,
otherwise the electrical system (electronic components) of the vehicle
may be damaged. When disconnecting the battery from the electrical
system of the vehicle, first disconnect the negative terminal (-) of the
battery. Then disconnect the positive terminal (+).
•When reconnecting the battery, first connect the positive terminal (+)
and only then the negative terminal (-) of the battery. You must on no
account connect the cables wrongly - risk of a cable fire.
•Ensure that battery acid does not come into contact with the vehicle
body otherwise damage could occur to the paintwork.
•Do not place the battery in direct daylight in order to protect the battery
housing from the effects of ultra-violet light.
For the sake of the environment
A removed battery is a special type of waste which is harmful to the envi-
ronment - we recommend that you contact your Škoda Service Partner
regarding disposing of the battery.
Note
•Please also refer to the guidelines ⇒page 223, “Disconnecting and
reconnecting the battery”, also after connecting the battery.
Battery with a charge level indicator, the so-called
magic eye*
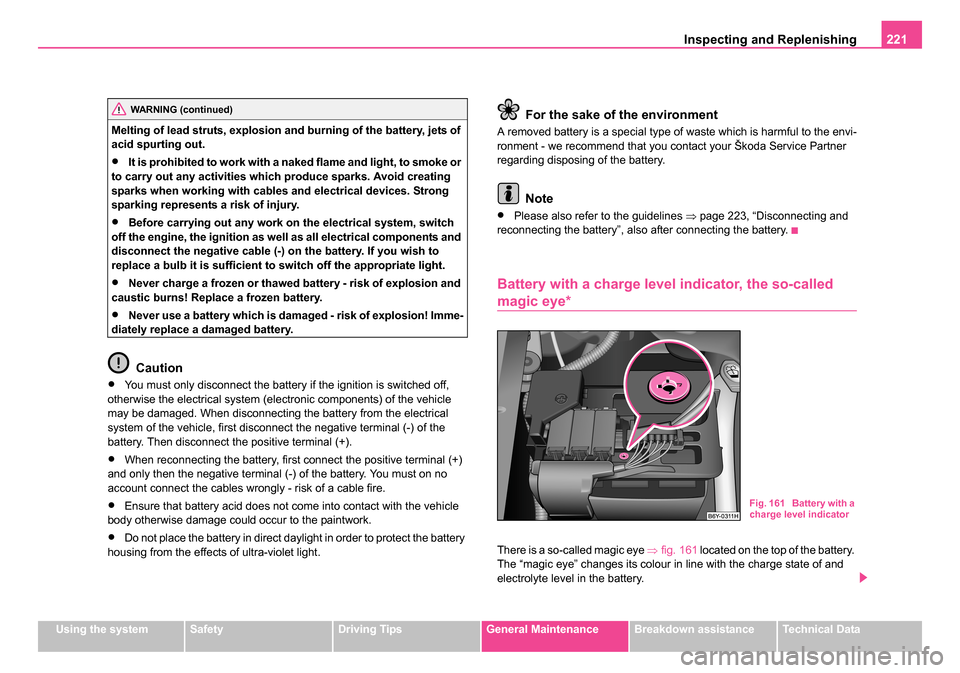
There is a so-called magic eye ⇒fig. 161 located on the top of the battery.
The “magic eye” changes its colour in line with the charge state of and
electrolyte level in the battery.
WARNING (continued)
Fig. 161 Battery with a
charge level indicator
NKO 20 A05.book Page 221 Wednesday, June 21, 2006 1:42 PM
Page 223 of 274
Inspecting and Replenishing
222
Air bubbles can influence the colour of the “magic eye”. For this reason
carefully knock on the “magic eye” before carrying out the check.
•Green colour - the battery is adequately charged.
•Dark colour - the battery has to be charged
•Colourless or yellow colour - we recommend you have the battery
checked by a Škoda Service Partner.
Batteries, which are more than 5 years old, must be replaced. We recom-
mend you have the electrolyte level inspected and adjusted to the correct
level or the battery replaced if necessary by a Škoda Service Partner.
Caution
If the vehicle has not been driven for more than 3 to 4 weeks, the battery
will discharge because certain electrical components consume electricity
(e.g. control units) also in idle state. You can prevent the discharging of
the battery by disconnecting the negative terminal or charging the battery
constantly with a very low charging current. Please also refer to the notes
when working on the battery ⇒page 220, “Working on the battery”.
Inspecting the electrolyte level
The battery is practically maintenance-free under normal operating
conditions. We do, however, recommend that you have the electrolyte
level inspected from time to time by a Škoda Service Partner when outside
temperatures are high or when driving on long trips. You should also
check the electrolyte level ⇒page 222 each time the battery is charged.
The battery acid level will also be checked as part of the Inspection
Service.
Operation in winter
The battery has to provide greater amounts of electricity during the winter.
It also has only part of the initial power output at low temperatures that it
has at normal temperatures.
A discharged battery may already freeze at temperatures just below
0°C.
We therefore recommend that you have the battery checked by a Škoda
Service Partner before the start of the winter, and recharged if
necessary.
Charging the battery
A properly charged battery is essential for reliably starting
the engine.
– Read the warning notes ⇒ in “Working on the battery” on
page 220 and ⇒.
– Switch the ignition and all electrical components off.
– Only for “quick-charging”: Disconnect both battery cables (first of all “negative”, then “positive”).
– Carefully attach the terminal clamps of the charger to the battery terminals (red = “positive”, black = “negative”).
– You can now plug the mains cable of the charger into the power socket and switch on the charger.
– When charging is completed: switch the charger off and unplug the mains cable from the power socket.
NKO 20 A05.book Page 222 Wednesday, June 21, 2006 1:42 PM
Page 224 of 274
Inspecting and Replenishing223
Using the systemSafetyDriving TipsGeneral MaintenanceBreakdown assistanceTechnical Data
– Only then should you disconnect the terminal clamps of the
charger.
– Reconnect the cables to the battery (first of all “positive”, then “negative”).
It is not normally necessary to disconnect the cables of the battery if you
recharge the battery using low amperages (as for example from a mini-
charger ). Please also refer to the instructions from the charger manufac-
turer.
A charging current of 0.1 of the total battery capacity (or lower) is that
which should be used until full charging is achieved.
It is, however, necessary to disconnect both cables before charging the
battery with high amperages, so-called “ quick-charging”.
“Quick-charging” a battery is dangerous ⇒ in “Working on the battery”
on page 220. It requires a special charger and appropriate knowledge. We
therefore recommend that you have your battery quick-charged only by
your Škoda Service Partner.
A discharged battery may already freeze at temperatures just below 0°C
⇒ . We recommend that you no longer use a battery which has thawed
out because the casing of the battery may be cracked through the forma-
tion of ice and this would allow battery electrolyte to flow out.
The vent plugs of the battery should not be opened for charging.
WARNING
Never charge a frozen or thawed battery - risk of explosion and
caustic burns! Replace a frozen battery.
Disconnecting and reconnecting the battery
On disconnecting and reconnecting the battery the following functions are
initially deactivated or are no longer able to operate fault-free.
We recommend having the vehicle checked by a Škoda Service Partner
to ensure full functionality of all electrical systems.
Replacing the battery
You should only replace a battery with a new battery of the same capacity,
voltage (12 V), amperage and of the same size. Škoda Service Partners
have a range of suitable batteries available.
We recommend that you only have an old battery disposed of by your
Škoda Service Partner since it does require special disposal.
For the sake of the environment
Batteries contain poisonous substances such as sulphuric acid and lead.
They must be disposed of in accordance with local environmental protec-
tion regulations and on no account as domestic waste.
OperationOperating measure
Electrical power window (operational
faults)⇒page 53
Enter radio code numbersee Radio Operating Instruc-
tions
Set hours⇒page 17
Data in the multi-functional indicator* are
deleted.⇒page 17
NKO 20 A05.book Page 223 Wednesday, June 21, 2006 1:42 PM
Page 244 of 274
Breakdown assistance243
Using the systemSafetyDriving TipsGeneral MaintenanceBreakdown assistanceTechnical Data
– Slacken the wheel bolt, or tighten it firmly ⇒page 241.
– Reinstall the full wheel trim/wheel cap after removing the adapter or place the cap onto the safety wheel bolt.
– Have the tightening torque checked with a torque wrench as
soon as possible. Steel and light alloy wheels must be tight-
ened to a tightening torque of 120 Nm.
The safety wheel bolts on vehicles fitted with them (one safety wheel bolt
per wheel) can only be loosened or tighten up by using the adapter
provided.
It is meaningful to note the code number hammered into the rear side of
the adapter or the rear side of the safety wheel bolts. You can obtain a
replacement adapter from a Škoda Service Partner, if necessary, by
quoting this number.
We recommend that you always carry the adapter for the wheel bolts with
you in the vehicle. It should be stowed in the vehicle tool kit.
Caution
•Damage can occur to the adapter and safety wheel bolt if the safety
wheel bolt is tightened up too much.
•On steel wheels, the theft-deterrent wheel bolt must always be
installed in the hole, which is close to the valve. Otherwise the full wheel
trim cannot be mounted and the full wheel trim can be damaged during the
assembly.
Note
The set of safety wheel bolts can be obtained from a Škoda Service
Partner.
Jump-starting
Initial steps
You can use the battery of another vehicle for jump-starting yours if the
engine does not start because the battery on your vehicle is flat. You will
require jump-start cables for this purpose.
Both batteries must have a rated voltage of 12 V. The capacity (Ah) of the
battery supplying the power must not be significantly less than the
capacity of the discharged battery in your vehicle.
Jump-start cables
Only use jump-start cables which have an adequately large cross-section
and insulated terminal clamps. Please pay attention to the manufacturer's
instructions.
Positive cable - colour coding in the majority of cases red.
Negative cable - colour coding in the majority of cases black.
WARNING
•A discharged battery may already freeze at temperatures just
below 0°C. In case of frozen battery carry out no jump-starting - risk
of explosion! Also after thawing of the battery there is a risk of
caustic burns due to leaking acid. Replace the frozen battery.
•Please pay attention to the warning instructions relating to
working in the engine compartment ⇒page 210.
Note
•There must not be any contact between the two vehicles otherwise
current may flow as soon as the negative terminals are connected.
NKO 20 A05.book Page 243 Wednesday, June 21, 2006 1:42 PM
Page 245 of 274
Breakdown assistance
244
•The discharged battery must be properly connected to the system of
the vehicle.
•Switch off any installed telephone and also pay attention to the instruc-
tions for use of the telephone in such a situation.
•We recommend purchasing jump-start cables from Škoda Service
Partners as a Škoda original accessory or from retailers who sell branded
batteries.
Start engine
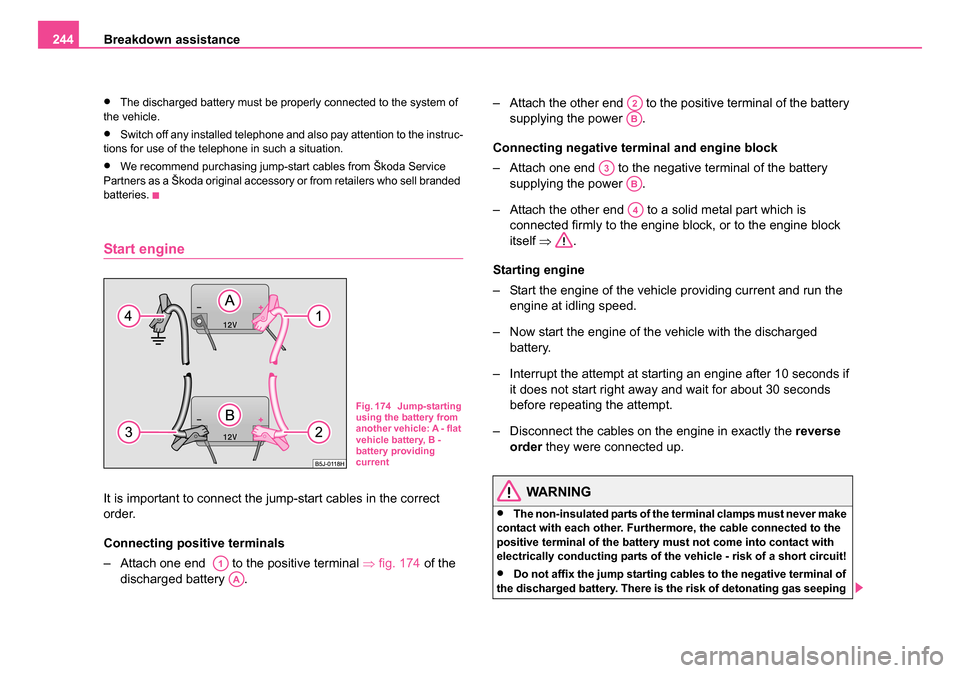
It is important to connect the jump-start cables in the correct
order.
Connecting positive terminals
– Attach one end to the positive terminal ⇒fig. 174 of the
discharged battery . – Attach the other end to the positive terminal of the battery
supplying the power .
Connecting negative terminal and engine block
– Attach one end to the negative terminal of the battery supplying the power .
– Attach the other end to a solid metal part which is connected firmly to the engine block, or to the engine block
itself ⇒ .
Starting engine
– Start the engine of the vehicle providing current and run the engine at idling speed.
– Now start the engine of the vehicle with the discharged battery.
– Interrupt the attempt at starting an engine after 10 seconds if it does not start right away and wait for about 30 seconds
before repeating the attempt.
– Disconnect the cables on the engine in exactly the reverse
order they were connected up.WARNING
•The non-insulated parts of the terminal clamps must never make
contact with each other. Furthermore, the cable connected to the
positive terminal of the battery must not come into contact with
electrically conducting parts of the vehicle - risk of a short circuit!
•Do not affix the jump starting cables to the negative terminal of
the discharged battery. There is the risk of detonating gas seeping
Fig. 174 Jump-starting
using the battery from
another vehicle: A - flat
vehicle battery, B -
battery providing
current
A1
AA
A2
AB
A3
AB
A4
NKO 20 A05.book Page 244 Wednesday, June 21, 2006 1:42 PM
Page 246 of 274
Breakdown assistance245
Using the systemSafetyDriving TipsGeneral MaintenanceBreakdown assistanceTechnical Data
out the battery being ignited by the strong spark which results from
the engine being started.
•Do not affix the cable end to parts of the fuel and brake
system.
•Run the jump-start cables so that they cannot be caught by any
rotating parts in the engine compartment.
•Do not bend over the batteries - risk of caustic burns!
•The vent screws of the battery cells must be tightened firmly.
•Keep any sources of ignition (naked flame, smouldering ciga-
rettes etc.) away from the battery - risk of an explosion!
Tow-starting and towing vehicle
General
Please pay attention to the following instructions if you are going
to use a tow rope:
Driver of the towing vehicle
– Do not drive off until the tow rope is taught.
– Release the clutch particularly gently when starting off. Driver of the towed vehicle
– Switch the ignition on so that the steering wheel is not blocked
and you can also operate the turn signal lights, the headlight
flasher, the windscreen wipers and windscreen washer
system.
– Take the vehicle out of gear or move the selector lever into position N if your vehicle is fitted with an automatic gearbox.
– Note that the brake servo unit and power steering only operate if the engine is running. You will require significantly greater
physical force to depress the brake pedal and to steer the
vehicle if the engine is not running.
– Ensure that the tow rope is always kept taught.
Tow rope or tow bar
A tow bar is safest way of towing a vehicle and also minimizes any
shocks. You can use a tow rope only if a suitable tow bar is not available.
The tow rope must be elastic to protect the vehicle. Thus one should only
use plastic fibre rope or a rope made out of a similarly elastic material.
Attach the tow rope or the tow bar only to the towing eyes provided for
this purpose ⇒page 246, “Front towing eye” and ⇒page 247, “Rear
towing eye”.
Driving style
Towing another vehicle requires a certain amount of practice. Both drivers
should be familiar with the particular points about towing a vehicle.
Unskilled drivers should not attempt to tow in another vehicle or to be
towed in.
One should be constantly vigilant not to allow impermissibly high towing
forces or jerky loadings. There is always a risk of excessive stresses and
WARNING (continued)
A4
NKO 20 A05.book Page 245 Wednesday, June 21, 2006 1:42 PM
Page 253 of 274
Fuses and light bulbs
252
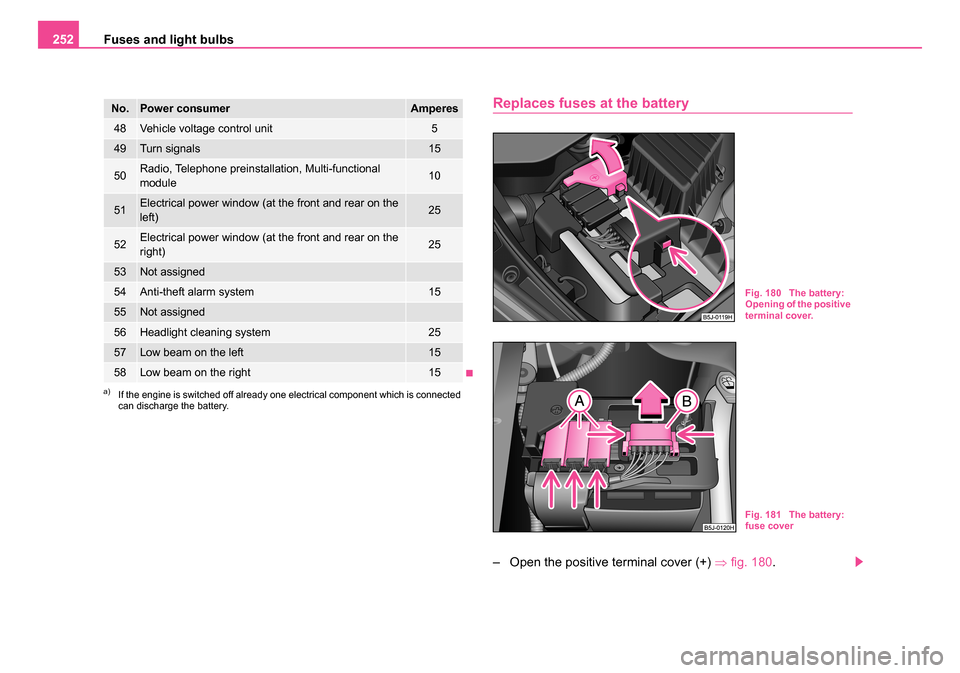
Replaces fuses at the battery
– Open the positive terminal cover (+) ⇒fig. 180 .
48Vehicle voltage control unit5
49Turn signals15
50Radio, Telephone preinstallation, Multi-functional
module10
51Electrical power window (at the front and rear on the
left)25
52Electrical power window (at the front and rear on the
right)25
53Not assigned
54Anti-theft alarm system15
55Not assigned
56Headlight cleaning system25
57Low beam on the left15
58Low beam on the right15
a)If the engine is switched off already one electrical component which is connected
can discharge the battery.
No.Power consumerAmperes
Fig. 180 The battery:
Opening of the positive
terminal cover.
Fig. 181 The battery:
fuse cover
NKO 20 A05.book Page 252 Wednesday, June 21, 2006 1:42 PM
Page 254 of 274
Fuses and light bulbs253
Using the systemSafetyDriving TipsGeneral MaintenanceBreakdown assistanceTechnical Data
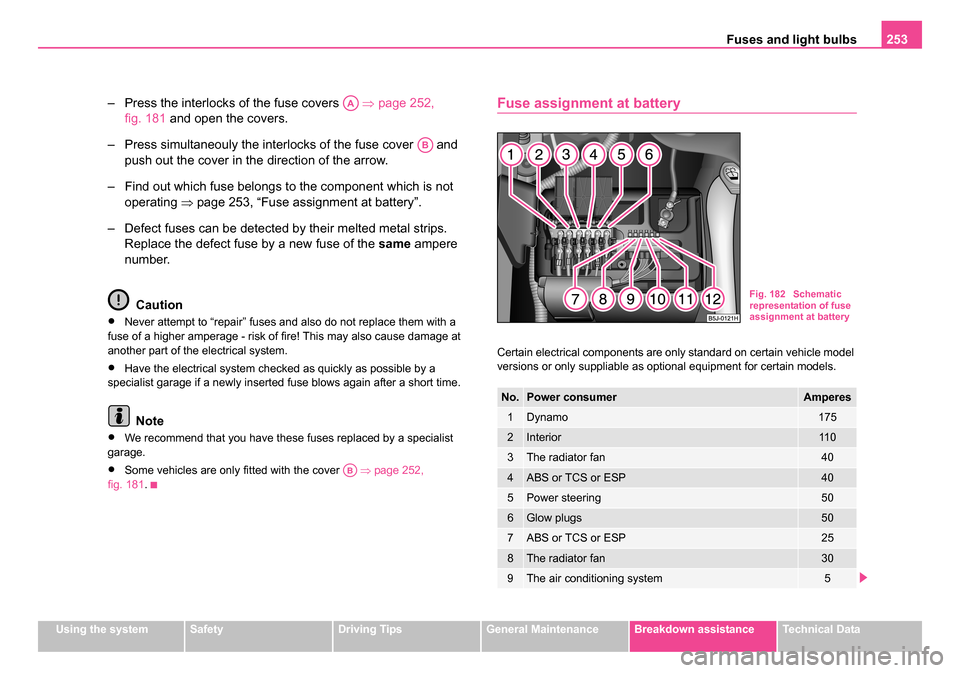
– Press the interlocks of the fuse covers ⇒page 252,
fig. 181 and open the covers.
– Press simultaneouly the interlocks of the fuse cover and push out the cover in the direction of the arrow.
– Find out which fuse belongs to the component which is not operating ⇒page 253, “Fuse assignment at battery”.
– Defect fuses can be detected by their melted metal strips. Replace the defect fuse by a new fuse of the same ampere
number.
Caution
•Never attempt to “repair” fuses and also do not replace them with a
fuse of a higher amperage - risk of fire! This may also cause damage at
another part of the electrical system.
•Have the electrical system checked as quickly as possible by a
specialist garage if a newly inserted fuse blows again after a short time.
Note
•We recommend that you have these fuses replaced by a specialist
garage.
•Some vehicles are only fitted with the cover ⇒page 252,
fig. 181 .
Fuse assignment at battery
Certain electrical components are only standard on certain vehicle model
versions or only suppliable as optional equipment for certain models.
AA
AB
AB
No.Power consumerAmperes
1Dynamo175
2Interior11 0
3The radiator fan40
4ABS or TCS or ESP40
5Power steering50
6Glow plugs50
7ABS or TCS or ESP25
8The radiator fan30
9The air conditioning system5
Fig. 182 Schematic
representation of fuse
assignment at battery
NKO 20 A05.book Page 253 Wednesday, June 21, 2006 1:42 PM
Page 266 of 274
Index265
Index
A
Abroad . . . . . . . . . . . . . . . . . . . . . . . . . . . . . 192
ABS . . . . . . . . . . . . . . . . . . . . . . . . . . . . . . . 181
Warning light . . . . . . . . . . . . . . . . . . . . . . 35
Accessories . . . . . . . . . . . . . . . . . . . . . . . . . 232
Adjusting seats . . . . . . . . . . . . . . . . 69, 75, 143
Adjusting the seat backrest . . . . . . . . . . . . . . 72
Adjusting the steering wheel . . . . . . . . . . . . 109
Air conditioning system . . . . . . . . . . . . . . . . . 99
Air outlet vents . . . . . . . . . . . . . . . . . . . . . . . 103
Airbag . . . . . . . . . . . . . . . . . . . . . . . . . . . . . 154 Deployment . . . . . . . . . . . . . . . . . . . . . . 155
Front airbag . . . . . . . . . . . . . . . . . . . . . . 156
Head airbag . . . . . . . . . . . . . . . . . . . . . . 161
Side airbag . . . . . . . . . . . . . . . . . . . . . . . 159
Warning light . . . . . . . . . . . . . . . . . . . . . . 36
Airbag system . . . . . . . . . . . . . . . . . . . . . . . 154 Warning light . . . . . . . . . . . . . . . . . . . . . . 36
Alarm . . . . . . . . . . . . . . . . . . . . . . . . . . . . . . . 49
Alternator Warning light . . . . . . . . . . . . . . . . . . . . . . 29
Antilock brake system . . . . . . . . . . . . . . . . . 181
Antilock brake system - ABS Warning light . . . . . . . . . . . . . . . . . . . . . . 35
Anti-theft alarm system . . . . . . . . . . . . . . . . . 49
Ashtray . . . . . . . . . . . . . . . . . . . . . . . . . . . . . 87
Auto Check Control . . . . . . . . . . . . . . . . . . . . 24 Auto Computer . . . . . . . . . . . . . . . . . . . . . . . . 17
Automatic gearbox . . . . . . . . . . . . . . . . . . . . 119
Emergency programme . . . . . . . . . . . . . 124
Kickdown . . . . . . . . . . . . . . . . . . . . . . . . 122
Selector lever-emergency unlocking . . . 124
Tiptronic . . . . . . . . . . . . . . . . . . . . . . . . . 123
Automatic vehicle wash systems . . . . . . . . . 198
Automatic wiper/washer system . . . . . . . . . . 63
Avoiding damage to your vehicle . . . . . . . . . 192
B
B rake booster . . . . . . . . . . . . . . . . . . . . . . . 181
Battery . . . . . . . . . . . . . . . . . . . . . . . . . . 29, 220 change . . . . . . . . . . . . . . . . . . . . . . . . . . 223
Charge . . . . . . . . . . . . . . . . . . . . . . . . . . 222
Inspecting the electrolyte level . . . . . . . . 222
Operation in winter . . . . . . . . . . . . . . . . . 222
Before setting off . . . . . . . . . . . . . . . . . . . . . 142
Belt tensioner . . . . . . . . . . . . . . . . . . . . . . . . 152
Belt tensioners . . . . . . . . . . . . . . . . . . . . . . . 152
Belts . . . . . . . . . . . . . . . . . . . . . . . . . . . . . . . 147
Bicycle carrier . . . . . . . . . . . . . . . . . . . . . . . . 81
Biodiesel . . . . . . . . . . . . . . . . . . . . . . . . . . . 205
Bluetooth™ . . . . . . . . . . . . . . . . . . . . . . . . . 136
Bonnet . . . . . . . . . . . . . . . . . . . . . . . . . . . . . 209
Brake Handbrake . . . . . . . . . . . . . . . . . . . . . . . 114 Brake booster . . . . . . . . . . . . . . . . . . . . . . . . 181
Brake fluid . . . . . . . . . . . . . . . . . . . . . . . . . . 218
Brake pads
Warning light . . . . . . . . . . . . . . . . . . . . . . . 33
Brake system Warning light . . . . . . . . . . . . . . . . . . . . . . . 36
Brakes . . . . . . . . . . . . . . . . . . . . . . . . . . . . . 180
Bulbs . . . . . . . . . . . . . . . . . . . . . . . . . . . . . . 254
Button on the driver's door Central locking system . . . . . . . . . . . . . . . 45C
Car jack . . . . . . . . . . . . . . . . . . . . . . . . . . . . 236
Car state . . . . . . . . . . . . . . . . . . . . . . . . . . . . 24
Catalytic converter . . . . . . . . . . . . . . . . . . . . 186
CD changer . . . . . . . . . . . . . . . . . . . . . . . . . 139
Central locking system . . . . . . . . . . . . . . . . . . 42lock . . . . . . . . . . . . . . . . . . . . . . . . . . . . . . 44
unlock . . . . . . . . . . . . . . . . . . . . . . . . . . . . 44
Changing a wheel . . . . . . . . . . . . . . . . . . . . 237
Changing the engine oil . . . . . . . . . . . . . . . . 215
Changing wheels around . . . . . . . . . . . . . . . 227
Charging the battery . . . . . . . . . . . . . . . . . . 222 Warning light . . . . . . . . . . . . . . . . . . . . . . . 29
Check engine oil level . . . . . . . . . . . . . . . . . 213
Child safety . . . . . . . . . . . . . . . . . . . . . . . . . 166 Side airbag . . . . . . . . . . . . . . . . . . . . . . . 169
NKO 20 A05.book Page 265 Wednesday, June 21, 2006 1:42 PM
Page 269 of 274
Index
268
L
Lashing eyes . . . . . . . . . . . . . . . . . . . . . . . . . 78
Leather care . . . . . . . . . . . . . . . . . . . . . . . . 203
Lighting
Interior light and reading light . . . . . . . . 258
Storage compartment lighting . . . . . . . . 257
Lighting of the interior of the vehicle front . . . . . . . . . . . . . . . . . . . . . . . . . . . . . 60
Lights converting/masking over . . . . . . . . . . . . 192
Range adjustment . . . . . . . . . . . . . . . . . . 58
switching on and off . . . . . . . . . . . . . . . . 55
Warning lights . . . . . . . . . . . . . . . . . . . . . 27
Lights and Visibility . . . . . . . . . . . . . . . . . . . . 58
Liquid in reservoir for windscreen washer system Warning light . . . . . . . . . . . . . . . . . . . . . . 33
Loading . . . . . . . . . . . . . . . . . . . . . . . . . . . . . 77
Lock Central locking system . . . . . . . . . . . . . . 44
lock Central locking system . . . . . . . . . . . . . . 44
Locking . . . . . . . . . . . . . . . . . . . . . . . . . . 41, 42 Remote control . . . . . . . . . . . . . . . . . . . . 48
Locking and unlocking from inside . . . . . . . . 45
Locking of the door in an emergency . . . . . . . . . . . . . . . . . . . 46
Low beam . . . . . . . . . . . . . . . . . . . . . . . 55, 256 Warning light . . . . . . . . . . . . . . . . . . . . . . 29 Luggage compartment . . . . . . . . . . . . . . . . . 77
Folding hooks . . . . . . . . . . . . . . . . . . . . . 78
Lashing eyes . . . . . . . . . . . . . . . . . . . . . . 78
M
Main beam . . . . . . . . . . . . . . . . . . . 55, 59, 256Warning light . . . . . . . . . . . . . . . . . . . . . . 29
Manual gearbox . . . . . . . . . . . . . . . . . . . . . 113
Manual shifting of gears . . . . . . . . . . . . . . . 113
Memory for the on-board computer . . . . . . . 18
Mobile phone . . . . . . . . . . . . . . . . . . . 128, 138
Mobiltelefon Bluetooth™ . . . . . . . . . . . . . . . . . . . . . . 136
Motoring abroad . . . . . . . . . . . . . . . . . . . . . 192 Headlights . . . . . . . . . . . . . . . . . . . . . . . 192
Multi-functional indicator . . . . . . . . . . . . . . . . 17
N
Navigation system . . . . . . . . . . . . . . . . . . . . . 26
New tyres . . . . . . . . . . . . . . . . . . . . . . . . . . 185
Note holder . . . . . . . . . . . . . . . . . . . . . . . . . . 87
O
Oil . . . . . . . . . . . . . . . . . . . . . . . . . . . . . . . . 212 Change . . . . . . . . . . . . . . . . . . . . . . . . . 215
Warning light . . . . . . . . . . . . . . . . . . . . . . 32
Oil dipstick . . . . . . . . . . . . . . . . . . . . . . . . . . 213
Onboard computer . . . . . . . . . . . . . . . . . . . . 17 Opening a single door . . . . . . . . . . . . . . . . . . 42
Opening doors
Warning light . . . . . . . . . . . . . . . . . . . . . . 33
Operating the radio . . . . . . . . . . . . . . . . . . . 126
Operation in winter Battery . . . . . . . . . . . . . . . . . . . . . . . . . . 222
Biodiesel . . . . . . . . . . . . . . . . . . . . . . . . 207
De-icing windows . . . . . . . . . . . . . . . . . . 200
Snow chains . . . . . . . . . . . . . . . . . . . . . . 230
Outside temperature . . . . . . . . . . . . . . . . . . . 20
Overview of the engine compartment . . . . . 212
P
Paint . . . . . . . . . . . . . . . . . . . . . . . . . . . . . . 200
Paint damage . . . . . . . . . . . . . . . . . . . . . . . 200
Panorama roof . . . . . . . . . . . . . . . . . . . . . . . . 54
Parking . . . . . . . . . . . . . . . . . . . . . . . . . . . . 115
Parking aid . . . . . . . . . . . . . . . . . . . . . . . . . 115
Parking light . . . . . . . . . . . . . . . . . . . . . . . . . . 60
Passive Safety . . . . . . . . . . . . . . . . . . . . . . . 141
Pedals . . . . . . . . . . . . . . . . . . . . . . . . . . . . . . 76
Petrol . . . . . . . . . . . . . . . . . . . . . . . . . . . . . . 205
Petrol engines Starting the engine . . . . . . . . . . . . . . . . . 112
Polishing . . . . . . . . . . . . . . . . . . . . . . . . . . . 199
Power socket . . . . . . . . . . . . . . . . . . . . . . . . . 89
Power steering . . . . . . . . . . . . . . . . . . . . . . 183 Warning light . . . . . . . . . . . . . . . . . . . . . . 30
NKO 20 A05.book Page 268 Wednesday, June 21, 2006 1:42 PM