technical data SKODA ROOMSTER 2008 1.G Owners Manual
[x] Cancel search | Manufacturer: SKODA, Model Year: 2008, Model line: ROOMSTER, Model: SKODA ROOMSTER 2008 1.GPages: 248, PDF Size: 46.44 MB
Page 182 of 248
Inspecting and Replenishing181
Using the systemSafetyDriving TipsGeneral MaintenanceBreakdown assistancePraktikTechnical Data
Radiator fan
The radiator fan may switch on suddenly.
The radiator fan is driven by an electric motor and controlled by a thermostat according to the coolant temperature.
The radiator fan may continue running fo r up to 10 minutes after the engine has been switched off - even if the ignition is also off. It may also switch on suddenly after a certain time, if
•the coolant temperature ha s risen because of an accumulation of heat or
•the warm engine compartment is heated up additionally by strong sunlight.
WARNING
You must therefore be aware when working in the engine compartment that the fan may switch on suddenly - risk of injury!
Brake fluid
Inspecting the brake fluid level
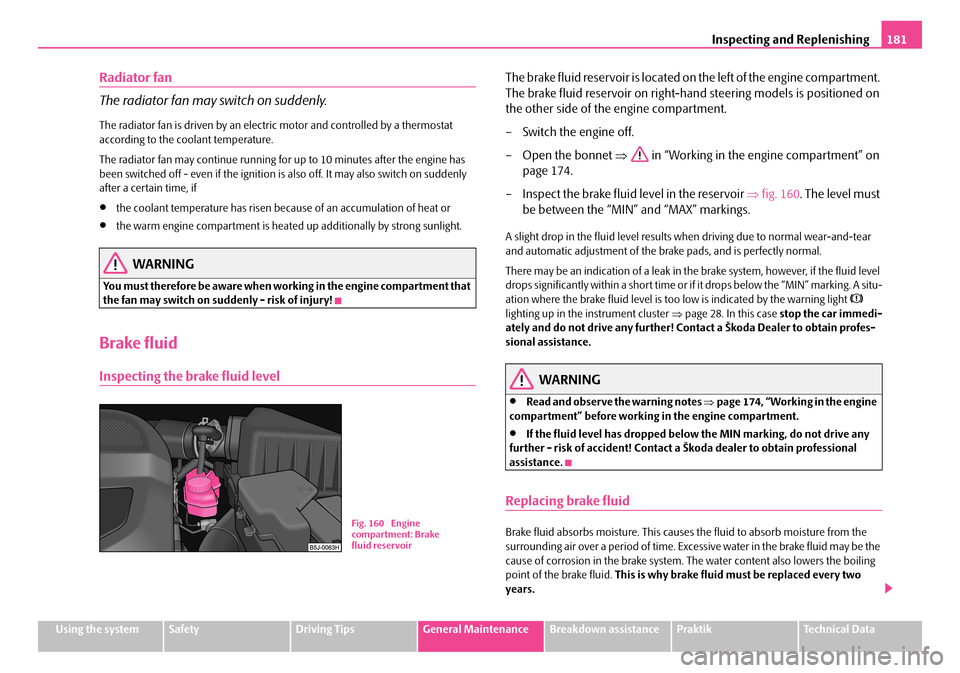
The brake fluid reservoir is located on the left of the engine compartment.
The brake fluid reservoir on right-hand steering models is positioned on
the other side of the engine compartment.
– Switch the engine off.
– Open the bonnet ⇒ in “Working in the engine compartment” on
page 174.
– Inspect the brake fluid level in the reservoir ⇒fig. 160. The level must
be between the “MIN” and “MAX” markings.
A slight drop in the fluid level results when driving due to normal wear-and-tear and automatic adjustment of the br ake pads, and is perfectly normal.
There may be an indication of a leak in the brake system, however, if the fluid level drops significantly within a short time or if it drops below the “MIN” marking. A situ-ation where the brake fluid level is too low is indicated by the warning light lighting up in the instrument cluster ⇒page 28. In this case stop the car immedi- ately and do not drive any further! Cont act a Škoda Dealer to obtain profes- sional assistance.
WARNING
•Read and observe the warning notes ⇒page 174, “Working in the engine compartment” before working in the engine compartment.
•If the fluid level has dropped below the MIN marking, do not drive any further - risk of accident! Contact a Škoda dealer to obtain professional assistance.
Replacing brake fluid
Brake fluid absorbs moisture. This causes the fluid to absorb moisture from the surrounding air over a period of time. Excessive water in the brake fluid may be the cause of corrosion in the brake system. Th e water content also lowers the boiling point of the brake fluid. This is why brake fluid must be replaced every two years.
Fig. 160 Engine compartment: Brake fluid reservoir
NKO A05R 20 MR08.book Page 181 Wednesday, March 28, 2007 9:42 AM
Page 184 of 248
Inspecting and Replenishing183
Using the systemSafetyDriving TipsGeneral MaintenanceBreakdown assistancePraktikTechnical Data
WARNING
•The battery acid is strongly corrosive and must, therefore, be handled with the greatest of care. Always we ar protective gloves, eye and skin protection when handling batteries. Corrosive fumes in the air irritate the air passages and lead to conjunctivitis and inflammation of the air passages in the lungs. Battery acid corrodes dental enamel and creates deep wounds after contact with the skin which take a long time to heal. Repeated contact with diluted acids causes skin diseases (inflammations, ulcers, slin cracks). Acids coming into contact with water are diluted accompanied by significant development of heat.
•Do not tilt the battery otherwise battery electrolyte may flow out of the battery vent openings. Prot ect the eyes with safety glasses or a shield! There is the danger of suffering blindness! If any battery electrolyte gets into your eye, rinse out your eye immediately with clear water for several minutes. Contact a doctor without delay.
•Splashes of acid on your skin or clothes should be neutralised as soon as possible using soap suds and then rinsed with plenty of water. Contact a doctor immediately if you swallow battery electrolyte.
•Keep batteries out of the reach of children.
•Hydrogen is released when you char ge a battery and a highly explosive gas mixture is produced. An explosion can be caused through sparkling over during unclamping or loosening of the cable plug while the ignition is on.
•Bridging of the poles will create a short circuit (e.g. through metal objects, cables). Possible consequences of a short circuit: Melting of lead struts, explosion and burning of the battery, jets of acid spurting out.
•It is prohibited to work with a naked flame and light, to smoke or to carry out any activities which produce sparks. Avoid creating sparks when working with cables and electrical device s. Strong sparking represents a risk of injury.
•Before carrying out any work on the electrical system, switch off the engine, the ignition as well as all electrical components and disconnect the negative cable (-) on the battery. If you wish to replace a bulb it is sufficient to switch off the appropriate light.
•Never charge a frozen or thawed battery - risk of explosion and caustic burns! Replace a frozen battery.
•Never use a battery which is damaged - risk of explosion! Immediately replace a damaged battery.
Caution
•You must only disconnect the battery if the ignition is switched off, otherwise the electrical system (electronic components) of the vehicle may be damaged. When disconnecting the battery from the el ectrical system of the vehicle, first disconnect the negative terminal (-) of th e battery. Then disconnect the positive terminal (+).
•When reconnecting the battery, first conne ct the positive terminal (+) and only then the negative terminal (-) of the batt ery. You must on no account connect the cables wrongly - risk of a cable fire.
•Ensure that battery acid does not come into contact with the vehicle body otherwise damage could occur to the paintwork.
•Do not place the battery in direct daylight in order to protect the battery housing from the effects of ultra-violet light.
For the sake of the environment
A removed battery is a special type of waste which is harmful to the environment - we recommend that you contact your Škod a Service Partner regarding disposing of the battery.
Note
•Please also refer to the guidelines ⇒page 185, “Disconnecting and recon- necting the battery”, also after connecting the battery.
WARNING (continued)
NKO A05R 20 MR08.book Page 183 Wednesday, March 28, 2007 9:42 AM
Page 186 of 248
Inspecting and Replenishing185
Using the systemSafetyDriving TipsGeneral MaintenanceBreakdown assistancePraktikTechnical Data
– When charging is completed: switch the charger off and unplug the
mains cable from the power socket.
– Only then should you disconnect the terminal clamps of the charger.
– Reconnect the cables to the battery (first of all “positive”, then “nega-
tive”).
It is not normally necessary to disconnect the cables of the battery if you recharge the battery using low ampera ges (as for example from a mini-charger). Please also refer to the instructions from the charger manufacturer.
A charging current of 0.1 of the total batter y capacity (or lower) is that which should be used until full charging is achieved.
It is, however, necessary to disconnect both cables before charging the battery with high amperages, so-called “ quick-charging”.
“Quick-charging” a battery is dangerous ⇒ in “Working on the battery” on page 182. It requires a special charger an d appropriate knowledge. We therefore recommend that you have your battery qu ick-charged only by your Škoda Service Par tner.
A discharged battery may already freeze at temperatures just below 0°C ⇒. We recommend that you no longer use a ba ttery which has thawed out because the casing of the battery may be cracked through the formation of ice and this would allow battery electrolyte to flow out.
The vent plugs of the battery should not be opened for charging.
WARNING
Never charge a frozen or thawed battery - risk of explosion and caustic burns! Replace a frozen battery.
Disconnecting and reconnecting the battery
On disconnecting and reconnecting the batte ry the following functions are initially deactivated or are no longer able to operate fault-free.
We recommend having the vehicle checked by a Škoda Service Partner to ensure full functionality of all electrical systems.
Replacing the battery
You should only replace a battery with a new battery of the same capacity, voltage (12 V), amperage and of the same size. Škoda Service Partners have a range of suit-able batteries available.
We recommend that you only have an ol d battery disposed of by your Škoda Service Partner since it does require special disposal.
For the sake of the environment
Batteries contain pois onous substances such as sulphuric acid and lead. They must be disposed of in accordance with loca l environmental protection regulations and on no account as domestic waste.
OperationOperating measure
Electrical power window (operational faults)⇒ page 42
Enter radio code numbersee Radio Operating Instruc- tions
Set hours⇒ page 13
Data in the multi-functional indicator* are deleted.⇒ page 13
NKO A05R 20 MR08.book Page 185 Wednesday, March 28, 2007 9:42 AM
Page 188 of 248

Wheels and Tyres187
Using the systemSafetyDriving TipsGeneral MaintenanceBreakdown assistancePraktikTechnical Data
Wheels and Tyres
Wheels
General comments
•New tyres do not offer optimal grip at first and should therefore be run in for about 500 km at a moderate speed and an appropriately cautious style of driving. You will also profit from longer tyre life.
•The tread depth of new tyres may differ because of design features and the configuration of the tread (depending on the type of tyre and the manufacturer).
•Drive over curbs on the side of the road and other such obstacles slowly and, where possible, at a right angles in order to avoid damage to tyres and wheel trims.
•Inspect your tyres from time to time for damage (punctures, cuts, splits and bulges). Remove foreign bodies from the tyre profile.
•Damage to tyres and wheels is frequent ly not visible. Unusual vibrations or pulling of the vehicle to one side could be a sign of tyre damage. Please reduce your speed immediately and stop if you suspect that a wheel is damaged. Inspect the tyres for signs of damage (bulge s, splits, etc.) If no visible damage is present, please drive at an appropriatel y slow speed and carefully to the nearest specialist garage in order to have your vehicle inspected.
•Also protect your tyres from contact with oil, grease and fuel.
•Immediately replace any dust caps of the valves which have got lost.
•Mark wheels before removing them so th at their previous direction of running can be maintained when mounted them again.
•Always store wheels or tyres which been removed in a cool, dry and, where possible, dark place. Tyres which are not fixed to a wheel trim should be stored upright.
Unidirectional tyres*
The direction of rotation of the tyres is marked by arrows on the wall of the tyre. This indicates the direction of rotation of the tyre, and it is essential that the tyres are fitted on to run in this direction. Only then are the tyres able to provide the optimal properties in terms of grip, low noise, wear-and-tear and aquaplaning.
Further information concerning the use of unidirectional tyres ⇒page 191.
WARNING
•New tyres during the first 500 km do not offer optimal grip and should therefore be run appropriately - risk of accident!
•Never drive with damaged tyres - risk of accident!
Note
Please observe the various differing legal requirements regarding tyres.
Tyre life
The life of your tyres very much depends on the following points:
Tyre pressure
The working life of tyres will be shortened considerably if the tyres are insufficiently or over-inflated and this will have an adverse effect on the handling of your vehicle.
Correctly inflated tyres are of partic ular importance when travelling at high speeds. It is therefore good to check the pressure at least once a month and also before
Fig. 164 An opened fuel filler flap with the tyre inflation pressure table
NKO A05R 20 MR08.book Page 187 Wednesday, March 28, 2007 9:42 AM
Page 190 of 248
Wheels and Tyres189
Using the systemSafetyDriving TipsGeneral MaintenanceBreakdown assistancePraktikTechnical Data
Changing wheels around
If significantly greater wear is present on the front tyres, we recommend changing the front wheels around with the rear wheels. You will then obtain approximately the same life for all the tyres.
It may be advantageous to swap the tyre s over “crosswise” when certain types of wear characteristic ar ise on the running surface of the tyres (but not in the case of unidirectional tyres). Škoda Service Pa rtners can provide you with details.
We recommend that you change the wheels around every 10 000 km in order to achieve even wear on all wheels and to obtain optimal tyre life.
New tyres and wheels
Tyres and wheel rims are important design elements. One should therefore use the tyres and wheel rims which have been released for use by Škoda Auto. They are exactly matched to the vehicle type and th erefore contribute significantly to good road holding and safe driving characteristics ⇒.
Only fit radial tyres of the same type on all 4 wheels, size (rolling circumference) and, if possible, the same tread pattern on one axle.
Škoda Service Partners have access to the most current information about which tyres we have released for use on your vehicle.
We recommend that you have any work rela ting to tyres or wheels carried out by your Škoda Service Partner. Your dealer has all of the necessary special tools and replacement parts available plus the requir ed specialist knowledge and is also in a position to properly dispose of the old ty res. A large number of Škoda Service Part- ners also have an attractive range of tyres and wheels available.
The tyre/wheel combinations which are appr oved for your vehicle are indicated in your vehicle documents. Approval and lice nsing may differ according to the legis- lation prevailing in individual countries.
Proper knowledge of the tyre data makes it easier for you to select the correct type of tyre. Tyres do, for example, have the following inscription on their walls:
185 / 65 R 14 86 T
What this means is:
The following speed restrictions apply to tyres.
The date of manufacture is also stated on the tyre wall (possibly only on the inside of wheel):
DOT ... 05 07...
means, for example, that the tyre was manufactured in the 40th week of the year 2007.
Any spare wheel which differs from the tyres fitted to the vehicle (e.g. winter tyres or low-profile tyres) should only be used only for a short time in the event of a puncture and when adopting an appropriately cautious style of driving. It should be replaced as quickly as po ssible by a normal wheel.
185Ty re w i d t h i n m m
65Height/width ratio in %
RCode letter for the type of tyre - Radial
14Diameter of wheel in inches
86Load index
TSpeed symbol
Speed symbolPermissible maximum speed
Q160 km/h
R170 km/h
S180 km/h
T190 km/h
H210 km/h
V240 km/h
W270 km/h
NKO A05R 20 MR08.book Page 189 Wednesday, March 28, 2007 9:42 AM
Page 192 of 248
Wheels and Tyres191
Using the systemSafetyDriving TipsGeneral MaintenanceBreakdown assistancePraktikTechnical Data
You must only fit those types of winter tyre which are approved for your vehicle. The permissible sizes of winter tyres are stated in your vehicle documents. Approvals may differ because of national legislation.
Please remember that the tyres should be in flated to 20 kPa (0.2 bar) more than is the case for summer tyres ⇒page 187.
Winter tyres no longer offer the same winter performance once the tyre tread has worn down to a depth of about 4 mm.
Ageing also causes winter tyres to lose most of their winter performance properties - even in cases where the remaining tread depth is still clearly more than 4 mm.
Speed restrictions apply to winter tyres as well as to summer tyres ⇒page 189, ⇒ .
You can fit winter tyres of a lower speed ca tegory to your vehicle provided that you also do not drive faster than the permis sible maximum speed for such tyres, even if the possible maximum speed of your ve hicle is higher. The corresponding tyre category can damage the tyres when ex ceeding the permissible maximum speed.
Please pay attention to the notes if you decide to fit winter tyres ⇒page 187.
You can also fit so-called “all-year tyres” instead of winter tyres.
Please contact your specialist garage if there are any points which are not clear who will be able to provide you with information regarding the maximum speed for your tyres.
WARNING
You must on no account drive your car at more than the permissible maximum speed for your winter tyres - risk of an accident resulting from tyre damage and loss of control over your car.
For the sake of the environment
Fit your summer tyres on again in good time since summer tyres offer you better grip and handling on roads which are free of snow and ice as well as ar tempera-tures below 7 °C - the braking distance is shor ter, there is less tyre noise, tyre wear is reduced and fuel consumption is reduced.
Note
Please observe the various differing legal requirements regarding tyres.
Unidirectional tyres*
The direction of rotation of the tyres is marked by arrows on the wall of the tyre. This indicates the direction of rotation of the tyre, and it is essential that the tyres are fitted on to run in this direction. Only then are the tyres able to provide the optimal properties in terms of grip, lo w noise, wear-and-tear and aquaplaning.
Should it be necessary to fit on a spare wheel in exceptional cases with a tyre not dedicated to the running dire ction or in opposite running direction, please adopt a cautious style of driving as the tyre is no longer able to provide optimal grip and handling in such a situation. This particularly important on wet roads. Please refer to the notes ⇒page 196, “Spare wheel*”.
You should have the defective tyre replac ed as soon as possible and restore the correct direction of rotation on all tyres
Snow chains
Snow chains must only be mounted on the front wheels.
When driving on wintry roads, snow chains improve not only traction, but also the braking performance.
For technical reasons, it is only permissi ble to fit snow chains with the following wheel/tyre combinations:
Only use fine-link snow chains. They must not project more than 9 mm - including the chain lock.
Wheel sizeDepth (D)Ty re s i z e
5J x 1435 mm175/70
6J x 1437 mm185/65
6J x 1543 mm185/55
NKO A05R 20 MR08.book Page 191 Wednesday, March 28, 2007 9:42 AM
Page 194 of 248
Accessories, changes and replacement of parts193
Using the systemSafetyDriving TipsGeneral MaintenanceBreakdown assistancePraktikTechnical Data
Accessories, changes and replacement of parts
Accessories and replacement parts
Škoda vehicles have been built according to the latest discoveries in safety engi- neering. Thus one should no t change the condition in which the vehicle was deliv- ered from the manufacturer without some thought.
The following guidelines should be observed when a vehicle is to be retrofitted with accessories, have technical ch anges made to it or a par t has to be replaced at some time in the future.
•Advise should always be obtained from a Škoda Service Partner before buying any accessories and before making any technical changes ⇒.
•This is particularly the case when accessories are bought in a foreign country.
•Škoda Genuine Accessories which have been released for use and Skoda orig- inal parts can be obtained from Škoda Se rvice Partners. They will install them professionally and correctly.
•All Škoda original accessory which is listed in the catalogue such as tilting roofs, spoilers, wheels etc. must have an official stamp of approval.
•Radios, aerials and other electrical accessories should only be installed by an authorised workshop.
•The guidelines issued by Škoda Auto a.s. must be observed when making tech- nical changes.
•This is to ensure that no technical damage occurs to the vehicle, that travelling and operating safety are maintained and that the chnages are permissible. Škoda Service Partners undertake this work professionally or refer it to an specialist company in special cases.
Any damage which is done caused by technical changes made without consulting a Skoda a.s. dealer is excluded from the guarantee.
WARNING
•We advise you, in your own interest, to only use Škoda Genuine Accesso- ries and Škoda original parts which have been expressly approved for use on
your Škoda. Reliability, safety and su itabiliity have been established for these Škoda original parts.
•We cannot guarantee suitability of installation into your vehicle of other products despite keeping a constant ey e on market developments (also not in the case where there is an attestation or permission can be produced).
Technical changes
Interference on the electronic components and their software can lead to opera-tional faults. This interference can also impair not directly affected systems because of the networking of the electronic co mponents. This means that the operating safety of your vehicle can be considerably jeopardized, a greater wear of vehicle parts can occur and finally the vehi cle registration documents expire.
We trust that you will understand that yo ur Škoda Service Partner cannot be liable for damage resulting from unprofessional work.
We therefore recommend that you have a ll work carried out with Škoda original parts at your authorised Škoda Service Partners.
WARNING
Work or modifications on your vehicle, which have been carried out unpro-fessionally, can cause operational faults - risk of accident!
WARNING (continued)
NKO A05R 20 MR08.book Page 193 Wednesday, March 28, 2007 9:42 AM
Page 196 of 248

Breakdown assistance195
Using the systemSafetyDriving TipsGeneral MaintenanceBreakdown assistancePraktikTechnical Data
Breakdown assistance
Breakdown assistance
First-aid box* and Warning triangle*
The first-aid box must be stored in such a way that it is immediately ready to hand.
A warning triangle with the maximum dimensions 39 x 68 x 450 mm can be attached to the trim panel of th e rear wall with rubber straps ⇒fig. 166
If you wish to equip your ve hicle additionally with a warning triangle, please contact a specialist garage.
WARNING
The first-aid box must be stored in such a way that the occupants do no suffer any injuries in the event of an emergency braking or a collision of the vehicle.
Note
Pay attention to the use-by-date of the contents of the first-aid box.
Fire extinguisher*
The fire extinguisher is attached with straps under the driver seat.
Please read carefully the instructions which are attached to the fire extin- guisher.
The fire extinguisher must be checked by an authorised person or company annu- ally (please observe the various differing national legal requirements).
WARNING
If the fire extinguisher is not correctly attached, in case of sudden manoeu- vres or an accident it can be “thrown” through the interior compartment and cause injuries.
Note
•The fire extinguisher must comply with the relevant and valid legal require- ments.
•Pay attention to the expiration date of the fire extinguisher. If the fire extin-guisher is used after the expiration date, its proper function is no longer assured.
•The fire extinguisher is only supplied in certain countries within the scope of delivery.
Fig. 166 Placing of the warning triangle
NKO A05R 20 MR08.book Page 195 Wednesday, March 28, 2007 9:42 AM
Page 198 of 248
Breakdown assistance197
Using the systemSafetyDriving TipsGeneral MaintenanceBreakdown assistancePraktikTechnical Data
•The spare wheel provided with a car fitted with unidirectional tyres has different dimensions. The wheel is provided with a warning sticker.
•After fitting on the wheel, the warning stic ker must not be concealed (e.g. by the wheel trim).
•Do not drive with this spare wheel at more than 80 km/h - risk of accident. Avoid accelerating at full throttle, sharp braking and fast cornering.
•The inflation pressure for this spare wheel is identical to the inflation pressure of the standard tyres.
•Use this spare wheel only to reach the ne arest specialist garage as it is not intended for co ntinuous use.
Changing a wheel
Preliminary work
The following steps should be carried out before actually changing the
wheel.
– If it is necessary to change a wheel, park the vehicle as far away as
possible from the traffic flow. The place you choose should be level.
– Have all the occupants get out. While changing a wheel, the occu-
pants of the vehicle should not stan d on the road (e.g. behind a crash
barrier).
– Apply the handbrake firmly.
–Engage 1st gear or if your vehicle is fitted with an automatic gearbox,
position the selector lever into position P.
– If a trailer is coupled, uncouple it.
– Take the vehicle tool kit and the spare wheel ⇒page 196 out of the
luggage compartment.
WARNING
•If you find yourself in flowing traffic switch on the hazard warning lights system and place the warning triangle on the side of the road at the prescribed distance from your vehicle while observing all national legal provisions. In this way you are protecting not only yourself but also other road users.
•Never start the engine with the vehicle sitting on the raised jack - danger of suffering injury!
Caution
If you have to change a wheel on a slope first block the opposite wheel with a stone or similar object in order to secure th e vehicle from unexpectedly rolling away.
Note
Comply with the national legal regulations.
Changing a wheel
Always change a wheel on a level surface as far as possible.
– Take off the full wheel trim* ⇒page 198 or the caps ⇒page 199.
– In the case of light alloy wheels remove the wheel trim cap
⇒ page 199.
– Slacken the wheel bolts ⇒page 200.
– Jack up the vehicle until the wheel to be changed is clear of the ground
⇒ page 200.
– Unscrew the wheel bolts and place them on a clean surface (cloth,
paper etc.).
– Take off the wheel.
NKO A05R 20 MR08.book Page 197 Wednesday, March 28, 2007 9:42 AM
Page 200 of 248
Breakdown assistance199
Using the systemSafetyDriving TipsGeneral MaintenanceBreakdown assistancePraktikTechnical Data
Caution
•Use the pressure of your hand, do not knock on the full wheel trim! Heavy knocks mainly on the points where the full wheel trim has not been inserted into the wheel, can result in damage to the guide and centering elements of the full wheel trim.
•First check for yourself that the th eft-deterrent wheel bolt is located ⇒ page 201, “Securing wheels against being stolen*” in the hole in the area of the valve before fitting the full wheel trim onto a steel wheel which is attached with a theft-deterrent wheel bolt.
Wheel trim caps*
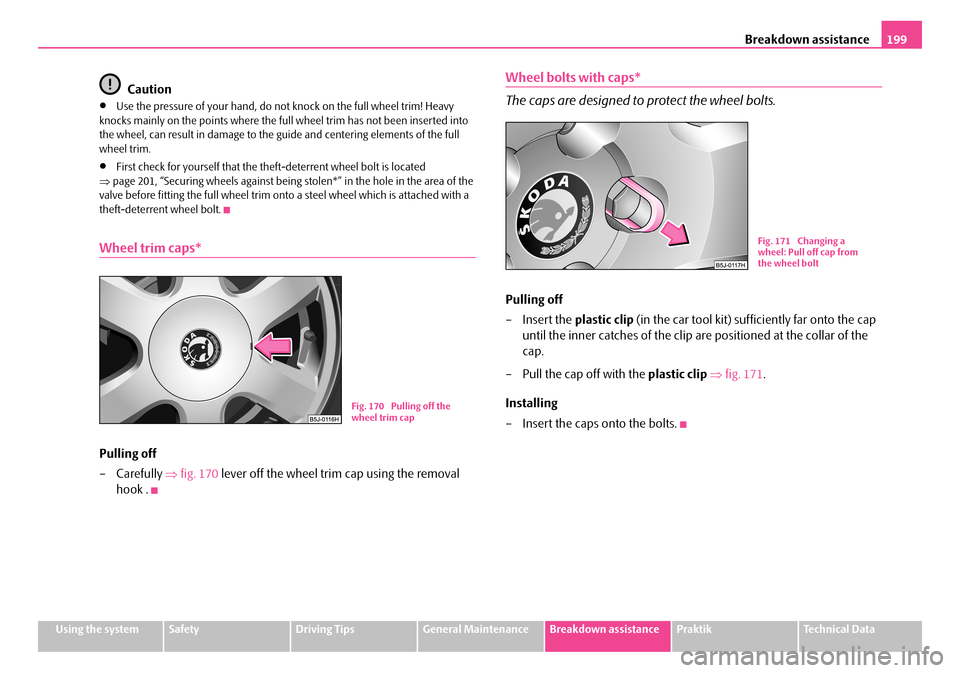
Pulling off
–Carefully ⇒fig. 170 lever off the wheel trim cap using the removal
hook .
Wheel bolts with caps*
The caps are designed to protect the wheel bolts.
Pulling off
– Insert the plastic clip (in the car tool kit) sufficiently far onto the cap
until the inner catches of the clip are positioned at the collar of the
cap.
– Pull the cap off with the plastic clip ⇒fig. 171.
Installing
– Insert the caps onto the bolts.
Fig. 170 Pulling off the wheel trim cap
Fig. 171 Changing a wheel: Pull off cap from the wheel bolt
NKO A05R 20 MR08.book Page 199 Wednesday, March 28, 2007 9:42 AM