instrument cluster SKODA ROOMSTER 2008 1.G User Guide
[x] Cancel search | Manufacturer: SKODA, Model Year: 2008, Model line: ROOMSTER, Model: SKODA ROOMSTER 2008 1.GPages: 248, PDF Size: 46.44 MB
Page 23 of 248
Instruments and Indicator/Warning Lights22
compartment, e.g. inspecting and replenishing oil and other fluids. It is also essential to observe all warnings ⇒page 174.
Note
•Arrangement of the indicator lights depends on the model and model version. The symbols shown in the following function al description are to be found as indi- cator lights in the instrument cluster.
•Operational faults are shown in the inst rument cluster as red symbols (priority 1 - danger) or yellow symbols (priority 2 - warning).
Turn signal system
Either the left or right indicator light flashes depending on the position of the turn signal lever.
The indicator light flashes at twice its normal rate if a turn signal light fails. This does not apply when towing a trailer.
Switching off the hazard warning light system is switched on will cause all of the turn signal lights as well as both indicator lights to flash.
Further information about the turn signal system ⇒page 47.
Main beam
The indicator light comes on when the main beam is selected or also when the headlight flasher is operated.
Further information about the main beam ⇒page 47.
Low beam
The indicator light comes on when low beam is selected ⇒page 44.
Rear fog light
The warning light comes on when the rear fog lights are operating ⇒page 46.
Alternator
The warning light comes on after the ignition has been switched on. It should go out after the engine has started.
If the warning light does not go out after the engine has started, or comes on when driving, drive to the nearest specialist garage. The vehicle battery will be discharged in this case so switch off all non-essential electrical components.
The following text will be displayed in the information display*:
ALTERNATOR WORKSHOP! (ALTERNATOR WORKSHOP!)
Caution
If the warning light comes on when driving and in addition the warning light (cooling system fault) also comes on in display, you must then stop the car imme- diately and switch the engine off - risk of engine damage!
Fog lights*
The warning light comes on when the fog lights are operating ⇒page 45.
Cornering lights*
If the warning light flashes for 1 minute while driving or after switching on the ignition and a warning signal sounds, a fault is confirmed.
Further information ⇒page 45.
WARNING (continued)
NKO A05R 20 MR08.book Page 22 Wednesday, March 28, 2007 9:42 AM
Page 28 of 248
Instruments and Indicator/Warning Lights27
Using the systemSafetyDriving TipsGeneral MaintenanceBreakdown assistancePraktikTechnical Data
Note
If the battery has been disconnected, the warning light comes on after switching on the ignition. The warning light must go out after driving a short distance.
Selector lever lock* (automatic gearbox)
If the warning light lights up, operate the brake pedal. This is necessary, in order to be able to move the selector lever out of the position P or N.
Electronic stability programme (ESP)*
The warning light comes on for a few seconds when the ignition is switched on.
Components of the ESP system also include the Traction Control System (TCS), Electronic Differential Lock (EDL), an d the Antilock Brake System ABS (ABS).
The warning light comes on when drivin g when a control cycle is activated.
The warning light will come on and remains on if the ESP is switched off or if there is a fault in the system.
The fact that the ESP system operates together with the ABS means that the ESP warning light will also come on if the ABS system is not operating properly.
Further information on the ESP ⇒page 145, “Electronic stability programme (ESP)*”.
Electronic Differential Lock (EDL)*
The EDL is a part of the ESP. A fault in th e EDL is indicated by the ESP warning light in the instrument cluster. Have the vehicle inspected immediately by your specialist garage. Further information on the EDL ⇒page 147.
Antilock brake system (ABS)*
The warning light shows the functionality of the ABS.
The warning light comes on for a few second s after the ignition has been switched on or when starting the engine. The warnin g light goes out after an automatic check sequence has been completed.
A fault in the ABS
The system is not functioning properly if the ABS warning light does not go out within a few seconds after switching on the ig nition, does not light up at all or lights up while driving. The vehicle will only be braked by the normal brake system. Visit a specialist garage as quickly as possible and adjust your style of driving in the meantime since you will not know how great the damage is.
Three additional warning tones will sound if there is a major fault in the ABS.
Further information about ABS ⇒page 149, “Antilock brake system (ABS)*”.
A fault in the entire brake system
If the ABS warning light comes on together with the brake system warning light (handbrake must be released), there is a fault not only in the ABS but also in another part of the brake system ⇒.
The following text will be displayed in the information display*:
STOP BRAKE FAULT OWNER'S MANUAL!
WARNING
•If the brake system warning light comes on together with the ABS warning light stop the vehicle immediately and check the brake fluid level in the reservoir ⇒page 181, “Brake fluid”. If the fluid level has dropped below the MIN marking, do not drive any further - risk of accident! Contact a Škoda dealer to obtain professional assistance.
•Pay attention to the following instructions ⇒page 174, “Working in the engine compartment” before checking the brake fluid level and opening the bonnet.
•If the brake fluid is at the correct level, the ABS control function has failed. The rear wheels may then block ve ry rapidly when braking. In certain circumstances, this can result in the rear end of the car breaking away - risk of skidding! Drive carefully to the ne arest specialist garage and have the fault rectified.
NKO A05R 20 MR08.book Page 27 Wednesday, March 28, 2007 9:42 AM
Page 46 of 248
Lights and Visibility45
Using the systemSafetyDriving TipsGeneral MaintenanceBreakdown assistancePraktikTechnical Data
WARNING
Never drive with side lights on - risk of accident! The side lights are not bright enough to light up the road sufficiently in front of you or to be seen by other oncoming traffic. In this case, always switch on the low beam when it is dark or if visibility is poor.
Note
•An audible warning will sound if you wi thdraw the ignition key and open the driver's door when the vehicle lights are still on.
•The acoustic warning signal is switched off over the door contact when the driver's door is closed (ignition off). The vehicle can be parked with the side lights on.
•If you park the car for a lengthy period , we recommend switching off all lights, or leaving only the side lights switched on.
•The switching on of the described lights should only be undertaken in accord- ance with the legal requirements.
•In the event of cool or humid weather co nditions, the headlights can be misted up from inside.
− The temperature difference between interior and external area of the head- light lenses is decisive.
− When the driving lights are switched on, the light outlet surfaces are free from mist after a short period. The headlight lenses can possibly mist up at the border areas.
− It also concerns reverse light and turn signal lights.
− This mist has no influence on the life of the lighting system.
Cornering lights*
For a better cornering illumination the cornering lights are controlled in the optimal position in line with the vehi cle speed and the steering angle.
If the warning light flashes for 1 minute while driving or after switching on the ignition and a warning signal sounds, a fault is confirmed.
WARNING
If there is a fault in the cornering lights, the warning light flashes in the instrument cluster. The cornering li ghts are automatically lowered to the emergency position, which prevents a po ssible dazzling of oncoming traffic. Thus the illuminated length of the road is shortened. Drive carefully and have the car inspected immedi ately by a specialist garage.
Fog lights*
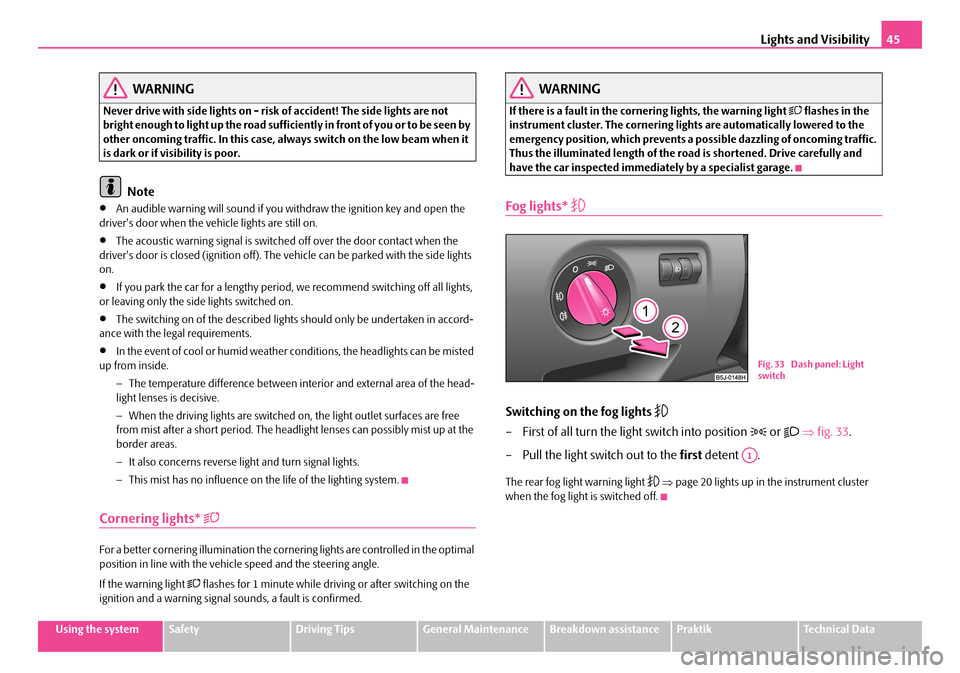
Switching on the fog lights
– First of all turn the light switch into position or ⇒fig. 33.
– Pull the light switch out to the first detent .
The rear fog light warning light ⇒page 20 lights up in the instrument cluster when the fog light is switched off.
Fig. 33 Dash panel: Light switch
A1
NKO A05R 20 MR08.book Page 45 Wednesday, March 28, 2007 9:42 AM
Page 47 of 248
Lights and Visibility46
Fog lights with integrated turning light*
The turning light is intended for a better illumination of the vehicle
close range when turning, parking etc.
The turning light is controlled in line with the steering angle or by switching on the turn signal light in th e following circumstances:
•Vehicle speed max. 40 km/h,
•low beam switched on,
•no reverse gear engaged,
•no hazard warning light system switched on.
A fault in the turning light is indicated by the warning light lighting up or flashing.
Note
If the fog lights are switched on, the function of the turning light is not active.
Rear fog light
Switching on the rear fog light
– First of all turn the light switch into position or ⇒page 45,
fig. 33 .
– Pull the light switch out to the second detent . The fog lights* light
up at the same time.
If the vehicle is not fitted with fog lights*, the rear fog light is switched on by turning the light switch to the position and is pulled out directly to the position . This switch does not have two positions, but only one position.
The rear fog light warning light ⇒page 20 lights up in the instrument cluster when the fog light is switched off.
Only the rear fog light of the trailer ligh ts up if the vehicle is fitted with a towing device from Škoda original accessories and when you are towing a trailer which is fitted with the rear fog light.
Caution
The rear fog light should only be switched on if visibility is particularly poor (conform with any varying legal provisions) to avoid dazzling vehicles behind your vehicle.
Headlamp range adjustment
Once the low beam is switched on you can then adapt the range of
the headlights to the load of the vehicle.
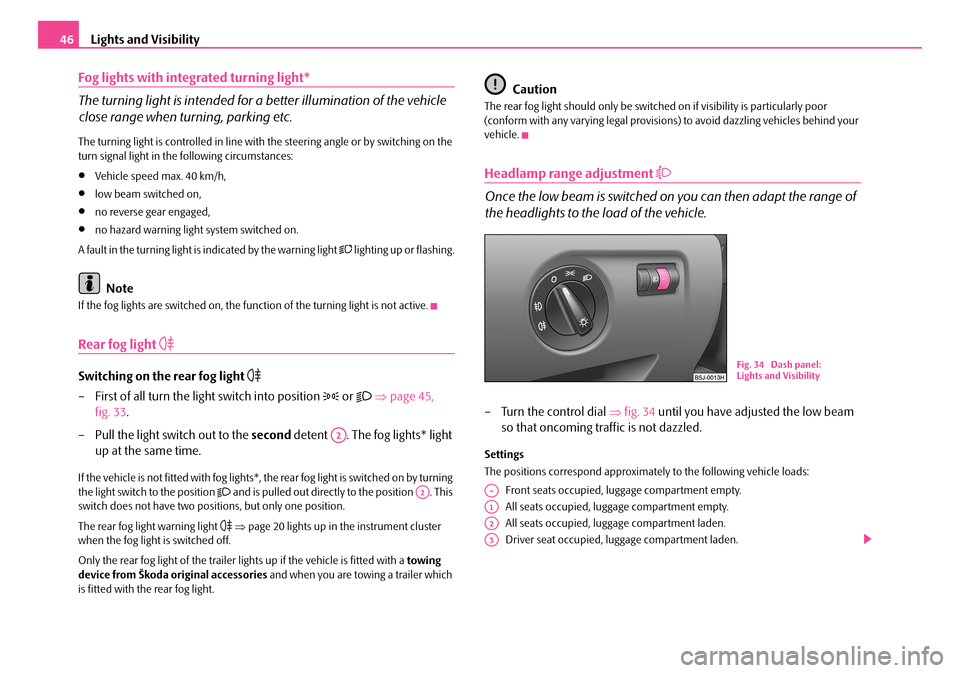
– Turn the control dial ⇒fig. 34 until you have adjusted the low beam
so that oncoming traffic is not dazzled.
Settings
The positions correspond approximat ely to the following vehicle loads:
Front seats occupied, luggage compartment empty.
All seats occupied, luggage compartment empty.
All seats occupied, luggage compartment laden.
Driver seat occupied, lu ggage compartment laden.
A2
A2
Fig. 34 Dash panel: Lights and Visibility
A-
A1
A2
A3
NKO A05R 20 MR08.book Page 46 Wednesday, March 28, 2007 9:42 AM
Page 48 of 248
Lights and Visibility47
Using the systemSafetyDriving TipsGeneral MaintenanceBreakdown assistancePraktikTechnical Data
Caution
Set the headlight beam adjustment in such a way as to avoid dazzling oncoming traffic.
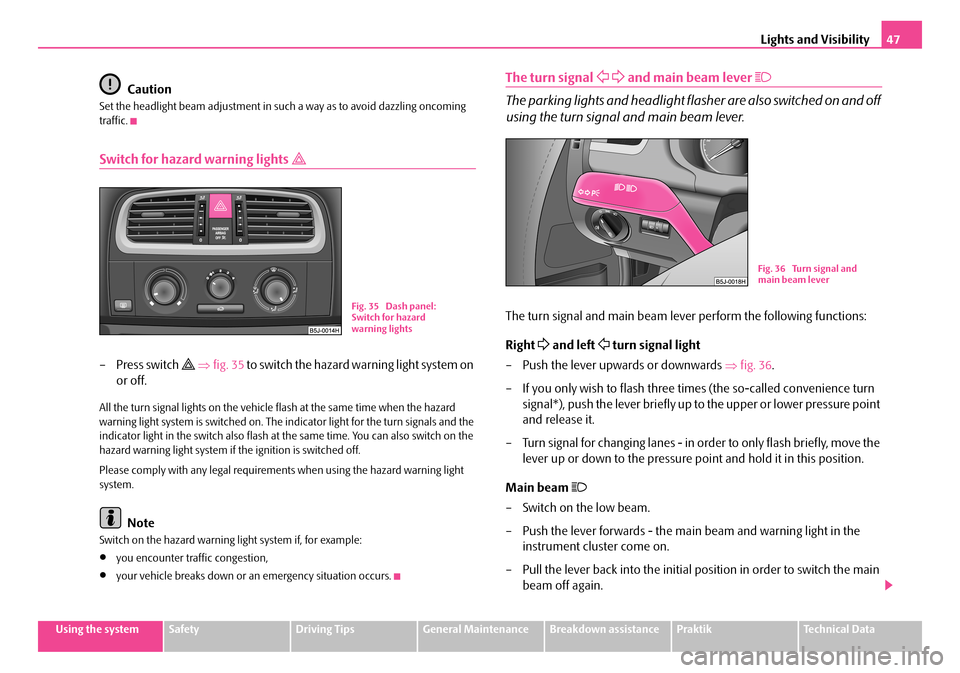
Switch for hazard warning lights
– Press switch ⇒fig. 35 to switch the hazard warning light system on
or off.
All the turn signal lights on the vehicle flash at the same time when the hazard warning light system is switched on. The in dicator light for the turn signals and the indicator light in the switch also flash at the same time. You can also switch on the hazard warning light system if the ignition is switched off.
Please comply with any legal requirements when using the hazard warning light system.
Note
Switch on the hazard warning light system if, for example:
•you encounter traffic congestion,
•your vehicle breaks down or an emergency situation occurs.
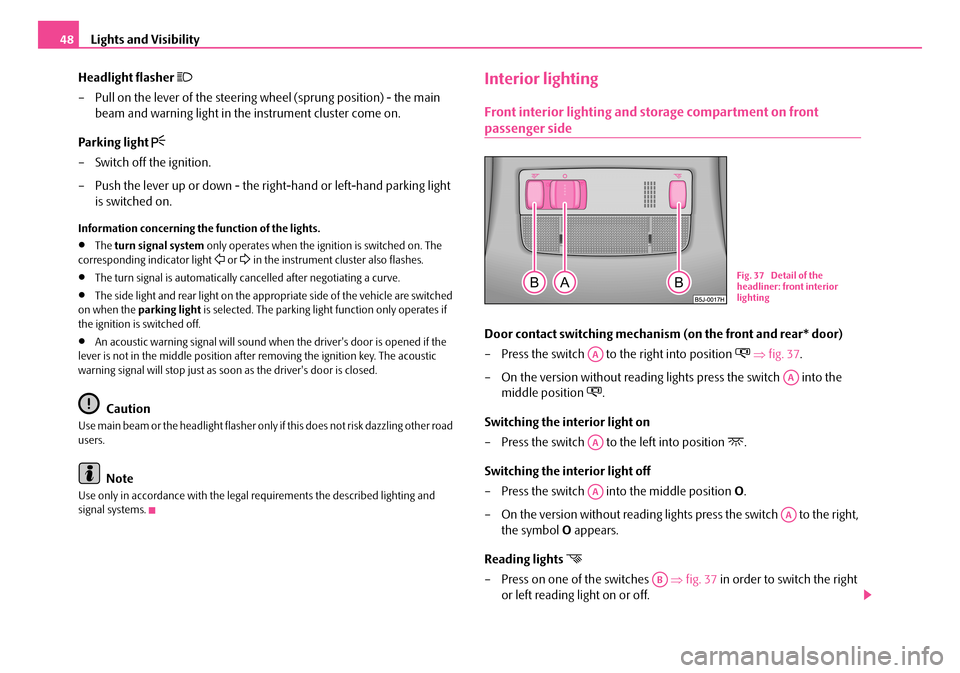
The turn signal and main beam lever
The parking lights and headlight flasher are also switched on and off
using the turn signal and main beam lever.
The turn signal and main beam le ver perform the following functions:
Right and left turn signal light
– Push the lever upwards or downwards ⇒fig. 36.
– If you only wish to flash three ti mes (the so-called convenience turn
signal*), push the lever briefly up to the upper or lower pressure point
and release it.
– Turn signal for changing lanes - in order to only flash briefly, move the
lever up or down to the pressure po int and hold it in this position.
Main beam
– Switch on the low beam.
– Push the lever forwards - the main beam and warning light in the
instrument cluster come on.
– Pull the lever back into the initial position in order to switch the main
beam off again.
Fig. 35 Dash panel: Switch for hazard warning lights
Fig. 36 Turn signal and main beam lever
NKO A05R 20 MR08.book Page 47 Wednesday, March 28, 2007 9:42 AM
Page 49 of 248
Lights and Visibility48
Headlight flasher
– Pull on the lever of the steering wheel (sprung position) - the main
beam and warning light in the instrument cluster come on.
Parking light
– Switch off the ignition.
– Push the lever up or down - the right-hand or left-hand parking light
is switched on.
Information concerning the function of the lights.
•The turn signal system only operates when the ignition is switched on. The corresponding indicator light or in the instrument cluster also flashes.
•The turn signal is automatically cancelled after negotiating a curve.
•The side light and rear light on the appropriate side of the vehicle are switched on when the parking light is selected. The parking light function only operates if the ignition is switched off.
•An acoustic warning signal will sound when the driver's door is opened if the lever is not in the middle position after removing the ignition key. The acoustic warning signal will stop just as soon as the driver's door is closed.
Caution
Use main beam or the headlight flasher only if this does not risk dazzling other road users.
Note
Use only in accordance with the legal requirements the described lighting and signal systems.
Interior lighting
Front interior lighting and storage compartment on front
passenger side
Door contact switching mechanism (on the front and rear* door)
– Press the switch to the right into position ⇒fig. 37.
– On the version without reading lights press the switch into the
middle position .
Switching the interior light on
– Press the switch to the left into position .
Switching the interior light off
– Press the switch into the middle position O.
– On the version without reading lights press the switch to the right,
the symbol O appears.
Reading lights
– Press on one of the switches ⇒fig. 37 in order to switch the right
or left reading light on or off.
Fig. 37 Detail of the headliner: front interior lighting
AA
AA
AA
AA
AA
AB
NKO A05R 20 MR08.book Page 48 Wednesday, March 28, 2007 9:42 AM
Page 99 of 248
Automatic gearbox98
•When the engine is running and the vehicle is stationary, it is necessary to hold the car with the brake pedal in all the positions of the selector lever (except P and N) since the power transmission is never completely inter- rupted, also not when the engine is idling - the vehicle "creeps".
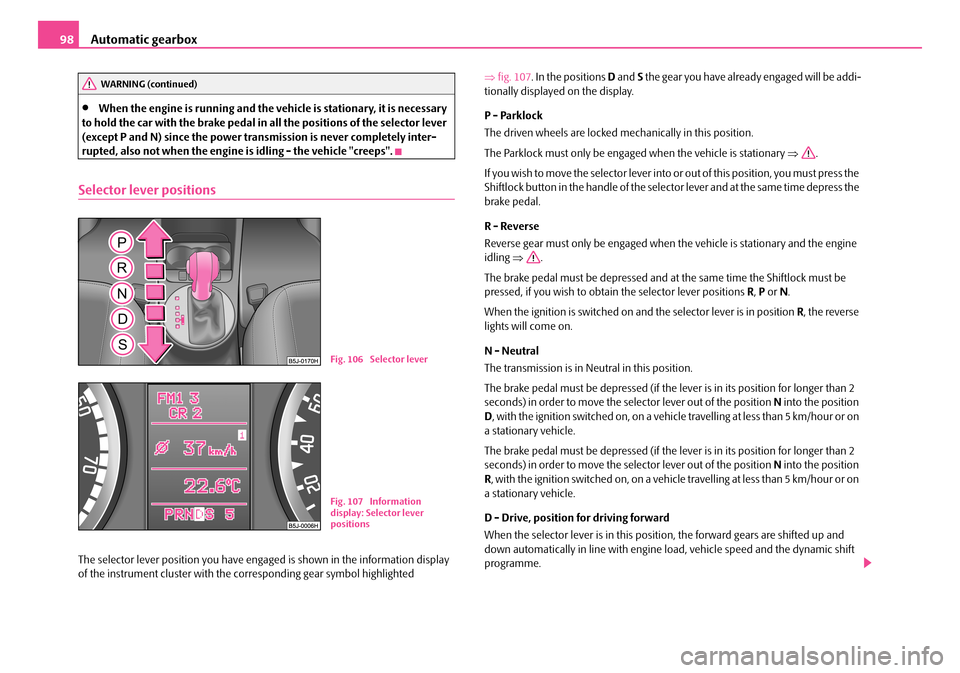
Selector lever positions
The selector lever position you have engaged is shown in the information display of the instrument cluster with the co rresponding gear symbol highlighted
⇒ fig. 107. In the positions D and S the gear you have already engaged will be addi- tionally displayed on the display.
P - Parklock
The driven wheels are locked mechanically in this position.
The Parklock must only be engage d when the vehicle is stationary ⇒.
I f y o u w i s h t o m o v e t h e s e l e c t o r l e v e r i n to or out of this position, you must press the Shiftlock button in the handle of the selector lever and at the same time depress the brake pedal.
R - Reverse
Reverse gear must only be engaged when the vehicle is stationary and the engine idling ⇒.
The brake pedal must be depressed and at the same time the Shiftlock must be pressed, if you wish to obtain the selector lever positions R, P or N.
When the ignition is switched on and the selector lever is in position R, the reverse lights will come on.
N - Neutral
The transmission is in Neutral in this position.
The brake pedal must be depressed (if the lever is in its position for longer than 2 seconds) in order to move the selector lever out of the position N into the position D , with the ignition switched on, on a vehicle travelling at less than 5 km/hour or on a stationary vehicle.
The brake pedal must be depressed (if the lever is in its position for longer than 2 seconds) in order to move the selector lever out of the position N into the position R , with the ignition switched on, on a vehicle travelling at less than 5 km/hour or on a stationary vehicle.
D - Drive, position for driving forward
When the selector lever is in this position, the forward gears are shifted up and down automatically in line with engine load, vehicle speed and the dynamic shift programme.
WARNING (continued)
Fig. 106 Selector lever
Fig. 107 Information display: Selector lever positions
NKO A05R 20 MR08.book Page 98 Wednesday, March 28, 2007 9:42 AM
Page 100 of 248
Automatic gearbox99
Using the systemSafetyDriving TipsGeneral MaintenanceBreakdown assistancePraktikTechnical Data
You must depress the brake pedal ⇒ if you wish to move the selector lever into position D from N when the vehicle is travelling at less than 5 km/hour or is stationary.
In certain circumstances (e.g. when driving in mountainous regions or when towing a trailer) it may be beneficial to select the manual shift programme ⇒page 100 for a short time in order to adapt the gearbox ratios manually to the driving situations.
S - Position for sporty style of driving
Shifting up later into a higher gear makes it possible to fully exploit the power potential of the engine. The gearbox also then shifts down at higher engine speeds as in the position D.
The gearbox does not shift into the 6th gear in the position S, because the maximum speed is achieved with the 5th gear.
The Shiftlock on the selector lever grip must be pressed when moving the selector lever out of the position D into the position S.
WARNING
•Never move the selector lever into position R or P when driving - risk of an accident!
•When the engine is running and the vehicle is stationary, it is necessary to hold the car with the brake pedal in all the positions of the selector lever (except P and N) since the power transmission is never completely inter-rupted, also not when the engine is idling - the vehicle "creeps".
•You must on no account unintentionally operate the throttle (e.g. by hand from the engine compartment) if a drive position is engaged when the car is stationary. The vehicle would ot herwise immediately start off - also when the handbrake is firmly applied - risk of an accident!
•You must move the selector lever into position P and firmly apply the handbrake first before you or any other person opens the bonnet and starts working on the engine when it is running - risk of accident! It is also essential to observe all warnings ⇒page 174, “Working in the engine compartment”.
Selector lever lock
Automatic selector lever lock
With the ignition on, the selector lever is locked when it is in the positions P and N. You must first of all depress the brake pedal in order to move the selector lever out of this position. The warning light ⇒page 27 lights up in the instrument cluster as a reminder for the driver when the selector lever is in position P and N:
A time delay element ensures that the sele ctor lever is not blocked when rapidly switching over the position N (e.g. from R to D). This does, for example, allow one to seesaw out a stuck vehicle. The selector lever lock will click into place if the lever is in the N position for more than 2 seconds without the brake pedal being pressed.
The selector lever lock is only active if th e vehicle is stationary or moving at speed of less than 5 km/hour. The lock is switched off automatically into position N when the car is travelling at a higher speed.
Shiftlock button
The Shiftlock button in the handle of sele ctor lever prevents certain selector lever positions being engaged inadvertently. The selector lever lock is cancelled when you press the Shiftlock button.
Note
For vehicles fitted with manual gearbox, yo u can withdraw the ignition key in each selector lever position after switching off the ignition.
Kickdown function
The kickdown function provides you with maximum acceleration
power.
Depressing the accelerator pedal allows th e kickdown function to be activated in the desired driving program. This function has precedence over the driving programme and serves for maximum accelera tion of the vehicle when exploiting the maximum power potential of the engine without taking into account the current selector lever position ( D, S or Tiptronic). The gearbox shifts down to one or several gears in line with the driving state and the vehicle accelerates. The
NKO A05R 20 MR08.book Page 99 Wednesday, March 28, 2007 9:42 AM
Page 129 of 248
Airbag system128
Airbag system
Description of the airbag system
General information on the airbag system
The front airbag system is complementary to the three-point seat belts and offers additional protection in the head and chest area of the driver and passenger in the event of a frontal collision.
In the event of a side collision, the side airbags reduce the risk of injury to the occu- pants to the part of their body facing the side of the accident.
The airbag system is only functional after the ignition has been switched on.
The operational readiness of the airbag system is monitored electronically. The airbag warning light comes on for a few seconds each time the ignition is switched on.
The airbag system (according to vehicl e equipment) essentially consists of:
•an electronic control unit,
•the front airbags for the driver and front passenger ⇒page 130,
•the side airbags ⇒page 132,
•Head airbags ⇒page 133,
•an airbag warning light in the instrument cluster ⇒page 28,
•a front passenger airbag switch* ⇒page 136,
•an indicator light for a switched off front seat passenger airbag* in the middle of the dash panel ⇒page 136.
A fault in the airbag system exists if:
•the airbag indicator light does not light up when the ignition is switched on,
•the airbag indicator light does not go out after about 3 seconds after the ignition is switched on,
•the airbag indicator light goes out and comes on again after the ignition is switched on,
•the airbag indicator light comes on or flickers when driving,
•an airbag indicator light showing a swit ched-off front passenger airbag* in the middle of the dash panel flashes.
WARNING
•To enable the occupants of a car to be protected with the greatest possible effect when the airbag is deployed, the front seats must be ⇒ page 119, “Correct seated position” correctly adjusted to match the body size of the occupant.
•If you do not fasten the seat belts when driving, lean too far forward or adopt an incorrect seated position, you are exposing yourself to increased risk of injury in the event of an accident.
•Have the airbag system checked imme diately by a specialist garage if a fault exists. Otherwise, there is a risk of the airbag not being activated in the event of an accident.
•No modifications of any kind may be made to parts of the airbag system.
•It is prohibited to manipulate individual parts of the airbag system as this might result in the airbag being deployed.
•The protective function of the airbag system is sufficient for only one accident. The airbag system must then be replaced if the airbag has been deployed.
•The airbag system needs no maintenance during its working life.
•If you sell your car, please hand over the complete vehicle documenta-tion to the new owener. Please note that the documents relating to the possibility of deactivating the front passenger airbag are also part of the vehicle documents!
•If the vehicle or individual parts of the airbag system are scrapped, it is essential to observe the relevant safety precautions. Škoda Service Partners are familiar with these regulations.
•When disposing of vehicle or parts of the airbag system, it is important to comply with the national legal requirements.
NKO A05R 20 MR08.book Page 128 Wednesday, March 28, 2007 9:42 AM
Page 136 of 248
Airbag system135
Using the systemSafetyDriving TipsGeneral MaintenanceBreakdown assistancePraktikTechnical Data
clothing. In addition, it is not permitted to use clothes hangers for hanging up items of clothing.
•There must not be any other persons (e.g. children) or animals between the car occupant and the deployment ar ea of the head airbag. In addition, none of the occupants should lean their head out of the window when driving, or extend their arms and hands out of the window.
•The sun visors must not be swivelled to the side windows into the deployment area of the head airbags if any objects, such as ball-point pens etc. are attached to them. This might result in injuries to the occupants if the head airbag is deployed.
•Installing impermissible accessories in the area of the head airbags may considerably impair the protection offered by the head airbag in the event of it being deployed. When the deployed head airbag is inflated, parts of the accessories fitted may in certain circumstances be thrown into the interior of the car and cause injuries to the occupants ⇒page 193.
•Any work on the head airbag system including installing and removing system components because of other re pair work (e.g. removing headliner) must only be carried ou t by a specialist garage.
Deactivating an airbag
Deactivating airbags
If any airbags have been deactivated, switch them on again as soon
as possible so that they are able to again provide their proper protec-
tion.
There is the technical means installed within your vehicle to switch off the front, side* or head airbag* (take out of commission).
This is why you should have the deactiva tion of the airbags carried out by a specialist garage.
On vehicles equipped with the switch for de activation of the airbags, you can deac- tivate the front passenger airbag or passen ger side airbag by means of this switch ⇒ page 136.
Deactivation of airbags is envisaged only for particular instances, such as if:
•you must in exceptional cases use a child seat on the front passenger seat where the child has its back to the directio n of travel of the vehicle (in some coun- tries this must be in the direction of travel due to other legal regulations applying) ⇒ page 137, “Important safety information regarding the use of child safety seats”
•you are not able to maintain the distance of at least 25 cm between middle of steering wheel and chest, despite the driver seat being correctly adjusted,
•special attachments are required in the area of the steering wheel because of a physical disability,
•you have installed other seats (e.g. orthopaedic seats without side airbags).
Monitoring the airbag system
The functionality of the airbag system is also monitored electronically, when one airbag has been switched off
If the airbag was switched of f using diagnostic equipment:
•The airbag indicator light in the instrument cluster lights up for about 3 seconds after switching on the ignition and then flashes after that for about 12 seconds.
If the airbag was switched off using the airbag switch* on the side of the dash panel:
•The airbag warning light comes on in the instrument cluster for about 3 seconds each time the ignition is switched on.
•Switching off airbags is indicated in the middle of the dash panel by the lighting up of the indicator light ⇒page 136, fig. 134.
Note
Your Škoda Service Partner will be able to advise you whether national legislation in your country allows airbags in your vehi cle to be deactivated, and which ones.
WARNING (continued)
NKO A05R 20 MR08.book Page 135 Wednesday, March 28, 2007 9:42 AM