window SKODA ROOMSTER 2008 1.G User Guide
[x] Cancel search | Manufacturer: SKODA, Model Year: 2008, Model line: ROOMSTER, Model: SKODA ROOMSTER 2008 1.GPages: 248, PDF Size: 46.44 MB
Page 41 of 248
Unlocking and locking40
Interior monitor* and Towing protection*
The interior monitor and the towing protection detect movements
inside the vehicle interior and then trigger the alarm.
The interior monitor and the towing protection are operated with the
button . You can switch the interior monitor and the towing protec-
tion off if there is a possibility that movements from (e.g. children or
animals) inside the vehicle interior or if the vehicle must be transported
(e.g. by train or ship) or towed, might trigger the alarm.
Switch off the interior monitor and towing protection
– Switch off the ignition.
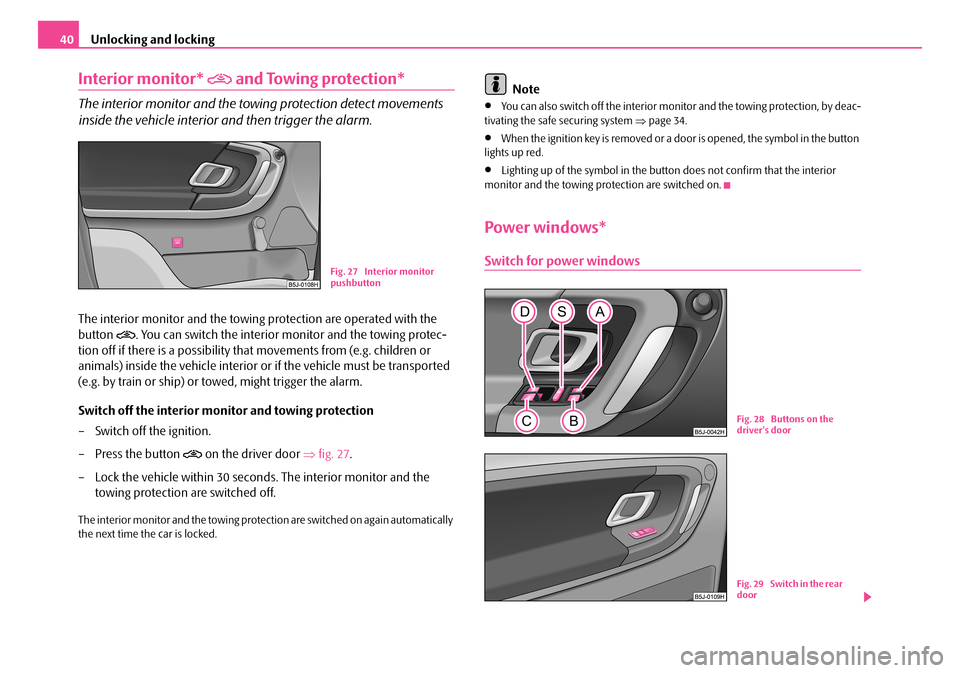
– Press the button on the driver door ⇒fig. 27.
– Lock the vehicle within 30 seconds. The interior monitor and the
towing protection are switched off.
The interior monitor and the towing protection are switched on again automatically the next time the car is locked.
Note
•You can also switch off the interior moni tor and the towing protection, by deac- tivating the safe securing system ⇒page 34.
•When the ignition key is removed or a door is opened, the symbol in the button lights up red.
•Lighting up of the symbol in the button does not confirm that the interior monitor and the towing protection are switched on.
Power windows*
Switch for power windowsFig. 27 Interior monitor pushbutton
Fig. 28 Buttons on the driver's door
Fig. 29 Switch in the rear door
NKO A05R 20 MR08.book Page 40 Wednesday, March 28, 2007 9:42 AM
Page 42 of 248
Unlocking and locking41
Using the systemSafetyDriving TipsGeneral MaintenanceBreakdown assistancePraktikTechnical Data
The power windows operate only when ignition is switched on.
Opening a window
– A window is opened by pres sing lightly on the respective butto n in the
door. The process stops when one releases the button.
– Additionally you can open the window automatically (fully opened) by
pressing the button up to the stop. Renewed pressing of the button
causes the window to stop immediately.
Closing a window
– A window is closed through pulling lightly on the respective button in
the door. The closing process stop s when one releases the button.
– Additionally you can close the window automatically (fully closed) by
pulling the button up to the stop. Renewed pulling of the button
causes the window to stop immediately.
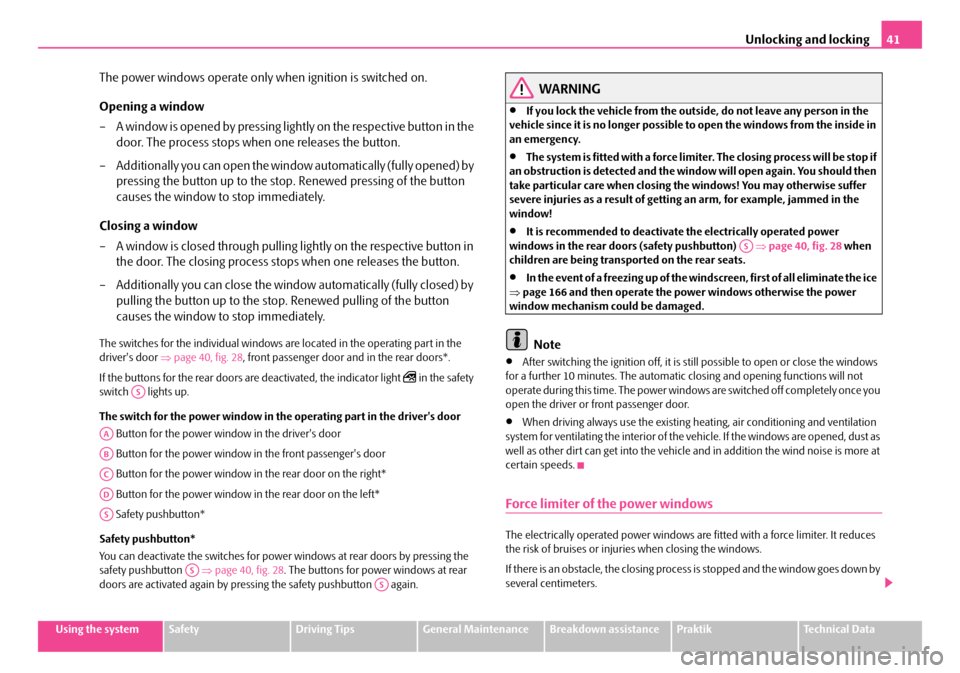
The switches for the individual windows are located in the operating part in the driver's door ⇒page 40, fig. 28, front passenger door and in the rear doors*.
If the buttons for the rear doors are deactivated, the indicator light in the safety switch lights up.
The switch for the power window in th e operating part in the driver's door
Button for the power window in the driver's door
Button for the power window in the front passenger's door
Button for the power window in the rear door on the right*
Button for the power window in the rear door on the left*
Safety pushbutton*
Safety pushbutton*
You can deactivate the switches for power windows at rear doors by pressing the safety pushbutton ⇒page 40, fig. 28. The buttons for power windows at rear doors are activated again by pressing the safety pushbutton again.
WARNING
•If you lock the vehicle from the outside, do not leave any person in the vehicle since it is no longer possible to open the windows from the inside in an emergency.
•The system is fitted with a force limiter. The closing process will be stop if an obstruction is detected and the window will open again. You should then take particular care when closing the windows! You may otherwise suffer severe injuries as a result of getting an arm, for example, jammed in the window!
•It is recommended to deactivate the electrically operated power windows in the rear doors (safety pushbutton) ⇒page 40, fig. 28 when children are being transported on the rear seats.
•In the event of a freezing up of the wi ndscreen, first of all eliminate the ice ⇒ page 166 and then operate the power windows otherwise the power window mechanism could be damaged.
Note
•After switching the ignition off, it is still possible to open or close the windows for a further 10 minutes. The automatic closing and opening functions will not operate during this time. The power windows are switched off completely once you open the driver or front passenger door.
•When driving always use the existing he ating, air conditioning and ventilation system for ventilating the interior of the vehicle. If the windows are opened, dust as well as other dirt can get into the vehicle an d in addition the wind noise is more at certain speeds.
Force limiter of the power windows
The electrically operated power windows are fitted with a force limiter. It reduces the risk of bruises or injuri es when closing the windows.
If there is an obstacle, the closing process is stopped and the window goes down by several centimeters.
AS
AA
AB
AC
AD
AS
ASAS
AS
NKO A05R 20 MR08.book Page 41 Wednesday, March 28, 2007 9:42 AM
Page 43 of 248
Unlocking and locking42
You must try to close the window again within 10 seconds, even if the obstacle was not yet removed, the closing process is stoppe d. During this time it is not possible to automatically close the window. The force limiter is still switched on.
The force limiter is only switched off, if you attempt to close the window within the next 10 seconds - the window closes now with full strength!
If you wait longer than 10 seconds, th e force limiter is switched on again.
WARNING
You should take particular care when closing the windows! You may other- wis e su ffe r s ev e re inj uri e s a s a re sul t o f g e t tin g an a rm , fo r e xa m pl e, j am m e d in the window!
Window convenience operation
You can open and close the window with power windows as follows
when unlocking and locking the vehicle.
Opening windows with the key
– Turn the key in the lock of the driver door into the opening position
and hold it until all the windows are open.
Closing windows with the key
– Turn the key in the lock of the driver door into the closing position and
hold it there until all of the windows are closed.
You can interrupt the opening or closing operation of the windows immediately by releasing the key.
WARNING
•Obstruction protection is not active during the convenience operating feature ⇒ in “Switch for power windows” on page 40.
•You should take particular care when closing the windows! You may otherwise suffer severe injuries as a re sult of getting an arm, for example, jammed in the window!
Operational faults
Electrically operated power windows do not operate
If the battery of the car has been disco nnected and then reconnected, the electri- cally operated power windows do not oper ate. The system must be activated. Proceed as follows in order to re-establish the function:
•turn the key in the lock of the driver d oor into the closing position and hold it there until all of the windows are closed,
•release the key,
•Once again insert the key and turn it into the closing position for about 3 seconds.
Operation in winter
Ice accumulating on the surface of the windows during the winter may result in a greater resistance when closing the windows and the window may stop and move back several centimetres
Proceed as follows to close the window fully:
•turn the key in the lock of the driver d oor into the closing position and hold it there until all of the windows are closed,
•repeat this operation until the window stops.
WARNING
•Obstruction protection is not active during the closing of the windows ⇒ in “Switch for power windows” on page 40.
•You should take particular care when closing the windows! You may otherwise suffer severe injuries as a re sult of getting an arm, for example, jammed in the window!
WARNING (continued)
NKO A05R 20 MR08.book Page 42 Wednesday, March 28, 2007 9:42 AM
Page 50 of 248
Lights and Visibility49
Using the systemSafetyDriving TipsGeneral MaintenanceBreakdown assistancePraktikTechnical Data
Lighting of storage compartment on the front passenger side
– When opening the flap of the storage compartment on the front
passenger side the lighting in the storage compartment comes on.
– The light switches on automatically when the parking light is switched
on and goes out when the flap is closed.
The interior light is switched on for abou t 20 seconds when a vehicle with a central locking system is unlocked, when a door is opened or when the ignition key is removed. The requirement for this is that the switch is in the door contact position. The inner light goes out out immediately after the ignition is switched on.
A time delay switch* causes the inner lighti ng on vehicles without a central locking system stays on for a few seconds after the doors have been closed. The inner light goes out out immediately after the ignition is switched on.
The interior lighting is switched off af ter about 30 minutes when a door has been left open in order to avoid discharging the battery of the vehicle.
Rear interior lighting*
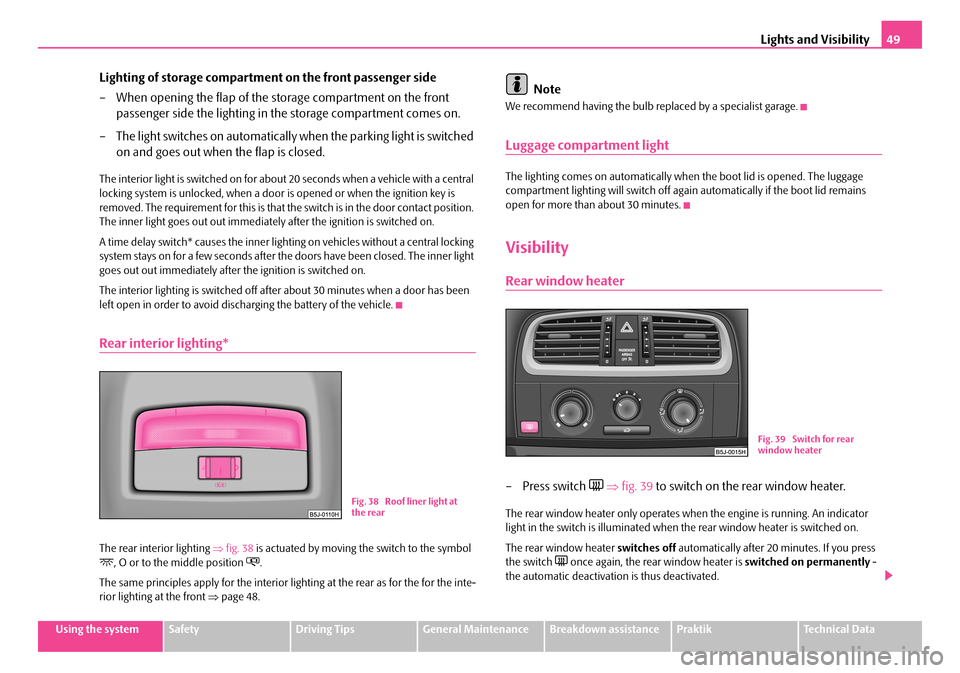
The rear interior lighting ⇒fig. 38 is actuated by moving the switch to the symbol , O or to the middle position .
The same principles apply for the interior lighting at the rear as for the for the inte- rior lighting at the front ⇒page 48.
Note
We recommend having the bulb replaced by a specialist garage.
Luggage compartment light
The lighting comes on automatically when the boot lid is opened. The luggage compartment lighting will switch off again automatically if the boot lid remains open for more than about 30 minutes.
Visibility
Rear window heater
– Press switch ⇒fig. 39 to switch on the rear window heater.
The rear window heater only operates when the engine is running. An indicator light in the switch is illuminated when the rear window heater is switched on.
The rear window heater switches off automatically after 20 minutes. If you press the switch once again, the rear window heater is switched on permanently - the automatic deactivation is thus deactivated.
Fig. 38 Roof liner light at the rear
Fig. 39 Switch for rear window heater
NKO A05R 20 MR08.book Page 49 Wednesday, March 28, 2007 9:42 AM
Page 51 of 248
Lights and Visibility50
For the sake of the environment
You should switch off the rear window heater as soon as the rear window is clear. The reduced current consumption will have a favourable effect on fuel economy ⇒ page 157, “Saving electricity”.
Sun visors
Using the sun visors can contribute to increasing road safety.
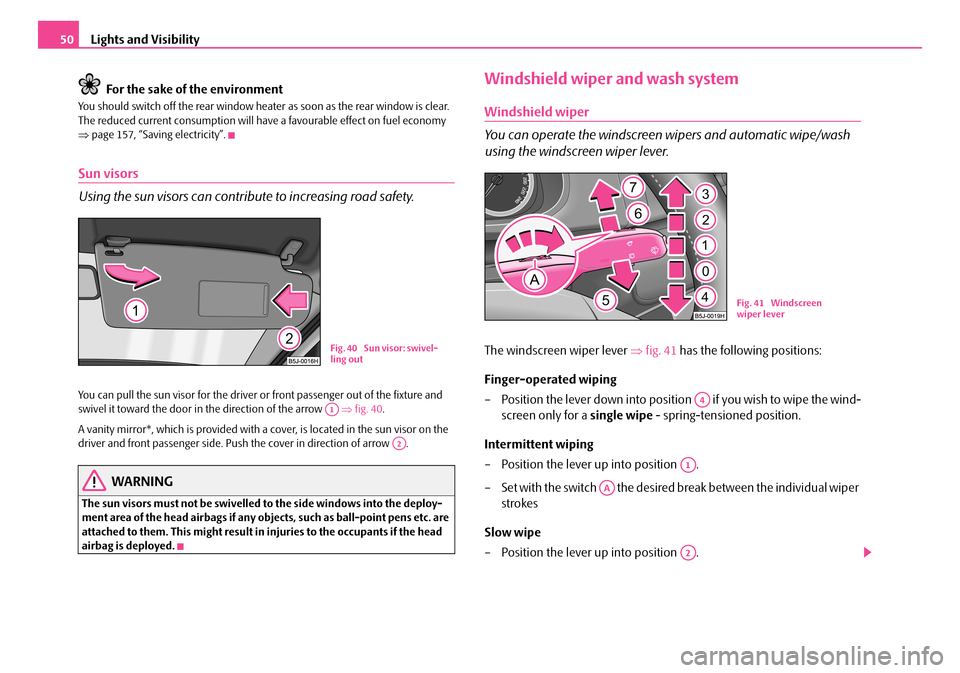
You can pull the sun visor for the driver or front passenger out of the fixture and swivel it toward the door in the direction of the arrow ⇒fig. 40.
A vanity mirror*, which is provided with a cover, is located in the sun visor on the driver and front passenger side. Push the cover in direction of arrow .
WARNING
The sun visors must not be swivelled to the side windows into the deploy-ment area of the head airbags if any ob jects, such as ball-point pens etc. are attached to them. This might result in injuries to the occupants if the head airbag is deployed.
Windshield wiper and wash system
Windshield wiper
You can operate the windscreen wipers and automatic wipe/wash
using the windscreen wiper lever.
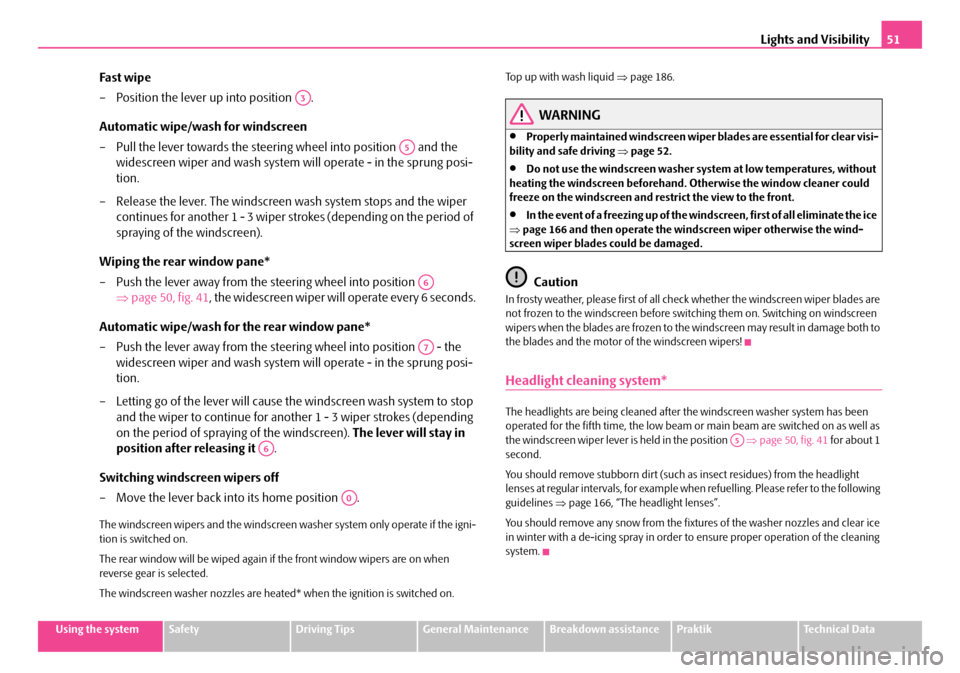
The windscreen wiper lever ⇒fig. 41 has the following positions:
Finger-operated wiping
– Position the lever down into position if you wish to wipe the wind-
screen only for a single wipe - spring-tensioned position.
Intermittent wiping
– Position the lever up into position .
– Set with the switch the desired break between the individual wiper
strokes
Slow wipe
– Position the lever up into position .
Fig. 40 Sun visor: swivel- ling out
A1
A2
Fig. 41 Windscreen wiper lever
A4
A1
AA
A2
NKO A05R 20 MR08.book Page 50 Wednesday, March 28, 2007 9:42 AM
Page 52 of 248
Lights and Visibility51
Using the systemSafetyDriving TipsGeneral MaintenanceBreakdown assistancePraktikTechnical Data
Fast wipe
– Position the lever up into position .
Automatic wipe/wash for windscreen
– Pull the lever towards the steering wheel into position and the
widescreen wiper and wash system wi ll operate - in the sprung posi-
tion.
– Release the lever. The windscreen wash system stops and the wiper
continues for another 1 - 3 wiper stro kes (depending on the period of
spraying of the windscreen).
Wiping the rear window pane*
– Push the lever away from the steering wheel into position
⇒ page 50, fig. 41, the widescreen wiper will operate every 6 seconds.
Automatic wipe/wash for the rear window pane*
– Push the lever away from the steering wheel into position - the
widescreen wiper and wash system wi ll operate - in the sprung posi-
tion.
– Letting go of the lever will cause the windscreen wash system to stop
and the wiper to continue for another 1 - 3 wiper strokes (depending
on the period of spraying of the windscreen). The lever will stay in
position after releasing it .
Switching windscreen wipers off
– Move the lever back into its home position .
The windscreen wipers and the windscreen washer system only operate if the igni- tion is switched on.
The rear window will be wiped again if the front window wipers are on when reverse gear is selected.
The windscreen washer nozzles are heated* when the ignition is switched on.
Top up with wash liquid ⇒page 186.
WARNING
•Properly maintained windscreen wiper blades are essential for clear visi- bility and safe driving ⇒page 52.
•Do not use the windscreen washer system at low temperatures, without heating the windscreen beforehand. Otherwise the window cleaner could freeze on the windscreen and restrict the view to the front.
•In the event of a freezing up of the wi ndscreen, first of all eliminate the ice ⇒ page 166 and then operate the windscreen wiper otherwise the wind- screen wiper blades could be damaged.
Caution
In frosty weather, please first of all check whether the windscreen wiper blades are not frozen to the windscreen before switching them on. Switching on windscreen wipers when the blades are frozen to the windscreen may result in damage both to the blades and the motor of the windscreen wipers!
Headlight cleaning system*
The headlights are being cleaned after the windscreen washer system has been operated for the fifth time, the low beam or main beam are switched on as well as the windscreen wiper lever is held in the position ⇒page 50, fig. 41 for about 1 second.
You should remove stubborn dirt (such as insect residues) from the headlight lenses at regular intervals, for example when refuelling. Please refer to the following guidelines ⇒page 166, “The headlight lenses”.
You should remove any snow from the fixtures of the washer nozzles and clear ice in winter with a de-icing spray in order to ensure proper operation of the cleaning system.
A3
A5
A6
A7
A6
A0
A5
NKO A05R 20 MR08.book Page 51 Wednesday, March 28, 2007 9:42 AM
Page 53 of 248

Lights and Visibility52
Replacing wiper blades for the windscreen wipers
Taking off the wiper blade
– Fold windscreen wiper arm away from the windscreen.
– Press the locking button, in order to unlock the wiper blade and pull
off in the direction of arrow.
Attaching a wiper blade
– Push the wiper blade until it locks up to the stop.
– Check whether the wiper bl ade is correctly attached.
– Fold the windscreen wiper arm back onto the windscreen.
Wiper blades in proper condition are esse ntial to obtain good visibility. Wiper blades should not be allowed to become dirtied by dust, insect remains and preserving wax.
Juddering or smearing of the wiper blades could then be due to wax residues left on the windscreen by vehicle washing in automatic vehicle wash systems. It is therefore important to degrease the lips of the wiper blades after every pass through an automatic vehicle wash system.
WARNING
•If the windscreen wipers are handled carelessly, there is a risk of damage to the windscreen.
•You should clean the wiper blades regu larly with a windscreen cleaner in order to avoid any smears. Clean a wiper blade with a sponge or cloth if it is very dirty, for example from insect residues.
•Replace the wiper blades once or twice a year for safety reasons. The wiper blades are available from Škoda Service Partners.
Replacing the wiper blade on the rear window wiper
Taking off the wiper blade
– Fold windscreen wiper arm out from the windscreen and position the
wiper blade at right angles to the wiper arm ⇒fig. 43.
– Hold the window wiper arm at the top end with one hand.
– With the other hand unlock the locking button in the direction of
arrow and remove the wiper blade.
Fig. 42 Wiper blade for the windscreen wiper
Fig. 43 Wiper blade for rear window
AA
NKO A05R 20 MR08.book Page 52 Wednesday, March 28, 2007 9:42 AM
Page 55 of 248

Seats and Stowage54
Seats and Stowage
Front seats
Basic information
The front seats have a wide range of different settings and can thus be matched to the physical characteristics of the driver and front passenger. Correct adjustment of the seats is particularly important for
•safely and quickly reaching the controls,
•a relaxed, fatigue-free body position,
•achieving the maximum protection offere d by the seat belts and the airbag system.
The chapters which follow describe the procedure which you should adopt for adjusting the seats.
WARNING
•Never transport more occupants than the maximum seating in the vehicle.
•Each occupant must correctly fasten the seat belt belonging to the seat. Children must be fastened ⇒page 137, “Transporting children safely” with a suitable restraint system.
•The front seats and the head restraints must always be adjusted to match the body size of the seat occupant as well as the seat belts must always be correctly fastened in order to provide an optimal protection for you and your occupants.
•Always keep your feet in the footwell when the car is being driven - never place your feet on the instrument panel, out of the window or on the surfaces of the seats. This is particularly important for the front seat passenger. You will be exposed to increased risk of injury if it becomes necessary to apply the brake or in the event of an accident. If an airbag is deployed, you may suffer fatal injuries when adopting an incorrect seated position!
•It is important for the driver and front passenger to maintain a distance of at least 25 cm from th e steering wheel or dash panel. Not maintaining this minimum distance will mean that the airbag system will not be able to prop- erly protect you - hazard! The front seats and the head restraints must always also be correctly adjusted to match the body size of the occupant.
•Ensure that there are no objects in the footwell as any objects may get behind the pedals during a driving or braking manoeuvre. You would then no longer be able to operate the clutch, to brake or accelerate.
Adjusting the front seats
Adjusting a seat in a forward/back direction
– Pull the lever ⇒fig. 45 up and push the seat into the desired posi-
tion.
– Release the lever and push the seat further until the lock is heard
to engage.
WARNING (continued)
Fig. 45 Controls at seat
A1
A1
NKO A05R 20 MR08.book Page 54 Wednesday, March 28, 2007 9:42 AM
Page 64 of 248
Seats and Stowage63
Using the systemSafetyDriving TipsGeneral MaintenanceBreakdown assistancePraktikTechnical Data
•On no account exceed the permissible axle loads and the permissible gross weight of the vehi cle - risk of accident!
•Never transport occupants in the luggage compartment.
Caution
Please ensure that the heating elements of the rear window heater are not damaged as a result of objects sliding in this area.
Note
•Tyre pressure must be adjusted to the load ⇒page 187, fig. 164.
•The air circulation in the interior of the car helps to prevent the windows from misting up. Stale air is diverted via the outlet nozzles into the luggage compartment below the bumper. Check for yourself that the outlet nozzles are not covered.
Fastening elements
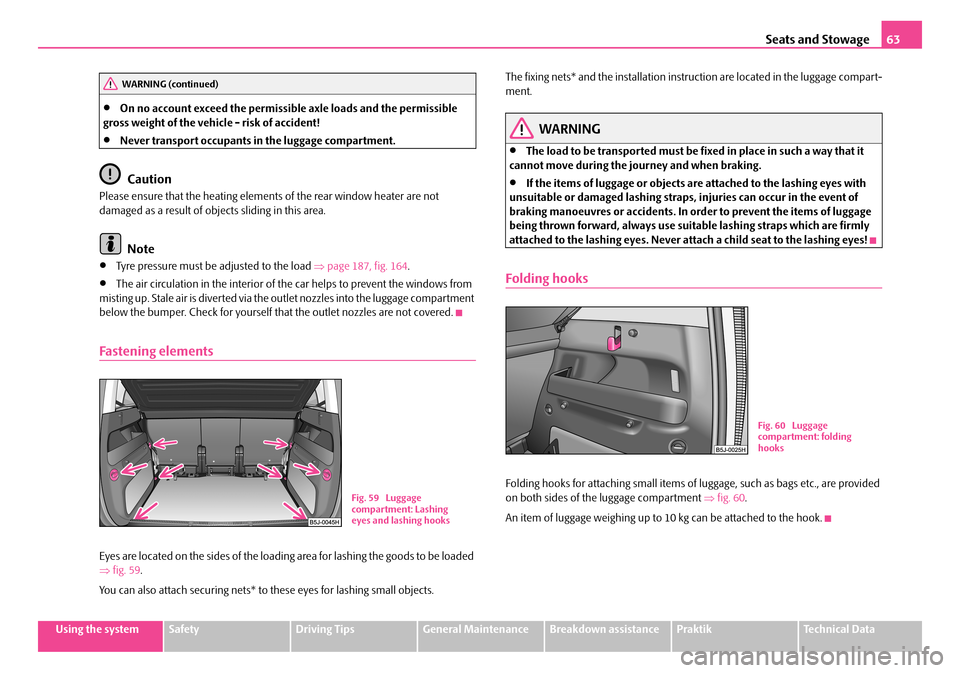
Eyes are located on the sides of the loading area for lashing the goods to be loaded ⇒ fig. 59.
You can also attach securing nets* to these eyes for lashing small objects.
The fixing nets* and the installation inst ruction are located in the luggage compart- ment.
WARNING
•The load to be transported must be fixed in place in such a way that it cannot move during the journey and when braking.
•If the items of luggage or objects ar e attached to the lashing eyes with unsuitable or damaged lashing straps, injuries can occur in the event of braking manoeuvres or accidents. In order to prevent the items of luggage being thrown forward, always use suit able lashing straps which are firmly attached to the lashing eyes. Never atta ch a child seat to the lashing eyes!
Folding hooks
Folding hooks for attaching small items of luggage, such as bags etc., are provided on both sides of the luggage compartment ⇒fig. 60.
An item of luggage weighing up to 10 kg can be attached to the hook.
WARNING (continued)
Fig. 59 Luggage compartment: Lashing eyes and lashing hooks
Fig. 60 Luggage compartment: folding hooks
NKO A05R 20 MR08.book Page 63 Wednesday, March 28, 2007 9:42 AM
Page 66 of 248
Seats and Stowage65
Using the systemSafetyDriving TipsGeneral MaintenanceBreakdown assistancePraktikTechnical Data
The luggage compartment cover
You can use the luggage compartment cover behind the head
restraints for storing light and soft items.
The luggage compartment cover can be removed as required if one must
transport bulky goods.
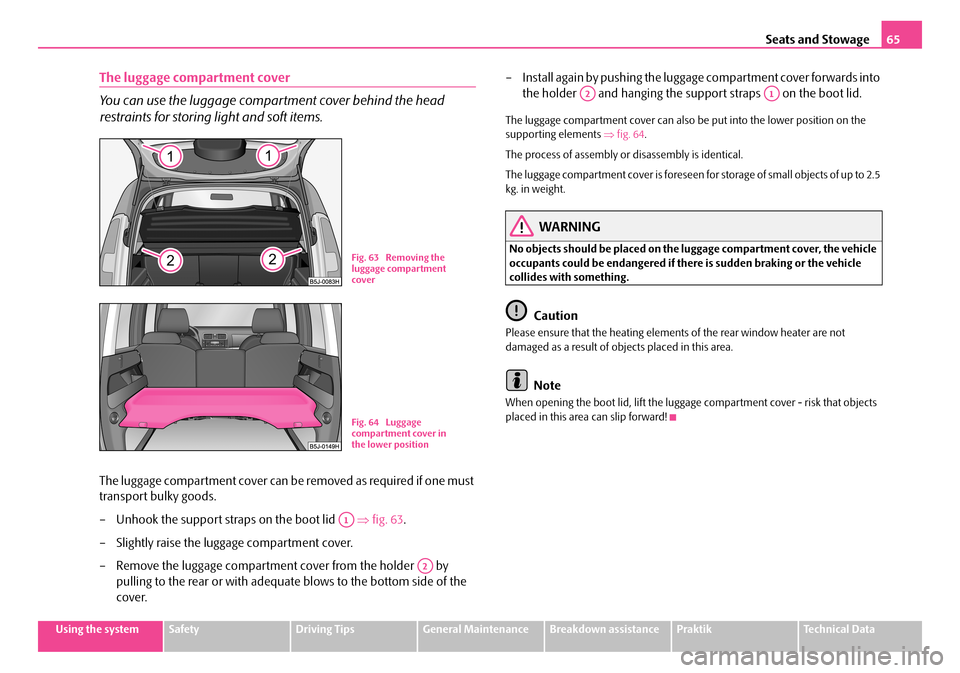
– Unhook the support stra ps on the boot lid ⇒fig. 63.
– Slightly raise the luggage compartment cover.
– Remove the luggage compartment cover from the holder by
pulling to the rear or with adequate blows to the bottom side of the
cover.
– Install again by pushing the luggage compartment cover forwards into
the holder and hanging the suppo rt straps on the boot lid.
The luggage compartment cover can also be put into the lower position on the supporting elements ⇒fig. 64.
The process of assembly or disassembly is identical.
The luggage compartment cover is foreseen fo r storage of small objects of up to 2.5 kg. in weight.
WARNING
No objects should be placed on the luggage compartment cover, the vehicle occupants could be endangered if th ere is sudden braking or the vehicle collides with something.
Caution
Please ensure that the heating elements of the rear window heater are not damaged as a result of obje cts placed in this area.
Note
When opening the boot lid, lift the luggage compartment cover - risk that objects placed in this area can slip forward!
Fig. 63 Removing the luggage compartment cover
Fig. 64 Luggage compartment cover in the lower position
A1
A2
A2A1
NKO A05R 20 MR08.book Page 65 Wednesday, March 28, 2007 9:42 AM