key battery SKODA ROOMSTER 2008 1.G Owner's Manual
[x] Cancel search | Manufacturer: SKODA, Model Year: 2008, Model line: ROOMSTER, Model: SKODA ROOMSTER 2008 1.GPages: 248, PDF Size: 46.44 MB
Page 13 of 248
Instruments and Indicator/Warning Lights12
Service Interval Display
A key symbol appears in the counter display for distance driven about 30 days before reaching the due date for the service ⇒page 11, fig. 4. The remaining distance to be driven will be indicated for 10 seconds next to the key symbol and then the remaining number of days to th e due date for the service inspection.
The following will be displayed in the information display*:
SERVICE IN ... KM OR ... DAYS
The kilometre indicator or the days indica tor reduces in steps of 100 km. or days until the service due date is reached.
The following text appears as a flashing key symbol and a text as soon as the due date for the service is reached.
INSP
The following will be displayed in the information display*:
SERVICE NOW
The display disappears within 20 seconds af ter switching on the ignition. The trip counter is also displayed after pressing th e reset button for the trip counter (for more than 1 second).
Display regarding the distance and days until the following service interval
You can have the distance still to be driv en and the days until the following service interval displayed at any time as follows:
•Press reset button for more than 3 seconds.
A key symbol is displayed on the display of the counter for the distance driven. The remaining distance to be driven will be indicated for 10 seconds next to the key symbol and then the remaining number of days to the due date for the service inspection.
Resetting Service Interval Display
It is only possible to reset the Service Interval Display, if a service message or at least a pre-warning is shown on the display of the instrument cluster.
We recommend having this resetting performed by a specialist garage.
The specialist garage:
•resets the memory of the display after the appropriate inspection,
•makes an entry in the Service schedule,
•affix the sticker with the entry of the following service interval to the side of the dash panel on the driver's side.
The Service Interval Display can also be reset with the reset button as follows:
•Switch off the ignition, press the reset button of the trip counter for distance driven and hold it down.
•Switch the ignition on and release the reset button. Now turn the reset button to the right. The service interval display is reset.
Caution
We recommend that you do not reset the Service Interval Display yourself other- wise this can result in the service interval display being incorrectly set, which may also result in problems with operation of your vehicle.
Note
•Never reset the display between service intervals otherwise this may result in incorrect readouts.
•information is retained in the Service Interval Display also after the battery of the vehicle is disconnected.
•it is necessary to re-code the Service Interval Display if a new instrument cluster is installed during repair work. This work is carried out by a specialist garage.
•The data displayed is the same after resetting the display with flexible service intervals (QG1) using the reset button as th at for a vehicle with fixed service inter- vals (QG2). We therefore recommend having the Service Interval Display reset only by a Škoda Service Partner who is famili ar with the procedure for resetting the display with a vehicle system tester.
•Please refer to the brochure Service schedule for extensive information about the service intervals.
A6
A6
NKO A05R 20 MR08.book Page 12 Wednesday, March 28, 2007 9:42 AM
Page 25 of 248
Instruments and Indicator/Warning Lights24
The indicator light does not flash if a turn signal light on the trailer or on the vehicle is not operating.
Coolant temperature/coolant level
The warning light comes on for a few seconds 1) when the ignition is switched on.
The coolant temperature is too high or the coolant level too low if the warning light does not go out after the engine is started or flashes while driving.
3 peeps sound as an additional warning signal.
In this case stop and switch the engine off and check the coolant level; top up the coolant as necessary ⇒page 180, “Replenishing the coolant”.
Do not continue your journey if for some reason it is not possible under the conditions prevailing to top up with coolant. Keep the engine switched off and obtain professional assistance from a specialist garage, otherwise it could lead to severe engine damage.
If the coolant is within the specified range, the increased temperature may be caused by an operating problem at the coolant fan. Check the fuse for the coolant fan, replace it if necessary ⇒page 210, “Fuse assignment at battery”.
Do not continue driving if the warning light does not go off although the fluid is at the correct level and also the fuse of the fa n is in proper order. Contact a specialist garage to obtain assistance.
Please also refer to the additional instructions ⇒page 178, “Cooling system”.
The following text will be displayed in the information display*:
STOP CHECK COOLANT OWNER'S MANUAL!
WARNING
•If you must stop for technical reasons, then park the vehicle at a safe distance from the traffic and switch off the engine and switch on the hazard warning light system ⇒page 47, “Switch for hazard warning lights ”.
•Pay attention to the following instructions ⇒page 174, “Working in the engine compartment” before checking the coolant fluid level and opening the bonnet.
•Take care when opening the coolant expa nsion bottle. If the engine is hot, the cooling system is pressurized - risk of scalding. It is best to allow the engine to cool down before removing the cap.
•Do not touch the coolant fan! The coolant fan may switch on automati- cally even if the ignition is off.
Electronic immobiliser
Data is compared between the ignition ke y and the control unit when switching on the ignition. The indicator light will light up for a few seconds when ignition key authorisation is confirmed.
The warning light will start flashing conti nuously if a non-authorised ignition key (for example the wrong ignition key) has been used. The engine cannot be started ⇒ page 31.
It is only possible to start the engine of your car with a Genuine Škoda key with the matching code.
Fuel reserve
The warning light comes on, if the fuel level is still about 7 litres.
A peep sounds as an additional warning signal.
The following text will be displayed in the information display*:
PLEASE REFUEL1)The warning light on vehicles fitted with information display does not come on after switching the ignition on, but only if the coolant temperature is too high or the coolant levelis too low.
NKO A05R 20 MR08.book Page 24 Wednesday, March 28, 2007 9:42 AM
Page 32 of 248
Unlocking and locking31
Using the systemSafetyDriving TipsGeneral MaintenanceBreakdown assistancePraktikTechnical Data
Changing the key battery
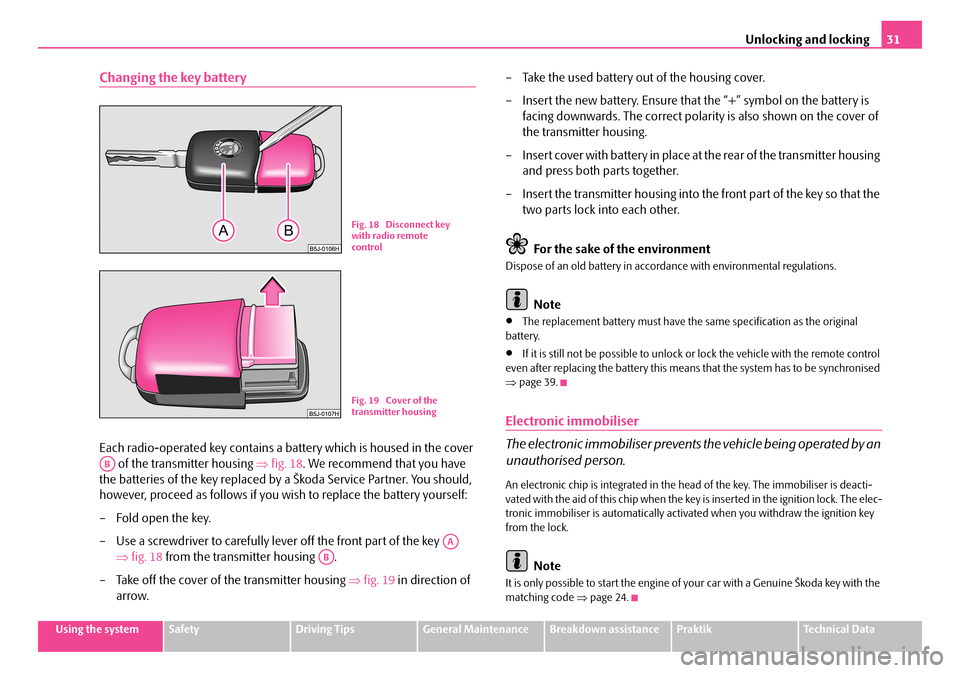
Each radio-operated key contains a battery which is housed in the cover
of the transmitter housing ⇒fig. 18. We recommend that you have
the batteries of the key replaced by a Škoda Service Partner. You should,
however, proceed as follows if you wi sh to replace the battery yourself:
– Fold open the key.
– Use a screwdriver to carefully lever off the front part of the key
⇒ fig. 18 from the transmitter housing .
– Take off the cover of the transmitter housing ⇒fig. 19 in direction of
arrow.
– Take the used battery out of the housing cover.
– Insert the new battery. Ensure that the “+” symbol on the battery is
facing downwards. The correct polarity is also shown on the cover of
the transmitter housing.
– Insert cover with battery in place at the rear of the transmitter housing
and press both parts together.
– Insert the transmitter housing into the front part of the key so that the
two parts lock into each other.
For the sake of the environment
Dispose of an old battery in accord ance with environmental regulations.
Note
•The replacement battery must have the same specification as the original battery.
•If it is still not be possible to unlock or lock the vehicle with the remote control even after replacing the battery this means that the system has to be synchronised ⇒ page 39.
Electronic immobiliser
The electronic immobiliser prevents the vehicle being operated by an
unauthorised person.
An electronic chip is integrated in the he ad of the key. The immobiliser is deacti- vated with the aid of this chip when the key is inserted in the ignition lock. The elec- tronic immobiliser is automatically activated when you withdraw the ignition key from the lock.
Note
It is only possible to start the engine of your car with a Genuine Škoda key with the matching code ⇒page 24.
Fig. 18 Disconnect key with radio remote control
Fig. 19 Cover of the transmitter housing
AB
AA
AB
NKO A05R 20 MR08.book Page 31 Wednesday, March 28, 2007 9:42 AM
Page 38 of 248
Unlocking and locking37
Using the systemSafetyDriving TipsGeneral MaintenanceBreakdown assistancePraktikTechnical Data
•Do not press on the rear window when closing the boot lid, it could crack - risk of injury!
Note
•After closing the boot lid, it is automatically locked within 1 seconds and the anti-theft alarm system* is activated. This applies only if the vehicle was locked before closing the boot lid.
•The function of the hand grip above the licence plate is deactivated when starting off or as of a speed of more than 5 km/hour for vehicles with central locking. The function of the hand grip is activated again when the vehicle has stopped and a door is opened.
•Hold the boot lid when opening.
Emergency unlocking of the boot lid
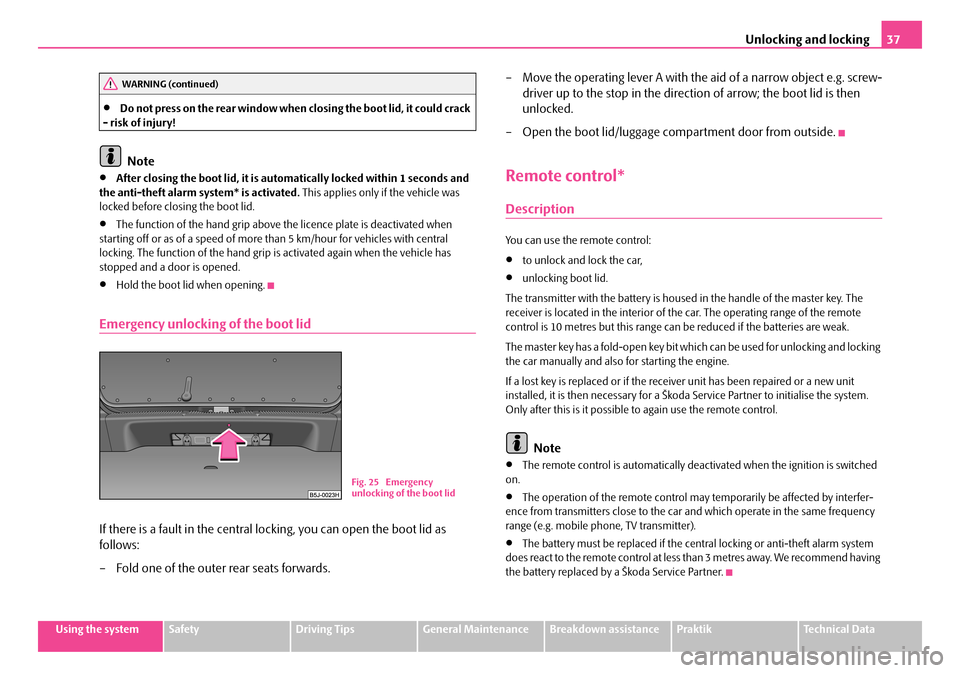
If there is a fault in the central lo cking, you can open the boot lid as
follows:
– Fold one of the outer rear seats forwards.
– Move the operating lever A with the aid of a narrow object e.g. screw-
driver up to the stop in the direction of arrow; the boot lid is then
unlocked.
– Open the boot lid/luggage compartment door from outside.
Remote control*
Description
You can use the remote control:
•to unlock and lock the car,
•unlocking boot lid.
The transmitter with the battery is housed in the handle of the master key. The receiver is located in the interior of th e car. The operating range of the remote control is 10 metres but this range can be reduced if the batteries are weak.
The master key has a fold-open key bit whic h can be used for unlocking and locking the car manually and also for starting the engine.
If a lost key is replaced or if the receiv er unit has been repaired or a new unit installed, it is then necessary for a Škoda Service Partner to initialise the system. Only after this is it possible to again use the remote control.
Note
•The remote control is automatically deactivated when the ignition is switched on.
•The operation of the remote control may temporarily be affected by interfer- ence from transmitters close to the car and which operate in the same frequency range (e.g. mobile phone, TV transmitter).
•The battery must be replaced if the central locking or anti-theft alarm system does react to the remote control at less than 3 metres away. We recommend having the battery replaced by a Škoda Service Partner.
WARNING (continued)
Fig. 25 Emergency unlocking of the boot lid
NKO A05R 20 MR08.book Page 37 Wednesday, March 28, 2007 9:42 AM
Page 40 of 248
Unlocking and locking39
Using the systemSafetyDriving TipsGeneral MaintenanceBreakdown assistancePraktikTechnical Data
Synchonisation of the remote control
If the vehicle cannot be unlocked by actuating the remote control system then it is possible that the code in the key and the control unit in the vehicle are no longer synchronised. This can occur when the butt ons on the radio-operated key are actu- ated a number of times outside of the operative range of the equipment or the battery on the remote control was replaced.
This means it is necessary to synchronise the code as follows:
•Press any button on the remote control.
•pressing of the button means that the door will unlock with the key within 1 minute.
Anti-theft alarm system*
The anti-theft alarm system increases the le vel of protection against people seeking to break into the vehicle. The system tri ggers audible and visual warning signals if an attempt is made to break into the vehicle.
How is the alarm system switched on?
The anti-theft alarm system is activated automatically when the vehicle is locked with the key on the closed driver's door or by using the remote control. It is acti- vated 30 seconds after closing the door.
How is the alarm system switched off?
The anti-theft alarm system is switched of f if the vehicle is unlocked by only using the remote control. The vehi cle is automatically locked again if the vehicle is not opened within 30 seconds after reactivating the anti-theft alarm system.
Once you unlock the vehicle by inserting the key into the driver door you then have to insert the key into the ignition lock an d switch the ignition on within 15 seconds after unlocking the door in order to deac tivate the anti-theft alarm system. The alarm will be triggered if you do not switch on the ignition within 15 seconds.
When is the alarm triggered?
The following security areas of the locked vehicle are monitored:
•Bonnet,
•Boot lid,
•Doors,
•Ignition lock,
•Vehicle interior* ⇒page 40,
•Angle of the vehicle*,
•A drop in voltage of the on-board power supply.
An alarm is immediately triggered if either of the two battery terminals is discon- nected while the anti-theft alarm system is activated.
How is the alarm switched off?
You switch the alarm off if you unlock the car with the radio remote control in the key or if you switch the ignition on.
Note
•The working life of the alarm siren is 5 years. More detailed information is avail-able from your Škoda Service Partner.
•Before leaving the car, check that all the windows and doors are properly closed in order to ensure that the anti-the ft alarm system is fully operational.
•Coding of the radio remote control and the receptor part precludes the use of the radio remote control from other vehicles.
NKO A05R 20 MR08.book Page 39 Wednesday, March 28, 2007 9:42 AM
Page 43 of 248
Unlocking and locking42
You must try to close the window again within 10 seconds, even if the obstacle was not yet removed, the closing process is stoppe d. During this time it is not possible to automatically close the window. The force limiter is still switched on.
The force limiter is only switched off, if you attempt to close the window within the next 10 seconds - the window closes now with full strength!
If you wait longer than 10 seconds, th e force limiter is switched on again.
WARNING
You should take particular care when closing the windows! You may other- wis e su ffe r s ev e re inj uri e s a s a re sul t o f g e t tin g an a rm , fo r e xa m pl e, j am m e d in the window!
Window convenience operation
You can open and close the window with power windows as follows
when unlocking and locking the vehicle.
Opening windows with the key
– Turn the key in the lock of the driver door into the opening position
and hold it until all the windows are open.
Closing windows with the key
– Turn the key in the lock of the driver door into the closing position and
hold it there until all of the windows are closed.
You can interrupt the opening or closing operation of the windows immediately by releasing the key.
WARNING
•Obstruction protection is not active during the convenience operating feature ⇒ in “Switch for power windows” on page 40.
•You should take particular care when closing the windows! You may otherwise suffer severe injuries as a re sult of getting an arm, for example, jammed in the window!
Operational faults
Electrically operated power windows do not operate
If the battery of the car has been disco nnected and then reconnected, the electri- cally operated power windows do not oper ate. The system must be activated. Proceed as follows in order to re-establish the function:
•turn the key in the lock of the driver d oor into the closing position and hold it there until all of the windows are closed,
•release the key,
•Once again insert the key and turn it into the closing position for about 3 seconds.
Operation in winter
Ice accumulating on the surface of the windows during the winter may result in a greater resistance when closing the windows and the window may stop and move back several centimetres
Proceed as follows to close the window fully:
•turn the key in the lock of the driver d oor into the closing position and hold it there until all of the windows are closed,
•repeat this operation until the window stops.
WARNING
•Obstruction protection is not active during the closing of the windows ⇒ in “Switch for power windows” on page 40.
•You should take particular care when closing the windows! You may otherwise suffer severe injuries as a re sult of getting an arm, for example, jammed in the window!
WARNING (continued)
NKO A05R 20 MR08.book Page 42 Wednesday, March 28, 2007 9:42 AM
Page 50 of 248
Lights and Visibility49
Using the systemSafetyDriving TipsGeneral MaintenanceBreakdown assistancePraktikTechnical Data
Lighting of storage compartment on the front passenger side
– When opening the flap of the storage compartment on the front
passenger side the lighting in the storage compartment comes on.
– The light switches on automatically when the parking light is switched
on and goes out when the flap is closed.
The interior light is switched on for abou t 20 seconds when a vehicle with a central locking system is unlocked, when a door is opened or when the ignition key is removed. The requirement for this is that the switch is in the door contact position. The inner light goes out out immediately after the ignition is switched on.
A time delay switch* causes the inner lighti ng on vehicles without a central locking system stays on for a few seconds after the doors have been closed. The inner light goes out out immediately after the ignition is switched on.
The interior lighting is switched off af ter about 30 minutes when a door has been left open in order to avoid discharging the battery of the vehicle.
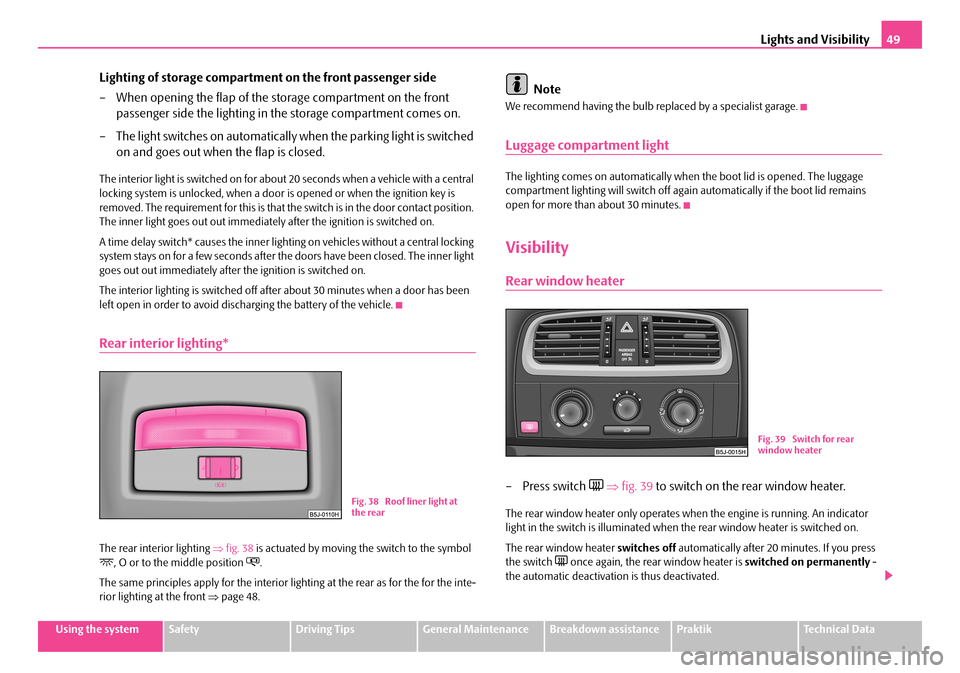
Rear interior lighting*
The rear interior lighting ⇒fig. 38 is actuated by moving the switch to the symbol , O or to the middle position .
The same principles apply for the interior lighting at the rear as for the for the inte- rior lighting at the front ⇒page 48.
Note
We recommend having the bulb replaced by a specialist garage.
Luggage compartment light
The lighting comes on automatically when the boot lid is opened. The luggage compartment lighting will switch off again automatically if the boot lid remains open for more than about 30 minutes.
Visibility
Rear window heater
– Press switch ⇒fig. 39 to switch on the rear window heater.
The rear window heater only operates when the engine is running. An indicator light in the switch is illuminated when the rear window heater is switched on.
The rear window heater switches off automatically after 20 minutes. If you press the switch once again, the rear window heater is switched on permanently - the automatic deactivation is thus deactivated.
Fig. 38 Roof liner light at the rear
Fig. 39 Switch for rear window heater
NKO A05R 20 MR08.book Page 49 Wednesday, March 28, 2007 9:42 AM
Page 72 of 248
Seats and Stowage71
Using the systemSafetyDriving TipsGeneral MaintenanceBreakdown assistancePraktikTechnical Data
Cigarette lighter* and power sockets*
Cigarette lighter
You can also use the socket on th e cigarette lighter for other elec-
trical appliances.
Using the cigarette lighter
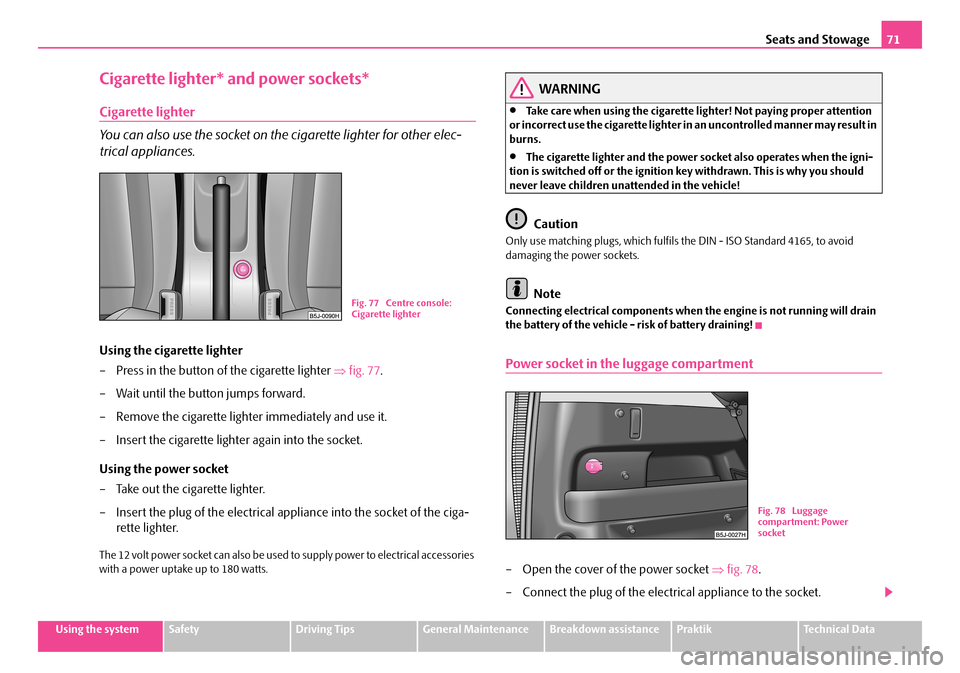
– Press in the button of the cigarette lighter ⇒fig. 77.
– Wait until the button jumps forward.
– Remove the cigarette lighter immediately and use it.
– Insert the cigarette lighter again into the socket.
Using the power socket
– Take out the cigarette lighter.
– Insert the plug of the electrical a ppliance into the socket of the ciga-
rette lighter.
The 12 volt power socket can also be used to supply power to electrical accessories with a power uptake up to 180 watts.
WARNING
•Take care when using the cigarette li ghter! Not paying proper attention or incorrect use the cigarette lighter in an uncontrolled manner may result in burns.
•The cigarette lighter and the power so cket also operates when the igni- tion is switched off or the ignition key withdrawn. This is why you should never leave children unattended in the vehicle!
Caution
Only use matching plugs, which fulfils the DIN - ISO Standard 4165, to avoid damaging the power sockets.
Note
Connecting electrical components when the engine is not running will drain the battery of the vehicle - risk of battery draining!
Power socket in the luggage compartment
– Open the cover of the power socket ⇒fig. 78.
– Connect the plug of the electr ical appliance to the socket.
Fig. 77 Centre console: Cigarette lighter
Fig. 78 Luggage compartment: Power socket
NKO A05R 20 MR08.book Page 71 Wednesday, March 28, 2007 9:42 AM
Page 92 of 248
Starting-off and Driving91
Using the systemSafetyDriving TipsGeneral MaintenanceBreakdown assistancePraktikTechnical Data
•Let go of the key as soon as the engine starts otherwise there may be damage to the starter.
The engine running noises may louder at first be louder for a short time after starting the cold engine until oil pressure can be built up in the hydraulic valve clearance compensation. This is quite normal and is not an operating problem.
If the engine does not start ...
You can use the battery of anothe r vehicle as a jump-start aid ⇒page 202.
It is only possible to tow-start vehicl es fitted with a manual gearbox. The tow- starting distance must not be more than 50 metres ⇒page 205.
WARNING
•Never run the engine in non ventilated or enclosed areas. The exhaust gases of the engine contain besides the odorless and colourless carbon monoxide a poisonous gas - hazard! Carbon monoxide can cause uncon- sciousness and death.
•Never leave your vehicle unattended with the engine running.
Caution
•The starter may only be operated (ignition key position ), if the engine is not running. If the starter is immediately oper ated after switching off the engine, the starter or the engine can be damaged.
•Avoid high engine revolutions, full throttle and high engine loads as long as the engine has not yet reached its normal oper ating temperature - risk of damaging the engine!
•Vehicles which are fitted wi th an exhaust gas catalytic converter should not be tow-started over a distance of more than 50 metres.
For the sake of the environment
Never warm up the engine when the vehicle is standing. Drive off right away. When driving the engine reaches its operating temperature more rapidly and the pollutant emissions are lower.
Petrol engines
These engines are fitted with a starter system which selects the correct fuel/air mixture for every external air temperature.
•Do not operate accelerator before and when starting engine.
•Interrupt the attempt at starting after 10 seconds if the engine does not start right awayand wait for about 30 seconds before repeating the attempt.
•It is possible that the fuse on the electric al fuel pump is defect if the engine still does not start. Check the fuse and replace it if necessary ⇒page 207.
•If the engine does not start, contact the nearest specialist garage to obtain professional assistance.
It may be necessary, if the engine is very hot, to slightly depress the accelerator after the engine has started.
Diesel engines
Glow plug system
Diesel engines are equipped with a glow plug system, the preglow period being controlled automatically in line with the coolant temperature and outside temper- ature.
The preglow indicator light comes on after the ignition has been switched on.
You should not switch on any major electrical components during the heating period otherwise the vehicle battery will be drained unnecessarily.
•You should start the engine immediately after the glow plug warning light has gone out.
•The glow plug warning light will come on for about one second if the engine is at a normal operating temperature or if the outside temperature is above +5°C. This means that you can start the engine right away.
•Interrupt the attempt at starting after 10 seconds if the engine does not start right awayand wait for about 30 seconds before repeating the attempt.
•It is possible that the fuse on the diesel preglow system is defect if the engine still does not start. Check the fuse and replace it if necessary ⇒page 207.
A3
NKO A05R 20 MR08.book Page 91 Wednesday, March 28, 2007 9:42 AM
Page 113 of 248

Communication112
In the modern business world as well as within the private sector the mobile communication gains increasi ngly on importance. Mobile phones from different manufacturers can be connected with the hands-free system by means of Blue- tooth. During the connecting procedure, no other mobile phone may be connected via Bluetooth with the hands-free system.
Up to four mobile phones can be connected to the hands-free system by means of Bluetooth, whereby only one mobile ph one can communicate via Bluetooth with the hands-free system. If a fifth mobile phone is connected to the handsfree- system, then the telephone, which has not been used together with the handsfree system for the longest period, is disconnected.
Establishing the Bluetooth connection
After switching on the ignition, the Blue tooth connection is automatically estab- lished for the already adapted mobile phone 3). You can hear an increasing tone sequence from the loudspeakers of the vehicle.
Disconnecting the Bluetooth connection
After withdrawing the ignition key, the Bluetooth connection is disonnected. You can hear an increasing tone sequence from the loudspeakers of the vehicle.
WARNING
•Pay attention primarily to the traffic situation! As the driver you are fully responsible for the traffic safety. Use the telephone system only to such an extent, so that you are in full control of your vehicle at any time - risk of acci- dent!
•In the event of air transport, the Bluetooth function of the handsfree- system must be switched off by a specialist garage.
Caution
Taking the mobile phone out of the adapter during the call can lead to interruption of the connection. When taking out th e mobile phone, the connection to the factory-fitted antenna is interrupted, this reduces the quality of the transmitting and receiving signal. This might result additionally in harmful radiation from the mobile phone in the interior of the ve hicle and the charging of the telephone battery is interrupted.
Note
•Not valid for all mobile phones which enable a communication via Bluetooth.
•Please operate your mobile phone exclusively with a suitable adapter, in order to keep a low radiation in the vehicle.
•Inserting the mobile phone into the adapter ensures an optimal sending and receiving power and offers at the same time the advantage of the battery charging.
•If you insert the mobile telephone in to the adapter, the connection is estab- lished via the interface in the adapter set and the Bluetooth connection is discon-nected. You can hear an incr easing tone sequence from the loudspeakers of the vehicle.
•Note that the range of the Bluetooth connection to the handsfree-system is limited to the vehicle interior. The range is dependent on local factors, e.g. obstacles between the devices and interferences with other devices. If your mobile phone is e.g. in a jacket pocket, this can lead to difficulties when establishing the Bluetooth connection with the handsfree-sy stem or the data transfer.
•If you have set the Portuguese language in the information display, it is used automatically for the mobile phone operat ion, as this is the language, which was entered during coding of the handsfree-system.
•On certain mobile phones with operating system, it is necessary to install on the mobile phone an application of the mobi le phone manufacturer, which enables the take-over of the phone phonebook via Bluetooth.
Mobile phones and tw o-way radio systems
We recommend that you have the installation of a mobile phone and two-way radio system in a vehicle carried out by a Škoda Service Partner.
Škoda Auto a.s. permits the operation of mobile phones and two-way radio systems with a professionally installed external aerial and a maximum transmission power of up to 10 watts.
Our Škoda Service Partners are also happy to inform you about the possibilities available for installing and operating mo bile telephones and radio transmitters which have an output greater than 10 watt s. The Škoda Service Partners can provide
NKO A05R 20 MR08.book Page 112 Wednesday, March 28, 2007 9:42 AM