technical data SKODA ROOMSTER 2009 1.G Owners Manual
[x] Cancel search | Manufacturer: SKODA, Model Year: 2009, Model line: ROOMSTER, Model: SKODA ROOMSTER 2009 1.GPages: 263, PDF Size: 32.25 MB
Page 178 of 263
Taking care of your vehicle and cleaning the vehicle177
Using the system
Safety
Driving Tips
General Maintenance
Breakdown assistance
Praktik
Technical Data
WheelsSteel wheels
You should also thoroughly wash the wheels and wheel trims when giving your
vehicle its regular wash. This prevents any brake dust, dirt and road salt from
sticking to the wheel hubs. You can remove stubborn brake abrasion adhering to
t h e w h e e l s w i t h a n i n d u s tr i a l c l e a n e r. To u c h u p a n y d a m a g e to t h e p a i n tw o r k o n th e
wheels before rust is able to form.
Light alloy wheels
Regular care of light alloy wheels is necessary in order to retain their decorative
appearance over long periods. It is particularly important to remove any road salt
and brake abrasion from light alloy wheels every two weeks, otherwise the surface
will suffer. Wash thoroughly and then treat the wheels with a protective product for
light alloy wheels which does not contain any acidic components. You should
provide the wheel hubs with a hard wax layer every three months. You must not use
any products which cause abrasion when treating the wheel hubs. Any damage to
the paint layer on the wheel hubs must be touched up immediately.
We recommend using a preservative from Škoda genuine accessories offered by
your Škoda dealer.
WARNING
One should remember when cleaning the wheels that moisture, ice and road
salt may adversely affect braking efficiency - risk of an accident!
Note
Severe layers of dirt on the wheels can also result in wheel imbalance. This may
show itself in the form of a wheel vibration which is transmitted to the steering
wheel which, in certain circumstances, can cause premature wear of the steering.
This means it is necessary to remove the dirt.
Underbody protectionThe underside of your vehicle is protected for life against chemical and mechanical
influences.
One cannot, however, completely rule out damage to the protective layer when
driving so we recommend that you inspect the protective layer on the underside of
your vehicle and on the chassis at certain intervals - this is best done at the begin-
ning and end of the winter - and to touch up any damaged areas.
Specialist garages have suitable spray products available as well as the necessary
equipment and are familiar with the instructions for use. Therefore, we recommend
you have such touch-up work or additional corrosion protection measures carried
out by a specialist garage.
WARNING
Never use additional underbody protection or corrosion-protection agents
for the exhaust pipes, catalytic converters, heat shields or diesel particle
filter*. When the engine reaches its operating temperature, these
substances might ignite - risk of fire!Protection of hollow spacesAll the cavities of your vehicle which are at risk from corrosion are protected for life
by a layer of protective wax applied in the factory.
This wax protection does not require to be inspected or re-treated. Please remove
any small amount of wax which flows out of the cavities at high temperatures with
a plastic scraper and clean the spot using petroleum cleaner.
WARNING
Safety and environmental protection regulations should observed when
using petroleum cleaner to remove wax - a risk of fire!
s29g.4.book Page 177 Wednesday, June 17, 2009 9:54 AM
Page 180 of 263
Taking care of your vehicle and cleaning the vehicle179
Using the system
Safety
Driving Tips
General Maintenance
Breakdown assistance
Praktik
Technical Data
Removing stains
– Remove fresh stains which are water-based (e.g. coffee, tea, juices,
blood etc.) with an absorbent cloth or household paper or use the
cleaner from the care set for a stain which has already dried in.
– Remove fresh stains on a fat base (e.g. butter, mayonnaise, chocolate
etc.) with an absorbent cloth or household cleaning paper or with the
cleaner from the care set if the stain has not yet penetrated into the
surface.
– Use a grease dissolver for grease stains which have dried in.
–Eliminate special stains (e.g. ball-point pens, felt pen, nail varnish,
dispersion paint, shoe cream etc.) with a special stain remover suit-
able for leather.
Leather care
– Treat the leather every six months with the leather care product avail-
able from specialist garages.
– Apply only a small amount of the care product.
– Dry the leather off with a soft clothWe recommend that you consult a specialist garage if you have any questions
regarding cleaning and care of the leather interior in your vehicle.
Caution
•
You must on no account treat the leather with solvents (e.g. gasoline, turpen-
tine), floor wax, shoe cream or such like.
•
Avoid leaving your vehicle for lengthy periods in bright sunlight in order to
avoid bleaching the leather. If you leave your vehicle parked in the open for lengthy
periods, protect the leather from the direct rays of the sun by covering it over.
•
Sharp-edged objects on items of clothing such as zip fasteners, rivets, sharp-
edged belts may leave permanent scratches or signs of rubbing on the surface.
Note
•
Use a care cream with light blocker and impregnation effect regularly and each
time after cleaning the leather. The cream nourishes the leather, allows it to breathe
and keeps it supple and also provides moisture. It also creates surface protection.
•
Clean the leather every 2 to 3 months, remove fresh soiling each time this
occurs.
•
Remove fresh stains such as those from ball-point pens, ink, lipstick, shoe
cream etc., as quickly as possible.
•
Care also for the leather dye. Refreshen areas which have lost their colour with
a special coloured leather cream as required.
•
The leather is a natural material with specific properties. During the use of the
vehicle, minor optical changes can occur on the leather parts of the covers (e. g
wrinkles or creases as a result of the stress of the covers).
Seat belts– Keep the seat belts clean!
– Wash seat belts which have become soiled using a mild soapy solu-
tion.
– Inspect the seat belts regularly to ensure they are in good condition.Belt webbing which has become severely soiled may prevent the inertia reel from
reeling up the belt properly.
WARNING
•
The seat belts must not be removed for cleaning.
•
Never clean the seat belts chemically as dry cleaning may destroy the
fabric. The seat belts must also not be allowed to come into contact with
corrosive liquids (such as acids etc.).
•
Seat belts which have damage to the webbing, the connections, the
inertia reel or the lock should be replaced by a specialist garage.
s29g.4.book Page 179 Wednesday, June 17, 2009 9:54 AM
Page 182 of 263
Fuel181
Using the system
Safety
Driving Tips
General Maintenance
Breakdown assistance
Praktik
Technical Data
FuelPetrolGrades of petrolThere are various grades of petrol. Please read the chapter ⇒page 233, “Technical
Data” in order to know which grade of petrol your vehicle requires. You will also find
the same information affixed to the inside of the fuel filler flap of your vehicle
⇒page 182, fig. 173.
A distinction is made between unleaded and leaded petrol. All Škoda vehicles with
petrol engines are equipped with a catalytic converter and must therefore be only
driven with unleaded petrol. Unleaded petrol complies with the standard EN 228.
The individual grades of petrol are distinguished by their octane number (RON).
Please adopt the following procedure if the grade of petrol which you normally use
is not be available in exceptional circumstances.
Engines which need unleaded premium petrol 95 RON can also be run on
unleaded regular petrol 91 RON. This does, however, result in a slight loss in
performance.
If, in an emergency, the only fuel available is one which has a lower octane number
than that required by the engine then only drive at medium engine speeds and
lower engine loadings.
You can make unlimited use of fuel which has a higher octane number than that
required by the engine. There will, however, be no advantages gained by this in
terms of engine performance and fuel consumption!
The handling, performance and life of your engine are determined to a significant
extent by the quality of the fuel. Do not use any petrol additives. Use fuel which
complies with the standard EN 228.
You can find further information on refuelling ⇒page 182.
Caution
•
Filling the tank even only once with leaded petrol will result in the catalytic
converter being destroyed.
•
Operating the engine with petrol of a lower octane number than that prescribed
can result in engine damage at high revolutions or severe engine loading.
DieselDiesel fuelYour vehicle can be operated with diesel fuel, which complies with the standard
EN 590.
Fuel additives
You must not use fuel additives, so-called “flow improvers” (petrol and similar
products) in diesel fuel.
If the quality of the diesel fuel is poor, it is then necessary to drain the fuel filter
more often than stated in the Service schedule.
You can find information on refuelling ⇒page 182, “Refuelling”.
Caution
•
Use fuel which complies with the standard EN 590. Filling the tank even only
once, which does not comply with the standard, can result in damage to the fuel
system.
•
Water which has collected in the fuel filter can result in engine problems.
•
Your vehicle is not adapted for use of biofuel (RME), therefore this fuel must not
be refuelled and driven. Using this fuel (RME) can lead to damage to the engine or
the fuel system.
s29g.4.book Page 181 Wednesday, June 17, 2009 9:54 AM
Page 184 of 263
Fuel183
Using the system
Safety
Driving Tips
General Maintenance
Breakdown assistance
Praktik
Technical Data
– Lock the fuel filler cap on the fuel filler tube by turning the vehicle key
to the right and withdraw the key.
– Press the fuel tank flap closed.The correct grades of fuel for your vehicle are stated on a sticker affixed to the inside
of the fuel filler flap. Further information on fuel ⇒page 181.
The fuel tank has a capacity of about 55 litres.
WARNING
Pay attention to any legal requirements if you do carry a spare canister in the
vehicle. We do not recommend carrying any fuel canisters in your vehicle for
safety reasons. The canister can be damaged in the event of an accident and
fuel may leak out.
Caution
•
Remove any fuel which has spilled onto the paintwork of your vehicle immedi-
ately - risk of paint damage!
•
On vehicles fitted with a catalytic converter, never let the fuel tank run
completely empty. An irregular supply of fuel to the engine can result in misfiring
and unburnt fuel may get into the exhaust system, which may result in overheating
and damage to the catalytic converter.
•
Make sure that the valve is not pressed into the filler tube when inserting the
pump nozzle into the filler tube. Otherwise you are unintentionally filling up the
volume, which in case of heat can cause an expansion of the fuel. This can lead to
an overflow of fuel or damage to parts of the fuel reservoir.
•
T h e f u e l t a n k i s f u l l j u s t a s s o o n a s t he pump nozzle switches off for the first time,
provided the nozzle has been operated properly. Do not continue refuelling -
otherwise the expansion volume is filled up.
s29g.4.book Page 183 Wednesday, June 17, 2009 9:54 AM
Page 186 of 263
Inspecting and replenishing185
Using the system
Safety
Driving Tips
General Maintenance
Breakdown assistance
Praktik
Technical Data
– Pull on the locking lever ⇒page 184, fig. 175, the bonnet is then
unlocked.
– Grip the bonnet and lift it up.
– Take the bonnet support out of its holder and set it in the opening
designed for it ⇒page 184, fig. 176.
Closing the bonnet
– Lift the bonnet slightly and unhook the bonnet support. Press the
bonnet support into the holder designed to hold it.
– Allow the bonnet to drop from a height of about 30 cm into the lock -
bonnet do not press down on it!
WARNING
•
Never open the bonnet if you see that steam or coolant is flowing out of
the engine compartment - risk of scalding! Wait long enough until the steam
or coolant has stopped escaping.
•
For safety reasons, the bonnet must always be properly closed when
driving. One should therefore check that the lock has in fact engaged prop-
erly after closing the bonnet.
•
Stop your vehicle immediately while driving if you notice that the lock is
not properly engaged and close the bonnet properly - risk of an accident!Caution
•
Before opening the bonnet, ensure that the arms of the windscreen wipers are
correctly in place against the windscreen. Otherwise, there is a risk of damage to the
paintwork.
Working in the engine compartment
Particular care is required when carrying out any work in the engine
compartment!There is a risk of injuries, scalding, accidents and fire when working in the
engine compartment, e.g. inspecting and replenishing oil and other fluids. For
this reason, it is essential to comply with the warning instructions stated
below and with the general applicable rules of safety. The engine compart-
ment of your car is a hazardous area ⇒.
WARNING
•
Never open the bonnet if you see that steam or coolant is flowing out of
the engine compartment - risk of scalding! Wait long enough until the steam
or coolant has stopped escaping.
•
Switch off the engine and pull out the ignition key.
•
Apply the handbrake firmly.
•
If your vehicle is fitted with a manual gearbox, move the gearshift lever
into Neutral, or if it is fitted with automatic gearbox, move the selector lever
into position P.
•
Allow the engine to cool down.
•
Keep children clear of the engine compartment.
•
Do not touch any hot engine parts - risk of burns!
•
Never spill oil and other fluids over the hot engine. Such fluids (e.g. the
antifreeze contained in the wash liquid) may ignite!
•
Avoid short circuits in the electrical system - particularly on the battery.
•
Never place your hand into the radiator fan as long as the engine is still
warm. The fan might suddenly start running!
•
Never open the cap of the coolant expansion bottle as long as the engine
is still warm. The cooling system is pressurized!
•
Cover over the cap of the coolant expansion reservoir with a large cloth
when opening it as protection for your face, hands and arms from hot steam
or hot coolant.
s29g.4.book Page 185 Wednesday, June 17, 2009 9:54 AM
Page 188 of 263
Inspecting and replenishing187
Using the system
Safety
Driving Tips
General Maintenance
Breakdown assistance
Praktik
Technical Data
Engine oilCheck engine oil level
The dipstick indicates the level of oil in the engine.Checking the oil level
– Ensure that the vehicle is positioned on a level surface and the engine
has reached its operating temperature.
– Switch the engine off.
– Open the bonnet ⇒ in “Working in the engine compartment” on
page 185.
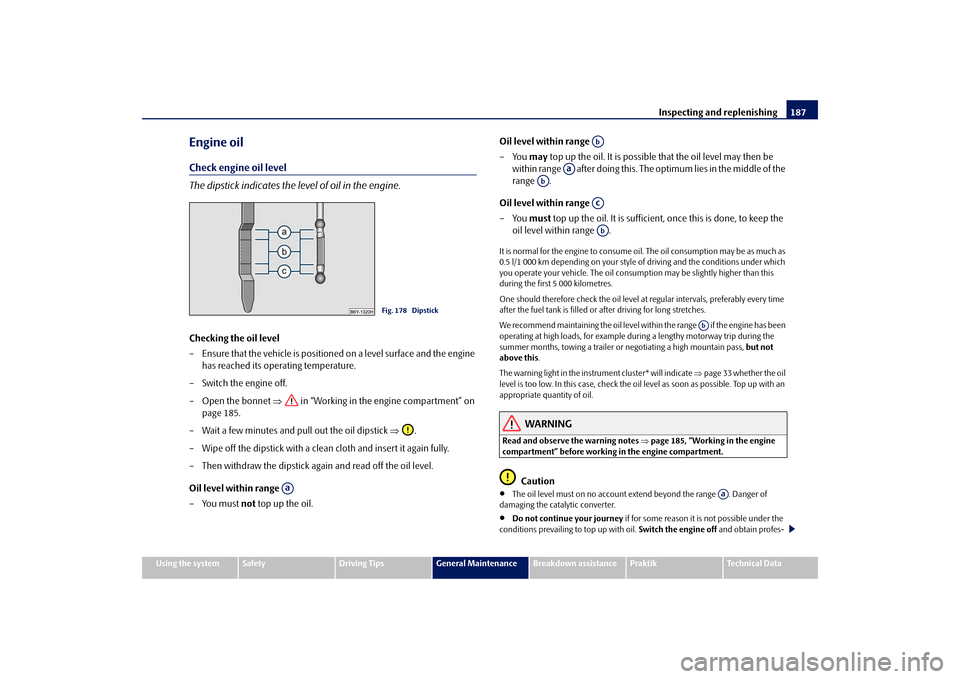
– Wait a few minutes and pull out the oil dipstick ⇒.
– Wipe off the dipstick with a clean cloth and insert it again fully.
– Then withdraw the dipstick again and read off the oil level.
Oil level within range
– You must not top up the oil.Oil level within range
–You may top up the oil. It is possible that the oil level may then be
within range after doing this. The optimum lies in the middle of the
range .
Oil level within range
–You must top up the oil. It is sufficient, once this is done, to keep the
oil level within range .
It is normal for the engine to consume oil. The oil consumption may be as much as
0.5 l/1 000 km depending on your style of driving and the conditions under which
you operate your vehicle. The oil consumption may be slightly higher than this
during the first 5 000 kilometres.
One should therefore check the oil level at regular intervals, preferably every time
after the fuel tank is filled or after driving for long stretches.
We recommend maintaining the oil level within the range if the engine has been
operating at high loads, for example during a lengthy motorway trip during the
summer months, towing a trailer or negotiating a high mountain pass, but not
above this.
The warning light in the instrument cluster* will indicate ⇒page 33 whether the oil
level is too low. In this case, check the oil level as soon as possible. Top up with an
appropriate quantity of oil.
WARNING
Read and observe the warning notes ⇒page 185, “Working in the engine
compartment” before working in the engine compartment.
Caution
•
The oil level must on no account extend beyond the range . Danger of
damaging the catalytic converter.
•
Do not continue your journey if for some reason it is not possible under the
conditions prevailing to top up with oil. Switch the engine off and obtain profes-
Fig. 178 Dipstick
Aa
Ab
Aa
Ab
AcAb
Ab
Aa
s29g.4.book Page 187 Wednesday, June 17, 2009 9:54 AM
Page 190 of 263
Inspecting and replenishing189
Using the system
Safety
Driving Tips
General Maintenance
Breakdown assistance
Praktik
Technical Data
Cooling systemCoolant
The job of the coolant is to cool the engine.The cooling system does not require any maintenance under normal operating
conditions. The coolant consists of water with a concentration of coolant additive
of 40 %. This mixture not only provides antifreeze protection down to -25°C but
also protects the cooling and heating system from corrosion. It also prevents the
formation of scale and significantly increases the boiling point of the coolant.
You must therefore not reduce the concentration of antifreeze agent in the coolant
by adding water, also not during the summer months or in countries with a warm
climate. The concentration of coolant additive in the coolant must be at least
40%.
You can increase the amount of antifreeze in the coolant if a higher concentration
of antifreeze is necessary for climatic reasons but only up to 60% (antifreeze
protection down to approx. -40°C). The antifreeze protection tails off above that
concentration.
Vehicles exported to countries with a cold climate (e.g. Sweden, Norway, Finland)
are already factory-filled with a coolant which offers antifreeze protection down to
about -35°C. In these countries the concentration of coolant additive should be at
least 50 %.
Coolant
The cooling system is factory-filled with coolant (purple in colour), which complies
with the specification TL-VW 774 G.
We recommend that you use the antifreeze agent G12 PLUS - PLUS (purple in
colour) for topping up the system.
We recommend that you contact a specialist garage if you have any questions
regarding the coolant or if you wish to fill up with a different coolant.
A specialist garage can also supply you with the correct coolant additives.
Caution
•
Other coolant additives may cause operational problems which, in partic-
ular, involves significantly reducing the anticorrosion effect.
•
Any faults or problems resulting from corrosion may cause a loss of
coolant and, as a consequence of this, result in major engine damage.
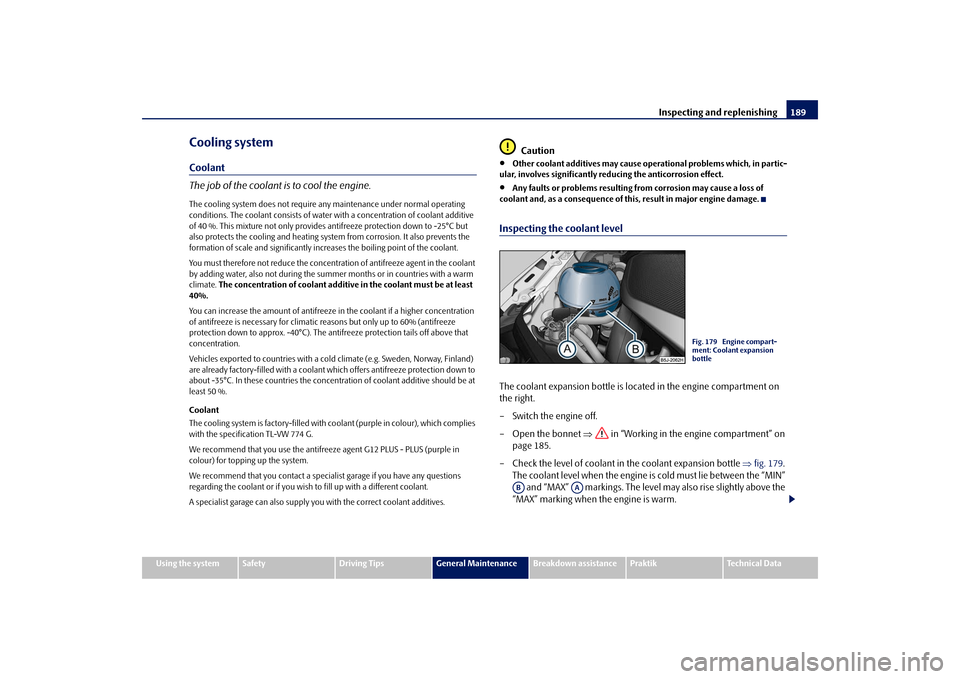
Inspecting the coolant levelThe coolant expansion bottle is located in the engine compartment on
the right.
– Switch the engine off.
– Open the bonnet ⇒ in “Working in the engine compartment” on
page 185.
– Check the level of coolant in the coolant expansion bottle ⇒fig. 179.
The coolant level when the engine is cold must lie between the “MIN”
and “MAX” markings. The level may also rise slightly above the
“MAX” marking when the engine is warm.
Fig. 179 Engine compart-
ment: Coolant expansion
bottle
AB
AA
s29g.4.book Page 189 Wednesday, June 17, 2009 9:54 AM
Page 192 of 263
Inspecting and replenishing191
Using the system
Safety
Driving Tips
General Maintenance
Breakdown assistance
Praktik
Technical Data
For the sake of the environment
Do not re-use coolant if it is necessary to drain the coolant in the system. It should
be collected and disposed of in compliance with environmental protection
regulations.Radiator fan
The radiator fan may switch on suddenly.The radiator fan is driven by an electric motor and controlled by a thermostat
according to the coolant temperature.
The radiator fan may continue running for up to 10 minutes after the engine has
been switched off - even if the ignition is also off. It may also switch on suddenly
after a certain time, if•
the coolant temperature has risen because of an accumulation of heat or
•
the warm engine compartment is heated up additionally by strong sunlight.
WARNING
You must therefore be aware when working in the engine compartment that
the fan may switch on suddenly - risk of injury!
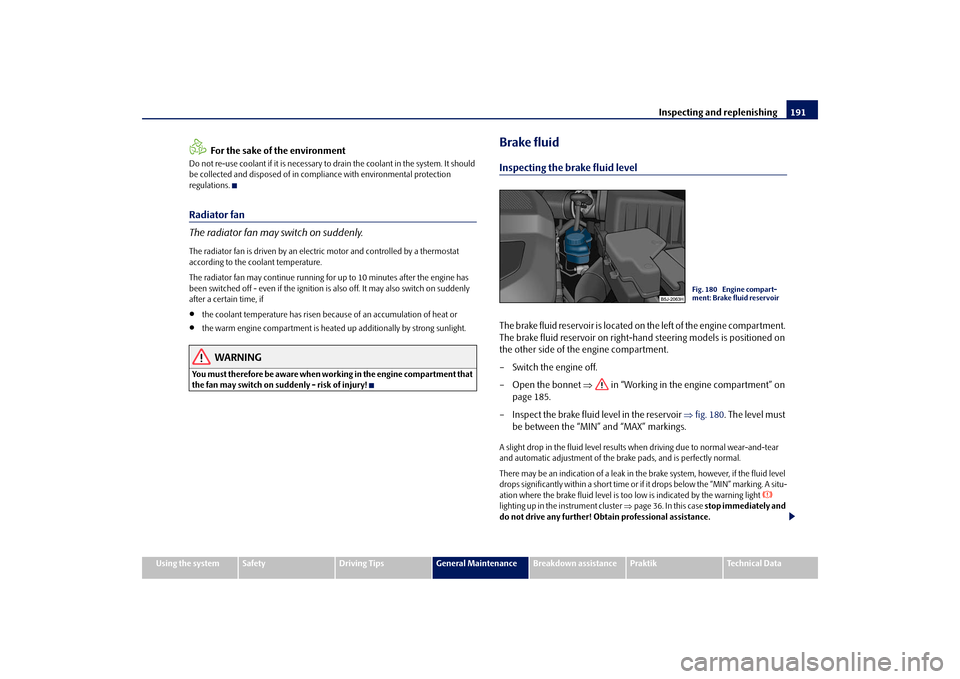
Brake fluidInspecting the brake fluid levelThe brake fluid reservoir is located on the left of the engine compartment.
The brake fluid reservoir on right-hand steering models is positioned on
the other side of the engine compartment.
– Switch the engine off.
– Open the bonnet ⇒ in “Working in the engine compartment” on
page 185.
– Inspect the brake fluid level in the reservoir ⇒fig. 180. The level must
be between the “MIN” and “MAX” markings.A slight drop in the fluid level results when driving due to normal wear-and-tear
and automatic adjustment of the brake pads, and is perfectly normal.
There may be an indication of a leak in the brake system, however, if the fluid level
drops significantly within a short time or if it drops below the “MIN” marking. A situ-
ation where the brake fluid level is too low is indicated by the warning light
lighting up in the instrument cluster ⇒page 36. In this case stop immediately and
do not drive any further! Obtain professional assistance.
Fig. 180 Engine compart-
ment: Brake fluid reservoir
s29g.4.book Page 191 Wednesday, June 17, 2009 9:54 AM
Page 194 of 263
Inspecting and replenishing193
Using the system
Safety
Driving Tips
General Maintenance
Breakdown assistance
Praktik
Technical Data
– Unlock the interlock on the positive terminal side of the battery
⇒page 192, fig. 181.
– Pull up the cover in direction of arrow ⇒page 192, fig. 181 (automatic
gearbox) or ⇒page 192, fig. 182 (manual gearbox).
– The installation of the battery cover on the positive terminal side takes
place in the reverse order.Removal and installation of the battery is not recommended since it can, under
certain circumstances, lead to major damage to the battery and fuse boxes. Contact
a specialist garage.
There is a risk of injuries, scalding, accidents and burns when carrying out any work
on the battery and on the electrical system. For this reason, it is essential to comply
with the warning instructions ⇒ stated below and with the general applicable
rules of safety.
WARNING
•
The battery acid is strongly corrosive and must, therefore, be handled
with the greatest of care. Always wear protective gloves, eye and skin
protection when handling batteries. Corrosive fumes in the air irritate the
air passages and lead to conjunctivitis and inflammation of the air passages
in the lungs. Battery acid corrodes dental enamel and creates deep wounds
after contact with the skin which take a long time to heal. Repeated contact
with diluted acids causes skin diseases (inflammations, ulcers, slin cracks).
Acids coming into contact with water are diluted accompanied by significant
development of heat.
•
Do not tilt the battery otherwise battery electrolyte may flow out of the
battery vent openings. Protect the eyes with safety glasses or a shield! There
is the danger of suffering blindness! If any battery electrolyte gets into your
eye, rinse out your eye immediately with clear water for several minutes.
Contact a doctor without delay.
•
Splashes of acid on your skin or clothes should be neutralised as soon as
possible using soap suds and then rinsed with plenty of water. Contact a
doctor immediately if you swallow battery electrolyte.
•
Keep batteries out of the reach of children.
•
Hydrogen is released when you charge a battery and a highly explosive
gas mixture is produced. An explosion can be caused through sparkling over
during unclamping or loosening of the cable plug while the ignition is on.
•
Bridging of the poles will create a short circuit (e.g. through metal
objects, cables). Possible consequences of a short circuit: Melting of lead
struts, explosion and burning of the battery, jets of acid spurting out.
•
It is prohibited to work with a naked flame and light, to smoke or to carry
out any activities which produce sparks. Avoid creating sparks when
working with cables and electrical devices. Strong sparking represents a risk
of injury.
•
Before carrying out any work on the electrical system, switch off the
engine, the ignition as well as all electrical components and disconnect the
negative cable (-) on the battery. If you wish to replace a bulb it is sufficient
to switch off the appropriate light.
•
Never charge a frozen or thawed battery - risk of explosion and caustic
burns! Replace a frozen battery.
•
Never use a battery which is damaged - risk of explosion! Immediately
replace a damaged battery.Caution
•
You must only disconnect the battery if the ignition is switched off, otherwise
the electrical system (electronic components) of the vehicle may be damaged.
When disconnecting the battery from the electrical system of the vehicle, first
disconnect the negative terminal (-) of the battery. Then disconnect the positive
terminal (+).
•
When reconnecting the battery, first connect the positive terminal (+) and only
then the negative terminal (-) of the battery. You must on no account connect the
cables wrongly - risk of a cable fire.
•
Ensure that battery acid does not come into contact with the vehicle body
otherwise damage could occur to the paintwork.WARNING (continued)
s29g.4.book Page 193 Wednesday, June 17, 2009 9:54 AM
Page 196 of 263
Inspecting and replenishing195
Using the system
Safety
Driving Tips
General Maintenance
Breakdown assistance
Praktik
Technical Data
Caution
If the vehicle has not been driven for more than 3 to 4 weeks, the battery will
discharge because certain electrical components consume electricity (e.g. control
units) also in idle state. You can prevent the discharging of the battery by discon-
necting the negative terminal or charging the battery constantly with a very low
charging current. Please also refer to the notes when working on the battery ⇒
in “Working on the battery” on page 192.
Note
•
Batteries with three-tone indicator, which are mounted as of factory, are
marked with a code which always begins with 1J0, 7N0 or 3B0. The exact marking
can be e.g. 1J0 915 105 AC.
•
Replacement batteries with three-tone indicator, which were obtained from
Škoda original accessories, are marked with the code 000 915 105 Ax, whereby
“x” stands for a variable. The exact marking can be e.g. 000 915 105 AB.
Inspecting the electrolyte levelThe battery is practically maintenance-free under normal operating conditions.
We do, however, recommend that you have the electrolyte level inspected from
time to time by a specialist garage when outside temperatures are high or when
driving on long trips. You should also have the electrolyte level ⇒page 195
checked each time the battery is charged.
The electrolyte level of the battery will also be checked as part of the Inspection
Service.Operation in winterThe battery has to provide greater amounts of electricity during the winter. It also
has only part of the initial power output at low temperatures that it has at normal
temperatures.
A discharged battery may already freeze at temperatures just below 0°C.We therefore recommend that you have the battery checked by a specialist garage
before the start of the winter, and recharged if necessary.
Charging the battery
A properly charged battery is essential for reliably starting the
engine.– Read the warning notes ⇒ in “Working on the battery” on
page 192 and ⇒.
– Switch the ignition and all electrical components off.
– Only for “quick-charging”: Disconnect both battery cables (first of all
“negative”, then “positive”).
– Carefully attach the terminal clamps of the charger to the battery
terminals (red = “positive”, black = “negative”).
– You can now plug the mains cable of the charger into the power socket
and switch on the charger.
– When charging is completed: switch the charger off and unplug the
mains cable from the power socket.
– Only then should you disconnect the terminal clamps of the charger.
– Reconnect the cables to the battery (first of all “positive”, then “nega-
tive”).It is not normally necessary to disconnect the cables of the battery if you recharge
the battery using low amperages (as for example from a mini-charger). Please also
refer to the instructions from the charger manufacturer.
A charging current of 0.1 of the total battery capacity (or lower) is that which should
be used until full charging is achieved.
It is, however, necessary to disconnect both cables before charging the battery with
high amperages, so-called “quick-charging”.
s29g.4.book Page 195 Wednesday, June 17, 2009 9:54 AM