air conditioning SKODA ROOMSTER 2009 1.G User Guide
[x] Cancel search | Manufacturer: SKODA, Model Year: 2009, Model line: ROOMSTER, Model: SKODA ROOMSTER 2009 1.GPages: 263, PDF Size: 32.25 MB
Page 97 of 263
Heating and air conditioning system 96After switching on the cooling Condensation from the evaporator of the air condi-
tioning may drip down and form a puddle below the vehicle. This is quite normal
and not an indication of a leak!
Recommended setting for all periods of the year:•
Set the temperature to 22 °C.
•
Press the button ⇒fig. 117.
•
Move the air outlet vents 3 and 4, so that the air flow is directed slightly upwards
⇒page 89, fig. 114.
Switching over between degrees Celsius and degrees Fahrenheit
Press and hold the buttons and ⇒fig. 117. The information in the
desired temperature measuring unit appears in the display.
WARNING
•
For your own safety and that of other road users, ensure that all the
windows are free of ice, snow and misting. Please familiarize yourself about
how to correctly operate the heating and ventilation systems, how to demist
and defrost the windows, as well as with the cooling mode.
•
You should not leave recirculated air mode on over a longer period of
time, as “stale” air may result in fatigue in the driver and occupants, divert
your attention and also cause the windows to mist up. The risk of having an
accident increases. Switch recirculated air mode off as soon as the windows
begin misting up.Note
•
If the cooling system has not been switched on for a lengthy period, odours may
be produced at the evaporator because of deposits. Switch the cooling system on
at least once a month for approximately 5 minutes at the highest blower stage - also
during the cold season of the year - in order to remove such odours. Also open a
window for a short time.
•
We recommend that you do not smoke in the vehicle when the recirculating air
mode is operating since the smoke which is drawn at the evaporator from the inte-
rior of the vehicle forms deposits in the evaporator of the air conditioning system. This produces a permanent odour when the air conditioning system is operating
which can only be eliminated through considerable effort and expense (replace-
ment of compressor).
•
The used air streams out through the air removal openings in the luggage
compartment.
•
Using the cooling economically ⇒page 95.
•
Operational problems ⇒page 95.
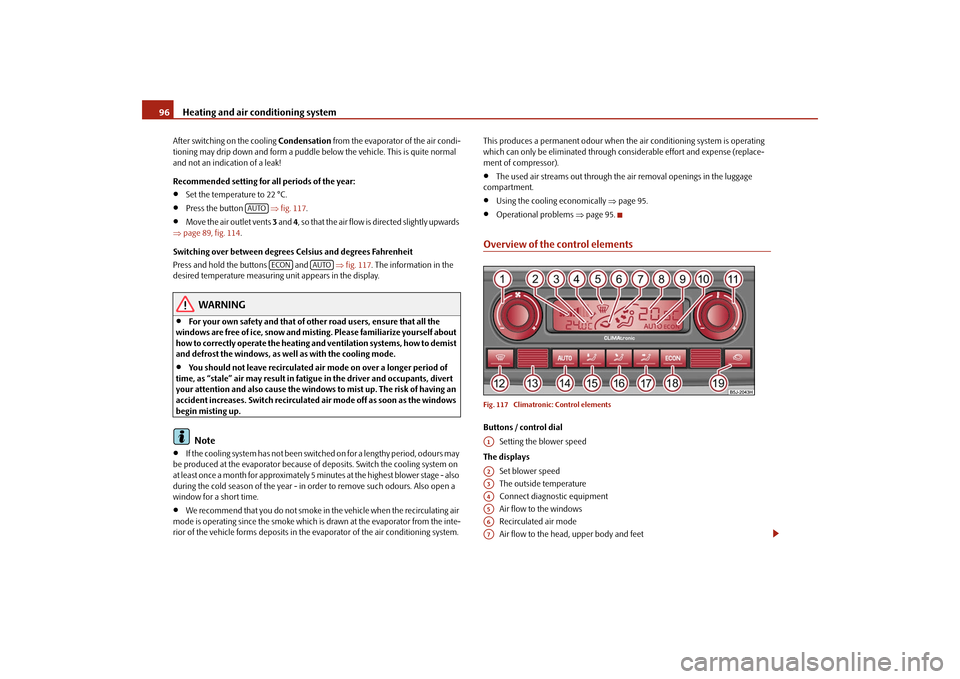
Overview of the control elementsFig. 117 Climatronic: Control elementsButtons / control dial
Setting the blower speed
The displays
Set blower speed
The outside temperature
Connect diagnostic equipment
Air flow to the windows
Recirculated air mode
Air flow to the head, upper body and feet
AUTO
ECON
AUTO
A1A2A3A4A5A6A7
s29g.4.book Page 96 Wednesday, June 17, 2009 9:54 AM
Page 98 of 263
Heating and air conditioning system97
Using the system
Safety
Driving Tips
General Maintenance
Breakdown assistance
Praktik
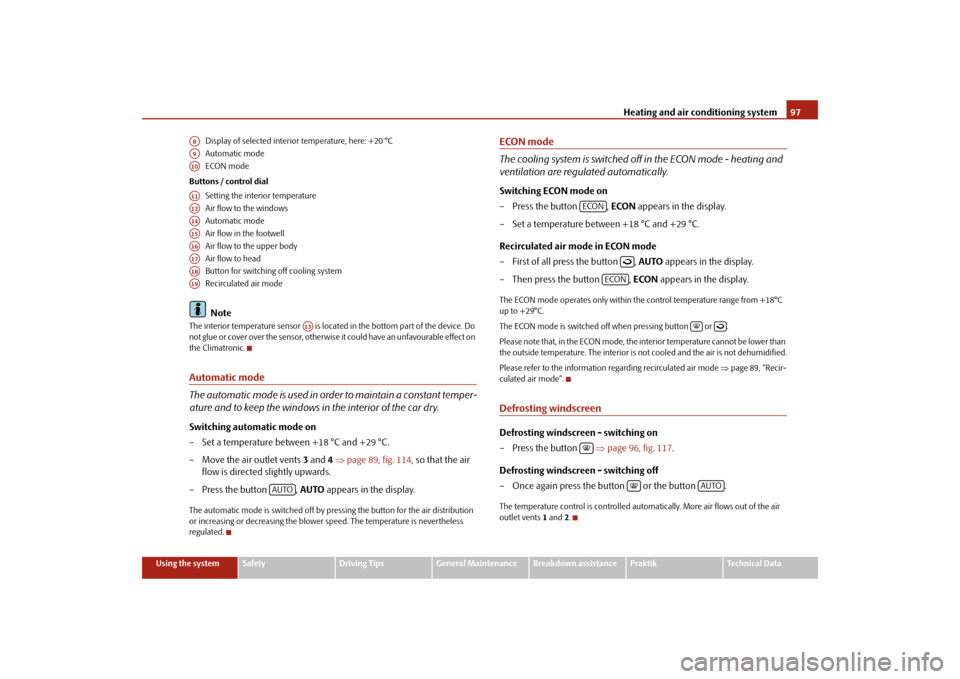
Technical Data Display of selected interior temperature, here: +20 °C
Automatic mode
ECON mode
Buttons / control dial
Setting the interior temperature
Air flow to the windows
Automatic mode
Air flow in the footwell
Air flow to the upper body
Air flow to head
Button for switching off cooling system
Recirculated air mode
Note
The interior temperature sensor is located in the bottom part of the device. Do
not glue or cover over the sensor, otherwise it could have an unfavourable effect on
the Climatronic.Automatic mode
The automatic mode is used in order to maintain a constant temper-
ature and to keep the windows in the interior of the car dry.Switching automatic mode on
– Set a temperature between +18 °C and +29 °C.
– Move the air outlet vents 3 and 4 ⇒page 89, fig. 114, so that the air
flow is directed slightly upwards.
– Press the button , AUTO appears in the display.The automatic mode is switched off by pressing the button for the air distribution
or increasing or decreasing the blower speed. The temperature is nevertheless
regulated.
ECON mode
The cooling system is switched off in the ECON mode - heating and
ventilation are regulated automatically.Switching ECON mode on
–Press the button , ECON appears in the display.
– Set a temperature between +18 °C and +29 °C.
Recirculated air mode in ECON mode
– First of all press the button , AUTO appears in the display.
– Then press the button , ECON appears in the display.The ECON mode operates only within the control temperature range from +18°C
up to +29°C.
The ECON mode is switched off when pressing button or .
Please note that, in the ECON mode, the interior temperature cannot be lower than
the outside temperature. The interior is not cooled and the air is not dehumidified.
Please refer to the information regarding recirculated air mode ⇒page 89, “Recir-
culated air mode”.Defrosting windscreenDefrosting windscreen - switching on
–Press the button ⇒page 96, fig. 117.
Defrosting windscreen - switching off
– Once again press the button or the button .The temperature control is controlled automatically. More air flows out of the air
outlet vents 1 and2.
A8A9A10A11A12A14A15A16A17A18A19
A13
AUTO
ECON
ECON
AUTO
s29g.4.book Page 97 Wednesday, June 17, 2009 9:54 AM
Page 99 of 263
Heating and air conditioning system 98Setting temperature– You can set the desired interior temperature after switching on the
ignition with the control dial .You can set the interior temperature between +18°C and +29 °C. The interior
temperature is regulated automatically within this range. If you select a tempera-
ture of less than +18 °C, “LO” is shown on the display. If you select a temperature
above +29 °C, “HI” is shown on the display. In both limit positions the Climatronic
operates at maximum cooling or heating capacity, respectively. The temperature is
not controlled in this case.
Lengthy and uneven distribution of the air flow out of the vents (in particular at the
leg area) and large differences in temperature, for example when getting out of the
vehicle, can result in chills in sensitive persons.Controlling blower
There are a total of seven blower stages available.The Climatronic system controls the blower stages automatically in line
with the interior temperature. You can also, however, adapt the blower
stages manually to suit your particular needs.
– Turn the control dial ⇒page 96, fig. 117 to the left (reduce blower
speed) or right (increase blower speed).If you switch off the blowers, the Climatronic is switched off and OFF is shown in
the display.
The set blower speed is displayed next to the control dial when the respective
number of warning lights come on.
WARNING
•
“Stale air” may result in fatigue in the driver and occupants, reduce
attention levels and also cause the windows to mist up. The risk of having an
accident increases.
•
Do not switch the Climatronic system off for longer than necessary.
•
Switch the Climatronic system on as soon as the windows mist up.
A11
A1
A1
WARNING (continued)
s29g.4.book Page 98 Wednesday, June 17, 2009 9:54 AM
Page 169 of 263
Driving and the Environment 168Design measures•
Joints designed to be easily detached
•
Simplified disassembly due to the modular structure system
•
Improved purity of different classes of materials
•
Identification of all plastic parts in accordance with VDA Recommendation 260
•
Reduced fuel consumption and exhaust emission CO
2
•
Minimum fuel leakage during accidents
•
Reduced noise
Choice of materials
•
Extensive use of recyclable material
•
Air conditioning filled with CFC-free refrigerant
•
No cadmium
•
No asbestos
•
Reduction in the “vaporisation” of plastics
Manufacture
•
Solvent-free cavity protection
•
Solvent-free protection of the vehicle for transportation from the production
plant to the customer
•
The use of solvent-free adhesives
•
No CFCs used in the production process
•
Without use of mercury
•
Use of water-soluble paints
•
No use of hexavalent chromium
Trade-in and recycling of old cars
Škoda Auto meets the requirements of the brand and its products regarding envi-
ronment and ressource protection. All new Škoda vehicles can be utilized up to
95 % and always
7) be returned. In a lot of countries sufficient trade-in networks
have been created, where you can trade-in your vehicle. After you trade-in your vehicle, you will receive a confirmation stating the recycling in accordance with
environmental regulations.
Vehicles with special built-on types
Technical documents regarding changes carried out on the vehicle must be kept by
the vehicle user, in order to hand over later to the old car user. This ensures the
recycling in accordance with environmental regulations.
Note
Detailed information about the trade-in and recycling of old cars is available from
your Škoda Service Partner.Motoring abroadGeneral
Other circumstances may exist abroad.It is also possible, in certain countries, that the Škoda Service Partner network is
limited or has not been established yet. This is the reason why obtaining certain
spare parts may be somewhat complicated and specialist garage personnel may
o n l y b e a b l e t o m a ke l i m i te d re p a i rs . Š ko d a A u to i n t h e C z e c h R e pu b l i c a n d re l e v a n t
importers are happy to provide information about technical aspects of the vehicle,
required maintenance work and possibilities for getting repairs done.Unleaded petrolA vehicle fitted with a petrol engine must always be refuelled with unleaded petrol
⇒page 164. The automobile associations can provide you with information
regarding the locations of filling stations which offer unleaded petrol.
7)Subject to fulfilment of the national legal regulations.
s29g.4.book Page 168 Wednesday, June 17, 2009 9:54 AM
Page 224 of 263
Fuses and light bulbs223
Using the system
Safety
Driving Tips
General Maintenance
Breakdown assistance
Praktik
Technical Data
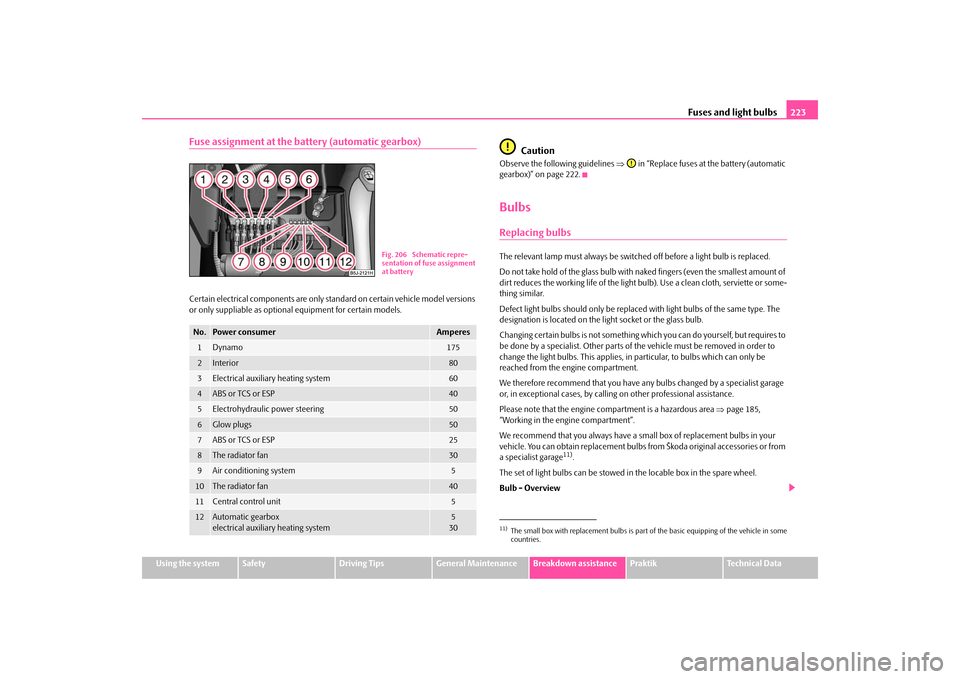
Fuse assignment at the battery (automatic gearbox)Certain electrical components are only standard on certain vehicle model versions
or only suppliable as optional equipment for certain models.
Caution
Observe the following guidelines ⇒ in “Replace fuses at the battery (automatic
gearbox)” on page 222.BulbsReplacing bulbsThe relevant lamp must always be switched off before a light bulb is replaced.
Do not take hold of the glass bulb with naked fingers (even the smallest amount of
dirt reduces the working life of the light bulb). Use a clean cloth, serviette or some-
thing similar.
Defect light bulbs should only be replaced with light bulbs of the same type. The
designation is located on the light socket or the glass bulb.
Changing certain bulbs is not something which you can do yourself, but requires to
be done by a specialist. Other parts of the vehicle must be removed in order to
change the light bulbs. This applies, in particular, to bulbs which can only be
reached from the engine compartment.
We therefore recommend that you have any bulbs changed by a specialist garage
or, in exceptional cases, by calling on other professional assistance.
Please note that the engine compartment is a hazardous area ⇒page 185,
“Working in the engine compartment”.
We recommend that you always have a small box of replacement bulbs in your
vehicle. You can obtain replacement bulbs from Škoda original accessories or from
a specialist garage
11).
The set of light bulbs can be stowed in the locable box in the spare wheel.
Bulb - Overview
No.
Power consumer
Amperes
1
Dynamo
175
2
Interior
80
3
Electrical auxiliary heating system
60
4
ABS or TCS or ESP
40
5
Electrohydraulic power steering
50
6
Glow plugs
50
7
ABS or TCS or ESP
25
8
The radiator fan
30
9
Air conditioning system
5
10
The radiator fan
40
11
Central control unit
5
12
Automatic gearbox
electrical auxiliary heating system
5
30
Fig. 206 Schematic repre-
sentation of fuse assignment
at battery
11)The small box with replacement bulbs is part of the basic equipping of the vehicle in some
countries.
s29g.4.book Page 223 Wednesday, June 17, 2009 9:54 AM
Page 234 of 263
Technical Data233
Using the system
Safety
Driving Tips
General Maintenance
Breakdown assistance
Praktik
Technical Data
Technical DataTechnical DataGeneral informationThe details given in the official vehicle registration documents always take prece-
dence over the details in the Owner's Manual. Please refer to the official vehicle
registration documents or consult a specialist garage concerning the engine with
which your vehicle is equipped.Used abbreviationsPerformancesThe listed performance values were determined without performance-reducing
equipment, e.g. air conditioning system.
WeightThe loading capacity is reduced in line with the range of the special equipment. The
unloaden weight contains a fuel tank topped up to 90%. A driver with a weight of
75 kg is also included in the value.Identification detailsVehicle data sticker
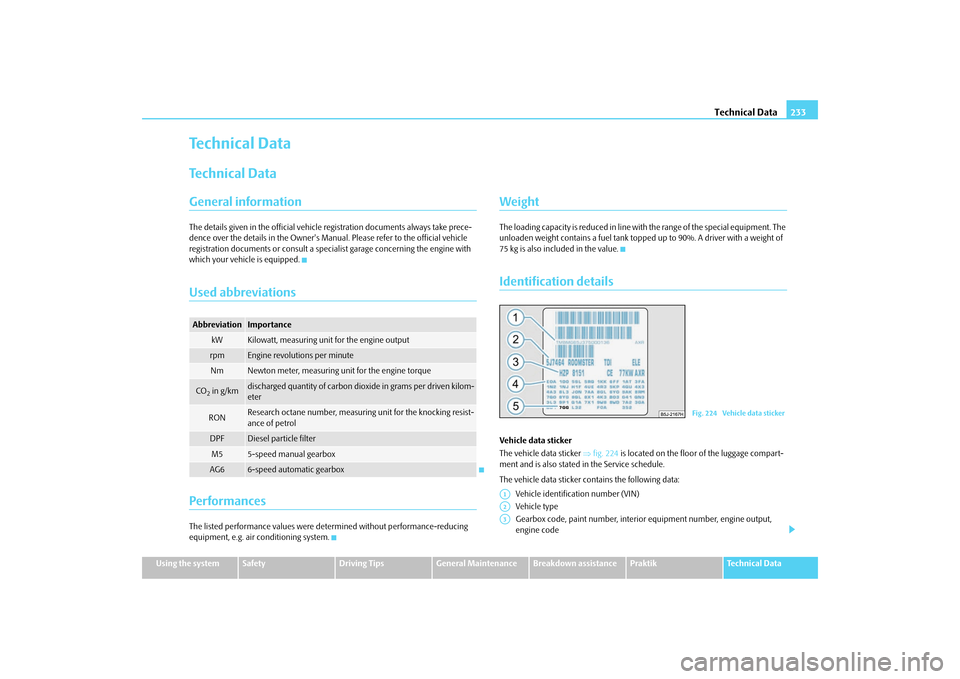
The vehicle data sticker ⇒fig. 224 is located on the floor of the luggage compart-
ment and is also stated in the Service schedule.
The vehicle data sticker contains the following data:
Vehicle identification number (VIN)
Vehicle type
Gearbox code, paint number, interior equipment number, engine output,
engine code
Abbreviation
Importance
kW
Kilowatt, measuring unit for the engine output
rpm
Engine revolutions per minute
Nm
Newton meter, measuring unit for the engine torque
CO2 in g/km
discharged quantity of carbon dioxide in grams per driven kilom-
eter
RON
Research octane number, measuring unit for the knocking resist-
ance of petrol
DPF
Diesel particle filter
M5
5-speed manual gearbox
AG6
6-speed automatic gearbox
Fig. 224 Vehicle data sticker
A1A2A3
s29g.4.book Page 233 Wednesday, June 17, 2009 9:54 AM
Page 252 of 263
Index251
Using the system
Safety
Driving Tips
General Maintenance
Breakdown assistance
Praktik
Technical Data
Index
AAbroad . . . . . . . . . . . . . . . . . . . . . . . . . . . . . . . . . . . . . 168
ABS . . . . . . . . . . . . . . . . . . . . . . . . . . . . . . . . . . . . . . . . . 159
Warning light . . . . . . . . . . . . . . . . . . . . . . . . . . . . . 35
Accessories . . . . . . . . . . . . . . . . . . . . . . . . . . . . . . . . . 204
Adjusting seats . . . . . . . . . . . . . . . . . . . . . . . 63, 68, 128
Adjusting the seat backrest . . . . . . . . . . . . . . . . . . . . 67
Adjusting the steering wheel . . . . . . . . . . . . . . . . . . . 99
Air conditioning system . . . . . . . . . . . . . . . . . . . . . . . 92
Airbag . . . . . . . . . . . . . . . . . . . . . . . . . . . . . . . . . . . . . . 138
Deployment . . . . . . . . . . . . . . . . . . . . . . . . . . . . . 139
Front airbag . . . . . . . . . . . . . . . . . . . . . . . . . . . . . 139
Head airbag . . . . . . . . . . . . . . . . . . . . . . . . . . . . . 143
Side airbag . . . . . . . . . . . . . . . . . . . . . . . . . . . . . . 142
Warning light . . . . . . . . . . . . . . . . . . . . . . . . . . . . . 36
Airbag system . . . . . . . . . . . . . . . . . . . . . . . . . . . . . . . 138
Warning light . . . . . . . . . . . . . . . . . . . . . . . . . . . . . 36
Alarm . . . . . . . . . . . . . . . . . . . . . . . . . . . . . . . . . . . . . . . . 48
Alternator
Warning light . . . . . . . . . . . . . . . . . . . . . . . . . . . . . 31
Antilock brake system . . . . . . . . . . . . . . . . . . . . . . . . 159
Antilock brake system - ABS
Warning light . . . . . . . . . . . . . . . . . . . . . . . . . . . . . 35
Anti-theft alarm system . . . . . . . . . . . . . . . . . . . . . . . 48
Ashtray . . . . . . . . . . . . . . . . . . . . . . . . . . . . . . . . . . . . . . 81
Auto Check Control . . . . . . . . . . . . . . . . . . . . . . . . . . . 27
Auto Computer . . . . . . . . . . . . . . . . . . . . . . . . . . . . . . . 22Automatic gearbox . . . . . . . . . . . . . . . . . . . . . . . . . . 107
Emergency programme . . . . . . . . . . . . . . . . . . 111
Kickdown . . . . . . . . . . . . . . . . . . . . . . . . . . . . . . . 110
Tiptronic . . . . . . . . . . . . . . . . . . . . . . . . . . . . . . . . 110
Automatic vehicle wash systems . . . . . . . . . . . . . . 174
Automatic wiper/washer system . . . . . . . . . . . . . . . 59
Avoiding damage to your vehicle . . . . . . . . . . . . . 169
BBattery . . . . . . . . . . . . . . . . . . . . . . . . . . . . . . . . . . 31, 192
change . . . . . . . . . . . . . . . . . . . . . . . . . . . . . . . . . . 196
Charge . . . . . . . . . . . . . . . . . . . . . . . . . . . . . . . . . . 195
Inspecting the electrolyte level . . . . . . . . . . . . 195
Operation in winter . . . . . . . . . . . . . . . . . . . . . . 195
Before setting off . . . . . . . . . . . . . . . . . . . . . . . . . . . . 128
Belt tensioner . . . . . . . . . . . . . . . . . . . . . . . . . . . . . . . 136
Belt tensioners . . . . . . . . . . . . . . . . . . . . . . . . . . . . . . 136
Belts . . . . . . . . . . . . . . . . . . . . . . . . . . . . . . . . . . . . . . . . 132
Bicycle carrier . . . . . . . . . . . . . . . . . . . . . . . . . . . . . . . . 77
Bluetooth . . . . . . . . . . . . . . . . . . . . . . . . . . . . . . . . . . . 121
Bonnet . . . . . . . . . . . . . . . . . . . . . . . . . . . . . . . . . . 16, 184
Boot lid
Warning light . . . . . . . . . . . . . . . . . . . . . . . . . . . . . 34
Brake
Handbrake . . . . . . . . . . . . . . . . . . . . . . . . . . . . . . 103
Brake booster . . . . . . . . . . . . . . . . . . . . . . . . . . . . . . . 158
Brake fluid . . . . . . . . . . . . . . . . . . . . . . . . . . . . . . . . . . 191Brake system
Warning light . . . . . . . . . . . . . . . . . . . . . . . . . . . . . 36
Brakes . . . . . . . . . . . . . . . . . . . . . . . . . . . . . . . . . . . . . . 158
Bulbs . . . . . . . . . . . . . . . . . . . . . . . . . . . . . . . . . . . . . . . 223
Button on the driver's door
Central locking system . . . . . . . . . . . . . . . . . . . . 44
Electrical power windows . . . . . . . . . . . . . . . . . . 49
CCar state . . . . . . . . . . . . . . . . . . . . . . . . . . . . . . . . . . . . . 27
Catalytic converter . . . . . . . . . . . . . . . . . . . . . . . . . . 164
CD changer . . . . . . . . . . . . . . . . . . . . . . . . . . . . . . . . . 123
Central locking system . . . . . . . . . . . . . . . . . . . . . . . . 42
lock . . . . . . . . . . . . . . . . . . . . . . . . . . . . . . . . . . . . . . 44
unlock . . . . . . . . . . . . . . . . . . . . . . . . . . . . . . . . . . . 43
Changing a wheel . . . . . . . . . . . . . . . . . . . . . . . . . . . 209
Changing wheels around . . . . . . . . . . . . . . . . . . . . . 200
Charging the battery . . . . . . . . . . . . . . . . . . . . . . . . . 195
Warning light . . . . . . . . . . . . . . . . . . . . . . . . . . . . . 31
Check engine oil level . . . . . . . . . . . . . . . . . . . . . . . . 187
Child safety . . . . . . . . . . . . . . . . . . . . . . . . . . . . . . . . . 147
Side airbag . . . . . . . . . . . . . . . . . . . . . . . . . . . . . . 149
Child safety lock . . . . . . . . . . . . . . . . . . . . . . . . . . . . . . 41
Child safety seat
on the front passenger seat . . . . . . . . . . . . . . . 148
Safety information . . . . . . . . . . . . . . . . . . . . . . . 147
s29g.4.book Page 251 Wednesday, June 17, 2009 9:54 AM
Page 256 of 263
Index255
Using the system
Safety
Driving Tips
General Maintenance
Breakdown assistance
Praktik
Technical Data Replacing bulbs . . . . . . . . . . . . . . . . . . . . . . . . . . . . . 223
Replacing fuses . . . . . . . . . . . . . . . . . . . . . . . . . . . . . 218
Replacing the wiper blades . . . . . . . . . . . . . . . . . . . . . 61
Roof aerial . . . . . . . . . . . . . . . . . . . . . . . . . . . . . . . . . . 174
Running in the car . . . . . . . . . . . . . . . . . . . . . . . . . . . 163
SSafe securing . . . . . . . . . . . . . . . . . . . . . . . . . . . . . . . . . 43
Safety . . . . . . . . . . . . . . . . . . . . . . . . . . . . . . . . . . . . . . 127
Safety information
Engine compartment . . . . . . . . . . . . . . . . . . . . . 185
Saving electrical energy . . . . . . . . . . . . . . . . . . . . . . 164
Seat belt height adjuster . . . . . . . . . . . . . . . . . . . . . 135
Seat belt warning light . . . . . . . . . . . . . . . . . . . . . . . 134
Seat belts . . . . . . . . . . . . . . . . . . . . . . . . . . . . . . . . . . . 132
Cleaning . . . . . . . . . . . . . . . . . . . . . . . . . . . . . . . . 179
fastening . . . . . . . . . . . . . . . . . . . . . . . . . . . . . . . . 134
Height adjustment . . . . . . . . . . . . . . . . . . . . . . . 135
Safety information . . . . . . . . . . . . . . . . . . . . . . . 133
taking off . . . . . . . . . . . . . . . . . . . . . . . . . . . . . . . . 136
Warning light . . . . . . . . . . . . . . . . . . . . . . . . . . . . . . 38
Seats . . . . . . . . . . . . . . . . . . . . . . . . . . . . . . . . . . . . . . . . . 63
Heating . . . . . . . . . . . . . . . . . . . . . . . . . . . . . . . . . . . 65
Selector lever . . . . . . . . . . . . . . . . . . . . . . . . . . . . . . . 108
Selector lever positions . . . . . . . . . . . . . . . . . . . . . . 108
Service Display . . . . . . . . . . . . . . . . . . . . . . . . . . . . . . . . 20
Service Interval Display . . . . . . . . . . . . . . . . . . . . . . . . 20
Setting temperature
Air conditioning system . . . . . . . . . . . . . . . . . . . . 93
Heating . . . . . . . . . . . . . . . . . . . . . . . . . . . . . . . . . . . 90
Setting the clock . . . . . . . . . . . . . . . . . . . . . . . . . . . . . . . 22Shifting . . . . . . . . . . . . . . . . . . . . . . . . . . . . . . . . . . . . . . 102
Side airbag . . . . . . . . . . . . . . . . . . . . . . . . . . . . . . . . . . 142
Side lights . . . . . . . . . . . . . . . . . . . . . . . . . . . . . . . . . . . . 53
Snow chains . . . . . . . . . . . . . . . . . . . . . . . . . . . . . . . . . 202
Spare wheel . . . . . . . . . . . . . . . . . . . . . . . . . . . . . . . . . 208
Stability programme (ESP) . . . . . . . . . . . . . . . . . . . . 155
Starting the engine . . . . . . . . . . . . . . . . . . . . . . . . . . . 100
Diesel engines . . . . . . . . . . . . . . . . . . . . . . . . . . . 101
Petrol engines . . . . . . . . . . . . . . . . . . . . . . . . . . . . 101
Static separation net . . . . . . . . . . . . . . . . . . . . . . . . . . 73
Steering force assistance . . . . . . . . . . . . . . . . . . . . . 160
Storage compartment
Lighting . . . . . . . . . . . . . . . . . . . . . . . . . . . . . . . . . . . 57
Storage compartments . . . . . . . . . . . . . . . . . . . . . . . . 83
Storage facilities . . . . . . . . . . . . . . . . . . . . . . . . . . . . . . 83
Sun visors . . . . . . . . . . . . . . . . . . . . . . . . . . . . . . . . . . . . 59
Switching lights on and off . . . . . . . . . . . . . . . . . . . . . 53
Switching off the engine . . . . . . . . . . . . . . . . . . . . . . 102
TTailgate
Lighting . . . . . . . . . . . . . . . . . . . . . . . . . . . . . . . . . . . 58
Taking care of your vehicle . . . . . . . . . . . . . . . . . . . 173
TCS . . . . . . . . . . . . . . . . . . . . . . . . . . . . . . . . . . . . . . . . . 156
Warning light . . . . . . . . . . . . . . . . . . . . . . . . . . . . . . 34
Telephone . . . . . . . . . . . . . . . . . . . . . . . . . . . . . . . . . . 114
Temperature
outside . . . . . . . . . . . . . . . . . . . . . . . . . . . . . . . . . . . 24
the first 1 500 kilometres . . . . . . . . . . . . . . . . . . . . . 163
The roof luggage rack system . . . . . . . . . . . . . . . . . . 79
Tiptronic . . . . . . . . . . . . . . . . . . . . . . . . . . . . . . . . . . . . 107Tool . . . . . . . . . . . . . . . . . . . . . . . . . . . . . . . . . . . . . . . . 208
Towing a trailer . . . . . . . . . . . . . . . . . . . . . . . . . . . . . . 170
Towing eye
front . . . . . . . . . . . . . . . . . . . . . . . . . . . . . . . . . . . . 215
rear . . . . . . . . . . . . . . . . . . . . . . . . . . . . . . . . . . . . . 216
Towing protection monitoring . . . . . . . . . . . . . . . . . 49
towing vehicle . . . . . . . . . . . . . . . . . . . . . . . . . . . . . . . 215
Tow-starting . . . . . . . . . . . . . . . . . . . . . . . . . . . . . . . . 215
Tow-starting and towing vehicle
Automatic gearbox . . . . . . . . . . . . . . . . . . . . . . . 111
Traction control system (TCS) . . . . . . . . . . . . . . . . . 156
Warning light . . . . . . . . . . . . . . . . . . . . . . . . . . . . . 34
Trailer . . . . . . . . . . . . . . . . . . . . . . . . . . . . . . . . . . . . . . 170
General Maintenance . . . . . . . . . . . . . . . . . . . . 170
Transporting children . . . . . . . . . . . . . . . . . . . . . . . . 147
Tread depth . . . . . . . . . . . . . . . . . . . . . . . . . . . . . . . . . 199
Turn signal light . . . . . . . . . . . . . . . . . . . . . . . . . . . . . 226
Turn signal lights . . . . . . . . . . . . . . . . . . . . . . . . . . . . . 56
Warning light . . . . . . . . . . . . . . . . . . . . . . . . . . . . . 30
Turn signal system for vehicles towing a trailer
Warning light . . . . . . . . . . . . . . . . . . . . . . . . . . . . . 32
Two-way radio system . . . . . . . . . . . . . . . . . . . . . . . 122
Tyre . . . . . . . . . . . . . . . . . . . . . . . . . . . . . . . . . . . . . . . . 198
Tyre inflation pressure
Warning light . . . . . . . . . . . . . . . . . . . . . . . . . . . . . 35
Tyre repair kit . . . . . . . . . . . . . . . . . . . . . . . . . . . . . . . 208
Tyres
Winter tyres . . . . . . . . . . . . . . . . . . . . . . . . . . . . . 202
UUnderbody protection . . . . . . . . . . . . . . . . . . . . . . . 177
s29g.4.book Page 255 Wednesday, June 17, 2009 9:54 AM