check engine SKODA ROOMSTER 2009 1.G User Guide
[x] Cancel search | Manufacturer: SKODA, Model Year: 2009, Model line: ROOMSTER, Model: SKODA ROOMSTER 2009 1.GPages: 263, PDF Size: 32.25 MB
Page 102 of 263
Starting-off and Driving101
Using the system
Safety
Driving Tips
General Maintenance
Breakdown assistance
Praktik
Technical Data
•
Let go of the key as soon as the engine starts otherwise there may be damage
to the starter.
The engine running noises may louder at first be louder for a short time after
starting the cold engine until oil pressure can be built up in the hydraulic valve
clearance compensation. This is quite normal and is not an operating problem.
If the engine does not start ...
You can use the battery of another vehicle as a jump-start aid ⇒page 213.
It is only possible to tow-start vehicles fitted with a manual gearbox. The tow-
starting distance must not be more than 50 metres ⇒page 216.
WARNING
•
Never run the engine in non ventilated or enclosed areas. The exhaust
gases of the engine contain besides the odorless and colourless carbon
monoxide a poisonous gas - hazard! Carbon monoxide can cause uncon-
sciousness and death.
•
Never leave your vehicle unattended with the engine running.Caution
•
The starter may only be operated (ignition key position ), if the engine is not
running. If the starter is immediately operated after switching off the engine, the
starter or the engine can be damaged.
•
Avoid high engine revolutions, full throttle and high engine loads as long as the
engine has not yet reached its normal operating temperature - risk of damaging the
engine!
•
Vehicles which are fitted with an exhaust gas catalytic converter should not be
tow-started over a distance of more than 50 metres.For the sake of the environment
Never warm up the engine when the vehicle is standing. Drive off right away. When
driving the engine reaches its operating temperature more rapidly and the pollutant
emissions are lower.
Petrol enginesThese engines are fitted with a starter system which selects the correct fuel-air
mixture for every external air temperature.•
Do not operate accelerator before and when starting engine.
•
Interrupt the attempt at starting after 10 seconds if the engine does not start
right awayand wait for about 30 seconds before repeating the attempt.
•
It is possible that the fuse on the electrical fuel pump is defect if the engine still
does not start. Check the fuse and replace it if necessary ⇒page 218.
•
If the engine does not start, contact the nearest specialist garage to obtain
professional assistance.
It may be necessary, if the engine is very hot, to slightly depress the accelerator
after the engine has started.
Diesel enginesGlow plug system
Diesel engines are equipped with a glow plug system, the preglow period being
controlled automatically in line with the coolant temperature and outside temper-
ature.
The preglow indicator light
comes on after the ignition has been switched on.
You should not switch on any major electrical components during the heating
period otherwise the vehicle battery will be drained unnecessarily.
•
You should start the engine immediately after the glow plug warning light
has gone out.
•
The glow plug warning light will come on for about one second if the engine is
at a normal operating temperature or if the outside temperature is above +5°C. This
means that you can start the engine right away.
•
Interrupt the attempt at starting after 10 seconds if the engine does not start
right awayand wait for about 30 seconds before repeating the attempt.
•
It is possible that the fuse on the diesel preglow system is defect if the engine
still does not start. Check the fuse and replace it if necessary ⇒page 218.
A3
s29g.4.book Page 101 Wednesday, June 17, 2009 9:54 AM
Page 167 of 263
Driving and the Environment 166Sensitive use of the accelerator will not only significantly reduce fuel consumption
but also positively influence environmental pollution and wear of your vehicle.
You should avoid exploiting the top speed of your vehicle wherever possible. Fuel
consumption, pollutant emissions and vehicle noises increase disproportionally at
high speeds.
The ⇒page 165, fig. 170 shows the ratio of fuel consumption to the speed of your
vehicle. You will cut your fuel consumption by half if you only make use three-quar-
ters of the possible top speed of your vehicle.Reducing idling
Idling also costs fuel.It is worthwhile switching off the engine in a traffic jam or when waiting at a level
crossing or at traffic lights with a lengthy red phase. Even after just 30 - 40 seconds
you will have saved more fuel than that is needed when you start the engine up
again.
If an engine is only idling it takes much longer for it to reach its normal operating
temperature. Wear-and-tear and pollutant emissions, though, are particularly high
in the warming-up phase. This is why you should drive off right after starting the
engine. Do avoid high engine revolutions at this time, however.Regular servicing
A poorly tuned engine consumes an unnecessarily high amount of
fuel.Having your vehicle serviced regularly at a specialist garge enables you to satisfy
one of the requirements for economical motoring even before you set off on your
journey. Keeping your vehicle properly serviced not only has a positive effect on the
safety of your vehicle and maintaining its value, but also saves on fuel.
A poorly tuned engine can result in a fuel consumption which is 10% higher than
normal.
The foreseen maintenance work should be undertaken exactly according to the
Service schedule by a specialist garage.Also check the oil level after refueling. Oil consumption is dependent to a consid-
erable extent on the load and speed of the engine. Oil consumption could be as
high as 0.5 litres/1 000 km depending on your style of driving.
It is quite normal that a new engine has a higher oil consumption at first, and
reaches its lowest level only after a certain running in time. It is therefore not
possible to correctly assess the oil consumption of a new vehicle until after you
have driven about 5 000 km.
For the sake of the environment
•
You can achieve additional improvements in your fuel economy by using high-
lubricity oils.
•
Check the ground below your vehicle at regular intervals to detect any leakages
in good time. Please have your vehicle inspected by a specialist garge if you find any
stains caused by oil or other fluids on the floor.
Avoid driving short distances
Short distances result in an above-average high fuel consumption.– Avoid driving a distance of no more than 4 km if the engine is cold.
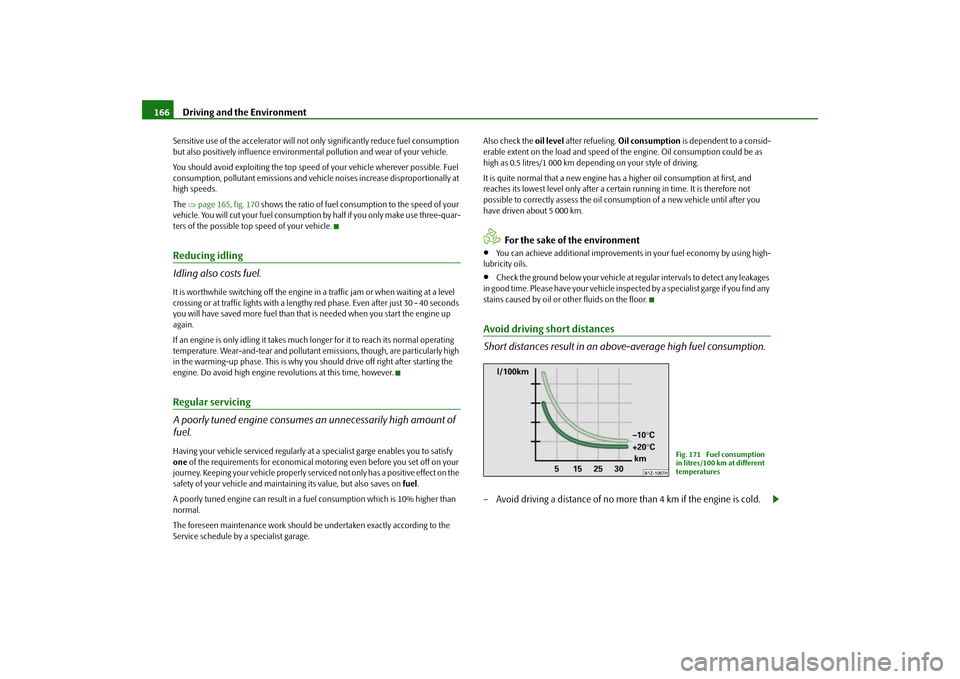
Fig. 171 Fuel consumption
in litres/100 km at different
temperatures
s29g.4.book Page 166 Wednesday, June 17, 2009 9:54 AM
Page 168 of 263
Driving and the Environment167
Using the system
Safety
Driving Tips
General Maintenance
Breakdown assistance
Praktik
Technical Data The engine and catalytic converter must first have reached their optimal operating
temperature in order to effectively reduce fuel consumption and pollutant emis-
sions.
The cold engine vehicle consumes approx. 15 - 20 litres/100 km of fuel immediately
after starting. Fuel consumption drops to 10 litres/100 km after just 1 kilometre. The
engine reaches its operating temperature (outside temperature and engine
dependent) only after about 4 to 10 kilometres and the fuel consumption then
stabilizes. You should therefore avoid driving short distances whenever possible.
An important factor in this connection is also the ambient temperature. The
⇒page 166, fig. 171 shows the different fuel consumptions for the same distance,
on the one hand at +20°C and on the other hand at -10°C. Your vehicle has a higher
fuel consumption in winter than in summer.
Checking tyre inflation pressures
Tyres which are correctly inflated save fuel.Always ensure that your tyres are inflated to the correct pressure at all times. The
rolling resistance will be increased if the tyre filling pressure is too low. This will not
only increase fuel consumption but also tyre wear and the driving behaviour will
worsen.
Always check the inflation pressure of the tyres when cold.
Do not drive with winter tyres all year round for this costs about 10 % more fuel.
Winter tyres are also louder.No unnecessary ballast
Transporting ballast costs fuel.The fact that every kilogram of extra weight increases your fuel consumption
means that it is worth taking a look in the luggage compartment to avoid trans-
porting any unnecessary ballast.
It is par ticularly i n town tra ffi c, whe n one is accelerating quite often, that the vehicle
weight will have a significant effect upon the fuel consumption. A rule of thumb here is that an increase in weight of 100 kilograms will cause an increase in fuel
consumption of about 1 litre/100 kilometres.
You may frequently also leave a roof rack fitted on just out of convenience,
although you no longer need it. The increased aerodynamic drag of your vehicle
causes it to use about 1 l more fuel than normal at a speed of 100 - 120 km/h, even
when you are not carrying a load on the roof.
Saving electricity
Generating electricity costs fuel.– Switch off electrical components as soon as you no longer need them.When the engine is running, the alternator generates and supplies electrical power.
The greater the load on the alternator as a result of having a large number of elec-
trical components switched on, the more fuel will be consumed for operating the
alternator.Keeping a log of your fuel consumptionIf you really wish to keep a close check on your fuel consumption, it is best to enter
the figures in a logbook. This does not take much time but is a very worthwhile exer-
cise. It enables you to detect any change (positive and negative) at an early stage
and to take any appropriate action.
If you find that your fuel consumption is too high, you should reflect on how, where
and in what conditions you have driven the vehicle since you last refuelled.Environmental compatibilityEnvironmental protection has played a major role in the design, selection of mate-
rials and manufacture of your new Škoda. Particular emphasis has been paid to a
number of aspects, including:
s29g.4.book Page 167 Wednesday, June 17, 2009 9:54 AM
Page 172 of 263
Towing a trailer171
Using the system
Safety
Driving Tips
General Maintenance
Breakdown assistance
Praktik
Technical Data Exterior mirrors
You have to have additional exterior mirrors fitted if you are not able to see the
traffic behind the trailer with the standard rear-view mirrors. Both exterior mirrors
should be attached to folding arms. Adjust the mirrors so that they provide you with
an adequate field of view to the rear.
Headlights
Before starting off with a hitched trailer, also check the setting of the headlights.
Alter the setting as necessary with the aid of the headlight beam adjuster
⇒page 55.
Detachable ball head
The ball rod is detachable on vehicles with towing device and suppliable from
Škoda original accessories. It is stowed together with separate fitting instructions in
the spare wheel well in the luggage compartment of the vehicle.
Note
•
We recommend that you also have your vehicle inspected between service
intervals if you tow a trailer frequently.
•
The handbrake on the towing vehicle must be put on when coupling and
decoupling the trailer.
Driving Tips
Particular caution is required when towing a trailer.– Do not, as far as possible, drive with your vehicle unladen and the
trailer laden.
– Do not make full use of the legal maximum speeds. This applies in
particular to downhill sections.
– Apply the brakes in good time.
– Keep a check on the coolant temperature gauge if the outside temper-
ature is high.
Distribution of weight
The distribution of the weight is very poor if your vehicle is unladen and the trailer
is laden. Maintain a particularly low speed if you cannot avoid driving with this
combination.
Driving speed
Do not drive faster than 80 km/h for safety reasons. This also applies for countries
in which higher speeds are allowed.
The fact that the driving stability of the vehicle + trailer combination reduces with
increasing speed means that the legally allowed speed should not be used when
there are unfavourable road, weather or wind conditions, particularly near accident
black spots.
You must always reduce your speed immediately as soon as you detect even just
the slightest swaying of the trailer. On no account attempt to stop the trailer from
“swaying” by accelerating.
Apply the brakes in good time! If the trailer is fitted with a trailer brake, apply the
brakes gently at first and then brake firmly. This will avoid brake jolts resulting from
the trailer wheels locking. Shift down gears in good time before negotiating a down-
hill section to allow the engine to also act as a brake.
Engine overheating
Please keep a check on the coolant temperature gauge if you have to negotiate a
lengthy slope in a low gear at a high engine speed when the outside temperature is
very high ⇒page 19.
If the needle of the coolant temperature gauge moves into the right-hand area or
even the red area of the scale, reduce your speed immediately. Stop and switch off
the engine if the warning light
in the instrument cluster begins flashing. Wait a
few minutes and check the level of coolant in the coolant expansion bottle
⇒page 189, “Inspecting the coolant level”.
Please refer to the following guidelines ⇒page 32, “Coolant temperature/coolant
level ”.
The coolant temperature can be reduced by switching on the heating.
Any increase in the cooling effect of the coolant fan through shifting down a gear
and increasing the engine speed is not possible since the fan speed is independent
s29g.4.book Page 171 Wednesday, June 17, 2009 9:54 AM
Page 186 of 263
Inspecting and replenishing185
Using the system
Safety
Driving Tips
General Maintenance
Breakdown assistance
Praktik
Technical Data
– Pull on the locking lever ⇒page 184, fig. 175, the bonnet is then
unlocked.
– Grip the bonnet and lift it up.
– Take the bonnet support out of its holder and set it in the opening
designed for it ⇒page 184, fig. 176.
Closing the bonnet
– Lift the bonnet slightly and unhook the bonnet support. Press the
bonnet support into the holder designed to hold it.
– Allow the bonnet to drop from a height of about 30 cm into the lock -
bonnet do not press down on it!
WARNING
•
Never open the bonnet if you see that steam or coolant is flowing out of
the engine compartment - risk of scalding! Wait long enough until the steam
or coolant has stopped escaping.
•
For safety reasons, the bonnet must always be properly closed when
driving. One should therefore check that the lock has in fact engaged prop-
erly after closing the bonnet.
•
Stop your vehicle immediately while driving if you notice that the lock is
not properly engaged and close the bonnet properly - risk of an accident!Caution
•
Before opening the bonnet, ensure that the arms of the windscreen wipers are
correctly in place against the windscreen. Otherwise, there is a risk of damage to the
paintwork.
Working in the engine compartment
Particular care is required when carrying out any work in the engine
compartment!There is a risk of injuries, scalding, accidents and fire when working in the
engine compartment, e.g. inspecting and replenishing oil and other fluids. For
this reason, it is essential to comply with the warning instructions stated
below and with the general applicable rules of safety. The engine compart-
ment of your car is a hazardous area ⇒.
WARNING
•
Never open the bonnet if you see that steam or coolant is flowing out of
the engine compartment - risk of scalding! Wait long enough until the steam
or coolant has stopped escaping.
•
Switch off the engine and pull out the ignition key.
•
Apply the handbrake firmly.
•
If your vehicle is fitted with a manual gearbox, move the gearshift lever
into Neutral, or if it is fitted with automatic gearbox, move the selector lever
into position P.
•
Allow the engine to cool down.
•
Keep children clear of the engine compartment.
•
Do not touch any hot engine parts - risk of burns!
•
Never spill oil and other fluids over the hot engine. Such fluids (e.g. the
antifreeze contained in the wash liquid) may ignite!
•
Avoid short circuits in the electrical system - particularly on the battery.
•
Never place your hand into the radiator fan as long as the engine is still
warm. The fan might suddenly start running!
•
Never open the cap of the coolant expansion bottle as long as the engine
is still warm. The cooling system is pressurized!
•
Cover over the cap of the coolant expansion reservoir with a large cloth
when opening it as protection for your face, hands and arms from hot steam
or hot coolant.
s29g.4.book Page 185 Wednesday, June 17, 2009 9:54 AM
Page 188 of 263
Inspecting and replenishing187
Using the system
Safety
Driving Tips
General Maintenance
Breakdown assistance
Praktik
Technical Data
Engine oilCheck engine oil level
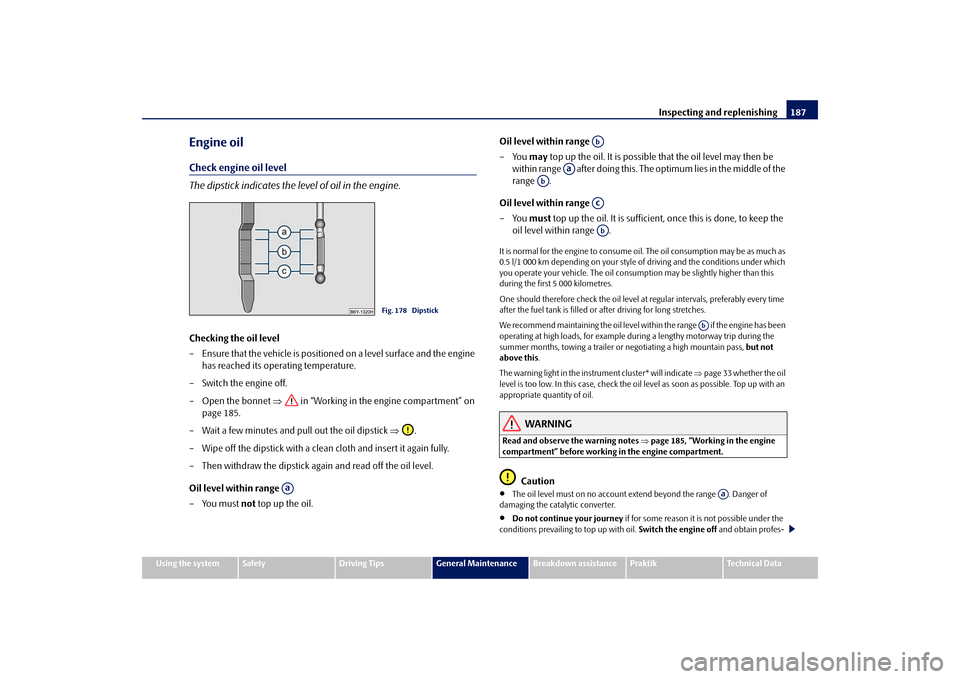
The dipstick indicates the level of oil in the engine.Checking the oil level
– Ensure that the vehicle is positioned on a level surface and the engine
has reached its operating temperature.
– Switch the engine off.
– Open the bonnet ⇒ in “Working in the engine compartment” on
page 185.
– Wait a few minutes and pull out the oil dipstick ⇒.
– Wipe off the dipstick with a clean cloth and insert it again fully.
– Then withdraw the dipstick again and read off the oil level.
Oil level within range
– You must not top up the oil.Oil level within range
–You may top up the oil. It is possible that the oil level may then be
within range after doing this. The optimum lies in the middle of the
range .
Oil level within range
–You must top up the oil. It is sufficient, once this is done, to keep the
oil level within range .
It is normal for the engine to consume oil. The oil consumption may be as much as
0.5 l/1 000 km depending on your style of driving and the conditions under which
you operate your vehicle. The oil consumption may be slightly higher than this
during the first 5 000 kilometres.
One should therefore check the oil level at regular intervals, preferably every time
after the fuel tank is filled or after driving for long stretches.
We recommend maintaining the oil level within the range if the engine has been
operating at high loads, for example during a lengthy motorway trip during the
summer months, towing a trailer or negotiating a high mountain pass, but not
above this.
The warning light in the instrument cluster* will indicate ⇒page 33 whether the oil
level is too low. In this case, check the oil level as soon as possible. Top up with an
appropriate quantity of oil.
WARNING
Read and observe the warning notes ⇒page 185, “Working in the engine
compartment” before working in the engine compartment.
Caution
•
The oil level must on no account extend beyond the range . Danger of
damaging the catalytic converter.
•
Do not continue your journey if for some reason it is not possible under the
conditions prevailing to top up with oil. Switch the engine off and obtain profes-
Fig. 178 Dipstick
Aa
Ab
Aa
Ab
AcAb
Ab
Aa
s29g.4.book Page 187 Wednesday, June 17, 2009 9:54 AM
Page 190 of 263
Inspecting and replenishing189
Using the system
Safety
Driving Tips
General Maintenance
Breakdown assistance
Praktik
Technical Data
Cooling systemCoolant
The job of the coolant is to cool the engine.The cooling system does not require any maintenance under normal operating
conditions. The coolant consists of water with a concentration of coolant additive
of 40 %. This mixture not only provides antifreeze protection down to -25°C but
also protects the cooling and heating system from corrosion. It also prevents the
formation of scale and significantly increases the boiling point of the coolant.
You must therefore not reduce the concentration of antifreeze agent in the coolant
by adding water, also not during the summer months or in countries with a warm
climate. The concentration of coolant additive in the coolant must be at least
40%.
You can increase the amount of antifreeze in the coolant if a higher concentration
of antifreeze is necessary for climatic reasons but only up to 60% (antifreeze
protection down to approx. -40°C). The antifreeze protection tails off above that
concentration.
Vehicles exported to countries with a cold climate (e.g. Sweden, Norway, Finland)
are already factory-filled with a coolant which offers antifreeze protection down to
about -35°C. In these countries the concentration of coolant additive should be at
least 50 %.
Coolant
The cooling system is factory-filled with coolant (purple in colour), which complies
with the specification TL-VW 774 G.
We recommend that you use the antifreeze agent G12 PLUS - PLUS (purple in
colour) for topping up the system.
We recommend that you contact a specialist garage if you have any questions
regarding the coolant or if you wish to fill up with a different coolant.
A specialist garage can also supply you with the correct coolant additives.
Caution
•
Other coolant additives may cause operational problems which, in partic-
ular, involves significantly reducing the anticorrosion effect.
•
Any faults or problems resulting from corrosion may cause a loss of
coolant and, as a consequence of this, result in major engine damage.
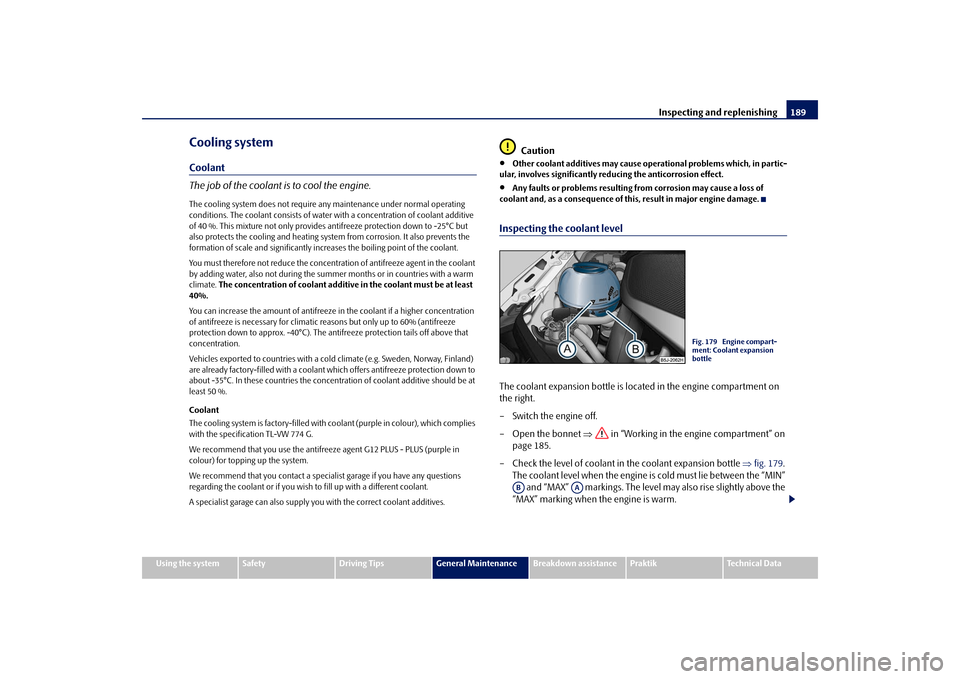
Inspecting the coolant levelThe coolant expansion bottle is located in the engine compartment on
the right.
– Switch the engine off.
– Open the bonnet ⇒ in “Working in the engine compartment” on
page 185.
– Check the level of coolant in the coolant expansion bottle ⇒fig. 179.
The coolant level when the engine is cold must lie between the “MIN”
and “MAX” markings. The level may also rise slightly above the
“MAX” marking when the engine is warm.
Fig. 179 Engine compart-
ment: Coolant expansion
bottle
AB
AA
s29g.4.book Page 189 Wednesday, June 17, 2009 9:54 AM
Page 196 of 263
Inspecting and replenishing195
Using the system
Safety
Driving Tips
General Maintenance
Breakdown assistance
Praktik
Technical Data
Caution
If the vehicle has not been driven for more than 3 to 4 weeks, the battery will
discharge because certain electrical components consume electricity (e.g. control
units) also in idle state. You can prevent the discharging of the battery by discon-
necting the negative terminal or charging the battery constantly with a very low
charging current. Please also refer to the notes when working on the battery ⇒
in “Working on the battery” on page 192.
Note
•
Batteries with three-tone indicator, which are mounted as of factory, are
marked with a code which always begins with 1J0, 7N0 or 3B0. The exact marking
can be e.g. 1J0 915 105 AC.
•
Replacement batteries with three-tone indicator, which were obtained from
Škoda original accessories, are marked with the code 000 915 105 Ax, whereby
“x” stands for a variable. The exact marking can be e.g. 000 915 105 AB.
Inspecting the electrolyte levelThe battery is practically maintenance-free under normal operating conditions.
We do, however, recommend that you have the electrolyte level inspected from
time to time by a specialist garage when outside temperatures are high or when
driving on long trips. You should also have the electrolyte level ⇒page 195
checked each time the battery is charged.
The electrolyte level of the battery will also be checked as part of the Inspection
Service.Operation in winterThe battery has to provide greater amounts of electricity during the winter. It also
has only part of the initial power output at low temperatures that it has at normal
temperatures.
A discharged battery may already freeze at temperatures just below 0°C.We therefore recommend that you have the battery checked by a specialist garage
before the start of the winter, and recharged if necessary.
Charging the battery
A properly charged battery is essential for reliably starting the
engine.– Read the warning notes ⇒ in “Working on the battery” on
page 192 and ⇒.
– Switch the ignition and all electrical components off.
– Only for “quick-charging”: Disconnect both battery cables (first of all
“negative”, then “positive”).
– Carefully attach the terminal clamps of the charger to the battery
terminals (red = “positive”, black = “negative”).
– You can now plug the mains cable of the charger into the power socket
and switch on the charger.
– When charging is completed: switch the charger off and unplug the
mains cable from the power socket.
– Only then should you disconnect the terminal clamps of the charger.
– Reconnect the cables to the battery (first of all “positive”, then “nega-
tive”).It is not normally necessary to disconnect the cables of the battery if you recharge
the battery using low amperages (as for example from a mini-charger). Please also
refer to the instructions from the charger manufacturer.
A charging current of 0.1 of the total battery capacity (or lower) is that which should
be used until full charging is achieved.
It is, however, necessary to disconnect both cables before charging the battery with
high amperages, so-called “quick-charging”.
s29g.4.book Page 195 Wednesday, June 17, 2009 9:54 AM
Page 197 of 263
Inspecting and replenishing 196“Quick-charging” a battery is dangerous ⇒ in “Working on the battery” on
page 192. It requires a special charger and appropriate knowledge. We therefore
recommend that you have your battery quick-charged only by your specialist
garage.
A discharged battery may already freeze at temperatures just below 0°C ⇒. We
recommend that you no longer use a battery which has thawed out because the
casing of the battery may be cracked through the formation of ice and this would
allow battery electrolyte to flow out.
The vent plugs of the battery should not be opened for charging.
WARNING
Never charge a frozen or thawed battery - risk of explosion and caustic
burns! Replace a frozen battery.Disconnecting and reconnecting the batteryOn disconnecting and reconnecting the battery the following functions are initially
deactivated or are no longer able to operate fault-free.
We recommend having the vehicle checked by a specialist garage to ensure full
functionality of all electrical systems.
Replacing the batteryYou should only replace a battery with a new battery of the same capacity, voltage
(12 V), amperage and of the same size. Specialist garages have a range of suitable
batteries available.
We re c o m m e nd t h a t y o u o n l y ha v e a n o l d b a t te r y d i s p o s e d o f b y a s p e c i a l i s t g a ra g e
since it does require special disposal.
For the sake of the environment
Batteries contain poisonous substances such as sulphuric acid and lead. They must
be disposed of in accordance with local environmental protection regulations and
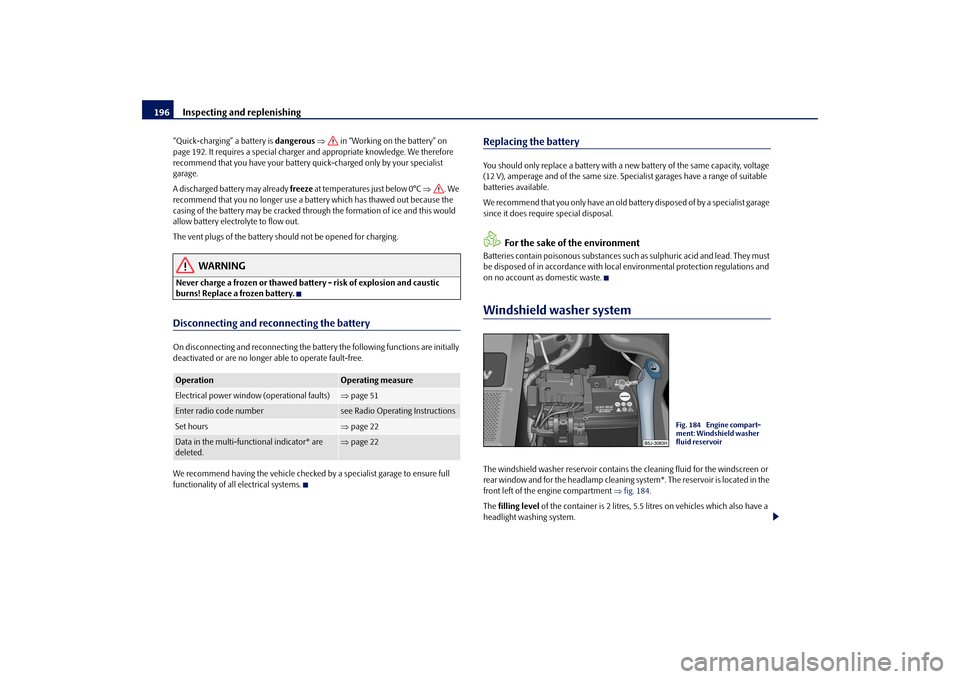
on no account as domestic waste.Windshield washer systemThe windshield washer reservoir contains the cleaning fluid for the windscreen or
rear window and for the headlamp cleaning system*. The reservoir is located in the
front left of the engine compartment ⇒fig. 184.
The filling level of the container is 2 litres, 5.5 litres on vehicles which also have a
headlight washing system.
Operation
Operating measure
Electrical power window (operational faults)
⇒page 51
Enter radio code number
see Radio Operating Instructions
Set hours
⇒page 22
Data in the multi-functional indicator* are
deleted.
⇒page 22
Fig. 184 Engine compart-
ment: Windshield washer
fluid reservoir
s29g.4.book Page 196 Wednesday, June 17, 2009 9:54 AM
Page 214 of 263
Breakdown assistance213
Using the system
Safety
Driving Tips
General Maintenance
Breakdown assistance
Praktik
Technical Data
– Pull off the full wheel trim/cap from the wheel hub or cap from the
safety wheel bolt.
– Insert the adapter with its toothed side fully into the inner toothing
of the safety wheel bolt right down in such a way that only the
outer hexagon is jutting out ⇒page 212, fig. 194.
– Insert the wheel wrench fully onto the adapter .
– Slacken the wheel bolt, or tighten it firmly ⇒page 211.
– Reinstall the full wheel trim/wheel cap after removing the adapter or
place the cap onto the safety wheel bolt.
–Have the tightening torque checked w i t h a t o rq u e w re n c h a s s o o n a s
possible. Steel and light alloy wheels must be tightened to a tightening
torque of 120 Nm.The safety wheel bolts on vehicles fitted with them (one safety wheel bolt per
wheel) can only be loosened or tighten up by using the adapter provided.
It is meaningful to note the code number hammered into the rear side of the
adapter or the rear side of the safety wheel bolts. You can obtain a replacement
adapter from a specialist garage, if necessary, by quoting this number.
We recommend that you always carry the adapter for the wheel bolts with you in
the vehicle. It should be stowed in the vehicle tool kit.
Caution
•
Damage can occur to the adapter and safety wheel bolt if the safety wheel bolt
is tightened up too much.
•
On steel wheels, the theft-deterrent wheel bolt must always be installed in the
hole, which is close to the valve. Otherwise the full wheel trim cannot be mounted
and the full wheel trim can be damaged during the assembly.Note
The set of safety wheel bolts can be obtained from a specialist garage.
Jump-startingInitial stepsYou can use the battery of another vehicle for jump-starting yours if the engine
does not start because the battery on your vehicle is flat. You will require jump-start
cables for this purpose.
Both batteries must have a rated voltage of 12 V. The capacity (Ah) of the battery
supplying the power must not be significantly less than the capacity of the
discharged battery in your vehicle.
Jump-start cables
Only use jump-start cables which have an adequately large cross-section and insu-
lated terminal clamps. Please pay attention to the manufacturer's instructions.
Positive cable - colour coding in the majority of cases red.
Negative cable - colour coding in the majority of cases black.
WARNING
•
A discharged battery may already freeze at temperatures just below 0°C.
In case of frozen battery carry out no jump-starting - risk of explosion! Also
after thawing of the battery there is a risk of caustic burns due to leaking
acid. Replace the frozen battery.
•
Please pay attention to the warning instructions relating to working in
the engine compartment ⇒page 185.Note
•
There must not be any contact between the two vehicles otherwise current may
flow as soon as the negative terminals are connected.
•
The discharged battery must be properly connected to the system of the
vehicle.
•
Switch off any installed telephone and also pay attention to the instructions for
use of the telephone in such a situation.
AB
AA
AB
s29g.4.book Page 213 Wednesday, June 17, 2009 9:54 AM