clutch SKODA ROOMSTER 2009 1.G Owner's Manual
[x] Cancel search | Manufacturer: SKODA, Model Year: 2009, Model line: ROOMSTER, Model: SKODA ROOMSTER 2009 1.GPages: 263, PDF Size: 32.25 MB
Page 64 of 263
Seats and Storage63
Using the system
Safety
Driving Tips
General Maintenance
Breakdown assistance
Praktik
Technical Data
Seats and StorageFront seatsBasic informationThe front seats have a wide range of different settings and can thus be matched to
the physical characteristics of the driver and front passenger. Correct adjustment of
the seats is particularly important for:•
safely and quickly reaching the controls;
•
a relaxed, fatigue-free body position;
•
achieving the maximum protection offered by the seat belts and the airbag
system.
The chapters which follow describe the procedure which you should adopt for
adjusting the seats.
WARNING
•
Never transport more occupants than the maximum seating in the
vehicle.
•
Each occupant must correctly fasten the seat belt belonging to the seat.
Children must be fastened ⇒page 147, “Transporting children safely” with
a suitable restraint system.
•
The front seats and the head restraints must always be adjusted to match
the body size of the seat occupant as well as the seat belts must always be
correctly fastened in order to provide an optimal protection for you and your
occupants.
•
Always keep your feet in the footwell when the vehicle is being driven -
never place your feet on the instrument panel, out of the window or on the
surfaces of the seats. This is particularly important for the front seat
passenger. You will be exposed to increased risk of injury if it becomes
necessary to apply the brake or in the event of an accident. If an airbag is
deployed, you may suffer fatal injuries when adopting an incorrect seated
position!
•
It is important for the driver and front passenger to maintain a distance
of at least 25 cm from the steering wheel or dash panel. Not maintaining this
minimum distance will mean that the airbag system will not be able to prop-
erly protect you - hazard! The front seats and the head restraints must
always also be correctly adjusted to match the body size of the occupant.
•
Ensure that there are no objects in the footwell as any objects may get
behind the pedals during a driving or braking manoeuvre. You would then
no longer be able to operate the clutch, to brake or accelerate.
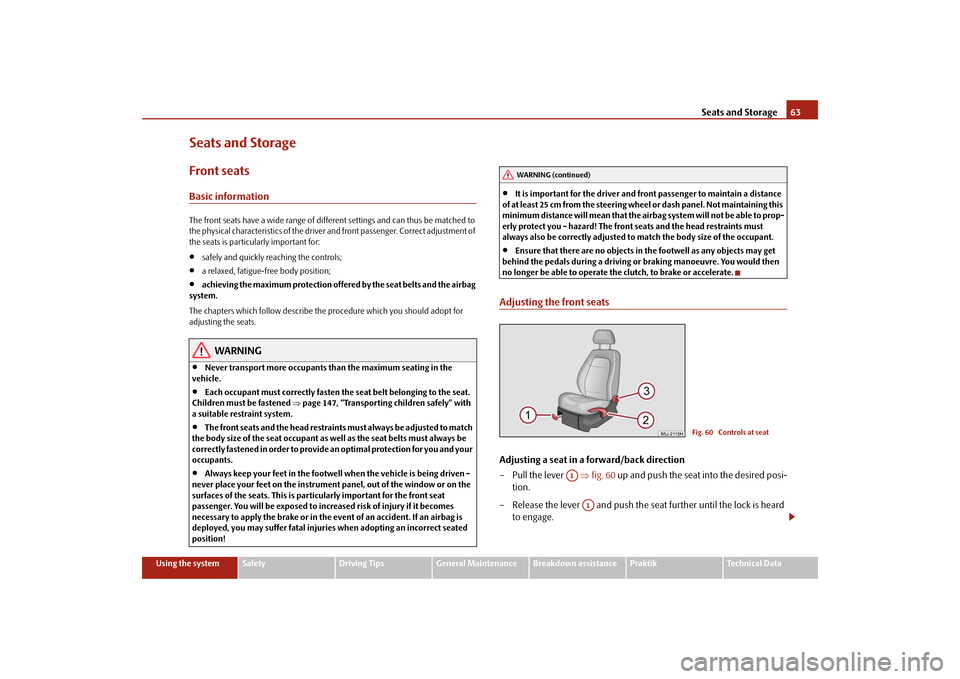
Adjusting the front seatsAdjusting a seat in a forward/back direction
–Pull the lever ⇒fig. 60 up and push the seat into the desired posi-
tion.
– Release the lever and push the seat further until the lock is heard
to engage.
WARNING (continued)
Fig. 60 Controls at seat
A1
A1
s29g.4.book Page 63 Wednesday, June 17, 2009 9:54 AM
Page 71 of 263
Seats and Storage 70PedalsYou should use only footmats which do not obstruct the movement of the pedals
and have an anti-slip protection.
We recommend only to use footmats from Škoda genuine accessories offered by
your Škoda dealer.
Operation of the pedals must not be hindered!
WARNING
•
Greater pedal distances may be needed when there is a fault in the brake
system.
•
Do not place any footmats or other additional floor coverings in the area
of the pedals in order to ensure that all the pedals can be fully depressed and
are able to return unobstructed to their initial position - risk of accident!
•
There must be no objects on the floor which could roll under the pedals.
You would then no longer be able to apply the brakes, operate the clutch or
accelerator - risk of accident!
luggage compartmentLoading the luggage compartmentPlease observe the following in the interest of having good handling char-
acteristics of your vehicle:
– Distribute the items of luggage as evenly as possible.
– Place heavy objects as far forward as possible.
– Attach the items of luggage to the lashing eyes or the fixing net*
⇒page 71.In the event of an accident, there is such a high kinetic energy which is produced by
small and light objects that they can cause severe injuries. The magnitude of the kinetic energy depends on the speed at which the vehicle is travelling and on the
weight of the object. The speed at which the vehicle is travelling is in this case the
more significant factor.
Example: In the event of a frontal collision at a speed of 50 km/h, an unsecured
object with a weight of 4.5 kg produces an energy, which corresponds to 20 times
its own weight. This means that it results in a weight of approx. 90 kg. You can
imagine the injuries that can occur, if this “bullet” is flying through the interior
compartment and hits an occupant.
WARNING
•
Store the objects in the luggage compartment and attach them to the
lashing eyes.
•
Loose objects in the passenger compartment can be thrown forward
during a sudden manoeuvre or in case of an accident and can injure the
occupants or other oncoming traffic. This risk is still increased, if the objects
which are flying around are hit by a deployed airbag. In this case, the objects
which are thrown back can injure the occupants - hazard.
•
Please note that the handling properties of your vehicle may be affected
when transporting heavy objects as a result of the displacement of the
centre of gravity. The speed and style of driving must be adjusted accord-
ingly.
•
The items carried in the luggage compartment should be stored in such
a way that no objects are able to slip forward if there are any sudden driving
or braking manoeuvres undertaken - risk of injury!
•
When transporting fastened objects which are sharp and dangerous in
the luggage compartment enlarged by folding the rear seats forward or
removing the rear seats, ensure the safety of the passengers transported on
the other rear seats ⇒page 130, “Correct seated position for the occupants
on the rear seats”.
•
If the rear seats next to the folded forward seat are occupied, ensure
maximum safety, e.g. by placing the goods to be transported in such a way
that a folding back of the seat is prevented in case of a rear collision.
•
Never drive with the boot lid fully opened or slightly ajar otherwise
exhaust gases may get into the interior of the vehicle - risk of poisoning!
s29g.4.book Page 70 Wednesday, June 17, 2009 9:54 AM
Page 85 of 263
Seats and Storage 84•
Ensure that when driving no objects from the centre console of from
other storage possibilities may get into the footwell of the driver. You would
then no longer be able to apply the brakes, operate the clutch or accelerator
- risk of accident!
Storage compartments on the front passenger side*On some vehicles, the storage compartments are not equipped with lids.
Opening and closing the storage compartments on the front
passenger side
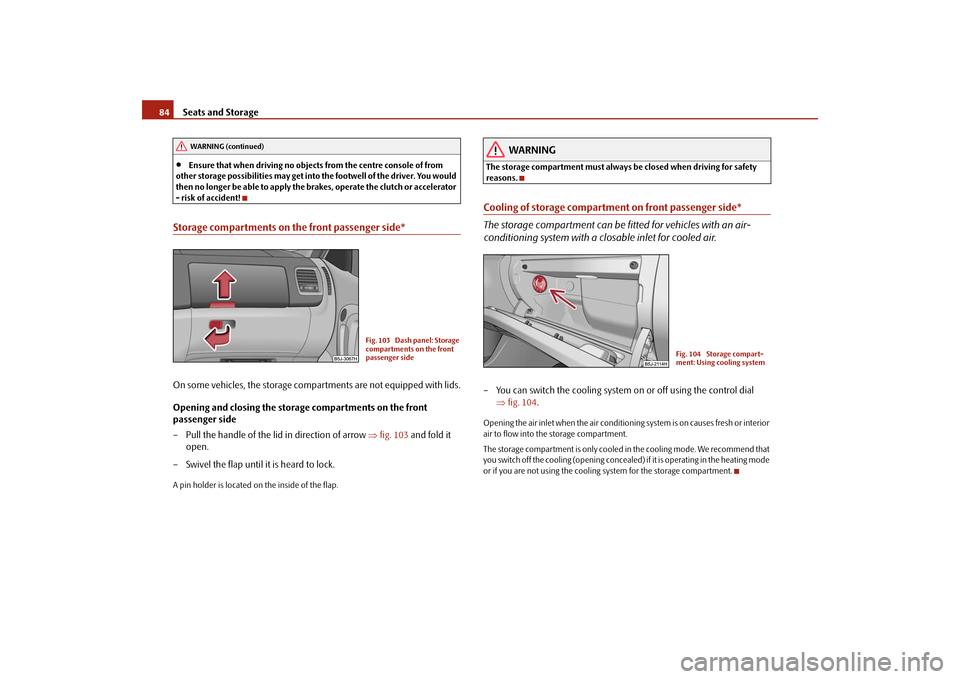
– Pull the handle of the lid in direction of arrow ⇒fig. 103 and fold it
open.
– Swivel the flap until it is heard to lock.A pin holder is located on the inside of the flap.
WARNING
The storage compartment must always be closed when driving for safety
reasons.Cooling of storage compartment on front passenger side*
The storage compartment can be fitted for vehicles with an air-
conditioning system with a closable inlet for cooled air.– You can switch the cooling system on or off using the control dial
⇒fig. 104.Opening the air inlet when the air conditioning system is on causes fresh or interior
air to flow into the storage compartment.
The storage compartment is only cooled in the cooling mode. We recommend that
you switch off the cooling (opening concealed) if it is operating in the heating mode
or if you are not using the cooling system for the storage compartment.
WARNING (continued)
Fig. 103 Dash panel: Storage
compartments on the front
passenger side
Fig. 104 Storage compart-
ment: Using cooling system
s29g.4.book Page 84 Wednesday, June 17, 2009 9:54 AM
Page 101 of 263
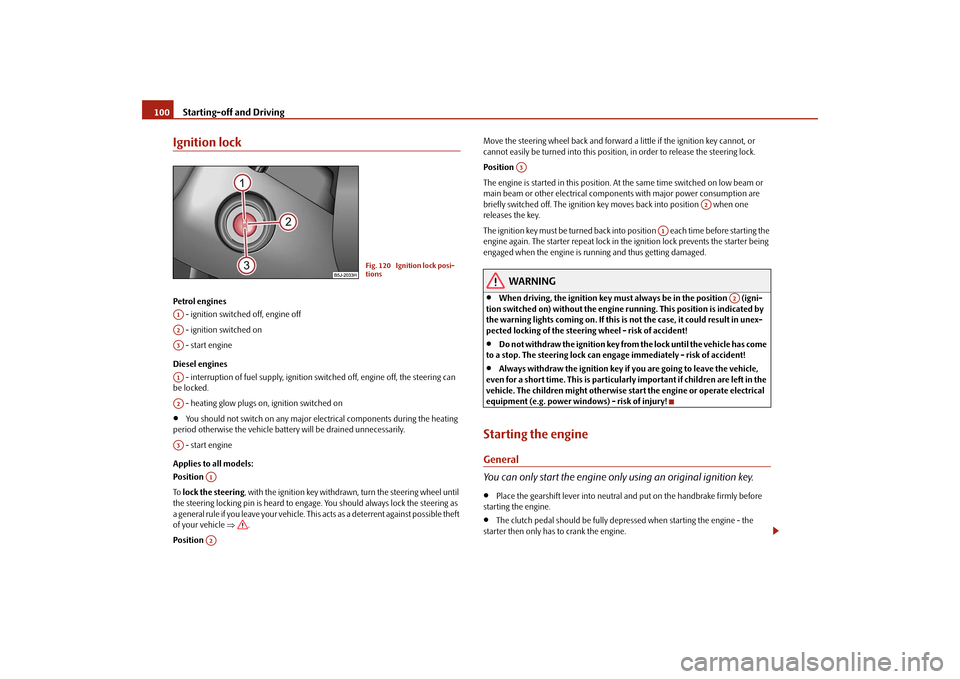
Starting-off and Driving 100Ignition lockPetrol engines
- ignition switched off, engine off
- ignition switched on
- start engine
Diesel engines
- interruption of fuel supply, ignition switched off, engine off, the steering can
be locked.
- heating glow plugs on, ignition switched on•
You should not switch on any major electrical components during the heating
period otherwise the vehicle battery will be drained unnecessarily.
- start engine
Applies to all models:
Position
To lock the steering, with the ignition key withdrawn, turn the steering wheel until
the steering locking pin is heard to engage. You should always lock the steering as
a general rule if you leave your vehicle. This acts as a deterrent against possible theft
of your vehicle ⇒.
Position Move the steering wheel back and forward a little if the ignition key cannot, or
cannot easily be turned into this position, in order to release the steering lock.
Position
The engine is started in this position. At the same time switched on low beam or
main beam or other electrical components with major power consumption are
briefly switched off. The ignition key moves back into position when one
releases the key.
The ignition key must be turned back into position each time before starting the
engine again. The starter repeat lock in the ignition lock prevents the starter being
engaged when the engine is running and thus getting damaged.
WARNING
•
When driving, the ignition key must always be in the position (igni-
tion switched on) without the engine running. This position is indicated by
the warning lights coming on. If this is not the case, it could result in unex-
pected locking of the steering wheel - risk of accident!
•
Do not withdraw the ignition key from the lock until the vehicle has come
to a stop. The steering lock can engage immediately - risk of accident!
•
Always withdraw the ignition key if you are going to leave the vehicle,
even for a short time. This is particularly important if children are left in the
vehicle. The children might otherwise start the engine or operate electrical
equipment (e.g. power windows) - risk of injury!
Starting the engineGeneral
You can only start the engine only using an original ignition key.•
Place the gearshift lever into neutral and put on the handbrake firmly before
starting the engine.
•
The clutch pedal should be fully depressed when starting the engine - the
starter then only has to crank the engine.
Fig. 120 Ignition lock posi-
tions
A1A2A3A1A2A3
A1A2
A3
A2
A1
A2
s29g.4.book Page 100 Wednesday, June 17, 2009 9:54 AM
Page 103 of 263
Starting-off and Driving 102•
Contact the nearest specialist garage to obtain professional assistance.
Starting the engine after fuel tank has run dry
It may take longer than normal to start the engine after refuelling if the fuel tank has
run completely dry - up to one minute. This is because the fuel system must first of
all be filled while the attempting to start the engine.
Switching off the engine– The engine can be switched off by turning the ignition key from posi-
tion into ⇒page 100, fig. 120.
WARNING
•
Never switch off the engine before the vehicle is stationary - risk of acci-
dent!
•
The brake booster only operates when the engine is running. Greater
physical effort for braking is required when engine is switched off. Because
if you do not stop as normal, this can cause an accident and severe injuries.Caution
you should not switch the engine off right away at the end of your journey after the
engine has been operated for a lengthy period at high loads but should be allowed
it to run at idling speed for about 2 minutes. This prevents any accumulation of heat
when the engine is switched off.
Note
•
The radiator fan may continue running for a further 10 minutes or so after the
engine and the ignition have been switched off. The coolant fan may, however, also
switch on again after some time if the coolant temperature rises because of an
accumulation of heat in the engine or if the engine is warm and the engine
compartment is additionally heated by strong sunlight.
•
This is why particular care is required when carrying out any work in the engine
compartment ⇒page 185, “Working in the engine compartment”.
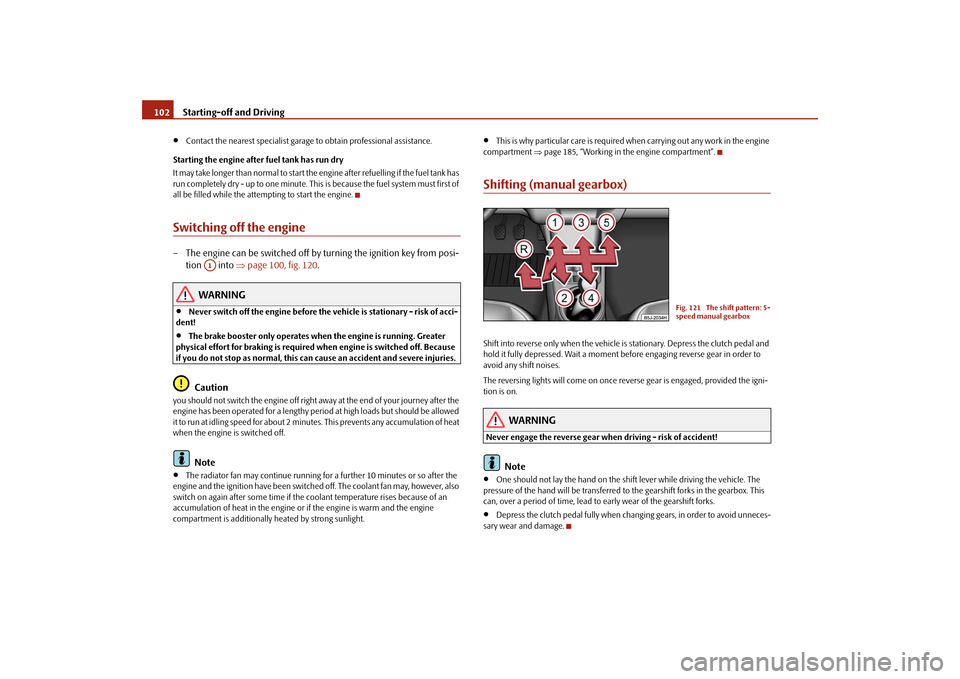
Shifting (manual gearbox)Shift into reverse only when the vehicle is stationary. Depress the clutch pedal and
hold it fully depressed. Wait a moment before engaging reverse gear in order to
avoid any shift noises.
The reversing lights will come on once reverse gear is engaged, provided the igni-
tion is on.
WARNING
Never engage the reverse gear when driving - risk of accident!
Note
•
One should not lay the hand on the shift lever while driving the vehicle. The
pressure of the hand will be transferred to the gearshift forks in the gearbox. This
can, over a period of time, lead to early wear of the gearshift forks.
•
Depress the clutch pedal fully when changing gears, in order to avoid unneces-
sary wear and damage.
A1
Fig. 121 The shift pattern: 5-
speed manual gearbox
s29g.4.book Page 102 Wednesday, June 17, 2009 9:54 AM
Page 105 of 263
Starting-off and Driving 104Range of sensors
The clearance warning begins at a distance of about 160 cm from the obstacle (area
⇒page 103, fig. 123). The interval between the warning signals becomes
shorter as the clearance is reduced.
A continuous tone sounds from a distance of approx. 30 cm (area ) - danger area.
You should not reverse any further after this signal sounds!
Activating
The parking aid is activated automatically when reverse gear is engaged and the
ignition is turned on. This is confirmed by a brief acknowledgement signal.
Deactivating
The parking aid is deactivated by removing the reverse gear.
WARNING
•
The parking aid is not a substitute for the driver paying proper attention
and it is always the driver's responsibility to take care when parking the
vehicle or carrying out similar manoeuvres.
•
You should therefore satisfy yourself, before reversing, that there is no
small obstacle, such as a rock, thin post, trailer drawbar etc., behind your
vehicle. Such an obstacle might not be within the range detected by the
sensors.Note
•
When operating with a trailer, the parking aid is without function.
•
A system fault is indicated if a warning signal sounds for about 5 seconds after
switching the ignition on and engaging reverse gear and there is no obstacle close
to your vehicle. Have the fault rectified by a specialist workshop.
•
The sensors must be kept clean and free of ice to enable the parking aid to
operate properly.
•
If the parking aid is activated and the selector lever of the automatic gearbox is
in the position , warning signal indicates interruption (vehicle can no longer
move).
Cruise control system (CCS)*IntroductionThe cruise control system (CCS) maintains a constant speed, more than 30 km/h,
once it has been set, without you having to depress the accelerator pedal. This is
only possible within the range which is permitted by the power output and braking
power of the engine. The cruise control system makes it possible - particularly on
long journeys - for you to rest your “accelerator foot”.
WARNING
•
The cruise control system must not, for safety reasons, be used in dense
traffic or on unfavourable road surfaces (such as icy roads, slippery roads or
loose chippings) - risk of accident!
•
In order to prevent unintentional use of the cruise control system, always
switch off the system after use.Note
•
Models fitted with a manual gearbox: Always depress the clutch pedal if you
switch on the cruise control system when the gearbox is in Neutral. Otherwise the
engine can rev up unintentionally.
•
The cruise control system is not able to maintain a constant speed when driving
on steep downhill sections. The weight of the vehicle increases the speed at which
it travels. One should shift down in good time to a lower gear or slow the vehicle
down by applying the foot brake.
•
It is not possible on vehicles fitted with an automatic gearbox to switch on the
cruise control system if the selector lever is in the position P, N or R.
AA
AB
AP
s29g.4.book Page 104 Wednesday, June 17, 2009 9:54 AM
Page 106 of 263
Starting-off and Driving105
Using the system
Safety
Driving Tips
General Maintenance
Breakdown assistance
Praktik
Technical Data
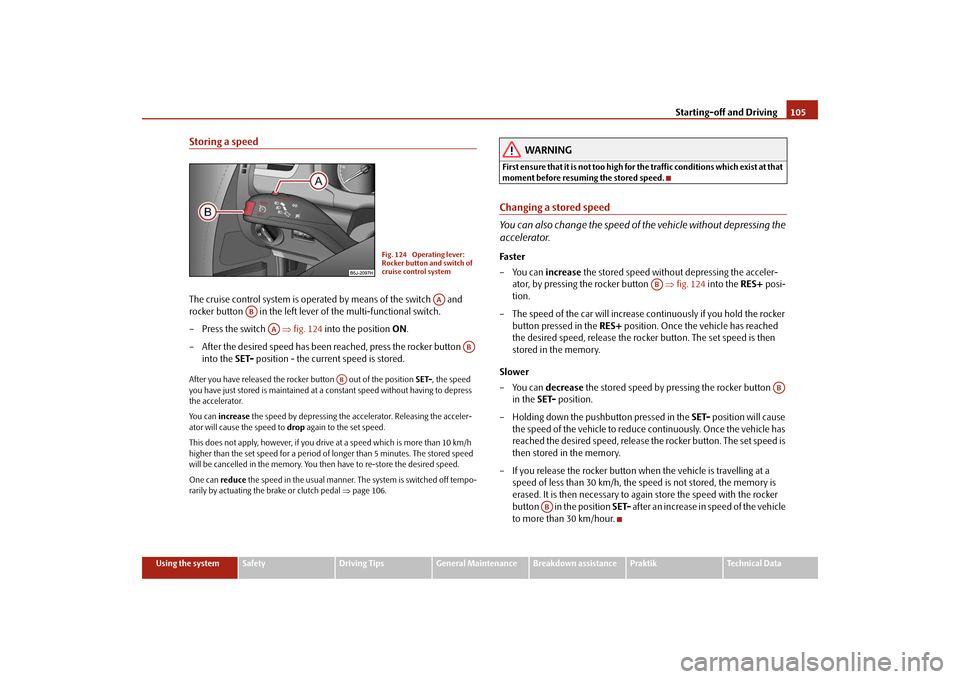
Storing a speedThe cruise control system is operated by means of the switch and
rocker button in the left lever of the multi-functional switch.
– Press the switch ⇒fig. 124 into the position ON.
– After the desired speed has been reached, press the rocker button
into the SET- position - the current speed is stored.After you have released the rocker button out of the position SET-, the speed
you have just stored is maintained at a constant speed without having to depress
the accelerator.
Yo u c a n increase the speed by depressing the accelerator. Releasing the acceler-
ator will cause the speed to drop again to the set speed.
This does not apply, however, if you drive at a speed which is more than 10 km/h
higher than the set speed for a period of longer than 5 minutes. The stored speed
will be cancelled in the memory. You then have to re-store the desired speed.
One can reduce the speed in the usual manner. The system is switched off tempo-
rarily by actuating the brake or clutch pedal ⇒page 106.
WARNING
First ensure that it is not too high for the traffic conditions which exist at that
moment before resuming the stored speed.Changing a stored speed
You can also change the speed of the vehicle without depressing the
accelerator.Fa s t er
–You can increase the stored speed without depressing the acceler-
ator, by pressing the rocker button ⇒fig. 124 into the RES+ posi-
tion.
– The speed of the car will increase continuously if you hold the rocker
button pressed in the RES+ position. Once the vehicle has reached
the desired speed, release the rocker button. The set speed is then
stored in the memory.
Slower
–You can decrease the stored speed by pressing the rocker button
in the SET- position.
– Holding down the pushbutton pressed in the SET- position will cause
the speed of the vehicle to reduce continuously. Once the vehicle has
reached the desired speed, release the rocker button. The set speed is
then stored in the memory.
– If you release the rocker button when the vehicle is travelling at a
speed of less than 30 km/h, the speed is not stored, the memory is
erased. It is then necessary to again store the speed with the rocker
button in the position SET- after an increase in speed of the vehicle
to more than 30 km/hour.
Fig. 124 Operating lever:
Rocker button and switch of
cruise control system
AA
AB
AA
AB
AB
AB
AB
AB
s29g.4.book Page 105 Wednesday, June 17, 2009 9:54 AM
Page 107 of 263
Starting-off and Driving 106Switching off the cruise control system temporarily– You can switch off temporarily the cruise control system, if you
depress the brake or clutch pedal.The set speed remains stored in the memory.
Press the rocker button in the position RES+ for the resumption of the stored
speed after releasing the clutch or brake pedal.
WARNING
First ensure that it is not too high for the traffic conditions which exist at that
moment before resuming the stored speed.Switching off the cruise control system completely– Press the switch ⇒page 105, fig. 124 to the right into position
OFF.
ABAA
s29g.4.book Page 106 Wednesday, June 17, 2009 9:54 AM
Page 130 of 263
Passive Safety129
Using the system
Safety
Driving Tips
General Maintenance
Breakdown assistance
Praktik
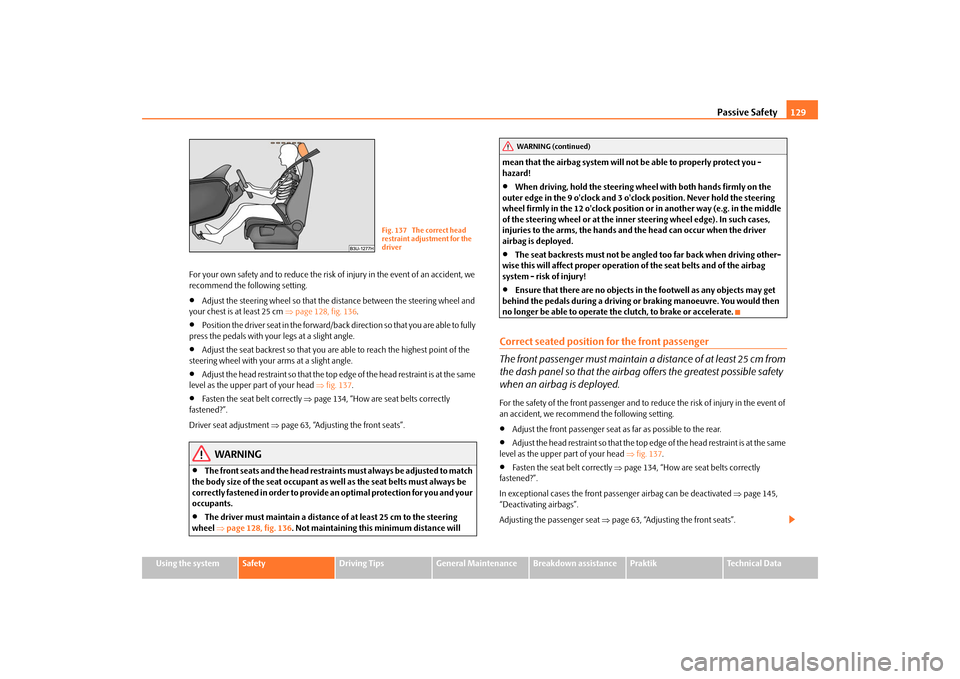
Technical Data For your own safety and to reduce the risk of injury in the event of an accident, we
recommend the following setting.
•
Adjust the steering wheel so that the distance between the steering wheel and
your chest is at least 25 cm ⇒page 128, fig. 136.
•
Position the driver seat in the forward/back direction so that you are able to fully
press the pedals with your legs at a slight angle.
•
Adjust the seat backrest so that you are able to reach the highest point of the
steering wheel with your arms at a slight angle.
•
Adjust the head restraint so that the top edge of the head restraint is at the same
level as the upper part of your head ⇒fig. 137.
•
Fasten the seat belt correctly ⇒page 134, “How are seat belts correctly
fastened?”.
Driver seat adjustment ⇒page 63, “Adjusting the front seats”.
WARNING
•
The front seats and the head restraints must always be adjusted to match
the body size of the seat occupant as well as the seat belts must always be
correctly fastened in order to provide an optimal protection for you and your
occupants.
•
The driver must maintain a distance of at least 25 cm to the steering
wheel ⇒page 128, fig. 136. Not maintaining this minimum distance will mean that the airbag system will not be able to properly protect you -
hazard!
•
When driving, hold the steering wheel with both hands firmly on the
outer edge in the 9 o'clock and 3 o'clock position. Never hold the steering
wheel firmly in the 12 o'clock position or in another way (e.g. in the middle
of the steering wheel or at the inner steering wheel edge). In such cases,
injuries to the arms, the hands and the head can occur when the driver
airbag is deployed.
•
The seat backrests must not be angled too far back when driving other-
wise this will affect proper operation of the seat belts and of the airbag
system - risk of injury!
•
Ensure that there are no objects in the footwell as any objects may get
behind the pedals during a driving or braking manoeuvre. You would then
no longer be able to operate the clutch, to brake or accelerate.
Correct seated position for the front passenger
The front passenger must maintain a distance of at least 25 cm from
the dash panel so that the airbag offers the greatest possible safety
when an airbag is deployed.For the safety of the front passenger and to reduce the risk of injury in the event of
an accident, we recommend the following setting.•
Adjust the front passenger seat as far as possible to the rear.
•
Adjust the head restraint so that the top edge of the head restraint is at the same
level as the upper part of your head ⇒fig. 137.
•
Fasten the seat belt correctly ⇒page 134, “How are seat belts correctly
fastened?”.
In exceptional cases the front passenger airbag can be deactivated ⇒page 145,
“Deactivating airbags”.
Adjusting the passenger seat ⇒page 63, “Adjusting the front seats”.
Fig. 137 The correct head
restraint adjustment for the
driver
WARNING (continued)
s29g.4.book Page 129 Wednesday, June 17, 2009 9:54 AM
Page 216 of 263
Breakdown assistance215
Using the system
Safety
Driving Tips
General Maintenance
Breakdown assistance
Praktik
Technical Data
Tow-starting and towing vehicleGeneralPlease pay attention to the following instructions if you are going to use a
tow rope:
Driver of the towing vehicle
– Do not drive off until the tow rope is taught.
– Release the clutch particularly gently when starting off.
Driver of the towed vehicle
– Switch the ignition on so that the steering wheel is not blocked and
you can also operate the turn signal lights, the headlight flasher, the
windscreen wipers and windscreen washer system.
– Take the vehicle out of gear or move the selector lever into position N
if your vehicle is fitted with an automatic gearbox.
– Note that the brake servo unit and power steering only operate if the
engine is running. You will require significantly greater physical force
to depress the brake pedal and to steer the vehicle if the engine is not
running.
– Ensure that the tow rope is always kept taught.Tow rope or tow bar
A tow bar is safest way of towing a vehicle and also minimizes any shocks. You can
use a tow rope only if a suitable tow bar is not available.
The tow rope must be elastic to protect the vehicle. Thus one should only use
plastic fibre rope or a rope made out of a similarly elastic material.
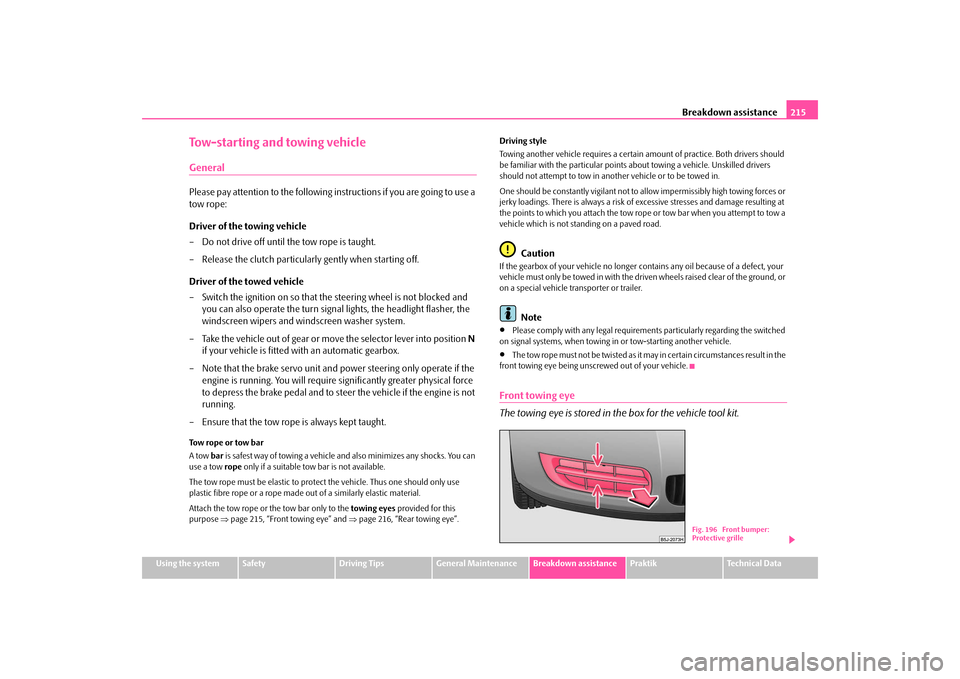
Attach the tow rope or the tow bar only to the towing eyes provided for this
purpose ⇒page 215, “Front towing eye” and ⇒page 216, “Rear towing eye”.Driving style
Towing another vehicle requires a certain amount of practice. Both drivers should
be familiar with the particular points about towing a vehicle. Unskilled drivers
should not attempt to tow in another vehicle or to be towed in.
One should be constantly vigilant not to allow impermissibly high towing forces or
jerky loadings. There is always a risk of excessive stresses and damage resulting at
the points to which you attach the tow rope or tow bar when you attempt to tow a
vehicle which is not standing on a paved road.
Caution
If the gearbox of your vehicle no longer contains any oil because of a defect, your
vehicle must only be towed in with the driven wheels raised clear of the ground, or
on a special vehicle transporter or trailer.
Note
•
Please comply with any legal requirements particularly regarding the switched
on signal systems, when towing in or tow-starting another vehicle.
•
The tow rope must not be twisted as it may in certain circumstances result in the
front towing eye being unscrewed out of your vehicle.
Front towing eye
The towing eye is stored in the box for the vehicle tool kit.
Fig. 196 Front bumper:
Protective grille
s29g.4.book Page 215 Wednesday, June 17, 2009 9:54 AM