remove seats SKODA ROOMSTER 2009 1.G Owner's Manual
[x] Cancel search | Manufacturer: SKODA, Model Year: 2009, Model line: ROOMSTER, Model: SKODA ROOMSTER 2009 1.GPages: 263, PDF Size: 32.25 MB
Page 66 of 263
Seats and Storage65
Using the system
Safety
Driving Tips
General Maintenance
Breakdown assistance
Praktik
Technical Data
– Move the head restraint downwards if required by pressing the locking
button ⇒fig. 62 and by pressing with the other hand the head
restraint downwards.
Removing and installing a head restraint
– Pull the head restraint out of the seat backrest as far as the stop.
– Press the locking button in the direction of arrow ⇒fig. 62 and pull
the head restraint out.
– To re-insert the head restraint, push it down into the seat backrest far
enough until you hear the locking button engage.The position of the front, rear outer head restraints and the rear middle head
restraint* is adjustable for height.
The head restraints must be adjusted to match the size of the seat occupant.
Correctly adjusted head restraints together with the seat belts offer effective
protection for the occupants ⇒page 128.
WARNING
•
The head restraints must be correctly adjusted in order to offer effective
protection for the occupants in the event of an accident.
•
Do not drive under any circumstance with removed head restraints - risk
of injury!
Heating the front seats*The seating and leaning surfaces of the driver and front passenger seat
can be heated when the ignition is switched on.
Front seats
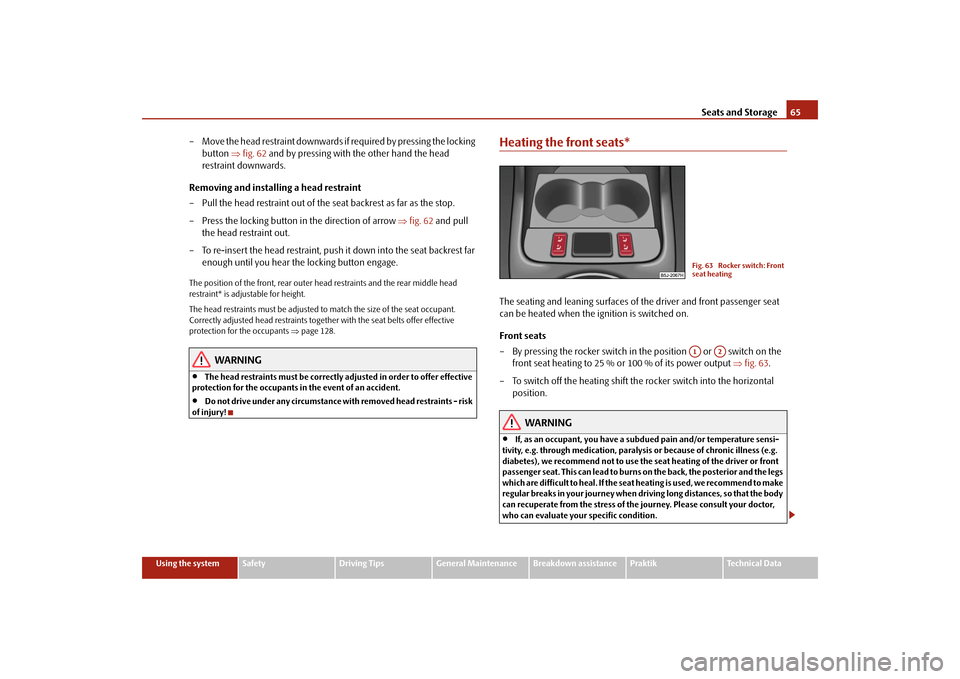
– By pressing the rocker switch in the position or switch on the
front seat heating to 25 % or 100 % of its power output ⇒fig. 63.
– To switch off the heating shift the rocker switch into the horizontal
position.
WARNING
•
If, as an occupant, you have a subdued pain and/or temperature sensi-
tivity, e.g. through medication, paralysis or because of chronic illness (e.g.
diabetes), we recommend not to use the seat heating of the driver or front
passenger seat. This can lead to burns on the back, the posterior and the legs
which are difficult to heal. If the seat heating is used, we recommend to make
regular breaks in your journey when driving long distances, so that the body
can recuperate from the stress of the journey. Please consult your doctor,
who can evaluate your specific condition.
Fig. 63 Rocker switch: Front
seat heatingA1
A2
s29g.4.book Page 65 Wednesday, June 17, 2009 9:54 AM
Page 67 of 263
Seats and Storage 66•
Do not use the seat heating if objects are fastened or stored on a seat for
example a child seat, a bag etc. A fault in the system of the seat heating can
occur.Caution
•
You should not kneel on the seats or otherwise apply pressure at specific points
in order to avoid damaging the heating elements of the seat heaters.
•
Do not clean the seats moist ⇒page 178.Note
The seat heating should only be switched on when the engine is running. This has
a significant effect of saving on the battery capacity.Rear seatsAdjusting seats in forward/back direction
To enlarge the luggage compartment, the outer rear seats can be pushed
forwards, folded fully forwards or the seats can be removed.
Moving seats in forward/back direction
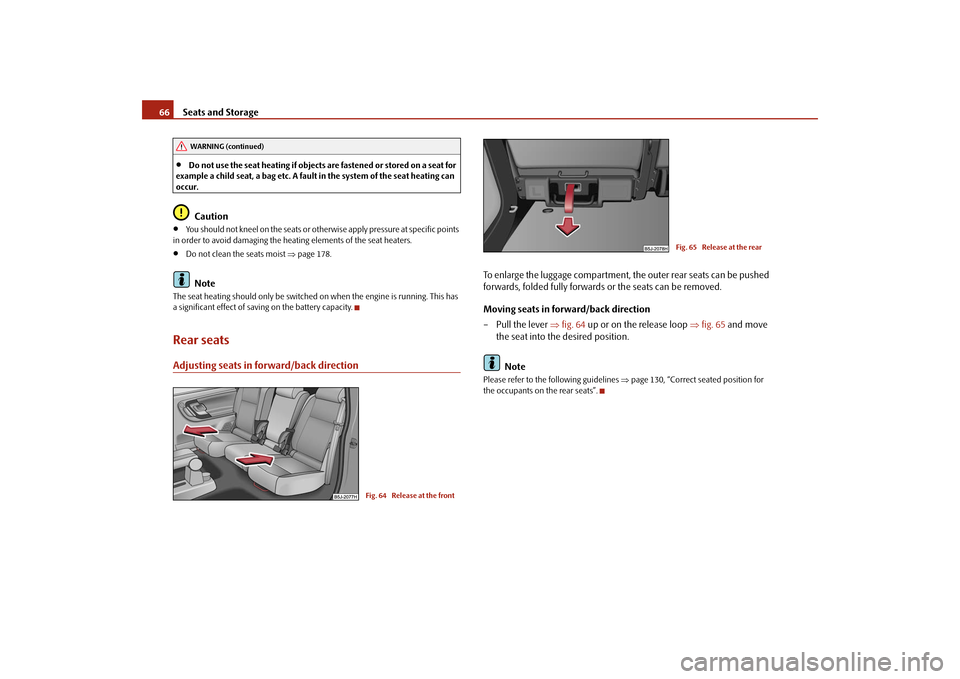
– Pull the lever ⇒fig. 64 up or on the release loop ⇒fig. 65 and move
the seat into the desired position.
NotePlease refer to the following guidelines ⇒page 130, “Correct seated position for
the occupants on the rear seats”.
WARNING (continued)
Fig. 64 Release at the front
Fig. 65 Release at the rear
s29g.4.book Page 66 Wednesday, June 17, 2009 9:54 AM
Page 69 of 263
Seats and Storage 68
NotePlease refer to the following guidelines ⇒page 130, “Correct seated position for
the occupants on the rear seats”.Removing seatsUnlocking and removing seats
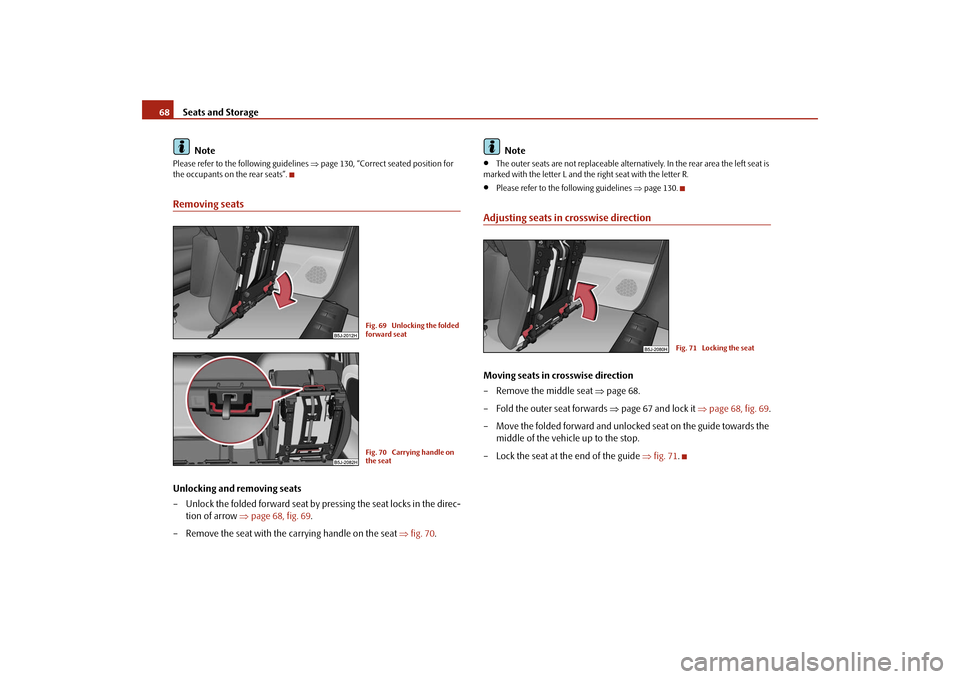
– Unlock the folded forward seat by pressing the seat locks in the direc-
tion of arrow ⇒page 68, fig. 69.
– Remove the seat with the carrying handle on the seat ⇒fig. 70.Note
•
The outer seats are not replaceable alternatively. In the rear area the left seat is
marked with the letter L and the right seat with the letter R.
•
Please refer to the following guidelines ⇒page 130.
Adjusting seats in crosswise directionMoving seats in crosswise direction
– Remove the middle seat ⇒page 68.
– Fold the outer seat forwards ⇒page 67 and lock it ⇒page 68, fig. 69.
– Move the folded forward and unlocked seat on the guide towards the
middle of the vehicle up to the stop.
– Lock the seat at the end of the guide ⇒fig. 71.
Fig. 69 Unlocking the folded
forward seatFig. 70 Carrying handle on
the seat
Fig. 71 Locking the seat
s29g.4.book Page 68 Wednesday, June 17, 2009 9:54 AM
Page 70 of 263
Seats and Storage69
Using the system
Safety
Driving Tips
General Maintenance
Breakdown assistance
Praktik
Technical Data
Move seats into the initial positionLocking seats and folding back into position
– If the seat is removed, first of all position it on the guide and lock the
seat ⇒page 68, fig. 71. Check for yourself that the seat is correctly
locked by pulling it up.
– Fold the seat into the horizontal position until it is heard to lock. Check
for yourself that the seat can no longer be lifted by pulling it up.
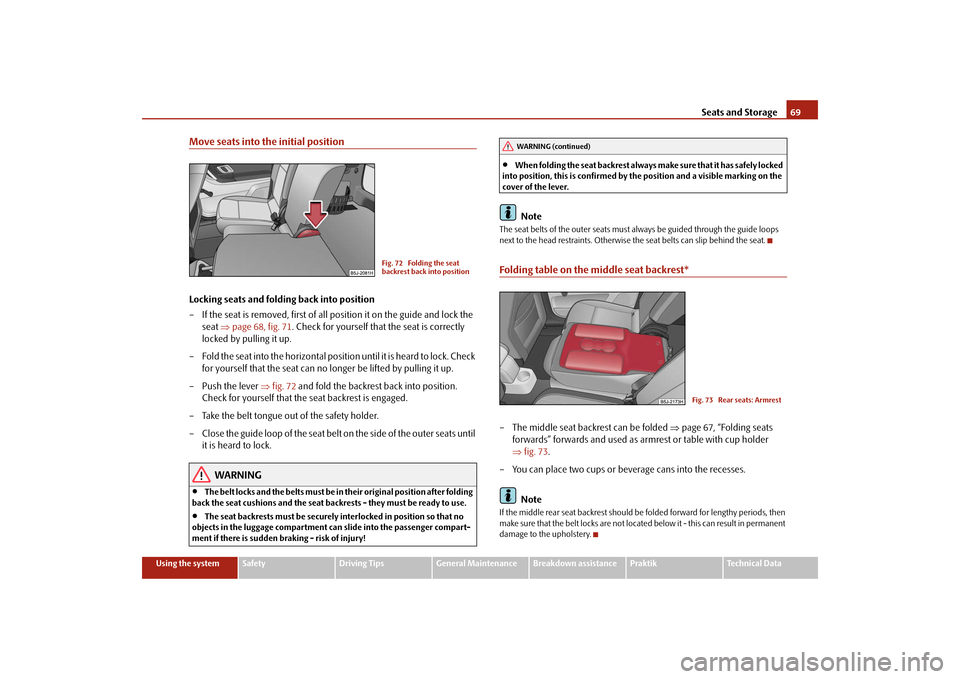
– Push the lever ⇒fig. 72 and fold the backrest back into position.
Check for yourself that the seat backrest is engaged.
– Take the belt tongue out of the safety holder.
– C l o s e th e g u id e l o o p o f t h e s ea t b el t o n th e s i de o f t h e o u te r s e a t s u n t il
it is heard to lock.
WARNING
•
The belt locks and the belts must be in their original position after folding
back the seat cushions and the seat backrests - they must be ready to use.
•
The seat backrests must be securely interlocked in position so that no
objects in the luggage compartment can slide into the passenger compart-
ment if there is sudden braking - risk of injury!
•
When folding the seat backrest always make sure that it has safely locked
into position, this is confirmed by the position and a visible marking on the
cover of the lever.Note
The seat belts of the outer seats must always be guided through the guide loops
next to the head restraints. Otherwise the seat belts can slip behind the seat.Folding table on the middle seat backrest*– The middle seat backrest can be folded ⇒page 67, “Folding seats
forwards” forwards and used as armrest or table with cup holder
⇒fig. 73.
– You can place two cups or beverage cans into the recesses.
NoteIf the middle rear seat backrest should be folded forward for lengthy periods, then
make sure that the belt locks are not located below it - this can result in permanent
damage to the upholstery.
Fig. 72 Folding the seat
backrest back into position
WARNING (continued)
Fig. 73 Rear seats: Armrest
s29g.4.book Page 69 Wednesday, June 17, 2009 9:54 AM
Page 74 of 263
Seats and Storage73
Using the system
Safety
Driving Tips
General Maintenance
Breakdown assistance
Praktik
Technical Data
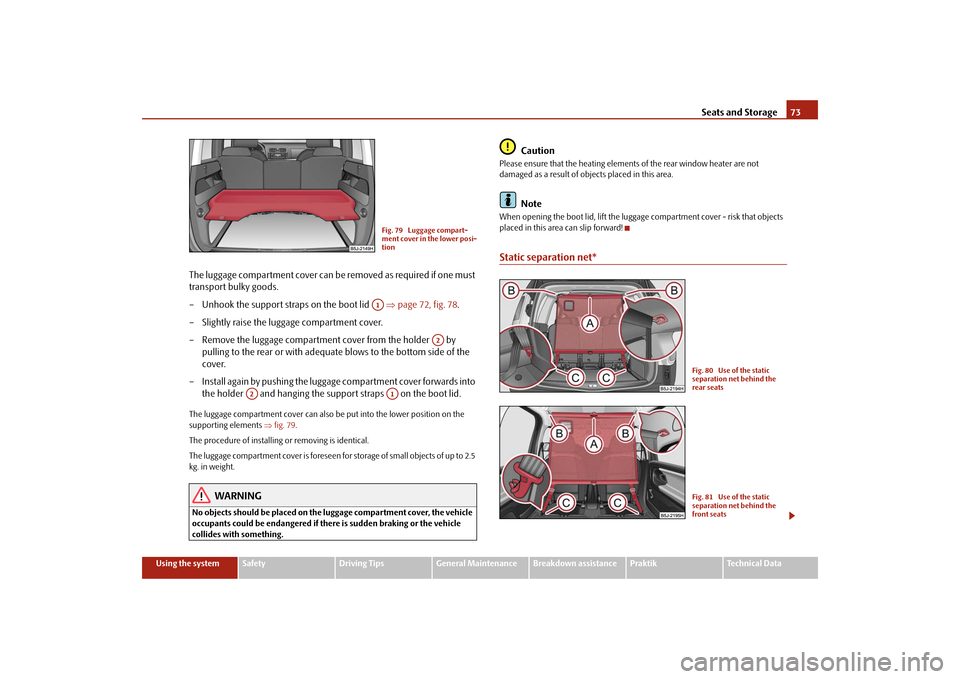
The luggage compartment cover can be removed as required if one must
transport bulky goods.
– Unhook the support straps on the boot lid ⇒page 72, fig. 78.
– Slightly raise the luggage compartment cover.
– Remove the luggage compartment cover from the holder by
pulling to the rear or with adequate blows to the bottom side of the
cover.
– Install again by pushing the luggage compartment cover forwards into
the holder and hanging the support straps on the boot lid.The luggage compartment cover can also be put into the lower position on the
supporting elements ⇒fig. 79.
The procedure of installing or removing is identical.
The luggage compartment cover is foreseen for storage of small objects of up to 2.5
kg. in weight.
WARNING
No objects should be placed on the luggage compartment cover, the vehicle
occupants could be endangered if there is sudden braking or the vehicle
collides with something.
Caution
Please ensure that the heating elements of the rear window heater are not
damaged as a result of objects placed in this area.
Note
When opening the boot lid, lift the luggage compartment cover - risk that objects
placed in this area can slip forward!Static separation net*
Fig. 79 Luggage compart-
ment cover in the lower posi-
tionA1
A2
A2
A1
Fig. 80 Use of the static
separation net behind the
rear seatsFig. 81 Use of the static
separation net behind the
front seats
s29g.4.book Page 73 Wednesday, June 17, 2009 9:54 AM
Page 75 of 263
Seats and Storage 74
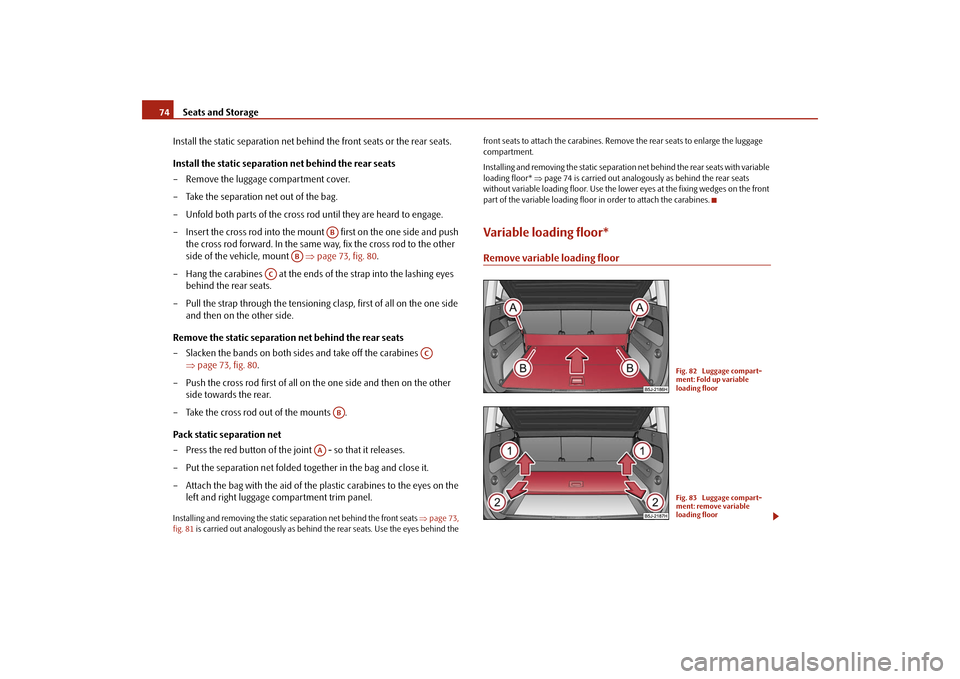
Install the static separation net behind the front seats or the rear seats.
Install the static separation net behind the rear seats
– Remove the luggage compartment cover.
– Take the separation net out of the bag.
– Unfold both parts of the cross rod until they are heard to engage.
– Insert the cross rod into the mount first on the one side and push
the cross rod forward. In the same way, fix the cross rod to the other
side of the vehicle, mount ⇒page 73, fig. 80.
– Hang the carabines at the ends of the strap into the lashing eyes
behind the rear seats.
– Pull the strap through the tensioning clasp, first of all on the one side
and then on the other side.
Remove the static separation net behind the rear seats
– Slacken the bands on both sides and take off the carabines
⇒page 73, fig. 80.
– Push the cross rod first of all on the one side and then on the other
side towards the rear.
– Take the cross rod out of the mounts .
Pack static separation net
– Press the red button of the joint - so that it releases.
– Put the separation net folded together in the bag and close it.
– Attach the bag with the aid of the plastic carabines to the eyes on the
left and right luggage compartment trim panel.Installing and removing the static separation net behind the front seats ⇒page 73,
fig. 81 is carried out analogously as behind the rear seats. Use the eyes behind the front seats to attach the carabines. Remove the rear seats to enlarge the luggage
compartment.
Installing and removing the static separation net behind the rear seats with variable
loading floor* ⇒page 74 is carried out analogously as behind the rear seats
without variable loading floor. Use the lower eyes at the fixing wedges on the front
part of the variable loading floor in order to attach the carabines.
Variable loading floor*Remove variable loading floor
AB
AB
AC
AC
AB
AA
Fig. 82 Luggage compart-
ment: Fold up variable
loading floorFig. 83 Luggage compart-
ment: remove variable
loading floor
s29g.4.book Page 74 Wednesday, June 17, 2009 9:54 AM
Page 76 of 263
Seats and Storage75
Using the system
Safety
Driving Tips
General Maintenance
Breakdown assistance
Praktik
Technical Data
The variable loading floor makes it easier to handle bulky goods and
creates an even luggage compartment floor when the rear seats are
folded forward. The maximum permissable surface load of the variable
loading floor is 75 kg.
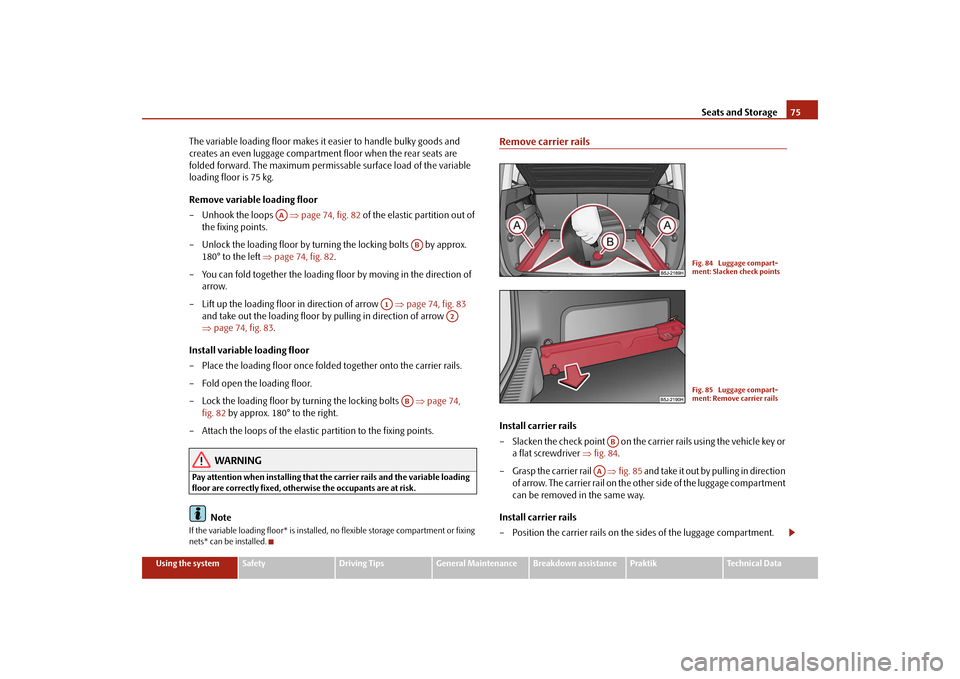
Remove variable loading floor
– Unhook the loops ⇒page 74, fig. 82 of the elastic partition out of
the fixing points.
– Unlock the loading floor by turning the locking bolts by approx.
180° to the left ⇒page 74, fig. 82.
– You can fold together the loading floor by moving in the direction of
arrow.
– Lift up the loading floor in direction of arrow ⇒page 74, fig. 83
and take out the loading floor by pulling in direction of arrow
⇒page 74, fig. 83.
Install variable loading floor
– Place the loading floor once folded together onto the carrier rails.
– Fold open the loading floor.
– Lock the loading floor by turning the locking bolts ⇒page 74,
fig. 82 by approx. 180° to the right.
– Attach the loops of the elastic partition to the fixing points.
WARNING
Pay attention when installing that the carrier rails and the variable loading
floor are correctly fixed, otherwise the occupants are at risk.
Note
If the variable loading floor* is installed, no flexible storage compartment or fixing
nets* can be installed.
Remove carrier railsInstall carrier rails
– Slacken the check point on the carrier rails using the vehicle key or
a flat screwdriver ⇒fig. 84.
– Grasp the carrier rail ⇒fig. 85 and take it out by pulling in direction
of arrow. The carrier rail on the other side of the luggage compartment
can be removed in the same way.
Install carrier rails
– Position the carrier rails on the sides of the luggage compartment.
AA
AB
A1
A2
AB
Fig. 84 Luggage compart-
ment: Slacken check pointsFig. 85 Luggage compart-
ment: Remove carrier rails
AB
AA
s29g.4.book Page 75 Wednesday, June 17, 2009 9:54 AM
Page 77 of 263
Seats and Storage 76
– Press the check point on each carrier rail up to the stop.
– Check the attachment of the carrier rails by pulling it.
WARNING
Pay attention when installing that the carrier rails and the variable loading
floor are correctly fixed, otherwise the occupants are at risk.Take out lateral carrier rail and fixing wedges
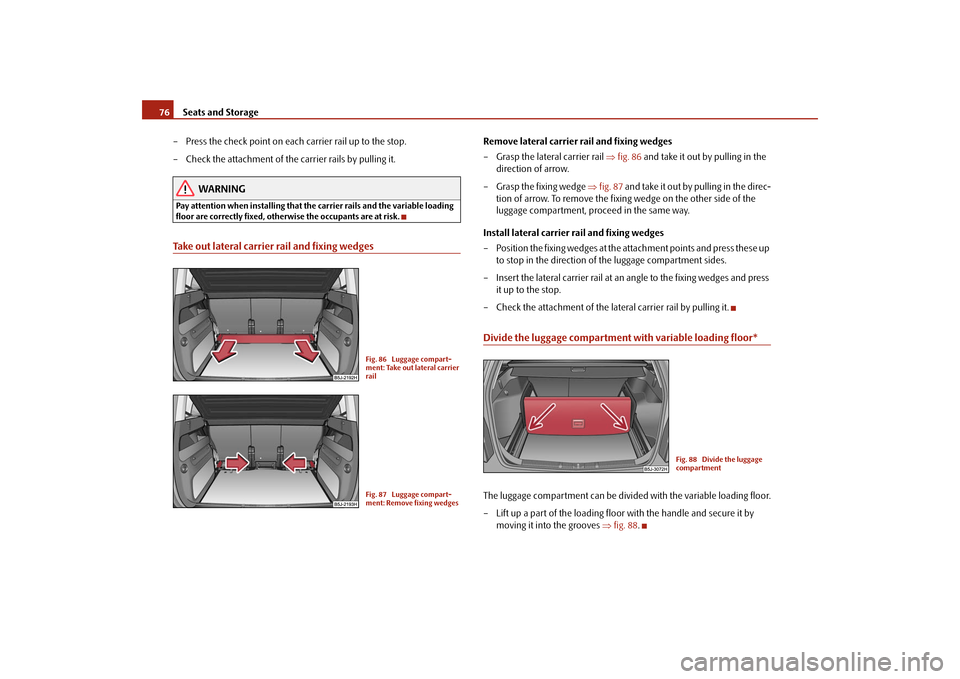
Remove lateral carrier rail and fixing wedges
– Grasp the lateral carrier rail ⇒fig. 86 and take it out by pulling in the
direction of arrow.
– Grasp the fixing wedge ⇒fig. 87 and take it out by pulling in the direc-
tion of arrow. To remove the fixing wedge on the other side of the
luggage compartment, proceed in the same way.
Install lateral carrier rail and fixing wedges
– Position the fixing wedges at the attachment points and press these up
to stop in the direction of the luggage compartment sides.
– Insert the lateral carrier rail at an angle to the fixing wedges and press
it up to the stop.
– Check the attachment of the lateral carrier rail by pulling it.Divide the luggage compartment with variable loading floor*The luggage compartment can be divided with the variable loading floor.
– Lift up a part of the loading floor with the handle and secure it by
moving it into the grooves ⇒fig. 88.
Fig. 86 Luggage compart-
ment: Take out lateral carrier
railFig. 87 Luggage compart-
ment: Remove fixing wedges
Fig. 88 Divide the luggage
compartment
s29g.4.book Page 76 Wednesday, June 17, 2009 9:54 AM
Page 78 of 263
Seats and Storage77
Using the system
Safety
Driving Tips
General Maintenance
Breakdown assistance
Praktik
Technical Data
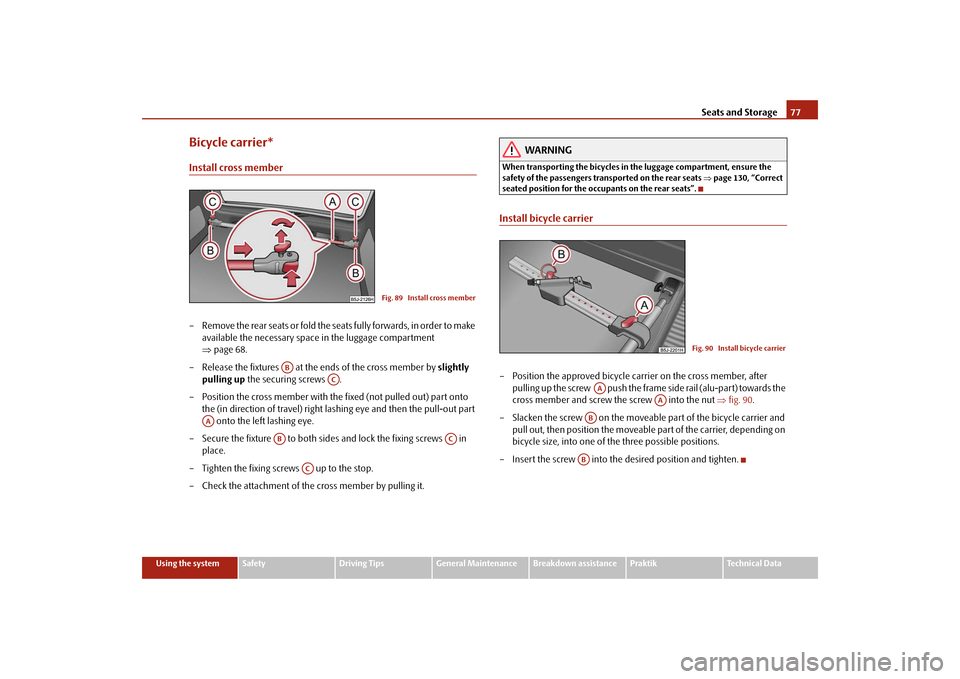
Bicycle carrier*Install cross member– Remove the rear seats or fold the seats fully forwards, in order to make
available the necessary space in the luggage compartment
⇒page 68.
– Release the fixtures at the ends of the cross member by slightly
pulling up the securing screws .
– Position the cross member with the fixed (not pulled out) part onto
the (in direction of travel) right lashing eye and then the pull-out part
onto the left lashing eye.
– Secure the fixture to both sides and lock the fixing screws in
place.
– Tighten the fixing screws up to the stop.
– Check the attachment of the cross member by pulling it.
WARNING
When transporting the bicycles in the luggage compartment, ensure the
safety of the passengers transported on the rear seats ⇒page 130, “Correct
seated position for the occupants on the rear seats”.Install bicycle carrier– Position the approved bicycle carrier on the cross member, after
pulling up the screw push the frame side rail (alu-part) towards the
cross member and screw the screw into the nut ⇒fig. 90.
– Slacken the screw on the moveable part of the bicycle carrier and
pull out, then position the moveable part of the carrier, depending on
bicycle size, into one of the three possible positions.
– Insert the screw into the desired position and tighten.
Fig. 89 Install cross member
AB
AC
AA
AB
AC
AC
Fig. 90 Install bicycle carrier
AA
AA
ABAB
s29g.4.book Page 77 Wednesday, June 17, 2009 9:54 AM
Page 79 of 263
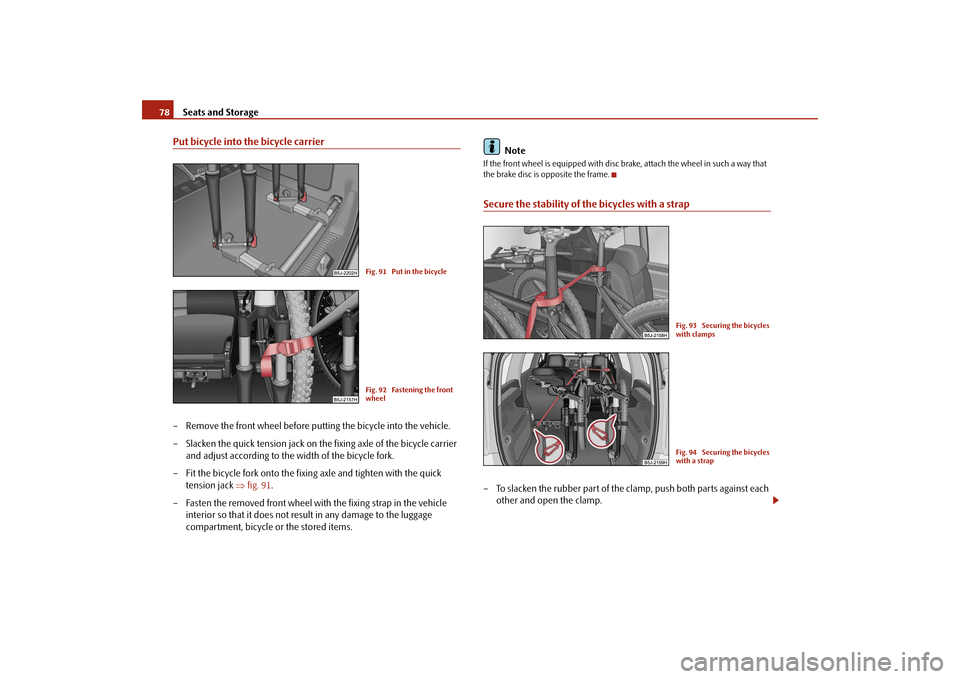
Seats and Storage 78Put bicycle into the bicycle carrier– Remove the front wheel before putting the bicycle into the vehicle.
– Slacken the quick tension jack on the fixing axle of the bicycle carrier
and adjust according to the width of the bicycle fork.
– Fit the bicycle fork onto the fixing axle and tighten with the quick
tension jack ⇒fig. 91.
– Fasten the removed front wheel with the fixing strap in the vehicle
interior so that it does not result in any damage to the luggage
compartment, bicycle or the stored items.Note
If the front wheel is equipped with disc brake, attach the wheel in such a way that
the brake disc is opposite the frame.Secure the stability of the bicycles with a strap– To slacken the rubber part of the clamp, push both parts against each
other and open the clamp.
Fig. 91 Put in the bicycleFig. 92 Fastening the front
wheel
Fig. 93 Securing the bicycles
with clampsFig. 94 Securing the bicycles
with a strap
s29g.4.book Page 78 Wednesday, June 17, 2009 9:54 AM