fog light bulb SKODA ROOMSTER 2010 1.G Owner's Manual
[x] Cancel search | Manufacturer: SKODA, Model Year: 2010, Model line: ROOMSTER, Model: SKODA ROOMSTER 2010 1.GPages: 231, PDF Size: 12.91 MB
Page 26 of 231
Instruments and warning lights25
Using the system
Safety
Driving Tips
General Maintenance
Breakdown assistance
Praktik
Technical Data
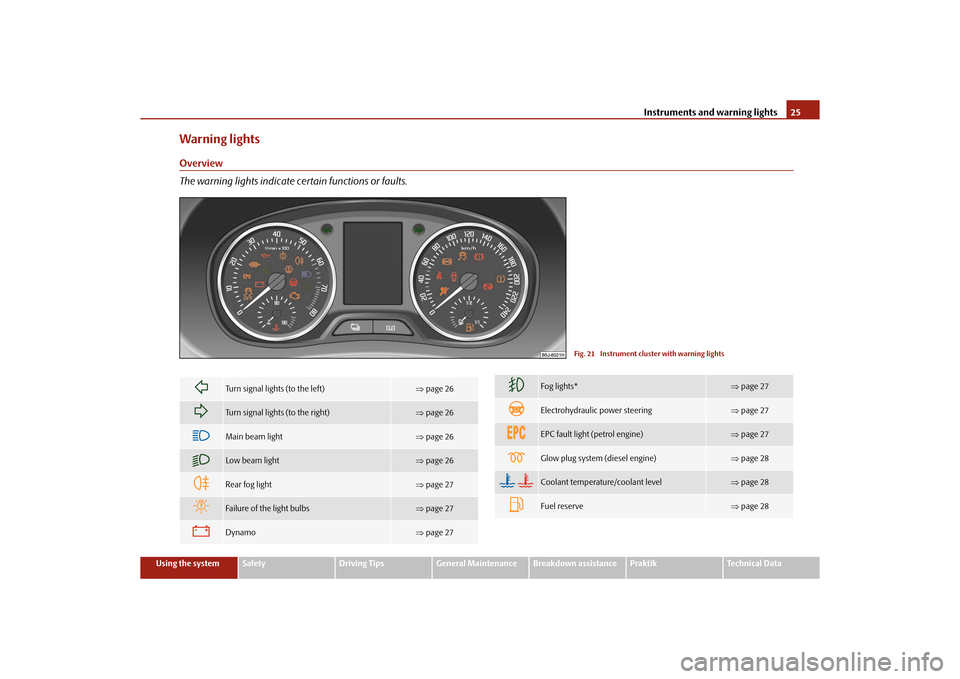
Warning lightsOverview
The warning lights indicate certain functions or faults.
Fig. 21 Instrument cluster with warning lights
Turn signal lights (to the left)
page 26
Turn signal lights (to the right)
page 26
Main beam light
page 26
Low beam light
page 26
Rear fog light
page 27
Failure of the light bulbs
page 27
Dynamo
page 27
Fog lights*
page 27
Electrohydraulic power steering
page 27
EPC fault light (petrol engine)
page 27
Glow plug system (diesel engine)
page 28
Coolant temperature/coolant level
page 28
Fuel reserve
page 28
s16g.4.book Page 25 Wednesda y, February 10, 2010 3:53 PM
Page 28 of 231
Instruments and warning lights27
Using the system
Safety
Driving Tips
General Maintenance
Breakdown assistance
Praktik
Technical Data
Rear fog light
The warning light
comes on when the rear fog lights are operating page 48.
Bulb failure
The warning light
comes on if a bulb is faulty:
up to 2 seconds after the ignition is switched on;
when switching on the defective light bulb.
The following text e.g will be displayed in the information display*: Check front right dipped beam!
The rear side lights and the licence plate li ghting require several light bulbs. The indi-
cator light
only lights up if all light bulbs of the licence plate lighting or the parking
light (in one rear light unit) are defective. Check regularly the function of the light
bulbs.
Alternator
The warning light
comes on after the ignition has been switched on. It should go
out after the engine has started.
If the warning light does not go out after the engine has started, or comes on when
driving, drive to the nearest specialist garage. The vehicle battery will be discharged in
this case so switch off all non- essential electrical components.
Caution
If the warning light
comes on when driving and in addition the warning light
(cooling system fault) also comes on in di splay, you must then stop the car immedi-
ately and switch the engine off - risk of engine damage!
Fog lights*
The warning light
comes on when the fog lights are operating page 48.
Electrohydraulic power steering
The warning light
comes on for a few seconds when the ignition is switched on.
If the warning light after switching on the ignition or when driving lights up continu-
ously, a fault exists in the electrohydraulic power steering. The power steering operates
with reduced steering assist or is completely without function.
Further information page 137.
WARNING
Contact your specialist garage if the power steering is defective.
Note
If the yellow warning light
goes out after starting the engine again and a short
drive, it is not necessary to visit a specialist garage.
If the battery has been di sconnected and reconnected, the yellow warning light
comes on after switching on the ignition. The warning light must go out after driving a
short distance.
There is no power-assisted steering su pport when the vehicle is being towed
without the engine running or when the powe r-assisted steering is defect. The vehicle
is fully steerable however. There is however increased force required to turn the
steering wheel.
EPC fault light
(petrol engine)
The
(Electronic Power Control) warning light comes on for a few seconds when the
ignition is switched on.
If the warning light
flashes after starting the engine or flashes while driving, a fault
exists in the engine control system. The engine management system selects an emer-
gency programme which enables you to drive to the nearest specialist garage by
adopting a gentle style of driving.
The following text will be displayed in the information display*:
Engine fault: Workshop!
s16g.4.book Page 27 Wednesda y, February 10, 2010 3:53 PM
Page 48 of 231
Lights and Visibility47
Using the system
Safety
Driving Tips
General Maintenance
Breakdown assistance
Praktik
Technical Data
Switching on daylight driving lights*– Remove the cover of the fuse box on the left side of the dash panel page 191.
– Turn the light switch into position O page 46, fig. 34.
– Switch on the switch for daylight driving lights page 46, fig. 34 .Switching off daylight driving lights*– Switch off the switch for the daylight driving lights page 46, fig. 34 .
– Turn the light switch to the position side lights
or low beam
page 46,
fig. 34 .
When the daylight driving lights are switch ed on, also the low beam shines together
with the side lights (valid for vehicles without fog lights).
On vehicles which are fitted with bulbs for daylight driving lights
6) in the fog lights*,
the side lights and the low beam
7) do not come on when activating the function
daylight driving lights.
Halogen projector headlights with cornering light function*For a better cornering illumination, the ha logen projector headlights with cornering
light function are set in the optimal positi on in line with the vehicle speed and the
steering angle.
If the warning light
comes on while driving or after the ignition is switched on, a
fault is confirmed.
WARNING
If there is a fault in the halogen projec tor headlights with cornering light func-
tion, the warning light
lights up in the instrument cluster. The halogen
projector headlights with cornering light function are automatically lowered to
the emergency position, which prevents a possible dazzling of oncoming traffic.
Thus the illuminated length of the road is shortened. Drive carefully and have
the car inspected immediatel y by a specialist garage.
Tourist light*Halogen projector headlights with cornering light functionThis mode makes it possible to drive in countries with opposing traffic system, driving
on the left/right, without dazzling the oncoming vehicles. When the mode “tourist
light” is active, the side to side swivel of the headlights is deactivated.Activating tourist lightBefore activating the tourist light, the following conditions must be met:
Ignition switched off, light switched off (light switch in the position O), control dial for
the headlamp beam adjustment in the position 0, no gear engaged or selector lever in
the position N (automatic gearbox), tourist light deactivated.
– Switch on the ignition.
Up to 10 seconds after the ignition is switched on:
– Turn the light switch to the position
page 46.
– Engage the reverse gear (manual gearbox) or move the selector lever into the posi- tion R (automatic gearbox).
– Turn the control dial for headlamp beam adjustment from the position 0 to the
position 3 page 49.
Deactivating tourist lightBefore deactivating the tourist light, the following conditions must be met:
Ignition switched off, light switched off (light switch in the position O), control dial for
the headlamp beam adjustment in the position 3, no gear engaged or selector lever in
the position N (automatic gearbox), tourist light activated.
– Switch on the ignition.
Up to 10 seconds after the ignition is switched on:
– Turn the light switch to the position
page 46.
– Engage the reverse gear (manual gearbox) or move the selector lever into the posi- tion R (automatic gearbox).
– Turn the control dial for headlamp beam adjustment from the position 3 to the
position 0 page 49.
6)Valid for vehicles Scout.7)Only valid for some countries.
s16g.4.book Page 47 Wednesda y, February 10, 2010 3:53 PM
Page 193 of 231
Fuses and light bulbs
192
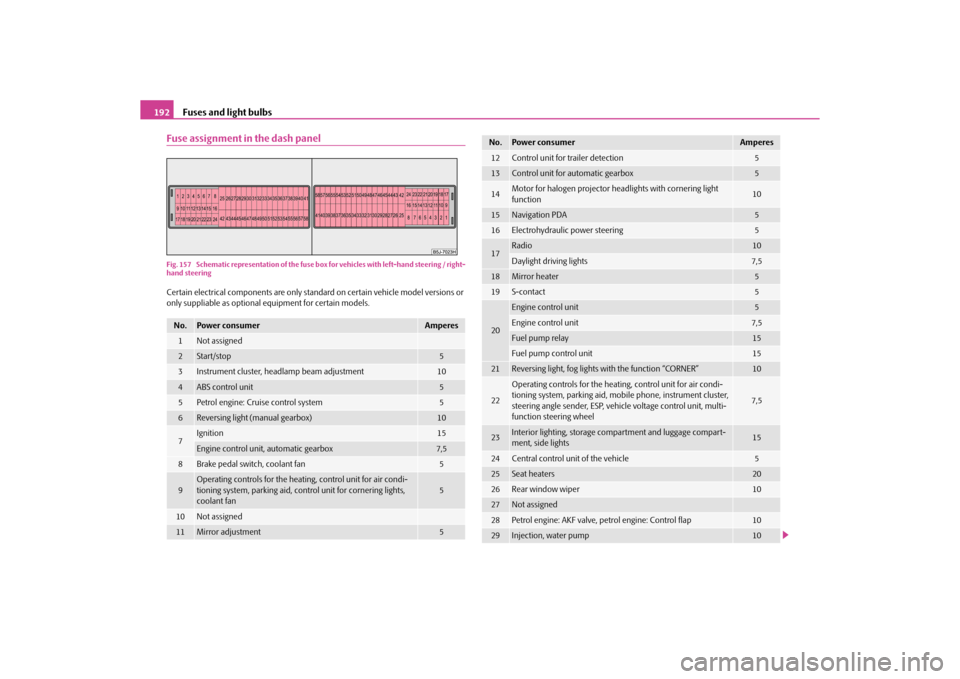
Fuse assignment in the dash panelFig. 157 Schematic representation of the fuse box for vehicles with left-hand steering / right-
hand steeringCertain electrical components are only standard on certain vehicle model versions or
only suppliable as optional equipment for certain models.No.
Power consumer
Amperes
1
Not assigned
2
Start/stop
5
3
Instrument cluster, headlamp beam adjustment
10
4
ABS control unit
5
5
Petrol engine: Cruise control system
5
6
Reversing light (manual gearbox)
10
7
Ignition
15
Engine control unit, automatic gearbox
7,5
8
Brake pedal switch, coolant fan
5
9
Operating controls for the heating, control unit for air condi-
tioning system, parking aid, control unit for cornering lights,
coolant fan
5
10
Not assigned
11
Mirror adjustment
5
12
Control unit for trailer detection
5
13
Control unit for automatic gearbox
5
14
Motor for halogen projector headlights with cornering light
function
10
15
Navigation PDA
5
16
Electrohydraulic power steering
5
17
Radio
10
Daylight driving lights
7,5
18
Mirror heater
5
19
S-contact
5
20
Engine control unit
5
Engine control unit
7,5
Fuel pump relay
15
Fuel pump control unit
15
21
Reversing light, fog lights with the function “CORNER”
10
22
Operating controls for the heating, control unit for air condi-
tioning system, parking aid, mobi le phone, instrument cluster,
steering angle sender , ESP, vehicle voltage control unit, multi-
function steering wheel
7,5
23
Interior lighting, storage compartment and luggage compart-
ment, side lights
15
24
Central control unit of the vehicle
5
25
Seat heaters
20
26
Rear window wiper
10
27
Not assigned
28
Petrol engine: AKF valve, petrol engine: Control flap
10
29
Injection, water pump
10
No.
Power consumer
Amperes
s16g.4.book Page 192 Wednesda y, February 10, 2010 3:53 PM
Page 194 of 231
Fuses and light bulbs193
Using the system
Safety
Driving Tips
General Maintenance
Breakdown assistance
Praktik
Technical Data
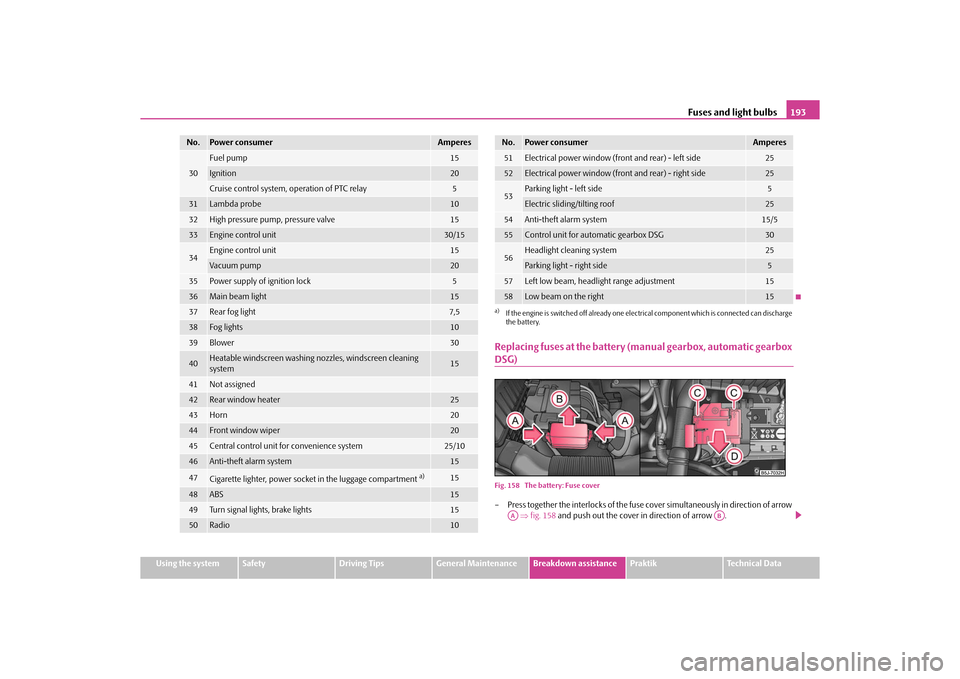
Replacing fuses at the battery (manual gearbox, automatic gearbox DSG)Fig. 158 The battery: Fuse cover– Press together the interlocks of the fuse cover simultaneously in direction of arrow
fig. 158 and push out the cover in direction of arrow .
30
Fuel pump
15
Ignition
20
Cruise control system, operation of PTC relay
5
31
Lambda probe
10
32
High pressure pump, pressure valve
15
33
Engine control unit
30/15
34
Engine control unit
15
Vacuum pump
20
35
Power supply of ignition lock
5
36
Main beam light
15
37
Rear fog light
7,5
38
Fog lights
10
39
Blower
30
40
Heatable windscreen washing nozzles, windscreen cleaning
system
15
41
Not assigned
42
Rear window heater
25
43
Horn
20
44
Front window wiper
20
45
Central control unit fo r convenience system
25/10
46
Anti-theft alarm system
15
47
Cigarette lighter, power socket in the luggage compartment
a)
15
48
ABS
15
49
Turn signal lights, brake lights
15
50
Radio
10
No.
Power consumer
Amperes
51
Electrical power window (front and rear) - left side
25
52
Electrical power window (front and rear) - right side
25
53
Parking light - left side
5
Electric sliding/tilting roof
25
54
Anti-theft alarm system
15/5
55
Control unit for automatic gearbox DSG
30
56
Headlight cleaning system
25
Parking light - right side
5
57
Left low beam, headlight range adjustment
15
58
Low beam on the right
15
a)If the engine is switched off already one electr ical component which is connected can discharge
the battery.No.
Power consumer
Amperes
AA
AB
s16g.4.book Page 193 Wednesda y, February 10, 2010 3:53 PM
Page 197 of 231
Fuses and light bulbs
196Caution
Observe the following guidelines in “Replace fuses at the battery (automatic
gearbox)”.BulbsReplacing bulbsThe relevant lamp must always be switch ed off before a light bulb is replaced.
Do not take hold of the glass bulb with naked fingers (even the smallest amount of dirt
reduces the working life of the light bulb). Use a clean cloth, serviette or something
similar.
Defect light bulbs should only be replaced with light bulbs of the same type. The desig-
nation is located on the ligh t socket or the glass bulb.
Changing certain bulbs is not something whic h you can do yourself, but requires to be
done by a specialist. Other parts of the vehicle must be removed in order to change the
light bulbs. This applies, in particular, to bulbs which can only be reached from the
engine compartment.
We therefore recommend that you have any bulbs changed by a specialist garage or,
in exceptional cases, by calling on other professional assistance.
Please note that the engine compartment is a hazardous area page 162, “Working
in the engine compartment”.
We recommend that you always have a small box of replacement bulbs in your vehicle.
You can obtain replacement bulbs from Škoda original accessories or from a specialist
garage
16).
A stowage place for the bulbs is located in the box in the spare wheel.
Bulb - Overview
16)The small box with replacement bulbs is part of the basic equipping of the vehicle in some coun-
tries.
Front headlight
Halogen headlight
Halogen projector
headlights
Low beam light
H4
H7
Main beam light
H4
H7
Parking lights
W5W
Turn signals
PY21W
Fog lights*
H8/HB4
a)
a)Valid for vehicles Scout.Daylight driving lights*
P21W
Rear light unit
Bulb
Reversing light
P21W
Turn signals
PY21W
Brake lights
P21W
Fog lights
P21W
Parking lights
2x W5W
Others
Bulb
Side turn signal lights
WY5W
Licence plate light
C5W / T4W (5W)
3. Brake light
LED
Interior lighting front / rear
C10W
Reading lights
W5W
Luggage compartment light
W5W
Storage compartment light - front passenger
side
W5W
s16g.4.book Page 196 Wednesda y, February 10, 2010 3:53 PM
Page 199 of 231
Fuses and light bulbs
198
– Remove the protective cap page 197, fig. 162 on the right.
– Turn the connector with the light bulb up to the stop towards the left and remove.
– Replace the halogen lamp H7, insert the connector with the new halogen lamp and turn to the right up to the stop.
– Insert the protective cap.
– We recommend that you have the headlight setting checked by a Skoda Service Partner after replacing the light bulb.Main beam (halogen projector headlights)– Open the bonnet.
– Remove the protective cap page 197, fig. 162 .
– Turn the connector with the light bulb up to the stop towards the left and remove.
– Replace the halogen lamp H7, insert the connector with the new halogen lamp and turn to the right up to the stop.
– Insert the protective cap.
– We recommend that you have the headlight setting checked by a Skoda Service Partner after replacing the light bulb.Turn signal light (at the front)– Open the bonnet. – Turn the socket (halogen headlight)
page 197, fig. 162 or the socket
(halogen projector headlight) to the left and take it out together with the light bulb
for the turn signal light.
– Replace the defective light bulb.
– Insert the lamp holder with light bulb into the headlight. Secure the lamp holder by
turning it to the right until it locks in place.
Parking light at the front– Open the bonnet.
– Remove the protective cap (halogen headlight) or (halogen projector head- light) page 197, fig. 162 .
– Grasp the light bulb holder and pull it out of the headlight.
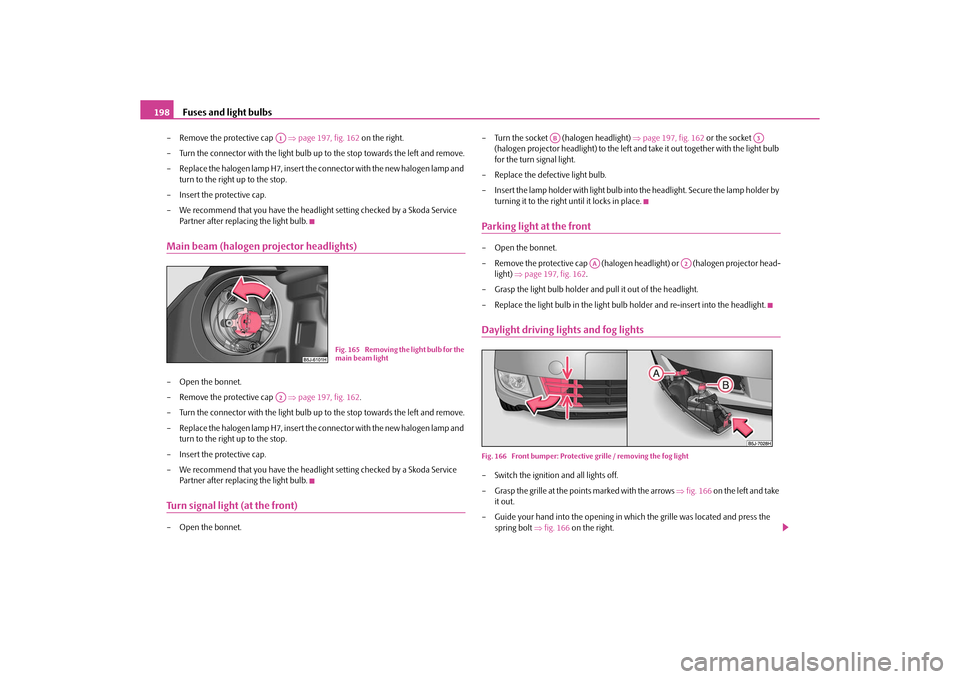
– Replace the light bulb in the light bulb holder and re-insert into the headlight.Daylight driving lights and fog lightsFig. 166 Front bumper: Protective grille / removing the fog light– Switch the ignition and all lights off.
– Grasp the grille at the points marked with the arrows fig. 166 on the left and take
it out.
– Guide your hand into the opening in wh ich the grille was located and press the
spring bolt fig. 166 on the right.
A1
Fig. 165 Removing the light bulb for the
main beam light
A2
AB
A3
AA
A2
s16g.4.book Page 198 Wednesda y, February 10, 2010 3:53 PM
Page 200 of 231
Fuses and light bulbs199
Using the system
Safety
Driving Tips
General Maintenance
Breakdown assistance
Praktik
Technical Data
– Take out the fog light.
– Turn the socket with the bulb for daylight driving light or the socket with the
bulb of the fog light to the left up to stop and take it out.
– Replace the lamp, insert the connector with the new lamp and turn to the right up
to the stop.
– For the installation, first of all insert the fog light with the interlock to the side far
away from the marking of the vehicle.
– Press into place the headlight onto the side facing the marking.
– First of all put the grille with the latch in place on the side opposite the marking.
– Press into place the protective grille onto the side facing the marking.
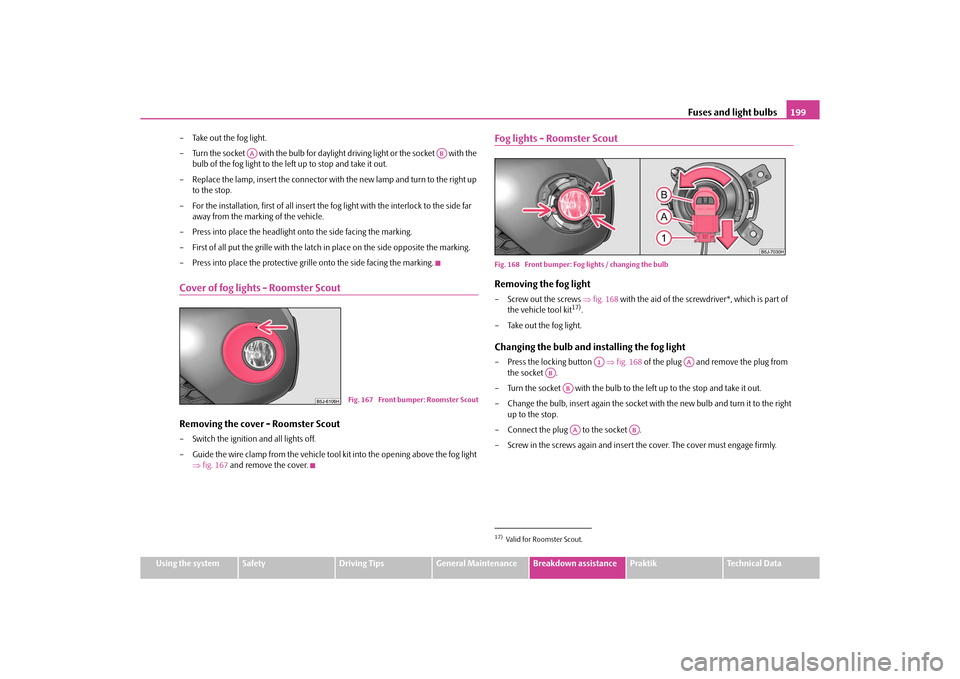
Cover of fog lights - Roomster ScoutRemoving the cover - Roomster Scout– Switch the ignition and all lights off.
– Guide the wire clamp from the vehicle tool kit into the opening above the fog light
fig. 167 and remove the cover.
Fog lights - Roomster ScoutFig. 168 Front bumper: Fog lights / changing the bulbRemoving the fog light– Screw out the screws fig. 168 with the aid of the screwd river*, which is part of
the vehicle tool kit
17).
– Take out the fog light.
Changing the bulb and installing the fog light– Press the locking button fig. 168 of the plug and remove the plug from
the socket .
– Turn the socket with the bulb to the left up to the stop and take it out.
– Change the bulb, insert again the socket wi th the new bulb and turn it to the right
up to the stop.
– Connect the plug to the socket .
– Screw in the screws again and insert th e cover. The cover must engage firmly.
AA
AB
Fig. 167 Front bumper: Roomster Scout
17)Valid for Roomster Scout.
A1
AA
AB
ABAA
AB
s16g.4.book Page 199 Wednesday, February 10, 2010 3:53 PM
Page 201 of 231
Fuses and light bulbs
200
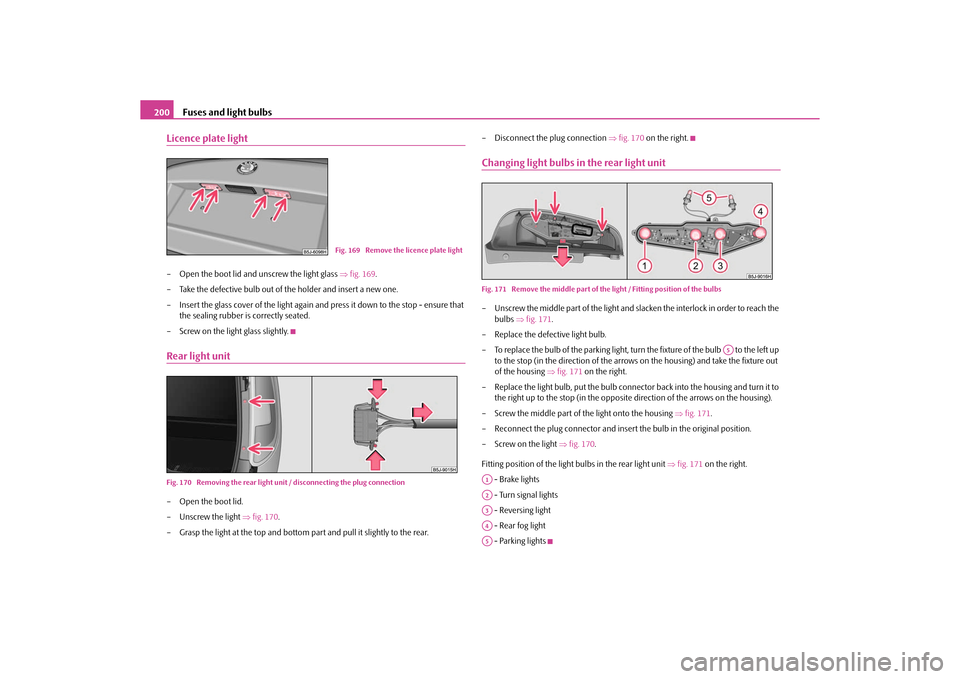
Licence plate light– Open the boot lid and unscrew the light glass fig. 169 .
– Take the defective bulb out of the holder and insert a new one.
– Insert the glass cover of the light again and press it down to the stop - ensure that
the sealing rubber is correctly seated.
– Screw on the light glass slightly.Rear light unitFig. 170 Removing the rear light uni t / disconnecting the plug connection– Open the boot lid.
– Unscrew the light fig. 170 .
– Grasp the light at the top and bottom pa rt and pull it slightly to the rear. – Disconnect the plug connection
fig. 170 on the right.
Changing light bulbs in the rear light unitFig. 171 Remove the middle part of the light / Fitting position of the bulbs– Unscrew the middle part of the light and slacken the interlock in order to reach the
bulbs fig. 171 .
– Replace the defective light bulb.
– To replace the bulb of the parking light, turn the fixture of the bulb to the left up to the stop (in the direction of the arrows on the housing) and take the fixture out
of the housing fig. 171 on the right.
– Replace the light bulb, put th e bulb connector back into the housing and turn it to
the right up to the stop (in the opposite direction of the arrows on the housing).
– Screw the middle part of the light onto the housing fig. 171 .
– Reconnect the plug connector and insert the bulb in the original position.
– Screw on the light fig. 170 .
Fitting position of the light bulbs in the rear light unit fig. 171 on the right.
- Brake lights
- Turn signal lights
- Reversing light
- Rear fog light
- Parking lights
Fig. 169 Remove the licence plate light
A5
A1A2A3A4A5
s16g.4.book Page 200 Wednesda y, February 10, 2010 3:53 PM