run flat SKODA ROOMSTER 2010 1.G Owner's Manual
[x] Cancel search | Manufacturer: SKODA, Model Year: 2010, Model line: ROOMSTER, Model: SKODA ROOMSTER 2010 1.GPages: 231, PDF Size: 12.91 MB
Page 95 of 231
Automatic gearbox
94
Automatic gearboxAutomatic gearbox*Information for driving with the 6-speed automatic gearbox*
Your car is equipped with a conv entional 6-speed automatic gearbox.The maximum speed is reached in the 5th gear. The 6th gear serves as an economic
driving programme, which is intended to redu ce the fuel consumption. Shifting up and
down through the gears is performed automa tically. You can also, however, switch the
gearbox over into the Tiptronic mode. This mode makes it possible for you to also shift
gears manually page 98.Starting-off and Driving– Depress the brake pedal fully and keep it depressed.
– Press the Shiftlock button (button in ha ndle of the selector lever), move the
selector lever into the desired position, e.g. D page 95, and then release the
Shiftlock button.
– Wait a moment until the gearbox has shif ted (a slight engagement nudge can be
felt).
– Release the brake pedal and depress the accelerator .Stop– The selector lever position N does not have to be selected when stopping just for
a short time, such as at a cross roads. It is sufficient to hold the vehicle stationary
using the foot brake. The engine can, however, be allowed just to idle.Parking– Depress the brake pedal and hold it depressed.
– Apply the handbrake firmly.
– Press and Shiftlock button in the selector lever, move the selector lever to P and
then release the Shiftlock button.
The engine can only be started when the selector lever is in position P or N page 88. It is sufficient to engage selector lever position
P when parking on a flat surface. When
parking on a slope you should first apply the handbrake firmly and then move the
selector lever into position P. This is to ensure that there is no excessive pressure acting
on the lock mechanism and that it is easier to subsequently move the selector lever out
of position P.
If the selector lever position N is selected by accident while driving it is first necessary
to release pressure on the accelerator pedal and wait for idling speed of the engine to
be reached before engaging a drive position in the selector lever.
WARNING
Do not depress the accelerator when changing the position of the selector
lever if the car is stationary and the engine is running - risk of accident!
Never move the selector lever into position R or P when driving - risk of an
accident!
When the engine is running and the vehi cle is stationary, it is necessary to
hold the car with the brake pedal in all the positions of the selector lever (except
P and N) since the power transmission is never completely interrupted, also not
when the engine is idling - the vehicle creeps.
Information for driving with the automatic gearbox DSG*
The abbreviation DSG mean s Direct shift gearbox (Direct shift gearbox).Two independent clutches are needed for the power transmission between the engine
and the gearbox. These replace the torque converter of the conventional automatic
gearbox. Their shifting is matched in such a way that there are no jerks when shifting
the gear and the power transmission of the engine to the front wheels is not inter-
rupted. Shifting up and down through the gears is performed automatically. You can
also, however, switch the gearbox over into the Tiptronic mode. This mode makes it
possible for you to also shift gears manually page 98.Starting-off and Driving– Depress the brake pedal fully and keep it depressed.
s16g.4.book Page 94 Wednesda y, February 10, 2010 3:53 PM
Page 96 of 231
Automatic gearbox95
Using the system
Safety
Driving Tips
General Maintenance
Breakdown assistance
Praktik
Technical Data
– Press the Shiftlock button (button in ha
ndle of the selector lever), move the
selector lever into the desired position, e.g. in D, and then release the Shiftlock
button.
– Release the brake pedal and depress the accelerator .
Stop– The selector lever position N does not have to be selected when stopping just for
a short time, such as at a cross roads. It is absolutely sufficient to hold the stopped
vehicle stationary by depressing the foot brake. The engine can, however, be
allowed just to idle.Parking– Depress the brake pedal and hold it depressed.
– Apply the handbrake firmly.
– Press and Shiftlock button in the selector lever, move the selector lever to P and
then release the Shiftlock button.
The engine can only be started when the selector lever is in position P or N page 88.
At temperatures below -10 °C the engine can only be started in the selector lever posi-
tion P.
It is sufficient to engage selector lever position P when parking on a flat surface. When
parking on a slope you should first apply the handbrake firmly and then move the
selector lever into position P. This is to ensure that there is no excessive pressure acting
on the lock mechanism and that it is easier to subsequently move the selector lever out
of position P .
If the selector lever position N is selected by accident while driving it is first necessary
to release pressure on the accelerator pedal and wait for idling speed of the engine to
be reached before engaging a drive position in the selector lever.
WARNING
Do not depress the accelerator when changing the position of the selector
lever if the car is stationary and the engine is running - risk of accident!
Never move the selector lever into position R or P when driving - risk of an
accident!
If you are stopping at a hill (downhill section), never try to hold the car
stationary with the gear engaged by mean s of the “accelerator”, this means by
letting the clutch slip. This can lead to ov erheating of the clutch. If there is a risk
of overheating of the clutch due to overlo ad, the clutch is opened automatically
and the vehicle rolls backward - risk of accident!
If yo u m us t s to p a t a sl ope , d e pre s s a nd ho ld t he b ra ke pe d a l , s o t ha t y ou c a n
prevent the vehicle from rolling back.Caution
The double clutch on the automatic gear box DSG is equipped with an overload
protection. If you make use of the uphill func tion on a vehicle which is stationary or
driving slowly uphill, it will result in an increase of thermal stress of the clutches.
In the event that they overheat, the warning light
and a warning text page 23
appear in the information display*. In such a case bring the vehicle to a stop, switch off
the engine and wait until the warning light and the warning go out - risk of gearbox
damage! You can continue the trip as soon as the warning light and the warning go
out.
Selector lever positionsFig. 97 Selector lever / information display: Se lector lever positionsThe selector lever position you have engaged is shown in the information display of
the instrument cluster with the corresponding gear symbol highlighted fig. 97 on
WARNING (continued)
s16g.4.book Page 95 Wednesda y, February 10, 2010 3:53 PM
Page 139 of 231
Intelligent Technology
138
You will place great stresses on the power steering system if the steering is turned to
full lock when the vehicle is stationary. Turn ing the steering to full lock in such a situa-
tion will be accompanied by noises.
It is still possible to fully steer the vehicle if the power steering fails or if the engine is
not running (vehicle being towed in). The only difference is that greater physical effort
is required.
It is possible that the hydraulic pump of the power steering will not run due to the low
vehicle network voltage if the battery has gone flat and the engine must started with
the help off jump leads. This condition will be indicated by lighting up of the warning
light.
The power steering operates again if the ba ttery is charged to a specific range when
engine is running. It also op erates again, if the engine can be started with its own
battery.
If there is a fault in the power steering, the warning light lights up in the instrument
cluster
page 25.
Caution
Do not leave the steering at full lock fo r more than 15 seconds when the engine is
running - risk of damaging the power steering!
Note
Have the steering inspected as soon as possible by a specialist garage if there is a leak
or fault in the system.
Tyre pressure monitoring system*The tyre pressure monitoring system compares with the aid of the ABS sensors the
speed and also the rolling circumference of the individual wheels. If the tyre inflation
pressure is significantly changed and thus the rolling circumference of a wheel, the
warning light
lights up in the instrument cluster page 30. The tyre pressure moni-
toring system functions late or too sensitively if:
the structure of the tyre is damaged,
the vehicle is loaded to one side or with a load on the roof,
the wheels of an axle are loaded heavily (e.g. when towing a trailer or when driving
uphill or downhill),
the vehicle is operated in unfavourable wi nter conditions or on an unfirm ground,
snow chains or emergency wheel are mounted,
the driver has a sporty style of driving (with sharp acceleration and high speed
when cornering).
Basic setting of the system
After changing the tyre inflation pressures or after changing one or several wheels, a
basic setting of the system mu st be carried out as follows.
Inflate all tyres to the specified inflation pressure page 173.
Switch on the ignition.
Press button
fig. 127 for more than 2 seconds. While pressing the button,
the warning light
lights up. At the same time the basic values are stored, which is
confirmed with an acoustic sound and then the warning light
goes out.
Fig. 127 Button for setting the tyre
inflation pressure control value
s16g.4.book Page 138 Wednesda y, February 10, 2010 3:53 PM
Page 146 of 231
Driving and the Environment145
Using the system
Safety
Driving Tips
General Maintenance
Breakdown assistance
Praktik
Technical Data
hand at +20°C and on the other hand at
-10°C. Your vehicle has a higher fuel
consumption in winter than in summer.
Checking tyre inflation pressures
Tyres which are correctly inflated save fuel.Always ensure that your tyres are inflated to the correct pressure at all times. The rolling
resistance will be increased if the tyre filling pressure is too low. This will not only
increase fuel consumption but also tyre we ar and the driving behaviour will worsen.
Always check the inflation pr essure of the tyres when cold.
Do not drive with winter tyres all year round for this costs about 10 % more fuel.
Winter tyres are also louder.No unnecessary ballast
Transporting ballast costs fuel.The fact that every kilogram of extra weight increases your fuel consumption means
that it is worth taking a look in the luggage compartment to avoid transporting any
unnecessary ballast.
It is particularly in town traffic, when one is accelerating quite often, that the vehicle
weight will have a significant effect upon the fuel consumption. A rule of thumb here
is that an increase in weight of 100 kilograms will cause an increase in fuel consump-
tion of about 1 litre/100 kilometres.
You may frequently also leave a roof rack fitted on just out of convenience, although
you no longer need it. The increased aerodyna mic drag of your vehicle causes it to use
about 1 l more fuel than normal at a speed of 100 - 120 km/h, even when you are not
carrying a load on the roof.Saving electricity
Generating electricity costs fuel.– Switch off electrical components as soon as you no longer need them. When the engine is running,
the alternator generates and supplies electrical power.
The greater the load on the alternator as a result of having a large number of electrical
components switched on, the more fuel will be consumed for operating the
alternator.
Keeping a log of your fuel consumptionIf you really wish to keep a close check on your fuel consumption, it is best to enter
the figures in a logbook. This does not take much time but is a very worthwhile exer-
cise. It enables you to detect any change (p ositive and negative) at an early stage and
to take any appropriate action.
If you find that your fuel consumption is too high, you should reflect on how, where
and in what conditions you have driven the vehicle since you last refuelled.Environmental compatibilityEnvironmental protection has played a major role in the design, selection of materials
and manufacture of your new Škoda. Particular emphasis has been paid to a number
of aspects, including:
Design measures
Joints designed to be easily detached.
Simplified disassembly due to the modular structure system.
Improved purity of differ ent classes of materials.
Identification of all plastic parts in accordance with VDA Recommendation°260.
Reduced fuel consumption and exhaust emission CO
2.
Minimum fuel leakage during accidents.
Reduced noise.
Choice of materials
Extensive use of re cyclable material.
Air conditioning filled with CFC-free refrigerant.
No cadmium.
No asbestos.
s16g.4.book Page 145 Wednesda y, February 10, 2010 3:53 PM
Page 174 of 231
Wheels and Tyres173
Using the system
Safety
Driving Tips
General Maintenance
Breakdown assistance
Praktik
Technical Data
Wheels and TyresWheelsGeneral information
New tyres do not offer optimal grip at first and should therefore be run in for about
500 km at a moderate speed and an appropri ately cautious style of driving. You will
also profit from longer tyre life.
The tread depth of new tyres may differ because of design features and the config-
uration of the tread (depending on the type of tyre and the manufacturer).
Drive over curbs on the side of the road and other such obstacles slowly and,
where possible, at a right angle in order to avoid damage to tyres and wheel trims.
Inspect your tyres from time to time for damage (punctures, cuts, splits and
bulges). Remove foreign bodies from the tyre profile.
Damage to tyres and wheels is frequently not visible. Unusual vi brations or pulling
of the vehicle to one side coul d be a sign of tyre damage. Please reduce your speed
immediately and stop if you su spect that a wheel is damaged. Inspect the tyres for
signs of damage (bulges, splits, etc.). If no visible damage is present, please drive at an
appropriately slow speed and carefully to the nearest specialist garage in order to have
your vehicle inspected.
Also protect your tyres from contact with oil, grease and fuel.
Immediately replace any dust caps of the valves which have got lost.
Mark wheels before removing them so that their previous direction of running can
be maintained when mounted them again.
Always store wheels or tyres which been removed in a cool, dry and, where
possible, dark place. Tyres which are not fixed to a wheel trim should be stored upright.
Unidirectional tyres*
The direction of rotation of the tyres is mark ed by arrows on the wall of the tyre. This
indicates the direction of rotation of the tyre, and it is essential that the tyres are fitted
on to run in this direction. Only then are the tyres able to provide the optimal proper-
ties in terms of grip, low nois e, wear-and-tear and aquaplaning.
Further information concerning th e use of unidirectional tyres page 177.
WARNING
New tyres during the first 500 km do not offer optimal grip and should
therefore be run appropriately - risk of accident!
Never drive with damaged tyres - risk of accident!Note
Please observe the various differing legal requirements regarding tyres.Ty re l i feThe life of your tyres very much depends on the following points:
Tyre pressure
The working life of tyres will be shortened considerably if the tyres are insufficiently or
over-inflated and this will have an adverse effect on the handling of your vehicle.
Correctly inflated tyres are of particular importance when travelling at high speeds. It
is therefore good to check the pressure at least once a month and also before setting
off on a long trip. Please do not forget the spare wheel when checking the tyres.
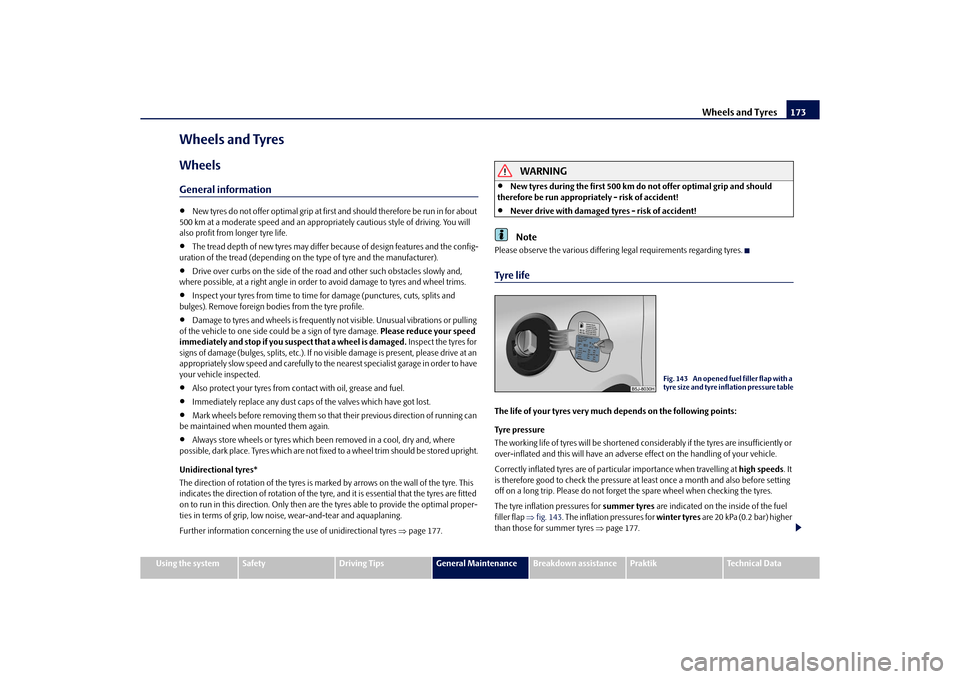
The tyre inflation pressures for summer tyres are indicated on the inside of the fuel
filler flap fig. 143 . The inflation pressures for winter tyres are 20 kPa (0.2 bar) higher
than those for summer tyres page 177.
Fig. 143 An opened fuel filler flap with a
tyre size and tyre inflation pressure table
s16g.4.book Page 173 Wednesda y, February 10, 2010 3:53 PM
Page 178 of 231
Wheels and Tyres177
Using the system
Safety
Driving Tips
General Maintenance
Breakdown assistance
Praktik
Technical Data
Winter tyresThe handling of your vehicle will be signif icantly improved when driving on wintry
roads if you fit winter tyres. Summer tyres do not offer the same grip on ice, snow and
at temperatures below 7 °C because of thei r construction (width, rubber blend, tread
pattern). This applies in particular to vehicles which are equipped with low-profile
tyres or high-speed tyres (code index H, V or W on wall of tyre).
Winter tyres must be mounted on all four wheels to obtain the best handling charac-
teristics.
You must only fit those types of winter tyre which are approved for your vehicle. The
permissible sizes of winter tyres are stated in your vehicle documents. Approvals may
differ because of na tional legislation.
Please remember that the tyres should be inflated to 20 kPa (0.2 bar) more than is the
case for summer tyres page 173.
Winter tyres no longer offer the same winter performance once the tyre tread has
worn down to a depth of about 4 mm.
Ageing also causes winter tyres to lose most of their winter performance properties -
even in cases where the remaining tread depth is still clearly more than 4 mm.
Speed restrictions apply to winter tyres as well as to summer tyres page 175,
.
You can fit winter tyres of a lower speed catego ry to your vehicle provided that you also
do not drive faster than the permissible maximum speed for such tyres, even if the
possible maximum speed of your vehicle is higher. The corresponding tyre category
can damage the tyres when exceeding the permissible maximum speed.
Please pay attention to the notes if you decide to fit winter tyres page 173.
You can also fit so-called “all-year tyres” instead of winter tyres.
Please contact your specialist garage if there are any points which are not clear who will
be able to provide you with information regarding the maximum speed for your tyres.
WARNING
You must on no account drive your car at more than the permissible maximum
speed for your winter tyres - risk of an accident resulting from tyre damage and
loss of control over your car.
For the sake of the environment
Fit your summer tyres on again in good time since summer tyres offer you better grip
and handling on roads which are free of snow and ice as well as ar temperatures below
7 °C - the braking distance is shorter, there is less tyre noise, tyre wear is reduced and
fuel consumption is reduced.
Note
Please observe the various differing legal requirements regarding tyres.Unidirectional tyres*The direction of rotation of the tyres is marked by arrows on the wall of the tyre. This
indicates the direction of rotation of the tyre, and it is essential that the tyres are fitted
on to run in this direction. Only then are the tyres able to provide the optimal proper-
ties in terms of grip, low nois e, wear-and-tear and aquaplaning.
Should it be necessary to fit on a spare wheel in exceptional cases with a tyre not dedi-
cated to the running direction or in oppo site running direction, please adopt a
cautious style of driving as the tyre is no longer able to provide optimal grip and
handling in such a situation. This particular ly important on wet roads. Please refer to
the notes page 182, “Spare wheel*”.
You should have the defective tyre replaced as soon as possible and restore the correct
direction of rotation on all tyresSnow chainsSnow chains must only be mounted on the front wheels.
When driving on wintry roads, snow chains improve not only traction, but also the
braking performance.
For technical reasons, it is only permissible to fit snow chains with the following
wheel/tyre combinations.
s16g.4.book Page 177 Wednesda y, February 10, 2010 3:53 PM
Page 188 of 231
Breakdown assistance187
Using the system
Safety
Driving Tips
General Maintenance
Breakdown assistance
Praktik
Technical Data
Jump-start cables
Only use jump-start cables which have an
adequately large cross-section and insu-
lated terminal clamps. Plea se pay attention to the manufacturer's instructions.
Positive cable - colour coding in the majority of cases red.
Negative cable - colour coding in the majority of cases black.
WARNING
A discharged battery may already freeze at temperatures just below 0°C. In
case of frozen battery carry out no jump-starting - risk of explosion! Also after
thawing of the battery there is a risk of caustic burns due to leaking acid.
Replace the frozen battery.
Please pay attention to the warning instructions relating to working in the
engine compartment page 162.Note
There must not be any contact between the two vehicles otherwise current may
flow as soon as the negati ve terminals are connected.
The discharged battery must be properly connected to the system of the vehicle.
Switch off any installed telephone and also pay attention to the instructions for use
of the telephone in such a situation.
We recommend that you purchase the jump-starting cable in the specialist shops
of the battery manufacturers.
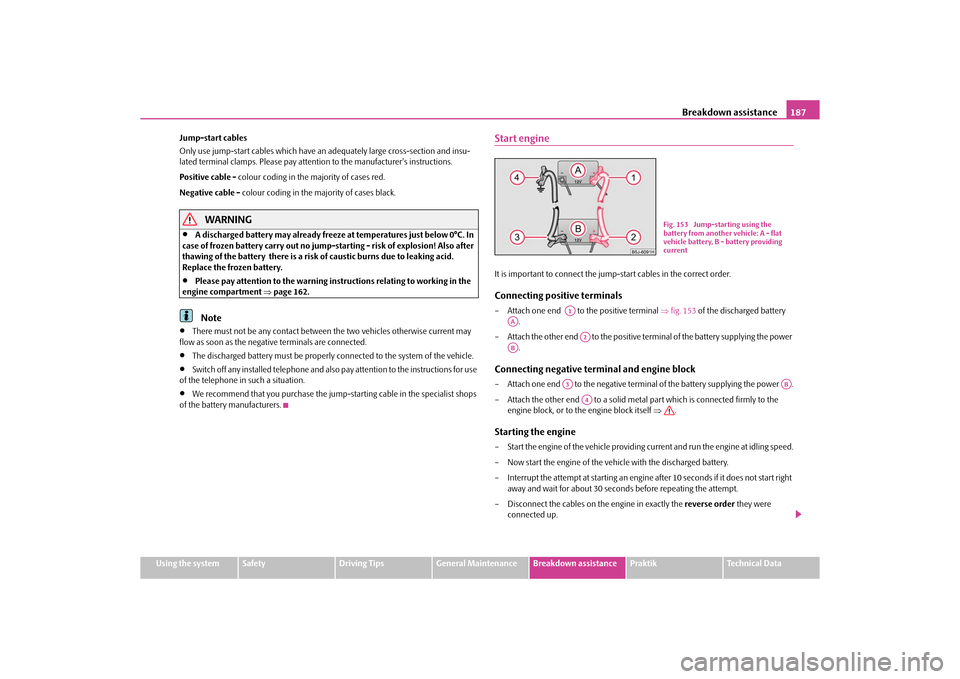
Start engineIt is important to connect the jump-start cables in the correct order.Connecting positive terminals– Attach one end to the positive terminal fig. 153 of the discharged battery
.
– Attach the other end to the positive te rminal of the battery supplying the power
.Connecting negative term inal and engine block– Attach one end to the negative termin al of the battery supplying the power .
– Attach the other end to a solid metal part which is connected firmly to the
engine block, or to the engine block itself .Starting the engine– Start the engine of the vehicle providing current and run the engine at idling speed.
– Now start the engine of the vehicle with the discharged battery.
– Interrupt the attempt at starting an engine after 10 seconds if it does not start right away and wait for about 30 seconds before repeating the attempt.
– Disconnect the cables on the engine in exactly the reverse order they were
connected up.
Fig. 153 Jump-starting using the
battery from another vehicle: A - flat
vehicle battery, B - battery providing
current
A1
AA
A2
AB
A3
AB
A4
s16g.4.book Page 187 Wednesda y, February 10, 2010 3:53 PM
Page 226 of 231
Index225
Using the system
Safety
Driving Tips
General Maintenance
Breakdown assistance
Praktik
Technical Data
Remote control . . . . . . . . . . . . . . . . . . . . . . . . . . . . . . . 40
Synchronisation process . . . . . . . . . . . . . . . . . . . 41
Removing seats . . . . . . . . . . . . . . . . . . . . . . . . . . . . . . . 60
Replacing bulbs . . . . . . . . . . . . . . . . . . . . . . . . . . . . . . 196
Replacing fuses . . . . . . . . . . . . . . . . . . . . . . . . . . . . . . 191
Replacing the wiper blades . . . . . . . . . . . . . . . . . . . . 54
Roof aerial . . . . . . . . . . . . . . . . . . . . . . . . . . . . . . . . . . 151
Running in the car . . . . . . . . . . . . . . . . . . . . . . . . . . . 141
SSafe securing . . . . . . . . . . . . . . . . . . . . . . . . . . . . . . . . . 36
Safety . . . . . . . . . . . . . . . . . . . . . . . . . . . . . . . . . . . . . . . 109
Safety information Engine compartment . . . . . . . . . . . . . . . . . . . . . 162
Saving electrical energy . . . . . . . . . . . . . . . . . . . . . . 142
Seat belt height adjuster . . . . . . . . . . . . . . . . . . . . . . 115
Seat belt warning light . . . . . . . . . . . . . . . . . . . . . . . . 115
Seat belts . . . . . . . . . . . . . . . . . . . . . . . . . . . . . . . . . . . . 113 Cleaning . . . . . . . . . . . . . . . . . . . . . . . . . . . . . . . . . 157
fastening . . . . . . . . . . . . . . . . . . . . . . . . . . . . . . . . 115
Height adjustment . . . . . . . . . . . . . . . . . . . . . . . . 115
Safety information . . . . . . . . . . . . . . . . . . . . . . . . 114
taking off . . . . . . . . . . . . . . . . . . . . . . . . . . . . . . . . 116
Warning light . . . . . . . . . . . . . . . . . . . . . . . . . . . . . 33
Seats . . . . . . . . . . . . . . . . . . . . . . . . . . . . . . . . . . . . . . . . . 57 Heating . . . . . . . . . . . . . . . . . . . . . . . . . . . . . . . . . . . 59
Selector lever . . . . . . . . . . . . . . . . . . . . . . . . . . . . . . . . . 95
Selector lever positions . . . . . . . . . . . . . . . . . . . . . . . . 95
Selector lever-emergency unlocking . . . . . . . . . . . . 98
Service Display . . . . . . . . . . . . . . . . . . . . . . . . . . . . . . . 17
Service Interval Display . . . . . . . . . . . . . . . . . . . . . . . . 17 Setting temperature
Air conditioning system . . . . . . . . . . . . . . . . . . . . 82
Heating . . . . . . . . . . . . . . . . . . . . . . . . . . . . . . . . . . . 79
Setting the clock . . . . . . . . . . . . . . . . . . . . . . . . . . . . . . 18
Shifting . . . . . . . . . . . . . . . . . . . . . . . . . . . . . . . . . . . . . . . 90
Side airbag . . . . . . . . . . . . . . . . . . . . . . . . . . . . . . . . . . 121
Side lights . . . . . . . . . . . . . . . . . . . . . . . . . . . . . . . . . . . . 46
Snow chains . . . . . . . . . . . . . . . . . . . . . . . . . . . . . . . . . 177
Spare wheel . . . . . . . . . . . . . . . . . . . . . . . . . . . . . . . . . 182
Speedometer . . . . . . . . . . . . . . . . . . . . . . . . . . . . . . . . . 16
Stability programme (ESP) . . . . . . . . . . . . . . . . . . . . 133
Starting the engine . . . . . . . . . . . . . . . . . . . . . . . . . . . . 88 Diesel engines . . . . . . . . . . . . . . . . . . . . . . . . . . . . . 89
Petrol engines . . . . . . . . . . . . . . . . . . . . . . . . . . . . . 89
Static separation net . . . . . . . . . . . . . . . . . . . . . . . . . . . 65
Steering force assistance . . . . . . . . . . . . . . . . . . . . . . 137
Storage compartment Lighting . . . . . . . . . . . . . . . . . . . . . . . . . . . . . . . . . . . 51
Storage compartments . . . . . . . . . . . . . . . . . . . . . . . . 73
Storage facilities . . . . . . . . . . . . . . . . . . . . . . . . . . . . . . 73
Sun visors . . . . . . . . . . . . . . . . . . . . . . . . . . . . . . . . . . . . 52
Switching lights on and off . . . . . . . . . . . . . . . . . . . . . 46
Switching off the engine . . . . . . . . . . . . . . . . . . . . . . . 89
TTaking care of your vehicle . . . . . . . . . . . . . . . . . . . . 151
TCS . . . . . . . . . . . . . . . . . . . . . . . . . . . . . . . . . . . . . . . . . 134 Warning light . . . . . . . . . . . . . . . . . . . . . . . . . . . . . . 30
Telephone . . . . . . . . . . . . . . . . . . . . . . . . . . . . . . . . . . . 101
Temperature outside . . . . . . . . . . . . . . . . . . . . . . . . . . . . . . . . . . . 20 the first 1 500 kilometres . . . . . . . . . . . . . . . . . . . . . 141
The roof luggage rack system . . . . . . . . . . . . . . . . . . . 70
Tiptronic . . . . . . . . . . . . . . . . . . . . . . . . . . . . . . . . . . . . . 94
Tool . . . . . . . . . . . . . . . . . . . . . . . . . . . . . . . . . . . . . . . . 181
Tourist light . . . . . . . . . . . . . . . . . . . . . . . . . . . . . . . . . . . 47
Towing a trailer . . . . . . . . . . . . . . . . . . . . . . . . . . . . . 148
Towing eye
front . . . . . . . . . . . . . . . . . . . . . . . . . . . . . . . . . . . . 189
rear . . . . . . . . . . . . . . . . . . . . . . . . . . . . . . . . . . . . . 189
Towing protection monitoring . . . . . . . . . . . . . . . . . . 42
towing vehicle . . . . . . . . . . . . . . . . . . . . . . . . . . . . . . 188
Tow-starting . . . . . . . . . . . . . . . . . . . . . . . . . . . . . . . . 188
Tow-starting and towing vehicle Automatic gearbox . . . . . . . . . . . . . . . . . . . . . . . . . 99
Traction control system (TCS) . . . . . . . . . . . . . . . . 134 Warning light . . . . . . . . . . . . . . . . . . . . . . . . . . . . . . 30
Trailer . . . . . . . . . . . . . . . . . . . . . . . . . . . . . . . . . . . . . . 148 General Maintenance . . . . . . . . . . . . . . . . . . . . 148
Transporting children . . . . . . . . . . . . . . . . . . . . . . . . 126
Tread depth . . . . . . . . . . . . . . . . . . . . . . . . . . . . . . . . 174
Turn signal light . . . . . . . . . . . . . . . . . . . . . . . . . . . . . 198
Turn signal lights . . . . . . . . . . . . . . . . . . . . . . . . . . . . . . 50 Warning light . . . . . . . . . . . . . . . . . . . . . . . . . . . . . . 26
Two-way radio systems . . . . . . . . . . . . . . . . . . . . . . 101
Tyre . . . . . . . . . . . . . . . . . . . . . . . . . . . . . . . . . . . . . . . . 173
Tyre inflation pressure Warning light . . . . . . . . . . . . . . . . . . . . . . . . . . . . . . 30
Tyre pressure monitoring system . . . . . . . . . . . . . 138
Tyre repair kit . . . . . . . . . . . . . . . . . . . . . . . . . . . . . . . 182
Tyres Winter tyres . . . . . . . . . . . . . . . . . . . . . . . . . . . . . 177
s16g.4.book Page 225 Wednesda y, February 10, 2010 3:53 PM