warning SKODA ROOMSTER 2011 1.G Owner's Manual
[x] Cancel search | Manufacturer: SKODA, Model Year: 2011, Model line: ROOMSTER, Model: SKODA ROOMSTER 2011 1.GPages: 212, PDF Size: 3.3 MB
Page 175 of 212
●
when driving with very low tyre pressure or with a completely flat tyre,
● if the use-by-date (see inflation bottle) has passed. WARNING
● If you find yourself in flowing traffic switch on the hazard warning lights
system and place the warning triangle on the side of the road at the prescri-
bed distance from your vehicle. Comply with the national legal regulations. In
this way you are protecting not only yourself but also other road users.
● Park the vehicle as far away as possible from the traffic flow. Park on as
flat and firm a surface as possible.
● A tyre filled with sealant has the same driving characteristics as a standard
tyre.
● Do not drive faster than 80 km/h, 50 mph.
● Avoid accelerating at full throttle, sharp braking and fast cornering.
● Check the tyre inflation pressure after driving 10 minutes.
● Sealant is hazardous to heath. Remove immediately if it comes into con-
tact with the skin. For the sake of the environment
Used sealant or sealant whose expiry date has passed must be disposed of in ac-
cordance with environmental protection regulations. Note
● Observe the manufacturer's usage instructions for the tyre repair kit.
● You can purchase a new bottle of sealant from the range of the ŠKODA Origi-
nal Accessories.
● Change the wheel that was repaired using the tyre repair kit or consult a spe-
cialist garage about possibilities for getting repairs done. Components of the tyre repair kit
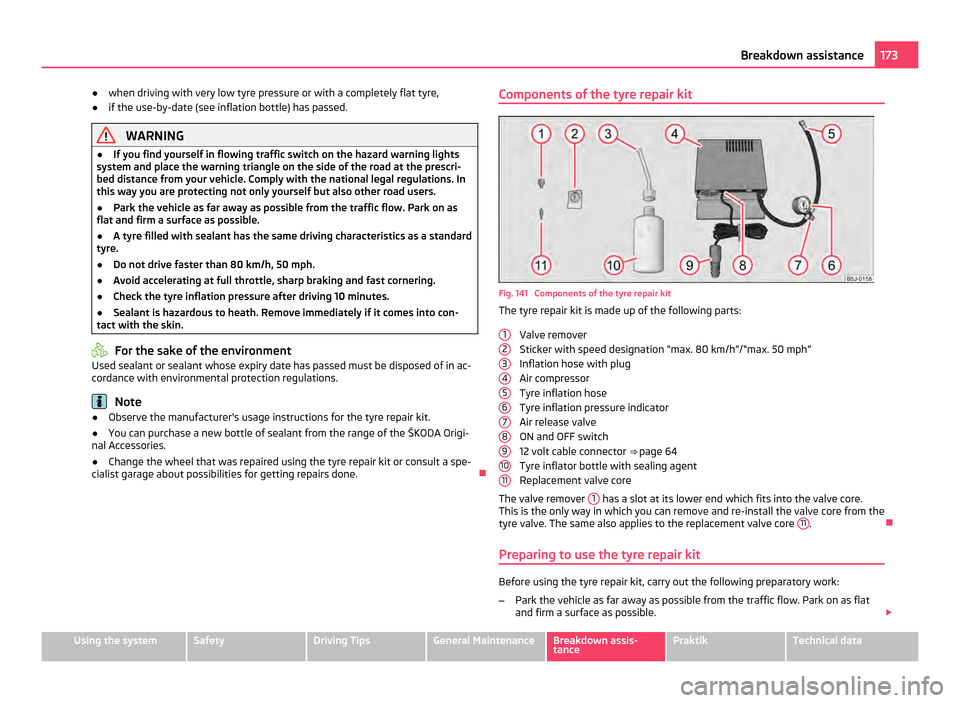
Fig. 141 Components of the tyre repair kit
The tyre repair kit is made up of the following parts:
Valve remover
Sticker with speed designation
“max. 80 km/h”/“max. 50 mph”
Inflation hose with plug
Air compressor
Tyre inflation hose
Tyre inflation pressure indicator
Air release valve
ON and OFF switch
12 volt cable connector ⇒ page 64
Tyre inflator bottle with sealing agent
Replacement valve core
The valve remover 1 has a slot at its lower end which fits into the valve core.
This is the only way in which you can remove and re-install the valve core from the
tyre valve. The same also applies to the replacement valve core 11 .
Preparing to use the tyre repair kit Before using the tyre repair kit, carry out the following preparatory work:
–
Park the vehicle as far away as possible from the traffic flow. Park on as flat
and firm a surface as possible. £
1 2
3
4
5
6
7
8
9
10
11 173
Breakdown assistance Using the system Safety Driving Tips General Maintenance Breakdown assis-
tance Praktik Technical data
Page 176 of 212
–
Have all the occupants get out. While changing a tyre, the occupants of the
vehicle should not stand on the road (instead they should remain behind a
crash barrier, for example).
– Switch off the engine and engage 1st gear or if your vehicle is fitted with an
automatic gearbox, position the selector lever into position P .
– Apply the handbrake firmly.
– Check whether you can carry out the repairs with the tyre repair kit
⇒ page 172, General information.
– If a trailer is coupled, uncouple it.
– Remove the tyre repair kit from the luggage compartment.
– Stick the sticker 2
⇒
fig. 141 on the dash panel in view of the driver.
– Do not remove the foreign body, e.g. screw or nail, from the tyre.
– Unscrew the valve cap.
– Use the valve remover 1 to remove the valve core and place it down on a
clean surface.
Seal and inflate tyres Sealing tyres
–
Forcefully shake the tyre inflator bottle 10
⇒ fig. 141 several times.
– Firmly screw inflation hose 3 onto the tyre inflator bottle in a clockwise direc-
tion 10 . The film on the cap is pierced automatically.
– Remove the plug from the inflation hose 3 and plug the open end fully into
the tyre valve.
– Hold the bottle 10 with the floor facing upwards and fill the whole sealing
agent in the tyre inflator bottle into the tyres.
– Remove the empty tyre inflator bottle from the valve.
– Screw the valve core back into the tyre valve using the valve remover 1 .
Pumping up the tyres
– Screw the tyre inflation hose 5
⇒
fig. 141 of the air compressor firmly onto the
tyre valve.
– Check whether the air release valve 7 is closed.–
On vehicles fitted with a manual gearbox, move the gearshift lever into Neu-
tral.
– Start the engine and run it in idle.
– Plug the connector 9 into 12 Volt socket ⇒
page 64.
– Switch on the air compressor with the ON and OFF switch 8 .
– Allow the air compressor to run until reaching a pressure of 2.0 - 2.5 bar. Maxi-
mum run time of 8 minutes ⇒ !
– Switch off the air compressor with the ON and OFF switch.
– If you cannot reach an air pressure of 2.0 – 2.5 bar, unscrew the tyre inflation
hose 5 from the tyre valve.
– Drive the vehicle approx. 10 metres forwards or backwards to allow the sealing
agent to distribute in the tyre.
– Screw the tyre inflation hose of the air compressor 5 firmly back onto the
tyre valve and repeat the inflation procedure.
– If you cannot reach the required tyre inflation pressure here either, this means
the tyre has sustained too much damage. You cannot seal with tyre with the
breakdown kit ⇒ .
– Switch off the air compressor with the ON and OFF switch.
– Remove the tyre inflation hose 5 from the tyre valve.
After reaching a tyre inflation pressure of 2.0 – 2.5 bar, drive at a maximum speed
of 80 km/h (50
mph).
Check the tyre inflation pressure after driving 10 minutes ⇒ page 175, Check after
driving for 10 minutes. WARNING
● During inflation, the tyre inflation hose and air compressor may get hot-
risk of injury!
● Do not place hot tyre inflation hoses or hot air compressors on flammable
materials - risk of fire!
● If you cannot inflate the tyre to at least 2.0 bar, this means the damage
sustained was too serious. The sealing agent cannot be used to seal the tyre.
Do not drive the vehicle. Get professional assistance. £174
Breakdown assistance
Page 177 of 212
CAUTION
Switch off the air compressor after running 8 minutes at the latest - danger of
overheating! Allow the air compressor to cool a few moments before switching it
on again.
Check after driving for 10 minutes Check the tyre inflation pressure after driving 10 minutes.
If the tyre inflation pressure is 1.3 bar or less:
–
Do not drive the vehicle! You cannot properly seal with tyre with the break-
down kit.
– Contact a Škoda dealer to obtain professional assistance.
If the tyre inflation pressure is 1.3 bar or more:
– Adjust the tyre inflation pressure to the correct value (see inside of fuel filler
cap).
– Continue driving carefully to the nearest specialist garage at a maximum
speed of 80 km/h (50 mph).
Jump-starting Initial steps You can use the battery of another vehicle for jump-starting yours if the engine
does not start because the battery on your vehicle is flat. You will require jump-
start cables for this purpose.
Both batteries must have a rated voltage of 12 V. The capacity
(Ah) of the battery
supplying the power must not be significantly less than the capacity of the dis-
charged battery in your vehicle.
Jump-start cables
Only use jump-start cables which have an adequately large cross-section and in-
sulated terminal clamps. Please pay attention to the manufacturer's instructions.
Positive cable - colour coding in the majority of cases red.
Negative cable -
colour coding in the majority of cases black. WARNING
● A discharged battery may already freeze at temperatures just below 0 °C.
In case of frozen battery carry out no jump-starting - risk of explosion! Also af-
ter thawing of the battery there is a risk of caustic burns due to leaking acid.
Replace the frozen battery.
● Please pay attention to the warning instructions relating to working in the
engine compartment ⇒ page 150
. Note
● There must not be any contact between the two vehicles otherwise current
may flow as soon as the negative terminals are connected.
● The discharged battery must be properly connected to the system of the vehi-
cle.
● Switch off the car phone. Heed the advice concerning the use of mobile
phones in such a situation.
● We recommend you buy jump-start cables from a car battery specialist.
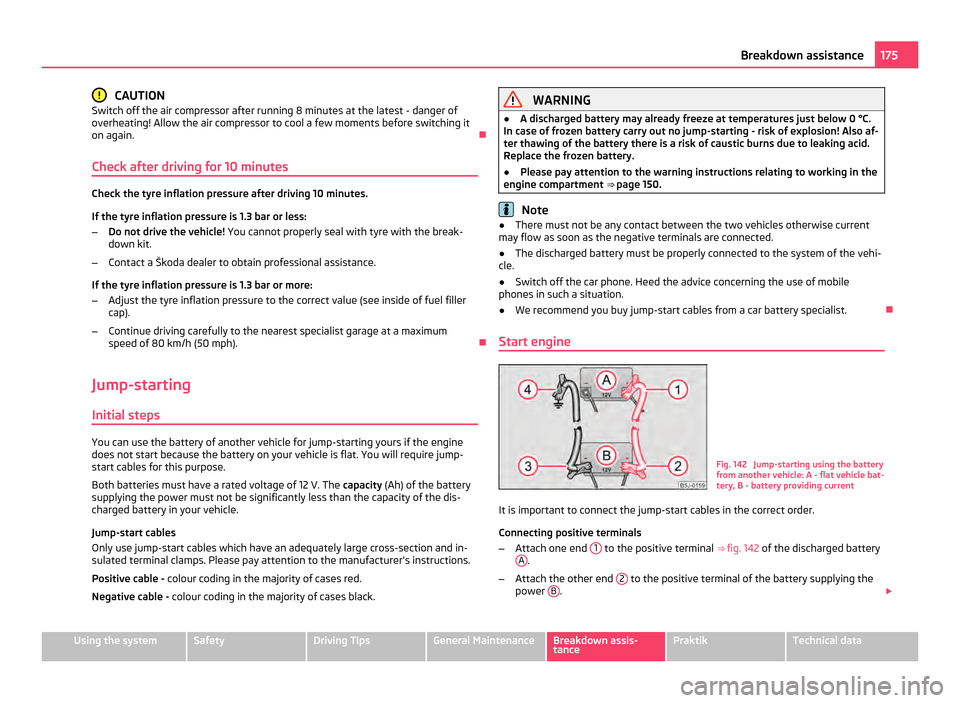
Start engine Fig. 142 Jump-starting using the battery
from another vehicle: A - flat vehicle bat-
tery, B - battery providing current
It is important to connect the jump-start cables in the correct order.
Connecting positive terminals
– Attach one end 1 to the positive terminal
⇒ fig. 142 of the discharged battery
A .
– Attach the other end 2 to the positive terminal of the battery supplying the
power B .
£ 175
Breakdown assistance Using the system Safety Driving Tips General Maintenance Breakdown assis-
tance Praktik Technical data
Page 178 of 212
Connecting negative terminal and engine block
– Attach one end 3 to the negative terminal of the battery supplying the power
B .
– Attach the other end 4 to a solid metal part which is connected firmly to the
engine block, or to the engine block itself ⇒ .
Starting engine
– Start the engine of the vehicle providing current and run the engine at idling
speed.
– Now start the engine of the vehicle with the discharged battery.
– Interrupt the attempt at starting an engine after 10 seconds if it does not start
right away and wait for about 30 seconds before repeating the attempt.
– Disconnect the cables in exactly the reverse order they were connected.WARNING
● The non-insulated parts of the terminal clamps must never make contact
with each other. In addition, the jump-start cable connected to the positive
terminal of the battery must not come into contact with electrically conduct-
ing parts of the vehicle - risk of short circuit!
● Do not affix the jump starting cables to the negative terminal of the dis-
charged battery. There is the risk of detonating gas seeping out the battery
being ignited by the strong spark which results from the engine being started.
● Do not affix the cable end 4 to parts of the fuel and brake system.
● Run the jump-start cables so that they cannot be caught by any rotating
parts in the engine compartment.
● Do not bend over the batteries - risk of caustic burns!
● The vent screws of the battery cells must be tightened firmly.
● Keep any sources of ignition (naked flame, smouldering cigarettes etc.)
away from the battery - risk of an explosion!
● Never jump-start the batteries which have a too low electrolyte level - risk
of explosion and caustic burns! Jump-starting on vehicles with the “START-STOP” system
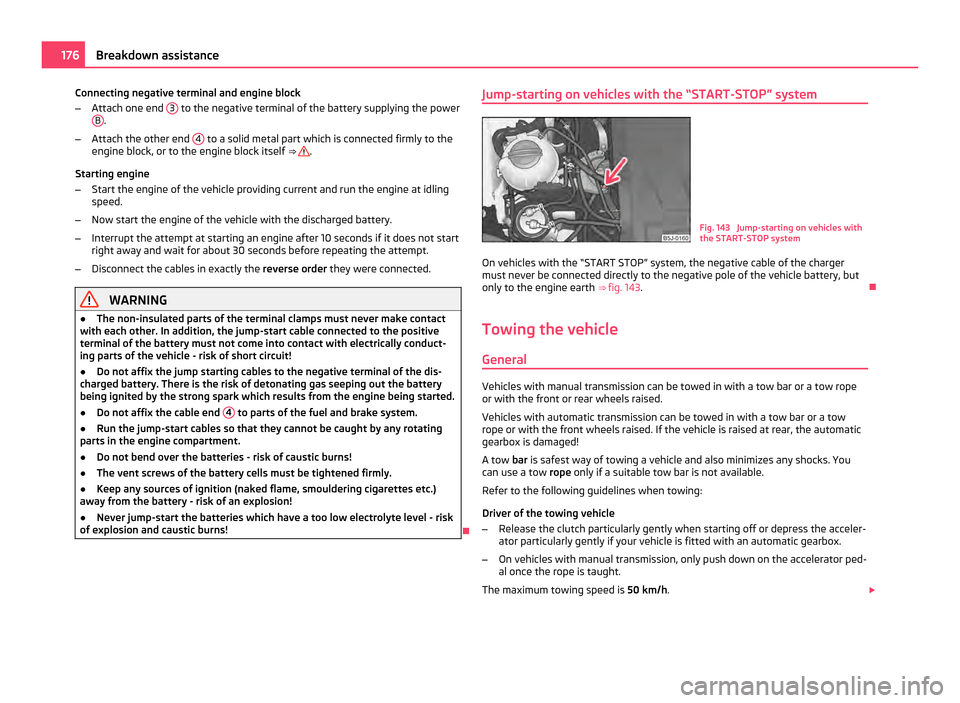
Fig. 143 Jump-starting on vehicles with
the START-STOP system
On vehicles with the “START STOP” system, the negative cable of the charger
must never be connected directly to the negative pole of the vehicle battery, but
only to the engine earth ⇒ fig. 143 .
Towing the vehicle General Vehicles with manual transmission can be towed in with a tow bar or a tow rope
or with the front or rear wheels raised.
Vehicles with automatic transmission can be towed in with a tow bar or a tow
rope or with the front wheels raised. If the vehicle is raised at rear, the automatic
gearbox is damaged!
A tow bar
is safest way of towing a vehicle and also minimizes any shocks. You
can use a tow rope only if a suitable tow bar is not available.
Refer to the following guidelines when towing:
Driver of the towing vehicle
– Release the clutch particularly gently when starting off or depress the acceler-
ator particularly gently if your vehicle is fitted with an automatic gearbox.
– On vehicles with manual transmission, only push down on the accelerator ped-
al once the rope is taught.
The maximum towing speed is 50 km/h. £176
Breakdown assistance
Page 181 of 212
Fuses and light bulbs
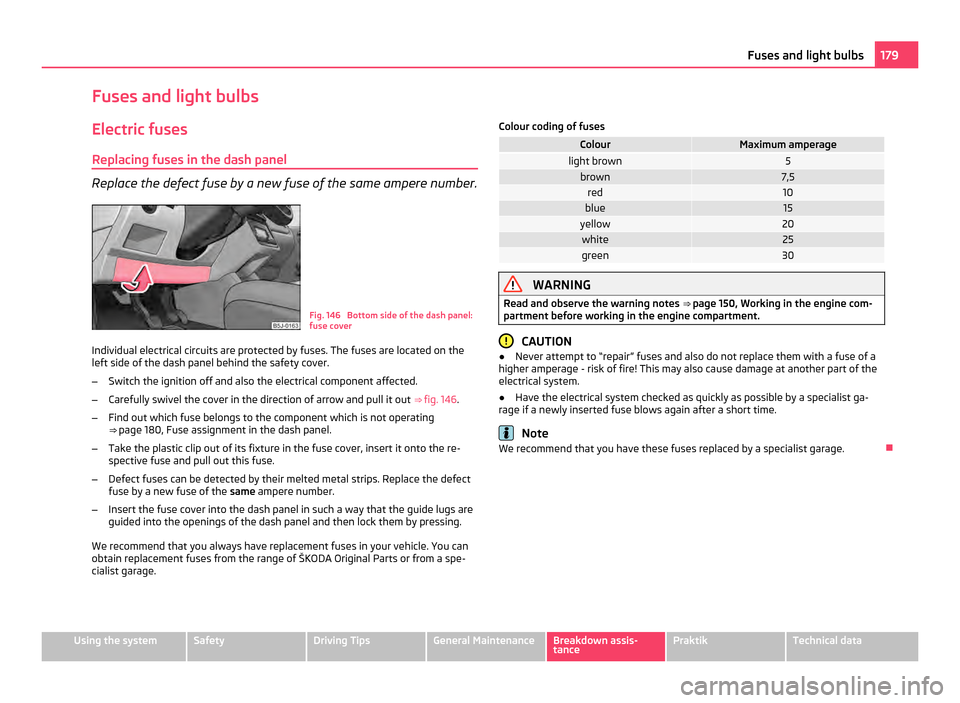
Electric fuses Replacing fuses in the dash panel Replace the defect fuse by a new fuse of the same ampere number.
Fig. 146 Bottom side of the dash panel:
fuse cover
Individual electrical circuits are protected by fuses. The fuses are located on the
left side of the dash panel behind the safety cover.
– Switch the ignition off and also the electrical component affected.
– Carefully swivel the cover in the direction of arrow and pull it out ⇒ fig. 146 .
– Find out which fuse belongs to the component which is not operating
⇒ page 180
, Fuse assignment in the dash panel.
– Take the plastic clip out of its fixture in the fuse cover, insert it onto the re-
spective fuse and pull out this fuse.
– Defect fuses can be detected by their melted metal strips. Replace the defect
fuse by a new fuse of the same ampere number.
– Insert the fuse cover into the dash panel in such a way that the guide lugs are
guided into the openings of the dash panel and then lock them by pressing.
We recommend that you always have replacement fuses in your vehicle. You can
obtain replacement fuses from the range of
ŠKODA Original Parts or from a spe-
cialist garage. Colour coding of fuses Colour Maximum amperage
light brown 5
brown 7,5
red 10
blue 15
yellow 20
white 25
green 30
WARNING
Read and observe the warning notes ⇒ page 150
, Working in the engine com-
partment before working in the engine compartment. CAUTION
● Never attempt to
“repair” fuses and also do not replace them with a fuse of a
higher amperage - risk of fire! This may also cause damage at another part of the
electrical system.
● Have the electrical system checked as quickly as possible by a specialist ga-
rage if a newly inserted fuse blows again after a short time. Note
We recommend that you have these fuses replaced by a specialist garage. 179
Fuses and light bulbs Using the system Safety Driving Tips General Maintenance Breakdown assis-
tance Praktik Technical data
Page 183 of 212
No. Power consumer
43 Horn
44 Front window wiper
45 Central control unit for convenience system
46 Engine control unit
Engine control unit
Fuel pump relay
Fuel pump control unit
47 Cigarette lighter, power socket in the luggage compartment
a)48 ABS, START-STOP - DC/DC converter ESP
49 Turn signal lights, brake lights
50 START-STOP - DC/DC converter infotainment
Radio
51 Electrical power window (front and rear) - left side
52 Electrical power window (front and rear) - right side
53 Parking light - left side
Electric sliding/tilting roof
54 START-STOP - instrument cluster
Anti-theft alarm system
55 Control unit for automatic gearbox DSG
56 Headlight cleaning system
Parking light - right side
57 Left low beam, headlight range adjustment
58 Low beam on the right
a)
If the engine is switched off already one electrical component which is connected can discharge the
battery. Replacing fuses at the battery (manual gearbox, automatic
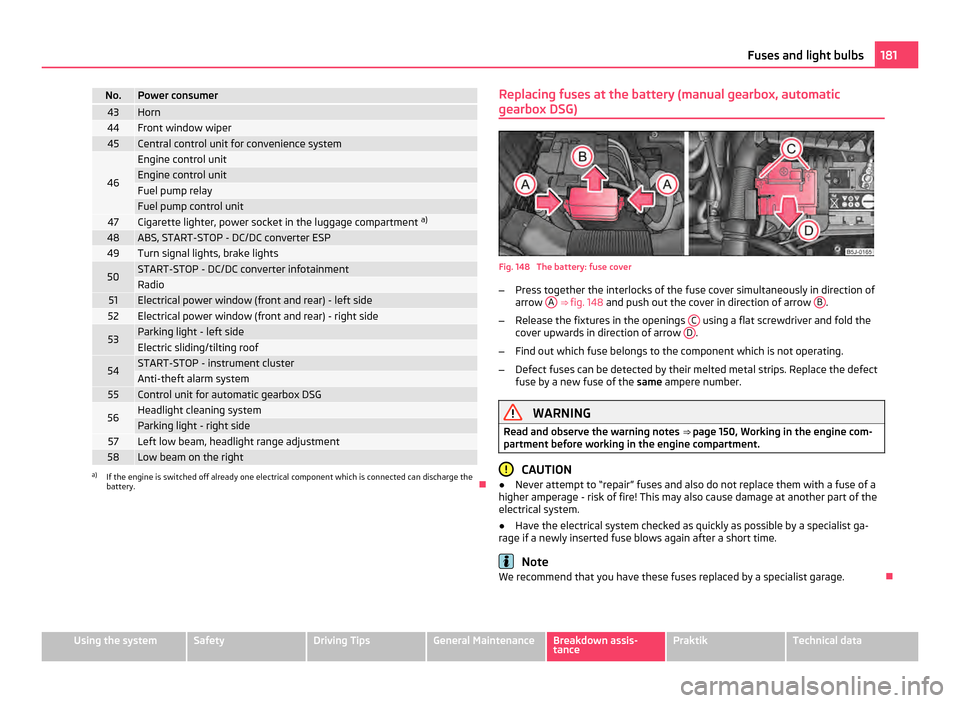
gearbox DSG) Fig. 148 The battery: fuse cover
– Press together the interlocks of the fuse cover simultaneously in direction of
arrow A
⇒ fig. 148 and push out the cover in direction of arrow B .
– Release the fixtures in the openings C using a flat screwdriver and fold the
cover upwards in direction of arrow D .
– Find out which fuse belongs to the component which is not operating.
– Defect fuses can be detected by their melted metal strips. Replace the defect
fuse by a new fuse of the same ampere number. WARNING
Read and observe the warning notes ⇒ page 150 , Working in the engine com-
partment before working in the engine compartment. CAUTION
● Never attempt to
“repair” fuses and also do not replace them with a fuse of a
higher amperage - risk of fire! This may also cause damage at another part of the
electrical system.
● Have the electrical system checked as quickly as possible by a specialist ga-
rage if a newly inserted fuse blows again after a short time. Note
We recommend that you have these fuses replaced by a specialist garage. 181
Fuses and light bulbs Using the system Safety Driving Tips General Maintenance Breakdown assis-
tance Praktik Technical data
Page 184 of 212
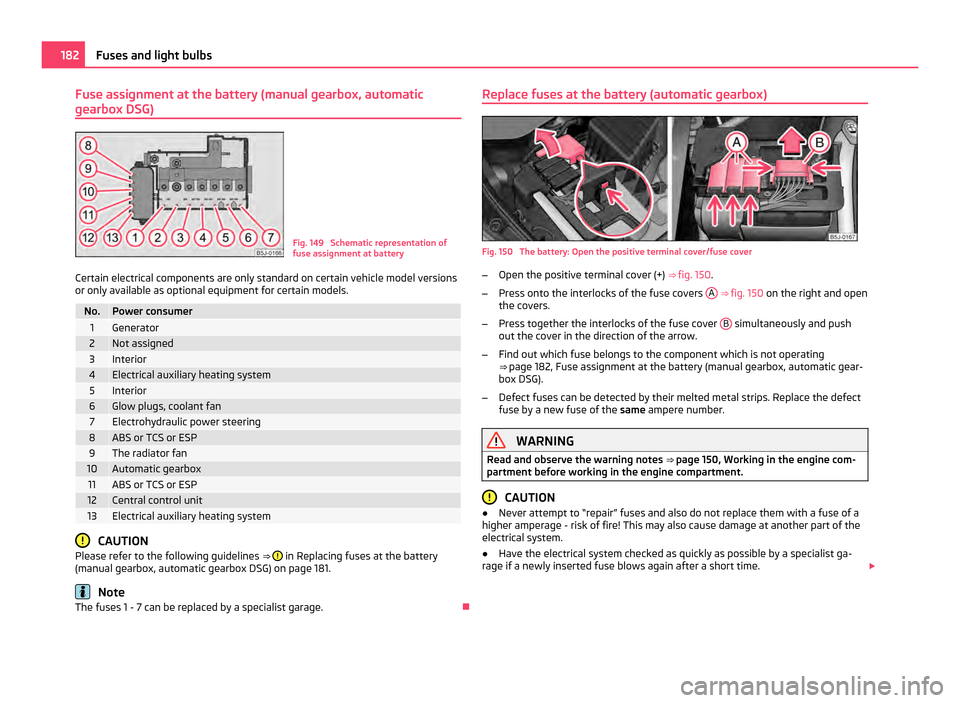
Fuse assignment at the battery (manual gearbox, automatic
gearbox DSG) Fig. 149 Schematic representation of
fuse assignment at battery
Certain electrical components are only standard on certain vehicle model versions
or only available as optional equipment for certain models. No. Power consumer
1 Generator
2 Not assigned
3 Interior
4 Electrical auxiliary heating system
5 Interior
6 Glow plugs, coolant fan
7 Electrohydraulic power steering
8 ABS or TCS or ESP
9 The radiator fan
10 Automatic gearbox
11 ABS or TCS or ESP
12 Central control unit
13 Electrical auxiliary heating system
CAUTION
Please refer to the following guidelines ⇒ in Replacing fuses at the battery
(manual gearbox, automatic gearbox DSG) on page 181 . Note
The fuses 1 - 7 can be replaced by a specialist garage. Replace fuses at the battery (automatic gearbox)
Fig. 150 The battery: Open the positive terminal cover/fuse cover
–
Open the positive terminal cover (+) ⇒ fig. 150.
– Press onto the interlocks of the fuse covers A
⇒
fig. 150 on the right and open
the covers.
– Press together the interlocks of the fuse cover B simultaneously and push
out the cover in the direction of the arrow.
– Find out which fuse belongs to the component which is not operating
⇒ page 182, Fuse assignment at the battery (manual gearbox, automatic gear-
box DSG)
.
– Defect fuses can be detected by their melted metal strips. Replace the defect
fuse by a new fuse of the same ampere number. WARNING
Read and observe the warning notes ⇒ page 150
, Working in the engine com-
partment before working in the engine compartment. CAUTION
● Never attempt to
“repair” fuses and also do not replace them with a fuse of a
higher amperage - risk of fire! This may also cause damage at another part of the
electrical system.
● Have the electrical system checked as quickly as possible by a specialist ga-
rage if a newly inserted fuse blows again after a short time. £182
Fuses and light bulbs
Page 186 of 212
Front headlight Halogen headlight Halogen projector head-
lightsParking lights W5W LL/W5W BL LL
Turn signals PY21W
Fog lights H8/HB4
a)Daylight driving lights P21W, LED
b)a)
Valid for vehicles Scout.
b) Valid for Scout vehicles with separate lights for daylight driving lights. Rear light unit Bulb
Reversing light P21W
Turn signals PY21W
Brake lights P21W
Fog lights P21W
Parking lights 2x W5W
Others Bulb
Side turn signal lights WY5W
Licence plate light C5W/T4W (5W)
3. Brake light LED
Interior lighting front/rear C10W
Reading lights W5W
Luggage compartment light W5W
Lighting in storage compartment W5W
WARNING
● Bulbs H7 LL and H4 LL are pressurised and may burst when changing the
bulb - risk of injury!
● It is recommended to wear gloves and safety glasses when changing a
bulb. Note
This Owner's Manual only describes the replacement of bulbs where it is assumed
that no major complications will arise. Other light bulbs should be changed by your
specialist garage. Front headlight
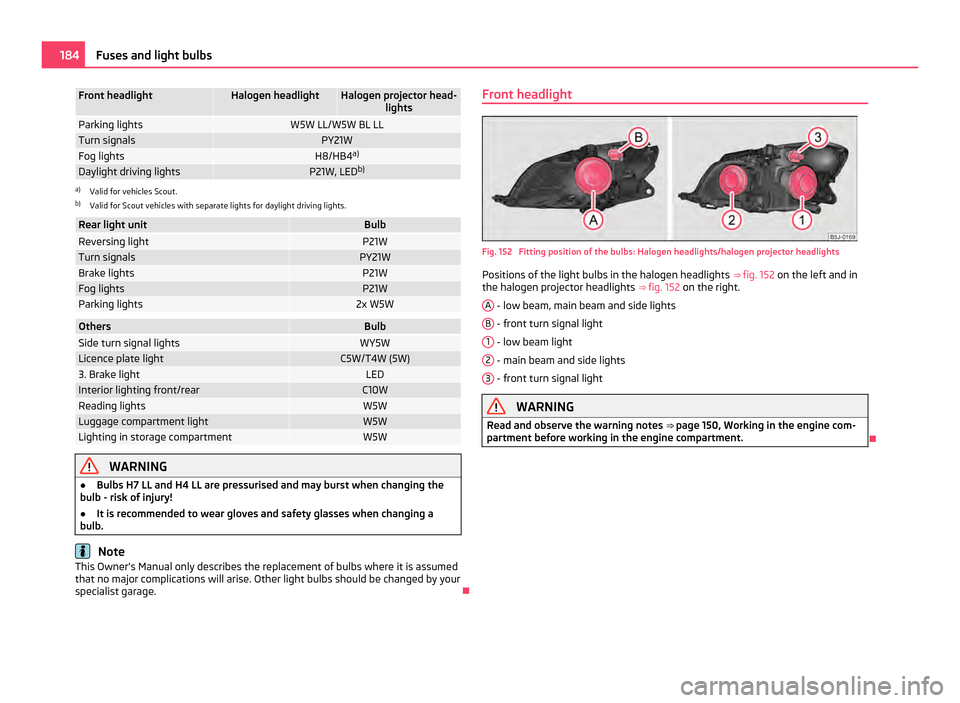
Fig. 152 Fitting position of the bulbs: Halogen headlights/halogen projector headlights
Positions of the light bulbs in the halogen headlights
⇒
fig. 152 on the left and in
the halogen projector headlights ⇒ fig. 152 on the right.
A - low beam, main beam and side lights
B - front turn signal light
1 - low beam light
2 - main beam and side lights
3 - front turn signal light
WARNING
Read and observe the warning notes ⇒ page 150
, Working in the engine com-
partment before working in the engine compartment. 184
Fuses and light bulbs
Page 191 of 212
Praktik
Praktik Rear interior lighting Switching the interior light on
–
Position the cover glass into position .
Switching the interior light off
– Position the cover glass into position O.
Door contact setting
– Position the cover glass into middle position .Note
We recommend having the bulb replaced by a specialist garage.
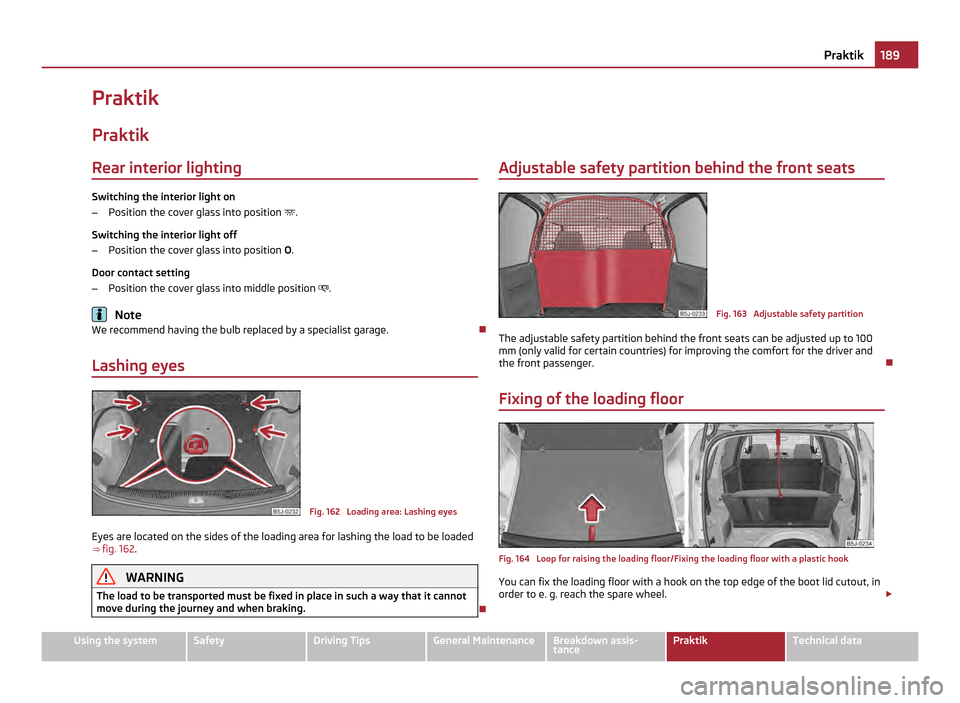
Lashing eyes Fig. 162 Loading area: Lashing eyes
Eyes are located on the sides of the loading area for lashing the load to be loaded
⇒ fig. 162 . WARNING
The load to be transported must be fixed in place in such a way that it cannot
move during the journey and when braking. Adjustable safety partition behind the front seats
Fig. 163 Adjustable safety partition
The adjustable safety partition behind the front seats can be adjusted up to 100
mm (only valid for certain countries) for improving the comfort for the driver and
the front passenger.
Fixing of the loading floor Fig. 164 Loop for raising the loading floor/Fixing the loading floor with a plastic hook
You can fix the loading floor with a hook on the top edge of the boot lid cutout, in
order to e. g. reach the spare wheel. £ 189
Praktik Using the system Safety Driving Tips General Maintenance Breakdown assis-
tance Praktik Technical data
Page 194 of 212
The following specifications are listed on the type plate
⇒ fig. 167:
Permissible gross weight
The permissible overall weight of the vehicle/trailer combination when the
vehicle is being operated with a trailer
Maximum permissible front axle load
Maximum permissible rear axle load
The identification plate is affixed to the lower part of the column between the
front and rear doors on the front passenger side. WARNING
Do not exceed the permissible overall weight - risk of accident and damage to
the vehicle.
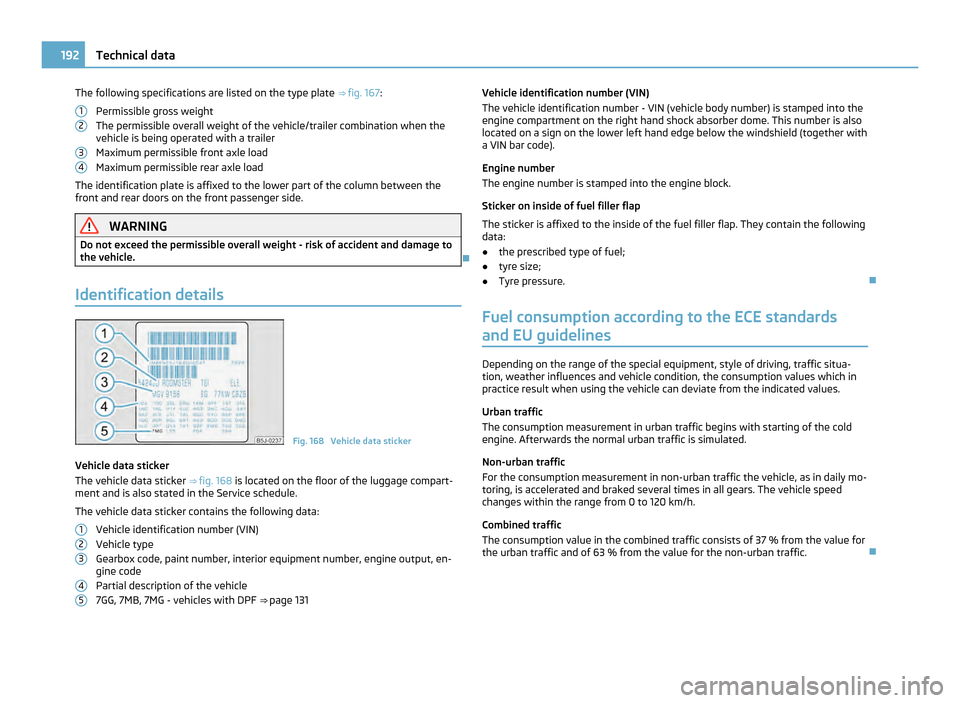
Identification details Fig. 168 Vehicle data sticker
Vehicle data sticker
The vehicle data sticker ⇒ fig. 168
is located on the floor of the luggage compart-
ment and is also stated in the Service schedule.
The vehicle data sticker contains the following data:
Vehicle identification number (VIN)
Vehicle type
Gearbox code, paint number, interior equipment number, engine output, en-
gine code
Partial description of the vehicle
7GG, 7MB, 7MG - vehicles with DPF ⇒ page 131
1 2
3
4
1
2
3
4
5 Vehicle identification number (VIN)
The vehicle identification number - VIN (vehicle body number) is stamped into the
engine compartment on the right hand shock absorber dome. This number is also
located on a sign on the lower left hand edge below the windshield (together with
a VIN bar code).
Engine number
The engine number is stamped into the engine block.
Sticker on inside of fuel filler flap
The sticker is affixed to the inside of the fuel filler flap. They contain the following
data:
● the prescribed type of fuel;
● tyre size;
● Tyre pressure.
Fuel consumption according to the ECE standards
and EU guidelines Depending on the range of the special equipment, style of driving, traffic situa-
tion, weather influences and vehicle condition, the consumption values which in
practice result when using the vehicle can deviate from the indicated values.
Urban traffic
The consumption measurement in urban traffic begins with starting of the cold
engine. Afterwards the normal urban traffic is simulated.
Non-urban traffic
For the consumption measurement in non-urban traffic the vehicle, as in daily mo-
toring, is accelerated and braked several times in all gears. The vehicle speed
changes within the range from 0 to 120 km/h.
Combined traffic
The consumption value in the combined traffic consists of 37 % from the value for
the urban traffic and of 63 % from the value for the non-urban traffic. 192
Technical data