fuse SKODA ROOMSTER 2011 1.G Owner's Manual
[x] Cancel search | Manufacturer: SKODA, Model Year: 2011, Model line: ROOMSTER, Model: SKODA ROOMSTER 2011 1.GPages: 212, PDF Size: 3.3 MB
Page 6 of 212
Tyre pressure monitoring system . . . . . . . . . . . . . . . . . . . 130
Diesel particle filter (diesel engine) . . . . . . . . . . . . . . . . . 131
Driving and the Environment . . . . . . . . . . . . . . . . . . . . . 132
The first 1 500 kilometres and afterwards . . . . . . . . . . . 132
Catalytic converter . . . . . . . . . . . . . . . . . . . . . . . . . . . . . . . . . 132
Driving in an economical and environmentally
conscious manner . . . . . . . . . . . . . . . . . . . . . . . . . . . . . . . . . 133
Environmental compatibility . . . . . . . . . . . . . . . . . . . . . . . . 136
Motoring abroad . . . . . . . . . . . . . . . . . . . . . . . . . . . . . . . . . . . 137
Avoiding damage to your vehicle . . . . . . . . . . . . . . . . . . . 137
Driving through bodies of water on roads . . . . . . . . . . . 138
Towing a trailer . . . . . . . . . . . . . . . . . . . . . . . . . . . . . . . . . . . . 139
Towing a trailer . . . . . . . . . . . . . . . . . . . . . . . . . . . . . . . . . . . 139
General Maintenance . . . . . . . . . . . . . . . . . . . . . 141
Taking care of your vehicle and cleaning the
vehicle . . . . . . . . . . . . . . . . . . . . . . . . . . . . . . . . . . . . . . . . . . . . . . 141
General . . . . . . . . . . . . . . . . . . . . . . . . . . . . . . . . . . . . . . . . . . . 141
Care of the exterior of vehicle . . . . . . . . . . . . . . . . . . . . . . 141
Care of the interior of vehicle . . . . . . . . . . . . . . . . . . . . . . . 145
Fuel . . . . . . . . . . . . . . . . . . . . . . . . . . . . . . . . . . . . . . . . . . . . . . . . . 147
Petrol . . . . . . . . . . . . . . . . . . . . . . . . . . . . . . . . . . . . . . . . . . . . . 147
Diesel . . . . . . . . . . . . . . . . . . . . . . . . . . . . . . . . . . . . . . . . . . . . . 148
Refuelling . . . . . . . . . . . . . . . . . . . . . . . . . . . . . . . . . . . . . . . . . 148
Inspecting and Replenishing . . . . . . . . . . . . . . . . . . . . . . 150
Engine compartment . . . . . . . . . . . . . . . . . . . . . . . . . . . . . . 150
Engine oil . . . . . . . . . . . . . . . . . . . . . . . . . . . . . . . . . . . . . . . . . 152
Cooling system . . . . . . . . . . . . . . . . . . . . . . . . . . . . . . . . . . . . 153
Brake fluid . . . . . . . . . . . . . . . . . . . . . . . . . . . . . . . . . . . . . . . . 156
Battery . . . . . . . . . . . . . . . . . . . . . . . . . . . . . . . . . . . . . . . . . . . 156
Windshield washer system . . . . . . . . . . . . . . . . . . . . . . . . . 160
Wheels and Tyres . . . . . . . . . . . . . . . . . . . . . . . . . . . . . . . . . . 161
Wheels . . . . . . . . . . . . . . . . . . . . . . . . . . . . . . . . . . . . . . . . . . . 161
Accessories, changes and replacement of parts . 166
General . . . . . . . . . . . . . . . . . . . . . . . . . . . . . . . . . . . . . . . . . . . 166 Breakdown assistance
. . . . . . . . . . . . . . . . . . . 167
Breakdown assistance . . . . . . . . . . . . . . . . . . . . . . . . . . . . 167
First-aid kit and warning triangle . . . . . . . . . . . . . . . . . . . 167
Fire extinguisher . . . . . . . . . . . . . . . . . . . . . . . . . . . . . . . . . . 167
Vehicle tool kit . . . . . . . . . . . . . . . . . . . . . . . . . . . . . . . . . . . . 167
Spare wheel . . . . . . . . . . . . . . . . . . . . . . . . . . . . . . . . . . . . . . . 168
Changing a wheel . . . . . . . . . . . . . . . . . . . . . . . . . . . . . . . . . 168
Tyre repair kit . . . . . . . . . . . . . . . . . . . . . . . . . . . . . . . . . . . . . 172
Jump-starting . . . . . . . . . . . . . . . . . . . . . . . . . . . . . . . . . . . . . 175
Towing the vehicle . . . . . . . . . . . . . . . . . . . . . . . . . . . . . . . . 176
Fuses and light bulbs . . . . . . . . . . . . . . . . . . . . . . . . . . . . . . 179
Electric fuses . . . . . . . . . . . . . . . . . . . . . . . . . . . . . . . . . . . . . . 179
Bulbs . . . . . . . . . . . . . . . . . . . . . . . . . . . . . . . . . . . . . . . . . . . . . 183
Praktik . . . . . . . . . . . . . . . . . . . . . . . . . . . . . . . . . . . . . . . . . . 189
Praktik . . . . . . . . . . . . . . . . . . . . . . . . . . . . . . . . . . . . . . . . . . . . . . 189
Rear interior lighting . . . . . . . . . . . . . . . . . . . . . . . . . . . . . . . 189
Lashing eyes . . . . . . . . . . . . . . . . . . . . . . . . . . . . . . . . . . . . . . 189
Adjustable safety partition behind the front seats . . . 189
Fixing of the loading floor . . . . . . . . . . . . . . . . . . . . . . . . . . 189
Adjustment of the safety partition . . . . . . . . . . . . . . . . . . 190
Emergency unlocking of the loading area door . . . . . . 190
Technical data . . . . . . . . . . . . . . . . . . . . . . . . . . . . . . . 191
Technical data . . . . . . . . . . . . . . . . . . . . . . . . . . . . . . . . . . . . . 191
General information . . . . . . . . . . . . . . . . . . . . . . . . . . . . . . . 191
Used abbreviations . . . . . . . . . . . . . . . . . . . . . . . . . . . . . . . . 191
Performances . . . . . . . . . . . . . . . . . . . . . . . . . . . . . . . . . . . . . 191
Weight . . . . . . . . . . . . . . . . . . . . . . . . . . . . . . . . . . . . . . . . . . . . 191
Identification details . . . . . . . . . . . . . . . . . . . . . . . . . . . . . . . 192
Fuel consumption according to the ECE standards and
EU guidelines
. . . . . . . . . . . . . . . . . . . . . . . . . . . . . . . . . . . . . 192
Dimensions . . . . . . . . . . . . . . . . . . . . . . . . . . . . . . . . . . . . . . . 193
Engine oil specifications . . . . . . . . . . . . . . . . . . . . . . . . . . . 194
Engine 1.2 l/51 kW - EU5/EU2 DDK . . . . . . . . . . . . . . . . . . 195
Engine 1.2 l/63 kW TSI - EU5 . . . . . . . . . . . . . . . . . . . . . . . . 196
Engine 1.2 l/77 kW TSI - EU5 . . . . . . . . . . . . . . . . . . . . . . . . 197
Engine 1.4 l/63 kW - EU5 . . . . . . . . . . . . . . . . . . . . . . . . . . . 198 Engine 1.6 l/77 kW - EU4/EU2 DDK . . . . . . . . . . . . . . . . . . 199
Engine 1.2 l/55 kW TDI CR - EU5 . . . . . . . . . . . . . . . . . . . . . 200
Engine 1.6 l/66 kW TDI CR DPF - EU5 . . . . . . . . . . . . . . . . 201
Engine 1.6 l/77 kW TDI CR DPF - EU5 . . . . . . . . . . . . . . . . 202
Index . . . . . . . . . . . . . . . . . . . . . . . . . . . . . . . . . . . . . . . . . . . . . 2034
Table of Contents
Page 11 of 212

Using the system
Cockpit General view This overview will help you to quickly familiarise yourself with the
displays and the control elements.
Power windows . . . . . . . . . . . . . . . . . . . . . . . . . . . . . . . . . . . . . . . . . . . . . . . . . . . . . . . . . 36
Electric exterior mirror adjustment . . . . . . . . . . . . . . . . . . . . . . . . . . . . . . . . . . . . 48
Air outlet vents . . . . . . . . . . . . . . . . . . . . . . . . . . . . . . . . . . . . . . . . . . . . . . . . . . . . . . . . . 70
Lever for the multi-functional switch:
– Turn signal light, headlight and parking light, headlight flasher . .43
– Speed regulating system . . . . . . . . . . . . . . . . . . . . . . . . . . . . . . . . . . . . . . . . . . . . 83
Steering wheel:
– with horn
– with driver airbag . . . . . . . . . . . . . . . . . . . . . . . . . . . . . . . . . . . . . . . . . . . . . . . . . . . . 111
– with controls for radio, radio navigation system and phone . . . . . .93
Instrument cluster: Instruments and indicator lights . . . . . . . . . . . . . . . . .10
Lever for the multi-functional switch:
– Multi-functional indicator . . . . . . . . . . . . . . . . . . . . . . . . . . . . . . . . . . . . . . . . . . . 14
– Windshield wiper and wash system . . . . . . . . . . . . . . . . . . . . . . . . . . . . . . . . 46
Switch for rear window heater . . . . . . . . . . . . . . . . . . . . . . . . . . . . . . . . . . . . . . . . . 45
TCS switch . . . . . . . . . . . . . . . . . . . . . . . . . . . . . . . . . . . . . . . . . . . . . . . . . . . . . . . . . . . . . . 125
Air outlet vents . . . . . . . . . . . . . . . . . . . . . . . . . . . . . . . . . . . . . . . . . . . . . . . . . . . . . . . . . 70
Switch for hazard warning lights . . . . . . . . . . . . . . . . . . . . . . . . . . . . . . . . . . . . . . 42
Indicator light for a switched off front seat passenger airbag . . . . . . .117
Depending on equipment fitted:
– Operating controls for the heating . . . . . . . . . . . . . . . . . . . . . . . . . . . . . . . . .
70
– Operating controls for the air conditioning system . . . . . . . . . . . . . . . .
72
– Operating controls for Climatronic . . . . . . . . . . . . . . . . . . . . . . . . . . . . . . . . . . 75
Storage compartments on the front passenger side . . . . . . . . . . . . . . . . .65
Front passenger airbag . . . . . . . . . . . . . . . . . . . . . . . . . . . . . . . . . . . . . . . . . . . . . . . . . 111
Switch passenger airbag deactivation . . . . . . . . . . . . . . . . . . . . . . . . . . . . . . . . . 117
1 2
3
4
5
6
7
8
9
10
11
12
13
14
15
16 Switch depending on equipment fitted:
–
Release for luggage compartment door . . . . . . . . . . . . . . . . . . . . . . . . . . . .33
– Interior monitor . . . . . . . . . . . . . . . . . . . . . . . . . . . . . . . . . . . . . . . . . . . . . . . . . . . . . . 36
Fuse box in the dash panel . . . . . . . . . . . . . . . . . . . . . . . . . . . . . . . . . . . . . . . . . . . . . 179
Light switch and headlamp beam adjustment . . . . . . . . . . . . . . . . . . . . . . . .39, 42
Release lever engine compartment lid . . . . . . . . . . . . . . . . . . . . . . . . . . . . . . . .150
Lever for adjusting the steering wheel . . . . . . . . . . . . . . . . . . . . . . . . . . . . . . . .78
Ignition lock . . . . . . . . . . . . . . . . . . . . . . . . . . . . . . . . . . . . . . . . . . . . . . . . . . . . . . . . . . . . . 78
Depending on equipment fitted:
– Radio
– Radio navigation system
Rocker switch for the heating on the driver's seat . . . . . . . . . . . . . . . . . . .51
Central locking switch . . . . . . . . . . . . . . . . . . . . . . . . . . . . . . . . . . . . . . . . . . . . . . . . . . 32
Depending on equipment fitted:
– Gearshift lever (manual gearbox) . . . . . . . . . . . . . . . . . . . . . . . . . . . . . . . . . . . 81
– Selector lever (automatic gearbox) . . . . . . . . . . . . . . . . . . . . . . . . . . . . . . . . . 89
Rocker switch for the heating on the driver's seat . . . . . . . . . . . . . . . . . . .51
Depending on equipment fitted:
– Ashtrays . . . . . . . . . . . . . . . . . . . . . . . . . . . . . . . . . . . . . . . . . . . . . . . . . . . . . . . . . . . . . . 63
– Storage compartment . . . . . . . . . . . . . . . . . . . . . . . . . . . . . . . . . . . . . . . . . . . . . . . 66
MDI . . . . . . . . . . . . . . . . . . . . . . . . . . . . . . . . . . . . . . . . . . . . . . . . . . . . . . . . . . . . . . . . . . . . . . 100 Note
● Cars with factory-fitted radio or navigation system are supplied with separate
instructions for operating such equipment.
● The arrangement of the controls and switches and the location of some items
on right-hand drive models may differ from that shown in ⇒
fig. 1. The symbols on
the controls and switches are the same as for left-hand drive models. 17
18
19
20
21
22
23
24
25
26
27
28
29 9
Cockpit Using the system Safety Driving Tips General Maintenance Breakdown assis-
tance Praktik Technical data
Page 25 of 212
If the
warning light begins to flash while driving, a fault exists in the engine
control. The engine management system selects an emergency programme which
enables you to drive to the nearest specialist garage by adopting a gentle style of
driving.
Coolant temperature/ Coolant quantity The warning light
lights up until the engine reaches operating temperature 1)
.
Avoid running at high engine speeds, at full throttle and at severe engine loads.
The warning light comes on for a few seconds when the ignition is switched on.
The coolant temperature is too high or the coolant level too low if the warning
light lights up or flashes while driving.
An audible signal sounds as an additional warning signal.
In this case stop and switch the engine off and check the coolant level; top up
the coolant as necessary ⇒ page 155, Replenishing the coolant
.
Do not continue your journey if for some reason it is not possible under the con-
ditions prevailing to top up with coolant. Keep the engine switched off and obtain
professional assistance from a specialist garage, otherwise it could lead to severe
engine damage.
If the coolant is within the specified range, the increased temperature may be
caused by an operating problem at the coolant fan. Check the fuse of the coolant
fan, replace it if necessary ⇒ page 182, Fuse assignment at the battery (manual
gearbox, automatic gearbox DSG).
If the warning light does not go out although the coolant is at the correct level
and also the fuse of the fan is in proper order, do not continue driving. Contact a
specialist garage to obtain assistance.
Please refer to the following guidelines ⇒ page 153, Cooling system.
The following text will be displayed in the information display: Check coolant! Owner's manual! WARNING
If you must stop for technical reasons, then park the vehicle at a safe distance
from the traffic and switch off the engine and switch on the hazard warning
light system ⇒ page 42
, Switch for hazard warning lights .
Fuel reserve The warning light
comes on, if the fuel level is less than 7 litres.
An audible signal sounds as an additional warning signal.
The following text will be displayed in the information display: Please refuel! Range...km
Engine oil The warning light
lights up red (low oil pressure)
The warning light comes on for a few seconds 2)
when the ignition is switched on.
Stop the vehicle and switch the engine off if the warning light does not go off
after the engine has started or flashes while driving. Check the oil level and top up
with oil as necessary ⇒
page 152.
3 peeps sound as an additional warning signal.
Do not continue your journey if for some reason it is not possible under the con-
ditions prevailing to top up with oil. Keep the engine switched off and obtain pro-
fessional assistance from a specialist garage, otherwise it could lead to severe en-
gine damage.
Do not drive any further if the warning light flashes even if the oil is at the correct
level. Do not run the engine not at idling speed either. Contact the nearest spe-
cialist garage to obtain professional assistance.
The following text will be displayed in the information display:
Oil Pressure Engine off! Owner's manual! £1)
Not valid for vehicles with information display.
2) The warning light on vehicles fitted with information display does not come on after switching
the ignition on, but only if a fault exists or the engine oil level is too low. 23
Instruments and warning lights Using the system Safety Driving Tips General Maintenance Breakdown assis-
tance Praktik Technical data
Page 42 of 212
Activating daylight driving lights
–
Remove the cover of the fuse box on the left side of the dash panel
⇒ page 179.
– Turn the light switch into position O ⇒ fig. 21 - left.
– Switch on the switch for daylight driving lights ⇒ fig. 21 - right.
Deactivating daylight driving lights
– Switch off the switch for daylight driving lights ⇒ fig. 21 - right.
– Turn the light switch to the position side lights or low beam ⇒
fig. 21 -
left.
Activating daylight driving lights on vehicles with “START-STOP”
– Switch off the ignition.
– Pull the turn signal light lever towards the steering wheel, at the same time
slide it to the top and hold it in this position.
– Switch on the ignition - wait until the right-turn signal light flashes 4x.
– Switch off the ignition - an audible signal sounds, which confirms the activa-
tion of the daylight driving lights.
– Release the turn signal light lever.
Deactivating daylight driving lights on vehicles with
“START-STOP”
– Switch off the ignition.
– Pull the turn signal light lever towards the steering wheel, at the same time
slide it to the bottom and hold it in this position.
– Switch on the ignition - wait until the left -turn signal light flashes 4x.
– Switch off the ignition - an audible signal sounds, which confirms the deactiva-
tion of the daylight driving lights.
– Release the turn signal light lever.
On vehicles with separate lights for daylight driving lights in the fog lights or in
the front bumper, the parking lights and the licence plate light do not come on
when activating the function daylight driving lights (neither front nor rear).
If the vehicle is not equipped with separate lights for daylight driving lights, the
combination of the low beam, the parking lights (front and rear) including the li-
cence plate light is used as daylight driving lights. In some countries, the national legal provisions require that the rear parking lights
also come on together with the separate lights for daylight driving lights when ac-
tivating the function daylight driving lights.
Halogen projector headlights with cornering light function For a better cornering illumination, the halogen projector headlights with corner-
ing light function are set in the optimal position in line with the vehicle speed and
the steering angle.
If the warning light
comes on while driving or after the ignition is switched on, a
fault is confirmed. WARNING
If there is a fault in the halogen projector headlights with cornering light func-
tion, the warning light lights up in the instrument cluster. The halogen pro-
jector headlights with cornering light function are automatically lowered to
the emergency position, which prevents a possible dazzling of oncoming traf-
fic. Thus the illuminated length of the road is shortened. Drive carefully and
have the car inspected immediately by a specialist garage.
Tourist light Halogen projector headlights with cornering light function
This mode makes it possible to drive in countries with opposing traffic system,
driving on the left/right, without dazzling the oncoming vehicles. When the mode
“tourist light
” is active, the side to side swivel of the headlights is deactivated.
Activating tourist light
Before activating the tourist light, the following conditions must be met:
Ignition switched off, light switched off (light switch in the position O), control dial
for the headlamp beam adjustment in the position -, no gear engaged or selector
lever in the position N (automatic gearbox), tourist light deactivated.
– Switch on the ignition.
Up to 10 seconds after the ignition is switched on:
– Turn the light switch to the position ⇒ page 39.
– Engage the reverse gear (manual gearbox) or move the selector lever into the
position R
(automatic gearbox). £40
Lights and Visibility
Page 71 of 212
Heating and air conditioning system
Introduction
Description and information The heating effect is dependent upon the coolant temperature, thus full heat out-
put only occurs when the engine has reached its operating temperature.
If the cooling system is switched on, the temperature and air humidity drops in
the vehicle. The well-being of the occupants of the car is enhanced as a result of
this particularly at high outside temperatures and a high air humidity. The system
prevents the windows misting up during the cold season of the year.
It is possible to briefly activate recirculated air mode in order to enhance the cool-
ing effect - air-conditioning system ⇒
page 74, Climatronic ⇒ page 77.
The air inlet in front of the windshield must be free of ice, snow or leaves in order
to ensure that the heating and cooling systems operate properly.
After switching on the cooling Condensation from the evaporator of the air condi-
tioning may drip down and form a puddle below the vehicle. This is quite normal
and not an indication of a leak! WARNING
● For your own safety and that of other road users, ensure that all the win-
dows are free of ice, snow and misting. Please familiarize yourself about how
to correctly operate the heating and ventilation systems, how to demist and
defrost the windows, as well as with the cooling mode.
● You should not leave recirculated air mode on over a longer period of time,
as
“stale” air may result in fatigue in the driver and occupants, divert your at-
tention and also cause the windows to mist up. The risk of having an accident
increases. Switch recirculated air mode off as soon as the windows begin
misting up. Note
● The used air streams out through the air removal openings in the luggage
compartment.
● We recommend that you do not smoke in the vehicle when the recirculating air
mode is operating since the smoke which is drawn at the evaporator from the in-
terior of the vehicle forms deposits in the evaporator of the air conditioning sys- tem. This produces a permanent odour when the air conditioning system is oper-
ating which can only be eliminated through considerable effort and expense (re-
placement of compressor).
● Please refer to the information regarding the recirculated air mode for heating
⇒
page 71 and/or for air-conditioning system ⇒ page 74 or Climatronic
⇒ page 77.
● To ensure that the heating and air conditioning systems work properly, do not
block up the air outlet vents with any objects.
Using the air conditioning system economically The compressor on the air conditioning system uses power from the engine when
in cooling mode which will effect the fuel consumption.
It recommended to open the windows or the doors of a vehicle for which the inte-
rior has been strongly heated through the effect of direct sunlight in order to al-
low the heated air to escape.
The cooling system should not be switched on while travelling when the window
is open.
The desired interior temperature can also be achieved without switching in the
cooling system just by switching to fresh air mode. For the sake of the environment
When you economize on fuel, you also reduce pollutant emissions.
Operational problems If the cooling system does not operate at outside temperatures higher than +5 °C,
there is a problem in the system. The reasons for this may be:
●
The fuse on the air conditioning system has blown. Check the fuse, replace it if
necessary ⇒ page 179.
● The cooling system has switched off automatically for a short time because
the coolant temperature of the engine is too hot ⇒ page 11.
If you are not able to rectify the operational problem yourself, or if the cooling ca-
pacity decreases, switch the cooling system off. Contact a specialist garage. 69
Heating and air conditioning system Using the system Safety Driving Tips General Maintenance Breakdown assis-
tance Praktik Technical data
Page 82 of 212
For the sake of the environment
Never warm up the engine when the vehicle is standing. Drive off right away.
When driving the engine reaches its operating temperature more rapidly and the
pollutant emissions are lower.
Petrol engines These engines are fitted with a starter system which selects the correct fuel-air
mixture for every external air temperature.
●
Do not operate accelerator before and when starting engine.
● Interrupt the attempt at starting after 10 seconds if the engine does not start
right away and wait for about 30 seconds before repeating the attempt.
● It is possible that the fuse on the electrical fuel pump is defect if the engine
still does not start. Check the fuse and replace it if necessary ⇒ page 179.
● If the engine does not start, contact the nearest specialist garage to obtain
professional assistance.
It may be necessary, if the engine is very hot, to slightly depress the accelerator
after the engine has started.
Diesel engines Glow plug system
Diesel engines are equipped with a glow plug system, the pre-glow period being
controlled automatically in line with the coolant temperature and outside temper-
ature.
The pre-glow indicator light comes on after the ignition has been switched on.
You should not switch on any major electrical components during the heating
period otherwise the vehicle battery will be drained unnecessarily.
● You should start the engine immediately after the glow plug warning light
has gone out.
● The glow plug warning light will come on for about one second if the engine is
at a normal operating temperature or if the outside temperature is above +5 °C.
This means that you can start the engine right away.
● Interrupt the attempt at starting after 10 seconds if the engine does not start
right away and wait for about 30 seconds before repeating the attempt. ●
It is possible that the fuse on the diesel pre-glow system is defect if the en-
gine still does not start. Check the fuse and replace it if necessary ⇒ page 179.
● Contact the nearest specialist garage to obtain professional assistance.
Starting the engine after fuel tank has run dry
It may take longer than normal to start the engine after refuelling if the fuel tank
has run completely dry - up to one minute. This is because the fuel system must
first of all be filled while the attempting to start the engine.
Switching off the engine –
The engine can be switched off by turning the ignition key into position 1 ⇒
fig. 78 . WARNING
● Never switch off the engine before the vehicle is stationary - risk of acci-
dent!
● The brake booster only operates when the engine is running. Greater
physical effort for braking is required when engine is switched off. Because if
you do not stop as normal, this can cause an accident and severe injuries. CAUTION
you should not switch the engine off right away at the end of your journey after
the engine has been operated for a lengthy period at high loads but should be al-
lowed it to run at idling speed for about 2
minutes. This prevents any accumula-
tion of heat when the engine is switched off. Note
● The radiator fan may continue running for a further 10 minutes or so after the
engine and the ignition have been switched off. The coolant fan may, however, al-
so switch on again after some time if the coolant temperature rises because of an
accumulation of heat in the engine or if the engine is warm and the engine com-
partment is additionally heated by strong sunlight.
● This is why particular care is required when carrying out any work in the en-
gine compartment ⇒
page 150, Working in the engine compartment. 80
Starting-off and Driving
Page 94 of 212
In case of interruption of the power supply (e.g. flat vehicle battery, defective
fuse) or defect of the selector lever lock, the selector lever can no longer be shif-
ted from the position
P in the normal way and the vehicle can no longer be moved.
The selector lever must be unlocked in case of emergency.
– Apply the handbrake firmly.
– Carefully pull up the front left and right cover.
– Pull up rear cover.
– Use the finger to press the yellow plastic part downwards ⇒ fig. 86.
– Simultaneously press the Shiftlock button in the handle of the selector lever
and shift the lever into the position N (if the selector lever is shifted again into
the position P , it is once again blocked). 92
Automatic gearbox
Page 181 of 212
Fuses and light bulbs
Electric fuses Replacing fuses in the dash panel Replace the defect fuse by a new fuse of the same ampere number.
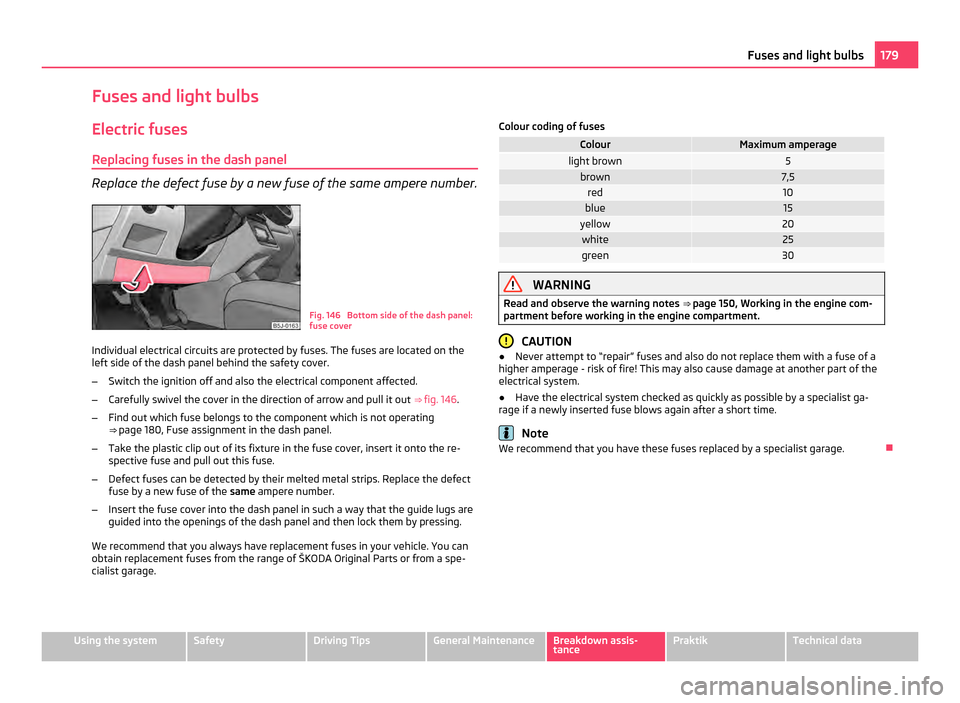
Fig. 146 Bottom side of the dash panel:
fuse cover
Individual electrical circuits are protected by fuses. The fuses are located on the
left side of the dash panel behind the safety cover.
– Switch the ignition off and also the electrical component affected.
– Carefully swivel the cover in the direction of arrow and pull it out ⇒ fig. 146 .
– Find out which fuse belongs to the component which is not operating
⇒ page 180
, Fuse assignment in the dash panel.
– Take the plastic clip out of its fixture in the fuse cover, insert it onto the re-
spective fuse and pull out this fuse.
– Defect fuses can be detected by their melted metal strips. Replace the defect
fuse by a new fuse of the same ampere number.
– Insert the fuse cover into the dash panel in such a way that the guide lugs are
guided into the openings of the dash panel and then lock them by pressing.
We recommend that you always have replacement fuses in your vehicle. You can
obtain replacement fuses from the range of
ŠKODA Original Parts or from a spe-
cialist garage. Colour coding of fuses Colour Maximum amperage
light brown 5
brown 7,5
red 10
blue 15
yellow 20
white 25
green 30
WARNING
Read and observe the warning notes ⇒ page 150
, Working in the engine com-
partment before working in the engine compartment. CAUTION
● Never attempt to
“repair” fuses and also do not replace them with a fuse of a
higher amperage - risk of fire! This may also cause damage at another part of the
electrical system.
● Have the electrical system checked as quickly as possible by a specialist ga-
rage if a newly inserted fuse blows again after a short time. Note
We recommend that you have these fuses replaced by a specialist garage. 179
Fuses and light bulbs Using the system Safety Driving Tips General Maintenance Breakdown assis-
tance Praktik Technical data
Page 182 of 212
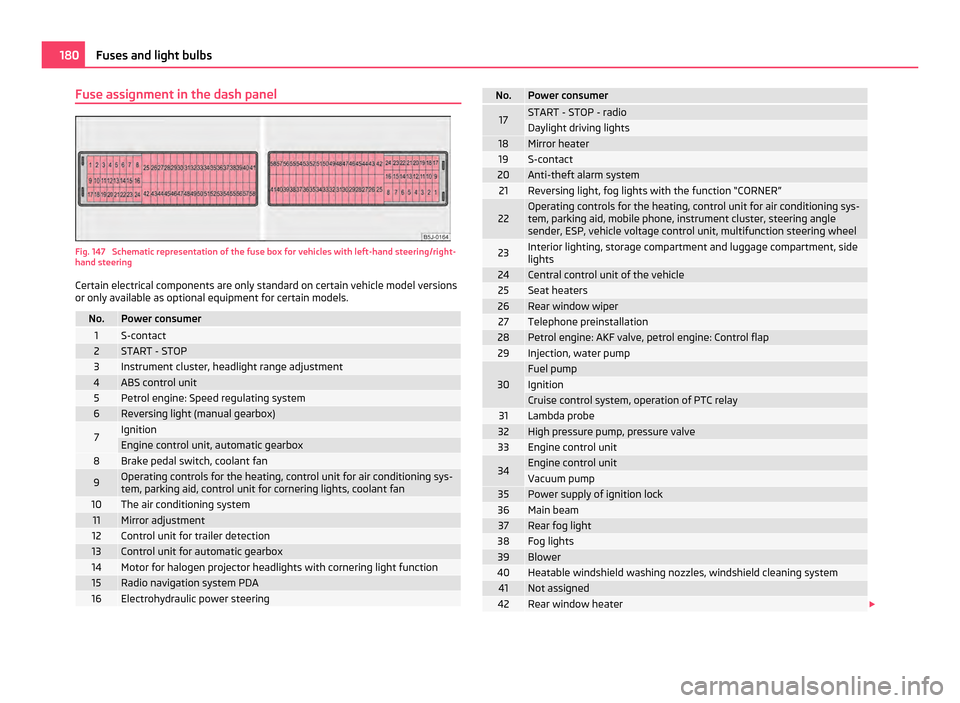
Fuse assignment in the dash panel
Fig. 147 Schematic representation of the fuse box for vehicles with left-hand steering/right-
hand steering
Certain electrical components are only standard on certain vehicle model versions
or only available as optional equipment for certain models. No. Power consumer
1 S-contact
2 START - STOP
3 Instrument cluster, headlight range adjustment
4 ABS control unit
5 Petrol engine: Speed regulating system
6 Reversing light (manual gearbox)
7 Ignition
Engine control unit, automatic gearbox
8 Brake pedal switch, coolant fan
9 Operating controls for the heating, control unit for air conditioning sys-
tem, parking aid, control unit for cornering lights, coolant fan
10 The air conditioning system
11 Mirror adjustment
12 Control unit for trailer detection
13 Control unit for automatic gearbox
14 Motor for halogen projector headlights with cornering light function
15 Radio navigation system PDA
16 Electrohydraulic power steering No. Power consumer
17 START - STOP - radio
Daylight driving lights
18 Mirror heater
19 S-contact
20 Anti-theft alarm system
21 Reversing light, fog lights with the function “CORNER”
22 Operating controls for the heating, control unit for air conditioning sys-
tem, parking aid, mobile phone, instrument cluster, steering angle
sender, ESP, vehicle voltage control unit, multifunction steering wheel
23 Interior lighting, storage compartment and luggage compartment, side
lights
24 Central control unit of the vehicle
25 Seat heaters
26 Rear window wiper
27 Telephone preinstallation
28 Petrol engine: AKF valve, petrol engine: Control flap
29 Injection, water pump
30 Fuel pump
Ignition
Cruise control system, operation of PTC relay
31 Lambda probe
32 High pressure pump, pressure valve
33 Engine control unit
34 Engine control unit
Vacuum pump
35 Power supply of ignition lock
36 Main beam
37 Rear fog light
38 Fog lights
39 Blower
40 Heatable windshield washing nozzles, windshield cleaning system
41 Not assigned
42 Rear window heater
£180
Fuses and light bulbs
Page 183 of 212
No. Power consumer
43 Horn
44 Front window wiper
45 Central control unit for convenience system
46 Engine control unit
Engine control unit
Fuel pump relay
Fuel pump control unit
47 Cigarette lighter, power socket in the luggage compartment
a)48 ABS, START-STOP - DC/DC converter ESP
49 Turn signal lights, brake lights
50 START-STOP - DC/DC converter infotainment
Radio
51 Electrical power window (front and rear) - left side
52 Electrical power window (front and rear) - right side
53 Parking light - left side
Electric sliding/tilting roof
54 START-STOP - instrument cluster
Anti-theft alarm system
55 Control unit for automatic gearbox DSG
56 Headlight cleaning system
Parking light - right side
57 Left low beam, headlight range adjustment
58 Low beam on the right
a)
If the engine is switched off already one electrical component which is connected can discharge the
battery. Replacing fuses at the battery (manual gearbox, automatic
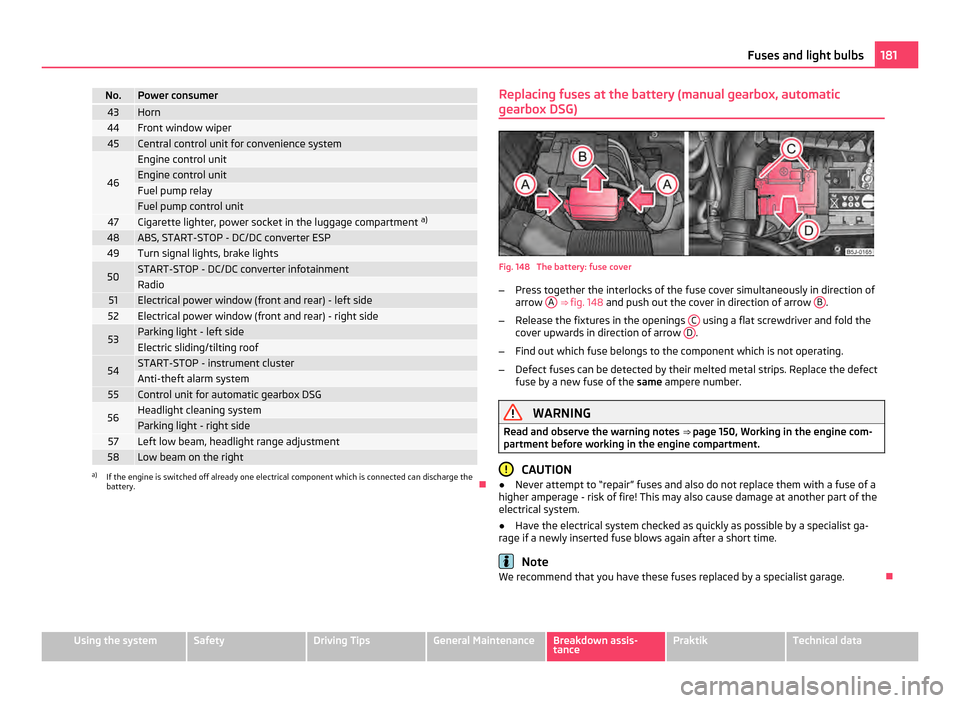
gearbox DSG) Fig. 148 The battery: fuse cover
– Press together the interlocks of the fuse cover simultaneously in direction of
arrow A
⇒ fig. 148 and push out the cover in direction of arrow B .
– Release the fixtures in the openings C using a flat screwdriver and fold the
cover upwards in direction of arrow D .
– Find out which fuse belongs to the component which is not operating.
– Defect fuses can be detected by their melted metal strips. Replace the defect
fuse by a new fuse of the same ampere number. WARNING
Read and observe the warning notes ⇒ page 150 , Working in the engine com-
partment before working in the engine compartment. CAUTION
● Never attempt to
“repair” fuses and also do not replace them with a fuse of a
higher amperage - risk of fire! This may also cause damage at another part of the
electrical system.
● Have the electrical system checked as quickly as possible by a specialist ga-
rage if a newly inserted fuse blows again after a short time. Note
We recommend that you have these fuses replaced by a specialist garage. 181
Fuses and light bulbs Using the system Safety Driving Tips General Maintenance Breakdown assis-
tance Praktik Technical data