remove seats SKODA ROOMSTER 2011 1.G Owner's Manual
[x] Cancel search | Manufacturer: SKODA, Model Year: 2011, Model line: ROOMSTER, Model: SKODA ROOMSTER 2011 1.GPages: 212, PDF Size: 3.3 MB
Page 39 of 212
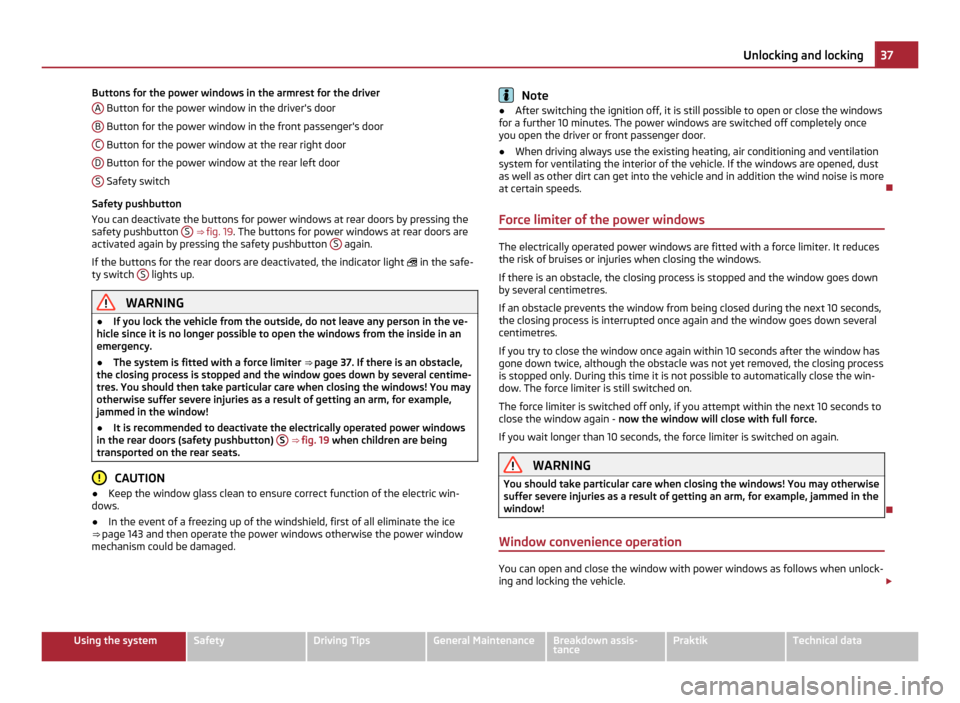
Buttons for the power windows in the armrest for the driver
A Button for the power window in the driver's door
B Button for the power window in the front passenger's door
C Button for the power window at the rear right door
D Button for the power window at the rear left door
S Safety switch
Safety pushbutton
You can deactivate the buttons for power windows at rear doors by pressing the
safety pushbutton S ⇒ fig. 19
. The buttons for power windows at rear doors are
activated again by pressing the safety pushbutton S again.
If the buttons for the rear doors are deactivated, the indicator light in the safe-
ty switch S lights up.
WARNING
● If you lock the vehicle from the outside, do not leave any person in the ve-
hicle since it is no longer possible to open the windows from the inside in an
emergency.
● The system is fitted with a force limiter ⇒ page 37. If there is an obstacle,
the closing process is stopped and the window goes down by several centime-
tres. You should then take particular care when closing the windows! You may
otherwise suffer severe injuries as a result of getting an arm, for example,
jammed in the window!
● It is recommended to deactivate the electrically operated power windows
in the rear doors (safety pushbutton) S ⇒
fig. 19 when children are being
transported on the rear seats. CAUTION
● Keep the window glass clean to ensure correct function of the electric win-
dows.
● In the event of a freezing up of the windshield, first of all eliminate the ice
⇒
page 143 and then operate the power windows otherwise the power window
mechanism could be damaged. Note
● After switching the ignition off, it is still possible to open or close the windows
for a further 10 minutes. The power windows are switched off completely once
you open the driver or front passenger door.
● When driving always use the existing heating, air conditioning and ventilation
system for ventilating the interior of the vehicle. If the windows are opened, dust
as well as other dirt can get into the vehicle and in addition the wind noise is more
at certain speeds.
Force limiter of the power windows The electrically operated power windows are fitted with a force limiter. It reduces
the risk of bruises or injuries when closing the windows.
If there is an obstacle, the closing process is stopped and the window goes down
by several centimetres.
If an obstacle prevents the window from being closed during the next 10 seconds,
the closing process is interrupted once again and the window goes down several
centimetres.
If you try to close the window once again within 10 seconds after the window has
gone down twice, although the obstacle was not yet removed, the closing process
is stopped only. During this time it is not possible to automatically close the win-
dow. The force limiter is still switched on.
The force limiter is switched off only, if you attempt within the next 10 seconds to
close the window again - now the window will close with full force.
If you wait longer than 10 seconds, the force limiter is switched on again. WARNING
You should take particular care when closing the windows! You may otherwise
suffer severe injuries as a result of getting an arm, for example, jammed in the
window!
Window convenience operation You can open and close the window with power windows as follows when unlock-
ing and locking the vehicle.
£ 37
Unlocking and locking Using the system Safety Driving Tips General Maintenance Breakdown assis-
tance Praktik Technical data
Page 53 of 212
Adjust the angle of the seat backrest
–
Relieve any pressure on the seat backrest (do not lean on it) and turn the
handwheel 3 to adjust the angle of the backrest.
The driver's seat should be adjusted in such a way that the pedals can be fully
pressed to the floor with slightly bent legs.
The seat backrest on the driver's seat should be adjusted in such a way that the
upper point of the steering wheel can be easily reached with slightly bent arms. WARNING
● Only adjust the driver seat when the vehicle is stationary - risk of injury!
● Take care when adjusting the seat! Adjusting the seat without care can
lead to bruises or injuries.
● The seat backrests must not be angled too far back when driving other-
wise this will affect proper operation of the seat belts and of the airbag sys-
tem - risk of injury!
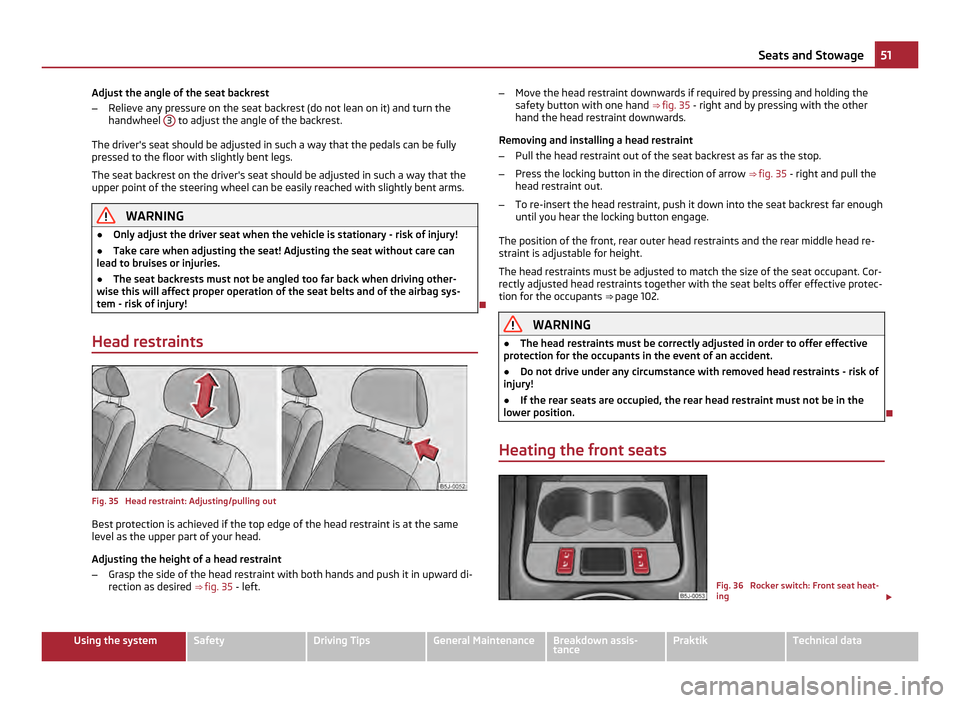
Head restraints Fig. 35 Head restraint: Adjusting/pulling out
Best protection is achieved if the top edge of the head restraint is at the same
level as the upper part of your head.
Adjusting the height of a head restraint
–
Grasp the side of the head restraint with both hands and push it in upward di-
rection as desired ⇒ fig. 35 - left. –
Move the head restraint downwards if required by pressing and holding the
safety button with one hand ⇒ fig. 35 - right and by pressing with the other
hand the head restraint downwards.
Removing and installing a head restraint
– Pull the head restraint out of the seat backrest as far as the stop.
– Press the locking button in the direction of arrow ⇒ fig. 35 - right and pull the
head restraint out.
– To re-insert the head restraint, push it down into the seat backrest far enough
until you hear the locking button engage.
The position of the front, rear outer head restraints and the rear middle head re-
straint is adjustable for height.
The head restraints must be adjusted to match the size of the seat occupant. Cor-
rectly adjusted head restraints together with the seat belts offer effective protec-
tion for the occupants ⇒ page 102. WARNING
● The head restraints must be correctly adjusted in order to offer effective
protection for the occupants in the event of an accident.
● Do not drive under any circumstance with removed head restraints - risk of
injury!
● If the rear seats are occupied, the rear head restraint must not be in the
lower position.
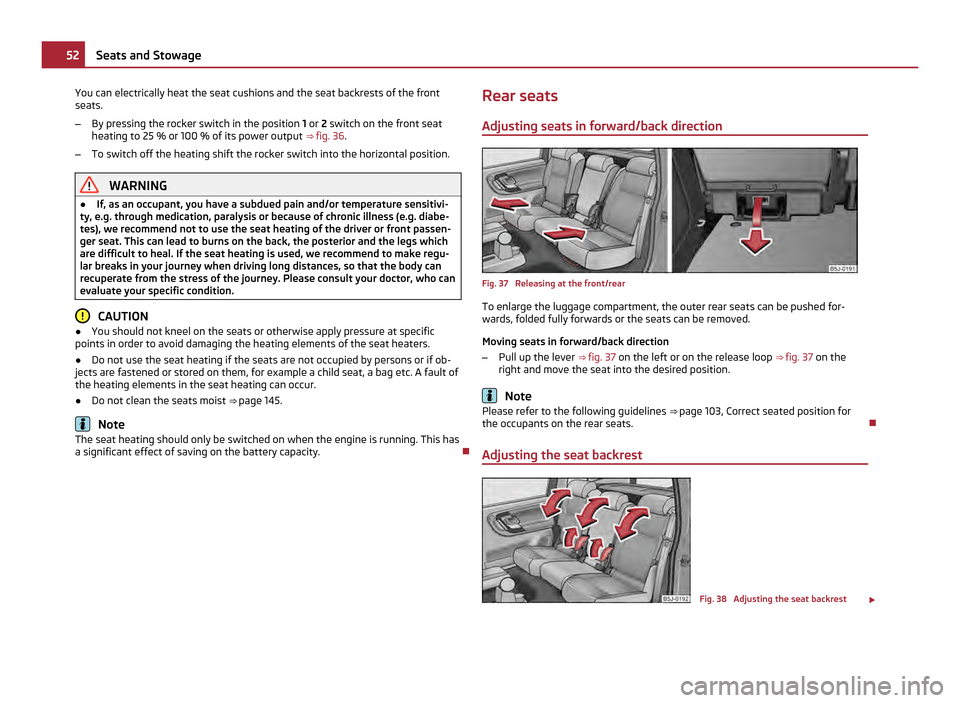
Heating the front seats Fig. 36 Rocker switch: Front seat heat-
ing
£ 51
Seats and Stowage Using the system Safety Driving Tips General Maintenance Breakdown assis-
tance Praktik Technical data
Page 54 of 212
You can electrically heat the seat cushions and the seat backrests of the front
seats.
– By pressing the rocker switch in the position 1 or 2 switch on the front seat
heating to 25 % or 100 % of its power output ⇒ fig. 36.
– To switch off the heating shift the rocker switch into the horizontal position. WARNING
● If, as an occupant, you have a subdued pain and/or temperature sensitivi-
ty, e.g. through medication, paralysis or because of chronic illness (e.g. diabe-
tes), we recommend not to use the seat heating of the driver or front passen-
ger seat. This can lead to burns on the back, the posterior and the legs which
are difficult to heal. If the seat heating is used, we recommend to make regu-
lar breaks in your journey when driving long distances, so that the body can
recuperate from the stress of the journey. Please consult your doctor, who can
evaluate your specific condition. CAUTION
● You should not kneel on the seats or otherwise apply pressure at specific
points in order to avoid damaging the heating elements of the seat heaters.
● Do not use the seat heating if the seats are not occupied by persons or if ob-
jects are fastened or stored on them, for example a child seat, a bag etc. A fault of
the heating elements in the seat heating can occur.
● Do not clean the seats moist ⇒ page 145.Note
The seat heating should only be switched on when the engine is running. This has
a significant effect of saving on the battery capacity. Rear seats
Adjusting seats in forward/back direction Fig. 37 Releasing at the front/rear
To enlarge the luggage compartment, the outer rear seats can be pushed for-
wards, folded fully forwards or the seats can be removed.
Moving seats in forward/back direction
– Pull up the lever ⇒ fig. 37 on the left or on the release loop ⇒ fig. 37 on the
right and move the seat into the desired position. Note
Please refer to the following guidelines ⇒ page 103, Correct seated position for
the occupants on the rear seats.
Adjusting the seat backrest Fig. 38 Adjusting the seat backrest
£52
Seats and Stowage
Page 55 of 212
Adjust the angle of the seat backrest
–
Pull the lever ⇒ fig. 38 and adjust the desired angle of the seat backrest.
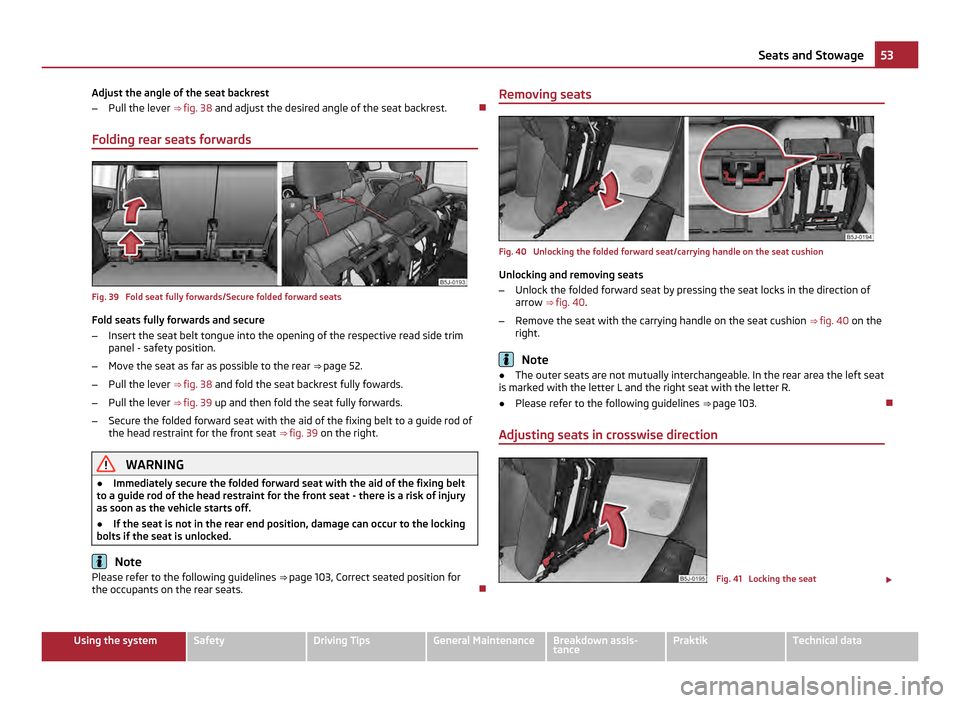
Folding rear seats forwards Fig. 39 Fold seat fully forwards/Secure folded forward seats
Fold seats fully forwards and secure
–
Insert the seat belt tongue into the opening of the respective read side trim
panel - safety position.
– Move the seat as far as possible to the rear ⇒ page 52.
– Pull the lever ⇒
fig. 38 and fold the seat backrest fully fowards.
– Pull the lever ⇒
fig. 39 up and then fold the seat fully forwards.
– Secure the folded forward seat with the aid of the fixing belt to a guide rod of
the head restraint for the front seat ⇒ fig. 39 on the right. WARNING
● Immediately secure the folded forward seat with the aid of the fixing belt
to a guide rod of the head restraint for the front seat - there is a risk of injury
as soon as the vehicle starts off.
● If the seat is not in the rear end position, damage can occur to the locking
bolts if the seat is unlocked. Note
Please refer to the following guidelines ⇒
page 103, Correct seated position for
the occupants on the rear seats. Removing seats
Fig. 40 Unlocking the folded forward seat/carrying handle on the seat cushion
Unlocking and removing seats
–
Unlock the folded forward seat by pressing the seat locks in the direction of
arrow ⇒ fig. 40 .
– Remove the seat with the carrying handle on the seat cushion ⇒
fig. 40 on the
right. Note
● The outer seats are not mutually interchangeable. In the rear area the left seat
is marked with the letter L and the right seat with the letter R.
● Please refer to the following guidelines ⇒ page 103.
Adjusting seats in crosswise direction Fig. 41 Locking the seat
£ 53
Seats and Stowage Using the system Safety Driving Tips General Maintenance Breakdown assis-
tance Praktik Technical data
Page 56 of 212
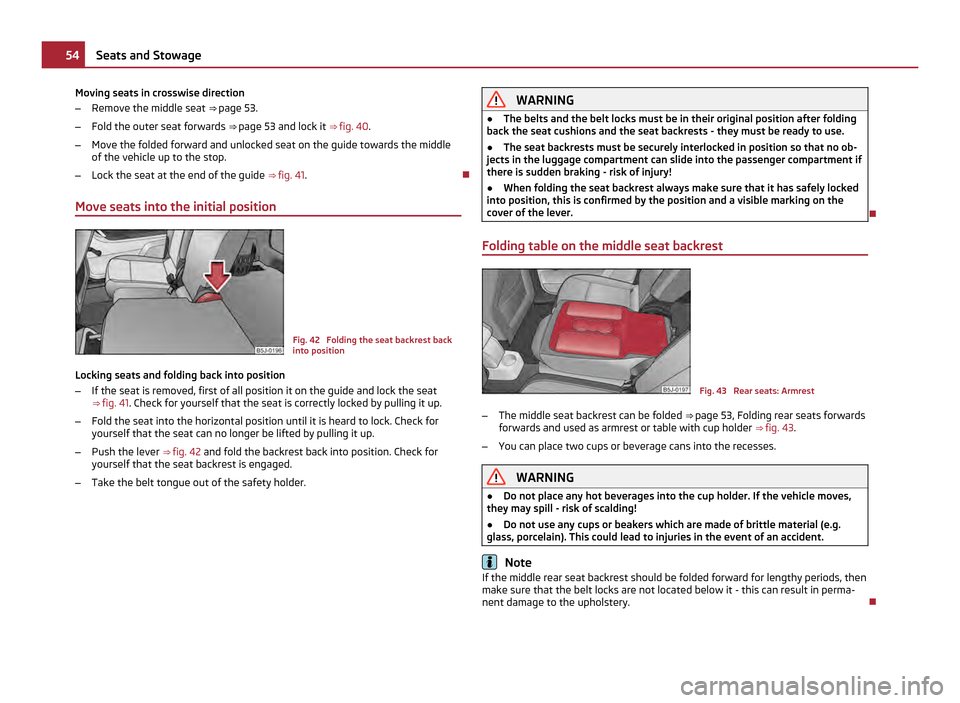
Moving seats in crosswise direction
–
Remove the middle seat ⇒ page 53.
– Fold the outer seat forwards ⇒ page 53 and lock it ⇒ fig. 40.
– Move the folded forward and unlocked seat on the guide towards the middle
of the vehicle up to the stop.
– Lock the seat at the end of the guide ⇒
fig. 41.
Move seats into the initial position Fig. 42 Folding the seat backrest back
into position
Locking seats and folding back into position
– If the seat is removed, first of all position it on the guide and lock the seat
⇒ fig. 41 . Check for yourself that the seat is correctly locked by pulling it up.
– Fold the seat into the horizontal position until it is heard to lock. Check for
yourself that the seat can no longer be lifted by pulling it up.
– Push the lever ⇒ fig. 42 and fold the backrest back into position. Check for
yourself that the seat backrest is engaged.
– Take the belt tongue out of the safety holder. WARNING
● The belts and the belt locks must be in their original position after folding
back the seat cushions and the seat backrests - they must be ready to use.
● The seat backrests must be securely interlocked in position so that no ob-
jects in the luggage compartment can slide into the passenger compartment if
there is sudden braking - risk of injury!
● When folding the seat backrest always make sure that it has safely locked
into position, this is confirmed by the position and a visible marking on the
cover of the lever.
Folding table on the middle seat backrest Fig. 43 Rear seats: Armrest
– The middle seat backrest can be folded ⇒
page 53, Folding rear seats forwards
forwards and used as armrest or table with cup holder ⇒ fig. 43.
– You can place two cups or beverage cans into the recesses. WARNING
● Do not place any hot beverages into the cup holder. If the vehicle moves,
they may spill - risk of scalding!
● Do not use any cups or beakers which are made of brittle material (e.g.
glass, porcelain). This could lead to injuries in the event of an accident. Note
If the middle rear seat backrest should be folded forward for lengthy periods, then
make sure that the belt locks are not located below it - this can result in perma-
nent damage to the upholstery. 54
Seats and Stowage
Page 59 of 212
The fixing nets and the installation instruction are located in the luggage com-
partment. WARNING
● The strength of the net makes it possible to load the pocket with objects
of up to 1.5 kg in weight. Heavy objects are not secured sufficiently - risk of
injury and net damage!
● The load to be transported must be fixed in place in such a way that it can-
not move during the journey and when braking. CAUTION
Do not place any objects with sharp edges in the nets - risk of net damage.
Fixing floor covering of the luggage compartment You can lean against the raised floor cover between the backrests of the rear
seats and the luggage compartment cover, as if one needs to reach the spare
wheel.
Luggage compartment cover You can use the luggage compartment cover behind the head re-
straints for storing light and soft items.
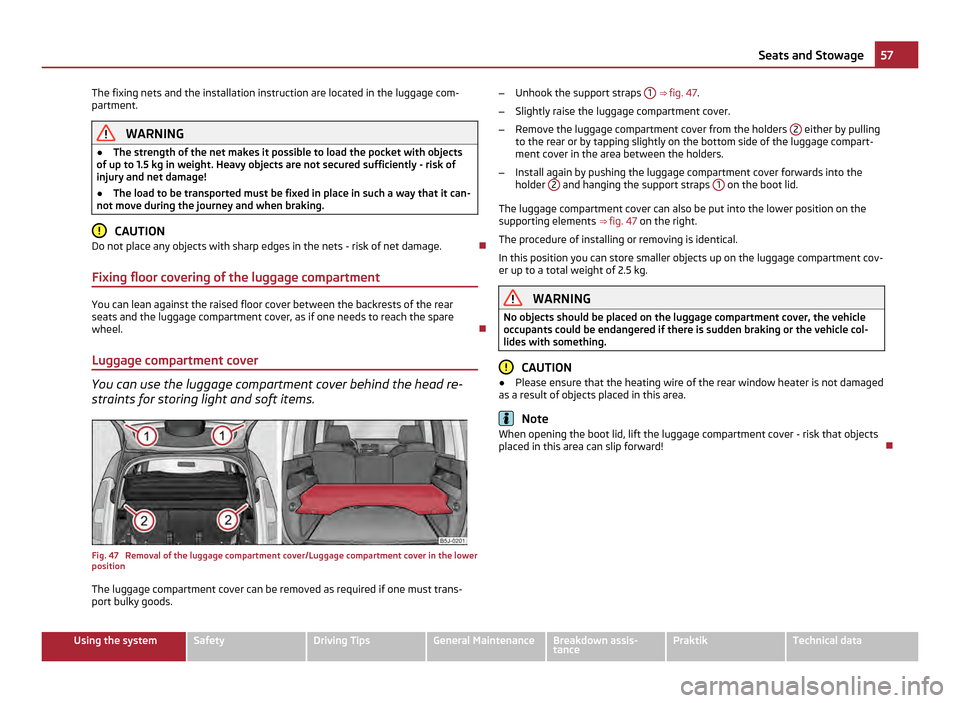
Fig. 47 Removal of the luggage compartment cover/Luggage compartment cover in the lower
position
The luggage compartment cover can be removed as required if one must trans-
port bulky goods. –
Unhook the support straps 1 ⇒ fig. 47.
– Slightly raise the luggage compartment cover.
– Remove the luggage compartment cover from the holders 2 either by pulling
to the rear or by tapping slightly on the bottom side of the luggage compart-
ment cover in the area between the holders.
– Install again by pushing the luggage compartment cover forwards into the
holder 2 and hanging the support straps
1 on the boot lid.
The luggage compartment cover can also be put into the lower position on the
supporting elements ⇒
fig. 47 on the right.
The procedure of installing or removing is identical.
In this position you can store smaller objects up on the luggage compartment cov-
er up to a total weight of 2.5 kg. WARNING
No objects should be placed on the luggage compartment cover, the vehicle
occupants could be endangered if there is sudden braking or the vehicle col-
lides with something. CAUTION
● Please ensure that the heating wire of the rear window heater is not damaged
as a result of objects placed in this area. Note
When opening the boot lid, lift the luggage compartment cover - risk that objects
placed in this area can slip forward! 57
Seats and Stowage Using the system Safety Driving Tips General Maintenance Breakdown assis-
tance Praktik Technical data
Page 60 of 212
Static separation net
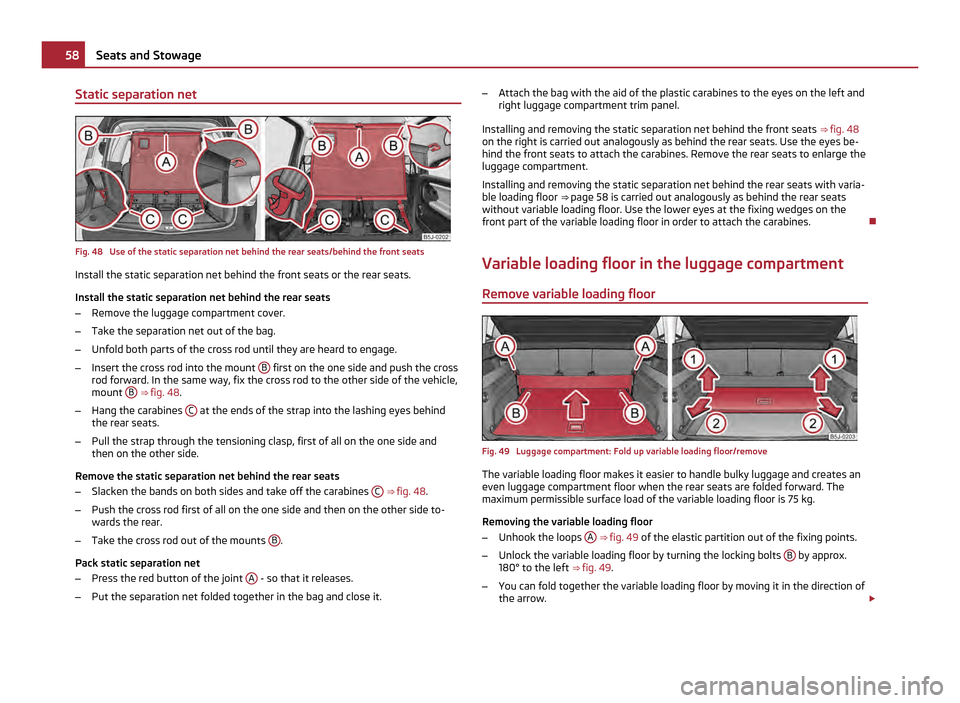
Fig. 48 Use of the static separation net behind the rear seats/behind the front seats
Install the static separation net behind the front seats or the rear seats.
Install the static separation net behind the rear seats
– Remove the luggage compartment cover.
– Take the separation net out of the bag.
– Unfold both parts of the cross rod until they are heard to engage.
– Insert the cross rod into the mount B first on the one side and push the cross
rod forward. In the same way, fix the cross rod to the other side of the vehicle,
mount B
⇒ fig. 48 .
– Hang the carabines C at the ends of the strap into the lashing eyes behind
the rear seats.
– Pull the strap through the tensioning clasp, first of all on the one side and
then on the other side.
Remove the static separation net behind the rear seats
– Slacken the bands on both sides and take off the carabines C
⇒ fig. 48 .
– Push the cross rod first of all on the one side and then on the other side to-
wards the rear.
– Take the cross rod out of the mounts B .
Pack static separation net
– Press the red button of the joint A - so that it releases.
– Put the separation net folded together in the bag and close it. –
Attach the bag with the aid of the plastic carabines to the eyes on the left and
right luggage compartment trim panel.
Installing and removing the static separation net behind the front seats ⇒ fig. 48
on the right is carried out analogously as behind the rear seats. Use the eyes be-
hind the front seats to attach the carabines. Remove the rear seats to enlarge the
luggage compartment.
Installing and removing the static separation net behind the rear seats with varia-
ble loading floor ⇒ page 58
is carried out analogously as behind the rear seats
without variable loading floor. Use the lower eyes at the fixing wedges on the
front part of the variable loading floor in order to attach the carabines.
Variable loading floor in the luggage compartment
Remove variable loading floor Fig. 49 Luggage compartment: Fold up variable loading floor/remove
The variable loading floor makes it easier to handle bulky luggage and creates an
even luggage compartment floor when the rear seats are folded forward. The
maximum permissible surface load of the variable loading floor is 75
kg.
Removing the variable loading floor
– Unhook the loops A
⇒ fig. 49 of the elastic partition out of the fixing points.
– Unlock the variable loading floor by turning the locking bolts B by approx.
180° to the left ⇒ fig. 49 .
– You can fold together the variable loading floor by moving it in the direction of
the arrow. £58
Seats and Stowage
Page 61 of 212
–
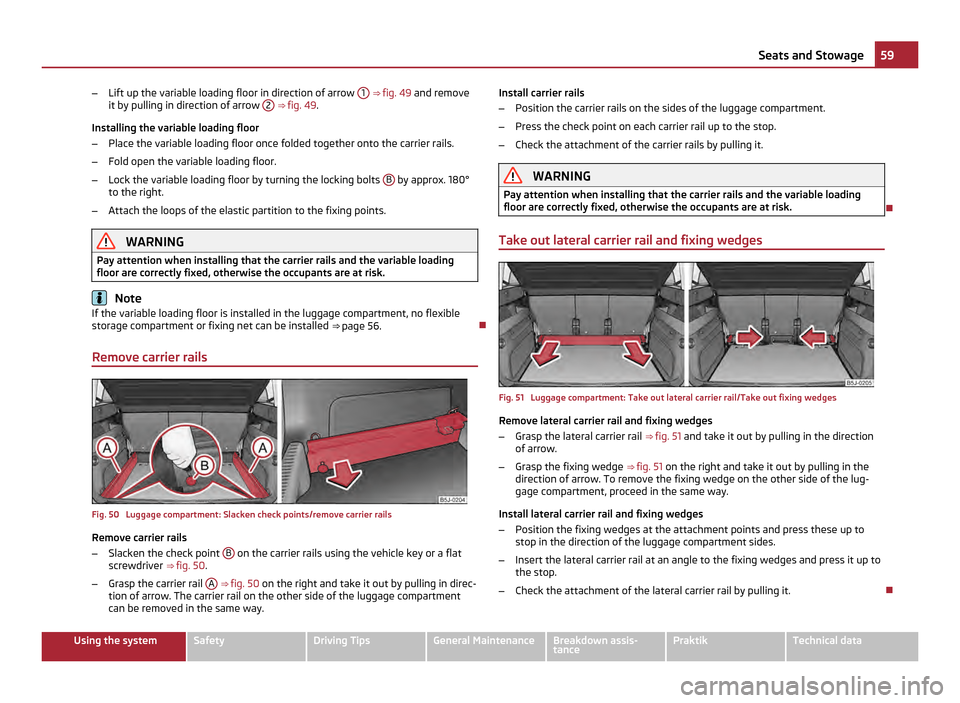
Lift up the variable loading floor in direction of arrow 1 ⇒ fig. 49
and remove
it by pulling in direction of arrow 2 ⇒
fig. 49 .
Installing the variable loading floor
– Place the variable loading floor once folded together onto the carrier rails.
– Fold open the variable loading floor.
– Lock the variable loading floor by turning the locking bolts B by approx. 180°
to the right.
– Attach the loops of the elastic partition to the fixing points. WARNING
Pay attention when installing that the carrier rails and the variable loading
floor are correctly fixed, otherwise the occupants are at risk. Note
If the variable loading floor is installed in the luggage compartment, no flexible
storage compartment or fixing net can be installed ⇒
page 56.
Remove carrier rails Fig. 50 Luggage compartment: Slacken check points/remove carrier rails
Remove carrier rails
–
Slacken the check point B on the carrier rails using the vehicle key or a flat
screwdriver ⇒
fig. 50 .
– Grasp the carrier rail A
⇒
fig. 50 on the right and take it out by pulling in direc-
tion of arrow. The carrier rail on the other side of the luggage compartment
can be removed in the same way. Install carrier rails
–
Position the carrier rails on the sides of the luggage compartment.
– Press the check point on each carrier rail up to the stop.
– Check the attachment of the carrier rails by pulling it. WARNING
Pay attention when installing that the carrier rails and the variable loading
floor are correctly fixed, otherwise the occupants are at risk.
Take out lateral carrier rail and fixing wedges Fig. 51 Luggage compartment: Take out lateral carrier rail/Take out fixing wedges
Remove lateral carrier rail and fixing wedges
–
Grasp the lateral carrier rail ⇒ fig. 51 and take it out by pulling in the direction
of arrow.
– Grasp the fixing wedge ⇒ fig. 51
on the right and take it out by pulling in the
direction of arrow. To remove the fixing wedge on the other side of the lug-
gage compartment, proceed in the same way.
Install lateral carrier rail and fixing wedges
– Position the fixing wedges at the attachment points and press these up to
stop in the direction of the luggage compartment sides.
– Insert the lateral carrier rail at an angle to the fixing wedges and press it up to
the stop.
– Check the attachment of the lateral carrier rail by pulling it. 59
Seats and Stowage Using the system Safety Driving Tips General Maintenance Breakdown assis-
tance Praktik Technical data
Page 62 of 212
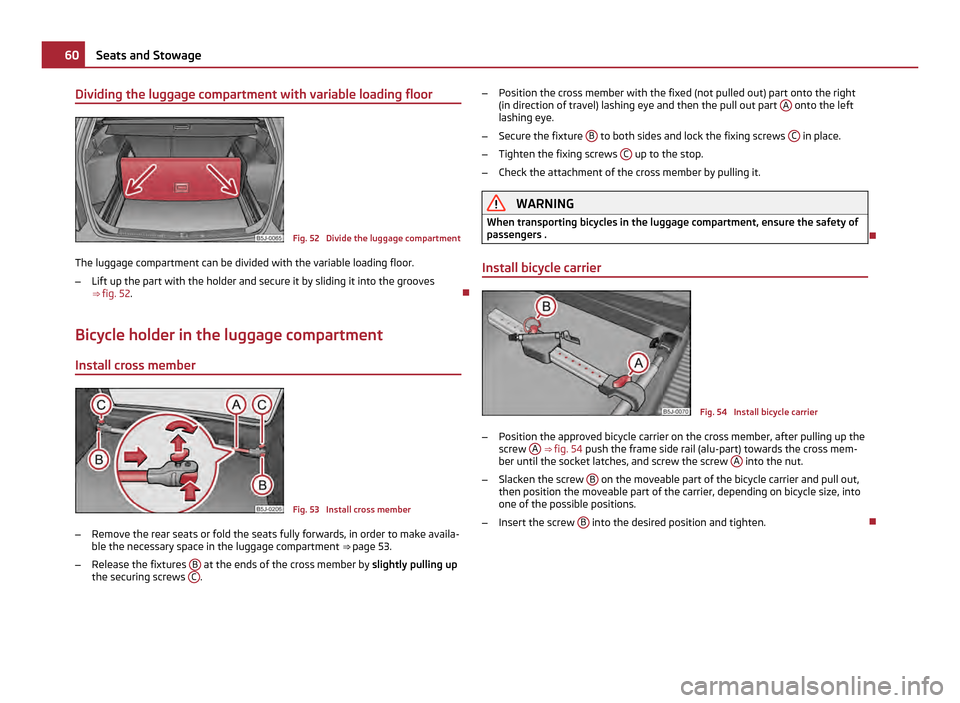
Dividing the luggage compartment with variable loading floor
Fig. 52 Divide the luggage compartment
The luggage compartment can be divided with the variable loading floor.
– Lift up the part with the holder and secure it by sliding it into the grooves
⇒ fig. 52 .
Bicycle holder in the luggage compartment Install cross member Fig. 53 Install cross member
– Remove the rear seats or fold the seats fully forwards, in order to make availa-
ble the necessary space in the luggage compartment ⇒
page 53.
– Release the fixtures B at the ends of the cross member by
slightly pulling up
the securing screws C . –
Position the cross member with the fixed (not pulled out) part onto the right
(in direction of travel) lashing eye and then the pull out part A onto the left
lashing eye.
– Secure the fixture B to both sides and lock the fixing screws
C in place.
– Tighten the fixing screws C up to the stop.
– Check the attachment of the cross member by pulling it. WARNING
When transporting bicycles in the luggage compartment, ensure the safety of
passengers .
Install bicycle carrier Fig. 54 Install bicycle carrier
– Position the approved bicycle carrier on the cross member, after pulling up the
screw A
⇒ fig. 54 push the frame side rail (alu-part) towards the cross mem-
ber until the socket latches, and screw the screw A into the nut.
– Slacken the screw B on the moveable part of the bicycle carrier and pull out,
then position the moveable part of the carrier, depending on bicycle size, into
one of the possible positions.
– Insert the screw B into the desired position and tighten.
60
Seats and Stowage
Page 63 of 212
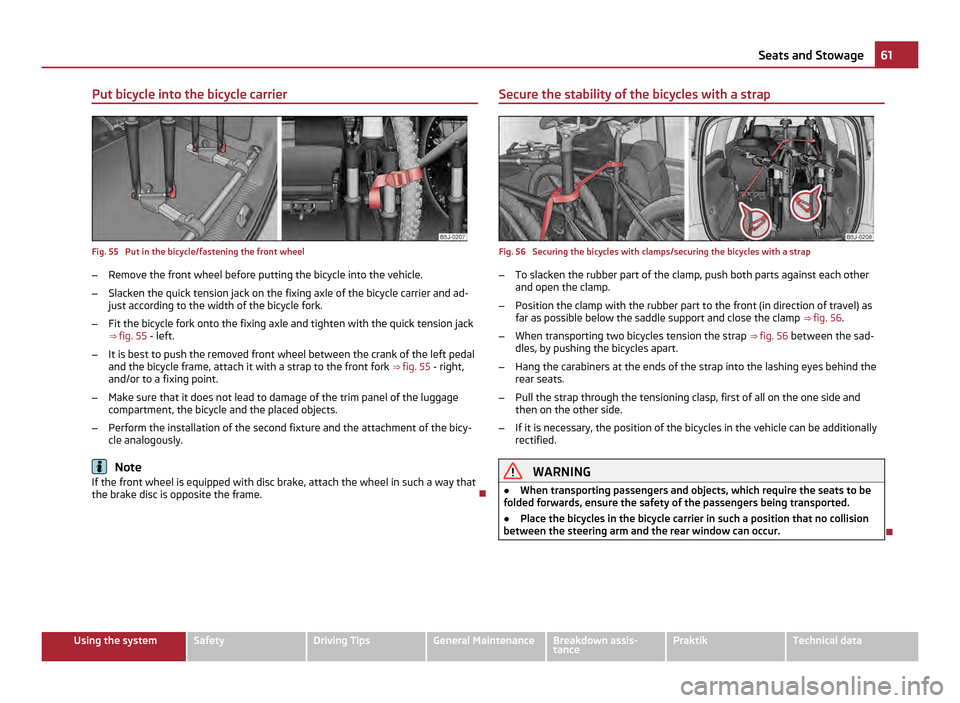
Put bicycle into the bicycle carrier
Fig. 55 Put in the bicycle/fastening the front wheel
– Remove the front wheel before putting the bicycle into the vehicle.
– Slacken the quick tension jack on the fixing axle of the bicycle carrier and ad-
just according to the width of the bicycle fork.
– Fit the bicycle fork onto the fixing axle and tighten with the quick tension jack
⇒ fig. 55 - left.
– It is best to push the removed front wheel between the crank of the left pedal
and the bicycle frame, attach it with a strap to the front fork ⇒
fig. 55 - right,
and/or to a fixing point.
– Make sure that it does not lead to damage of the trim panel of the luggage
compartment, the bicycle and the placed objects.
– Perform the installation of the second fixture and the attachment of the bicy-
cle analogously. Note
If the front wheel is equipped with disc brake, attach the wheel in such a way that
the brake disc is opposite the frame. Secure the stability of the bicycles with a strap Fig. 56 Securing the bicycles with clamps/securing the bicycles with a strap
–
To slacken the rubber part of the clamp, push both parts against each other
and open the clamp.
– Position the clamp with the rubber part to the front (in direction of travel) as
far as possible below the saddle support and close the clamp ⇒ fig. 56 .
– When transporting two bicycles tension the strap ⇒
fig. 56 between the sad-
dles, by pushing the bicycles apart.
– Hang the carabiners at the ends of the strap into the lashing eyes behind the
rear seats.
– Pull the strap through the tensioning clasp, first of all on the one side and
then on the other side.
– If it is necessary, the position of the bicycles in the vehicle can be additionally
rectified. WARNING
● When transporting passengers and objects, which require the seats to be
folded forwards, ensure the safety of the passengers being transported.
● Place the bicycles in the bicycle carrier in such a position that no collision
between the steering arm and the rear window can occur. 61
Seats and Stowage Using the system Safety Driving Tips General Maintenance Breakdown assis-
tance Praktik Technical data