ESP SKODA ROOMSTER 2012 1.G Owner's Guide
[x] Cancel search | Manufacturer: SKODA, Model Year: 2012, Model line: ROOMSTER, Model: SKODA ROOMSTER 2012 1.GPages: 194, PDF Size: 4.8 MB
Page 103 of 194
What influences the driving safety?
First read and observe the introductory information and safety warn-
ings on page 100.
The driver is fully responsible for himself and his occupants. If your driving safety
is effected, you place yourself and the oncoming traffic at risk.
The following guidelines must therefore be observed. › Do not get distracted from concentrating on the traffic situation, e.g. by your
passengers or mobile phone calls.
› Never drive when your driving ability is impaired, e.g. through medication, alco-
hol, drugs.
› Keep to the traffic regulations and the permissible speed limit.
› Always adjust the driving speed to the road, traffic and weather conditions.
› Take regular breaks on long journeys – at least every two hours. ÐCorrect seated position
ä
Introduction
This chapter contains information on the following subjects:
Correct seated position for the driver 102
Correct seated position for the front passenger 102
Correct seated position for the occupants on the rear seats 102
Examples of an incorrect seated position 102
WARNING
■ The front seats and the head restraints must always be adjusted to match
the body size of the seat occupant as well as the seat belts must always be
correctly fastened in order to provide an optimal protection for you and your
occupants.
■ Always assume the correct seated position before setting off and do not
change this position while driving. Also advise your passengers to adopt the
correct seated position and not to change this position while the car is mov-
ing.
ä WARNING (Continued)
■ If the occupant adopts an incorrect seated position, he is exposed to life-
threatening injuries, in case he is hit by a deployed airbag.
■ If the occupants on the rear seats are not sitting upright, the risk of injury is
increased due to incorrect routing of the seat belt.
■ The driver must maintain a distance of at least 25 cm to the steering wheel.
The front passenger must maintain a distance of at least 25 cm to the dash
panel. Not maintaining this minimum distance will mean that the airbag sys-
tem will not be able to properly protect you - hazard!
■ When driving, hold the steering wheel with both hands firmly on the outer
edge in the 9
o'clock and 3 o'clock position. Never hold the steering wheel in
the 12 o'clock position or in any other way (e.g. in the middle or inner edge of
the steering wheel). In such cases, you could severely injure the arms, hands
and head when the driver airbag is deployed.
■ The seat backrests must not be angled too far back when driving otherwise
this will affect proper operation of the seat belts and of the airbag system -
risk of injury!
■ Ensure that there are no objects in the driver's footwell as they may get
caught behind the pedals when driving or applying the braking. You would
then no longer be able to operate the clutch, brake or accelerate.
■ Always keep your feet in the footwell when the car is being driven - never
place your feet on the instrument panel, out of the window or on the surfaces
of the seats. You will be exposed to increased risk of injury if it becomes nec-
essary to apply the brake or in the event of an accident. If an airbag is de-
ployed, you may suffer fatal injuries when adopting an incorrect seated posi-
tion! Ð
101
Passive Safety
Page 104 of 194
Correct seated position for the driver
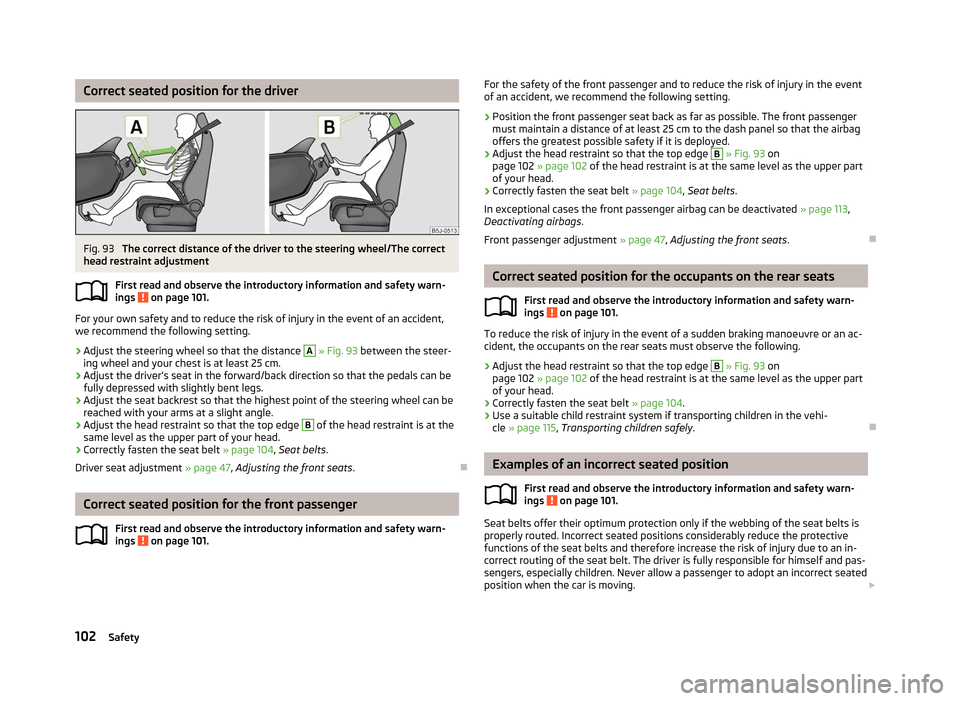
Fig. 93
The correct distance of the driver to the steering wheel/The correct
head restraint adjustment
First read and observe the introductory information and safety warn-
ings on page 101.
For your own safety and to reduce the risk of injury in the event of an accident,
we recommend the following setting.
› Adjust the steering wheel so that the distance A
» Fig. 93 between the steer-
ing wheel and your chest is at least 25 cm.
› Adjust the driver’s seat in the forward/back direction so that the pedals can be
fully depressed with slightly bent legs.
› Adjust the seat backrest so that the highest point of the steering wheel can be
reached with your arms at a slight angle.
› Adjust the head restraint so that the top edge B
of the head restraint is at the
same level as the upper part of your head.
› Correctly fasten the seat belt
» page 104, Seat belts.
Driver seat adjustment » page 47, Adjusting the front seats .ÐCorrect seated position for the front passenger
First read and observe the introductory information and safety warn-
ings on page 101.ä
ä For the safety of the front passenger and to reduce the risk of injury in the event
of an accident, we recommend the following setting.
› Position the front passenger seat back as far as possible. The front passenger
must maintain a distance of at least 25
cm to the dash panel so that the airbag
offers the greatest possible safety if it is deployed.
› Adjust the head restraint so that the top edge B
» Fig. 93 on
page 102 » page 102 of the head restraint is at the same level as the upper part
of your head.
› Correctly fasten the seat belt
» page 104, Seat belts.
In exceptional cases the front passenger airbag can be deactivated » page 113,
Deactivating airbags .
Front passenger adjustment » page 47, Adjusting the front seats .Ð Correct seated position for the occupants on the rear seats
First read and observe the introductory information and safety warn-
ings on page 101.
To reduce the risk of injury in the event of a sudden braking manoeuvre or an ac-
cident, the occupants on the rear seats must observe the following.
› Adjust the head restraint so that the top edge B
» Fig. 93 on
page 102 » page 102 of the head restraint is at the same level as the upper part
of your head.
› Correctly fasten the seat belt
» page 104.
› Use a suitable child restraint system if transporting children in the vehi-
cle » page 115, Transporting children safely .Ð Examples of an incorrect seated position
First read and observe the introductory information and safety warn-
ings on page 101.
Seat belts offer their optimum protection only if the webbing of the seat belts is
properly routed. Incorrect seated positions considerably reduce the protective
functions of the seat belts and therefore increase the risk of injury due to an in-
correct routing of the seat belt. The driver is fully responsible for himself and pas-
sengers, especially children. Never allow a passenger to adopt an incorrect seated
position when the car is moving.
£
ä
ä
102 Safety
Page 115 of 194
Deactivating airbags
Deactivating airbags
Deactivation of airbags is envisaged only for particular instances, such as if:
› using a child seat on the front passenger seat, in which the child has its back to
the vehicle's direction of travel (in some countries this must be in the direction
of travel due to different legal regulations applying) » page 115, Child seat;
› not being able to maintain a distance of at least 25
cm between the middle of
the steering wheel and chest, despite the driver's seat being correctly adjusted;
› special attachments are required in the area of the steering wheel because of a
physical disability;
› other seats have been installed (e.g. orthopaedic seats without side airbags).
The front passenger airbag can be switched off with the key-operated
switch » page 113 .
We recommend that you ask a ŠKODA Service Partner to switch off any other air-
bags.
Monitoring the airbag system
The functionality of the airbag system is also monitored electronically when one
airbag has been switched off.
If the airbag was switched off using diagnostic equipment:
› The airbag indicator light
lights up for 3 seconds after the ignition is switched
on and then flashes after that for about 12 seconds.
If the airbag was switched off using the key switch on the side of the dash pan-
el:
› The airbag warning light
comes on for 3 seconds after the ignition has been
switched on;
› Activation of the airbag is indicated by the illumination of the yellow indicator
light in display in the middle of the dash panel 3
» Fig. 103
on page 113. Note
■ The national regulations for switching off airbags must be observed.
■ A ŠKODA Service Partner will be able to inform you which airbags in your vehicle
can/must be deactivated. Ð Key switch for the front seat passenger airbag
Fig. 103
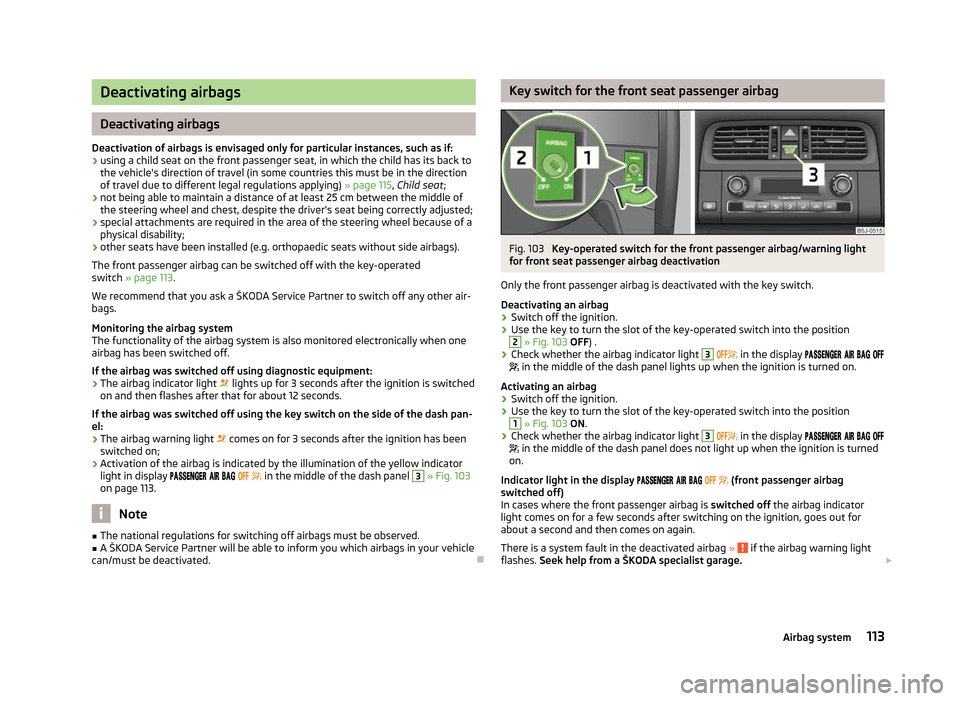
Key-operated switch for the front passenger airbag/warning light
for front seat passenger airbag deactivation
Only the front passenger airbag is deactivated with the key switch.
Deactivating an airbag › Switch off the ignition.
› Use the key to turn the slot of the key-operated switch into the position 2
» Fig. 103 OFF) .
› Check whether the airbag indicator light 3
in the display
in the middle of the dash panel lights up when the ignition is turned on.
Activating an airbag
› Switch off the ignition.
› Use the key to turn the slot of the key-operated switch into the position 1
» Fig. 103 ON
.
› Check whether the airbag indicator light 3
in the display
in the middle of the dash panel does not light up when the ignition is turned
on.
Indicator light in the display (front passenger airbag
switched off)
In cases where the front passenger airbag is switched off the airbag indicator
light comes on for a few seconds after switching on the ignition, goes out for
about a second and then comes on again.
There is a system fault in the deactivated airbag » if the airbag warning light
flashes. Seek help from a ŠKODA specialist garage. £
113
Airbag system
Page 116 of 194
WARNING
■ The driver is responsible for whether the airbag is switched on or switched
off.
■ Only switch off the airbag when the ignition is switched off! Otherwise a
fault can occur in the system for deactivating the airbag. ■ If the airbag warning light (airbag switched off) flashes, the front pas-
senger airbag will not be deployed in the event of an accident! Have the air-
bag system checked by a ŠKODA specialist garage immediately. Ð114
Safety
Page 121 of 194
Driving Tips
Driving and the Environment
The first 1 500 km
New engine
The engine has to be run in during the first 1 500 kilometres.
Up to 1 000 kilometres › Do not drive faster than 3/4 of the maximum speed of the gear in use, i.e. 3/4 of
the maximum permissible engine speed.
› No full throttle.
› Avoid high engine speeds.
› Do not tow a trailer.
From 1 000 up to 1
500 kilometres
› Gradually
increase the power output of the engine up to the full speed of the
gear engaged, i.e. up to the maximum permissible engine speed.
During the first operating hours the engine has higher internal friction than later
until all of the moving parts have harmonized. The driving style which you adopt
during the first approx.1
500 kilometres plays a decisive part in the success of
running in your car.
Never drive at unnecessarily high engine speeds even after the running-in period
is complete. The maximum permissible engine speed is marked by the start of the
red scale area of the revolutions counter. On vehicles fitted with a manual gear-
box, at the very latest shift up into the next gear when the red area is reached.
During acceleration (depressing the accelerator) exceptionally high engine
speeds are automatically reduced, yet the engine is not protected against too
high engine speeds which are caused by incorrectly shifting down the gears re-
sulting in a sudden increase of the engine speeds above the permitted maximum
revolutions which can lead to engine damage.
For a vehicle fitted with a manual gearbox the converse situation also applies: Do
not drive at an engine speed that is too low. Shift down a gear when the engine
is no longer running smoothly. Observe the recommended gear » page 11, Recom-
mended gear . CAUTION
All the speed and engine revolution figures apply only when the engine is at its
normal operating temperature. Never rev up a cold engine when the vehicle is
stationary or when driving in individual gears. For the sake of the environment
Not driving at unnecessarily high engine revolutions and shifting to a higher gear
as early as possible are ways to minimise fuel consumption and operating noise
levels and protects the environment. Ð New tyres
New tyres have to be “
run in” since they do not offer optimal grip at first. Drive
especially carefully for the first 500 km or so. Ð New brake pads
New brake pads initially do not provide full braking efficiency. The brake pads
must initially be “run in
”. Drive especially carefully for the first 200 km or so. Ð Catalytic converter
Proper operation of the emission control system (catalytic converter) is of major
significance for driving your vehicle in an environmentally conscious way.
The following guidelines must be observed: › Vehicles fitted with a petrol engine must always be refueled with unleaded pet-
rol » page 135, Unleaded petrol ;
› Do not pour too much oil into the engine
» page 139, Checking the engine oil
level;
› Do not switch off the ignition while driving.
If you drive your vehicle in a country in which unleaded petrol is not available, you
must have the catalytic converter replaced later when driving the vehicle into a
country in which use of a catalytic converter is mandatory. £
119
Driving and the Environment
Page 137 of 194
Note
The fuel tank has a capacity of about 55 litres, containing a reserve of approx.
7 litres . ÐUnleaded petrol
First read and observe the introductory information and safety warn-
ings on page 134.
Your vehicle can only be operated with
unleaded fuel
that complies with the
standard EN 228 (in Germany: standard DIN 51626-1 or E10 for unleaded fuel with
an octane rating of 95 RON and 91 RON or DIN 51626-2 or E5 for unleaded fuel
with the octane rating 95 RON and 98 RON).
Prescribed fuel - unleaded fuel 95/91 RON
Use unleaded fuel with the octane rating 95 RON. Unleaded petrol 91 RON can al-
so be used but results in a slight loss in performance.
If, in an emergency, the vehicle has to be refuelled with petrol of a lower octane
number than the one prescribed, the journey must only be continued at medium
engine speeds and a low engine load. Driving at high engine revs or a high engine
load can severely damage the engine! Refuel using petrol of the prescribed oc-
tane number as soon as possible.
Prescribed fuel - unleaded petrol min. 95 RON
Use unleaded fuel with the octane rating 95 RON.
In case of necessity, you can refuel with petrol with the octane rating 91 RON if
petrol with the octane rating 95 RON is not available. The journey must only be
continued at medium engine speeds and a minimum engine load. Driving at high
engine revs or a high engine load can severely damage the engine! Refuel using
petrol of the prescribed octane number as soon as possible.
Even in the event of an emergency, petrol of a lower octane number than 91 RON
must not be used, otherwise the engine can be severely damaged!
Unleaded petrol with higher octane number
Unleaded petrol that has a higher octane number than that required by the en-
gine can be used without limitations.
On vehicles with prescribed unleaded petrol 95/91 RON, the use of petrol with a
higher octane number than 95 RON does not result in a noticeable power in-
crease or a lower fuel consumption.
ä
On vehicles using prescribed unleaded petrol of
min.
95 RON, the use of petrol
with a higher octane number than 95 RON can increase the power and reduce
fuel consumption.
Prescribed fuel - unleaded petrol 98/(95) RON
Use unleaded fuel with the octane rating 98 RON. Unleaded petrol 95 RON can
also be used but results in a slight loss in performance.
In case of necessity, you can refuel with petrol with the octane rating 91 RON of
unleaded fuel with octane rating 98 RON or 95 RON is not available. The journey
must only be continued at medium engine speeds and a minimum engine load.
Driving at high engine revs or a high engine load can severely damage the engine!
Refuel using petrol of the prescribed octane number as soon as possible.
Even in the event of an emergency, petrol of a lower octane number than 91 RON
must not be used, otherwise the engine can be severely damaged!
Fuel additives
Only use unleaded petrol, which complies with the standard EN 228 (in Germany:
standard DIN 51626-1 or E10 for unleaded fuel with an octane rating of 95 RON
and 91 RON or DIN 51626-2 or E5 for unleaded fuel with an octane rating of
95 RON and 98 RON), as these meet all of the requirements for fault-free engine
operation. We therefore recommend that no fuel additives are used. CAUTION
■ All
ŠKODA vehicles with petrol engines must only be operated with unleaded
petrol. Just filling the tank with leaded petrol once will damage the exhaust sys-
tem!
■ Engine parts can be damaged if petrol with a lower octane number than the one
prescribed is used.
■ In no case may fuel additives with metal components be used, especially not
with manganese and iron content.
LRP (lead replacement petrol) fuels with met-
allic components may not be used. There is a risk of causing considerable damage
to parts of the engine or exhaust system!
■ Fuels with metallic content may not be used. There is a risk of causing consider-
able damage to parts of the engine or exhaust system!
■ The use of unsuitable fuel additives can cause considerable damage to parts of
the engine or the exhaust system. Ð
135
Inspecting and replenishing
Page 147 of 194
Battery cover
Fig. 120
Vehicle battery: Open up the
cover
First read and observe the introductory information and safety warn-
ings on page 143.
The battery is located in the engine compartment below a plastic box.
›
Push the lid in the direction of the arrow
» Fig. 120.
› The installation of the battery cover on the positive terminal side takes place in
the reverse order. ÐChecking the battery electrolyte level
Fig. 121
Vehicle battery: Electrolyte level
indicator
First read and observe the introductory information and safety warn-
ings on page 143.ä
ä We recommend you have the electrolyte level checked by a ŠKODA specialist ga-
rage from time to time, especially in the following cases.
› High outside temperatures.
› Long daily drives
› After each charge
» page 146.
On vehicles with a vehicle battery fitted with a colour indicator, the so-called
magic eye » Fig. 121, the electrolyte level can be determined by looking at the
change in colour.
Air bubbles can influence the colour of the indicator. For this reason carefully
knock on the indicator before carrying out the check. › Black colour - electrolyte level is correct.
› Colourless or light yellow colour - electrolyte level too low, the battery must be
replaced. Note
■ The battery electrolyte level is periodically checked by a ŠKODA Service Partner
as part of the Inspection Service. ■ For technical reasons, on vehicles with the description “AGM”, the electrolyte
level cannot be checked. ■ Vehicles with a START-STOP system are fitted with a battery control unit for
checking the energy level for the recurring engine start. Ð Operation in winter
First read and observe the introductory information and safety warn-
ings on page 143.
At low temperatures, the vehicle battery only has part of the initial power output
that it has at normal temperatures.
A discharged vehicle battery may already freeze at temperatures just below 0
°C.
We therefore recommend that you have the battery checked and, if necessary, re-
charged by a ŠKODA Service Partner before the start of the winter.
Ð
ä
145
Inspecting and replenishing
Page 149 of 194
Automatic load deactivation
First read and observe the introductory information and safety warn-
ings on page 143.
An intelligent vehicle power management system automatically takes various
measures at high loads on the vehicle battery to prevent discharging of the bat-
tery: This manifests itself by the following:
› The idling speed is raised to allow the generator to deliver more electricity to
the electrical system.
› Where appropriate large consumers of power, e.g. seat heaters, rear window
heaters, voltage supply to the 12V power socket, have their power limited or in
case of emergency shut off completely. Note
Despite such intervention by the vehicle electric system management, the vehicle
battery may be drained. For example, when the ignition is switched on a long time
with the engine turned off or the side or parking lights are turned on during lon-
ger parking. Driving comfort is not put at risk by any shutting off of consumers.
Often the driver is not aware of it having taken place. Ðä
147
Inspecting and replenishing
Page 155 of 194
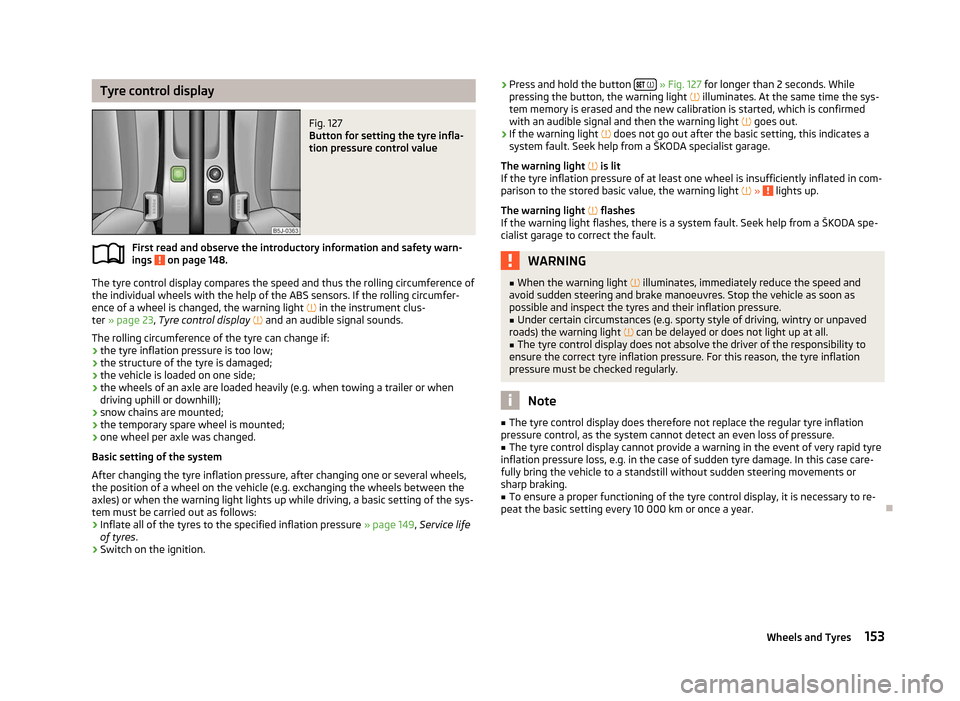
Tyre control display
Fig. 127
Button for setting the tyre infla-
tion pressure control value
First read and observe the introductory information and safety warn-
ings on page 148.
The tyre control display compares the speed and thus the rolling circumference of
the individual wheels with the help of the ABS sensors. If the rolling circumfer-
ence of a wheel is changed, the warning light
in the instrument clus-
ter » page 23, Tyre control display and an audible signal sounds.
The rolling circumference of the tyre can change if: › the tyre inflation pressure is too low;
› the structure of the tyre is damaged;
› the vehicle is loaded on one side;
› the wheels of an axle are loaded heavily (e.g. when towing a trailer or when
driving uphill or downhill);
› snow chains are mounted;
› the temporary spare wheel is mounted;
› one wheel per axle was changed.
Basic setting of the system
After changing the tyre inflation pressure, after changing one or several wheels,
the position of a wheel on the vehicle (e.g. exchanging the wheels between the
axles) or when the warning light lights up while driving, a basic setting of the sys-
tem must be carried out as follows:
› Inflate all of the tyres to the specified inflation pressure
» page 149, Service life
of tyres .
› Switch on the ignition.
ä
›
Press and hold the button
» Fig. 127
for longer than 2 seconds. While
pressing the button, the warning light illuminates. At the same time the sys-
tem memory is erased and the new calibration is started, which is confirmed
with an audible signal and then the warning light goes out.
› If the warning light
does not go out after the basic setting, this indicates a
system fault. Seek help from a ŠKODA specialist garage.
The warning light is lit
If the tyre inflation pressure of at least one wheel is insufficiently inflated in com-
parison to the stored basic value, the warning light » lights up.
The warning light flashes
If the warning light flashes, there is a system fault. Seek help from a
ŠKODA spe-
cialist garage to correct the fault. WARNING
■ When the warning light illuminates, immediately reduce the speed and
avoid sudden steering and brake manoeuvres. Stop the vehicle as soon as
possible and inspect the tyres and their inflation pressure.
■ Under certain circumstances (e.g. sporty style of driving, wintry or unpaved
roads) the warning light can be delayed or does not light up at all.
■ The tyre control display does not absolve the driver of the responsibility to
ensure the correct tyre inflation pressure. For this reason, the tyre inflation
pressure must be checked regularly. Note
■ The tyre control display does therefore not replace the regular tyre inflation
pressure control, as the system cannot detect an even loss of pressure. ■ The tyre control display cannot provide a warning in the event of very rapid tyre
inflation pressure loss, e.g. in the case of sudden tyre damage. In this case care-
fully bring the vehicle to a standstill without sudden steering movements or
sharp braking.
■ To ensure a proper functioning of the tyre control display, it is necessary to re-
peat the basic setting every 10 000 km or once a year. Ð
153
Wheels and Tyres
Page 167 of 194
■
One should be constantly vigilant not to allow impermissibly high towing forces
or jerky loadings. There is always a risk of excessive stresses and damage result-
ing at the points to which you attach the tow rope or tow bar when you attempt
to tow a vehicle which is not standing on a paved road.
■ Attach the tow rope or the tow bar to the towing eyes or to the detachable ball
head of the towing device » page 165 or » page 165.Note
■ We recommend using a tow rope from ŠKODA Original Accessories available
from a ŠKODA Service Partner. ■ Towing another vehicle requires a certain amount of practice. Both drivers
should be familiar with the particular points about towing a vehicle. Unskilled
drivers should not attempt to tow in another vehicle or to be towed in. ■ When towing, respect the national legal provisions, especially those which re-
late to the identification of the towing vehicle and the vehicle being towed. ■ The tow rope must not be twisted as it may in certain circumstances result in
the front towing eye being unscrewed out of your vehicle. ÐFront towing eye
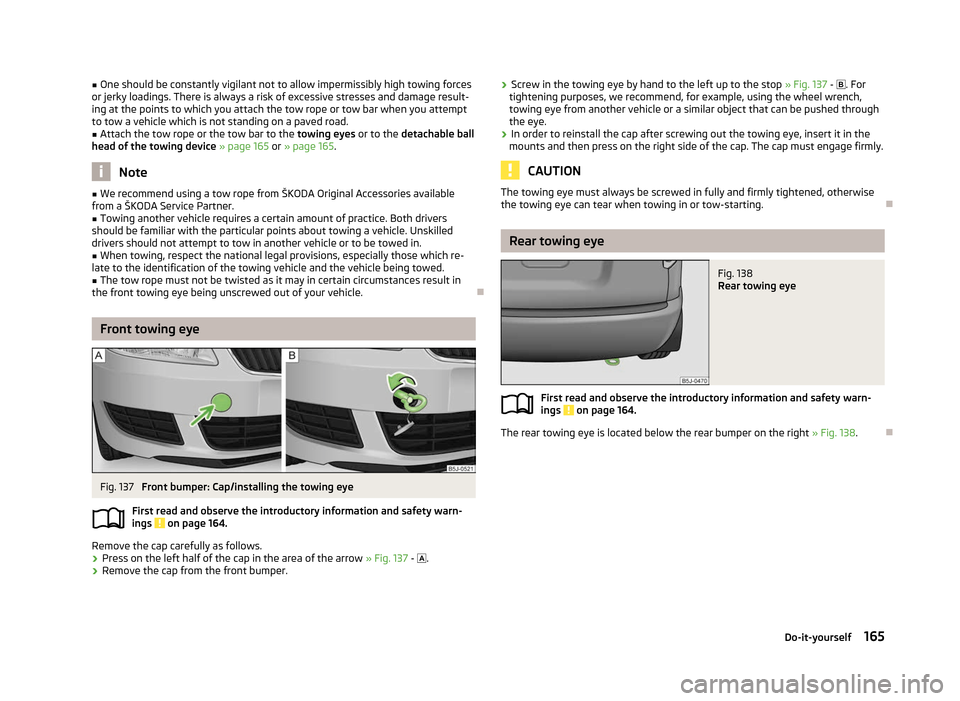
Fig. 137
Front bumper: Cap/installing the towing eye
First read and observe the introductory information and safety warn-
ings on page 164.
Remove the cap carefully as follows.
›
Press on the left half of the cap in the area of the arrow
» Fig. 137 - .
› Remove the cap from the front bumper.
ä ›
Screw in the towing eye by hand to the left up to the stop
» Fig. 137 - . For
tightening purposes, we recommend, for example, using the wheel wrench,
towing eye from another vehicle or a similar object that can be pushed through
the eye.
› In order to reinstall the cap after screwing out the towing eye, insert it in the
mounts and then press on the right side of the cap. The cap must engage firmly. CAUTION
The towing eye must always be screwed in fully and firmly tightened, otherwise
the towing eye can tear when towing in or tow-starting. Ð Rear towing eye
Fig. 138
Rear towing eye
First read and observe the introductory information and safety warn-
ings on page 164.
The rear towing eye is located below the rear bumper on the right
»
Fig. 138.Ð ä
165
Do-it-yourself