Set time SKODA ROOMSTER 2012 1.G Owner's Manual
[x] Cancel search | Manufacturer: SKODA, Model Year: 2012, Model line: ROOMSTER, Model: SKODA ROOMSTER 2012 1.GPages: 194, PDF Size: 4.8 MB
Page 10 of 194
Instruments and Indicator Lights
Instrument cluster
ä
Introduction
This chapter contains information on the following subjects:
Overview 8
Engine revolutions counter 9
Speedometer 9
Coolant temperature gauge 9
Fuel gauge 9
Counter for distance driven 10
Service Interval Display 10
Digital clock 11
Recommended gear 11
WARNING
■ Concentrate fully at all times on your driving! As the driver you are fully re-
sponsible for road safety.
■ Never operate the controls in the instrument cluster while driving, only
when the vehicle is stationary! Ð Overview
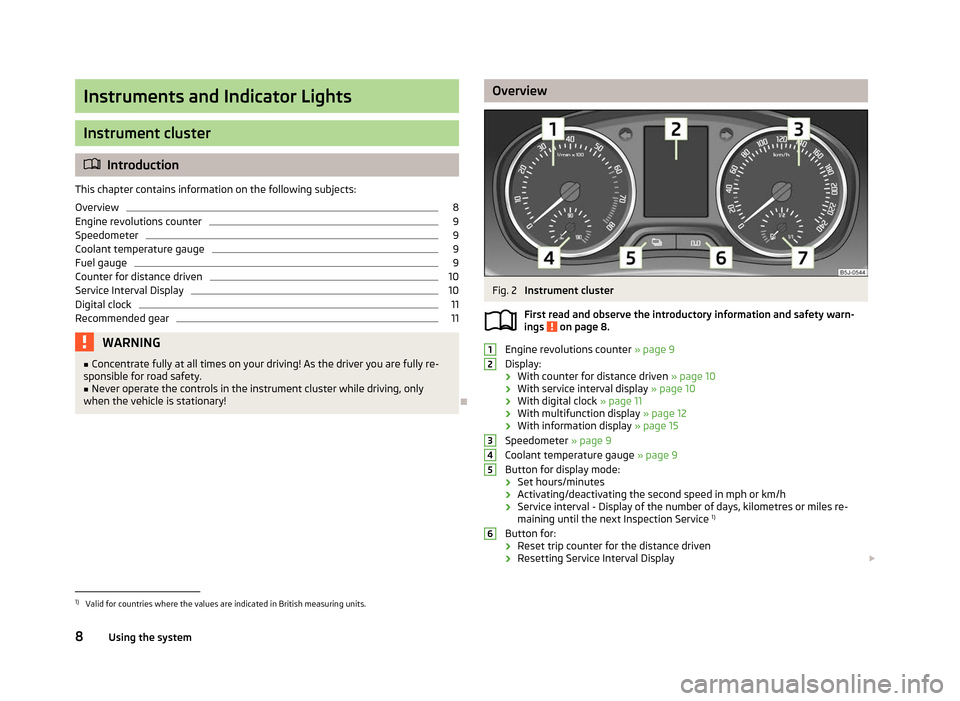
Fig. 2
Instrument cluster
First read and observe the introductory information and safety warn-
ings on page 8.
Engine revolutions counter
» page 9
Display:
› With counter for distance driven
» page 10
› With service interval display
» page 10
› With digital clock
» page 11
› With multifunction display
» page 12
› With information display » page 15
Speedometer » page 9
Coolant temperature gauge » page 9
Button for display mode:
› Set hours/minutes
› Activating/deactivating the second speed in mph or km/h
› Service interval - Display of the number of days, kilometres or miles re-
maining until the next Inspection Service 1)
Button for: › Reset trip counter for the distance driven
› Resetting Service Interval Display
£
ä 1
2
3
4
5
6
1)
Valid for countries where the values are indicated in British measuring units.
8 Using the system
Page 11 of 194
›
Set hours/minutes
› Activate/deactivate display mode
Fuel gauge »
page 9 ÐEngine revolutions counter
First read and observe the introductory information and safety warn-
ings on page 8.
The red scale of the rev counter 1
» Fig. 2 on page 8 indicates the range in which
the engine control unit begins to limit the engine speed. The engine control unit
restricts the engine speed to a steady limit.
You should shift into the next higher gear before the red scale of the revolution
counter is reached, or move the selector lever into position D if your car is fitted
with an automatic gearbox.
Avoid high engine speeds during the running-in period » page 119, New engine
and before the engine has warmed up to the operating temperature.
To maintain the optimum motor speed, observe the gearshift indica-
tor » page 11. For the sake of the environment
Shifting to a higher gear in good time helps to lower fuel consumption, minimises
operating noise levels, protects the environment and contributes to a longer life
and reliability of the engine. ÐSpeedometer
First read and observe the introductory information and safety warn-
ings on page 8.
Warning against excessive speeds
An audible warning signal will sound when the vehicle speed exceeds 120 km/h.
The audible warning signal is switched off when the vehicle speed falls below
this speed limit.
Note
This function is only valid for some countries. Ð7
ä
ä Coolant temperature gauge
First read and observe the introductory information and safety warn-
ings on page 8.
The coolant temperature gauge 4
» Fig. 2 on page 8 operates only when the ig-
nition is switched on.
The following guidelines regarding the temperature ranges must be observed to
avoid any damage to the engine.
Cold range
If the pointer is still in the left area of the scale it means that the engine has not
yet reached its operating temperature. Avoid high speeds, full throttle and high
engine loads.
The operating range
The engine has reached its operating temperature as soon as the pointer moves
into the mid-range of the scale, for a normal style of driving. The pointer may also
move further to the right at high engine loads and high outside temperatures. CAUTION
Additional headlights and other attached components in front of the fresh air in-
let impair the cooling efficiency of the coolant. There is then a risk of the engine
overheating at high outside temperatures and high engine loads »
page 19. Ð Fuel gauge
First read and observe the introductory information and safety warn-
ings on page 8.
The fuel gauge 7
» Fig. 2 on page 8 only operates when the ignition is switched
on.
The fuel tank has a capacity of about 55 litres. The indicator light in the instru-
ment cluster lights up when the pointer reaches the reserve mark-
ing » page 22 .
An audible signal sounds as a warning signal. £
ä
ä
9
Instruments and Indicator Lights
Page 12 of 194
CAUTION
Never drive until the fuel tank is completely empty! An irregular supply of fuel can
lead to irregular engine running. Unburnt fuel may get into the exhaust system
and damage the catalytic converter. Note
On some vehicles, the fuel gauge is shown in the display of the instrument clus-
ter. ÐCounter for distance driven
First read and observe the introductory information and safety warn-
ings on page 8.
The distance which you have driven with your vehicle is shown in kilometres (km).
In some countries the measuring unit
“mile” is used.
Daily trip counter (trip)
The daily trip counter indicates the distance which you have driven since it was
last reset - in steps of 100 metres or 1/10 of a mile.
To reset the display of the daily trip counter, press button 6
» Fig. 2 on page 8
for longer.
Odometer
The odometer indicates the total distance in kilometres or miles which the vehicle
has been driven.
Fault display
If there is a fault in the instrument cluster Error will appear continuously in the
display. Ensure the fault is rectified as soon as possible by
ŠKODA a specialist ga-
rage. Note
For vehicles fitted with the information display, if the display of the second speed
is activated in mph or km/h, this driving speed is indicated instead of the counter
for the total distance driven. Ð
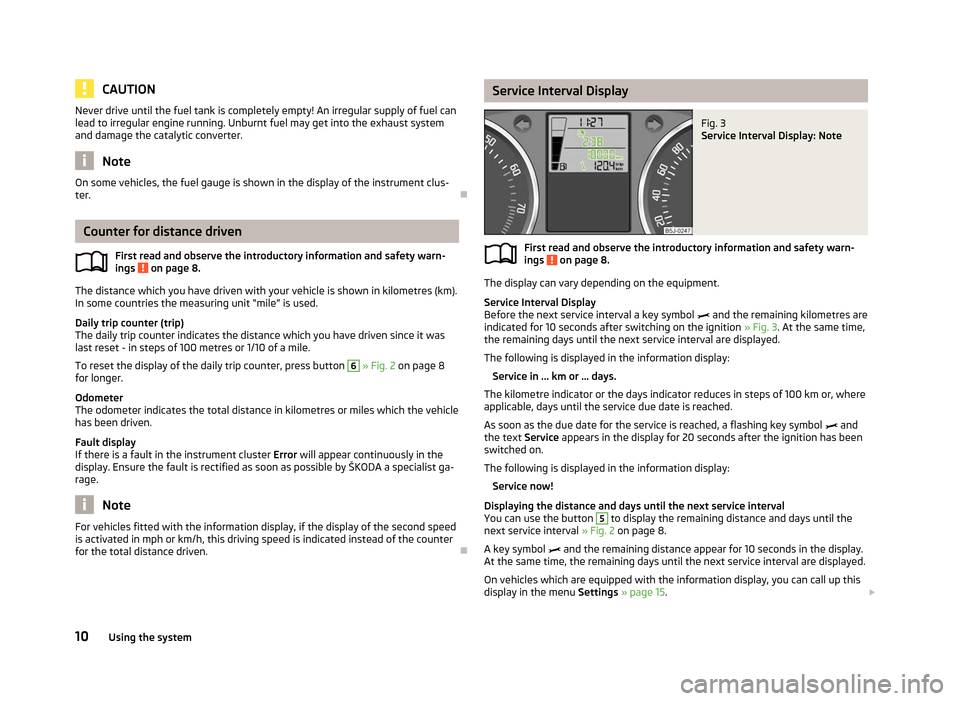
ä Service Interval Display
Fig. 3
Service Interval Display: Note
First read and observe the introductory information and safety warn-
ings on page 8.
The display can vary depending on the equipment.
Service Interval Display
Before the next service interval a key symbol
and the remaining kilometres are
indicated for 10 seconds after switching on the ignition » Fig. 3. At the same time,
the remaining days until the next service interval are displayed.
The following is displayed in the information display: Service in ... km or ... days.
The kilometre indicator or the days indicator reduces in steps of 100
km or, where
applicable, days until the service due date is reached.
As soon as the due date for the service is reached, a flashing key symbol and
the text Service appears in the display for 20 seconds after the ignition has been
switched on.
The following is displayed in the information display:
Service now!
Displaying the distance and days until the next service interval
You can use the button 5
to display the remaining distance and days until the
next service interval » Fig. 2 on page 8
.
A key symbol and the remaining distance appear for 10 seconds in the display.
At the same time, the remaining days until the next service interval are displayed.
On vehicles which are equipped with the information display, you can call up this
display in the menu Settings » page 15. £
ä
10 Using the system
Page 13 of 194
The following will be displayed in the information display for 10
seconds:
Service in ... km or ... days.
Resetting Service Interval Display
It is only possible to reset the Service Interval Display, if a service message or at
least a pre-warning is shown in the instrument cluster display.
We recommend that this reset is completed by a
ŠKODA specialist garage.
The ŠKODA specialist garage: › Resets the memory of the display after the appropriate inspection
› Adds an entry to the Service Schedule
› Affixes the sticker with the entry of the following service interval to the side of
the dashboard on the driver's side
Reset the service interval display by using the reset button 6
»
Fig. 2 on page 8.
On vehicles which are equipped with the information display, you can reset the
Service Interval Display in the menu Settings » page 15.CAUTION
We recommend that you do not reset the Service Interval Display yourself as this
can result in the incorrect setting of the Service Interval Display, which can also
cause possible problems with the operation of your vehicle. Note
■ Never reset the display between service intervals, as this will result in the incor-
rect display. ■ Information is retained in the Service Interval Display even after the vehicle bat-
tery is disconnected.
■ If the instrument cluster is exchanged after a repair, the correct values must be
entered in the counter for the Service Interval Display. This work is carried out by
a ŠKODA specialist garage. ■ After resetting the display with flexible service intervals, the displayed data is
the same as that for a vehicle with fixed service intervals. We therefore recom-
mend that the Service Interval Display is only reset by a
ŠKODA Service Partner,
who will reset the display with a vehicle system tester. ■ For more information on the service intervals » Service Plan. Ð Digital clock
First read and observe the introductory information and safety warn-
ings on page 8.
The clock is set with the buttons 5
and 6
» Fig. 2 on page 8.
Select the display that you wish to change with the button 5
and carry out the
change with the button 6
.
On vehicles that are fitted with the information display, it is also possible to set
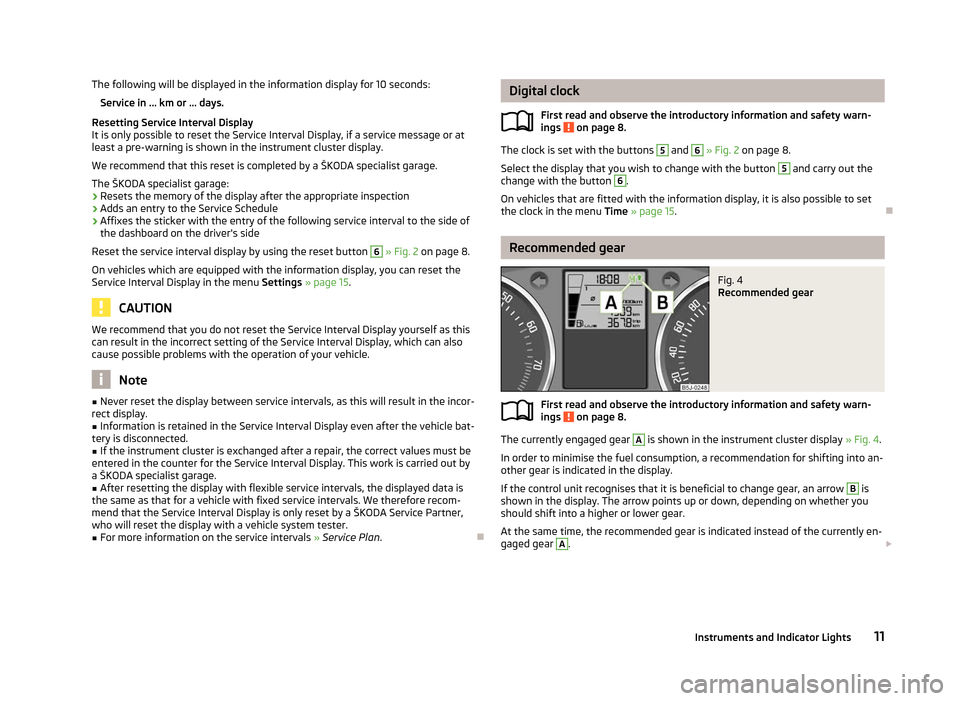
the clock in the menu Time » page 15. Ð Recommended gear
Fig. 4
Recommended gear
First read and observe the introductory information and safety warn-
ings on page 8.
The currently engaged gear A
is shown in the instrument cluster display
» Fig. 4.
In order to minimise the fuel consumption, a recommendation for shifting into an-
other gear is indicated in the display.
If the control unit recognises that it is beneficial to change gear, an arrow B
is
shown in the display. The arrow points up or down, depending on whether you
should shift into a higher or lower gear.
At the same time, the recommended gear is indicated instead of the currently en-
gaged gear A
.
£
ä
ä
11
Instruments and Indicator Lights
Page 15 of 194
Note
All information in the memory 1 and 2 is erased if the battery of the vehicle is dis-
connected. ÐOperation
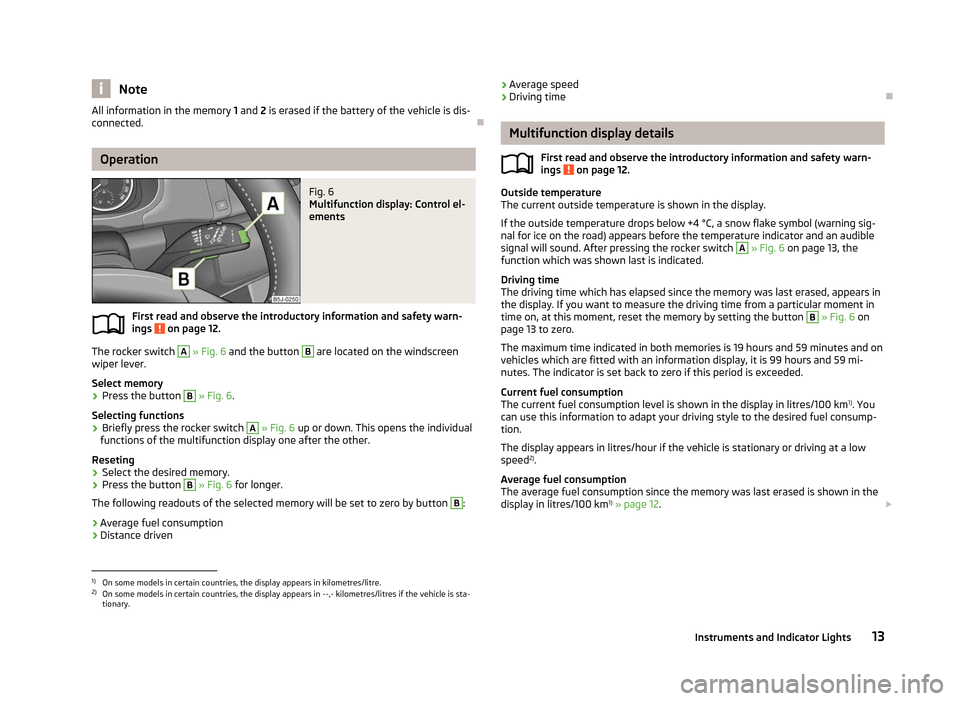
Fig. 6
Multifunction display: Control el-
ements
First read and observe the introductory information and safety warn-
ings on page 12.
The rocker switch A
» Fig. 6
and the button B
are located on the windscreen
wiper lever.
Select memory
› Press the button B
» Fig. 6.
Selecting functions
› Briefly press the rocker switch A
» Fig. 6
up or down. This opens the individual
functions of the multifunction display one after the other.
Reseting
› Select the desired memory.
› Press the button B
» Fig. 6 for longer.
The following readouts of the selected memory will be set to zero by button B
:
› Average fuel consumption
› Distance driven
ä ›
Average speed
› Driving time Ð Multifunction display details
First read and observe the introductory information and safety warn-
ings on page 12.
Outside temperature
The current outside temperature is shown in the display.
If the outside temperature drops below +4
°C, a snow flake symbol (warning sig-
nal for ice on the road) appears before the temperature indicator and an audible
signal will sound. After pressing the rocker switch A
» Fig. 6 on page 13, the
function which was shown last is indicated.
Driving time
The driving time which has elapsed since the memory was last erased, appears in
the display. If you want to measure the driving time from a particular moment in
time on, at this moment, reset the memory by setting the button B
» Fig. 6 on
page 13 to zero.
The maximum time indicated in both memories is 19 hours and 59
minutes and on
vehicles which are fitted with an information display, it is 99 hours and 59 mi-
nutes. The indicator is set back to zero if this period is exceeded.
Current fuel consumption
The current fuel consumption level is shown in the display in litres/100 km 1)
. You
can use this information to adapt your driving style to the desired fuel consump-
tion.
The display appears in litres/hour if the vehicle is stationary or driving at a low
speed 2)
.
Average fuel consumption
The average fuel consumption since the memory was last erased is shown in the
display in litres/100 km 1)
» page 12. £
ä
1)
On some models in certain countries, the display appears in kilometres/litre.
2) On some models in certain countries, the display appears in --,- kilometres/litres if the vehicle is sta-
tionary.
13
Instruments and Indicator Lights
Page 16 of 194
If you wish to determine the average fuel consumption over a certain period of
time, you must set the memory at the start of the new measurement to zero us-
ing the button
B
» Fig. 6 on page 13 . After erasing the memory, no value appears
in the display until you have driven approx. 300 m.
The display is updated regularly while you are driving.
Range
The estimated range in kilometres is shown on the display. It indicates the dis-
tance you can still drive with your vehicle based on the level of fuel in the tank
and the same style of driving.
The display is shown in steps of 10 km. Once the fuel gauge pointer reaches the
reserve marking, the range is displayed in 5 km.
The fuel consumption over the last 50 km is used to calculate the range. The
range will increase if you drive in a more economical manner.
If the memory is set to zero (after disconnecting the battery), the fuel consump-
tion of 10 ltr./100 km is calculated for the range; afterwards the value is adapted
accordingly to the style of driving.
Distance travelled
The distance travelled since the memory was last erased is shown in the dis-
play » page 12. If you want to measure the distance travelled from a particular
moment in time on, at this moment, reset the memory by setting the button B
» Fig. 6 on page 13 to zero.
The maximum distance indicated in both memories is 1
999 km or 9 999 km on
vehicles with an information display. The indicator is set back to zero if this period
is exceeded.
Average speed
The average speed since the memory was last erased is shown in the display in
km/hour » page 12 . To determine the average speed over a certain period of time,
set the memory to zero at the start of the measurement using button B
» Fig. 6
on page 13.
After erasing the memory, no value appears in the display until you have driven
approx. 300 m.
The display is updated regularly while you are driving.
Current speed
The current speed which is identical to the display of the speedometer 3
»
Fig. 2
on page 8 is indicated on the display. Oil temperature
If the oil temperature is lower than 50
°C or if a fault in the system for checking
the oil temperature is present, only - -.- is displayed instead of the oil tempera-
ture. Ð Warning against excessive speeds
First read and observe the introductory information and safety warn-
ings on page 12.
Adjust the speed limit while the vehicle is stationary
›
With button A
» Fig. 6 on page 13, choose the menu point
Warning against ex-
cessive speeds .
› Press the button B
to activate the ability to set the speed limit (value flashes).
› Use the button A
to adjust the required speed limit, e.g. to 50 km/h.
› Confirm the speed limit that was set with button B
, or wait approx. 5 seconds
until the setting is saved automatically (the value stops flashing).
This allows you to set the speed in 5 km/h intervals.
Adjusting the speed limit while the vehicle is moving
› With button A
» Fig. 6 on page 13, choose the menu point
Warning against ex-
cessive speeds .
› You can drive at the desired speed, e.g. 50 km/h.
› Press button B
to accept the current speed as the speed limit (the value flash-
es).
If you wish to change the set speed limit, it is changed in 5
km/h intervals (e.g. the
accepted speed of 47 km/h increases to 50 km/h or decreases to 45 km/h).
› Confirm the speed limit that was set by pressing button B
again, or wait ap-
prox. 5 seconds until the setting is saved automatically (the value stops flash-
ing).
Change or delete speed limit
› With button A
» Fig. 6 on page 13, choose the menu point
Warning against ex-
cessive speeds .
› Pressing the button B
deletes the speed limit.
› Pressing the button B
activates the ability to change the speed limit.
If the set speed limit is exceeded, an audible signal will sound as a warning. At
the same time the message Warning against excessive speeds appears on the
display with the set limit value.
The set speed limit value remains stored even after switching off the ignition. Ð
ä
14 Using the system
Page 17 of 194
MAXI DOT (information display)
ä
Introduction
This chapter contains information on the following subjects:
Main menu 15
Settings 15
Door, boot lid and bonnet warning 16
Auto Check Control 16
The information display provides you with information on the current operating
state of your vehicle . The information system also provides you with data (de-
pending on the equipment installed in the vehicle) relating to the radio, mobile
phone, multi-functional indicator, navigation system, the unit connected to the
MDI input and the automatic gearbox » page 87.
Certain functions and operating conditions are always being checked on the vehi-
cle when the ignition is switched on and also while driving.
Lighting up of certain symbols is combined with an acoustic warning signal. WARNING
Concentrate fully at all times on your driving! As the driver you are fully re-
sponsible for road safety. ÐMain menu
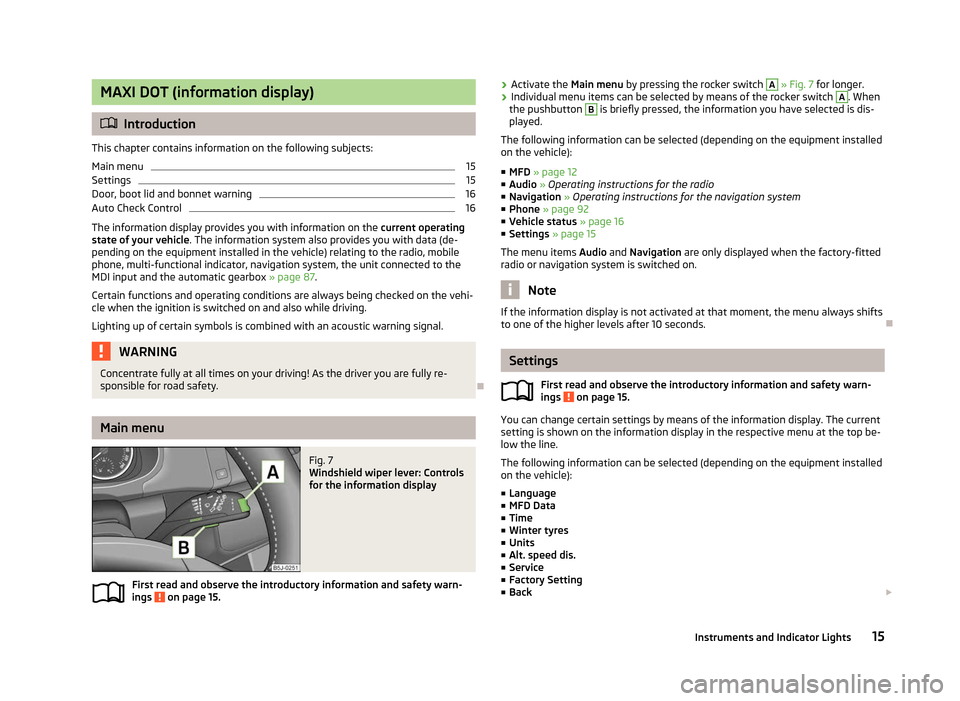
Fig. 7
Windshield wiper lever: Controls
for the information display
First read and observe the introductory information and safety warn-
ings on page 15.
ä ›
Activate the Main menu
by pressing the rocker switch A
» Fig. 7 for longer.
› Individual menu items can be selected by means of the rocker switch A
. When
the pushbutton B
is briefly pressed, the information you have selected is dis-
played.
The following information can be selected (depending on the equipment installed
on the vehicle):
■ MFD » page 12
■ Audio » Operating instructions for the radio
■ Navigation » Operating instructions for the navigation system
■ Phone »
page 92
■ Vehicle status » page 16
■ Settings » page 15
The menu items Audio and Navigation are only displayed when the factory-fitted
radio or navigation system is switched on. Note
If the information display is not activated at that moment, the menu always shifts
to one of the higher levels after 10
seconds. Ð Settings
First read and observe the introductory information and safety warn-
ings on page 15.
You can change certain settings by means of the information display. The current
setting is shown on the information display in the respective menu at the top be-
low the line.
The following information can be selected (depending on the equipment installed
on the vehicle):
■ Language
■ MFD Data
■ Time
■ Winter tyres
■ Units
■ Alt. speed dis.
■ Service
■ Factory Setting
■ Back £
ä
15
Instruments and Indicator Lights
Page 18 of 194
Select the menu item
Back to return to one level higher in the menu.
Language
You can set the language for the warning and information texts here.
MFD displays
Activate or deactivate certain displays of the multifunction display here.
Time
The time, time format (12 or 24 hour indicator) and the changeover between sum-
mer/winter time can be set here.
Winter tyres
Here, you can set the speed at which an audible signal should sound. This func-
tion is, for example, used for winter tyres where the maximum permissible speed
is lower than the maximum speed of the vehicle.
When exceeding the speed, the following is shown on the information display:
Winter tyres max. speed ...km/h.
Units of measurement
The units for the temperature, consumption and distance driven can be set here.
Second speed
The display of the second speed in mph or in km/h can be switched on here 1)
.
Service )
Here you can have the remaining kilometres and days until the next service inter-
val displayed, and reset the Service Interval Display.
Factory setting
After selecting the menu Factory setting
the factory setting of the information
display is restored. ÐDoor, boot lid and bonnet warning
First read and observe the introductory information and safety warn-
ings on page 15.
If at least one door is open, or the boot or bonnet is open, the information display
indicates the relevant
open door or boot/bonnet.
An audible signal also sounds if the vehicle is travelling at more than 6
km/h.Ð
ä Auto Check Control
First read and observe the introductory information and safety warn-
ings on page 15.
Vehicle condition
Certain functions and conditions of individual vehicle systems are checked contin-
uously when the ignition is switched on and also while driving.
Some error messages and other information are displayed in the information dis-
play. The messages are displayed at the same time as the symbols in the informa-
tion display or the warning lights in the instrument cluster » page 17.
If there is at least one error message, the menu item Vehicle status is displayed
in the menu. After selecting this menu the first of the error messages is dis-
played. Several error messages are shown on the display under the message e.g.
1/3. This indicates that the first of a total of three error messages is being dis-
played.
As long as the operational faults are not rectified, the symbols are always indica-
ted again. After they are displayed for the first time, the symbols continue to be
indicated without any extra messages for the driver.
Warning symbols
Engine oil pressure too low
» page 19
Clutches of the automatic gearbox are too
hot » page 16
Check engine oil level,
engine oil sensor faulty
» page 19 Clutches of the automatic gearbox are too hot
A symbol in the information display indicates that the temperature of the
clutches of the automatic gearbox is too high.
The following is displayed in the information display: Gearbox overheated. Stop! Owner's man.!
Stop the vehicle, switch off the engine, and wait until the symbol disappears -
risk of gearbox damage! You can continue your journey as soon as the symbol dis-
appears. £
ä
1)
Valid for countries where the values are indicated in British measuring units.
16 Using the system
Page 29 of 194
Central locking system
Introductory information
When using central locking or unlocking, all doors are locked or unlocked simulta-
neously. The boot lid is unlocked when opening. It can be opened by pressing the
handle above the licence plate » page 32, Opening/closing .
Warning light in the driver's door
After locking the vehicle, the warning light flashes for around 2 seconds in quick
succession, afterwards it begins to flash evenly at longer intervals.
If the vehicle is locked and the safe securing system » page 27 is not operating,
the warning light in the driver door flashes for about 2
seconds fast, goes out and
starts to flash evenly at longer intervals after about 30 seconds.
If the indicator light first flashes fast for about 2 seconds, then lights up for about
30 seconds continuously and then flashes slowly, there is a fault in the central
locking system or in the interior monitor and in the towing protection » page 31.
Seek help from a ŠKODA specialist garage.
Convenience operation of windows
The windows can be opened and closed when unlocking and locking the vehi-
cle » page 35. ÐIndividual settings
Opening a single door
This selection function makes it possible to only unlock the driver's door. The oth-
er doors remain locked and are only unlocked when the command is repeated.
Automatic locking and unlocking
All the doors and the boot lid are locked automatically once the car reaches a
speed of about 15 km/h.
If the ignition key is withdrawn, the car is then automatically unlocked again. In
addition, it is possible for the driver or front passenger to unlock the car by press-
ing the central locking button » page 28.
The doors can be unlocked and opened from the inside by pulling on the opening
lever of the respective door. By the first pull on the opening lever, the door is un-
locked . By the second pull on the opening lever, the door is opened. WARNING
Locked doors prevent unwanted entry into the vehicle from outside, for exam-
ple at road crossings. Locked doors do, however, make it more difficult for res-
cuers to get into the vehicle in an emergency - danger to life! Note
■ Upon request you can have custom settings activated by a
ŠKODA Service Part-
ner. ■ In the event of an accident in which the airbags are deployed, the locked doors
are automatically unlocked in order to enable rescuers to gain access to the vehi-
cle. ■ Only the driver's door can be unlocked or locked using the key if the central
locking system fails » page 28. The other doors and the boot lid can be manually
locked or unlocked. ■ Emergency locking of the door »
page 31.
■ Emergency unlocking of the boot lid » page 33. Ð Safe securing system
The central locking system is equipped with a safe securing system. The door
locks are blocked automatically if the vehicle is locked from the outside. The
warning light flashes for around 2 seconds in quick succession, afterwards it be-
gins to flash evenly at longer intervals. It is not possible to open the doors with
the door handle either from the inside or from the outside. This acts as an effec-
tive deterrent for attempts to break into your vehicle.
The safe securing system can be deactivated within 2
seconds by double locking
the vehicle.
If the safe securing system is not operating, the warning light in the driver door
flashes for about 2 seconds fast, goes out and starts to flash evenly at longer in-
tervals after about 30 seconds.
The safe securing system is activated again the next time the vehicle is unlocked
and locked.
If the vehicle is locked and the safe securing system is deactivated, the door can
be unlocked and opened from the inside by pulling on the opening lever of the
respective door. By the first pull on the opening lever, the door is unlocked. By
the second pull on the opening lever, the door is opened.£
27
Unlocking and locking
Page 32 of 194
Deactivating the safe securing system
›
Press the button 3
» Fig. 14 twice within 2
seconds. Further informa-
tion » page 27.
Unlocking the boot lid
› Press the button 2
» Fig. 14. Further information
» page 32.
Folding out the key bit
› Press the button 4
» Fig. 14.
Folding in the key bit
› Press the button 4
» Fig. 14 and fold in the key bit.
Unlocking
The turn signal lights flash twice as confirmation that the vehicle has been un-
locked. If the vehicle is unlocked using button 1
and none of the doors or the
boot lid are opened within the next 30 seconds, the vehicle is automatically
locked again and the safe securing system or anti-theft alarm system is reactiva-
ted. This function is intended to prevent the car being unlocked unintentionally.
In addition, when the car is unlocked, the electrically adjustable seats and exteri-
or mirrors move into the position assigned to this key. The stored setting of driver
seat and exterior mirrors is retrieved.
Locking
The turn signal lights flash once to confirm that the vehicle has been correctly
locked.
If the doors or the boot lid remain open after the vehicle has been locked, the
turn signal lights do not flash until they have been closed. WARNING
If the car is locked from the outside and the safe securing system is activated,
there must not be any person in the car as it is then not possible to open ei-
ther a door or a window from the inside. The locked doors make it more diffi-
cult for rescuers to get into the vehicle in an emergency - hazard! Note
■ Only operate the remote control when the doors and boot lid are closed and the
vehicle is in your line of sight. ■ To avoid the car being locked inadvertently once in the car, the lock button of the remote control must not be pressed before the key is inserted into the ig-
nition lock. Should this happen, press the unlock button
of the remote control.
Ð Synchronization
If the vehicle cannot be unlocked by actuating the remote control system then it
is possible that the code in the key and the control unit in the vehicle are no lon-
ger synchronised. This can occur when the buttons on the radio-operated key are
actuated a number of times outside of the operative range of the equipment or
the battery on the remote control was replaced.
This means it is necessary to synchronise the code as follows:
› press any button on the remote control key;
› pressing of the button means that the door will unlock with the key within 1 mi-
nute. Ð Anti-theft alarm system
Introductory information
The anti-theft alarm system increases the level of protection against people
seeking to break into the vehicle. The system triggers audible and visual warning
signals if an attempt is made to break into the vehicle.
How is the alarm system activated?
The anti-theft alarm system is activated when the vehicle is locked with the radio
remote control or the key in the driver's door . It is activated 30 seconds after
locking the door.
How is the alarm system deactivated?
The alarm system is deactivated by pressing the unlock button on the radio re-
mote control. The anti-theft alarm system is reactivated if the vehicle is not
opened within 30 seconds after transmitting the radio signal.
If the vehicle is unlocked by inserting the key into the driver door, the key must
be inserted into the ignition lock and the ignition switched on within 15
seconds
of unlocking the door to deactivate the alarm system. The alarm is triggered if
the ignition is not switched on within 15 seconds.
When is the alarm triggered?
The following security areas of the locked vehicle are monitored: › bonnet;
› boot lid;
› doors;
› ignition lock;
£
30 Using the system