gearbox SKODA ROOMSTER 2013 1.G Owner's Manual
[x] Cancel search | Manufacturer: SKODA, Model Year: 2013, Model line: ROOMSTER, Model: SKODA ROOMSTER 2013 1.GPages: 219, PDF Size: 13.83 MB
Page 2 of 219
Layout of this Owner's Manual
(explanations)
This Owner's Manual has been systematically designed to make it easy for you to
search for and obtain the information you require.
Chapters, table of contents and subject index
The text of the Owner's manual is divided into relatively short sections which are
combined into easy-to-read chapters. The chapter you are reading at any particular
moment is always specified on the bottom right of the page.
The Table of contents is arranged according to the chapters and the detailed Sub-
ject index at the end of the Owner's Manual helps you to rapidly find the informa-
tion you are looking for.
Direction indications
All direction indications such as “left”, “right”, “front”, “rear” relate to the direction of
travel of the vehicle.
Units of measurement
All values are expressed in metric units.
Explanation of symbolsDenotes a reference to a section with important information and safety
advice in a chapter.Denotes the end of a section.Denotes the continuation of a section on the next page.Indicates situations where the vehicle must be stopped as soon as possi-
ble.®Denotes a registered trademark.Denotes the display in the MAXI DOT display.Denotes the display in the segment display.
Display
The display in the segment display will be used in this Owner's Manual to represent the display unless otherwise specified.
Notes
WARNINGThe most important notes are marked with the heading WARNING. These
WARNING notes draw your attention to a serious risk of accident or injury .CAUTIONA Caution note draws your attention to the possibility of damage to your vehicle
(e.g. damage to gearbox), or points out general risks of an accident.
For the sake of the environment
An Environmental note draws your attention to environmental protection aspects.
This is where you will, for example, find tips aimed at reducing your fuel consump-
tion.
Note
A normal Note draws your attention to important information about the operation
of your vehicle.
Page 10 of 219
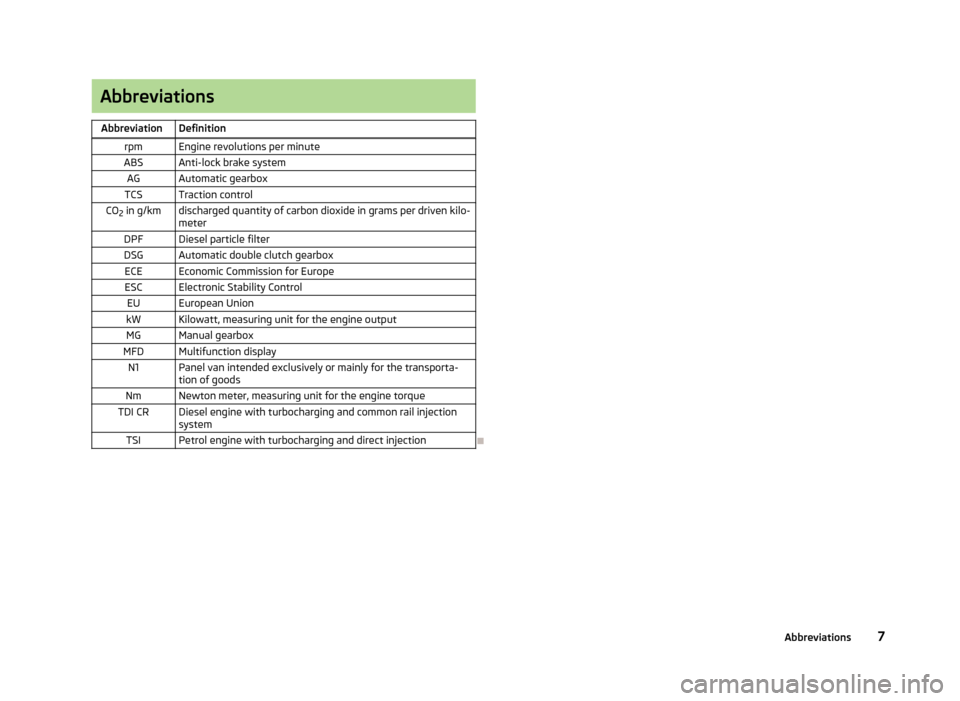
AbbreviationsAbbreviationDefinitionrpmEngine revolutions per minuteABSAnti-lock brake systemAGAutomatic gearboxTCSTraction controlCO2 in g/kmdischarged quantity of carbon dioxide in grams per driven kilo-
meterDPFDiesel particle filterDSGAutomatic double clutch gearboxECEEconomic Commission for EuropeESCElectronic Stability ControlEUEuropean UnionkWKilowatt, measuring unit for the engine outputMGManual gearboxMFDMultifunction displayN1Panel van intended exclusively or mainly for the transporta-
tion of goodsNmNewton meter, measuring unit for the engine torqueTDI CRDiesel engine with turbocharging and common rail injection systemTSIPetrol engine with turbocharging and direct injection
7Abbreviations
Page 12 of 219
Operation
Cockpit
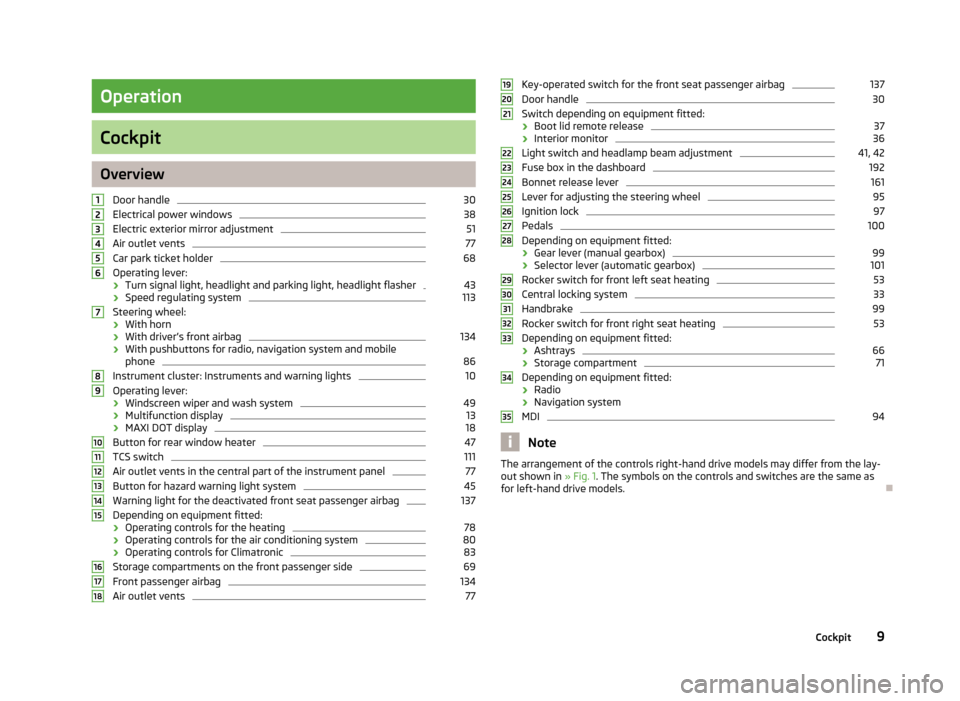
OverviewDoor handle
30
Electrical power windows
38
Electric exterior mirror adjustment
51
Air outlet vents
77
Car park ticket holder
68
Operating lever:
› Turn signal light, headlight and parking light, headlight flasher
43
›
Speed regulating system
113
Steering wheel:
› With horn
› With driver’s front airbag
134
›With pushbuttons for radio, navigation system and mobile
phone
86
Instrument cluster: Instruments and warning lights
10
Operating lever:
› Windscreen wiper and wash system
49
›Multifunction display
13
›
MAXI DOT display
18
Button for rear window heater
47
TCS switch
111
Air outlet vents in the central part of the instrument panel
77
Button for hazard warning light system
45
Warning light for the deactivated front seat passenger airbag
137
Depending on equipment fitted:
› Operating controls for the heating
78
›Operating controls for the air conditioning system
80
›Operating controls for Climatronic
83
Storage compartments on the front passenger side
69
Front passenger airbag
134
Air outlet vents
77123456789101112131415161718Key-operated switch for the front seat passenger airbag137Door handle30
Switch depending on equipment fitted:
› Boot lid remote release
37
›Interior monitor
36
Light switch and headlamp beam adjustment
41, 42
Fuse box in the dashboard
192
Bonnet release lever
161
Lever for adjusting the steering wheel
95
Ignition lock
97
Pedals
100
Depending on equipment fitted:
› Gear lever (manual gearbox)
99
›Selector lever (automatic gearbox)
101
Rocker switch for front left seat heating
53
Central locking system
33
Handbrake
99
Rocker switch for front right seat heating
53
Depending on equipment fitted:
› Ashtrays
66
›Storage compartment
71
Depending on equipment fitted:
› Radio
› Navigation system
MDI
94
Note
The arrangement of the controls right-hand drive models may differ from the lay-
out shown in » Fig. 1. The symbols on the controls and switches are the same as
for left-hand drive models.19202122232425262728293031323334359Cockpit
Page 14 of 219
Button for:
› Reset trip meter
» page 12
› Set hours/minutes
› Enable/disable the mode selected by means of button 5
Fuel gauge 1)
» page 11
Engine revolutions counter
First read and observe the introductory information and safety warn-ings
on page 10.
The red scale range of the rev counter
1
» Fig. 2 on page 10 indicates the range
in which the engine control unit begins to limit the engine speed. The engine con-
trol unit restricts the engine speed to a steady limit.
You should shift into the next higher gear before the red scale of the revolutioncounter is reached, or move the selector lever into position D if your car is fitted
with an automatic gearbox.
To maintain the optimum motor speed, observe the gearshift indica-
tor » page 13 .
For the sake of the environment
Shifting up in good time has the following benefits.■It helps to reduce fuel consumption.■
It reduces engine noise.
■
It protects the environment.
■
It benefits the life and reliability of the engine.
Speedometer
First read and observe the introductory information and safety warn-
ings
on page 10.
Warning against speeding
An audible warning will sound when the vehicle speed exceeds 120 km/h 2)
. The
audible warning is switched off once the vehicle speed falls below 120 km/h.
67Coolant temperature gauge display
First read and observe the introductory information and safety warn-
ings
on page 10.
The coolant temperature gauge
4
» Fig. 2 on page 10 works only when the igni-
tion is switched on.
In vehicles with a segment display, the coolant temperature is indicated only by
one of the warning lights » page 22, Coolant coming on or going off.
Cold range
The pointer in the left of the scale indicates that the engine has not yet reached
its operating temperature. Avoid high speeds, full throttle and high engine loads.
This prevents possible damage to the engine.
The operating range
The engine has reached its operating temperature as soon as the pointer moves into the middle of the scale. At very high ambient temperatures or under heavy
engine loads, the pointer may move even further to the right.
High temperature range
The coolant temperature is too high if the pointer reaches the red area of the
scale. Further information » page 22.
CAUTION
Additional headlights and other components mounted in front of the air inlet im-
pair the cooling efficiency of the coolant.
Fuel gauge
First read and observe the introductory information and safety warn-
ings
on page 10.
The fuel gauge
7
» Fig. 2 on page 10 only works when the ignition is switched
on.
The fuel remaining is displayed in the segment display on vehicles with the seg-
ment display.
1)
Applies for vehicles using the MAXI DOT display.
2)
This function is only enabled in certain countries.
11Instruments and Indicator Lights
Page 16 of 219
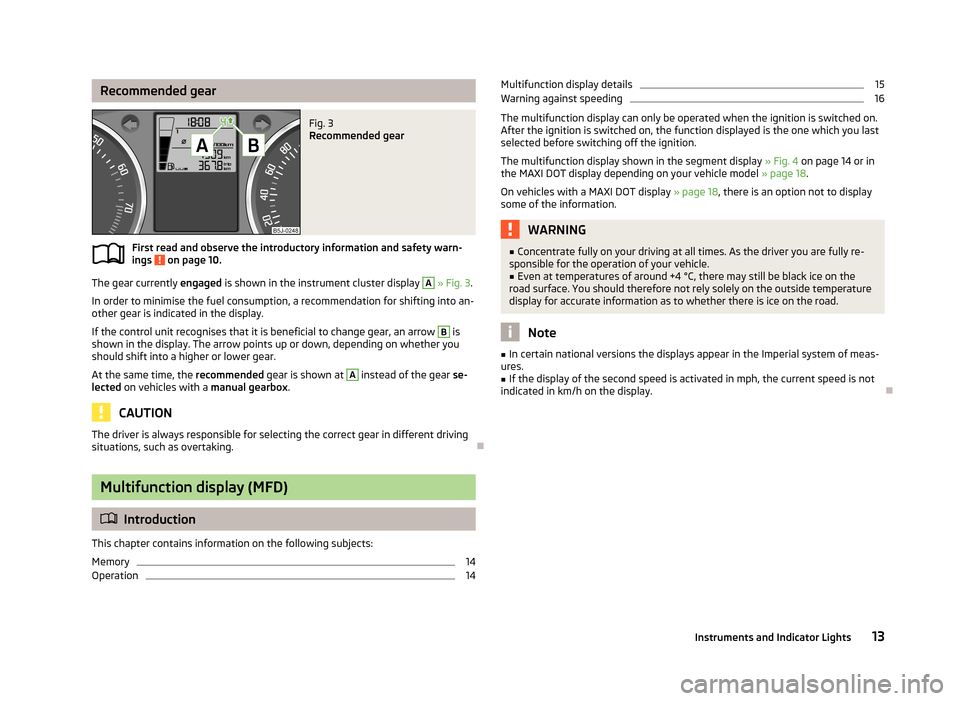
Recommended gearFig. 3
Recommended gear
First read and observe the introductory information and safety warn-
ings on page 10.
The gear currently engaged is shown in the instrument cluster display
A
» Fig. 3 .
In order to minimise the fuel consumption, a recommendation for shifting into an-
other gear is indicated in the display.
If the control unit recognises that it is beneficial to change gear, an arrow
B
is
shown in the display. The arrow points up or down, depending on whether you
should shift into a higher or lower gear.
At the same time, the recommended gear is shown at
A
instead of the gear se-
lected on vehicles with a manual gearbox.
CAUTION
The driver is always responsible for selecting the correct gear in different driving
situations, such as overtaking.
Multifunction display (MFD)
Introduction
This chapter contains information on the following subjects:
Memory
14
Operation
14Multifunction display details15Warning against speeding16
The multifunction display can only be operated when the ignition is switched on.
After the ignition is switched on, the function displayed is the one which you last
selected before switching off the ignition.
The multifunction display shown in the segment display » Fig. 4 on page 14 or in
the MAXI DOT display depending on your vehicle model » page 18.
On vehicles with a MAXI DOT display » page 18, there is an option not to display
some of the information.
WARNING■ Concentrate fully on your driving at all times. As the driver you are fully re-
sponsible for the operation of your vehicle.■
Even at temperatures of around +4 °C, there may still be black ice on the
road surface. You should therefore not rely solely on the outside temperature
display for accurate information as to whether there is ice on the road.
Note
■ In certain national versions the displays appear in the Imperial system of meas-
ures.■
If the display of the second speed is activated in mph, the current speed is not
indicated in km/h on the display.
13Instruments and Indicator Lights
Page 21 of 219
MAXI DOT display
Introduction
This chapter contains information on the following subjects:
Main menu
18
Settings
18
Door, boot lid and bonnet warning
19
Auto Check Control
19
The MAXI DOT display provides you with information about the current operating
state of your vehicle. The information system also provides you with data (de-
pending on the vehicle equipment) relating to the radio, mobile phone, multi-
functional display, navigation system, the device connected to the MDI input and
the automatic gearbox » page 100.
Lighting up of certain symbols is combined with an acoustic warning signal.
WARNINGConcentrate fully on your driving at all times. As the driver you are fully re-
sponsible for the operation of your vehicle.
Main menu
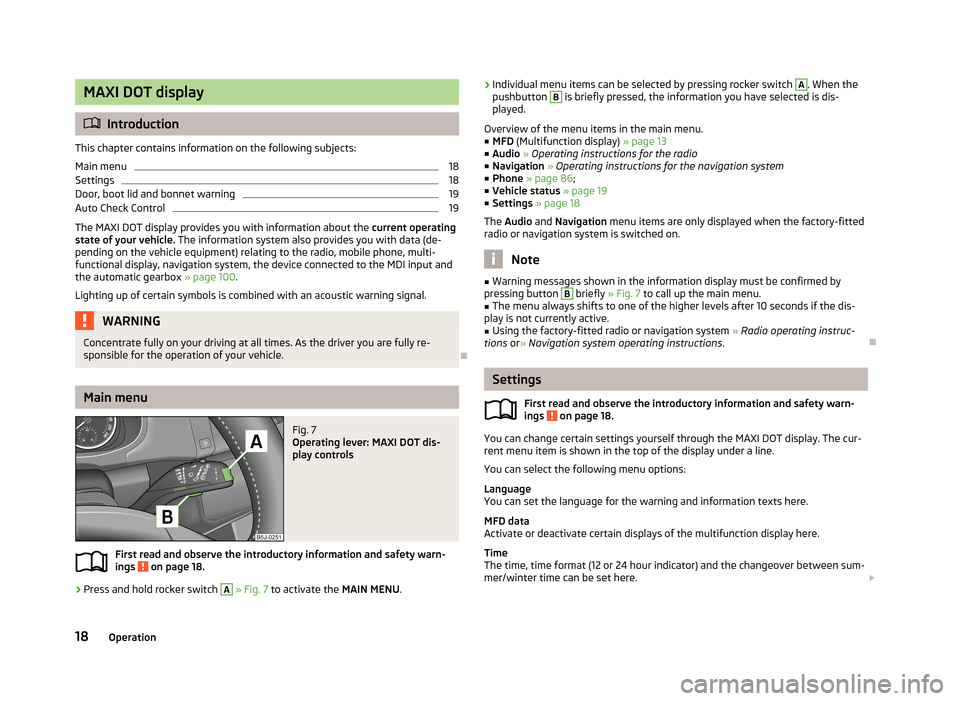
Fig. 7
Operating lever: MAXI DOT dis-
play controls
First read and observe the introductory information and safety warn- ings on page 18.
›
Press and hold rocker switch
A
» Fig. 7 to activate the MAIN MENU.
›Individual menu items can be selected by pressing rocker switch A. When the
pushbutton B is briefly pressed, the information you have selected is dis-
played.
Overview of the menu items in the main menu.
■ MFD (Multifunction display) » page 13
■ Audio » Operating instructions for the radio
■ Navigation » Operating instructions for the navigation system
■ Phone » page 86 ;
■ Vehicle status » page 19
■ Settings » page 18
The Audio and Navigation menu items are only displayed when the factory-fitted
radio or navigation system is switched on.
Note
■ Warning messages shown in the information display must be confirmed by
pressing button B briefly » Fig. 7 to call up the main menu.■
The menu always shifts to one of the higher levels after 10 seconds if the dis-
play is not currently active.
■
Using the factory-fitted radio or navigation system » Radio operating instruc-
tions or» Navigation system operating instructions .
Settings
First read and observe the introductory information and safety warn-
ings
on page 18.
You can change certain settings yourself through the MAXI DOT display. The cur- rent menu item is shown in the top of the display under a line.
You can select the following menu options:
Language
You can set the language for the warning and information texts here.
MFD data
Activate or deactivate certain displays of the multifunction display here.
Time
The time, time format (12 or 24 hour indicator) and the changeover between sum-
mer/winter time can be set here.
18Operation
Page 22 of 219

Winter tyres
Here, you can set the speed at which an audible signal should sound. This func-
tion is, for example, used for winter tyres where the maximum permissible speed
is lower than the maximum speed of the vehicle.
The following is shown on the information display if this speed is exceeded: Winter tyres: maximum ... km/h.
Units of measurement
The units for the temperature, consumption and distance driven can be set here.
Alt. speed dis.
Display of the second speed in mph 1)
can be activated here.
Service
The days and kilometres remaining until the next service can be displayed here.
Factory setting
The display can be restored to its factory settings here.
Door, boot lid and bonnet warning
First read and observe the introductory information and safety warn-ings
on page 18.
If at least one door is open, or the boot or bonnet is open, the MAXI DOT display
shows the vehicle with the corresponding door or boot/bonnet open.
An audible signal also sounds if the vehicle is travelling at more than 6 km/h.
Auto Check Control
First read and observe the introductory information and safety warn-
ings
on page 18.
Vehicle condition
Certain functions and conditions of individual vehicle systems are checked contin-
uously when the ignition is switched on and also while driving.
Some error messages and other information are displayed in the MAXI DOT dis-
play. The messages are displayed simultaneously with the icons in the MAXI DOT
display or with the warning lights in the instrument cluster » page 20.
The Vehicle status menu item is shown in the main menu of the MAXI DOT dis-
play whenever at least one fault message is present. The first of the fault mes-
sages is displayed after this menu item is selected. Several error messages are
shown on the display under the message e.g. 1/3. This indicates that the first of a
total of three error messages is being displayed.
As long as the operational faults are not rectified, the symbols are always indica- ted again. After they are displayed for the first time, the symbols continue to be
indicated without any extra messages for the driver.
Warning symbolsEngine oil pressure too low» page 21Clutches in the automatic gearbox are too
hot» page 19Check engine oil level,
engine oil sensor defective» page 21
Clutches in the automatic gearbox are too hot
The
symbol in the MAXI DOT display indicates that the temperature of the au-
tomatic gearbox clutches is too high.
The following message is shown in the MAXI DOT display.
Gearbox overheating. Stop. Read manual.
Stop the vehicle, switch off the engine, and wait until the
icon goes out – there
is a risk of gearbox damage. You can continue your journey as soon as the icon
disappears.
WARNINGIf you have to stop for technical reasons, park the vehicle at a safe distance
from the traffic, switch off the engine and switch on the hazard warning lights
system » page 45 . 1)
On models on which the speedometer indicates mph, the second speed is displayed in km/h.
19Instruments and Indicator Lights
Page 28 of 219
ECU fault light (petrol engine)First read and observe the introductory information and safety warn-
ings
on page 20.
If the warning light comes on or begins to flash while driving, a fault exists in
the engine control unit. The engine control unit allows the vehicle to run in emer-
gency mode.
Seek help from a specialist garage.
Diesel particulate filter (diesel engine)
First read and observe the introductory information and safety warn-ings
on page 20.
The diesel particulate filter separates the soot particles from the exhaust. The
soot particles collect in the diesel particulate filter where they are burnt on a reg-
ular basis.
The
warning light comes on if soot has accumulated in the filter.
In order to clean the filter, and where traffic conditions permit »
, the vehicle
should be driven for at least 15 minutes or until the warning light goes out at an
steady speed of at least 60 km/h at engine speeds of 1800 - 2500 rpm with 4th
or 5th gear engaged (automatic gearbox: position S).
The
warning light only goes out once the diesel particulate filter has been
successfully cleaned.
If the filter is not properly cleaned, the warning light
does not go out and the
warning light
begins to flash.
The following message is shown in the MAXI DOT display. Diesel particulate filter: Read manual.
The engine control unit allows the vehicle to run in emergency mode. After switching the ignition off and on again the indicator light, the indicator light
also lights up.
Seek help from a specialist garage.
WARNING■ The diesel particle filter achieves very high temperatures. Therefore do not
park in areas where the hot filter can come into direct contact with dry grass
or other combustible materials – there is the risk of fire.■
Always adjust your speed to suit weather, road, region and traffic condi-
tions. The recommendations indicated by the warning light must not tempt
you to disregard the national regulations for road traffic.
CAUTION
As long as the warning light lights up, one must take into account an in-
creased fuel consumption and in certain circumstances a power reduction of the
engine.
Note
■ We recommend avoiding regularly driving short distances to assist the combus-
tion process of the soot particles in the filter.■
Using diesel fuel with an increased sulphur content can considerably reduce the
service life of the filter. A ŠKODA Service Partner will be able to tell you which countries use diesel fuel with a high sulphur content.
■
If the engine is turned off during the filter cleaning process or shortly after-
wards, the cooling fan may turn on automatically for a few minutes.
Fuel reserve
First read and observe the introductory information and safety warn-ings
on page 20.
The indicator light will come on if the fuel level is less than 7 litres.
An audible signal sounds as a warning signal.
The following message is shown in the MAXI DOT display.
Please refuel. Range: ... km
Note
The text in the MAXI DOT display only goes out after the vehicle has been refuel-
led and driven a short distance.
25Instruments and Indicator Lights
Page 48 of 219
Ignition switched off, light switched off (light switch in position 0), control dial for
headlamp beam adjustment in the position, no gear engaged or selector lever
in the N position (automatic gearbox), tourist light deactivated.›
Switch on the ignition.
Within 10 seconds of the ignition being switched on:
›
Turn the light switch to the position » page 41 , Parking and low beam lights .
›
Engage reverse gear (manual gearbox) or move the selector lever to the R posi-
tion (automatic gearbox),
›
Turn the headlamp beam adjustment dial from to » page 42 .
Deactivating tourist light
Before deactivating the tourist light, the following conditions must be met.
Ignition switched off, light switched off (light switch in position 0), control dial for
headlamp beam adjustment in the
position, no gear engaged or selector lever in
the N position (automatic gearbox), tourist light activated.
›
Switch on the ignition.
Within 10 seconds of the ignition being switched on:
›
Turn the light switch to the
position » page 41 , Parking and low beam lights .
›
Engage reverse gear (manual gearbox) or move the selector lever to the R posi-
tion (automatic gearbox),
›
Turn the headlamp beam adjustment dial from
to
» page 42 .
Further information » page 109, Headlights .
Note
When the “tourist light” mode is active, the warning light flashes for 10 sec-
onds each time the ignition is switched on.
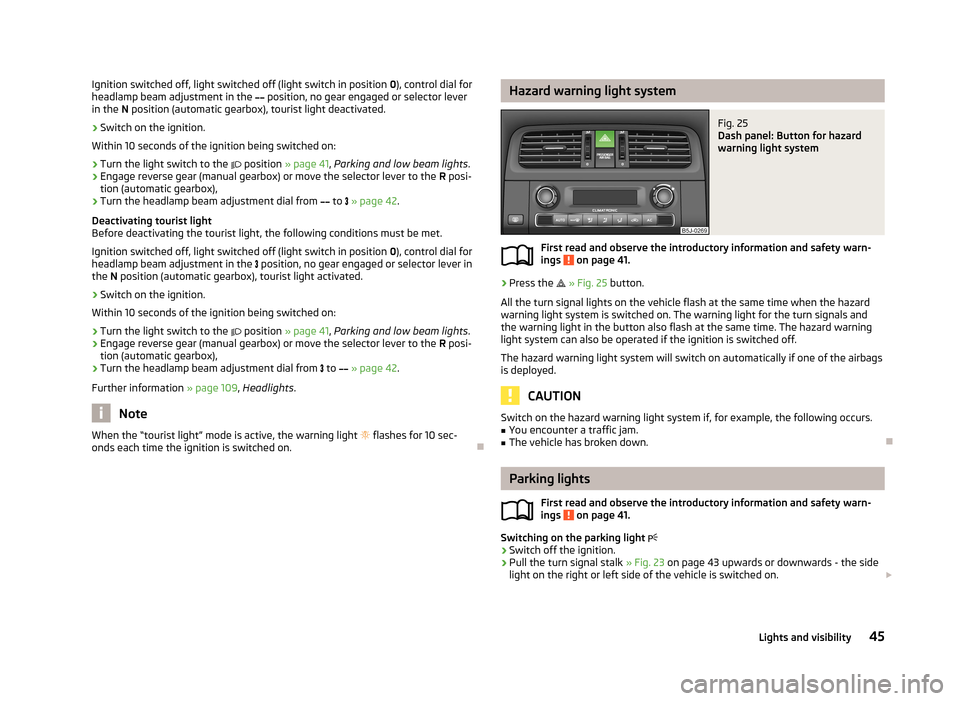
Hazard warning light systemFig. 25
Dash panel: Button for hazard
warning light system
First read and observe the introductory information and safety warn-
ings on page 41.
›
Press the
» Fig. 25 button.
All the turn signal lights on the vehicle flash at the same time when the hazard
warning light system is switched on. The warning light for the turn signals and
the warning light in the button also flash at the same time. The hazard warning
light system can also be operated if the ignition is switched off.
The hazard warning light system will switch on automatically if one of the airbags
is deployed.
CAUTION
Switch on the hazard warning light system if, for example, the following occurs.■You encounter a traffic jam.■
The vehicle has broken down.
Parking lights
First read and observe the introductory information and safety warn-ings
on page 41.
Switching on the parking light
›
Switch off the ignition.
›
Pull the turn signal stalk
» Fig. 23 on page 43 upwards or downwards - the side
light on the right or left side of the vehicle is switched on.
45Lights and visibility
Page 100 of 219
NoteAfter switching off the ignition, the radiator fan can intermittently continue to op-
erate for approx. 10 minutes.
Electronic immobilizer
First read and observe the introductory information and safety warn-ings
on page 96.
An electronic chip is integrated in the head of the key. The immobiliser is deacti-
vated with the aid of this chip when the key is inserted in the ignition lock. The
electronic immobiliser is automatically activated when the ignition key is with-
drawn from the lock.
The engine will not start if a non-authorized ignition key is used.
The MAXI DOT display shows the following: Immobilizer active.
Ignition lock
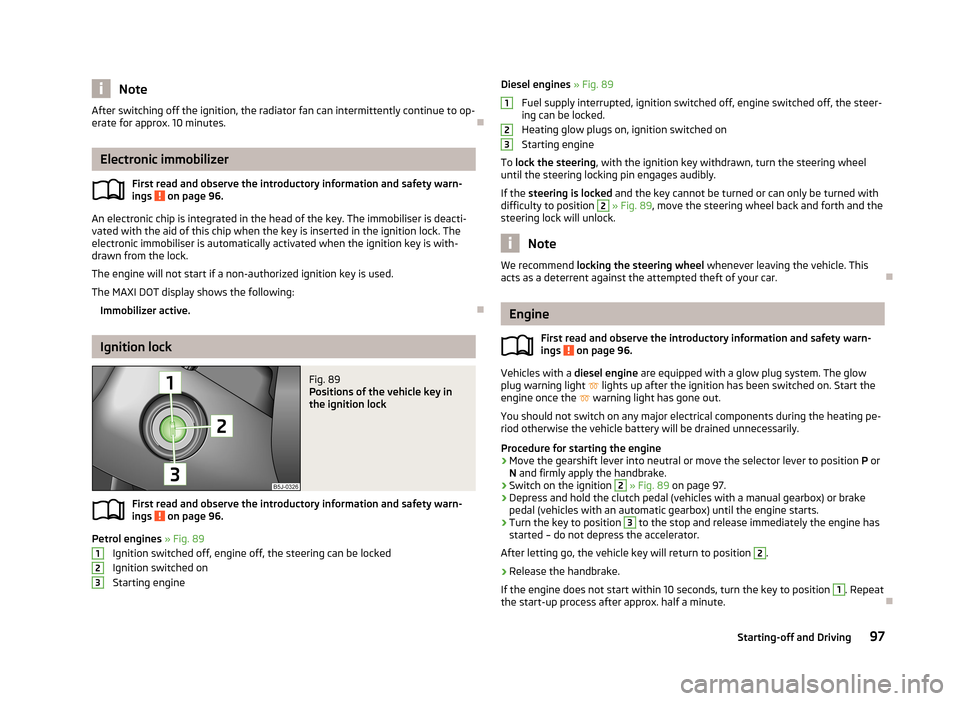
Fig. 89
Positions of the vehicle key in
the ignition lock
First read and observe the introductory information and safety warn-
ings on page 96.
Petrol engines » Fig. 89
Ignition switched off, engine off, the steering can be locked
Ignition switched on Starting engine
123Diesel engines » Fig. 89
Fuel supply interrupted, ignition switched off, engine switched off, the steer-
ing can be locked.
Heating glow plugs on, ignition switched on
Starting engine
To lock the steering , with the ignition key withdrawn, turn the steering wheel
until the steering locking pin engages audibly.
If the steering is locked and the key cannot be turned or can only be turned with
difficulty to position 2
» Fig. 89 , move the steering wheel back and forth and the
steering lock will unlock.
Note
We recommend locking the steering wheel whenever leaving the vehicle. This
acts as a deterrent against the attempted theft of your car.
Engine
First read and observe the introductory information and safety warn-
ings
on page 96.
Vehicles with a diesel engine are equipped with a glow plug system. The glow
plug warning light
lights up after the ignition has been switched on. Start the
engine once the
warning light has gone out.
You should not switch on any major electrical components during the heating pe- riod otherwise the vehicle battery will be drained unnecessarily.
Procedure for starting the engine
›
Move the gearshift lever into neutral or move the selector lever to position P or
N and firmly apply the handbrake.
›
Switch on the ignition
2
» Fig. 89 on page 97.
›
Depress and hold the clutch pedal (vehicles with a manual gearbox) or brake
pedal (vehicles with an automatic gearbox) until the engine starts.
›
Turn the key to position
3
to the stop and release immediately the engine has
started – do not depress the accelerator.
After letting go, the vehicle key will return to position
2
.
›
Release the handbrake.
If the engine does not start within 10 seconds, turn the key to position
1
. Repeat
the start-up process after approx. half a minute.
12397Starting-off and Driving